Windows 10 May 2021 Update common problems — and the fixes
Is the Windows 10 May 2021 Update giving you problems? If so, then use this guide to troubleshoot and fix any issue.
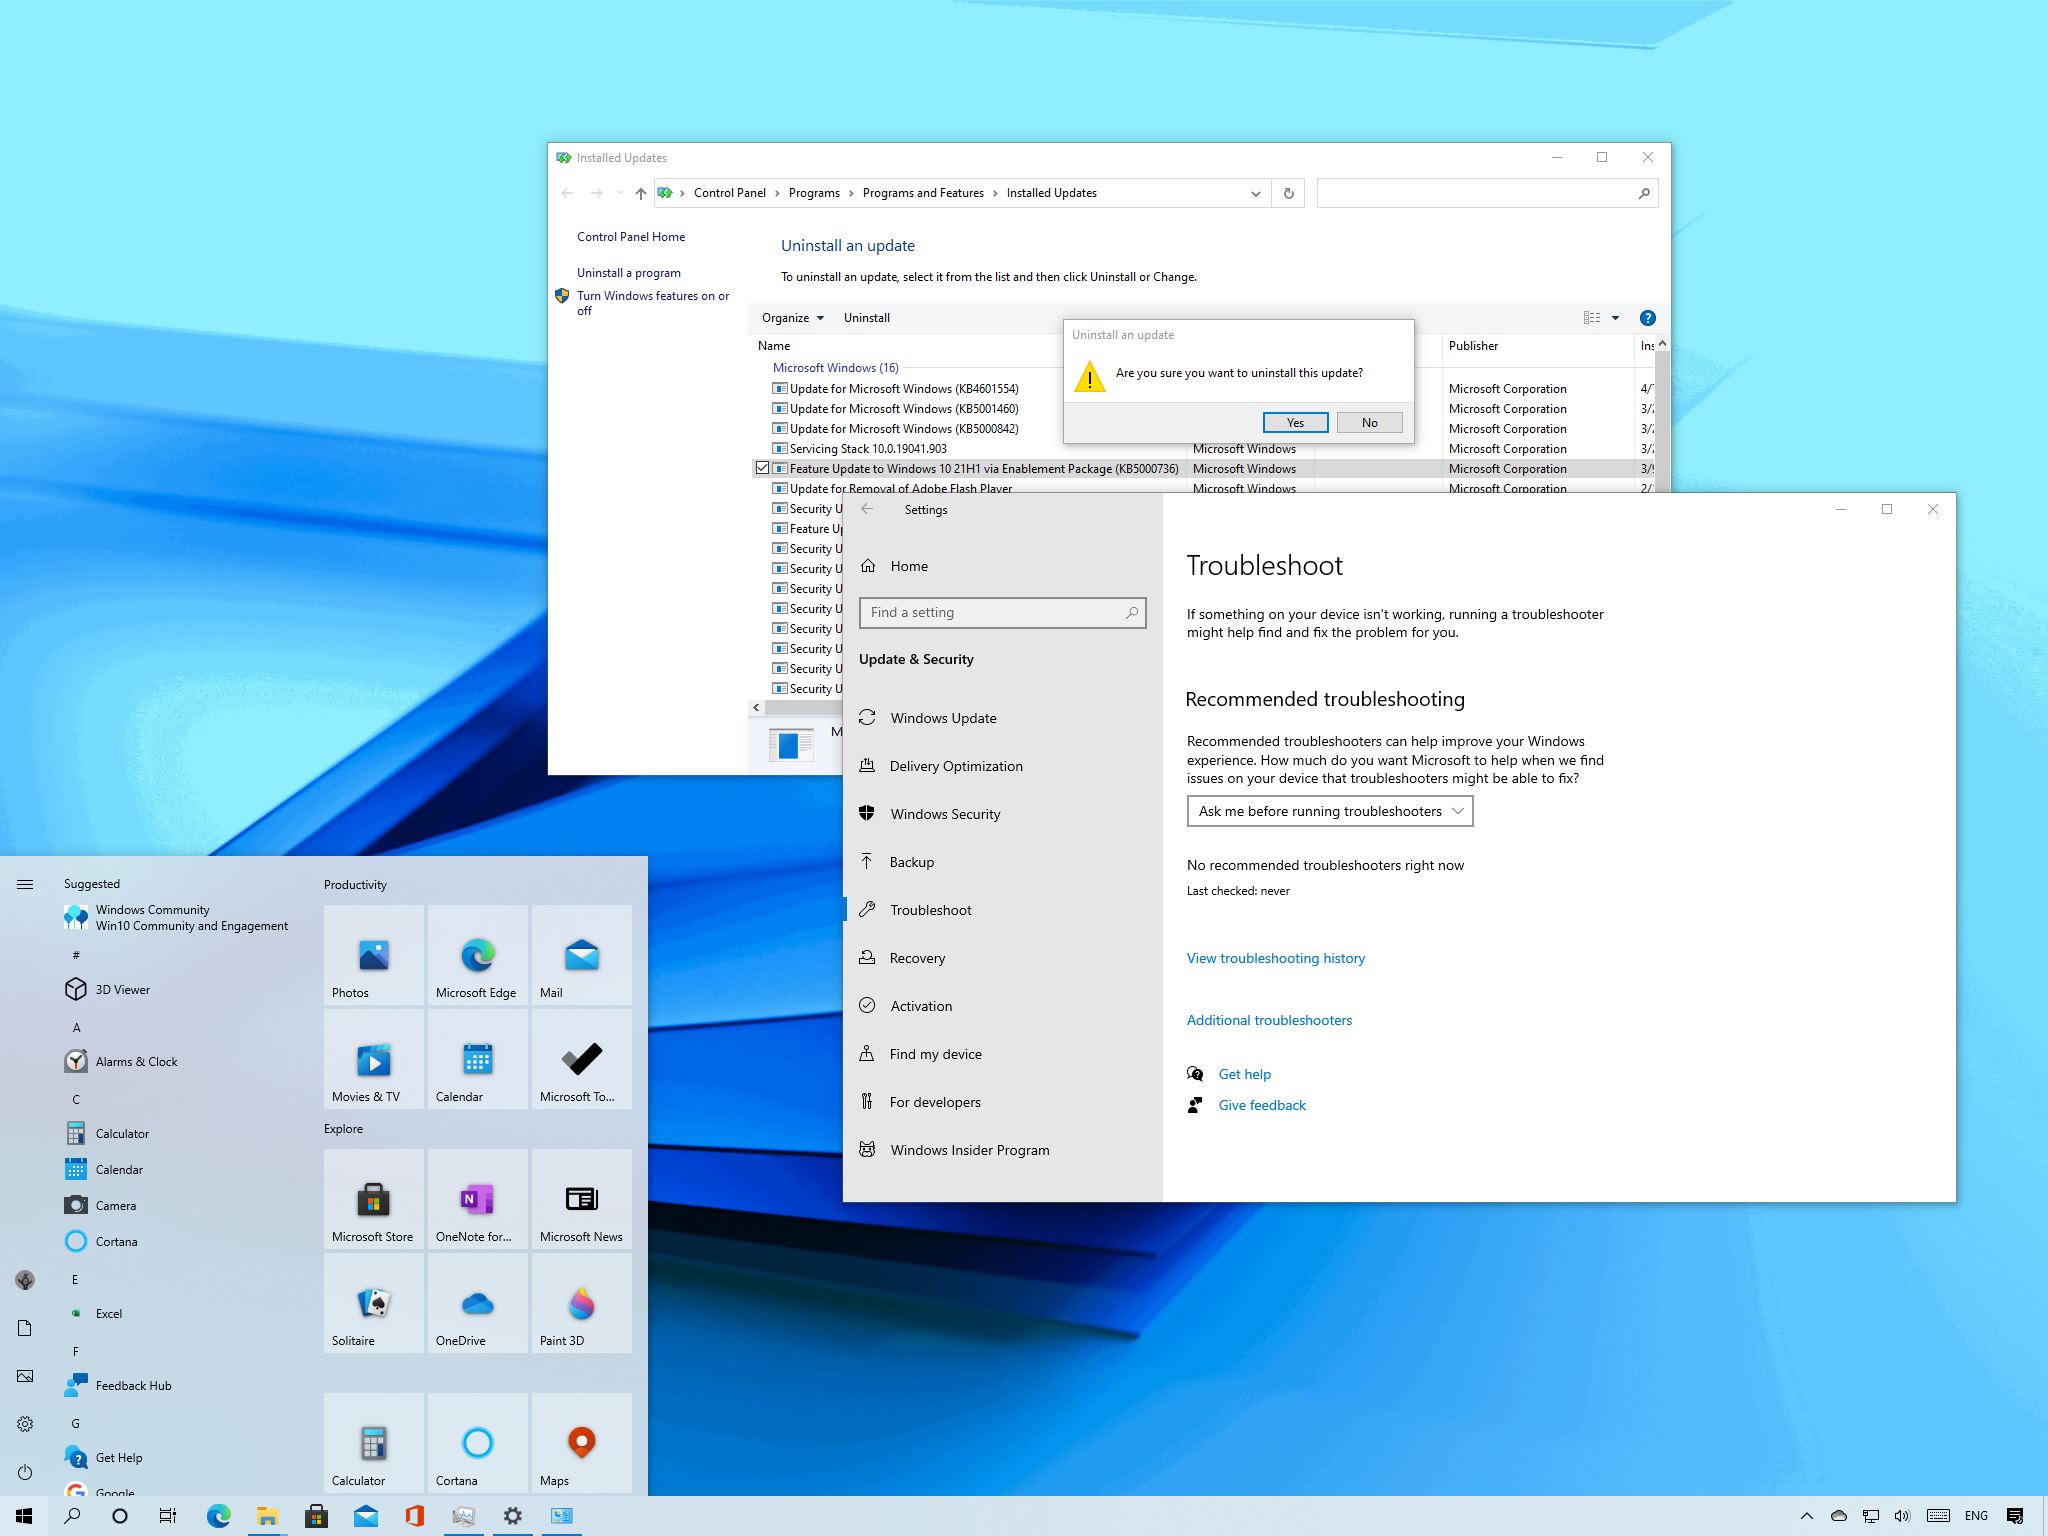
The May 2021 Update for Windows 10 (version 21H1) is now slowly rolling out as a minor update for compatible devices. This is the eleventh major refresh based on the same core file system available with versions 20H2 and 2004, and it is the first semi-annual update expected for 2021.
Since this is a minor update, it will arrive as a quality update for devices already running the two most recent versions without the need for reinstallation. However, on computers still using an older release (for example, the November 2019 Update), the upgrade won't change, and complete reinstallation will be required.
Although the upgrade process to a new version is usually smooth, there are always chances of issues, especially if you have to upgrade from a version that is no longer supported. Usually, the problems happen due to the new system changes, but many other times, issues occur because of hardware and software incompatibility, outdated device drivers, or custom configurations.
In this Windows 10 guide, we will walk you through the most common problems you're likely to see during the upgrade of the May 2021 Update and the instructions to resolve them.
How to fix May 2021 Update installation problems
On Windows 10, there are at least three types of problems when trying to upgrade. For example, you can come across issues with Windows Update, reactivation, and storage, which are usually not a problem with the new version. Instead, they are common issues during upgrades.
Then there are those problems that happen because of known or unknown bugs with the new release. You will see these issues during the installation process, and they are usually caused by compatibility problems with specific apps and drivers.
Also, there is a third kind of issue, which typically arrives after the upgrade, when you install quality updates that are supposed to resolve the problems with the original release, but they end up causing other issues.
All the latest news, reviews, and guides for Windows and Xbox diehards.
This guide includes the instructions to deal with all these types of problems when upgrading to the Windows 10 May 2019 Update from versions 20H2, 2004, or an older release using the Media Creation Tool, Update Assistant, or Windows Update.
- Fix problems with Windows Update installing May 2021 Update
- Fix problems with setup installing May 2021 Update
- Fix problems with Media Creation Tool installing May 2021 Update
- Fix problems with USB flash drive installing May 2021 Update
- Fix problems with Update Assistant installing May 2021 Update
- Fix error code 0xC1900101 upgrading to May 2021 Update
- Fix error code 0x80070002 0x20009 upgrading to May 2021 Update
- Fix error code 0x80070070 upgrading to May 2021 Update
- Fix error code 0xC1900107 upgrading to May 2021 Update
- Fix error code 0x800F0923 installing May 2021 Update
- Fix error code 0xC1900208 upgrading to May 2021 Update
- Fix error completing installation of May 2021 Update
- Fix black screen problem with May 2021 Update
- Fix Wi-Fi and Ethernet adapter problems with May 2021 Update
- Windows 10 May 2021 Update recommendations
Fix problems with Windows Update installing May 2021 Update
Although the recommended method to switch versions is to use the Windows Update settings, you may still come across problems that may not be easy to figure out, but there are a few things you can do to fix the problem.
Windows Update troubleshooter
To fix Windows Update issues installing the May 2021 Update, use these steps:
- Open Settings.
- Click on Update & Security.
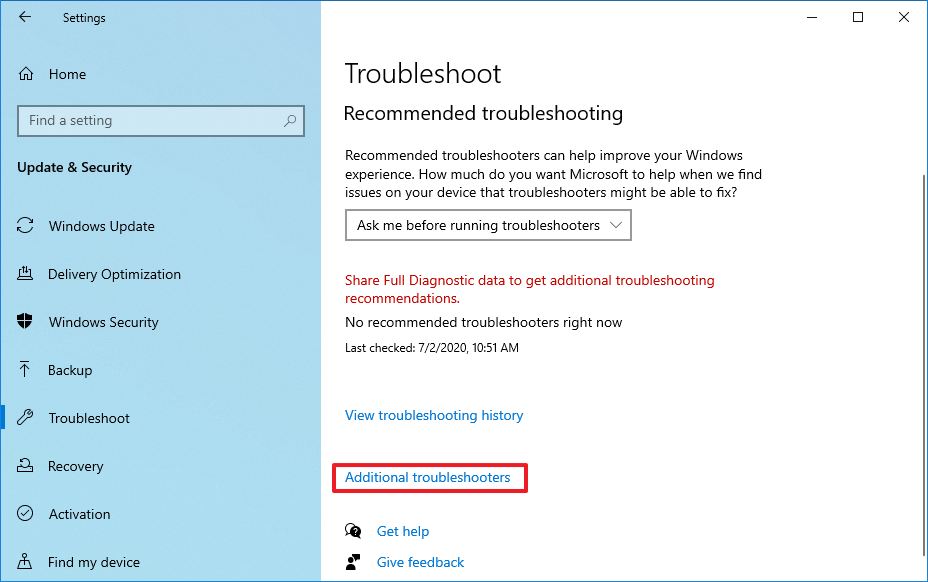
- Click on Troubleshoot.
- Click the Advanced troubleshooters option.
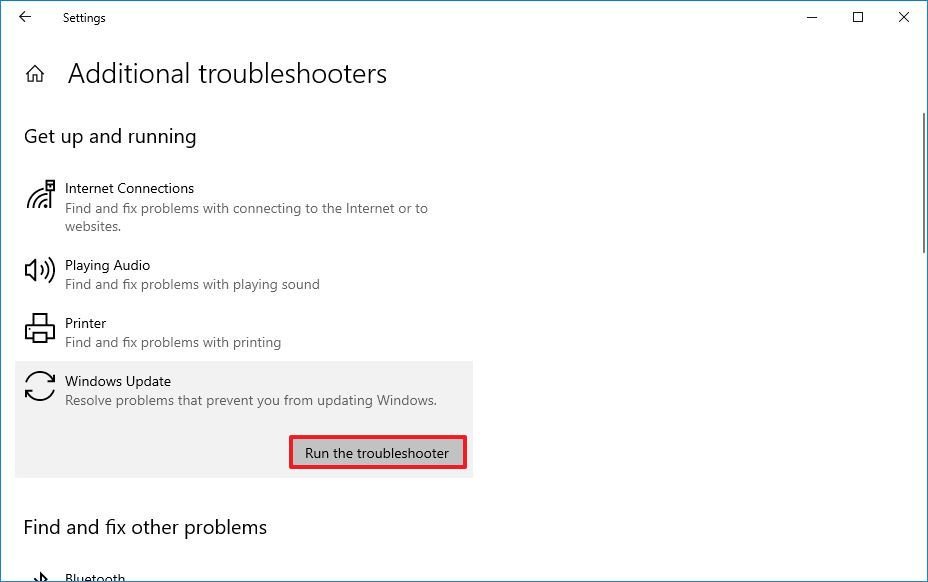
- Under the "Get up and running" section, select the Windows Update option.
- Click the Run the troubleshooter button.
- Click the Apply this fix option (if applicable).Quick note: If the "Apply this fix" option is not available, it does not indicate that the problem was not fixed. The tool will run a series of fixes, and if there's something else you need to repair, you will see the option to apply the fix.
- Continue with the on-screen directions.
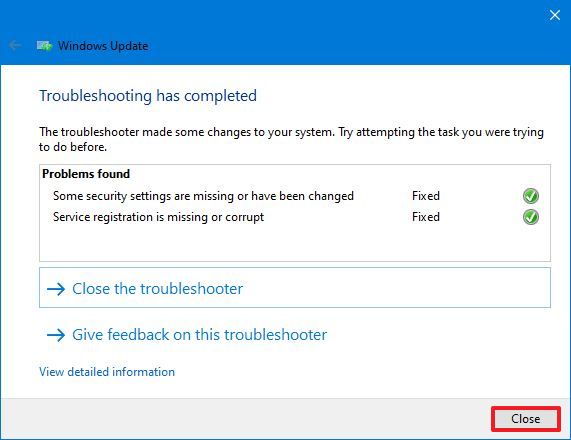
- Click the Close button.
- Restart the computer.
Once you complete the steps, the Windows Update settings should now work to install the new version of Windows 10.
If the error code is 0xc1900223, the problem is with the setup files, which Windows Update will fix automatically later.
Error code 0x800F0922 fix
In the event that you receive the error code 0x800F0922, it could be that the device cannot contact the server to download the installation files. It could also mean that there is not enough space in the System Reserved partition.
Fix server connection problem
When Windows Update cannot download the files, it is usually because the device is using a VPN connection.
To disconnect from a VPN server, use these steps:
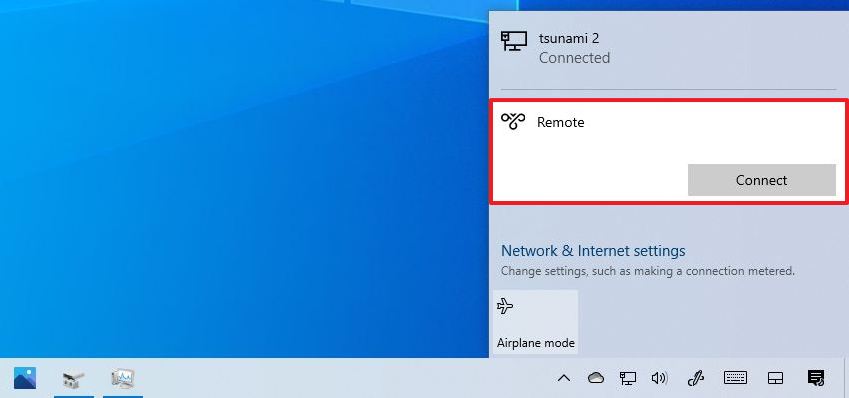
- Click the network icon in the taskbar.
- Select the VPN connection.
- Click the Disconnect button.
The above steps are meant to disconnect using the built-in VPN client. If you have a third-party client, check the software support website for more specific details.
Error code 0x80073712 fix
The error 0x80073712 indicates that some installation files are either damaged or missing.
To fix the problem, delete the temporary files and redownload the new version using these steps:
- Open Settings.
- Click on System.
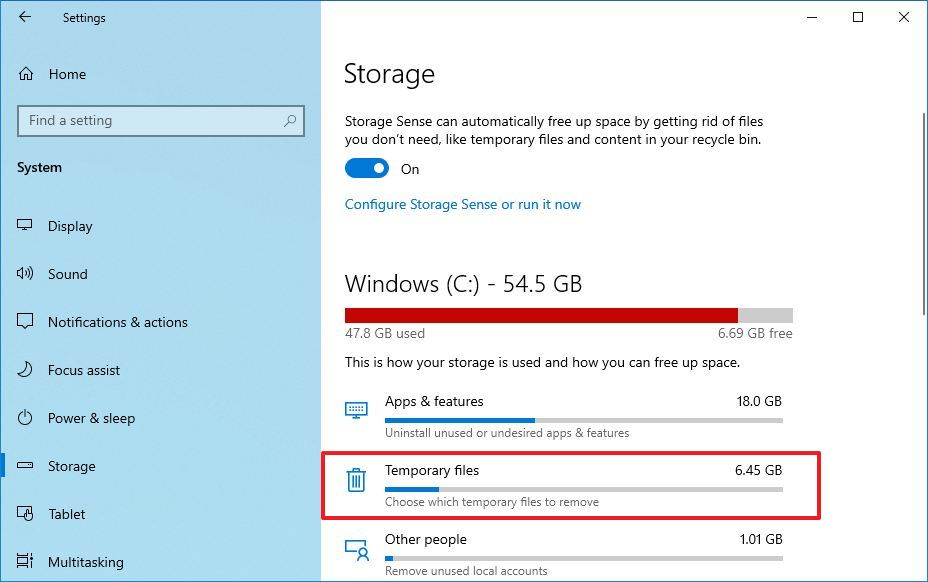
- Click on Storage.
- Click the Temporary files option for the main drive.
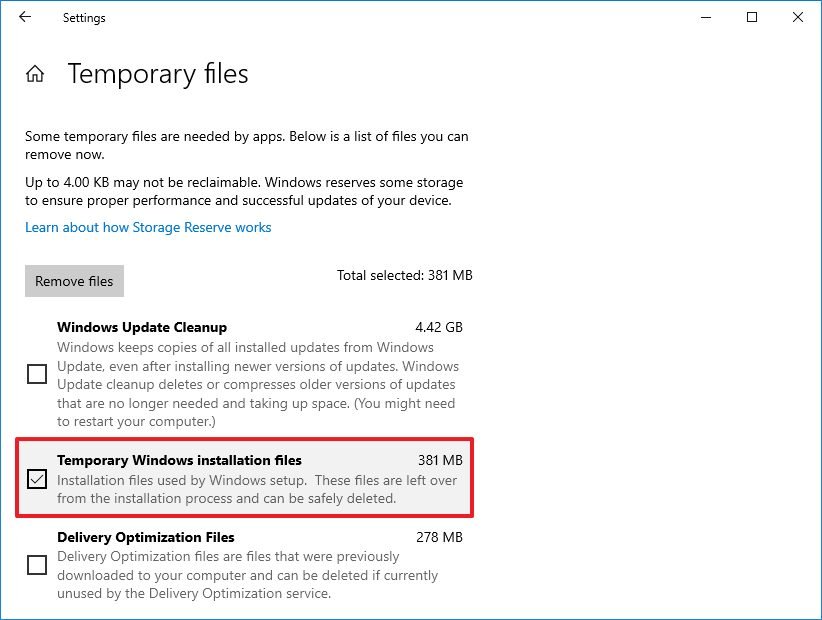
- Clear the current item selections.
- Check the Temporary Windows Installation files or Windows Setup temporary files item.
- Click the Remove files button.
After you complete the steps, use the Windows Update settings again to download version 21H1.
If the error persists, use the Media Creation Tool to upgrade the computer.
Change System Reserved partition size
On Windows 10, it is not uncommon for security software to write data inside the System Reserved partition that could prevent a new feature update.
If this is the issue, you can use third-party tools to change the partition size to 500MB or more. If you cannot seem to fix the problem, then upgrade using a clean installation to fix this problem and other existing issues since you will be starting with a fresh setup.
Fix problems with setup installing May 2021 Update
When using the Media Creation Tool or Update Assistant to install the May 2021 Update, the setup may stop unexpectedly with error code 0x8007042B 0x4000D or 0x800700B7 0x2000A if there another process conflicting with the upgrade.
You can quickly resolve this problem by terminating the process and restarting the setup. Using a clean boot to restart the Windows 10 setup or temporarily uninstalling the application causing the problem can fix the issue.
Terminate process in Task Manager
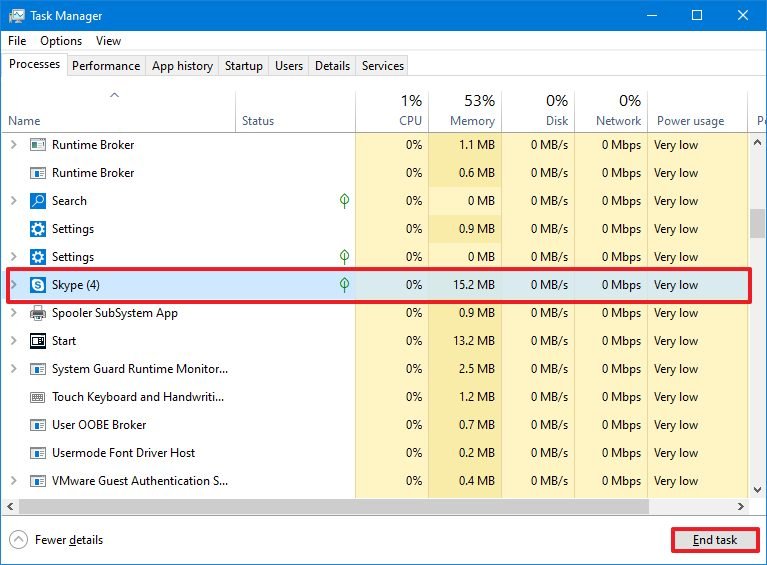
To use the Task Manager to terminate a process or application on Windows 10, use these steps:
- Open Start.
- Search for Task Manager and click the top result to open the app.
- Click the More details button.
- Select the app or process.
- Click the End task button.
- Repeat steps No. 3 and 4 to terminate the remaining apps.
After you complete the steps, start the setup again and continue with the upgrade.
Uninstall app on Windows 10
To remove an app on Windows 10, use these steps:
- Open Settings.
- Click on Apps.
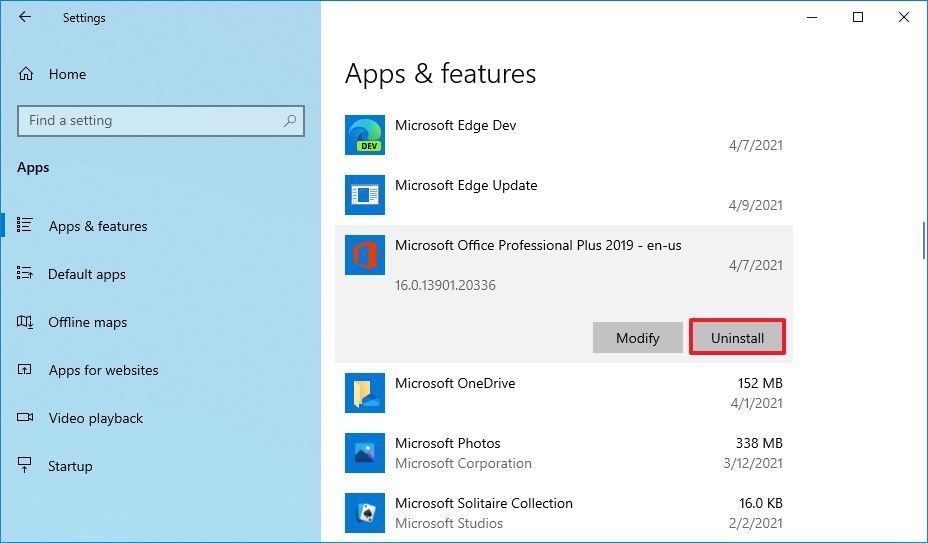
- Click on Apps & features.
- Select the app.
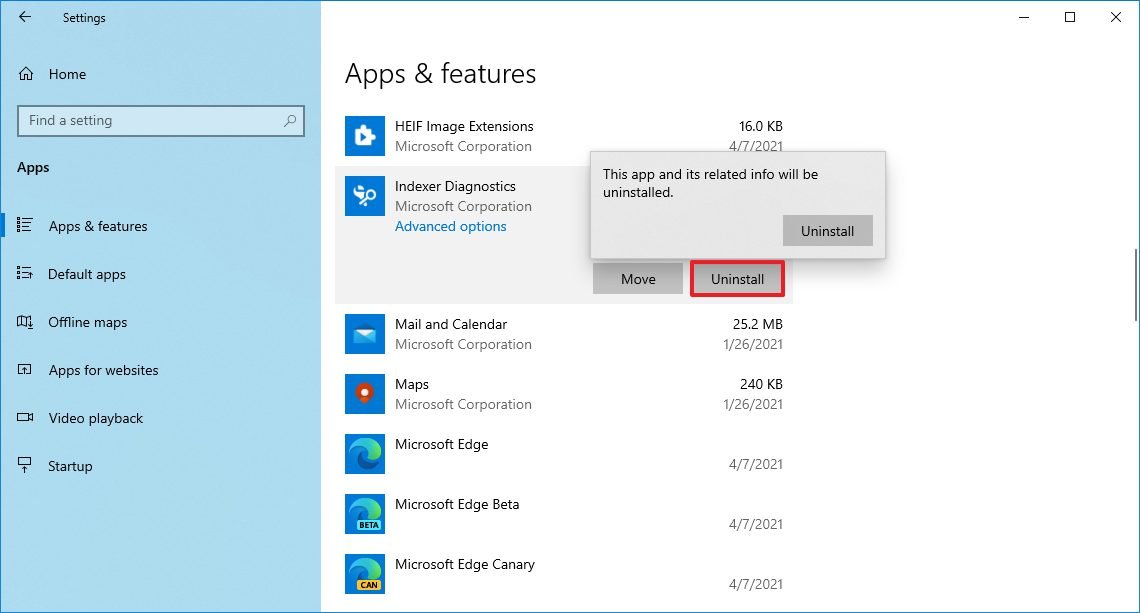
- Click the Uninstall button.
- Click the Uninstall button again.
- Continue with the on-screen directions (if applicable).
Once you complete the steps, the upgrade process to version 21H1 should finish without problems.
Fix problems with Media Creation Tool installing May 2021 Update
The Microsoft Media Creation Tool allows you to complete a clean installation or an in-place upgrade. However, even when this is the recommended tool when Windows Update does not work, you can also come across problems, including issues downloading the files and opening the application.
Resolve stuck downloading updates
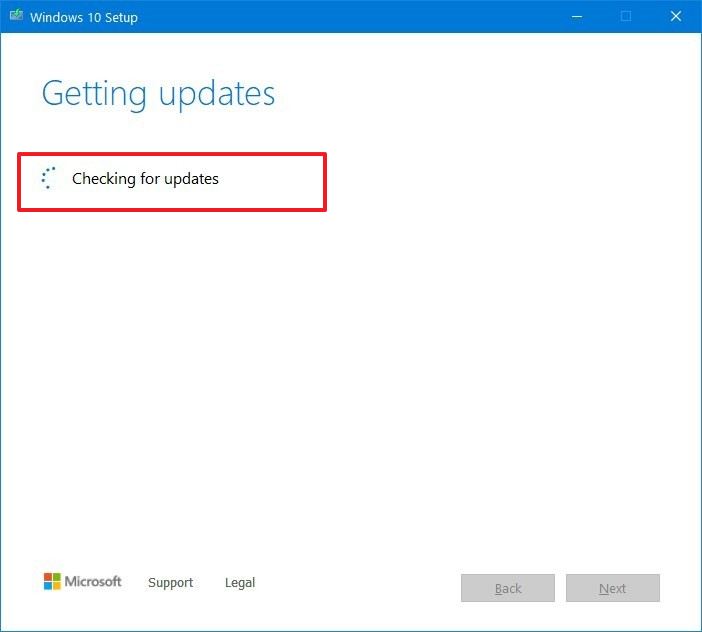
During the preparation process, the Media Creation Tool pulls the setup files and any available updates from the Microsoft server to install the most recent build of Windows 10. However, sometimes, the tool may get stuck during updates that will block the setup from continuing the installation.
To solve the stuck downloading files problem, use these steps:
- Close the Media Creation Tool.
- Open the Media Creation Tool again.
- Confirm the setup files finish downloading, and unplug the network cable or disconnect from the wireless network immediately.
Once you complete the steps, the connection will timeout and continue with the setup process without updates.
Resolve Media Creation Tool won't start setup
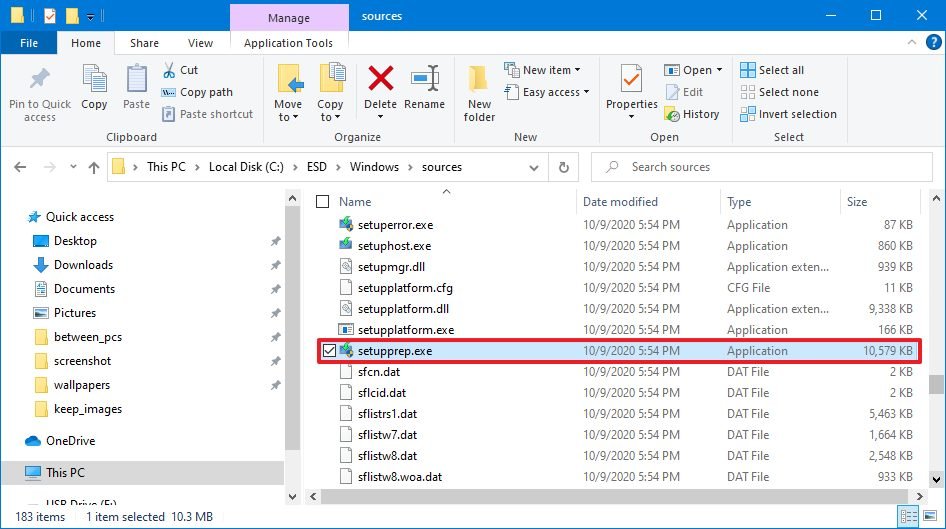
If you are using the Media Creation Tool to perform an in-place upgrade, it could happen that the setup won't start automatically after downloading the required files. If this happens, you may need to start the upgrade process manually.
To launch the Windows 10 setup manually, use these steps:
- Open File Explorer.
- Browse to the following path:
C:\ESD\Windows\sources - Double-click the Setupprep.exe file to launch the setup wizard.
After you complete the steps, continue with the version 21H1 upgrade process. Alternatively, you can try the Update Assistant to update the system to the newest version.
Fix problems with USB flash drive installing May 2021 Update
If you are using a USB flash drive to install the Windows 10 May 2021 Update and the setup fails, some of the files may be damaged or missing. You can quickly get around this problem by recreating the bootable media with the Media Creation Tool.
To create a USB bootable media to install Windows 10, use these steps:
- Open Windows 10 download page.
- Under the "Create Windows 10 installation media" section, click the Download tool now button.
- Save the installer on your device.
- Double-click the MediaCreationTool21H1.exe file to launch the setup.
- Click the Accept button.
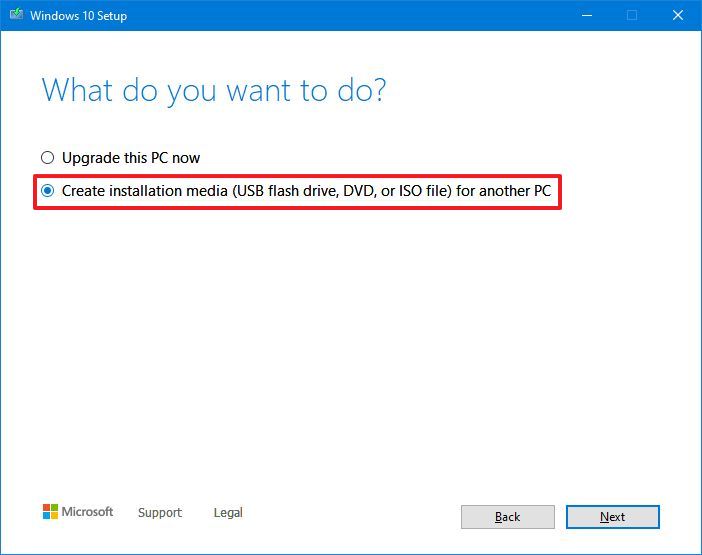
- Select the Create installation media (USB flash drive, DVD, or ISO file) for another PC option.
- Click the Next button.
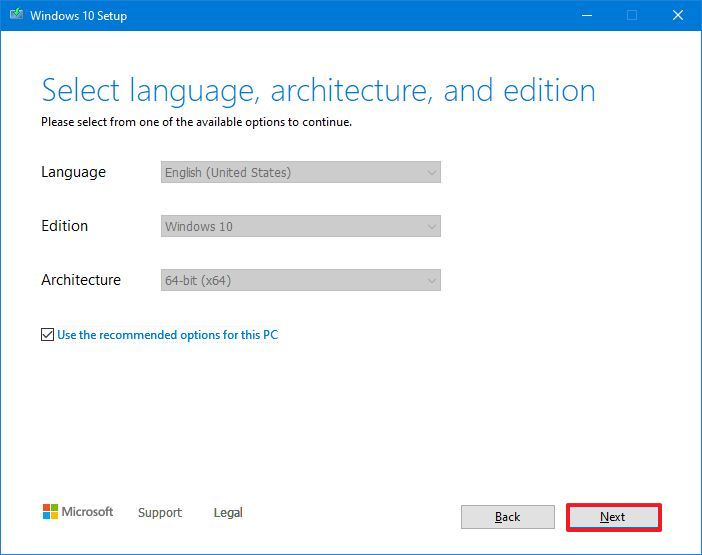
- Click the Next button again.
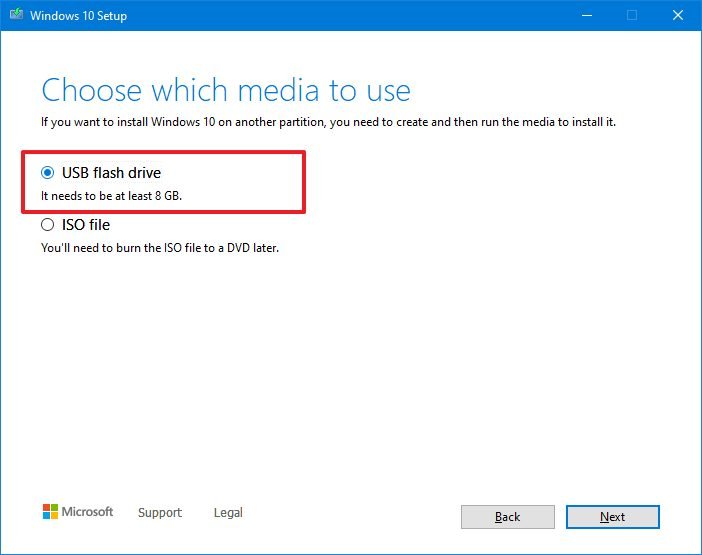
- Select the USB flash drive option.
- Click the Next button.
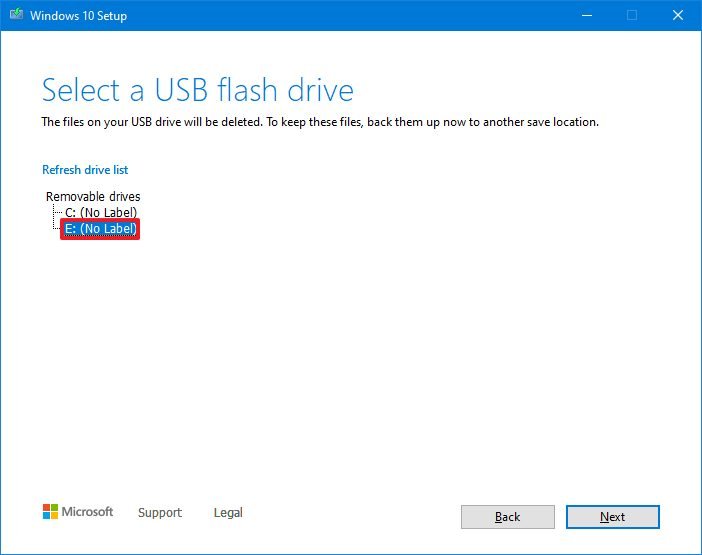
- Select the USB flash drive from the list.
- Click the Next button.
- Click the Finish button.
After you complete the steps, the Media Creation Tool will create a new setup drive with the files to install the May 2021 Update.
If the media fails again, then use another computer to recreate bootable media.
Fix problems with Update Assistant installing May 2021 Update
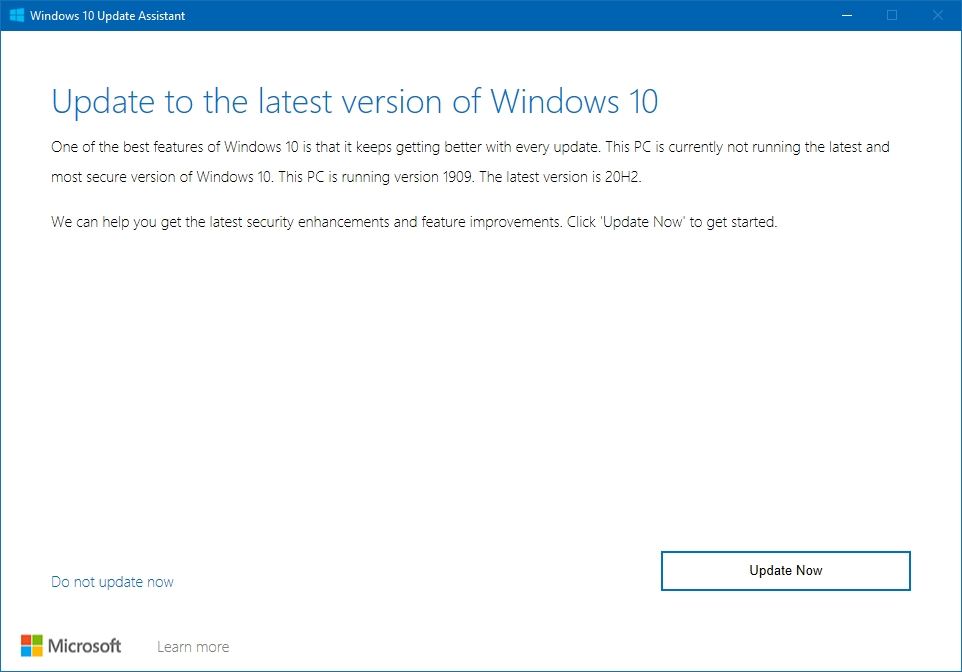
Microsoft also offers the Update Assistant, a utility to install new versions of Windows 10 when the Windows Updates option is having problems. However, even with this tool, you may not be able to upgrade your computer.
Since the Update Assistant is meant to offer an easy mechanism to upgrade a device, the problems are usually related to networking, which you may be able to resolve doing the following:
- Close the tool, disconnect the network cable or disconnect the computer from the Wi-Fi network using the network flyout on the taskbar. Wait sixty seconds, reconnect to the network, and restart the Update Assistant.
- Restart your computer, reopen the Update Assistant, and continue with the upgrade.
If the problem persists, then switch to the Media Creation Tool to perform an in-place upgrade to the May 2021 Update.
Fix error code 0xC1900101 upgrading to May 2021 Update
The error code starting with 0xC1900101 or 0x80090011 indicates a device problem during the Windows 10 May 2021 Update upgrade process.
These are the related "0xC1900101" error codes you may find on Windows 10:
- 0xC1900101 - 0x2000c
- 0xC1900101 - 0x20017
- 0xC1900101 - 0x30017
- 0xC1900101 - 0x30018
- 0xC1900101 - 0x3000D
- 0xC1900101 - 0x4000D
- 0xC1900101 - 0x40017
Cleanup storage space
The installation of version 21H1 requires at least 20GB of space. If you do not meet this requirement, you will see one of the 0xC1900101 error codes. If this is the case, you can use the Storage and Apps & features settings to free up space.
You can use this guide to find valuable tips to clear up unnecessary files to free up storage space on your device.
Disconnect devices
If you have peripherals (such as external drives, printers, Bluetooth devices, USB devices, cameras) connected to the computer, disconnect them before proceeding to reduce the chances of problems upgrading to the May 2021 Update.
You can always reconnect them (one at a time) after the upgrade.
Uninstall security apps
The error codes 0xC1900101 0x20017 and 0xC1900101 0x30017 may appear if there an issue with third-party security software.
Usually, you can mitigate this problem by temporarily uninstalling the third-party antivirus, anti-spyware, and any other security solution installed on the device.
To temporarily remove security software, use these steps:
- Open Settings.
- Click on Apps.
- Click on Apps & features.
- Select the security app.
- Click the Uninstall button.
- Click the Uninstall button again.
- Continue with the on-screen directions.
After you complete the steps, proceed with the upgrade process and reinstall the software one more time.
Update device drivers
The error code that starts with 0xC1900101 or 0x80090011 indicates a drive problem with one of the components, which you can usually fix by installing the latest update available.
Important: When using an update you downloaded from the manufacturer support website, always use their instructions, and skip the steps below.
To update drivers on Windows 10, use these steps:
- Open Settings.
- Click on Update & Security.
- Click on Windows Update.
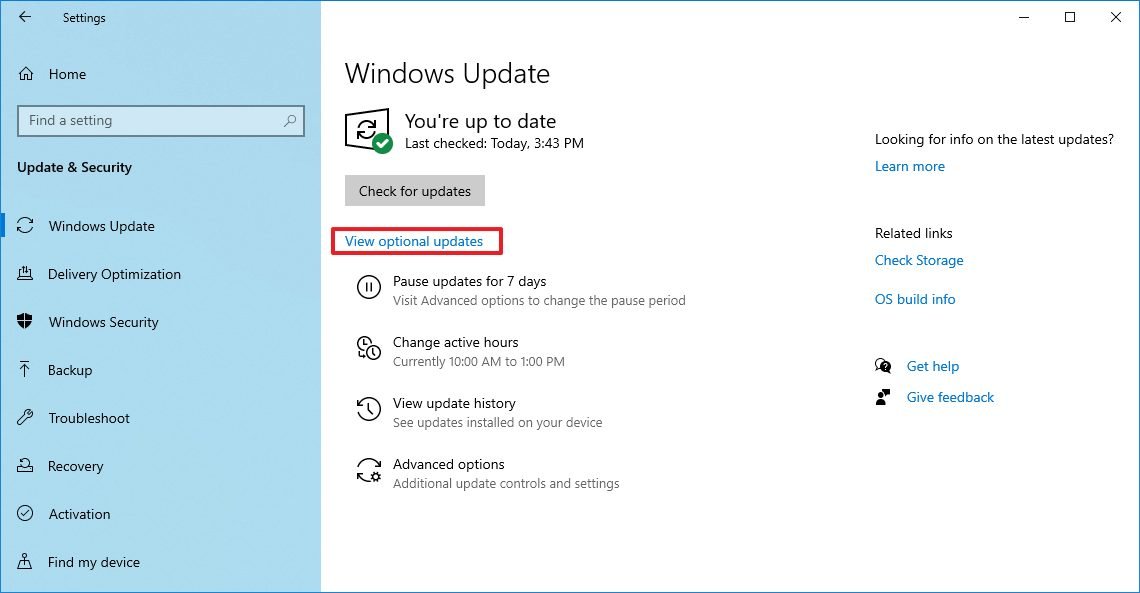
- Click the View optional updates option.Quick note: This option is only available when there is a driver update through Windows Update.
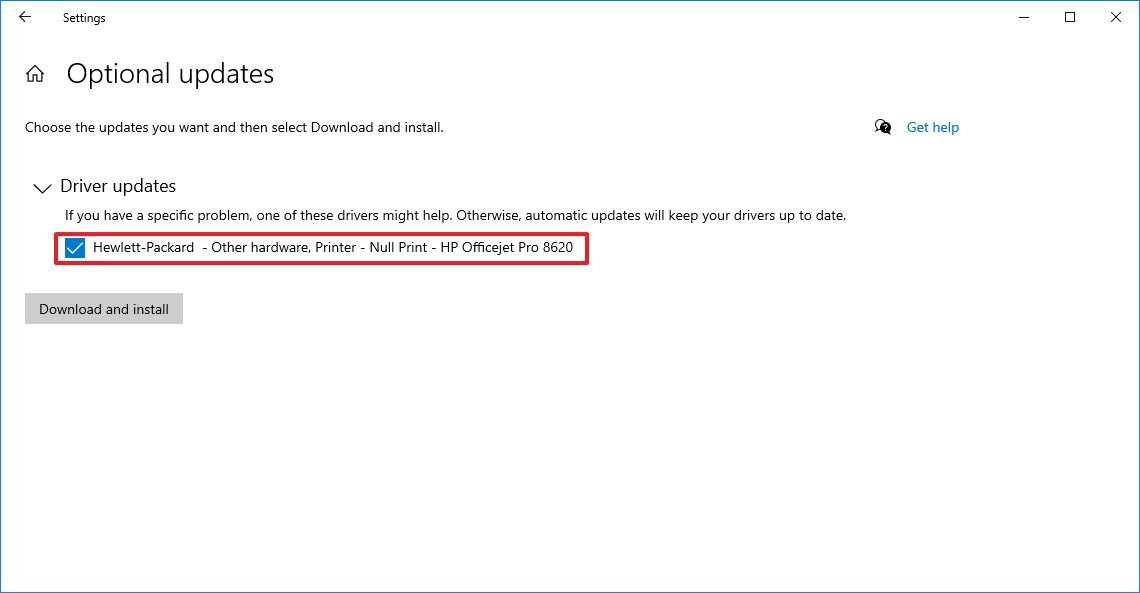
- Click the Driver updates list to expand.
- Select the driver to update.
- Click the Download and install option.
Once you complete the steps, the update will resolve the error codes previously preventing the device from installing the May 2021 Update.
Repair current installation
On Windows 10, an error starting with 0xC1900101 could indicate an issue with the current setup. If this is the case, you can use the Deployment Servicing and Management (DISM) and the System File Checker (SFC) command-line tools to repair the installation and continue with the version 21H1 upgrade.
You can use this DISM command tool guide to use these tools to repair the Windows 10 installation.
Repair hard drive
Alongside DISM and SFC, it is possible to use the CHKDSK tool to repair logical and specific physical errors on the hard drive that includes the Windows installation.
To use the CHKDSK tool, close all the applications, and then use these steps:
- Open Start.
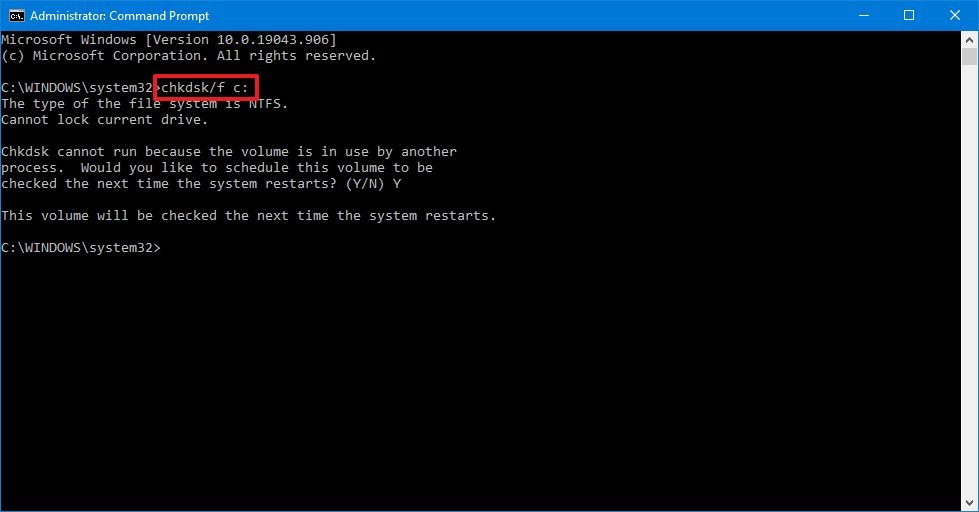
- Search for Command Prompt, right-click the top result, and select the Run as administrator option.
- Type the following command and press Enter:
chkdsk/f c:
- Type Y and press Enter to schedule a scan.
- Restart your device.
After the computer reboots, the CHKDSK tool will run and repair any hard drive problems that it may find.
Clean install upgrade
Alternatively, if the device continues to show an error code 0xC1900101, the best option to continue with the upgrade would be using the Microsoft Media Creation Tool to perform a clean install of the Windows 10 May 2021 Update.
Fix error code 0x80070002 0x20009 upgrading to May 2021 Update
In the upgrade process to version 21H1, you may also see the error code 0x80070002 0x20009 that describes a problem with the setup unable to find the installation files.
You can quickly resolve this problem by removing any external drives connected to the device, including USB flash drives (except the setup media) and hard drives.
Fix error code 0x80070070 upgrading to May 2021 Update
The error code 0x80070070 – 0x50011, 0x80070070 – 0x50012, or 0x80070070 – 0x60000 means the device does not have enough space to perform the upgrade. You can fix this problem by clearing up temporary files from the computer to free up space.
To free up storage space to continue with the May 2021 Update, use these steps:
- Open Settings.
- Click on System.
- Click on Storage.
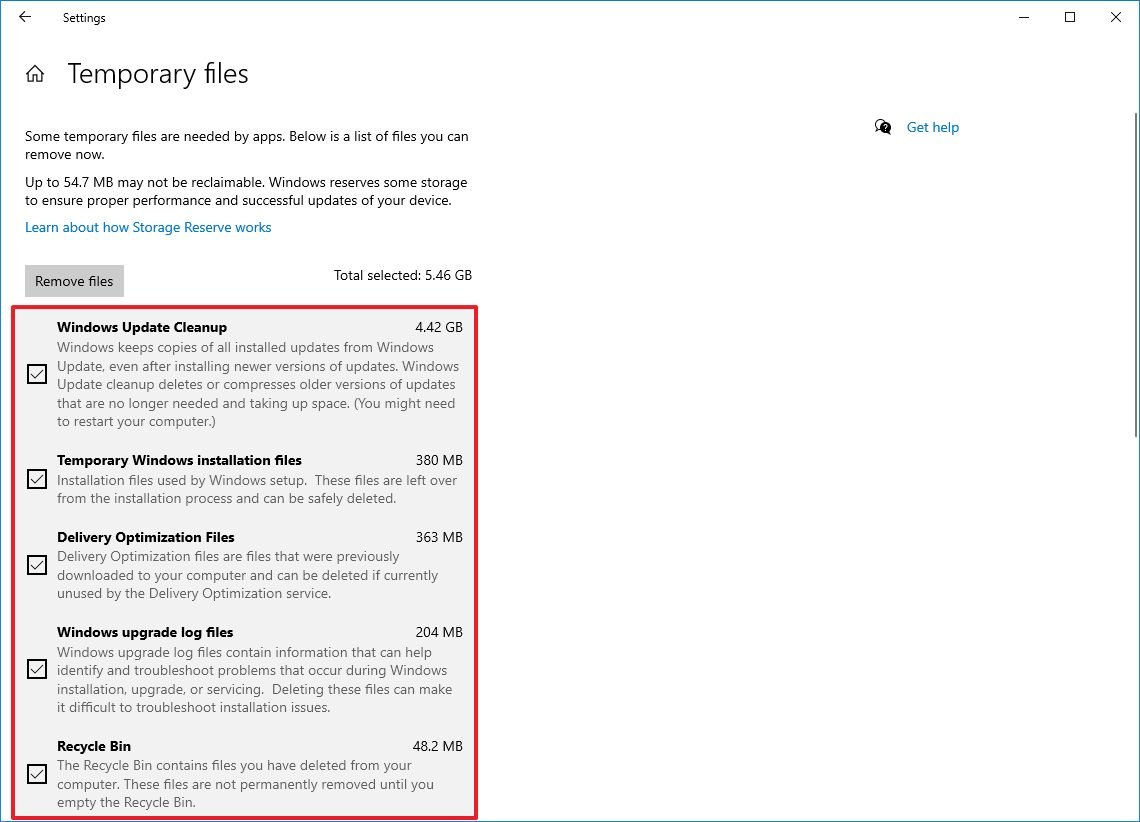
- Under the "Storage" section, click the Temporary files option for the system drive.
- Check the items to remove.Quick tip: When selecting the items, do not choose the "Windows Setup temporary files" or "Windows ESD installation files" options since these are the upgrade files.
- Click the Remove files button.
Once you complete the steps, continue with the upgrade to the first semi-annual update for Windows 10.
If you could not make enough room, you can connect an external storage (such as a USB flash drive or external hard drive) with at least 16GB of space that the setup can use as temporary storage for the upgrade.
You can also use this guide with more recommendations to clear up more storage space on your computer.
Fix error code 0xC1900107 upgrading to May 2021 Update
As you try to upgrade a computer to version 21H1, you may see the error code 0xC1900107, which indicates that the system has not completed the cleanup of the previous installation files. You can quickly get around this issue by rebooting the computer, or you can delete the previous setup files using Storage Sense.
To remove a previous installation of Windows 10, use these steps:
- Open Settings.
- Click on System.
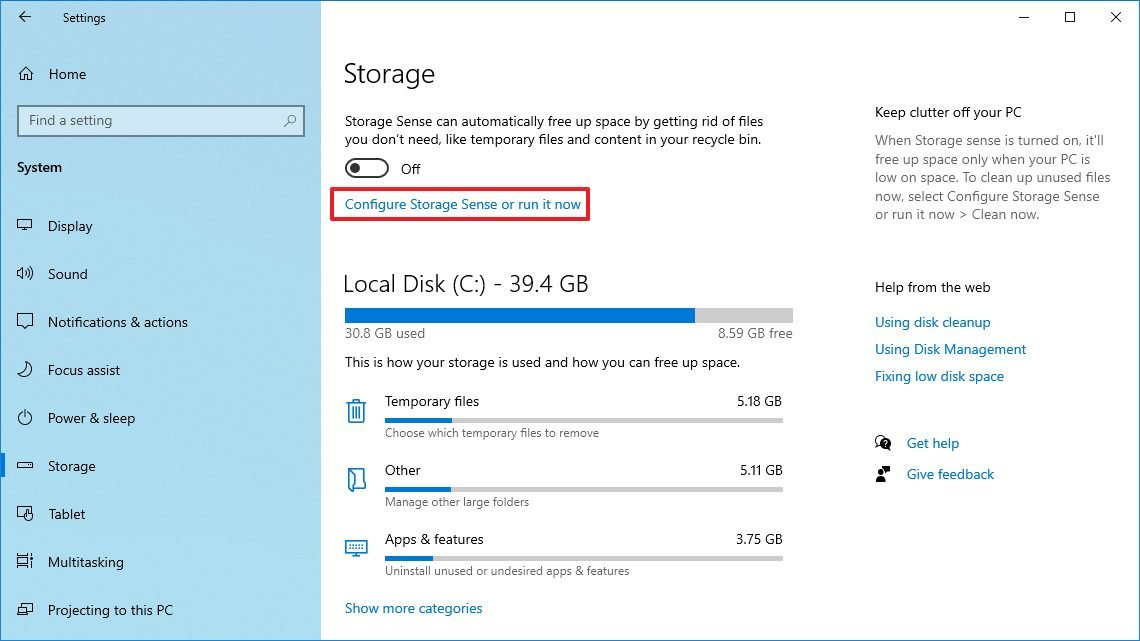
- Click on Storage.
- Under the "Storage" section, click the Configure Storage Sense or run in now option.
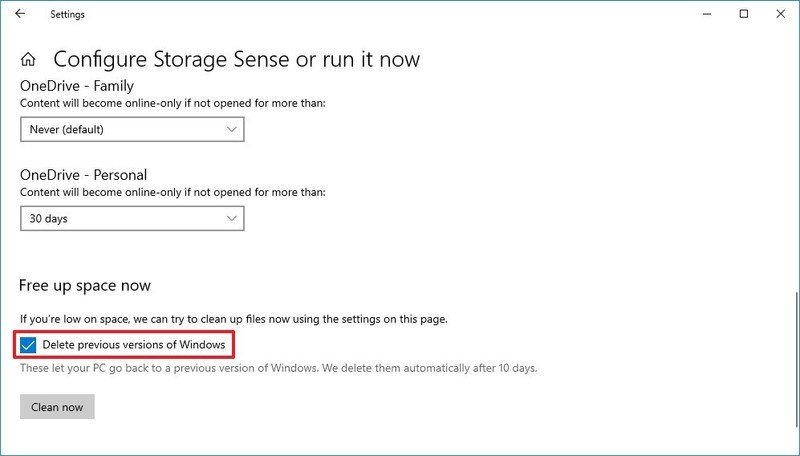
- Under the "Free up space now" section, check the Delete previous versions of Windows option.
- Check the Delete previous versions of Windows option.
- Click the Clean now button.
After you complete the steps, the tool will clean up the previous installation files, and you should now be able to proceed with the update.
Fix error code 0x800F0923 installing May 2021 Update
The error code 0x800F0923 describes a compatibility problem with a drive or program installed on the device.
Although many applications (outdated programs, old drivers, or third-party antivirus) can be the reason for this issue, it is usually a problem with the graphics driver.
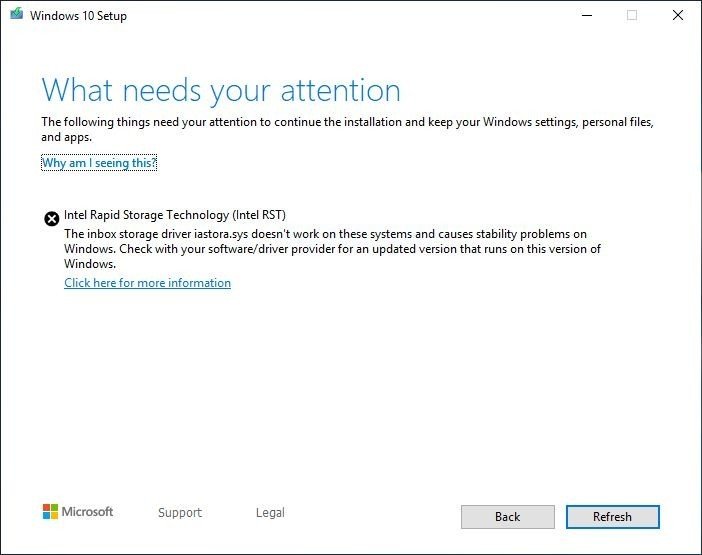
When it is a known issue, the Media Creation Tool or Update Assistant should provide details of the app causing the problem.
If this is a driver issue, then installing the latest updates from the manufacturer support website may help fix the problem. In the case that there's not a newer update, you should consider using a beta release of the device driver. If there is a bug, perhaps it is a known issue that the company is working to fix in an upcoming update, which may already be available as a pre-release.
If you cannot find any updates, you can get around this problem by uninstalling the driver to proceed with the May 2021 Update and then reinstall it after the upgrade.
Resolve app compatibility
When dealing with an incompatible application, either update or remove the app before proceeding with the upgrade.
To uninstall a Windows 10 app, use these steps:
- Open Settings.
- Click on Apps.
- Click on Apps & features.
- Select the incompatible app.
- Click the Uninstall button.
- Click the Uninstall button again.
- Continue with the on-screen directions (if applicable).
Once you complete the steps, continue with the installation of the May 2021 Update. After the upgrade, you can reinstall the apps again.
Resolve driver compatibility
To uninstall a Windows 10 driver, use these steps:
- Open Start.
- Search for Device Manager, and click the top result to open the app.
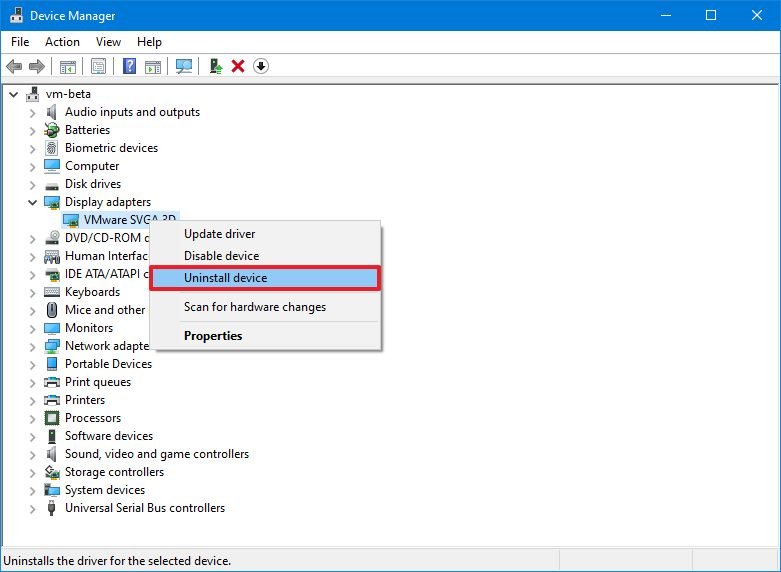
- Expand the branch with the device having issues.
- Right-click the component and select the Uninstall device option.
- Click the Uninstall button again.
After you complete the steps, the Windows 10 version 21H1 should now install without issues.
Fix error code 0xC1900208 upgrading to May 2021 Update
The error code 0xC1900208 – 0x4000C indicates a conflict with an application, which you can fix by removing the app in question.
To uninstall a app on Windows 10, use these steps:
- Open Settings.
- Click on Apps.
- Click on Apps & features.
- Select the incompatible application.Quick tip: If the application causing problems is not obvious, you can start removing the third-party antivirus or older programs that were not designed for Windows 10.
- Click the Uninstall button.
- Click the Uninstall button again.
- Continue with the on-screen direction to remove the app.
Once you complete the steps, you can continue with the version 21H1 installation.
Fix error completing installation of May 2021 Update
While applying the Windows 10 version 21H1 using the upgrade process or enablement package, you may see one of these two errors when completing the installation:
- Error: We couldn't complete the updates. Undoing changes. Don't turn off your computer.
- Error: Failure configuring Windows Updates. Reverting changes.
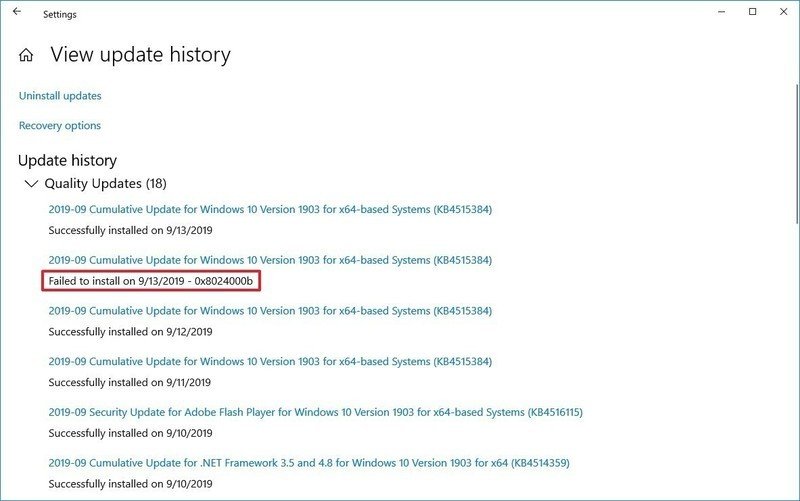
These general error messages do not provide any specific details. However, you can find out the error code using the Settings app, which you can then use to research online and find the appropriate instructions to fix it.
To check the error code preventing the version 21H1 installation, use these steps:
- Open Settings.
- Click on Update & Security.
- Click on Windows Update.
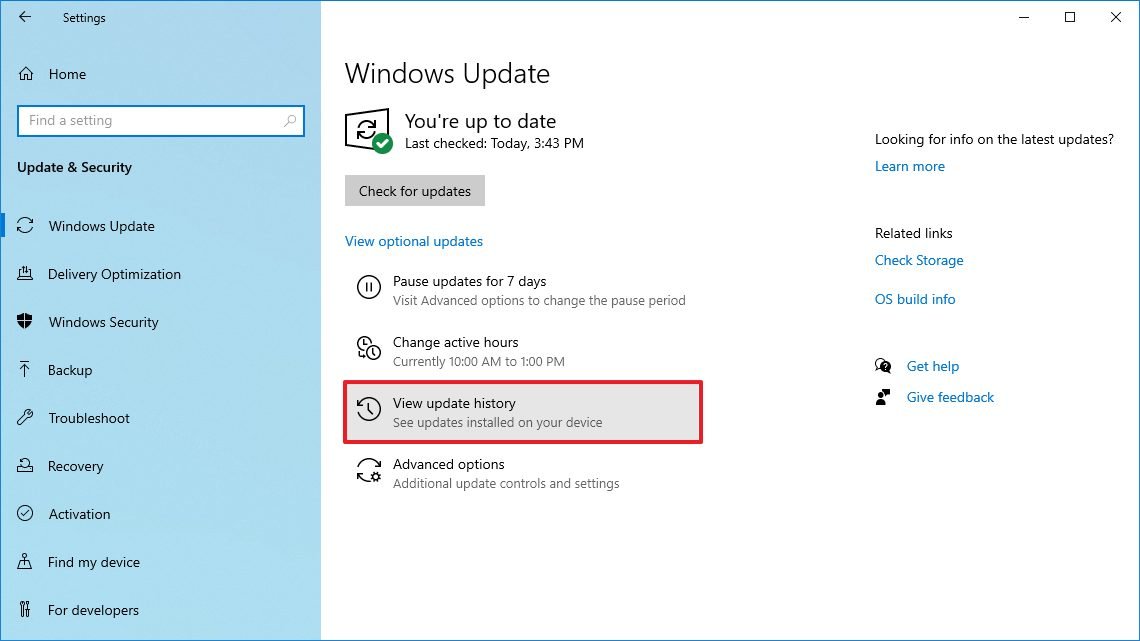
- Click the View your update history option.
- Check the error code next to the failed update.
Once you complete the steps, note the error code and search online to find a fix or workaround.
Fix black screen problem with May 2021 Update
On Windows 10, a black screen is a common issue that can occur during or after installing a new version. Usually, the problem is the graphics driver or an issue during the upgrade process.
If the error happened during the upgrade to the May 2021 Update, use this guide to resolve the issue.
If you cannot determine the problem, it could mean that the new version is not yet compatible with your computer. In this case, the option is to remove the update and roll it back to the previous installation.
Rollback to older version of Windows 10
If you previously had the November 2019 Update or an older version, use these steps to uninstall the May 2021 Update:
- Open Settings.
- Click on Update & Security.
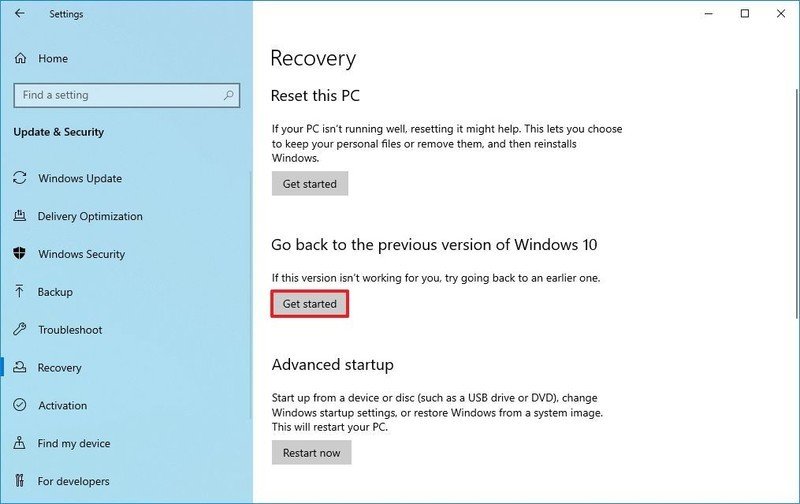
- Click on Recovery.
- Under the "Go back to a previous version of Windows 10" section, click the Get started button.
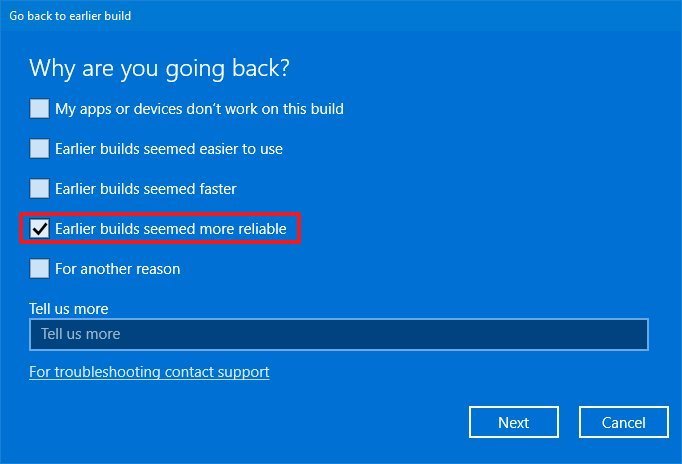
- Select any of the reasons available.
- Click the Next button.
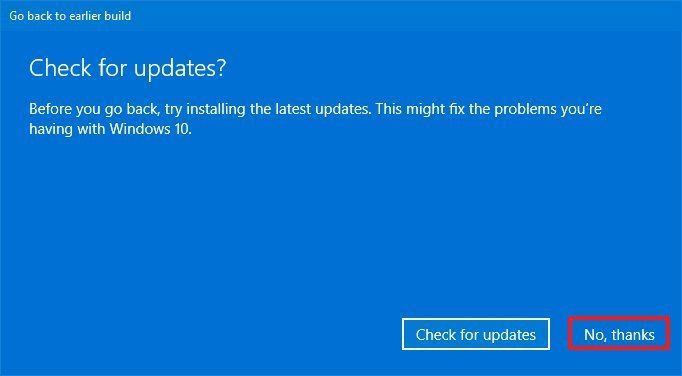
- Click the No, thanks button.
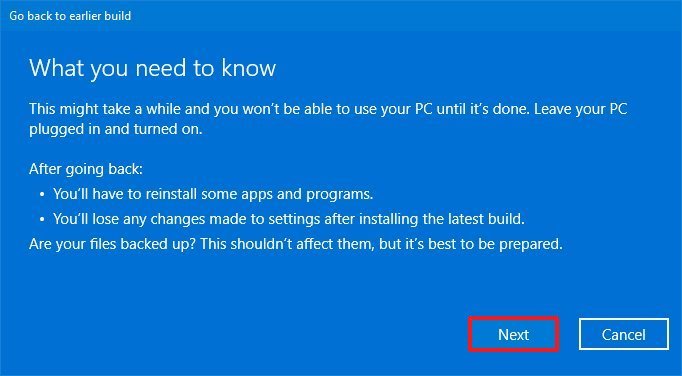
- Click the Next button.
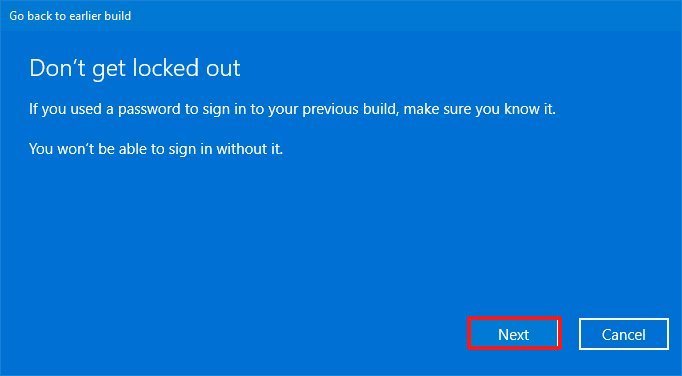
- Click the Next button again.
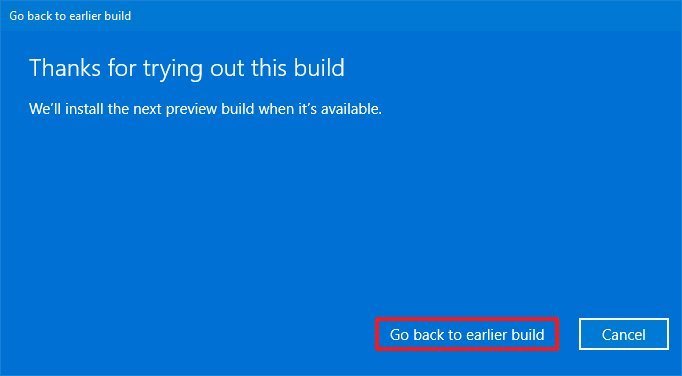
- Click the Go back to earlier build button.
After you complete the steps, the best action is to wait until a new update release to try the upgrade one more time.
Rollback to Windows 10 version 20H2 or 2004
If you updated installing the enablement package, then to uninstall version 21H2, use these steps:
- Open Settings.
- Click on Update & Security.
- Click on Windows Update.
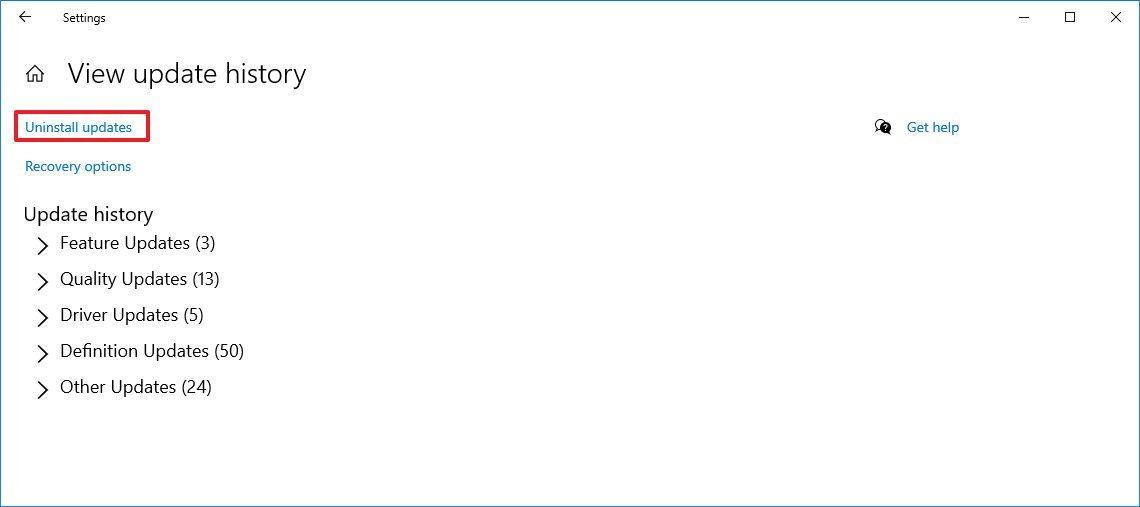
- Click the View update history option.
- Click the Uninstall updates option at the top of the page.
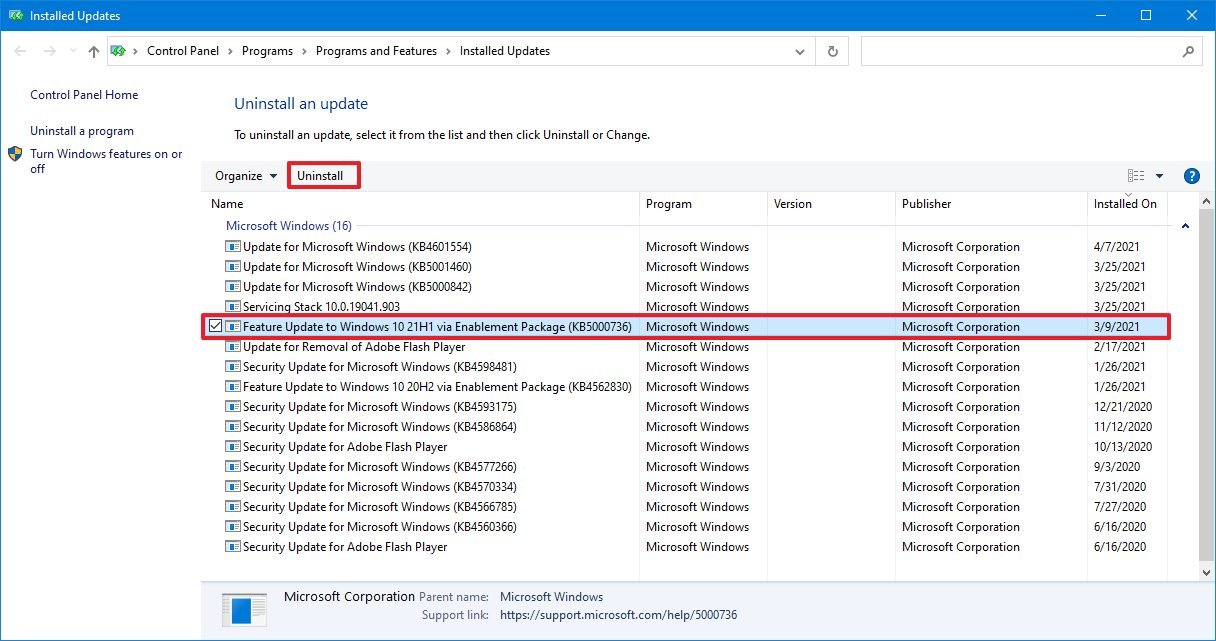
- Select the Feature Update to Windows 10 21H1 item from the list.
- Click the Uninstall button.
- Click the Yes button.
- Click the Restart now button.
In the case this is a known issue, Microsoft usually details the problem and workaround (if applicable) in the Windows 10 health dashboard page.
Fix Wi-Fi and Ethernet adapter problems with May 2021 Update
When installing a new version of Windows 10 can also cause problems with Ethernet and Wi-Fi adapters. For instance, it is not uncommon to read user reports of connectivity problems or adapter breaking entirely.
Although there could be many reasons for a particular problem (such as drivers, settings, wireless signal, cable, switch, router, and Internet Service Provider (ISP), it could be a bug with the May 2021 Update.
If the issue happens after applying Windows 10 version 21H1, this is likely a driver or configuration-related problem, which you can usually fix using the network troubleshooter or resetting the networking stack.
Network troubleshooter
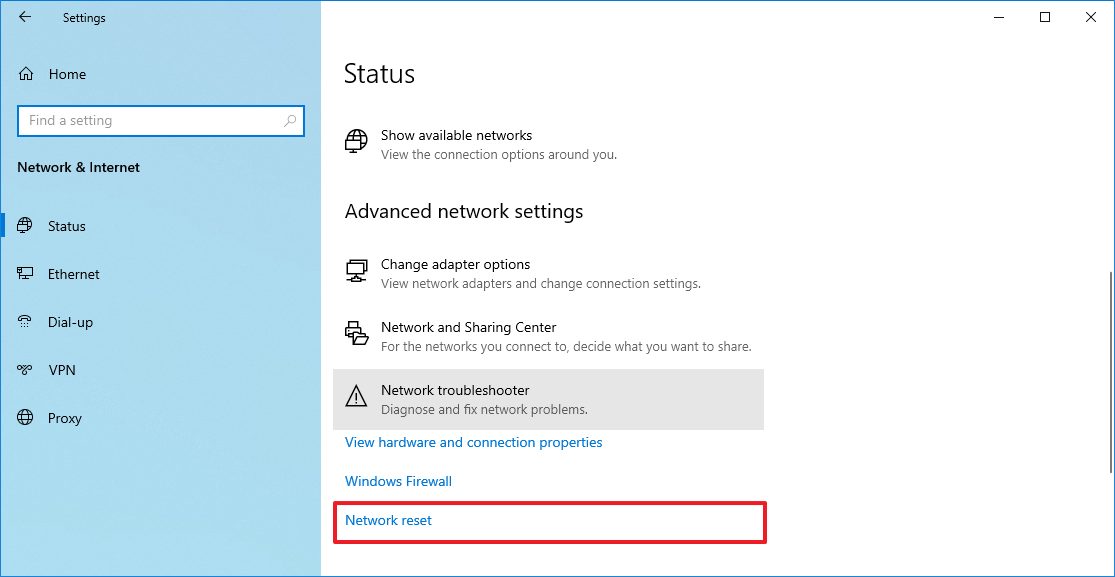
To fix network adapter problems after upgrading to version 21H1, use these steps:
- Open Settings.
- Click on Network & Security.
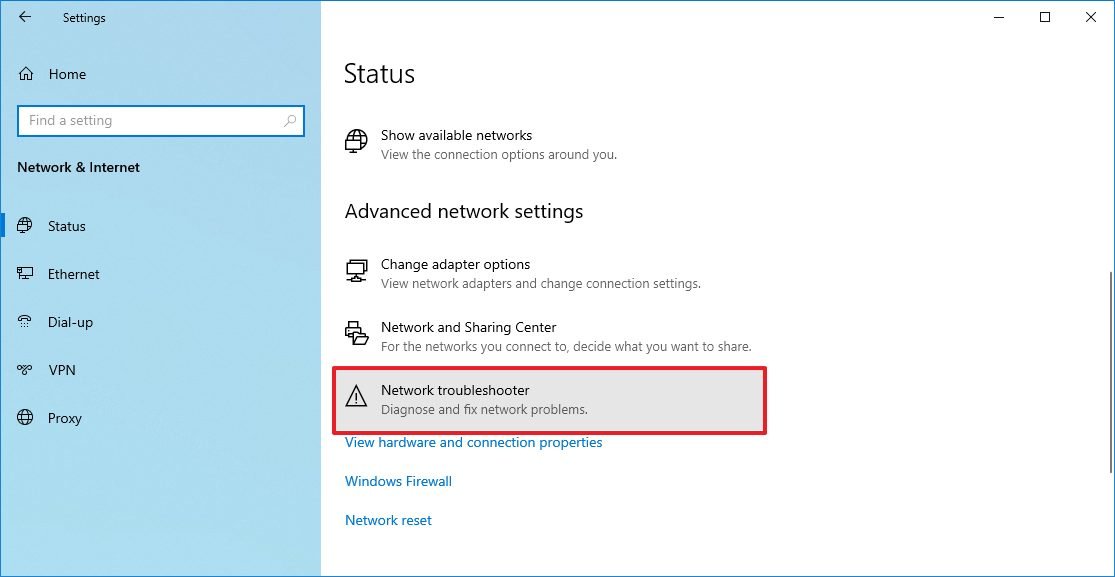
- Click on Status.
- Under the "Advanced network settings" section, click the Network Troubleshoot button.
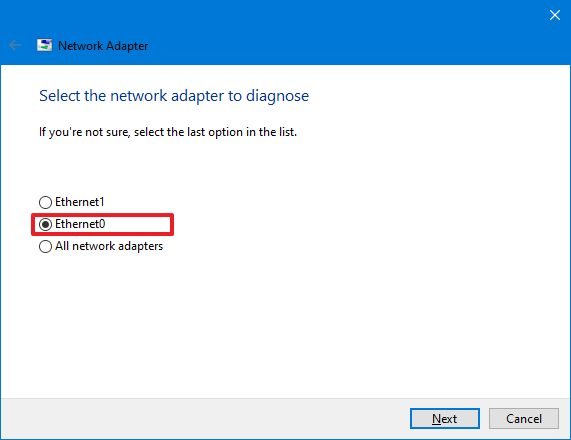
- Continue with the on-screen directions (if applicable).
Once you complete the steps, the computer should reconnect to the network.
Network reset
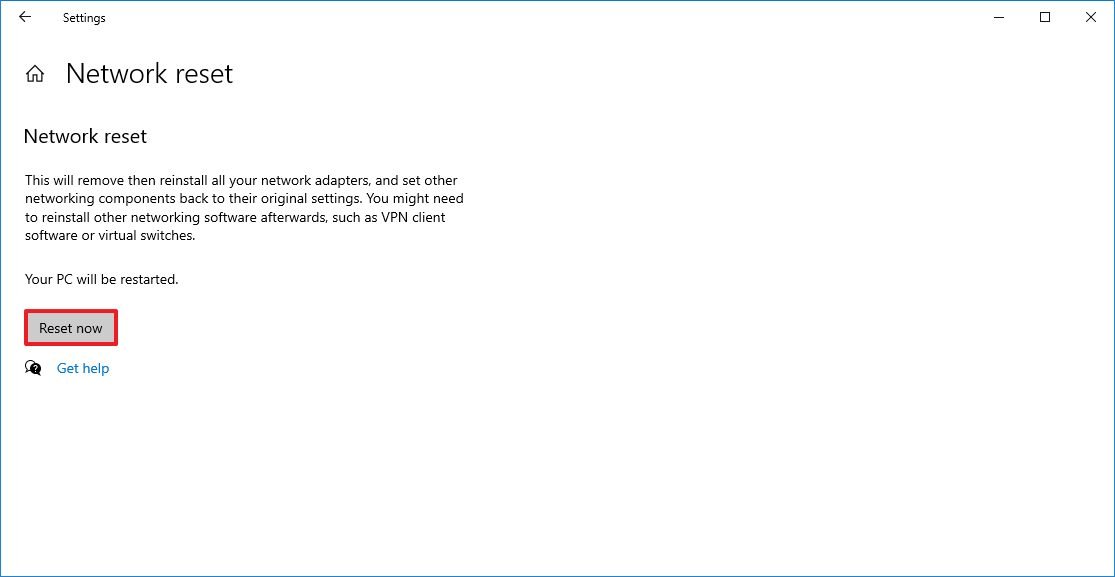
If you still cannot connect to the network, resetting all the network adapters may fix the problem.
To reset network adapters on Windows 10 to their default settings, use these steps:
- Open Settings.
- Click on Network & Security.
- Click on Status.
- Under the "Change your network settings" section, click the Network reset button.
- Click the Reset now button.
- Click the Yes button.
After you complete the steps, Windows 10 uninstall and reinstall all the adapters, and it will reapply all the default settings.
In the case that you are still dealing with the same problem, there is a good chance the problem is a bug with the new feature update. For additional assistance, you can use this guide to resolve most networking problems.
Windows 10 May 2021 Update recommendations
While the May 2021 Update is a minor update based on version 20H2 and 2004, you can still stumble upon problems during and after the upgrade, especially if you are updating a device with an older version. However, if you spend the time to prepare, you will have a better experience.
Create temporary backup
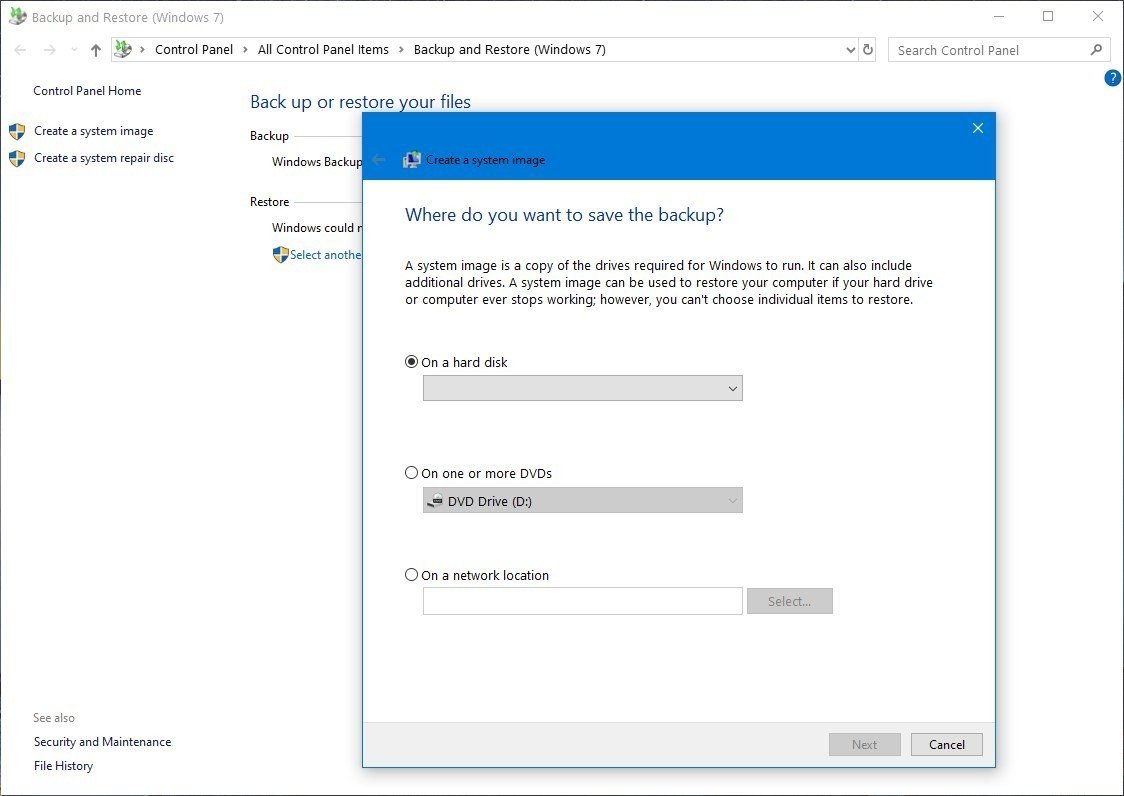
A full backup should always be the first step to prepare for a new update. The setup process includes safety features to roll back automatically if the upgrade does not complete successfully for any reason. However, it is not guaranteed that it'll work.
Also, even though the upgrade process usually works, there is always a minimal chance of data loss and other problems, which is the reason you always want to create a full backup before making changes.
You can use any backup software, but you can always create a temporary backup using the imaging tool available on Windows 10. In addition, it is also recommended to create a backup of your files to an external drive or cloud using OneDrive.
Create System Restore point
If you are using the October 2020 Update or May 2020 Update, you can also configure System Restore to create a restore point to undo the update if something goes wrong with the installation.
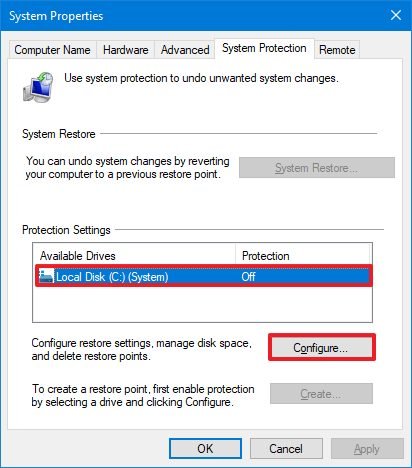
To enable System Restore on Windows 10, use these steps:
- Open Start.
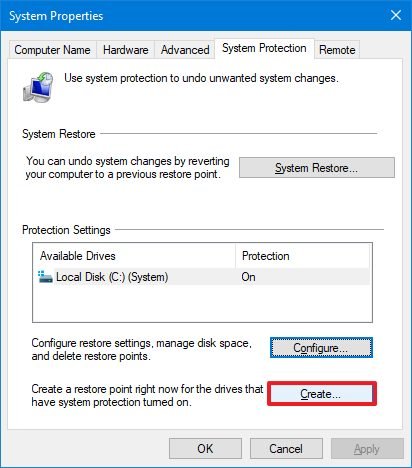
- Search for Create a restore point, and click the top result to open the System Properties app.
- Click the System Protection tab.
- Under the "Protection Settings" section, select the main (System) drive.
- Click the Configure button.
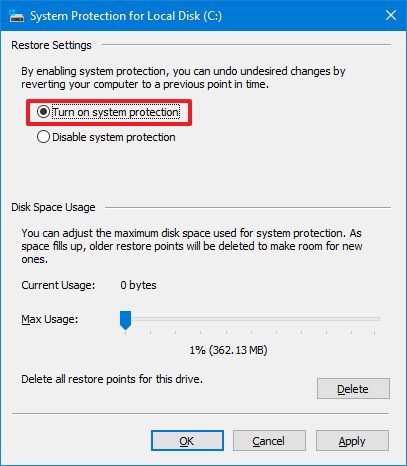
- Select the Turn on system protection option.
- Click the Apply button.
- Click the Create button.
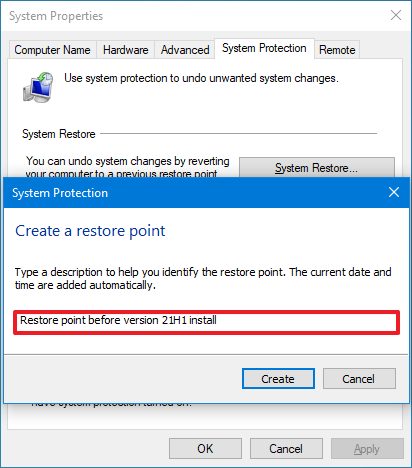
- Specify a name for the restore point. For instance, Restore point before installing the May 2021 Update.
- Click the Create button.
- Click the Close button.
- Click the OK button.
Once you complete the steps, the feature will take a snapshot of the current setup then if the feature update is causing issues, you can use the restore point to undo the changes without affecting your files.
Uninstall non-essential apps
Programs that were not designed for Windows 10 can cause compatibility problems. You can always prevent issues by uninstalling apps that may conflict with the installation process. Usually, you want to remove legacy applications and third-party antivirus.
To uninstall apps on Windows 10, use these steps:
- Open Settings.
- Click on Apps.
- Click on Apps & features.
- Select the app you want to remove, and click the Uninstall button.
- Click the Uninstall button again.
- Continue with the on-screen direction (if applicable).
After you complete the steps, repeat the instructions to uninstall other apps as necessary.
If you have a third-party antivirus or firewall, you should check your software vendor support page for specific details on how to disable or remove the solutions during the upgrade progress.
In the case that you decide to uninstall the security software, consider that the device won't be unprotected since the Microsoft Defender Antivirus will automatically enable to keep the device secure.
After the installation, you can reinstall the apps again.
Disable metered connection
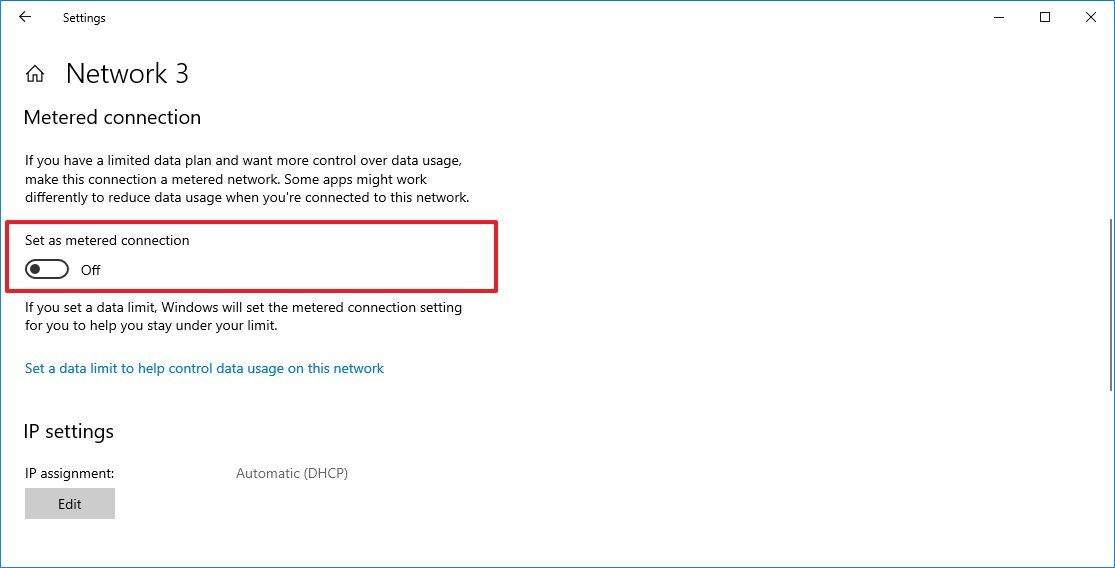
A metered connection will block the Windows 10 May 2021 Update from downloading automatically. If you are trying to update using Windows Update, confirm that the network connection is not configured as metered. In the case that you have a capped internet connection, connect to another network or disable the metered connection (assuming that you have enough data left) to download the update.
To disable a metered connection on Windows 10, use these steps:
- Open Settings.
- Click on Network & Security.
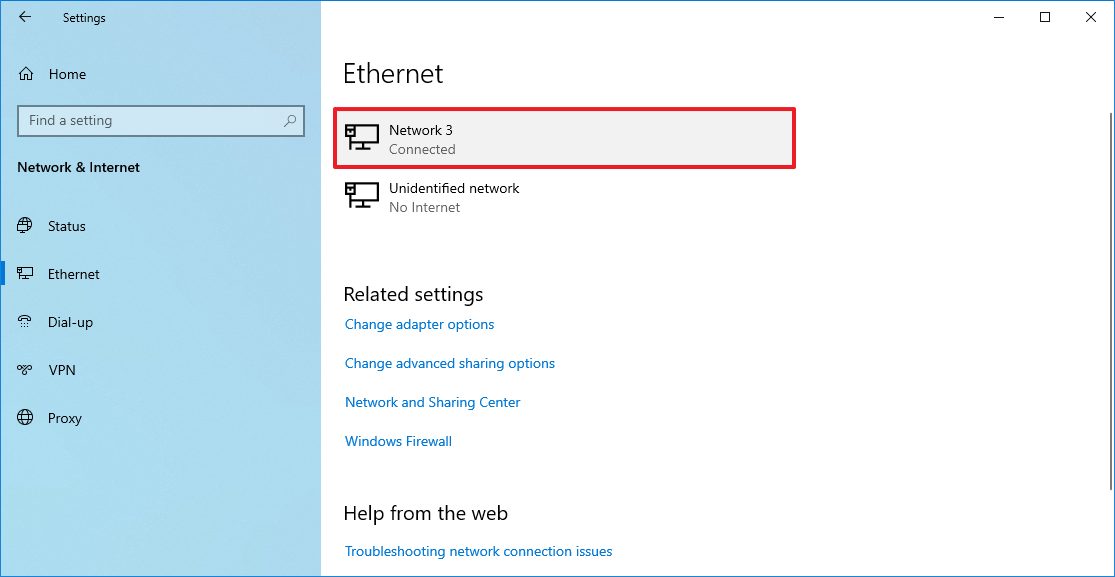
- Click on Wi-Fi or Ethernet.
- Select the active network connection.
- Under the "Metered connection" section, turn off the Set as metered connection toggle switch.
After you complete the steps, Windows Update should be able to download the May 2021 Update on the device.
Disconnect non-essential peripherals
When you plan to upgrade to a new version of Windows 10, non-essential peripherals (USB flash drive, SD cards, external hard drives, printers, scanners, dongles, and Bluetooth devices) can cause the installation to fail.
As a result, it's always recommended to disconnect all peripherals attached to the computer. You only need a monitor, keyboard, mouse, and internet connection.
After the installation, you can reconnect the peripherals again.
Perform clean installation
If nothing seems to work to fix the problem, it is best to stay in the older version for a bit longer, or you should consider doing a clean installation with the May 2021 Update.
A clean installation is always better than an upgrade because the device will start with a fresh copy of Windows 10, and it will even help resolve other issues.
The process to perform a clean install is not difficult. It only takes a little more time since you need to create a USB flash drive, and you need to reconfigure the system after the setup. You can use this guide to find specific steps to perform a fresh install of Windows 10.
Wrapping things app
While we are outlining a slew of solutions, most of them resolve common upgrade problems when trying to upgrade using the Media Creation Tool or Update Assistant. Since the May 2021 Update is a minor update for devices already using version 20H2 or 2004, it will download and apply like a cumulative update, which means that the risk of problems will be minimal.
Usually, it is never recommended to install a new version of Windows 10 as soon as it releases since it hasn't been fully tested on every hardware and software combination. As a rule of thumb, it is a good idea to wait until Microsoft releases several quality updates before proceeding with the upgrade process to minimize problems.
Did you encounter problems installing the May 2021 Update on your computer? Let us know in the comments and the steps you used to fix the issue.
More Windows 10 resources
For more helpful articles, coverage, and answers to common questions about Windows 10, visit the following resources:
- Windows 10 on Windows Central – All you need to know
- Windows 10 help, tips, and tricks
- Windows 10 forums on Windows Central

Mauro Huculak has been a Windows How-To Expert contributor for WindowsCentral.com for nearly a decade and has over 22 years of combined experience in IT and technical writing. He holds various professional certifications from Microsoft, Cisco, VMware, and CompTIA and has been recognized as a Microsoft MVP for many years.
