Microsoft OneDrive tips and tricks to make the cloud work for you

In the ever-evolving workplace, the expectations of having instant access to reports, projects and files cease to plateau. The concept of only being able to view your documents that live on your office computer from the computer itself is all but gone. Our information is as portable as we are.
Remote access to your work means that you can be productive and collaborative from anywhere. Your local storage remains uncluttered, enabling you to not have to worry about files you may access less frequently. Depending on your daily driver you may not want to invest in another storage card option, or perhaps you're simply unable to expand.
There are quite a few popular and powerful cloud storage service providers in the world, including Dropbox, Google Drive and Box. Microsoft's OneDrive, formerly SkyDrive (formerly Live Folders, Essentials and other iterations), is a well received and widely accepted cloud-sync option that's not to be overlooked. Natural and complete integration with Office is by far one of it's most powerful advantages over other solutions. If you're considering trusting OneDrive to help you manage your projects on the go, or you already use it, take a look at these tips and tricks. They just may help you "become one" with OneDrive.
- Manage sharing
- IFTTT and Microsoft Flow for effortless automation
- Offline access
- Locating file versions
- Avoid Outlook Clutter
Manage sharing
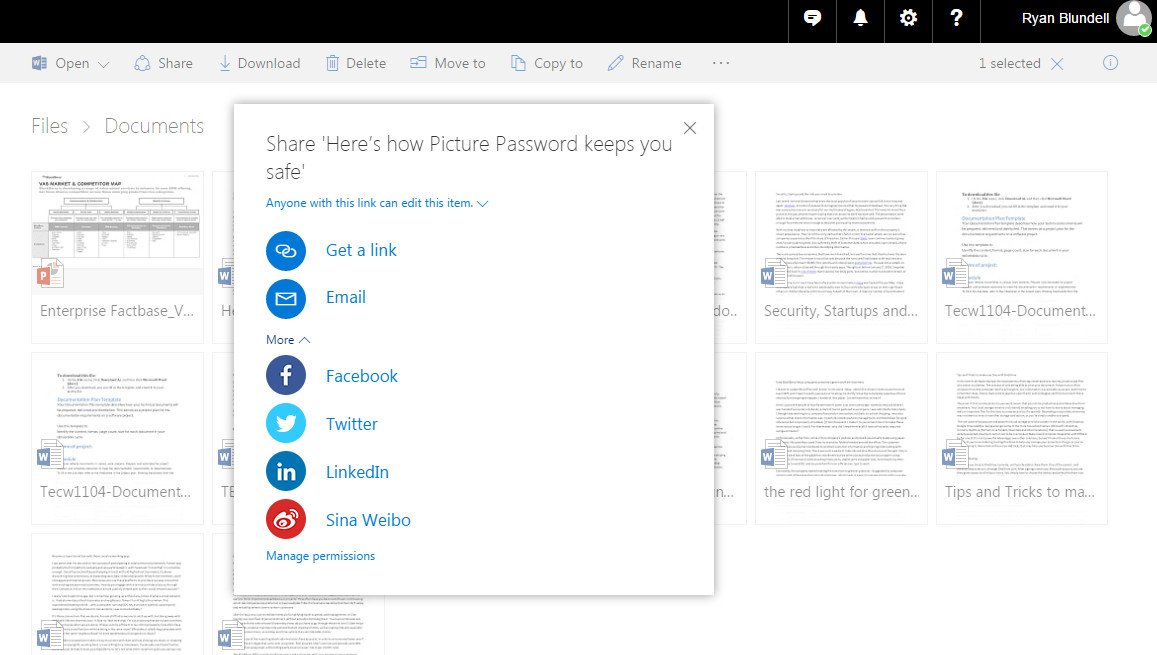
Anything you store in OneDrive is private until you decide to share it. One of the easiest and most creative ways to do so is using OneDrive.com. After signing in with your Microsoft account, you get access to all of your items. You simply have to choose the items and select the share icon. You have the option to choose a link to post or send an email invitation to specific individuals or distribution groups. Either method gives you the ability to choose a "view only" option (where your work can be viewed, copied or downloaded) or an "edit option" (allowing people to edit, forward, rename or delete your work or even add their own). It's a rather convenient way to share files without the need to simply email attachments, and you can rescind permissions at any time.
How to share an item using OneDrive.com
- Locate the file or folder in question.
- Right click on the folder and select Share or hover over the folder icon to make the checkmark circle appear.
- Select Share from the tool tray.
- In the pop-up window, select whether or not you want to allow the recipient to make edits to your work.
- Select Get a link to generate a shortened URL that can be copied.
- Select Email to send directly to the recipient by adding the email address and an optional message.
IFTTT and Microsoft Flow for effortless automation
Who doesn't want to get the most amount of work done while making the least amount of effort?
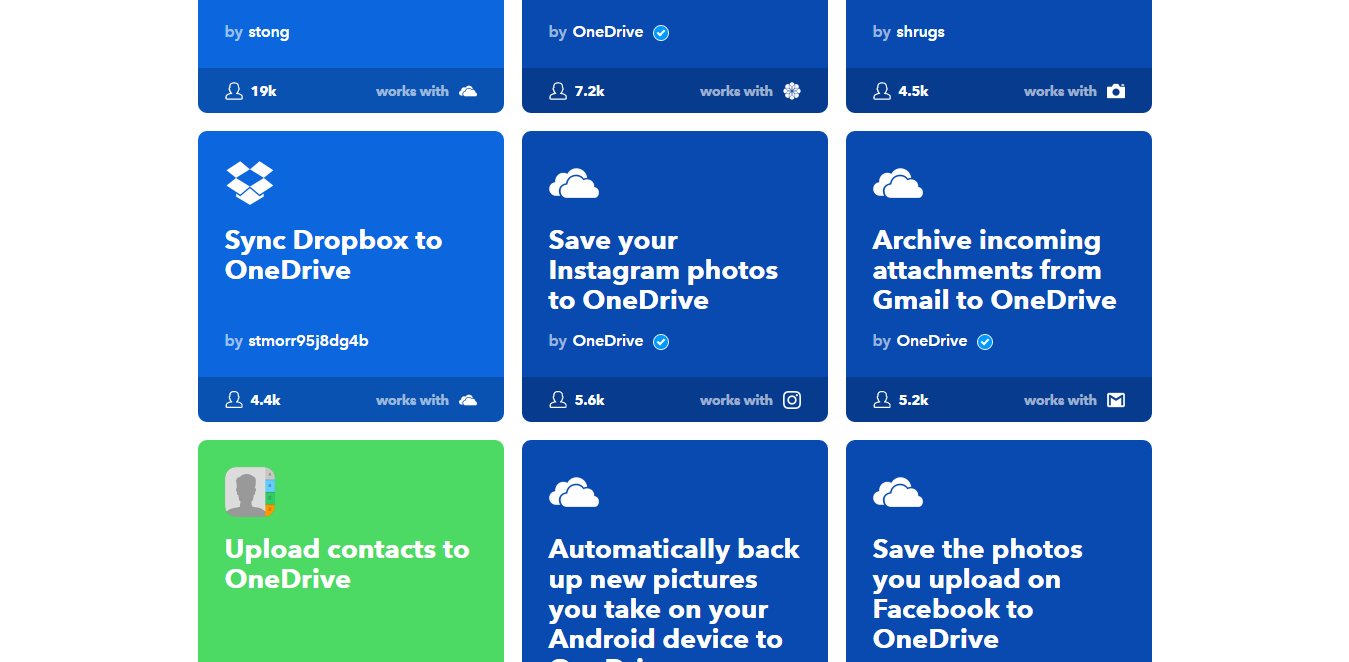
That may sound lazy, but it's more about simplifying the small tasks so that you can maximize your time and effectiveness for the more challenging items. One of the more popular web-based services that allows for online automation is IFTTT (an acronym for If This Then That). The service sports "applets" that allow various services to connect and perform functions nearly effortlessly. Users have been known to use IFTTT to upload images to social media automatically after taking them, or request their smart home setup to turn on the lights when the sun sets. With IFTTT, you can choose to automatically save images and screenshots, back up mail attachments or upload images posted to social media to your OneDrive.
Alternatively, you can use Microsoft Flow to save attachments from Outlook, copy files from other cloud-storage services, send files to an email address or connect to other services such as Wunderlist and Facebook. While these services manage behavior around managing your files, you can then focus on putting the files to work for you.
Get the Windows Central Newsletter
All the latest news, reviews, and guides for Windows and Xbox diehards.
Using IFTTT with OneDrive
- Log into your IFTTT account.
- Search for OneDrive.
- Click the option to Connect.
- Provide your OneDrive credentials .
- Review and accept IFTTT access requirements.
- Browse through the available list of applets. (For example, you could choose to save email attachments to OneDrive.)
- Select an applet and tap to turn on.
- Provide the credentials to your email account.
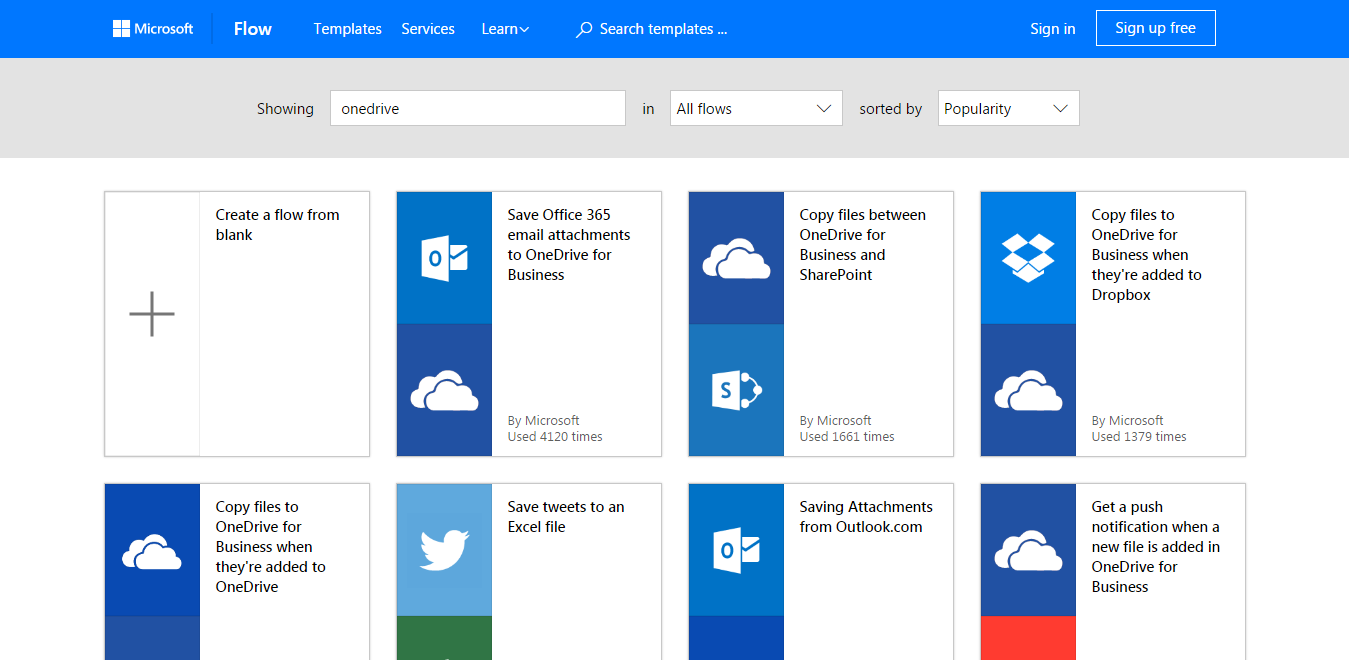
Alternatively, you could also use Microsoft Flow to save attachments from Outlook, copy files from other cloud-storage services, send files to an email address or connect to other services.
Using Microsoft Flow with OneDrive
- Access Flow and enter your account credentials.
- In the search bar, type in OneDrive or click on the OneDrive icon.
- Browse through the list of Flow templates to find one. (For example, you could choose a template for saving attachments from Outlook.com.)
- Select the template and provide any required login information for both your email account and for OneDrive.
- A popup will appear with permission-to-access requests. Read it and click Yes to accept.
- To activate the template, click on Create Flow.
With both Flow and IFTTT, the process is automated with little or no management required.
Offline access
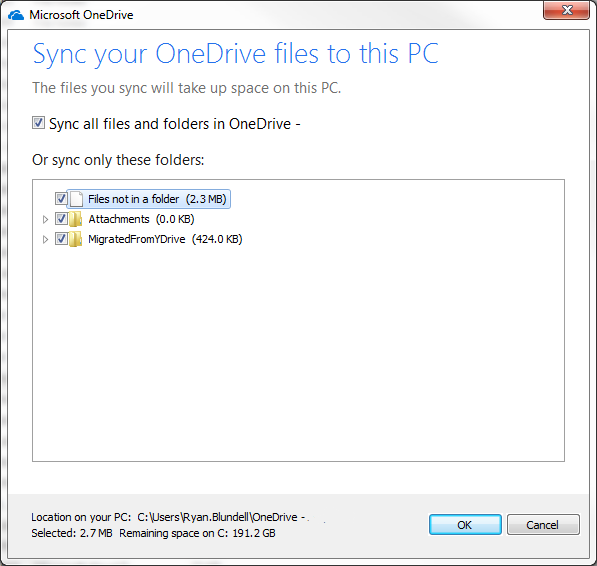
While being able to connect wirelessly to your items is convenient, you're not always in an area where you can do so. How can you still access your presentation without a cellular connection? With OneDrive for Windows 10, you can easily sync all or specific files or folders between your PC and your cloud storage folders. The settings menu of OneDrive makes it easy to check which folders you want to access offline. It's a feature that could save you when you're about to jump into a meeting with a client.
Using offline access on OneDrive for Windows 10 or Windows 7
All files in a local OneDrive folder are essentially always available offline. Users can choose which folders they want to sync between the cloud and the local version of OneDrive.
- In the system tray, right-click on the OneDrive Icon and select settings.
- To select the folders you want to sync, click Choose Folders.
- In the next screen, you can either maintain the Sync all files and folders in my OneDrive option or select or deselect folders in a list.
- Click OK to finish.
Locating file versions
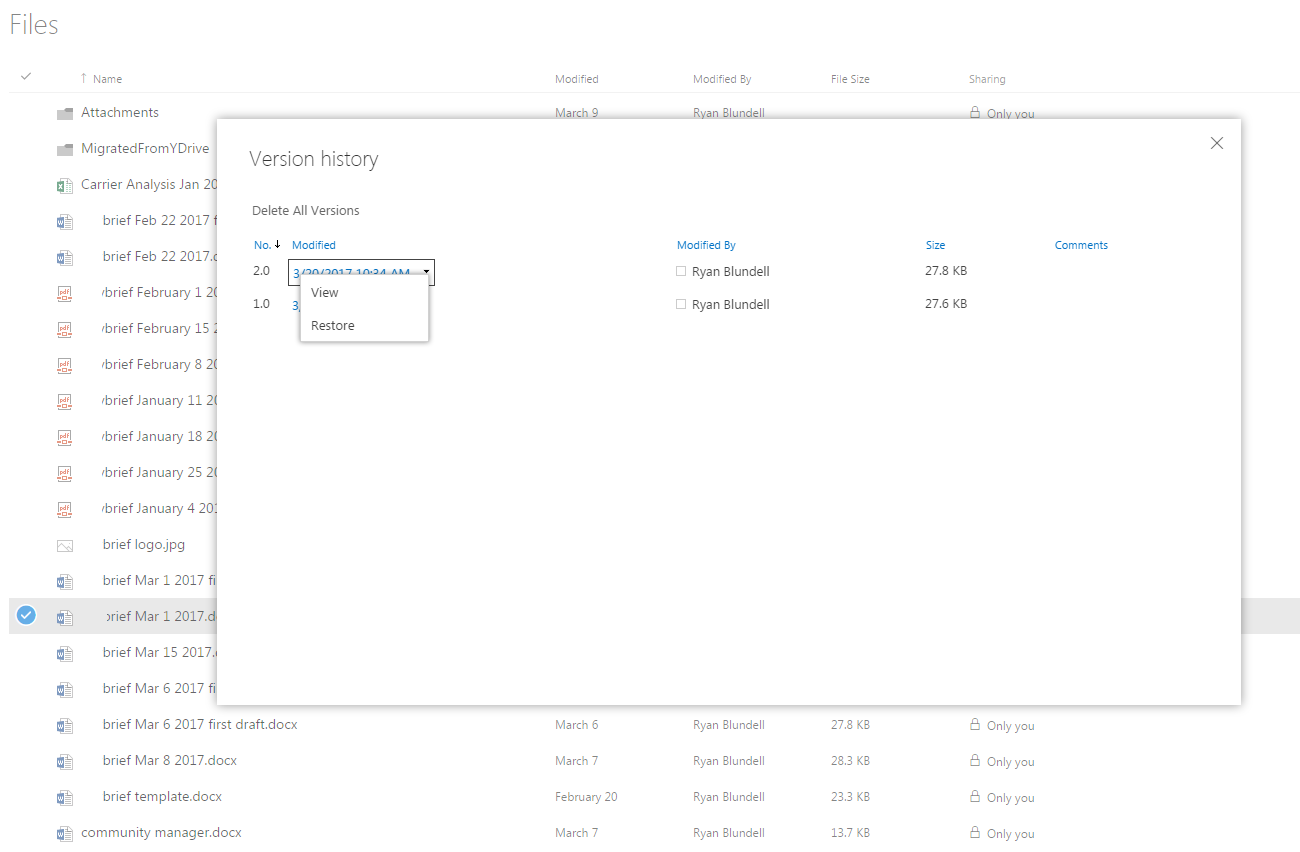
As you update documents and save them, the newest version is the only version you have access to. While you should always be up to date with your files, an important piece of information may have been in an earlier version, and it could get lost. What's worse is that a collaborative effort could end in disaster if a colleague overwrites a finished version with an unfinished draft. Thankfully, OneDrive protects every version of a file, allowing users to view and manage each one. This requires you to open up the web interface and then right-click the document to open up options, including the ability to edit or restore older versions.
Using OneDrive file versions
- From any OneDrive folder, right-click on the file in question and select Version History
- The file will open in another window. On the left side, you will see time and date details on the current version as well as details on older versions.
- Click on an older version to view it.
- To make it the most recent version, click on Restore.
- To save a copy of this version, click on Download.
Avoid Outlook clutter
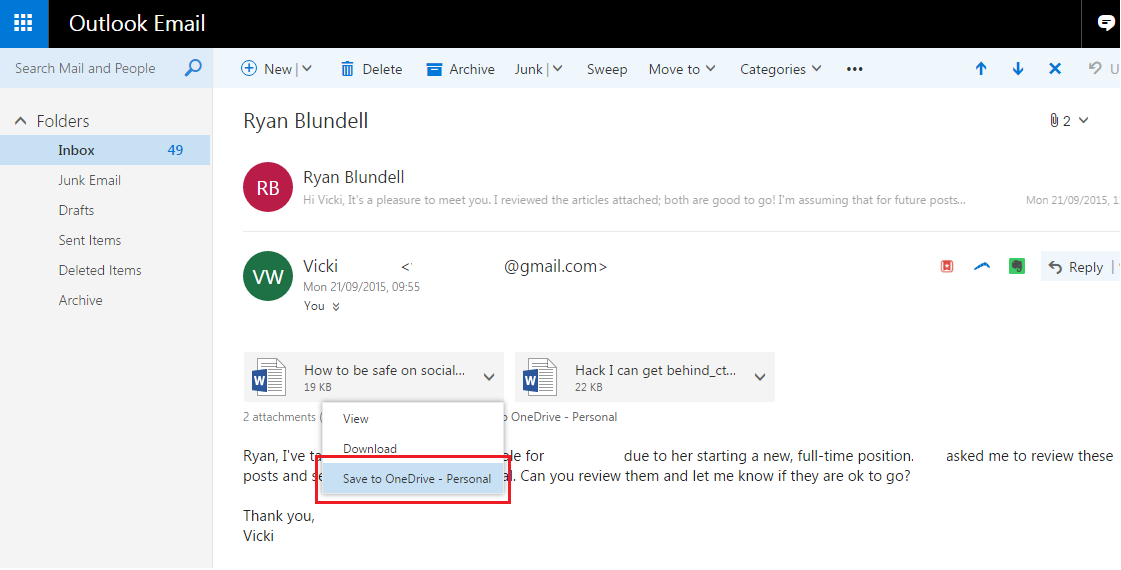
A bad habit many people have is keeping messages in their inbox simply to hang on to attachments. It's a practice that's more inefficient than they realize. They now hav4 to search Outlook by keywords or by Sender to find the files they want. Think of the time wasted as they try to answer a time-critical question. Why not take advantage of being able to save attachments from Outlook directly to OneDrive? To make it easy for those clinging onto their inboxes, the files are safely tucked away in an email-attachments folder within OneDrive.
Saving attachments from Outlook to OneDrive
- Open an email message with an attachment.
- Right-click on the attachment or click the drop-down icon to the right of the attachment.
- Select Save to OneDrive.
- The file will be saved in an email attachments folder in OneDrive.
If you haven't tried out OneDrive before, I suggest you do so and try out some of the tips mentioned above. If you're an avid OneDrive user, why not share your own tips in the comments below?
And check out our Office 101 help hub for more related articles:
- Microsoft Office 101: Help, how-tos and tutorials

