Synchronise full resolution Windows Phone photos with SkyDrive through Zune

Uploading photos from your Windows Phone to SkyDrive can be a pain, especially since full resolution photos are resized when sent to the cloud. This is presumably due to Microsoft taking measures to optimise transfer for those on tight data plans who may not be connected to a WiFi network. While perfectly understandable, it would make sense to have this option in the Windows Phone settings for the user to configure how they'd like their photos uploaded to their SkyDrive account.
For now there's a workaround of sorts. Unfortunately a Windows PC is required with Zune installed, sporting an active Internet connection, and of course the native SkyDrive client for Windows. Luckily, Microsoft has developed sturdy software enabling Windows users to access and synchronise their SkyDrive storage locally with a smart folder set on their machine. This is what we'll be using through Zune to automatically upload photos from the Windows Phone to the cloud.
Matt Stein got in touch with us and we were alerted to a simple feature of Zune, which would allow us to automatically save our photos from the device to a designated SkyDrive folder. Instead of allowing Zune to save imported photos to default library locations (User/Pictures) we were able to configure the software suite to use our local SkyDrive smart folder and select the destination. When the Windows Phone is plugged in and new photos are detected, Zune will automatically import them to the SkyDrive folder at full resolution, where Microsoft's cloud service would then take care of the rest.
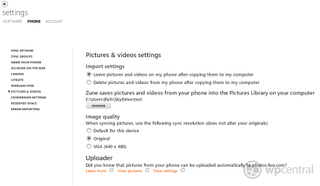
Step 1 - Launch Zune and head on over to the settings. Scroll down and select "Pictures & Videos" from the navigation list and we'll now have some options to configure. Before we continue, you can alter the 'image quality' to original should you so desire. We're here to change the location where Zune saves imported photos from connected devices. Hit "manage" and a pop-up window will appear.

Step 2 - You'll now be able to see the window below where we can change the location to our designated SkyDrive folder. Should you be seeing this window for the first time, you may have multiple default options already present. Be sure to choose between (or remove should they not be required) to achieve the desired result. By the end we'll want to have our pictures library location to be defaulted to our SkyDrive folder.

Now plugging in your Windows Phone will see Zune import photos from the device to your SkyDrive folder, which will then be synchronised with the cloud. Visiting the account on the web (or on another device) will show full quality photos captured and uploaded from your Windows Phone. All that's required is a quick sync every now and then (or whenever is required to extract media).
Let us know if you have attempted to configure Zune this way and whether you were able to achieve the same result. Be sure to check out other tips and tricks for SkyDrive on your Windows Phone.
Get the Windows Central Newsletter
All the latest news, reviews, and guides for Windows and Xbox diehards.
Thankls, @mattjstein, for the tip!

Rich Edmonds was formerly a Senior Editor of PC hardware at Windows Central, covering everything related to PC components and NAS. He's been involved in technology for more than a decade and knows a thing or two about the magic inside a PC chassis. You can follow him on Twitter at @RichEdmonds.