How to set different DNS settings on devices running Windows 11
Do you want to use a custom DNS address on Windows 11? Here are three ways to complete this task.
When you connect your device to a network and the internet, the Domain Name System (DNS) plays a critical role in making web browsing and downloading files possible. It translates the domain names you type into your browser, such as WindowsCentral.com, into a numeric IP address that computers need to communicate with each other.
By default, your Internet Service Provider (ISP) automatically assigns the DNS servers when you connect to the internet. While this setup works for most users, it often comes with downsides, as the ISP-provided DNS servers tend to be slower, less reliable, and lack privacy protections. However, it's possible to change this configuration to other services that offer faster performance, greater uptime, and enhanced privacy.
Defining DNS
In simple terms, DNS is the address book of the internet. It’s (usually) a free service that converts easy-to-remember domain names (like WindowCentral.com) into IP addresses (like 199.232.194.114), so browsers can load the correct websites. Without DNS, you would have to remember complex IP strings to access each website, something that would make the modern internet experience nearly impossible.
The reason is that computers require IP addresses to communicate with other devices. However, these IPs are not easy for us (humans) to remember, and DNS provides a means to translate friendly website names into the numeric addresses that computers understand when you type the domain name into the browser's address bar.
You probably never noticed this translation because the process happens almost in real time. However, depending on the service you use, this could make your internet experience slower and less reliable.
If you prefer a different service or want to switch to a more private and reliable resolver, Windows 11 allows you to change the DNS settings in at least three ways using the Settings app, Control Panel, and Command Prompt.
All the latest news, reviews, and guides for Windows and Xbox diehards.
Although it's best to configure the DNS settings on your router, you may sometimes need to change the network configuration on your computer manually. For instance, when you don't have access to the router, you must configure a server that requires static network configuration, or for many other reasons.
In this guide, I'll outline the steps to change the DNS settings on Windows 11.
These instructions has been updated to ensure accuracy and reflect changes to the process in the operating system.
How to change DNS from Settings on Windows 11
To change the DNS settings on Windows 11, use these steps:
- Open Settings.
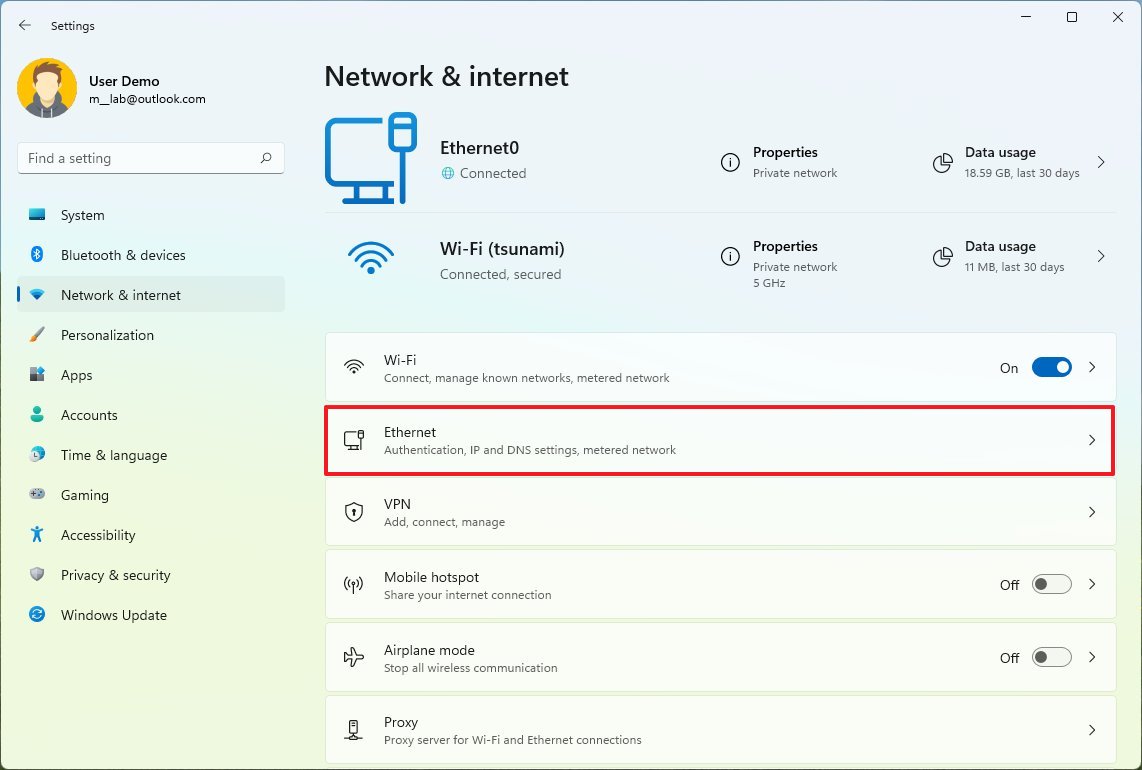
- Click on Network & internet.
- Click the Ethernet or Wi-Fi page on the right side.
- Quick note: If you select the "Wi-Fi" option, you must click the properties settings to access the networking configuration.
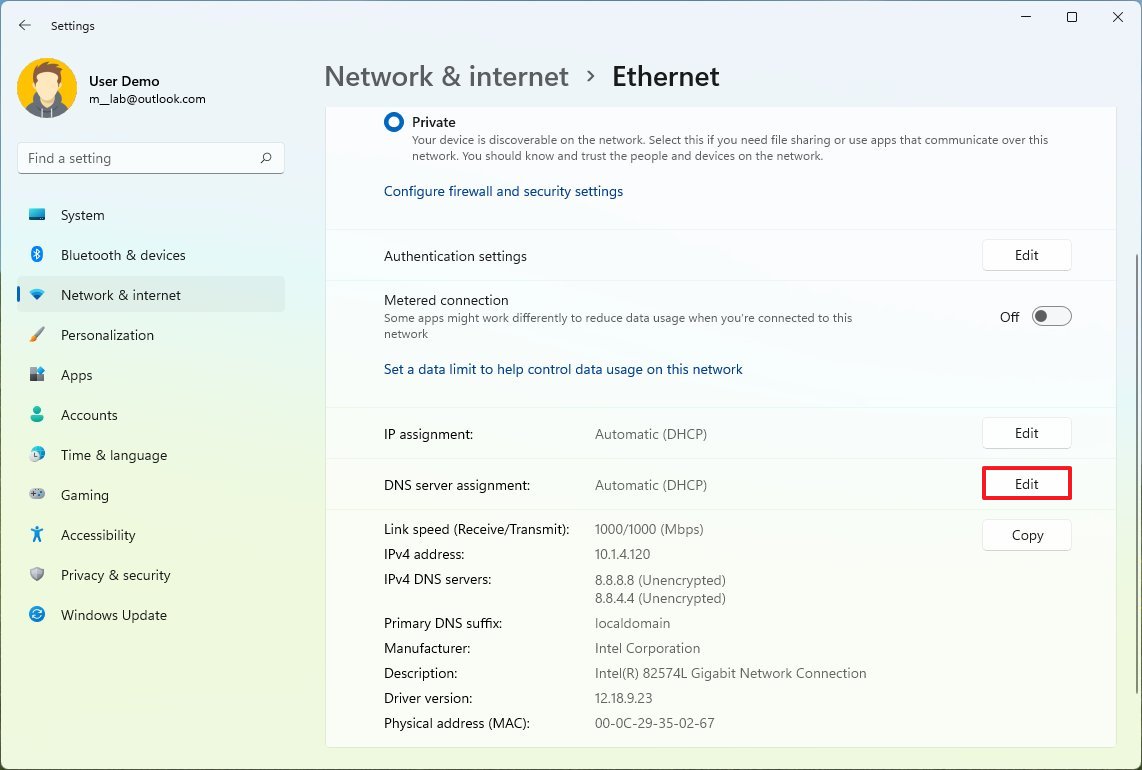
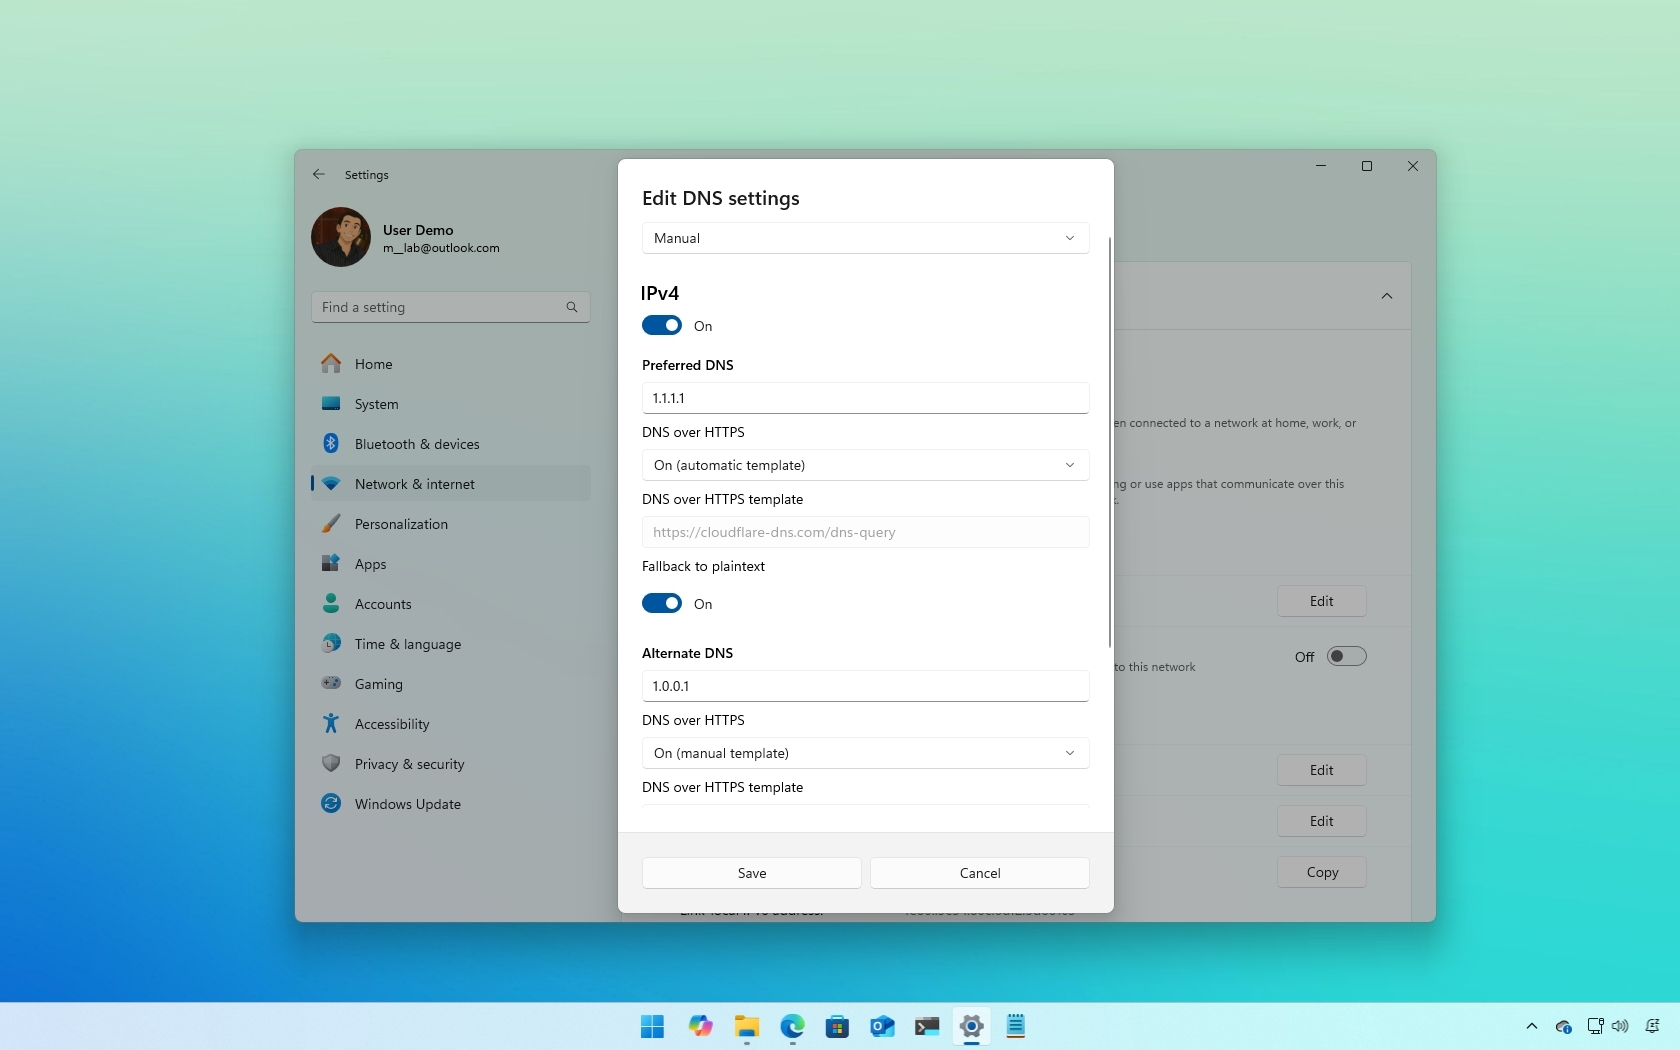
- Click the Edit button for the "DNS server assignment" setting.
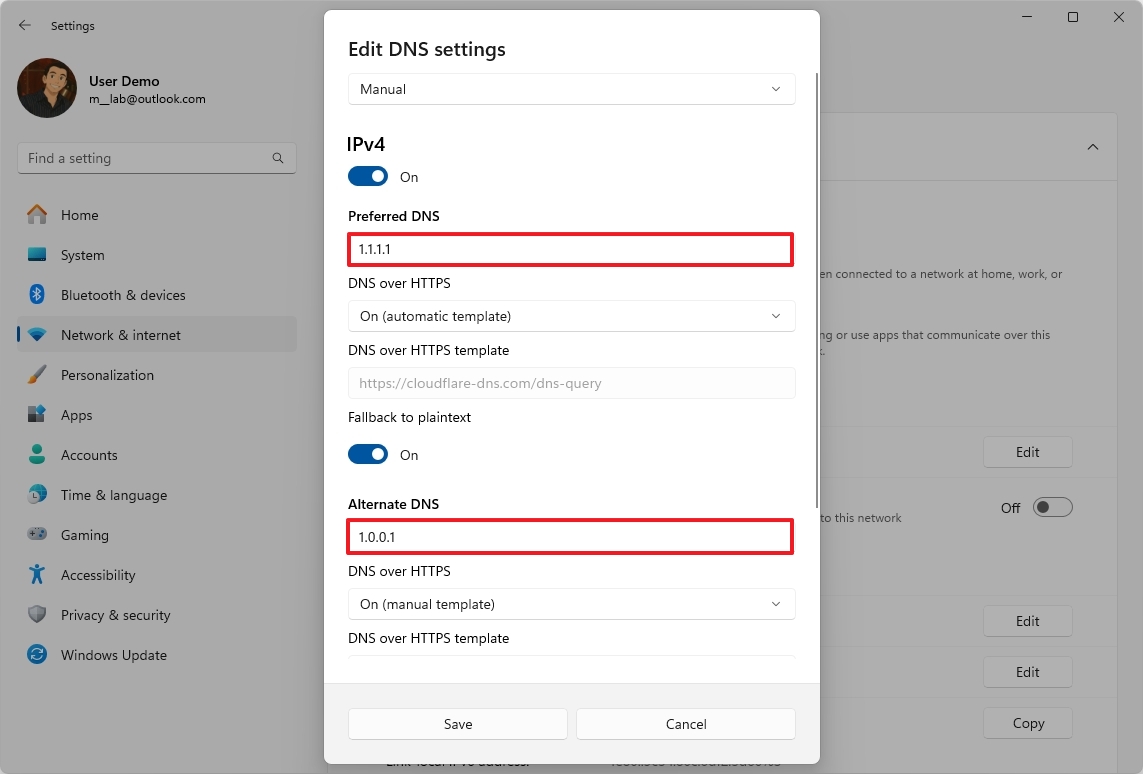
- Select the Manual option from the drop-down menu.
- Turn on the IPv4 toggle switch.
- Confirm the primary DNS address in the "Preferred DNS" setting:
- Cloudflare: 1.1.1.1
- Google Public DNS: 8.8.8.8
- OpenDNS: 208.67.222.222
- (Optional) Select the encryption option in the "DNS over HTTPS" setting. Options available include:
- On (automatic template) — The system will attempt to use DoH with the DNS servers you have configured automatically.
- On (automatic template) — The system will use the DoH template URL that you provided manually.
- Off — The system won't use DoH.
- Quick note: DNS over HTTPS (DoH) is a network protocol that encrypts DNS queries using the standard Hypertext Transfer Protocol Secure (HTTPS) protocol to protect DNS queries, resulting in better security and privacy browsing the web. You will only be able to enable this feature if you have specified a DNS address that supports encryption.
- (Optional) Turn on the "Fallback to plaintext" toggle switch to fall back to traditional DNS traffic if encryption isn't working, to maintain an internet connection.
- Confirm the secondary DNS address in the "Alternate DNS" setting. You can use one of the secondary addresses:
- Cloudflare: 1.0.0.1
- Google Public DNS: 8.8.4.4
- OpenDNS: 208.67.220.220
- (Optional) Select the encryption option in the "Alternative DNS encryption" setting.
- Click the Save button.
Once you complete the steps, the new settings should apply immediately. However, you may need to restart the computer for new DNS servers to start working.
How to change DNS from Control Panel on Windows 11
To specify different DNS addresses from Control Panel, use these steps:
- Open Control Panel.
- Click on Network and Internet.
- Click on Network and Sharing Center.
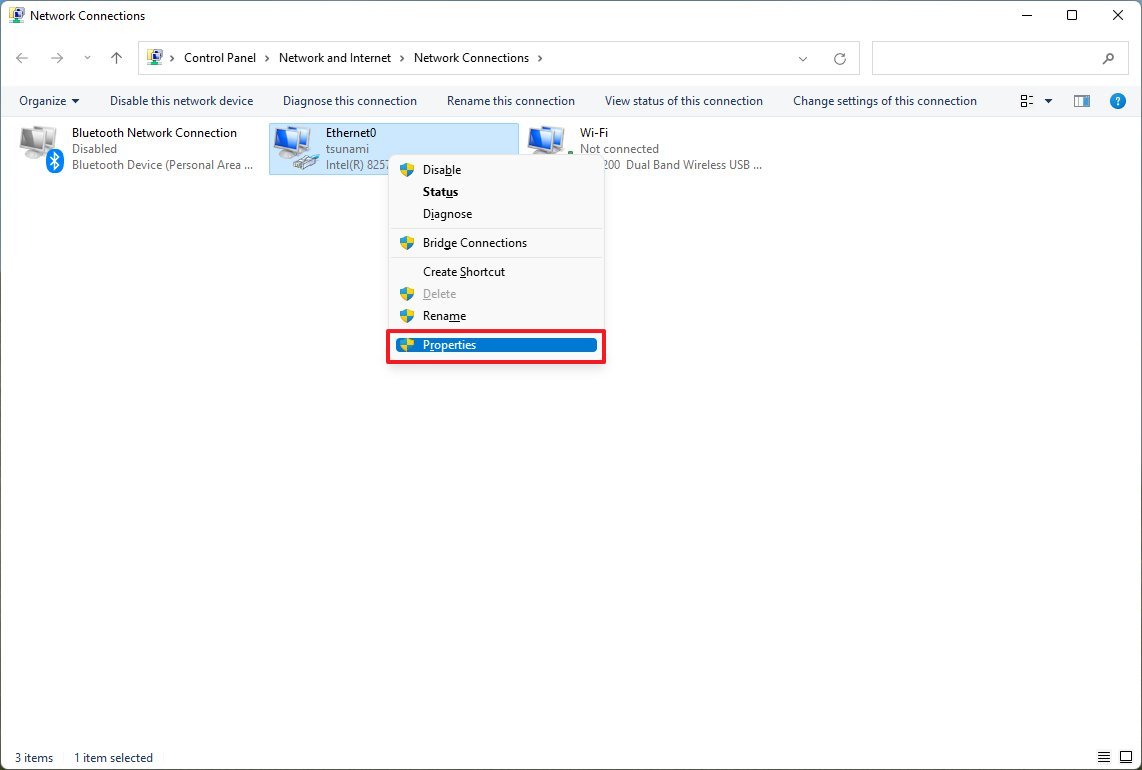
- Click the "Change adapter settings" option in the left pane.
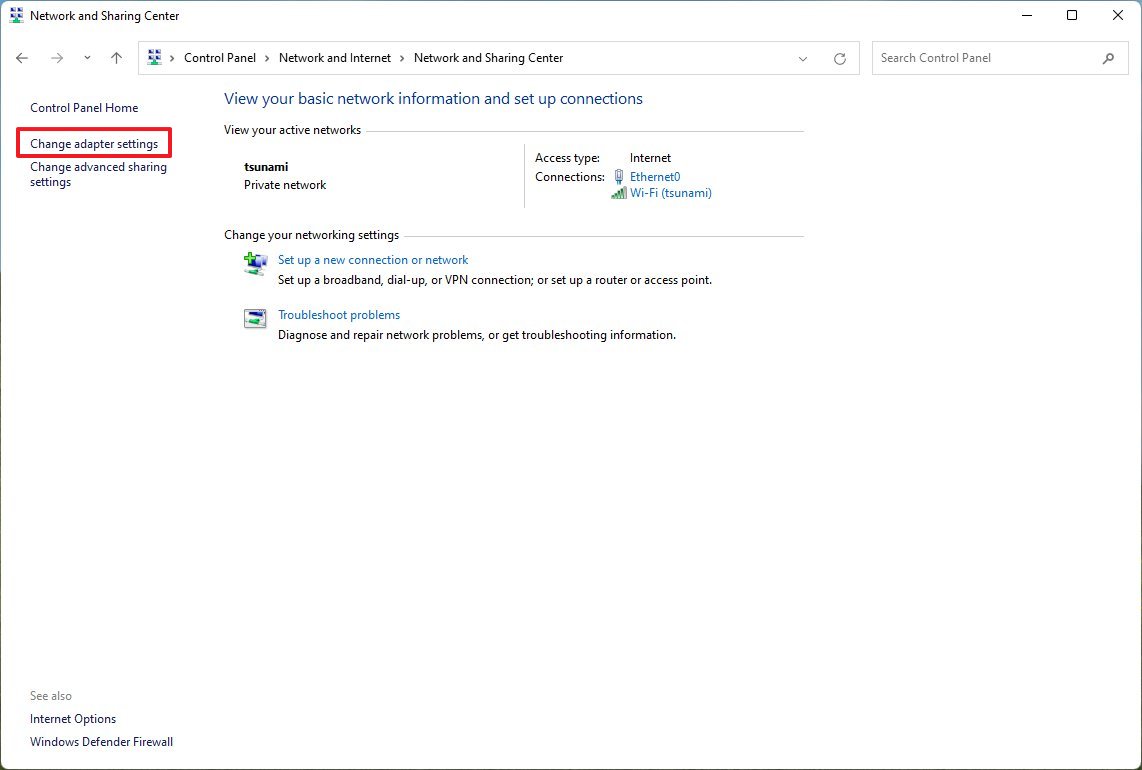
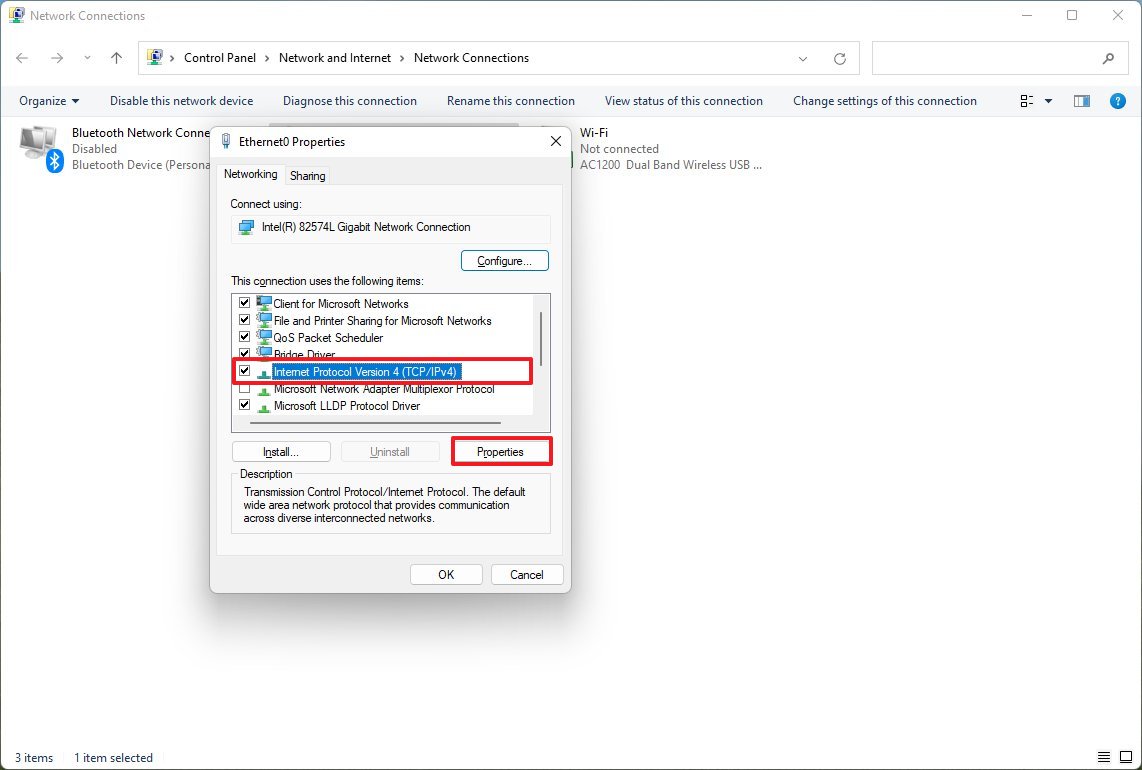
- Right-click the active network adapter and select the Properties option.
- Select and check the "Internet Protocol Version 4 (TCP/IPv4)" option.
- Click the Properties button.
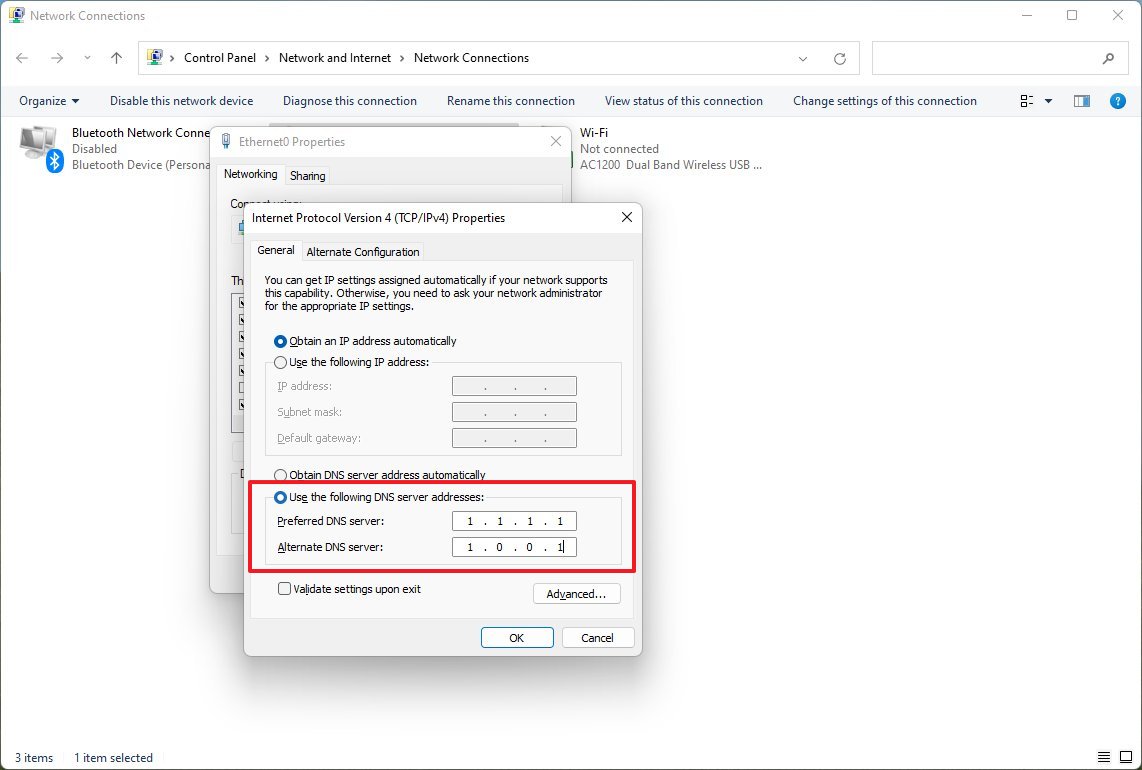
- Select the "Use the following DNS server addresses" option.
- Quick note: When you manually specify the DNS settings, the device will continue receiving the rest of the TCP/IP configuration from the DHCP server (router).
- Confirm the primary DNS address in the "Preferred DNS server" setting:
- Cloudflare: 1.1.1.1
- Google Public DNS: 8.8.8.8
- OpenDNS: 208.67.222.222
- Confirm the secondary DNS address in the "Alternate DNS server" setting. You can use one of the addresses:
- Cloudflare: 1.0.0.1
- Google Public DNS: 8.8.4.4
- OpenDNS: 208.67.220.220
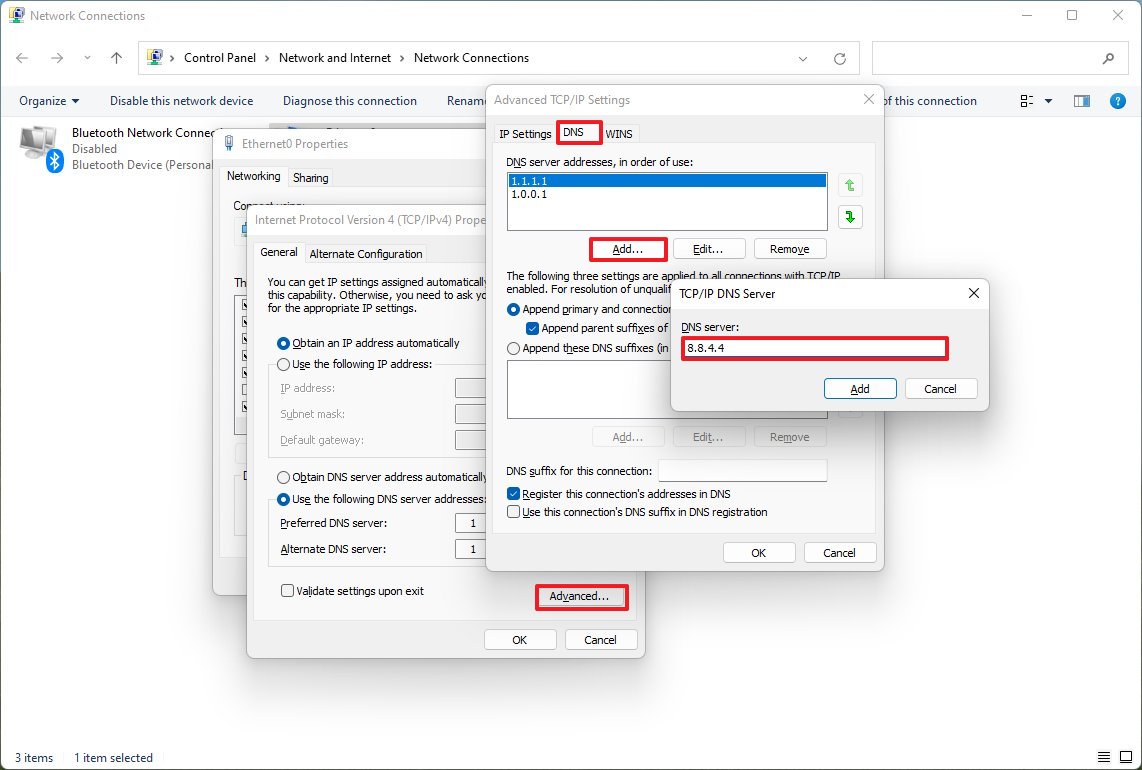
- (Optional) Click the Advanced button.
- Click the DNS tab.
- Click the Add button.
- Specify additional alternate DNS server addresses.
- Click the Add button.
- Quick tip: In addition to adding more addresses, you can edit and remove resolvers and have an option on the side to change their priority.
- Click the OK button.
- Click the Close button.
After you complete the steps, the new DNS servers should start working on your computer. Since Microsoft continues to fade away Control Panel slowly, you won't find the option to enable DNS over HTTPS from this experience.
How to change DNS from Command Prompt on Windows 11
To change the Windows 11 DNS addresses with commands, use these steps:
- Open Start.
- Search for Command Prompt, right-click the top result, and select the Run as administrator option.
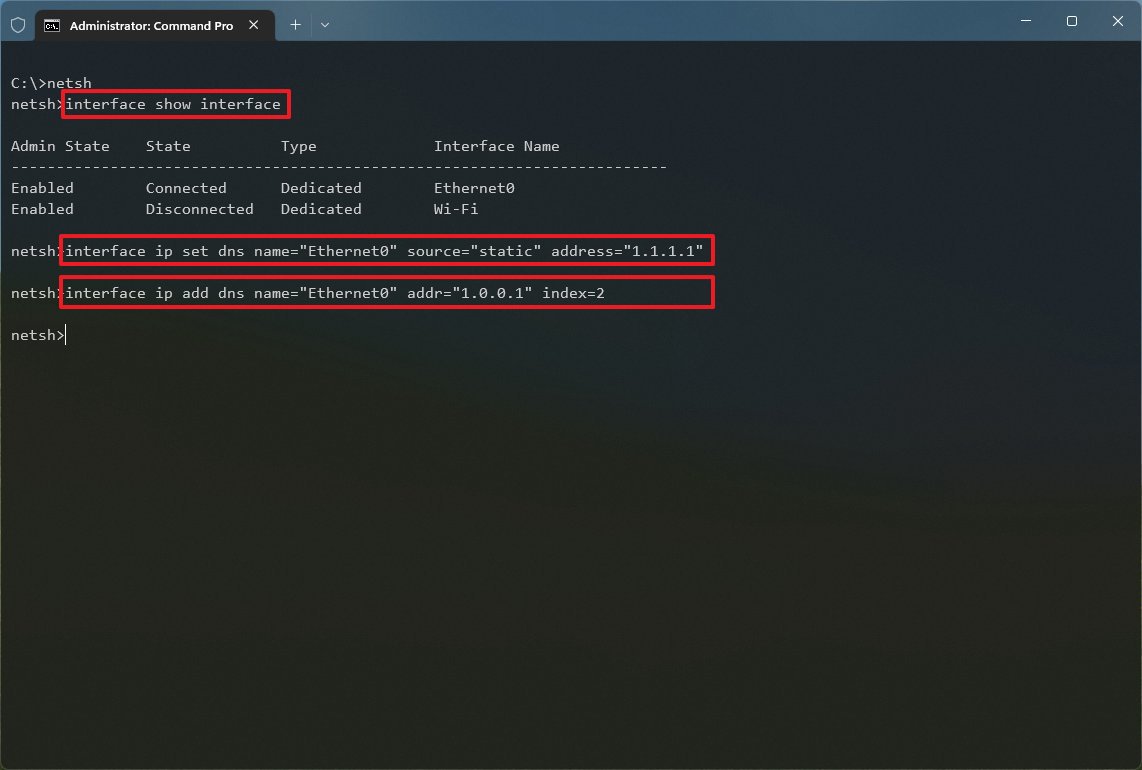
- Type the following command to run the netsh tool and press Enter: netsh
- Type the following command to identify the names of the network adapters and press Enter: interface show interface
- Type the following command to set the primary DNS address and press Enter: interface ip set dns name="ADAPTER-NAME" source="static" address="X.X.X.X"
In the command, change "ADAPTER-NAME" with the name of the network adapter you identified in step 4, and change "X.X.X.X" with the IP address you want to use. To use Cloudflare, Google Public DNS, or Cisco OpenDNS, you can use these settings:
- Cloudflare: 1.1.1.1 and 1.0.0.1
- Google Public DNS: 8.8.8.8 and 8.8.4.4
- OpenDNS: 208.67.222.222 and 208.67.220.220
This example sets the primary DNS address to 1.1.1.1: interface ip set dns name="Ethernet0" source="static" address="1.1.1.1"
- Type the following command to add an alternative DNS address and press Enter: interface ip add dns name="ADAPTER-NAME" addr="X.X.X.X" index=2
In the command, change "ADAPTER-NAME" with the name of your network adapter you queried on step 4, and change "X.X.X.X" with the secondary address. This example sets the secondary DNS address to 1.0.0.1: interface ip add dns name="Ethernet0" addr="1.0.0.1" index=2
- Quick tip: Repeat the above steps to set additional addresses (if necessary). However, in the command, you must increase the number of the index option by 1. For instance, interface ip add dns name="Ethernet1" addr="8.8.8.8" index=3
Once you complete the steps, the computer will start using the new addresses to perform DNS queries.
More resources
For more helpful articles, coverage, and answers to common questions about Windows 10 and Windows 11, visit the following resources:

Mauro Huculak has been a Windows How-To Expert contributor for WindowsCentral.com for nearly a decade and has over 22 years of combined experience in IT and technical writing. He holds various professional certifications from Microsoft, Cisco, VMware, and CompTIA and has been recognized as a Microsoft MVP for many years.
You must confirm your public display name before commenting
Please logout and then login again, you will then be prompted to enter your display name.
