How to fix your PC's installation using five effective methods on Windows 11
Check out these five effective ways to repair most Windows 11 problems without spending a lot of time troubleshooting.
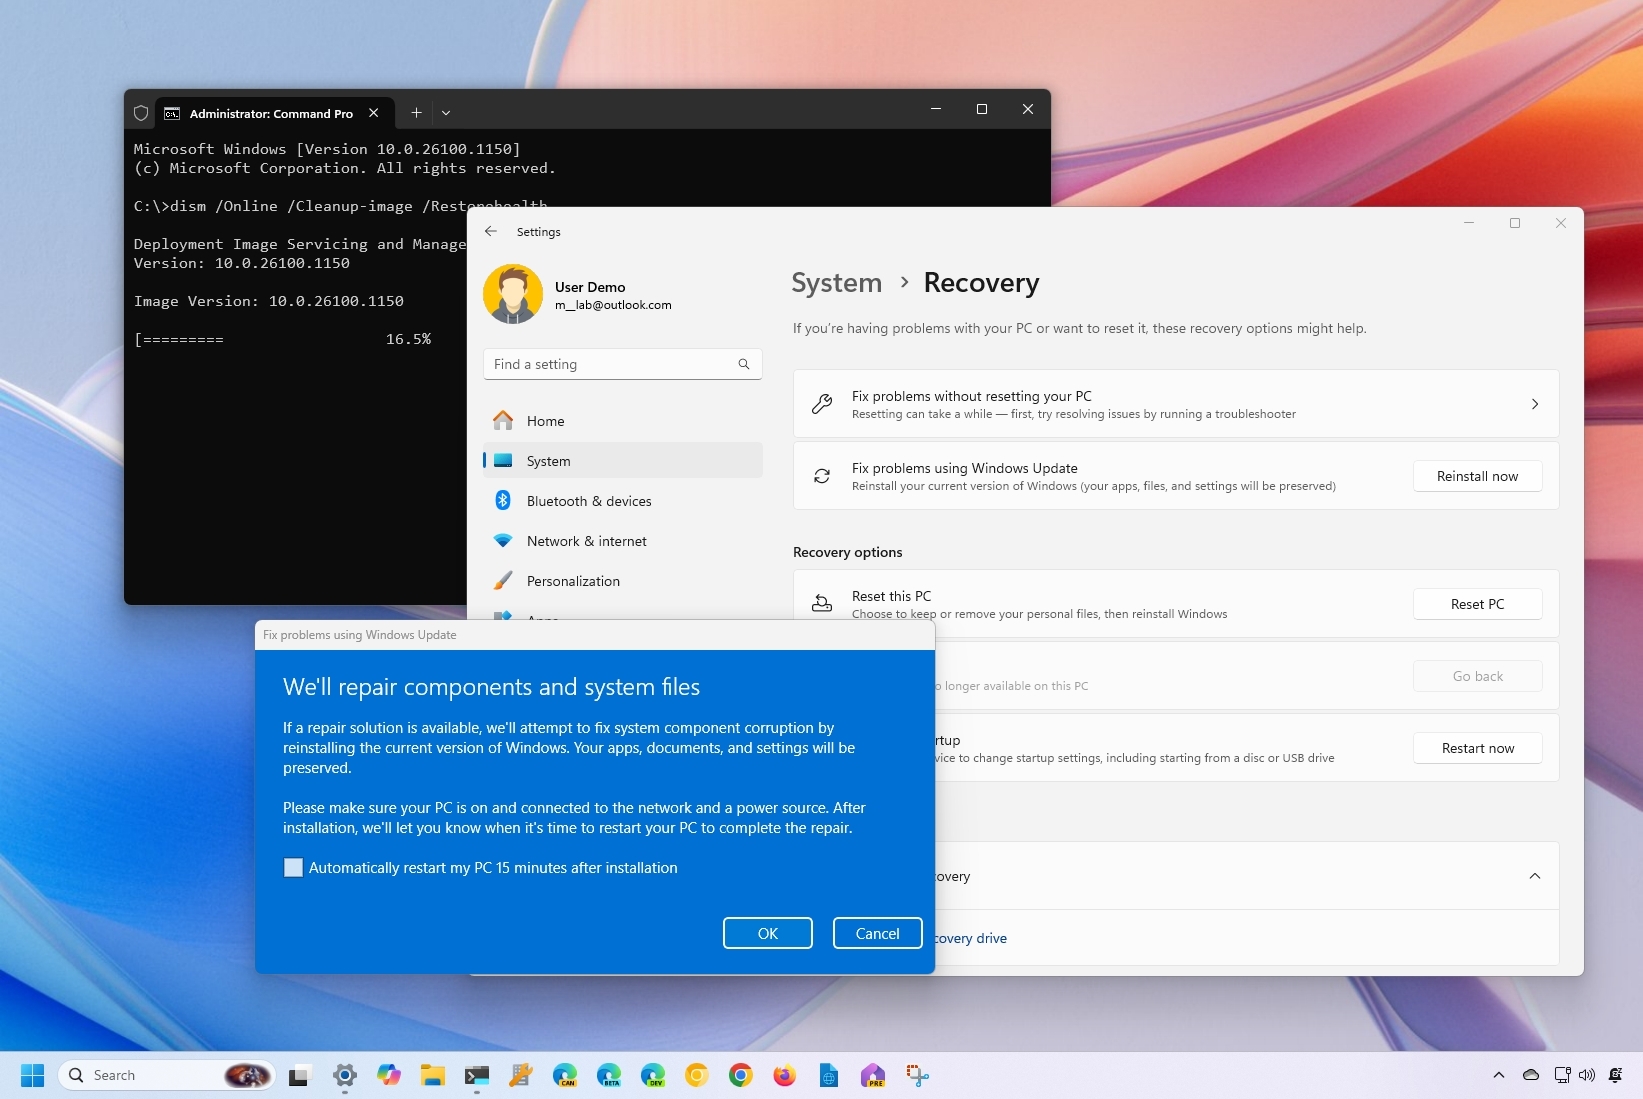
On Windows 11, if you're experiencing unwanted problems with the current setup, you have multiple ways to restore the system's health, and in this guide, I will show you five ways to complete this task.
Although you can rely on the operating system for virtually any task, sometimes you may encounter problems with performance, startup, battery life, software and hardware compatibility issues, and more due to various reasons ranging from file corruption and malware to problematic updates from Microsoft and other companies.
You can always perform different troubleshooting steps to fix the problems, but if there's a problem with the installation, finding a solution can take a long time. However, Windows 11 provides different tools that make it (relatively) easy to resolve most issues.
For instance, you can use the Deployment Image Servicing and Management (DISM) and the System File Checker (SFC) tools to repair missing or corrupted system files. You also have multiple mechanisms to uninstall buggy updates and roll back to a previous good working state. Furthermore, from the Windows Recovery Environment (WinRE), it's possible to fix problems with the current installation, and you can always reset the system more than once to start from scratch without losing your files.
In this how-to guide, I will explain multiple ways to resolve virtually any problem with the installation of Windows 11.
How to repair installation with DISM tool
On Windows 11, "Deployment Image Servicing and Management" (DISM) is an advanced command line tool that you can use to repair the local image of Windows and then use the repaired image with the System File Checker (SFC) tool to fix corrupted or missing system files to resolve issues with the current setup.
To use DISM and SFC to repair an installation of Windows 11, use these steps:
All the latest news, reviews, and guides for Windows and Xbox diehards.
- Open Start.
- Search for Windows Terminal, right-click the top result, and choose the Run as administrator option.
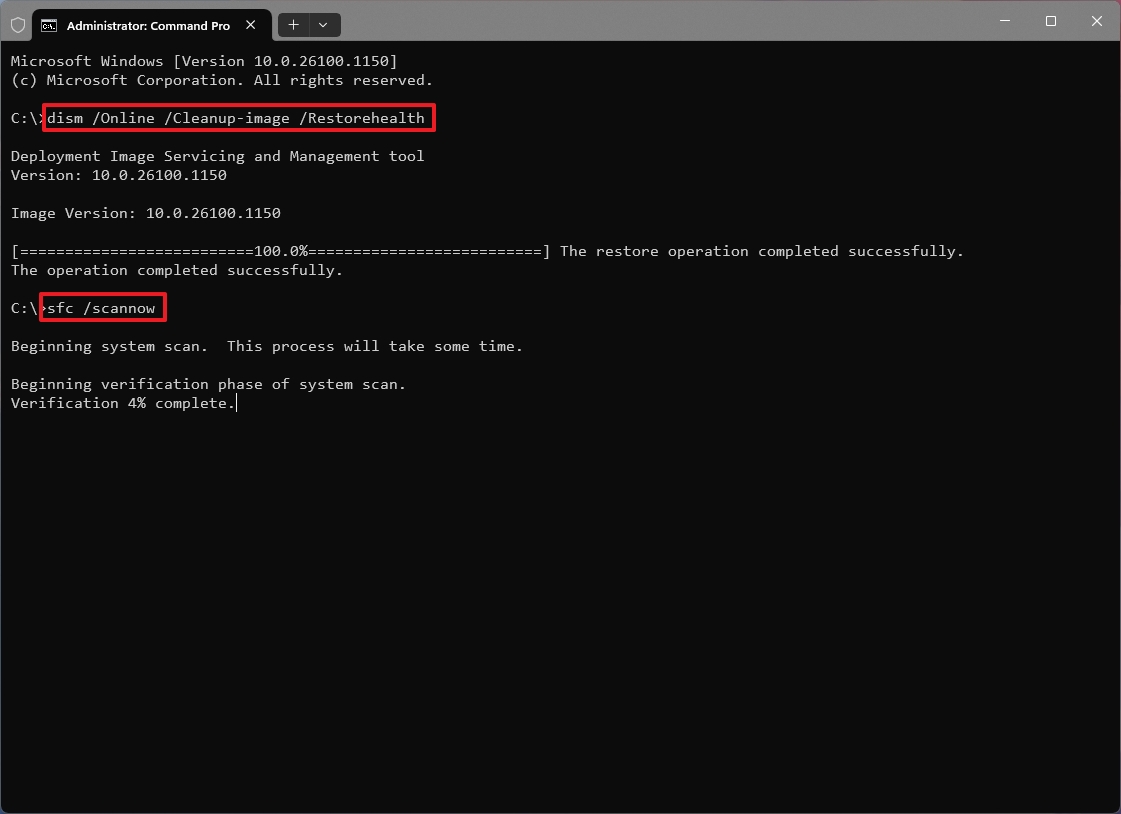
- Type the following command to check and repair the local images of Windows 11 and press Enter: dism /Online /Cleanup-image /Restorehealth
- Type the following command to fix the Windows setup and press Enter: SFC /scannow
After you complete the steps, the System File Checker will repair the Windows 11 installation. You can learn more about this process with these instructions.
How to repair installation with Windows Update
On Windows 11, updates can help to improve various aspects of the system, but they can also cause unwanted problems. As a result, if you recently applied an update and the computer is not working correctly, you may have to uninstall it to mitigate the problem. On the other hand, if the operating system has a known bug or compatibility issue, you will have to patch your computer to resolve the problem.
If it's unclear what the source of the issue is and your device isn't working correctly, you may need to reinstall Windows 11 to fix the problem and improve system performance and battery life.
Install updates to fix issues
If the device isn't working correctly because of a bug or problem that can be fixed through a newer update installation, use these steps:
- Open Settings.
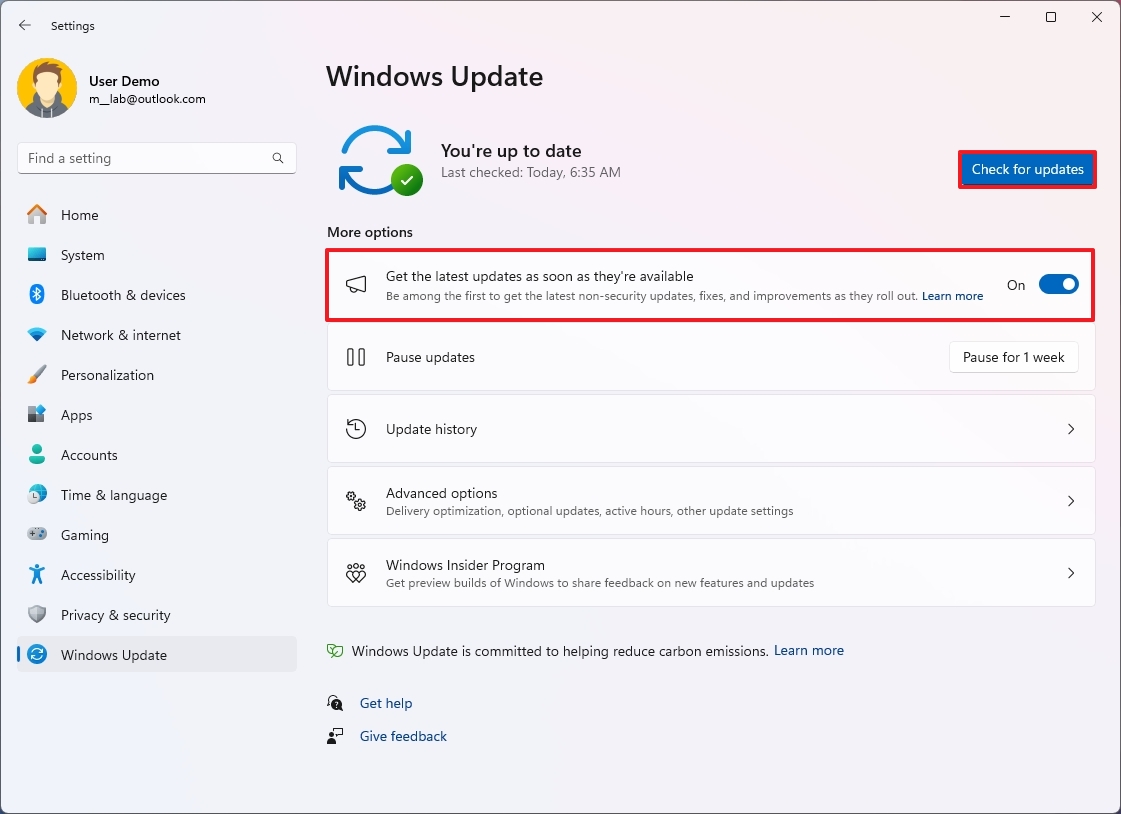
- Click on Windows Update.
- (Optional) Turn on the "Get the latest updates as soon as they're available" toggle switch.
- Quick note: You can enable this feature if Microsoft has a fix for an issue and you need the update quickly without waiting until the next monthly update release.
- Click the Check for updates button.
- Click the Install button (if applicable).
- Click the Restart button.
Once you complete the steps, confirm if the problem has been resolved.
Uninstall updates to fix issues
If the problem is caused by a recently installed update, use these steps:
- Open Settings.
- Click on Windows Update.
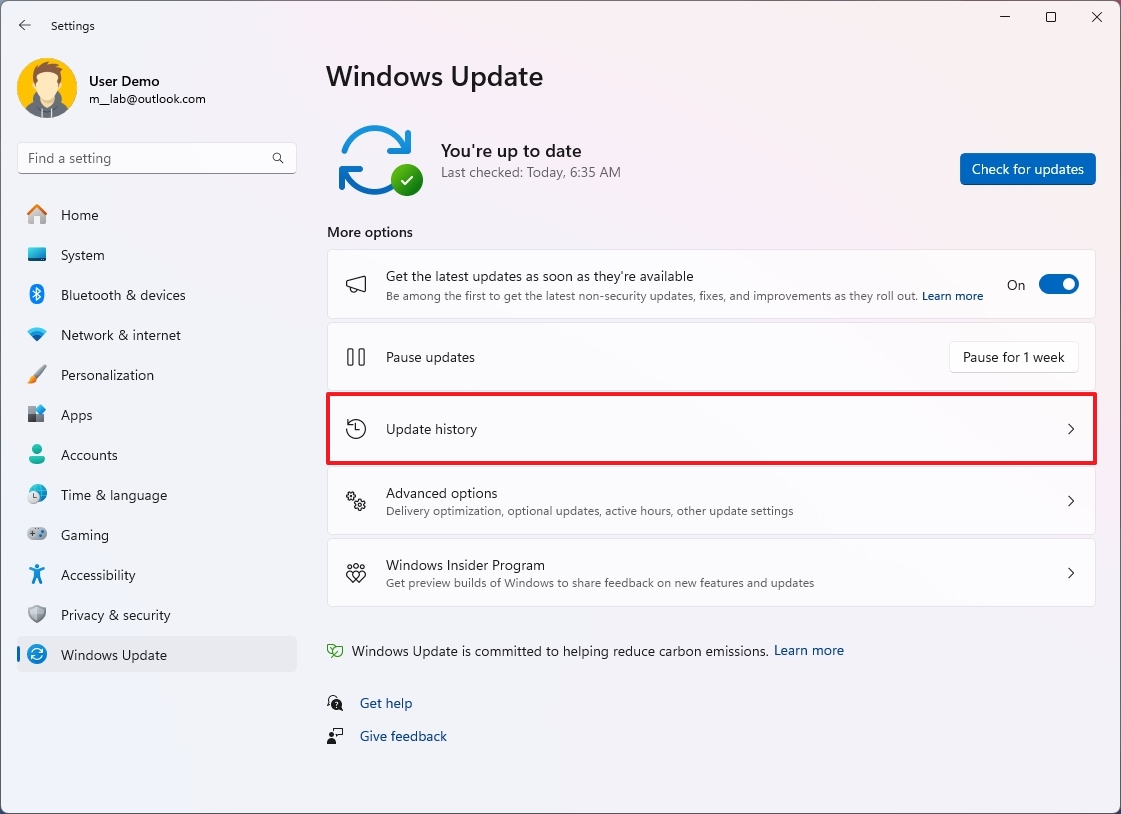
- Click the Update history page on the right side.
- Click the Uninstall updates setting under the "Related settings" section.
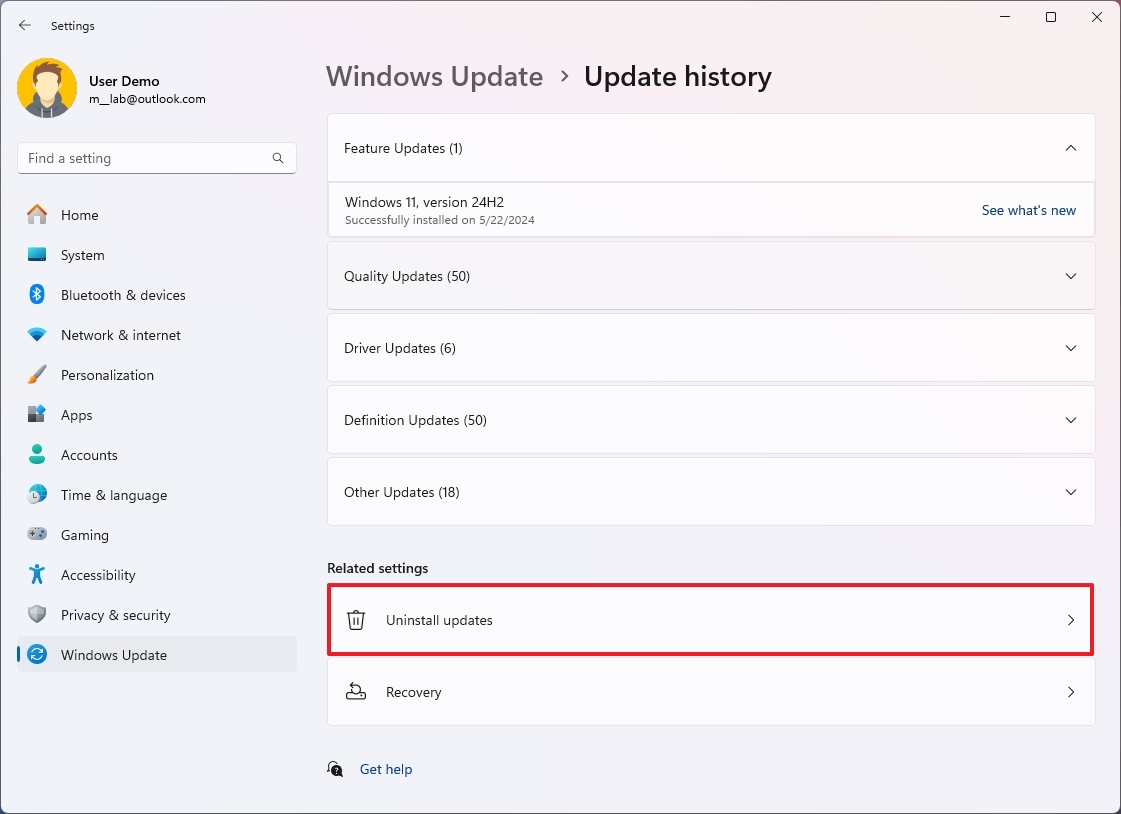
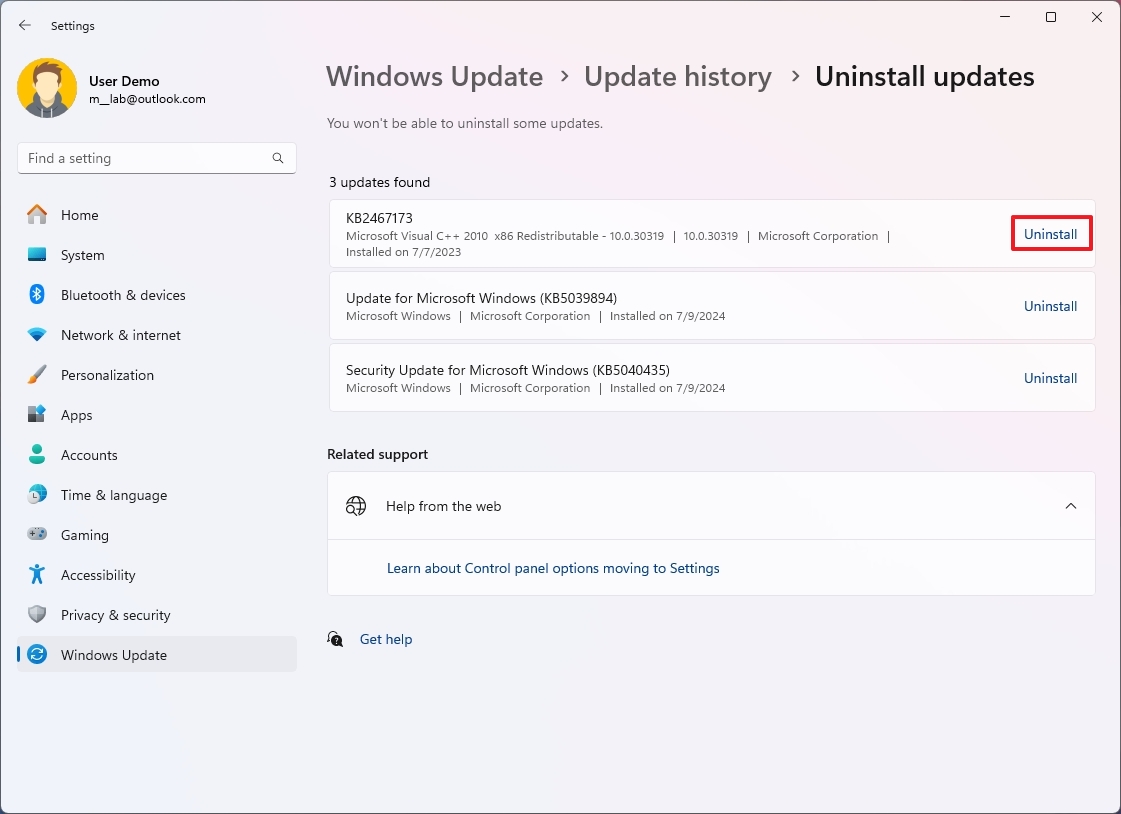
- Click the Uninstall button for the update causing problems.
- Quick tip: Usually, you only want to remove the most recent update, restart the computer, and confirm if the issue has been fixed.
After you complete the steps, the update will be removed from the computer, and the system will be rolled back to the known good working state.
Reinstall Windows 11 to fix issues
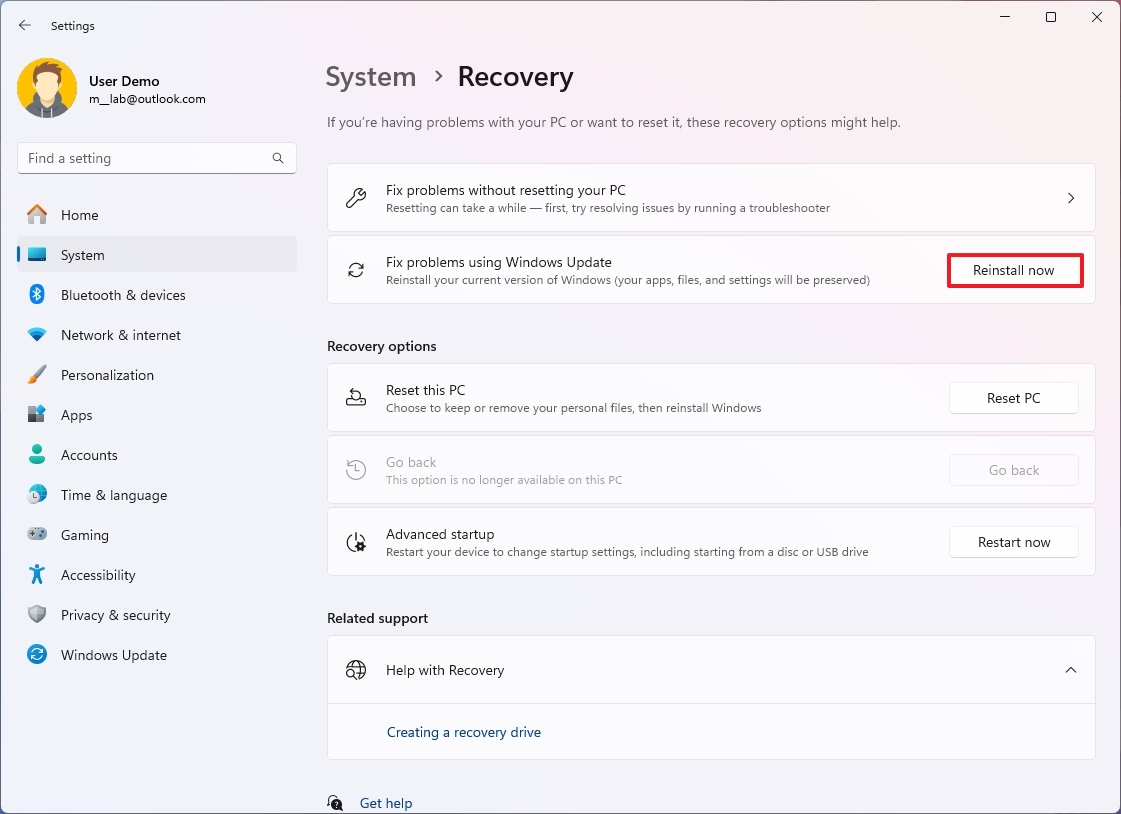
Windows 11 includes an option to reinstall the current version of the operating system to fix common problems, such as boot, performance, and battery issues, without losing your files, settings, or apps.
To reinstall Windows 11 without upgrading the current version, use these steps:
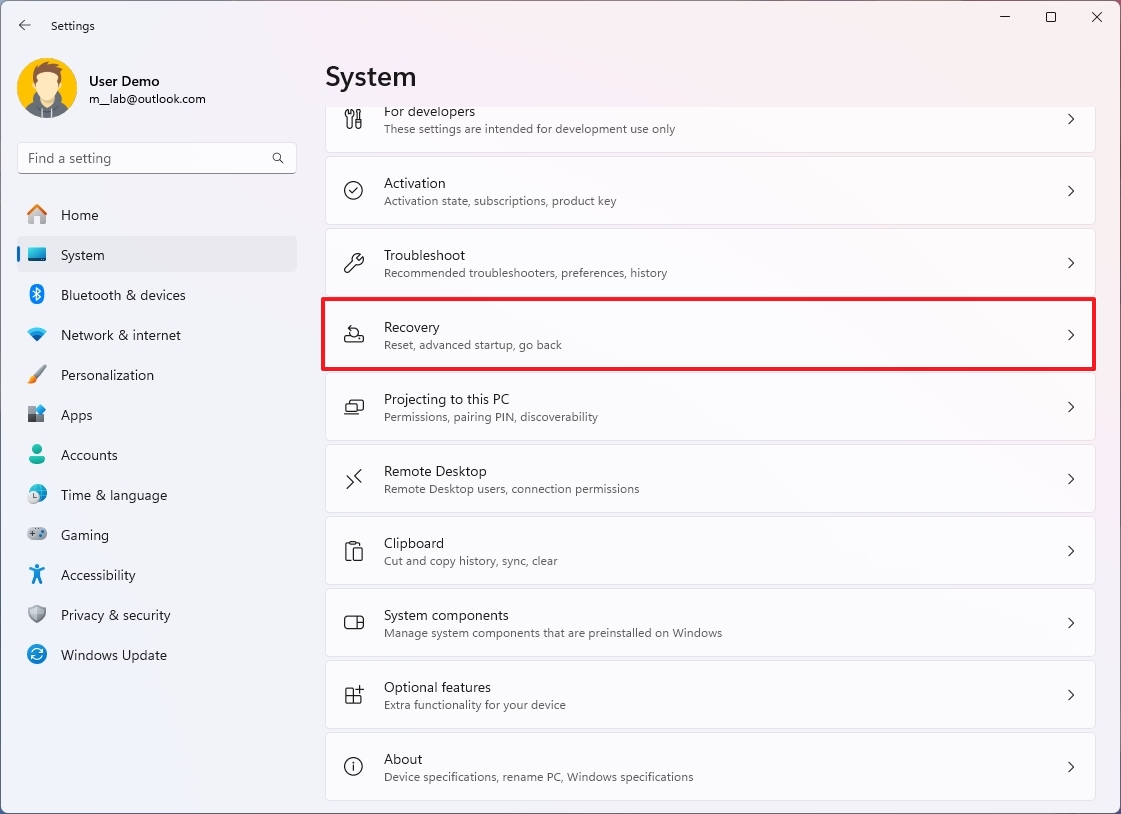
- Open Settings.
- Click on System.
- Click the Recovery page on the right side.
- Click the Reinstall now button from the "Fix problems using Windows Update" option.
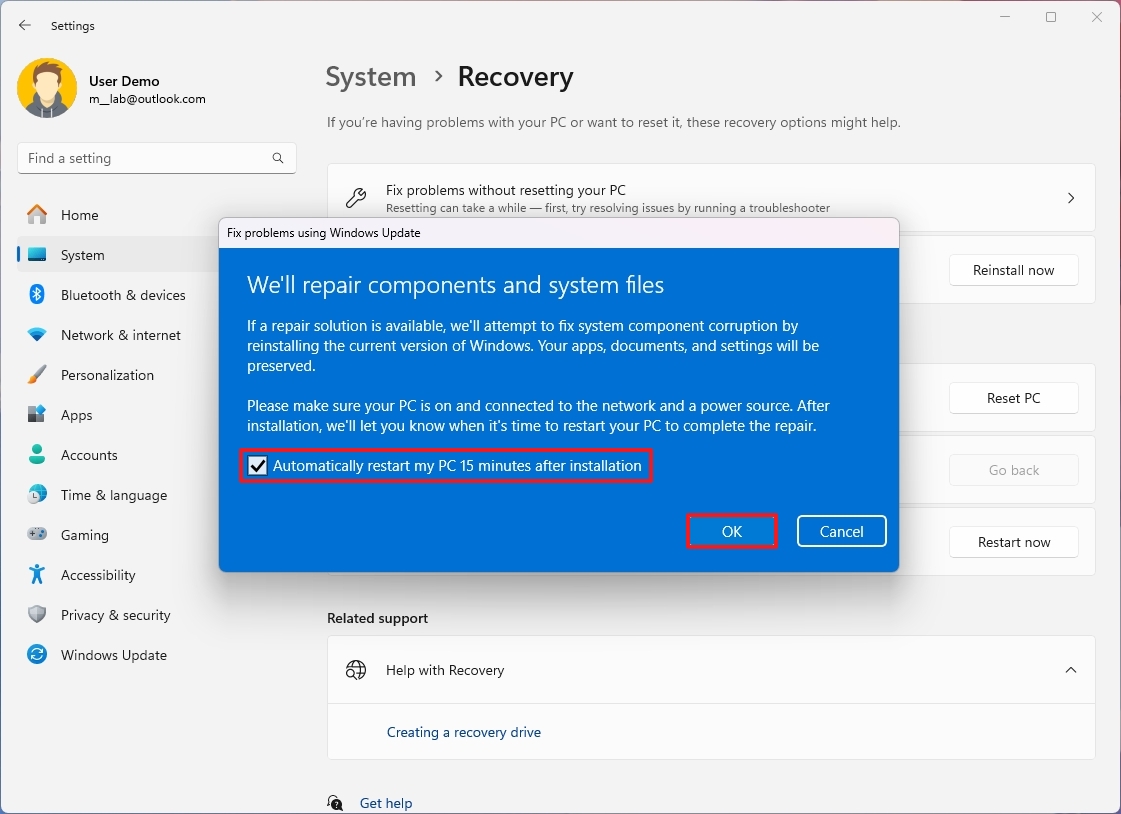
- Check the "Automatically restart my PC 15 minutes after installation" option.
- Click the OK button.
Once you complete the steps, the operating system will reinstall to refresh the system and fix problems, but your files, settings, and apps will be kept.
How to repair installation with Advanced Startup
If the problem doesn't allow the computer to boot correctly, you can use the Windows Recovery Environment (WinRE), also referred to as "Advanced Startup," to access the recovery tools.
Fix startup issues
To resolve issues with the startup process, use these steps:
- Start the computer.
- Press and hold the power button as soon as the Windows logo appears to shut down the system.
- Continue with steps 1 and 2 two more times, and the computer will boot into the Advanced Startup settings during the second or third restart.
- Click the Advanced options button.
- Click on Troubleshoot.
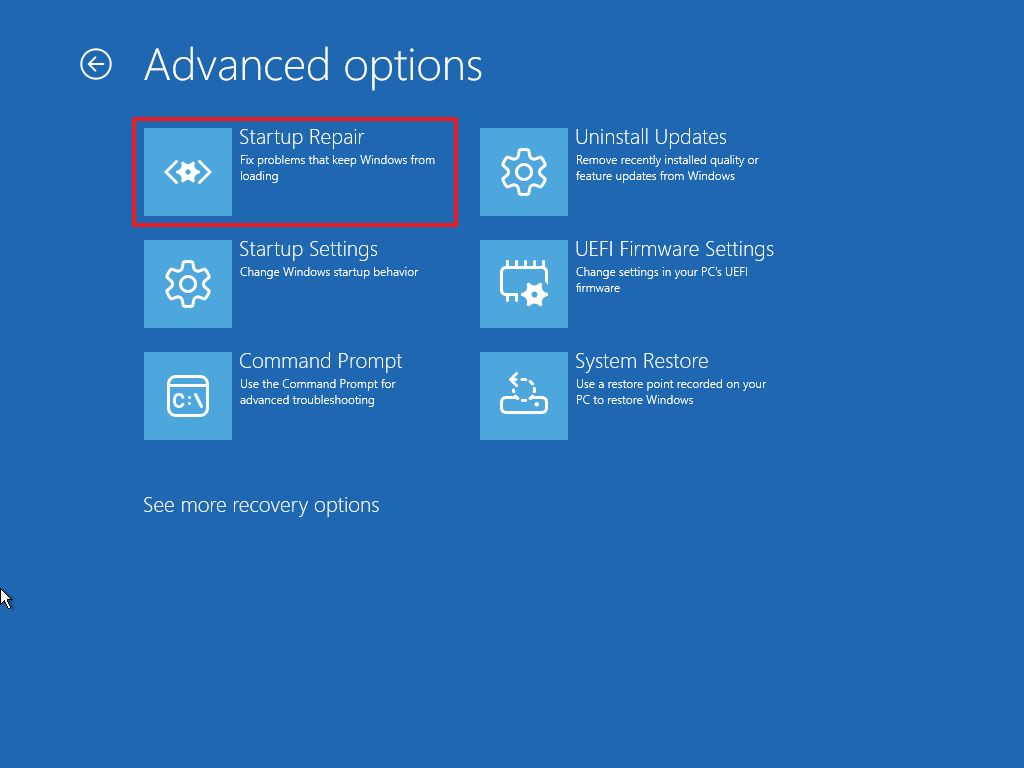
- Click on Advanced.
- Click the Startup Repair.
- Click the Shut down button.
After you complete the steps, the computer should start working normally.
Fix update issues
If the startup problem appeared after installing an update, you can remove the update with these steps:
- Start the computer.
- Press and hold the power button as soon as the Windows logo appears to shut down the system.
- Continue with steps 1 and 2 two more times, and the computer will boot into the Advanced Startup settings during the second or third restart.
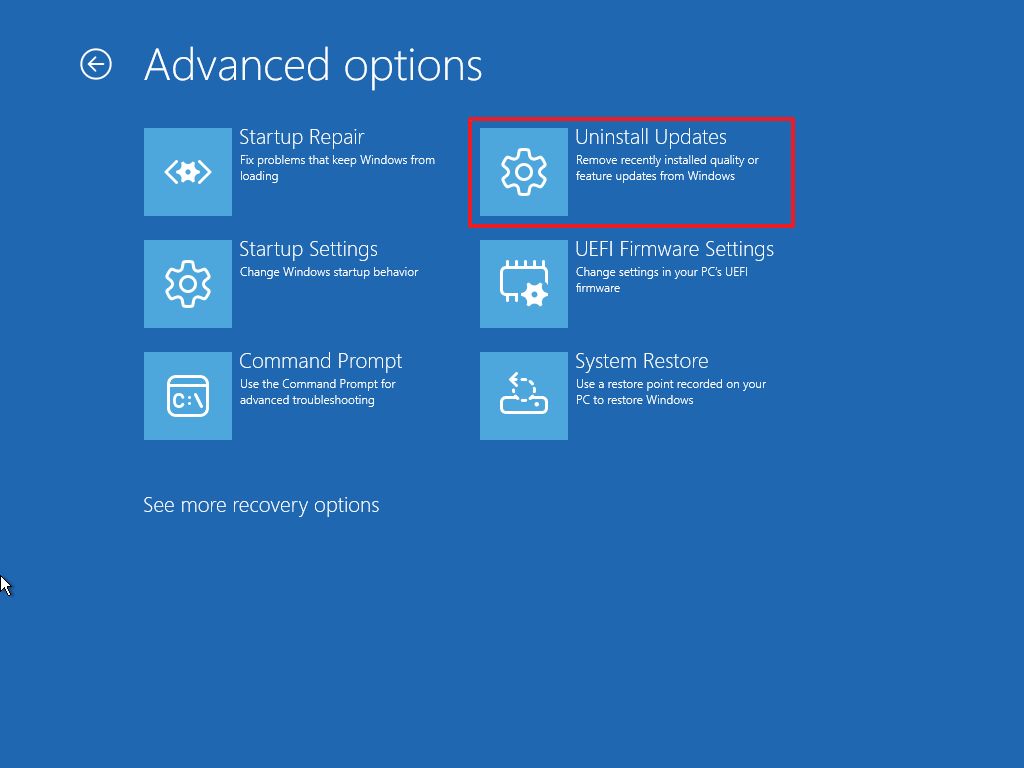
- Click the Advanced options button.
- Click on Troubleshoot.
- Click on Advanced options.
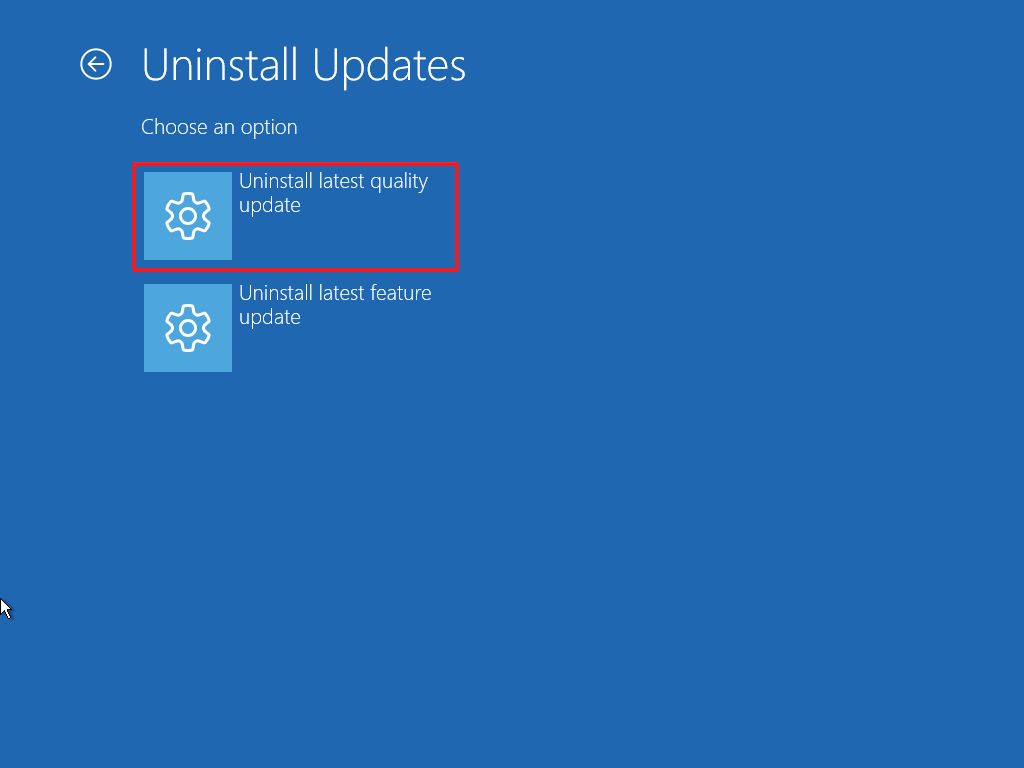
- Click the Uninstall Updates setting.
- Click the "Uninstall latest quality update" option.
- Click the "Uninstall quality update" button.
Once you complete the steps, the system will remove the problematic update and roll the computer back to its last known good state.
How to repair installation with System Restore
The System Restore option will only work if the feature has been previously enabled and you manually created a restore point or the system triggers a restore point automatically during app installation or system updates. You can use these instructions to enable and configure System Restore on your computer.
Restore from desktop
To fix problems with a system restore point with access to the desktop, use these steps:
- Open Start.
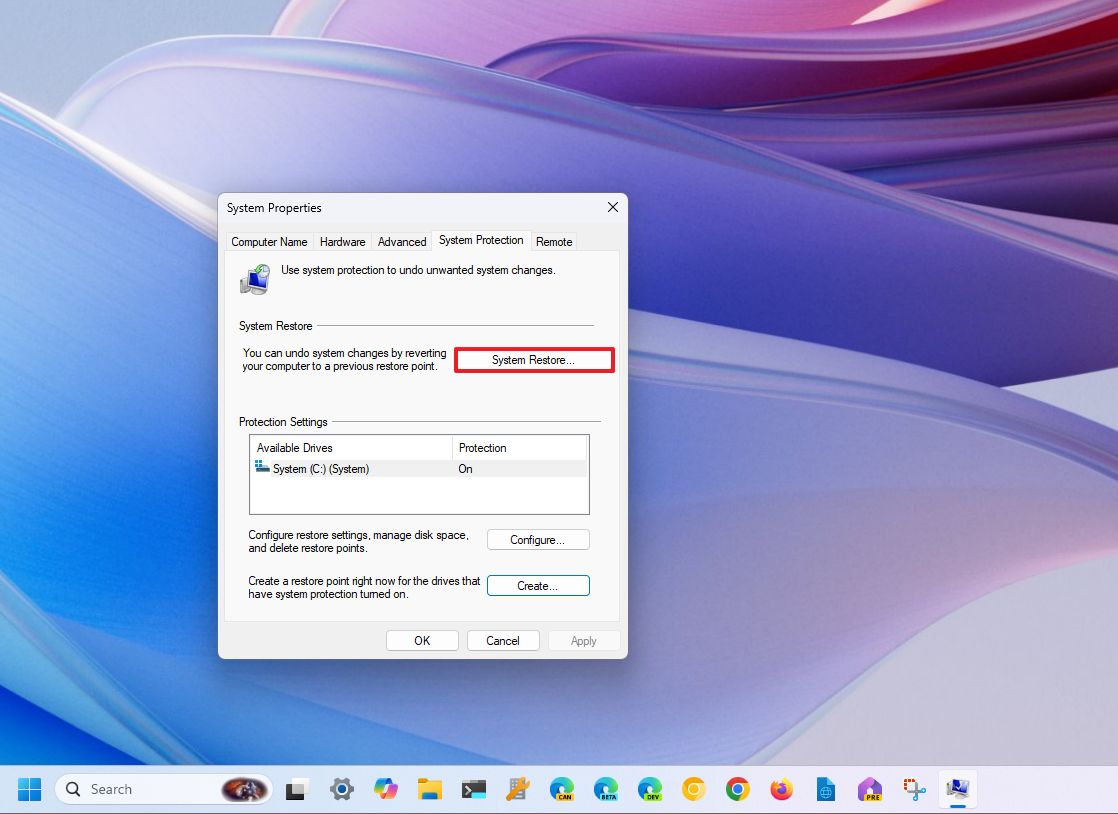
- Search for Create a restore point and click the top result to open the app.
- Click the System Restore button.
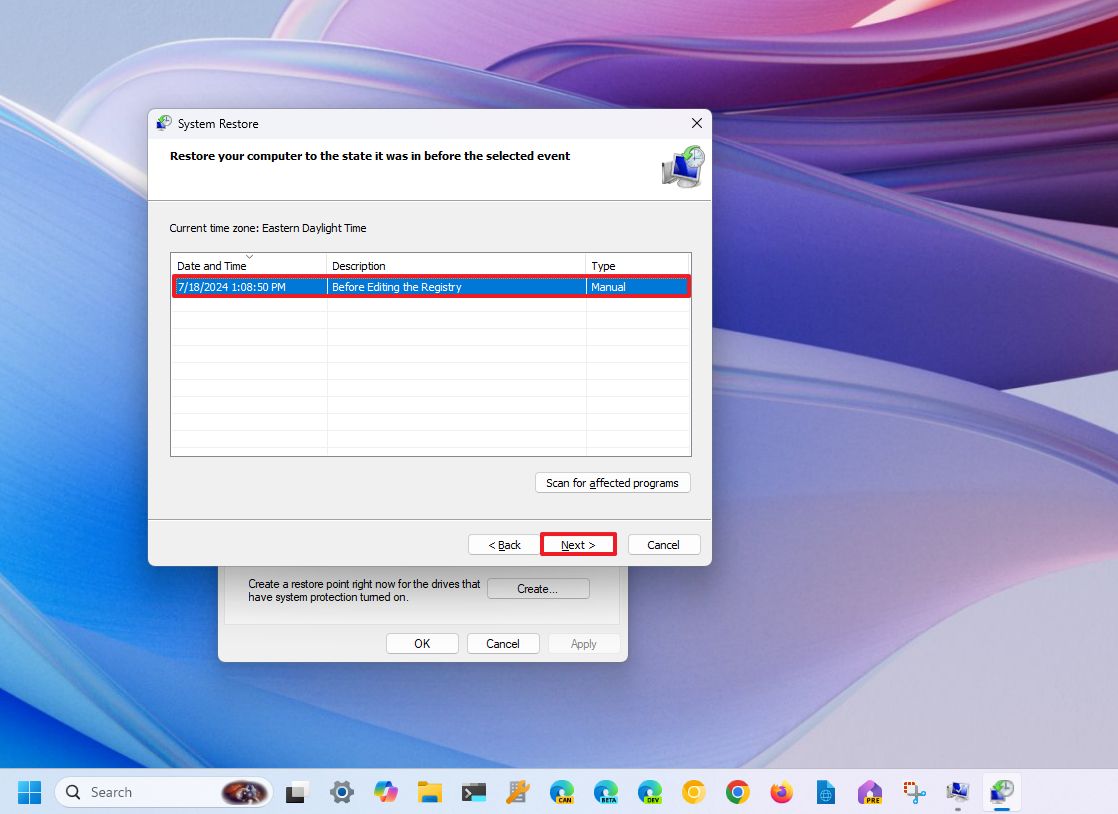
- Click the Next button.
- Choose the restore point to fix your device's setup.
- Click the Next button.
- Click the Finish button.
After you complete the steps, you must restart the computer to complete the process.
Restore from WinRE
To fix problems with a system restore point from the Windows Recovery Environment, use these steps:
- Start the computer.
- Press and hold the power button as soon as the Windows logo appears to shut down the system.
- Continue with steps 1 and 2 two more times, and the computer will boot into the Advanced Startup settings during the second or third restart.
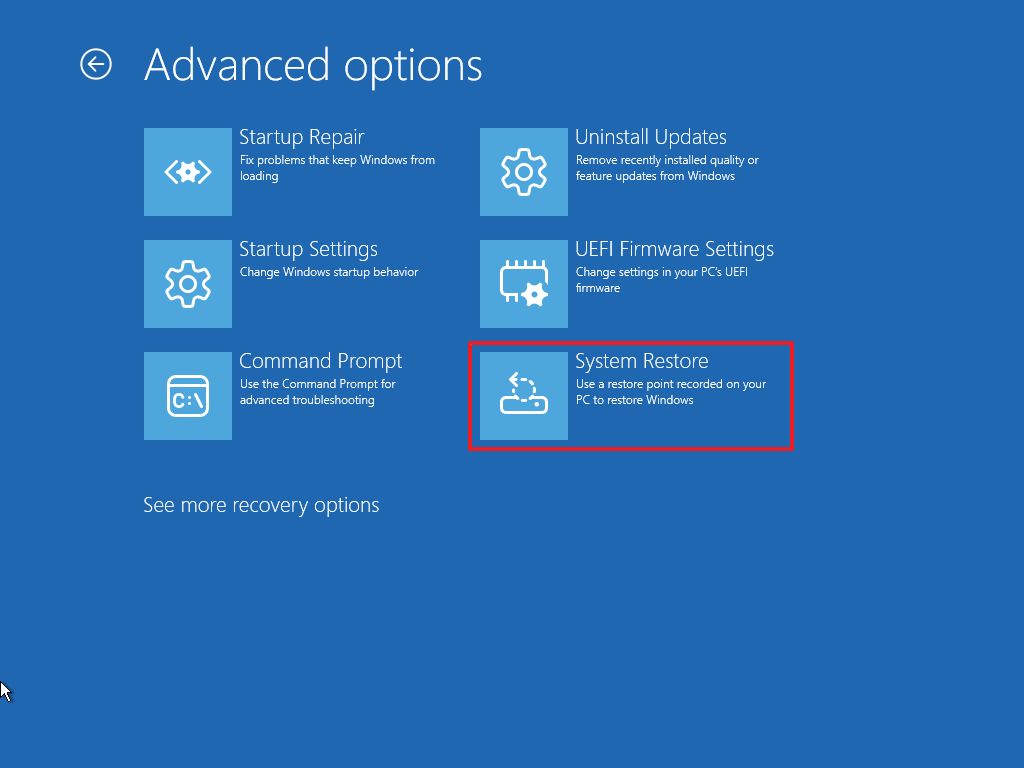
- Click the Advanced options button.
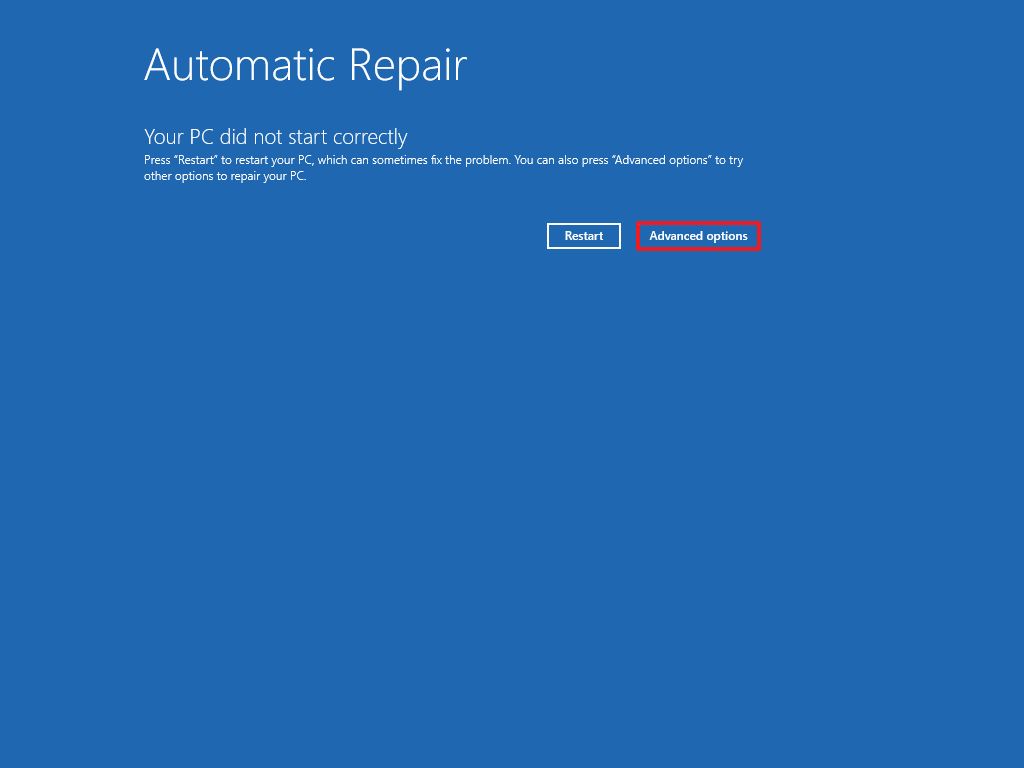
- Click on Troubleshoot.
- Click on Advanced options.
- Click the System Restore option.
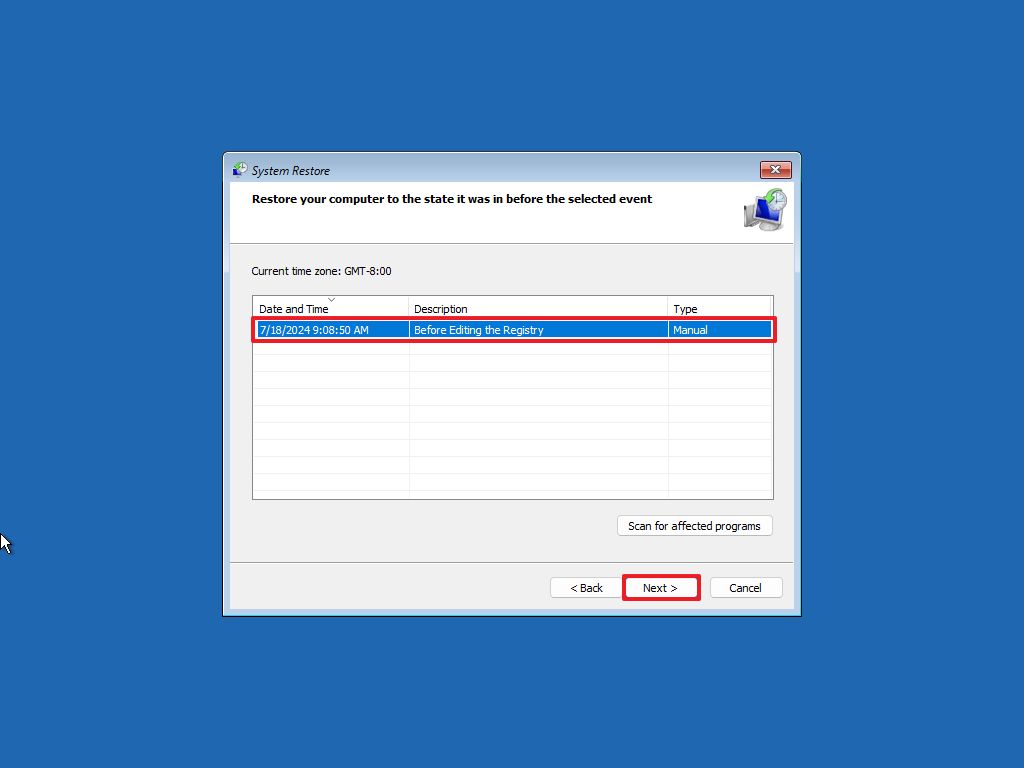
- Click the Next button.
- Choose the restore point to fix your device's setup.
- Click the Next button.
- Click the Finish button.
Once you complete the steps, you should now be able to start the device normally without issues since it'll boot in the last good known state.
It's important to note that System Restore will preserve your files, but it will remove any application or configuration applied after the restore point is created.
How to repair installation with Reset this PC
Another way to repair the Windows 11 installation is by using the Recovery features to reset the system. When using the "Reset this PC" feature, you will be reinstalling the operating system with the same version already installed on your computer. This process will keep your files, but apps and settings will be removed as they could be the reason the device is experiencing issues.
Reset from desktop
If you have access to the desktop environment, you can reset the computer to the factory default settings with these instructions:
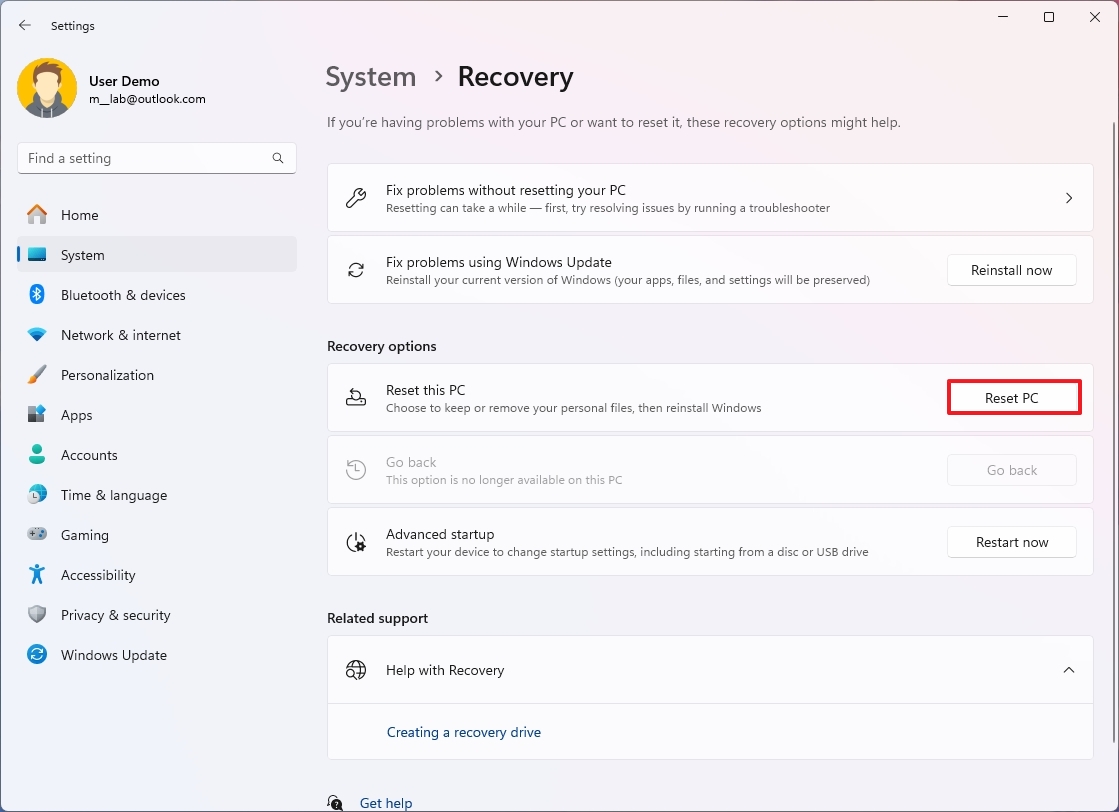
- Open Settings.
- Click on System.
- Click the Recovery page on the right side.
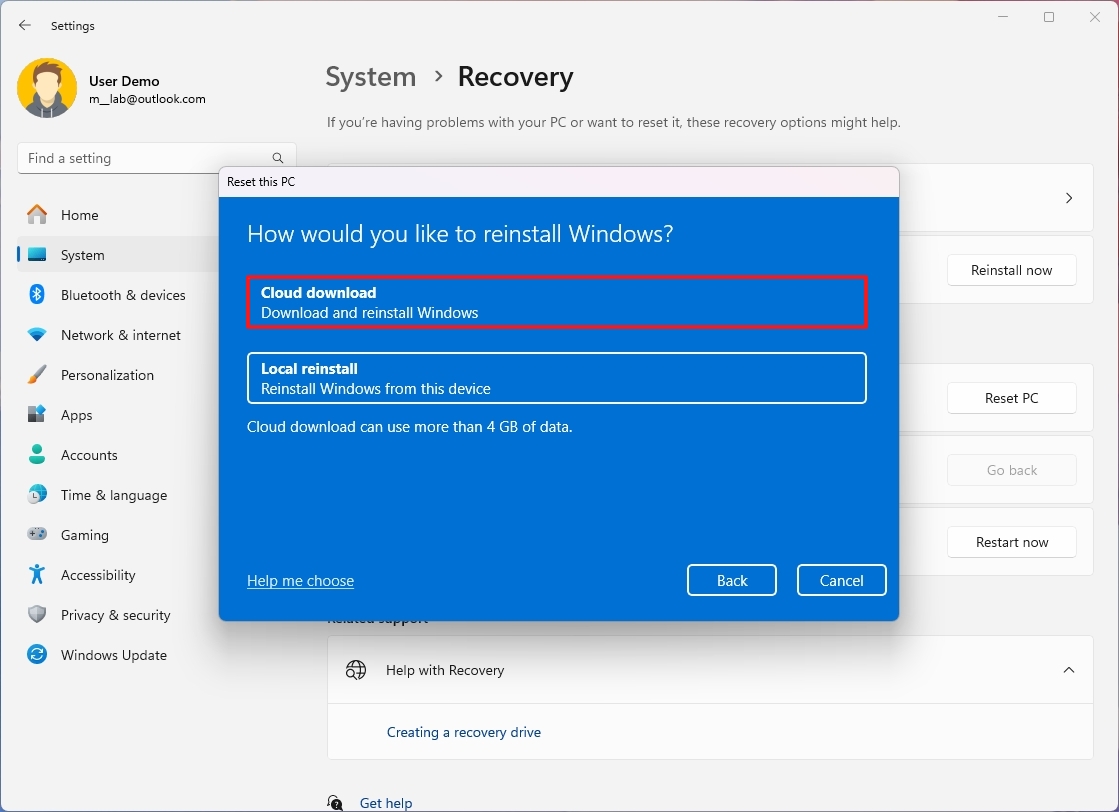
- Click the Reset PC button in the "Reset this PC" setting.
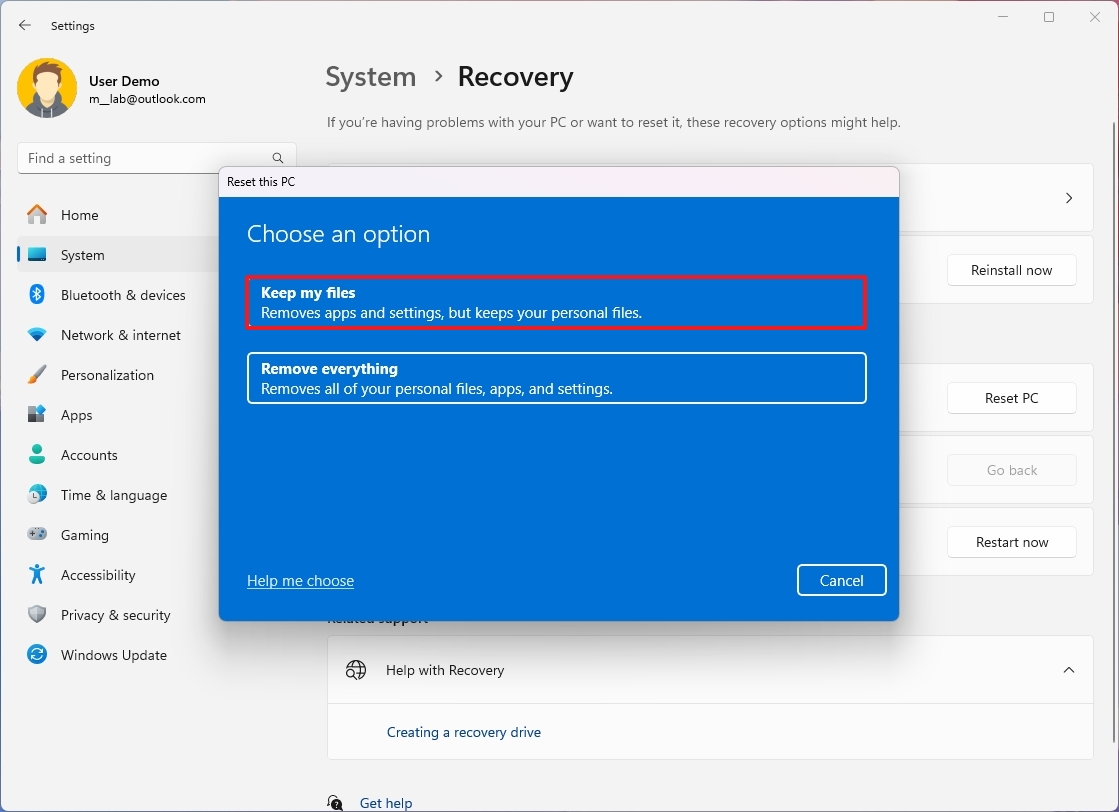
- Choose the "Keep my files" option.
- Choose the "Cloud download" option to download the installation files from the cloud (Microsoft servers) or the "Local reinstall" to allow the system to use the files already available on your computer.
- Click the Next button.
- Click the Reset button.
After you complete the steps, the feature will reinstall the operating system, keeping your files. Once you can confirm that the problem has been resolved, you can proceed to reinstall your apps and reapply the settings.
Reset from WinRE
If you can't boot the computer, you can reset the Windows 11 installation from the Windows Recovery Environment (WinRE) with these instructions:
- Start the computer.
- Press and hold the power button as soon as the Windows logo appears to shut down the system.
- Continue with steps 1 and 2 two more times, and the computer will boot into the Advanced Startup settings during the second or third restart.
- Click the Advanced options button.

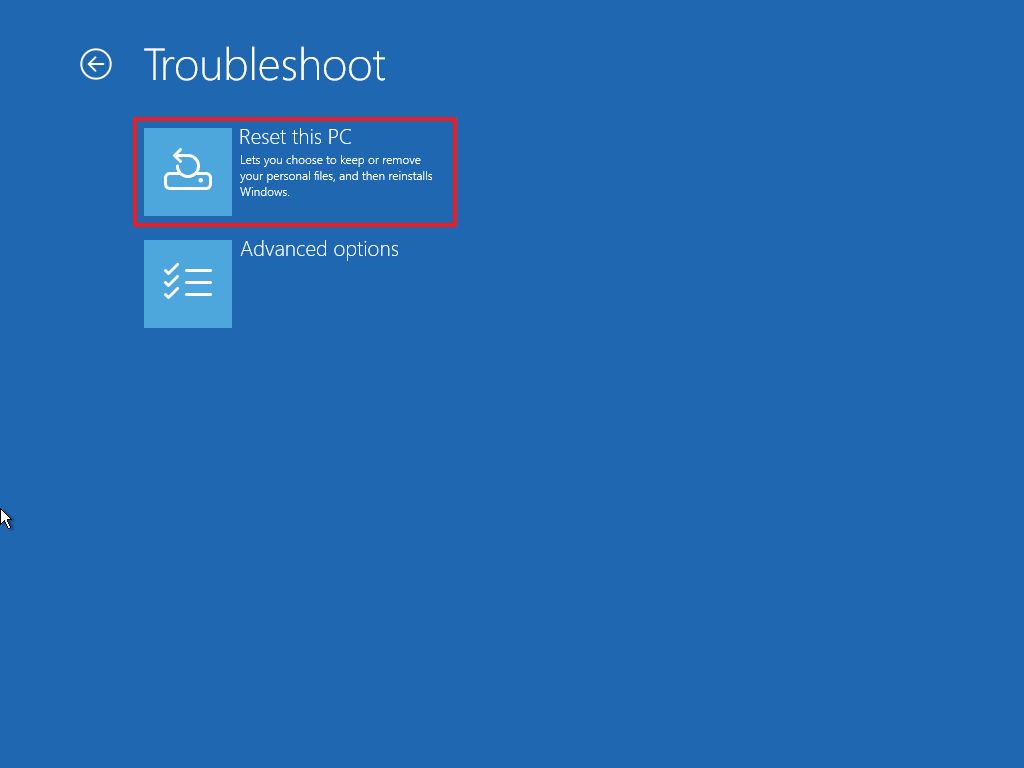
- Click on Troubleshoot.
- Click on Reset this PC.
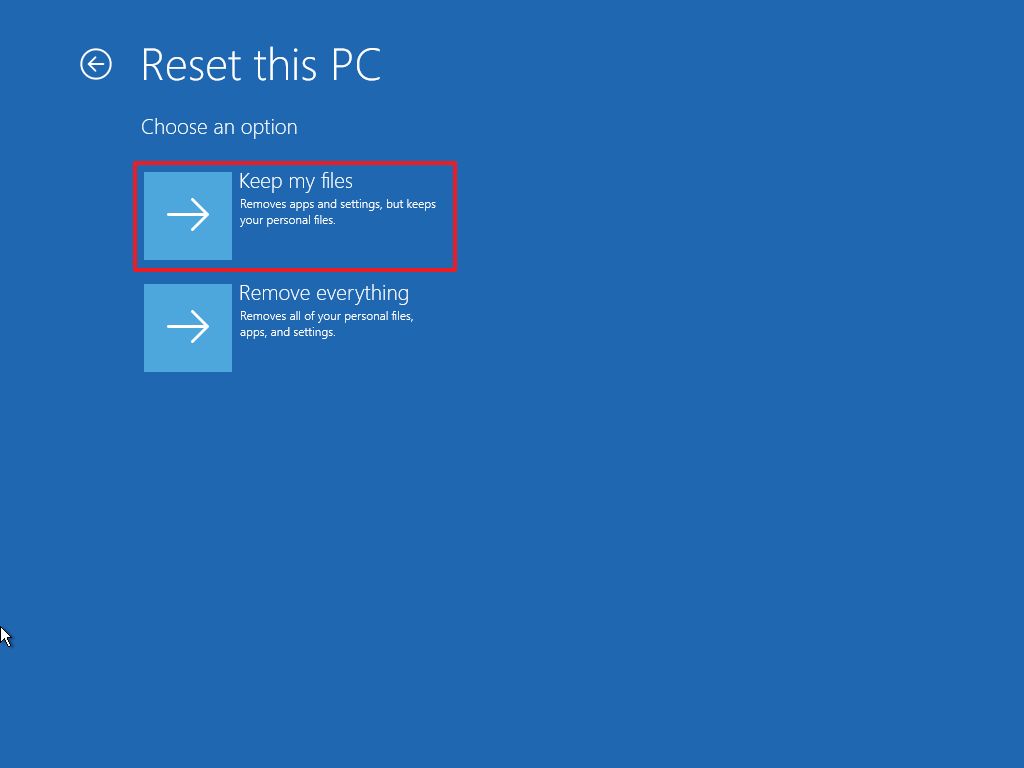
- Click the Keep my files option.
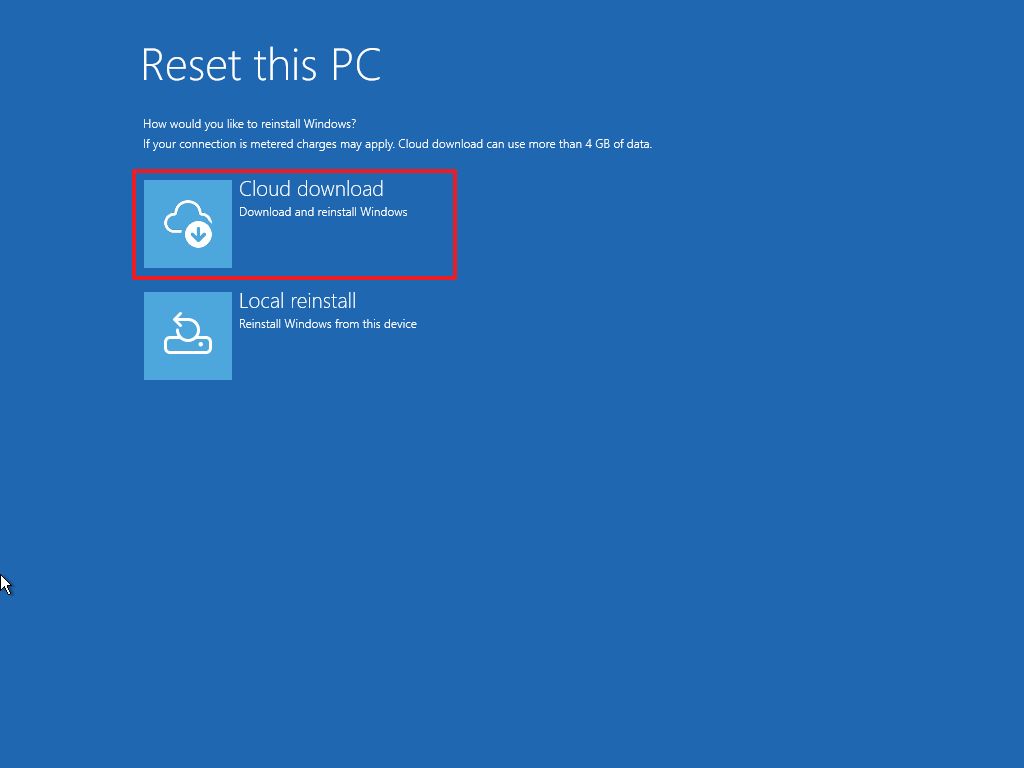
- Choose the "Cloud download" option to download the installation files from the cloud (Microsoft servers) or the "Local reinstall" to allow the system to use the files already available on your computer.
- Click the Reset button.
Once you complete the steps, Windows 11 will reinstall to fix existing problems with the previous setup. Your files will be kept, but you will have to reinstall apps and reapply settings.
Alternatively, you can always resolve the most issues (as long as they're not physical hardware problems) by backing up your files and performing a clean installation with the latest version of Windows 11.
It's important to note that I'm focusing these instructions on different methods to quickly repair an installation since there could be many ways to resolve specific problems, including the local Troubleshooters.
More resources
For more helpful articles, coverage, and answers to common questions about Windows 10 and Windows 11, visit the following resources:
- Windows 11 on Windows Central — All you need to know
- Windows 10 on Windows Central — All you need to know

Mauro Huculak has been a Windows How-To Expert contributor for WindowsCentral.com for nearly a decade and has over 22 years of combined experience in IT and technical writing. He holds various professional certifications from Microsoft, Cisco, VMware, and CompTIA and has been recognized as a Microsoft MVP for many years.
