How to disable annoying ads on Windows 11
Are you tired of ads on Windows 11? If so, you are not alone. Here's how to stop or at least minimize the frustration.
Whether you're just getting started with Windows 11 or you've been using it for a while, you've likely noticed that the operating system is increasingly filled with ads, though Microsoft prefers to call them suggestions, tips, or recommendations.
You can find them on the Lock screen, as pre-installed apps you've never used pinned to the Start menu, service promotions (such as OneDrive) in File Explorer, features and content suggestions are in the Settings app, and more.
To make matters worse, Microsoft also uses diagnostic data and activity signals to deliver personalized ads and tailored recommendations throughout the system experience.
If you're tired of these distractions, the good news is that Windows 11 includes multiple settings you can tweak to turn off these ads and limit targeted content. While not every advertisement can be removed completely, you can significantly reduce the number of interruptions and regain more control over your experience.
In this guide, I'll explain the steps to minimize annoying ads across Windows 11.
These instructions have been updated to ensure accuracy and reflect changes to the process in the operating system.
How to remove ads from Lock screen
On Windows 11, the Lock screen can show various kinds of advertisements. While you can't disable ads when using the Windows Spotlight feature, you can select the "Picture" or "Slideshow" option to prevent the system from showing unwanted information on the Lock screen.
To remove ads from the Lock screen while using custom images, use these steps:
All the latest news, reviews, and guides for Windows and Xbox diehards.
- Open Settings.
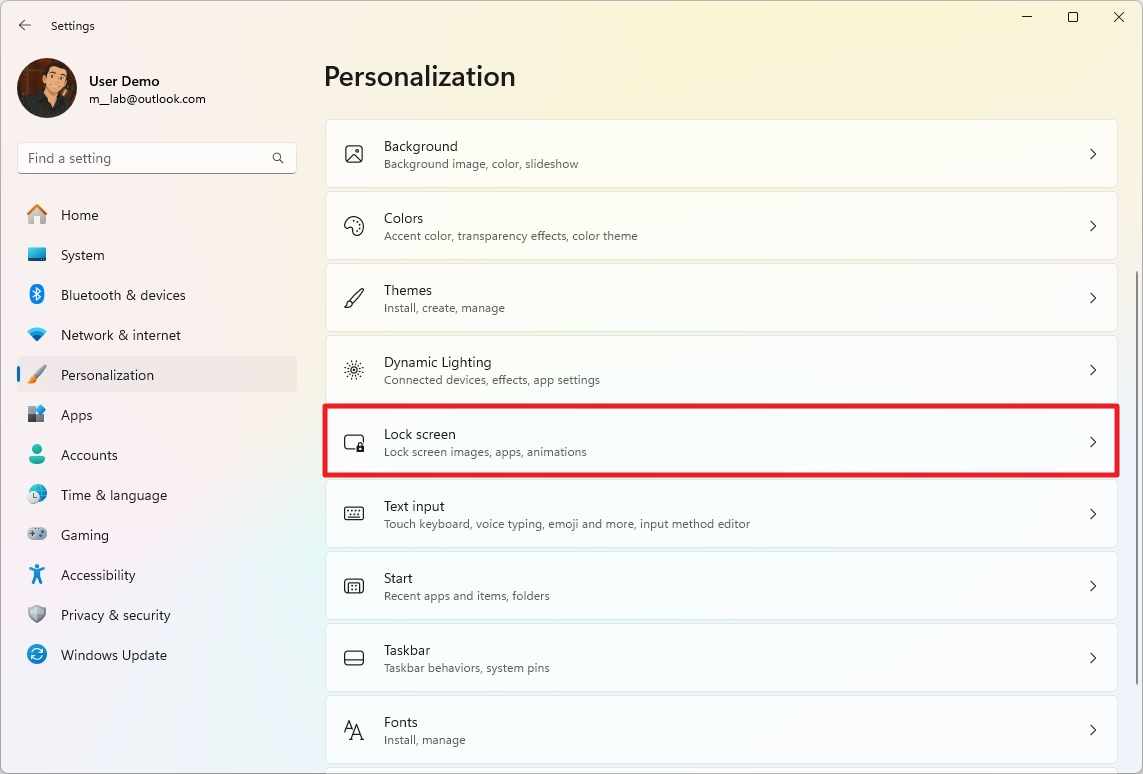
- Click on Personalization.
- Click the Lock screen page on the right side.
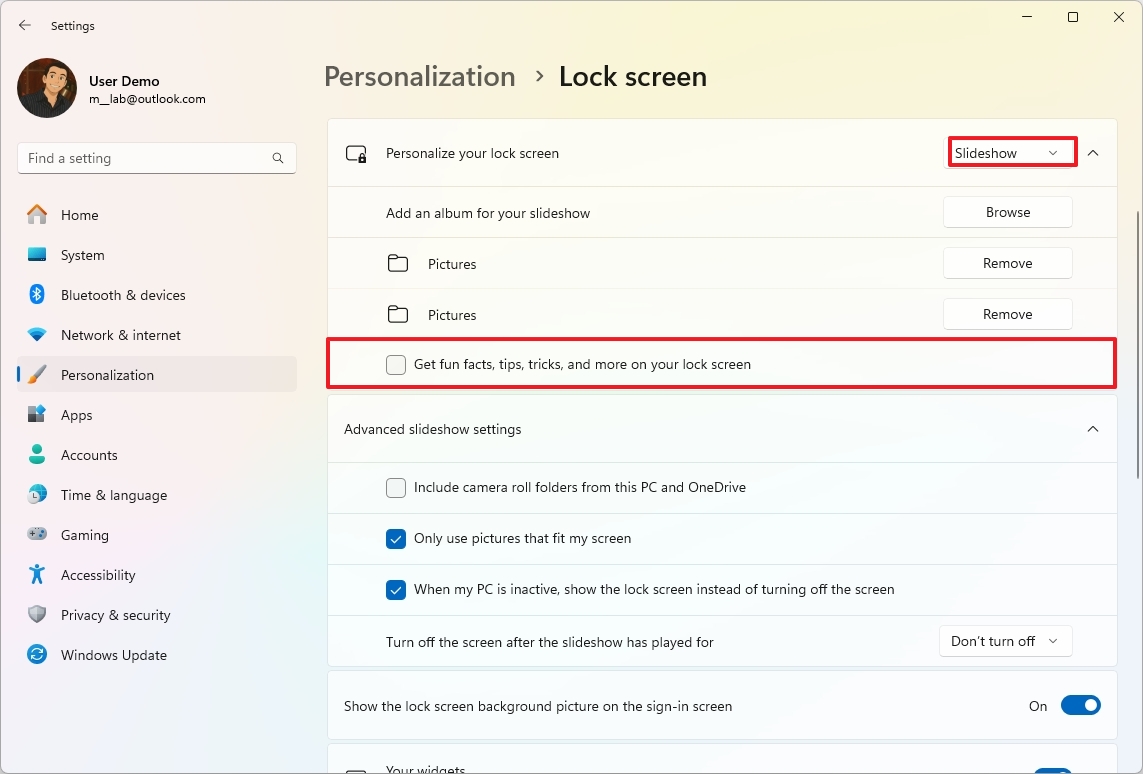
- Under the "Personalize your lock screen" section, if the Picture or Slideshow option is selected, clear the "Get fun facts, tips, tricks, and more on your lock screen" option.
- (Optional) Turn off the Your widgets toggle switch to disable the widgets in the Lock screen.
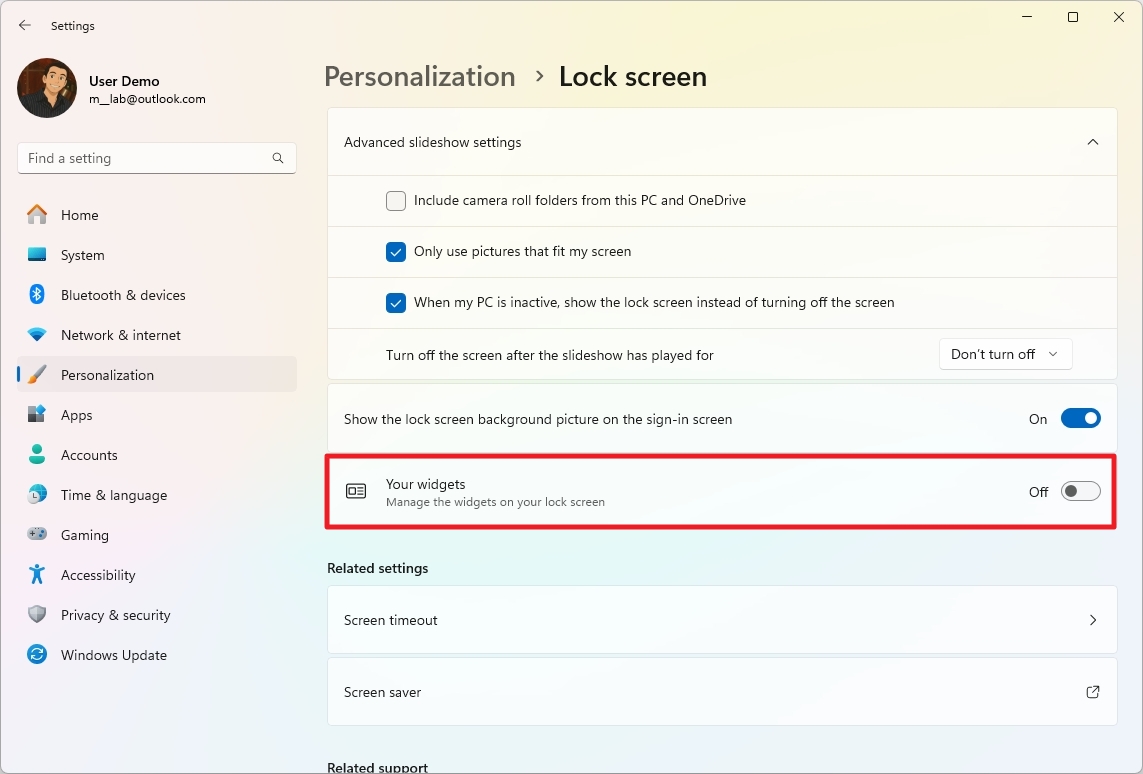
Once you complete the steps, the Lock screen will not show information that may be considered ads when using custom images.
How to remove ads from Start menu
Microsoft places ads in the form of pins in the Start menu. Although they are not installed on the computer, because they don't have labels, they increase the chances of luring users into installing apps they probably don't need.
The apps will typically be different depending on your region and the version of Windows installed. However, some of the ones you will find are Adobe Express, Prime Video, TikTok, Instagram, Spotify, and many others.
To remove app ads from the Start menu, use these steps:
- Open Start.
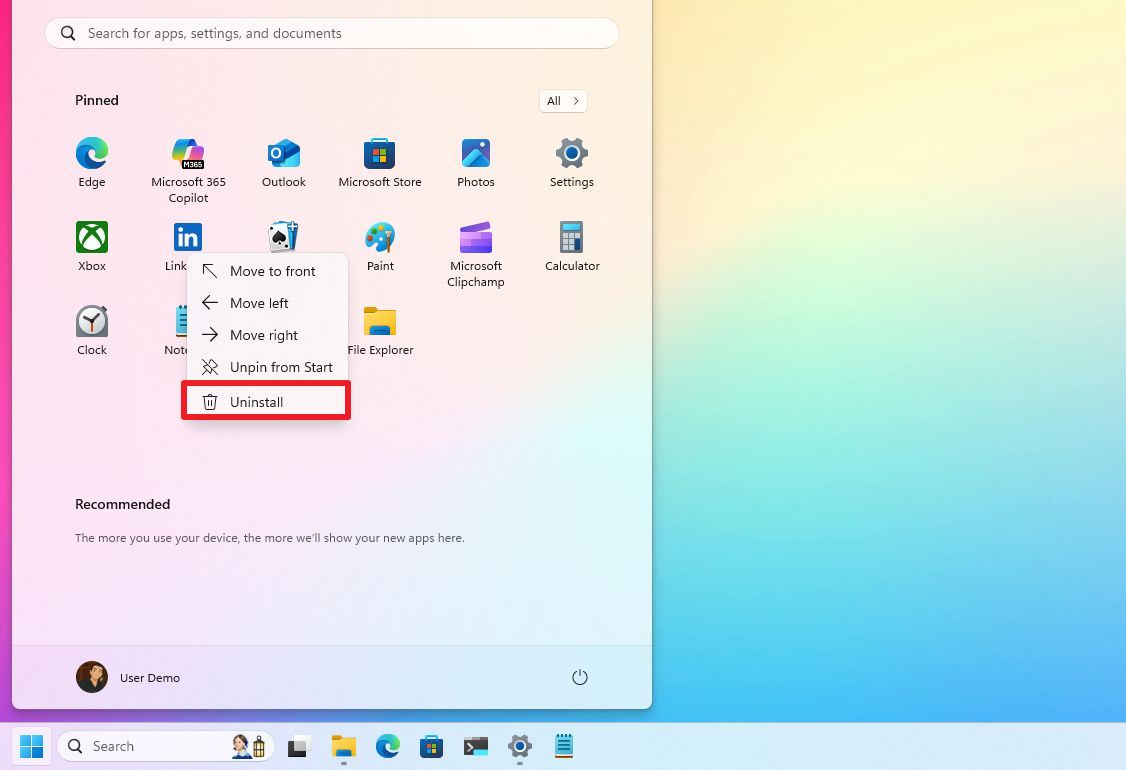
- Right-click the app you don't want and select the Uninstall button.
- Click the Uninstall button again.
You may need to repeat the steps to remove all those app ads from the Start menu.
Disable recommendations
Microsoft also displays app recommendations from the Microsoft Store inside the "Recommended" section. If you don't want this feature, you cannot disable it, but you can prevent the section from displaying anything. Here's how:
- Open Settings.
- Click on Personalization.
- Click the Start page on the right side.
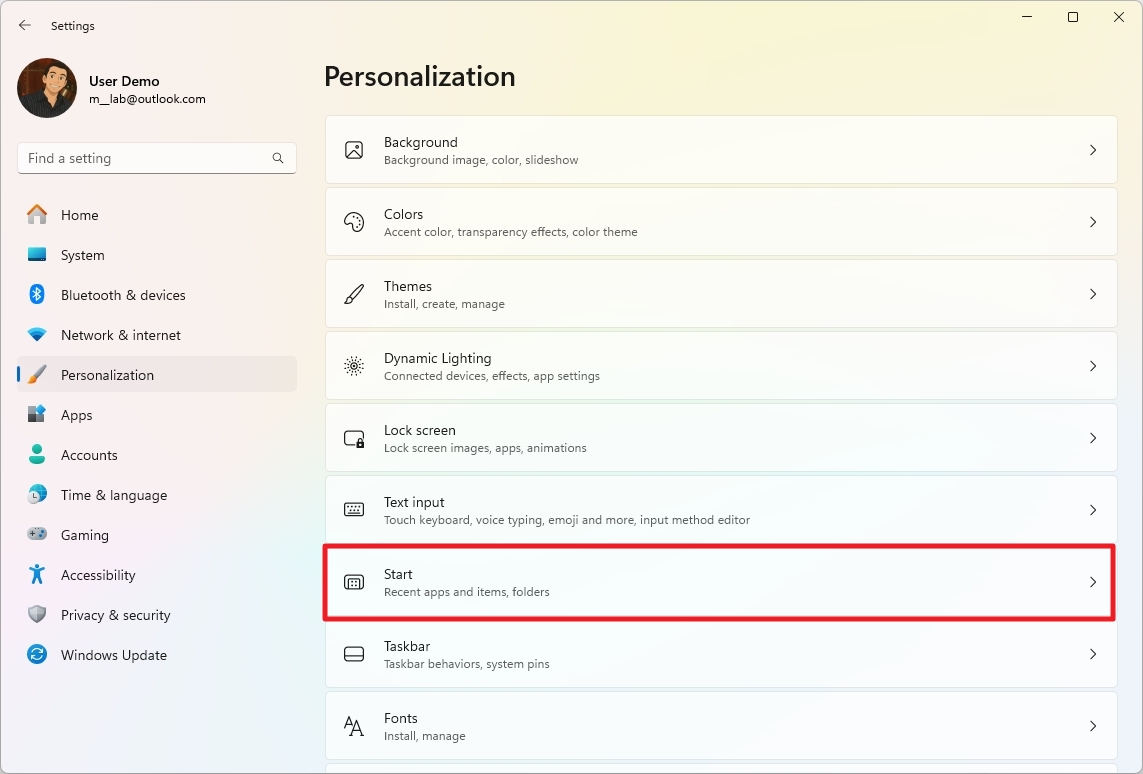
- Choose the More pins option.
- Turn off the "Show recently added apps" toggle switch to hide the recently installed apps.
- Turn off the "Show most used apps" toggle switch to hide frequent apps.
- Turn off the "Show recently opened items in Start, Jump Lists, and File Explorer" toggle switch to clear the recent files from the list.
- Turn on the "Show website from your browsing history" toggle switch.
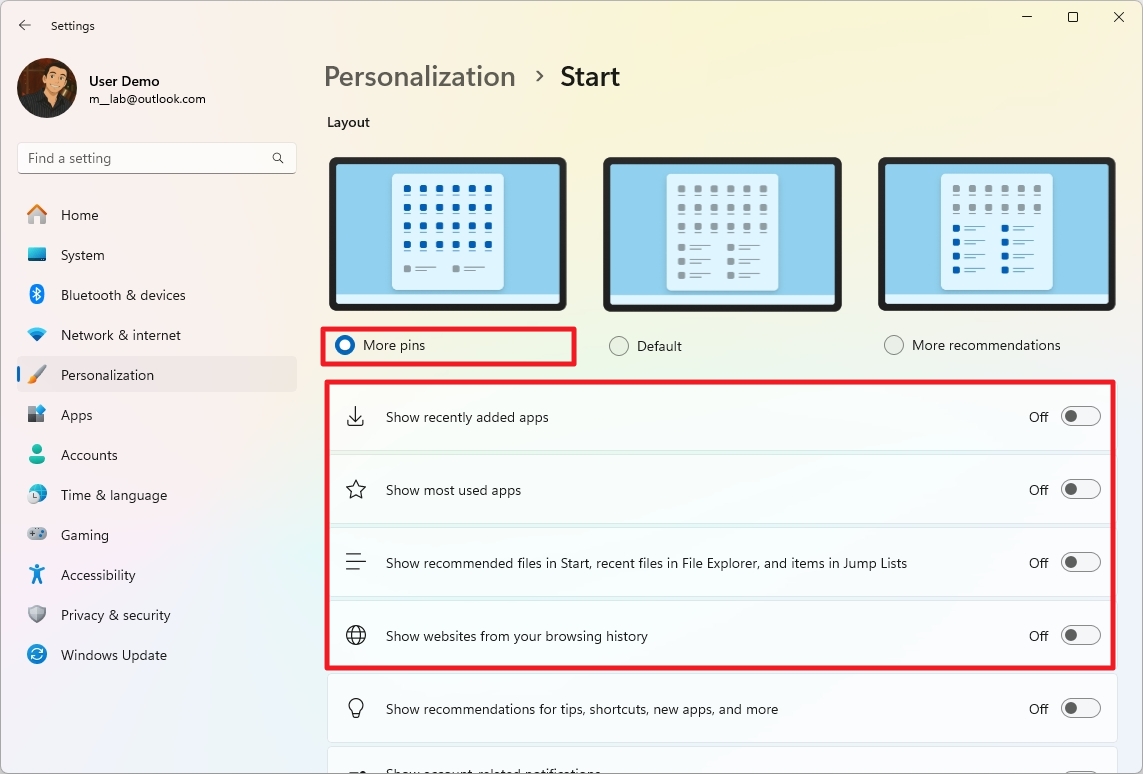
Once you complete the steps, the "Recommended" section will not show any type of content.
Disable profile menu notifications
In addition to removing the app promotions and disable the contents from the Recommended section, you can also turn off the notifications from the profile menu in the Start menu to stop the system from promoting Microsoft 365 services. Here's how:
- Open Settings.
- Click on Personalization.
- Click the Start page on the right side.

- Turn off the "Show raccount-related notifications" toggle switch.
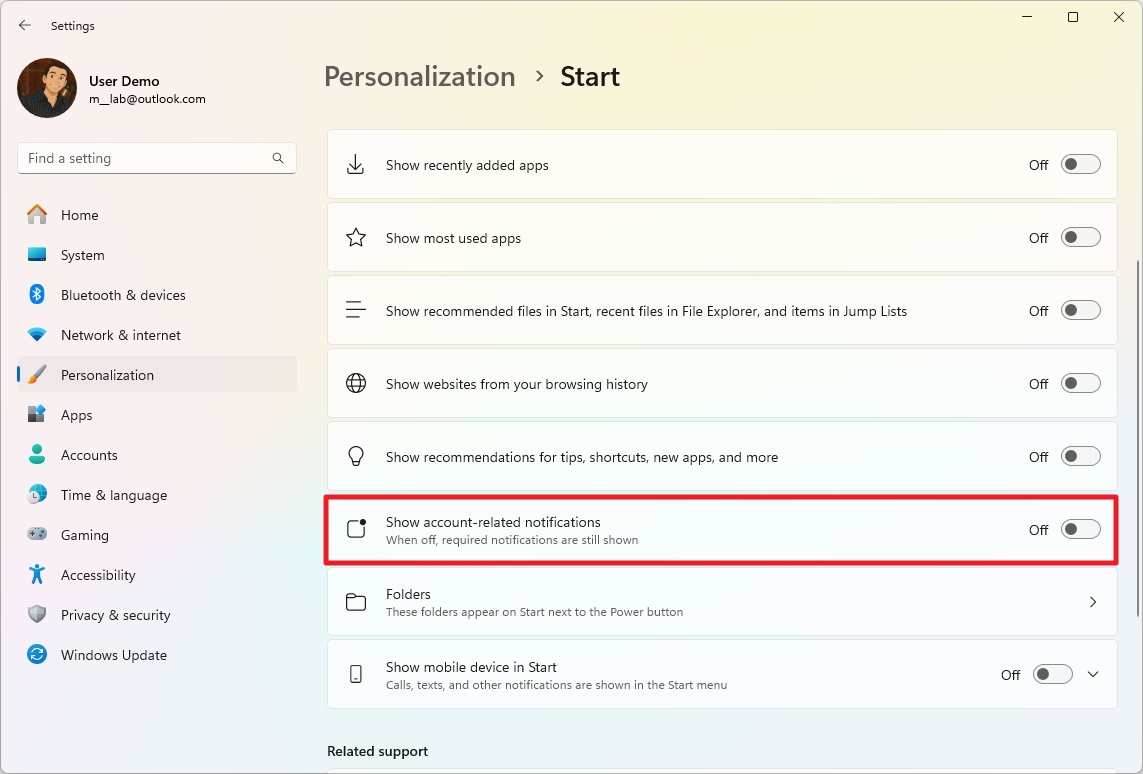
After you complete the steps, the profile menu will no promote features from the Microsoft 365 service.
How to remove ads from Search
On Windows 11, "Search highlights" is a feature that shows web suggestions in the Search home. However, since these types of content can also be seen as advertisements, as they can lure users into using online services and apps you may not want to use, you can disable the feature from the "Search permissions" settings.
To turn off content highlights in the Search home of Windows 11, use these steps:
- Open Settings.
- Click on Privacy & security.
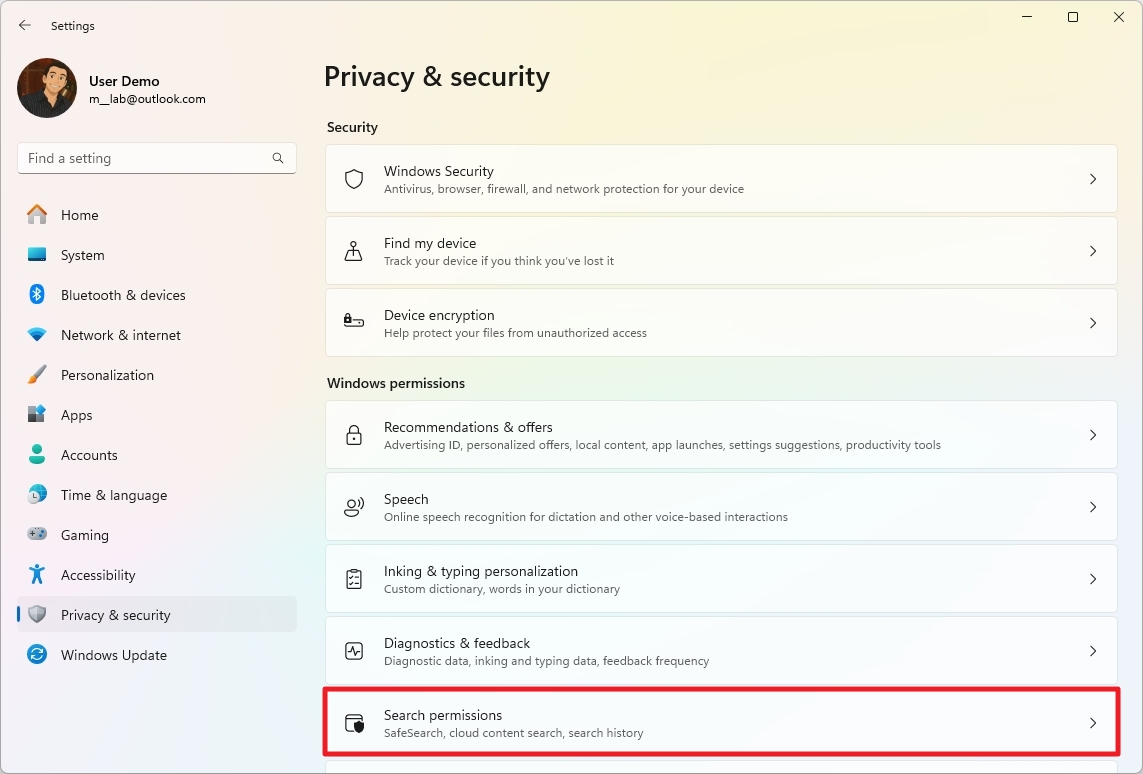
- Click the Search permissions page on the right side.
- Under the "More settings" section, turn off the "Show search highlights" toggle switch.
After you complete the steps, the next time you open the Search experience, instead of the online content, you will find two lists, including "Quick searches" with suggestions to find settings and "Top apps" with your top six apps.
How to remove ads from Widgets
The Widgets board can also be considered ads on Windows 11 since Microsoft uses this feature to promote curated online content that also sell advertisements and forces you to use Microsoft Edge and Bing.
Although you can't completely disable the feature, you can remove the contents and the icon from the Taskbar, and here's how:
- Open Settings.
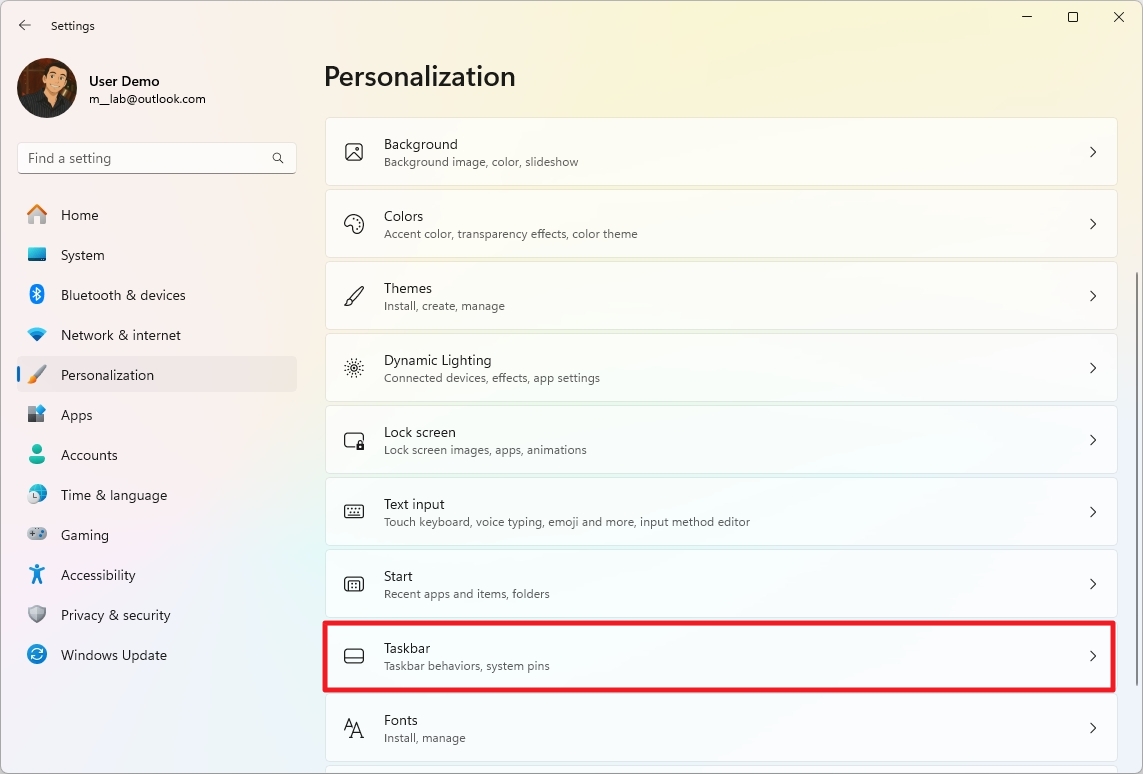
- Click on Personalization.
- Click the Taskbar page on the right side.
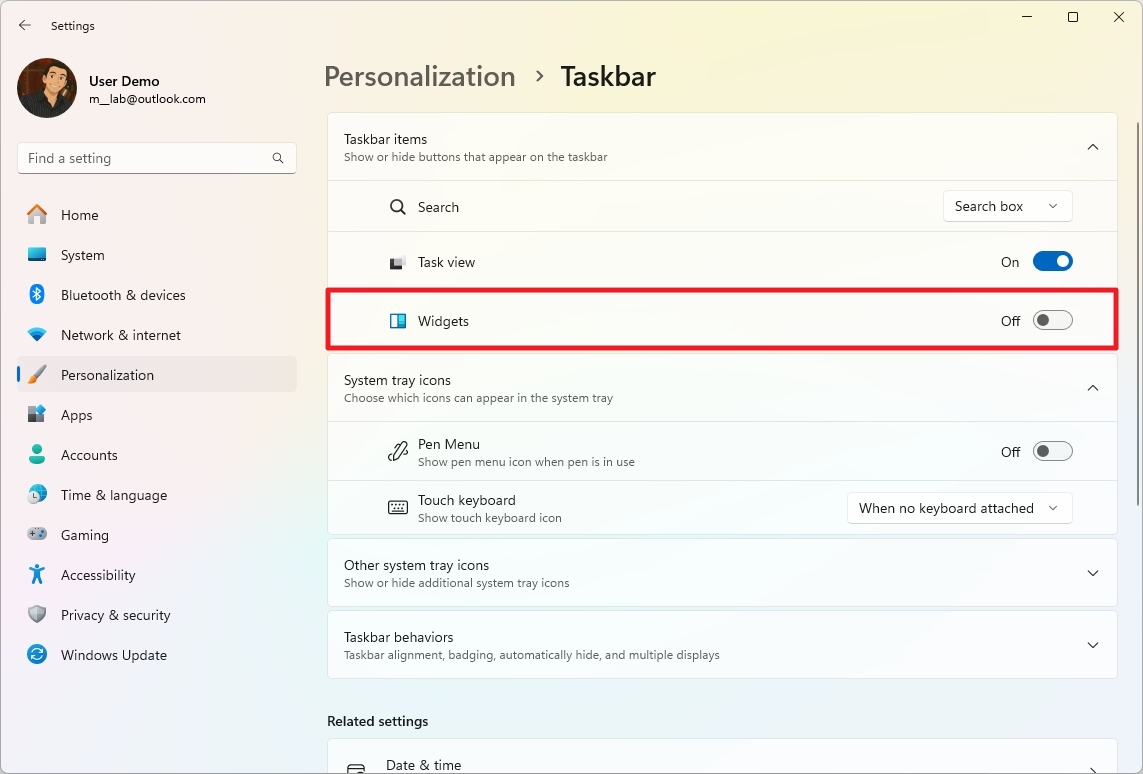
- Turn off the Widgets toggle switch under the "Taskbar items" section.
Once you complete the steps, the Widgets icon will no longer be available in the Taskbar.
Disable Widgets content
You can still access the Widgets board using the "Windows key + W keyboard shortcut. You can't turn off this feature, but you can turn off the news feed with these steps:
- Open Widgets (Windows key + W).
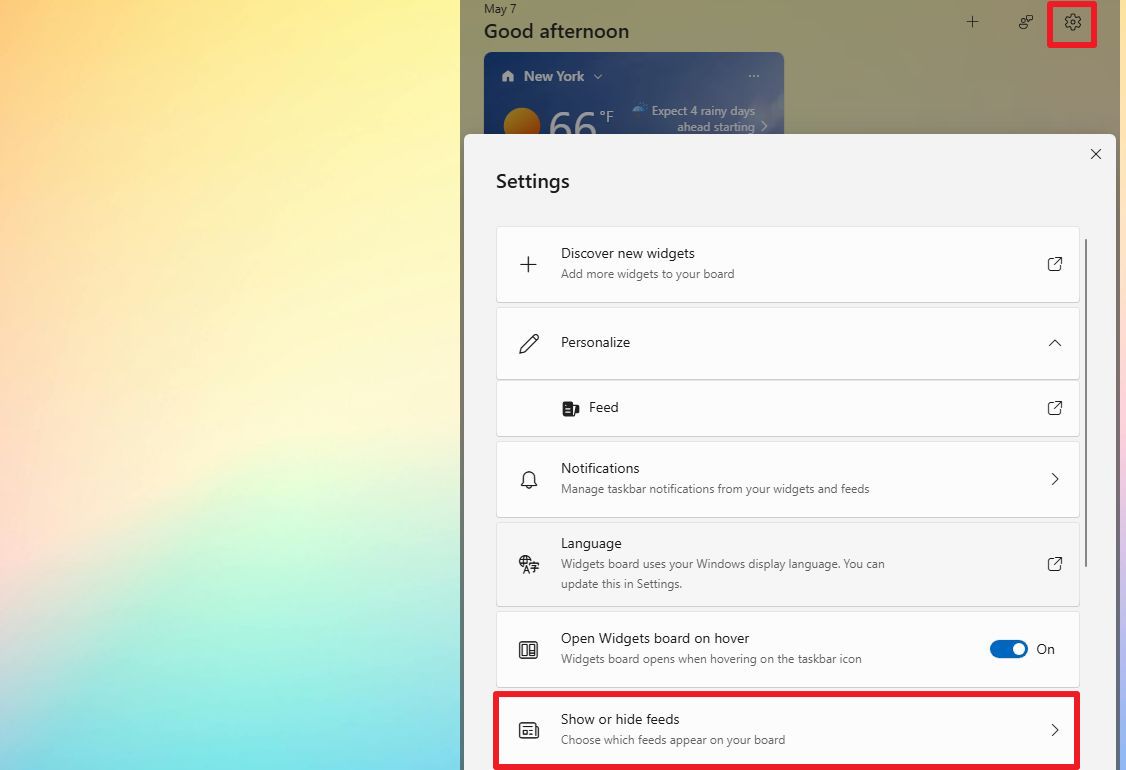
- Click the Profile menu in the top-right.
- Click the Settings button.
- Click the "Show or hide feeds" setting.
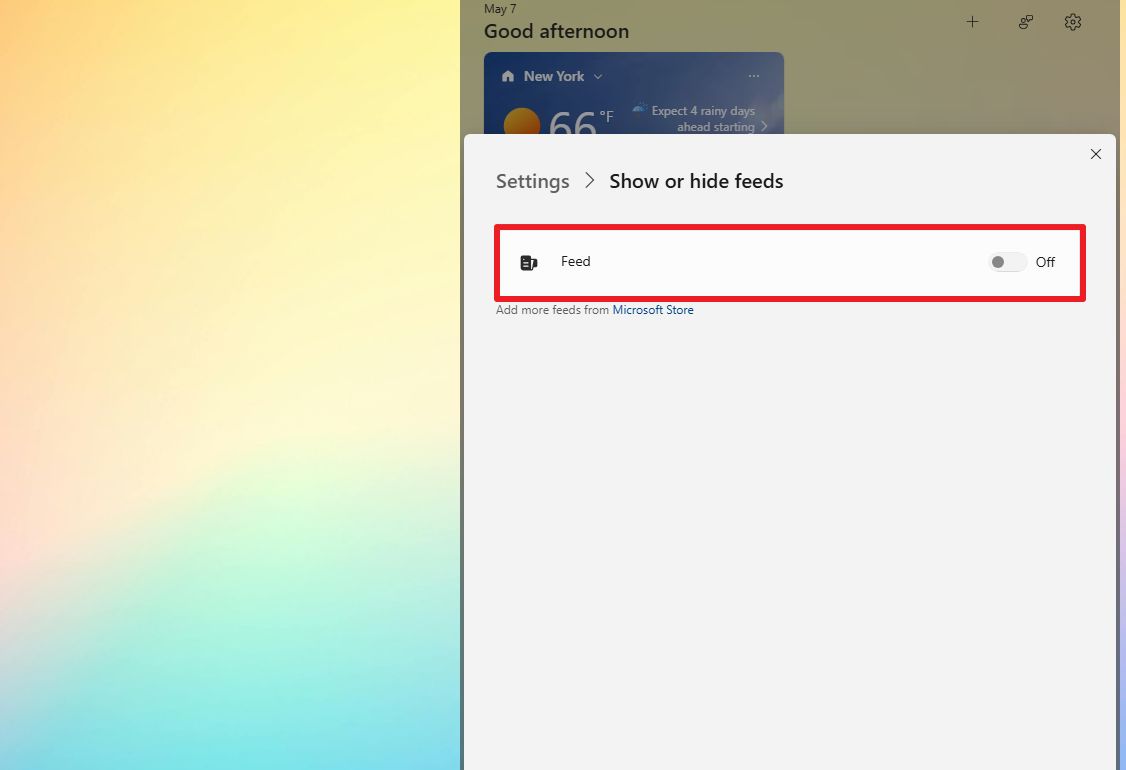
- Turn off the Feed toggle switch.
After you complete the steps, the board will no longer show any web content, limiting access to advertisements, but you will continue to have access to your widgets.
How to remove ads from File Explorer
File Explorer is another place where you may see some ads in the form of promotions to use certain services, such as OneDrive.
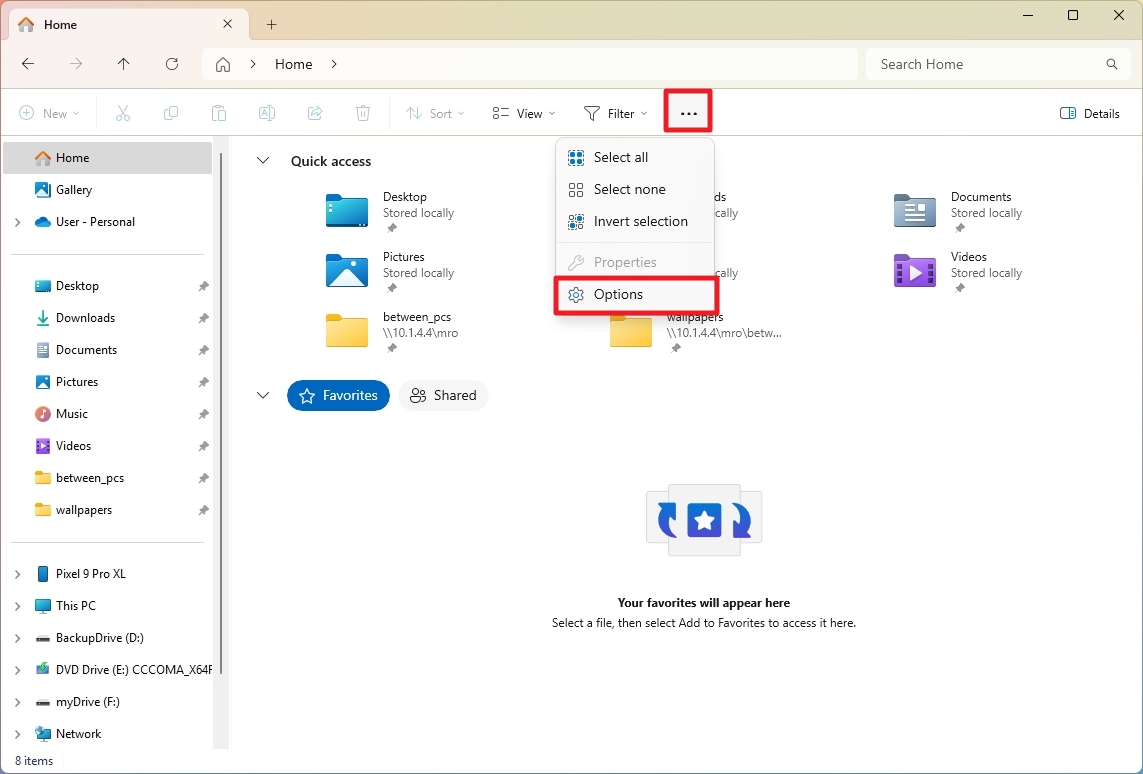
To stop getting ads (such as the OneDrive promotion) in File Explorer, use these steps:
- Open File Explorer.
- Click the See more (three-dotted) menu button from the command bar.
- Click on Options.
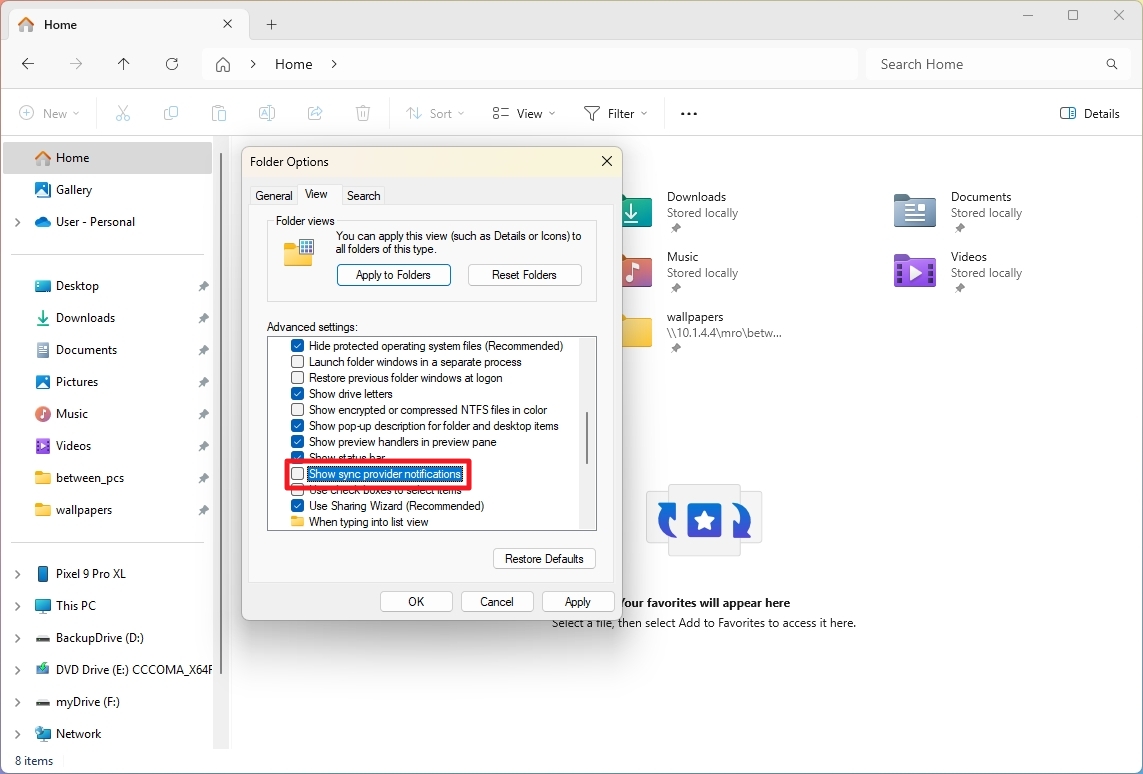
- Click the View tab.
- Click the "Show sync provider notifications" option.
Once you complete the steps, you should no longer see advertisements under the address bar of File Explorer.
If you see the "Start Backup" notification in the address bar, you can click on it and choose the "Turn off reminder" option to disable it.
How to disable device usage settings
"Device usage" is a feature that allows you to define how you plan to use your computer to enable the system to show personalized ads and other information. If you have previously configured this feature, you can turn it off to prevent advertisements based on how you use your computer.
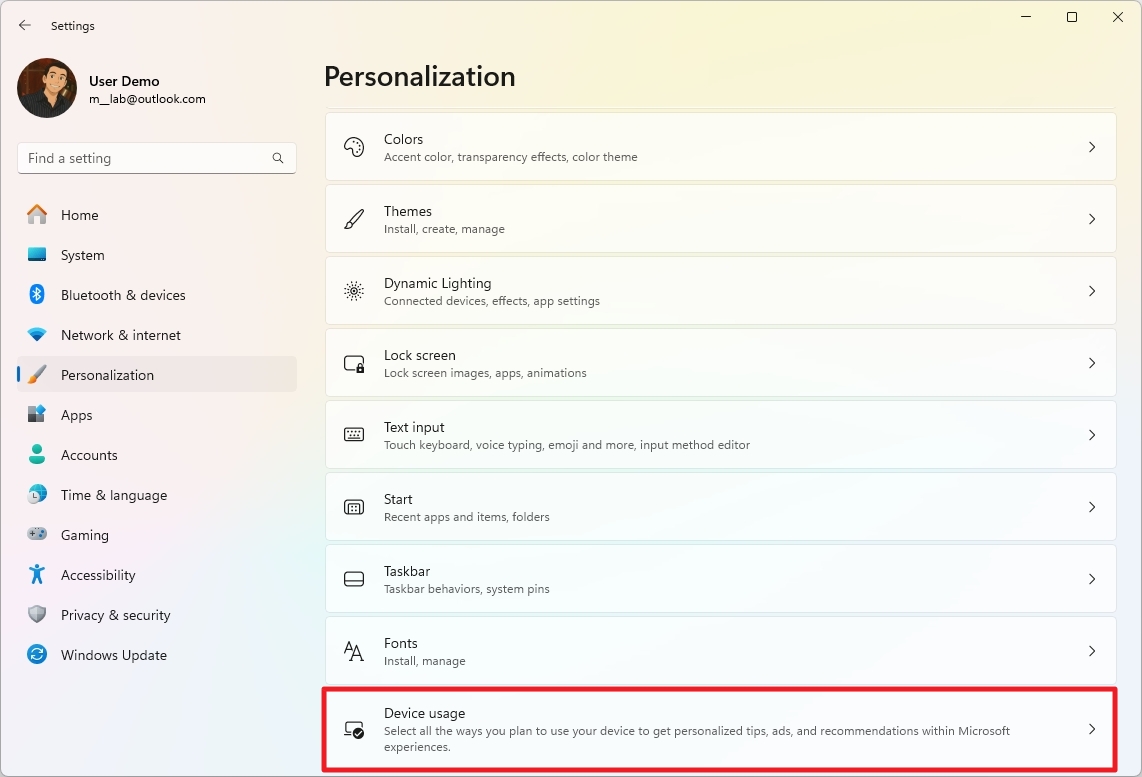
To prevent Windows 11 from showing personalized ads based on your computer usage, use these steps:
- Open Settings.
- Click on Personalization.
- Click the Device usage page on the right side.
- Turn off all the options to stop personalized ads and recommendations from Windows 11.
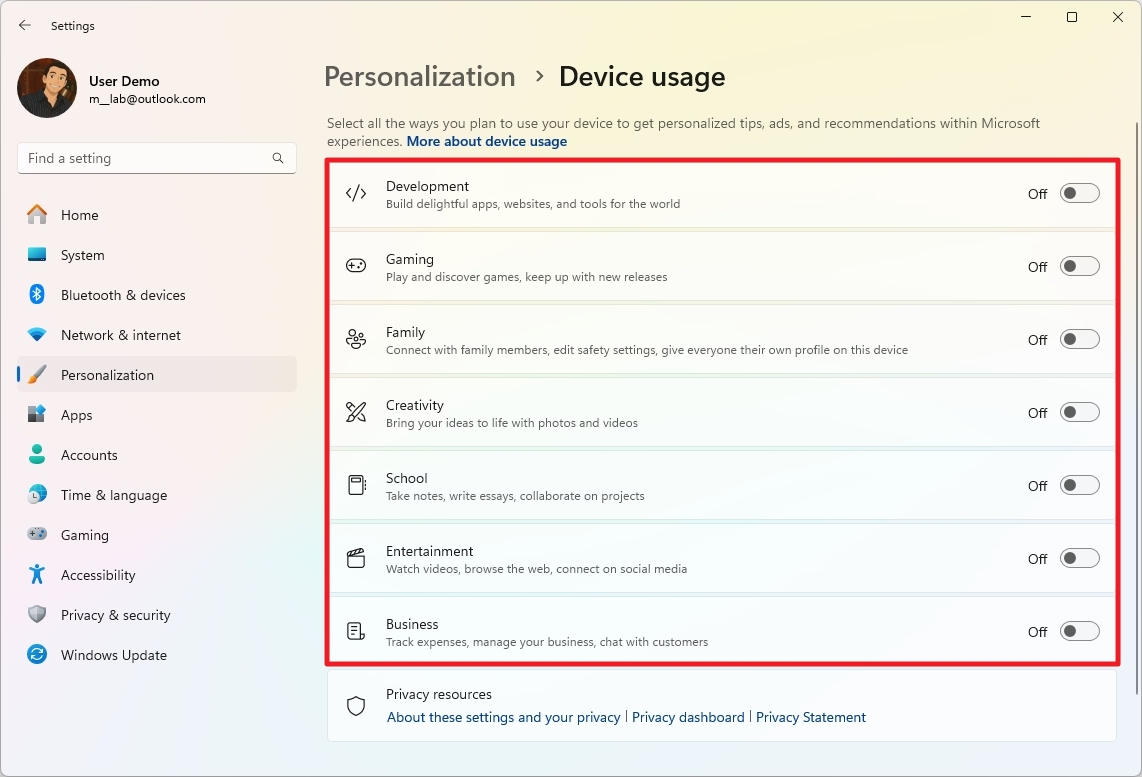
After you complete the steps, you should no longer see tailored ads based on your device usage.
How to disable notification ads on Windows 11
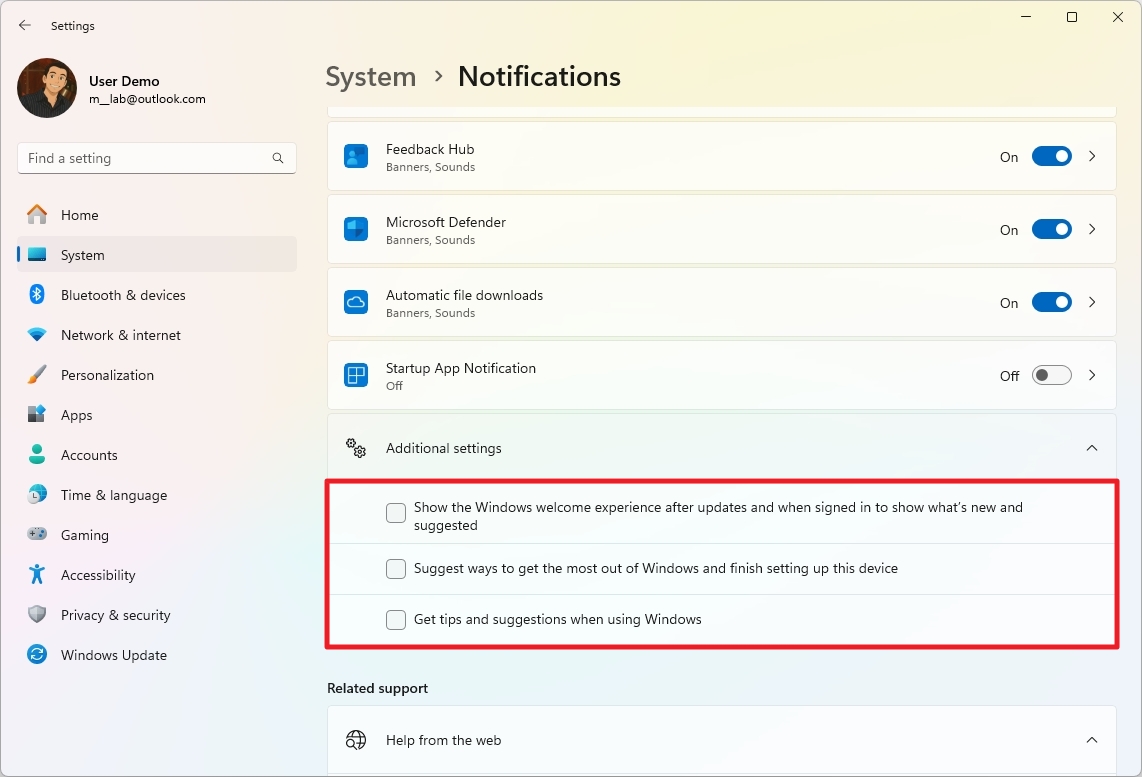
On Windows 11, the notification system can push toast notifications with tips and tricks to help you discover and use features. You can always turn off these random suggestions to prevent distractions if you don't need them.
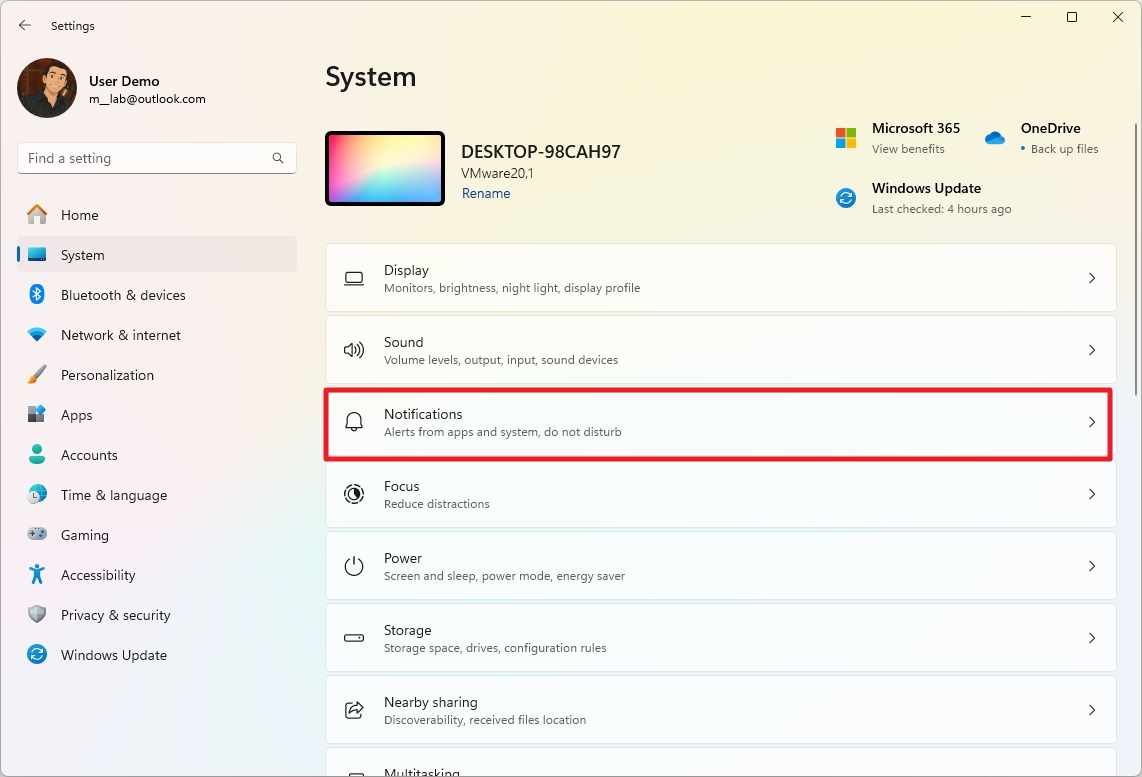
To prevent features from showing tips and other recommendations, use these steps:
- Open Settings.
- Click on System.
- Click the Notifications page on the right side.
- Click on Additional settings.
- Clear the "Show the Windows welcome experience after updates and when signed in to show what's new and suggested" option.
- Clear the "Suggest ways to get the most out of Windows and finish setting up this device" option.
- Clear the "Get tips and suggestions when using Windows" option.
Once you complete the steps, the system won't show notifications with tips and suggestions to use certain features.
How to disable suggested content in the Settings app
The Settings app can provide suggestions across the experience in many ways to help you discover features or tips for content and apps. You can turn off this feature for a cleaner experience.
To stop the Settings app from showing suggestions on Windows 11, use these steps:
- Open Settings.
- Click on Privacy & security.
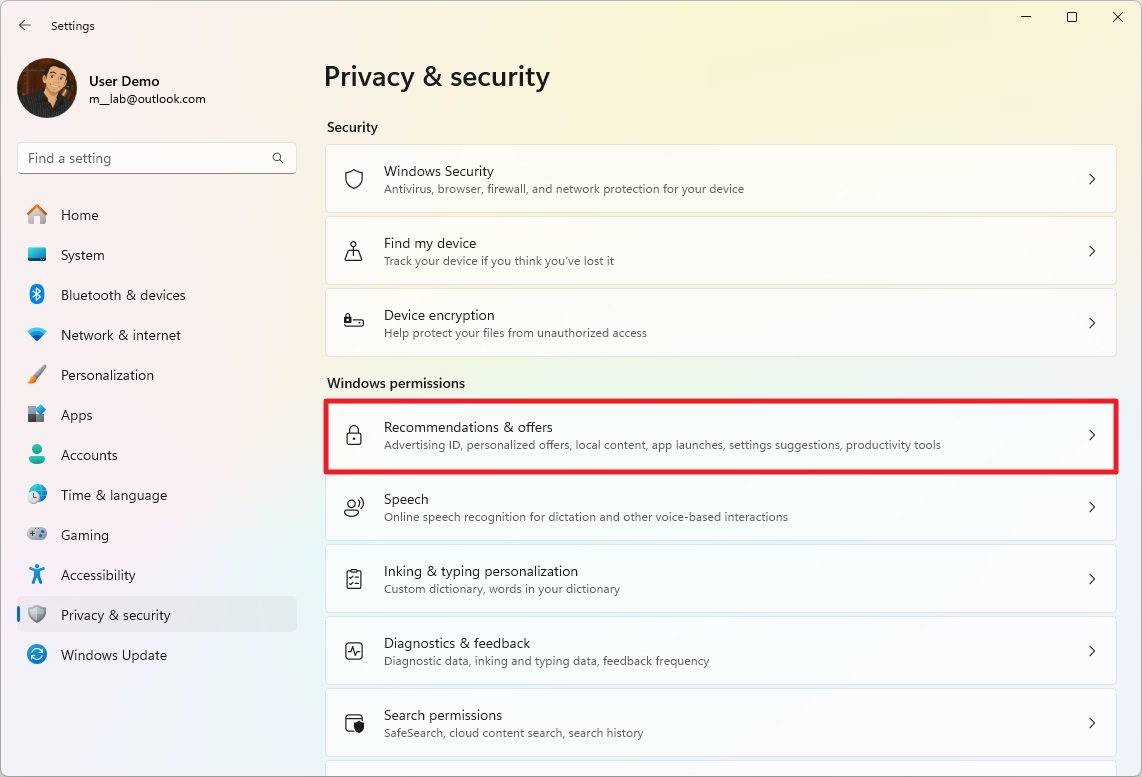
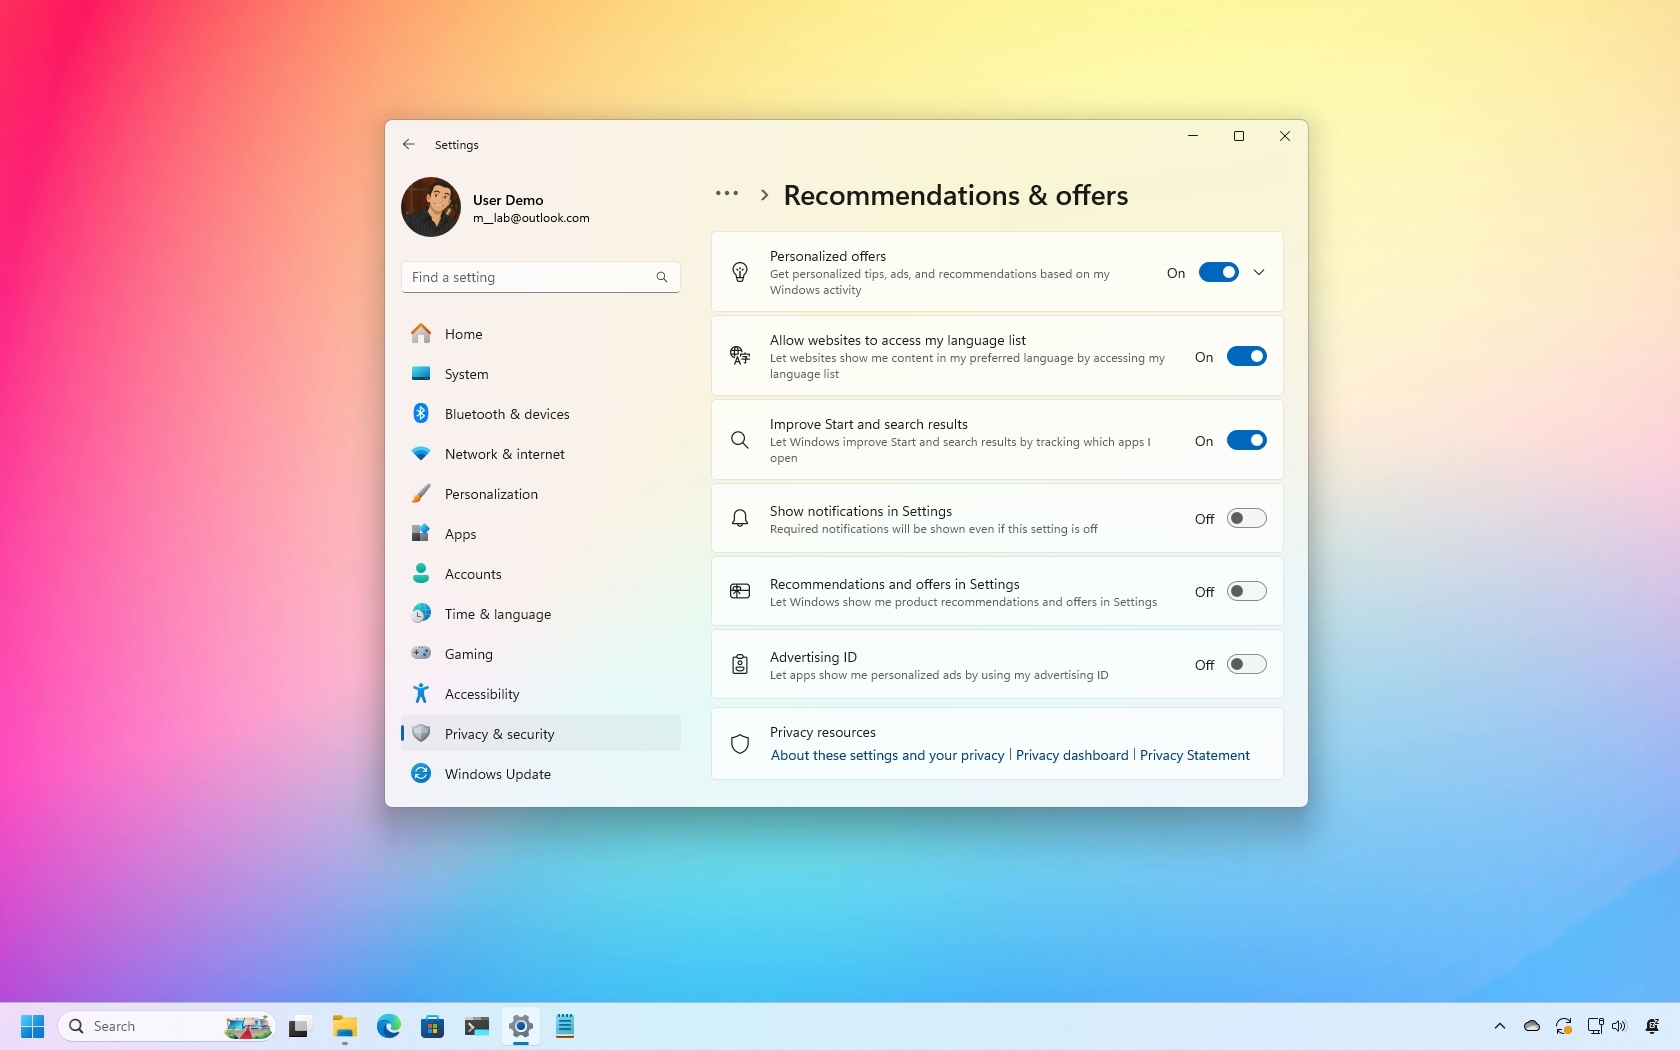
- Click the Recommendations & offers page on the right side.
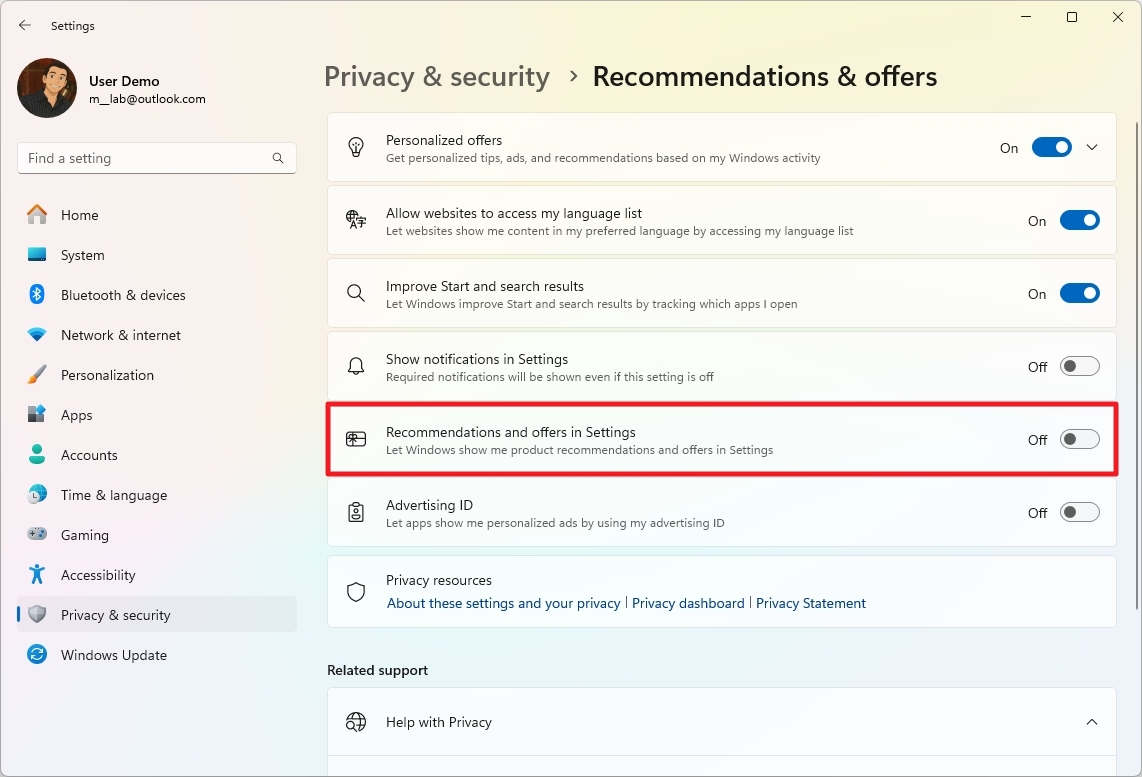
- (Optional) Turn off the "Show notifications in Settings" toggle switch.
- Turn off the "Recommendations and offers in Settings" toggle switch.
After you complete the steps, the Settings app will no longer show suggestions to the end-user.
How to stop apps showing ads on Windows 11
The apps you install on Windows 11 can use your system's unique identification number to target you with advertisements. If you want to prevent this from happening, it's possible to stop the system from letting apps use your "advertising ID."
To prevent apps from showing targeted ads, use these steps:
- Open Settings.
- Click on Privacy & security.
- Click the Recommendations & offers page on the right side.
- Turn off the "Advertising ID" toggle switch.
Once you complete the steps, apps you download from the Microsoft Store will continue to show ads, but they won't be personalized.
How to disable ads from diagnostic data on Windows 11
Windows 11 collects various pieces of information on every installation to understand how you use your computer to improve security and build new features. However, Microsoft also uses this information to target you with ads, tips, and recommendations.
To stop Microsoft from using your diagnostic data on Windows 11, use these steps:
- Open Settings.
- Click on Privacy & security.
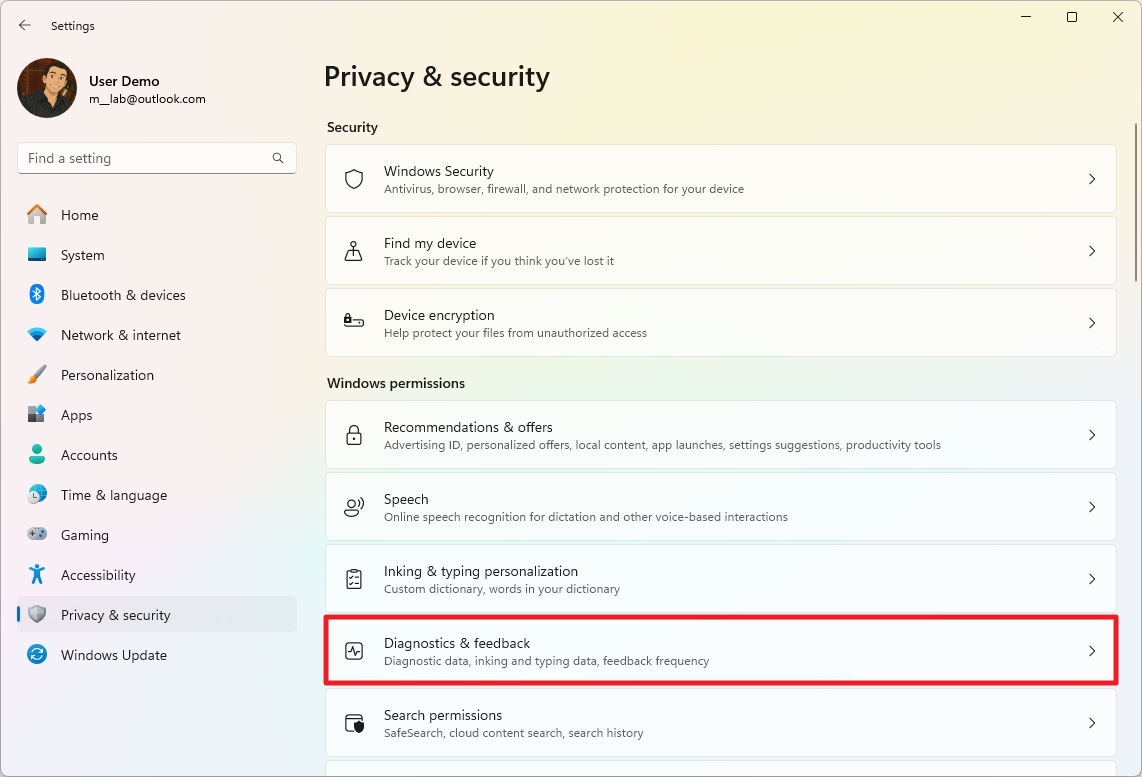
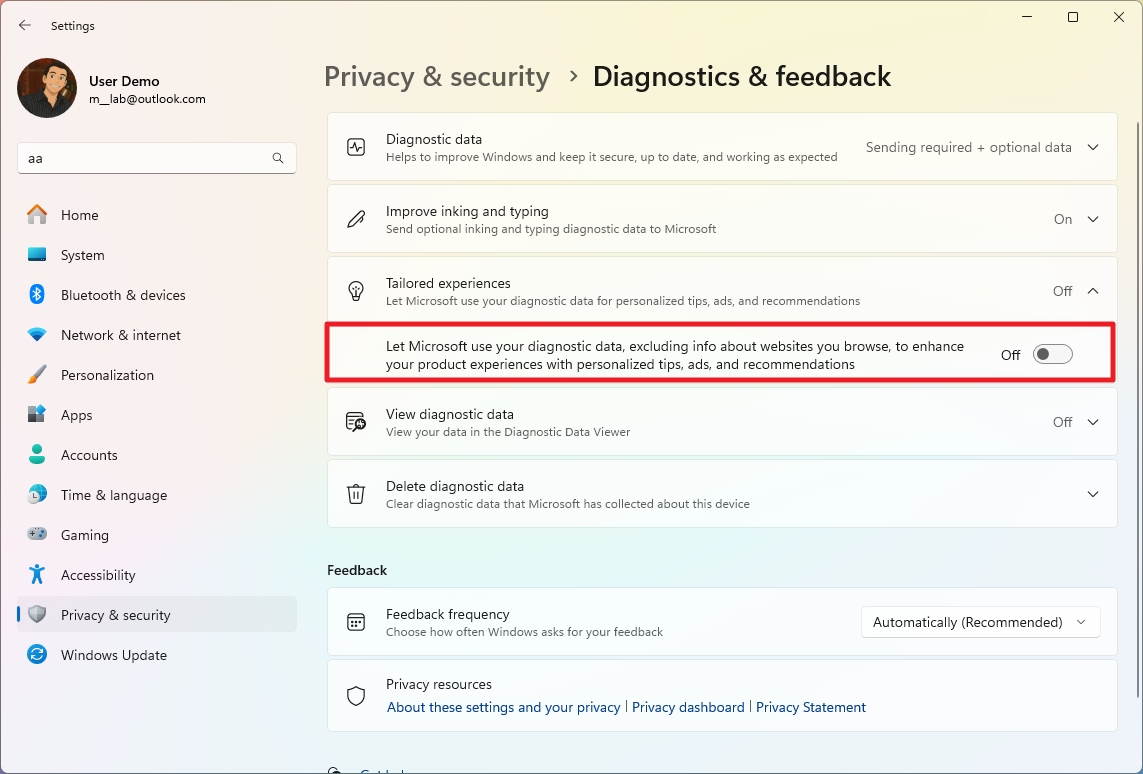
- Click the Diagnostics & feedback page on the right side.
- Click the Tailored experiences setting.
- Turn off the "Let Microsoft use your diagnostic data, excluding info about websites you browse, to enhance your product experiences with personalized tips, ads, and recommendations" toggle switch.
After you complete the steps, Microsoft will not continue using diagnostic data to tailor ads.
If you follow this guide, the number of ads will be significantly lower. However, you may continue to see some advertisements from Microsoft Store apps and other ad-supported third-party apps.
Also, remember that ads throughout the experience are not the same as those ads when browsing the web. On Windows 11, you won't see ads to purchase insurance, a new car, or medicine. Instead, the company uses its platform to show suggestions to lure you into apps and services from the company itself (OneDrive, Office, etc.) or partners (such as Spotify, Disney, etc.).
More resources
For more helpful articles, coverage, and answers to common questions about Windows 10 and Windows 11, visit the following resources:

Mauro Huculak has been a Windows How-To Expert contributor for WindowsCentral.com for nearly a decade and has over 22 years of combined experience in IT and technical writing. He holds various professional certifications from Microsoft, Cisco, VMware, and CompTIA and has been recognized as a Microsoft MVP for many years.
You must confirm your public display name before commenting
Please logout and then login again, you will then be prompted to enter your display name.
