How to customize mouse settings on Windows 11
Here are virtually every mouse customization settings you can configure on Windows 11.
On Windows 11, you can tweak the mouse settings to make it more functional and personal, and in this guide, I will explain how to complete this configuration.
Although you can connect the mouse (or touchpad) to your laptop or desktop computer to start using the pointer and cursor on the screen, you can customize a range of settings, including speed and scrolling direction. You can enable or disable specific features and personalize the pointer and cursor with different colors.
There are no right or wrong configurations for using these settings. You have to test and figure out what works best for you.
In this how-to guide, I will show you the different ways you can configure the mouse settings on Windows 11.
These instructions have been updated to ensure accuracy and reflect changes to the process in the operating system.
How to change mouse pointer speed
Sometimes, dragging the mouse around doesn't match your hand movement. When this happens, or you want to increase or decrease the mouse speed, you can manage this behavior from the Settings app as well as from the Control Panel.
From Settings
To change the mouse pointer speed on Windows 11, use these steps:
- Open Settings.
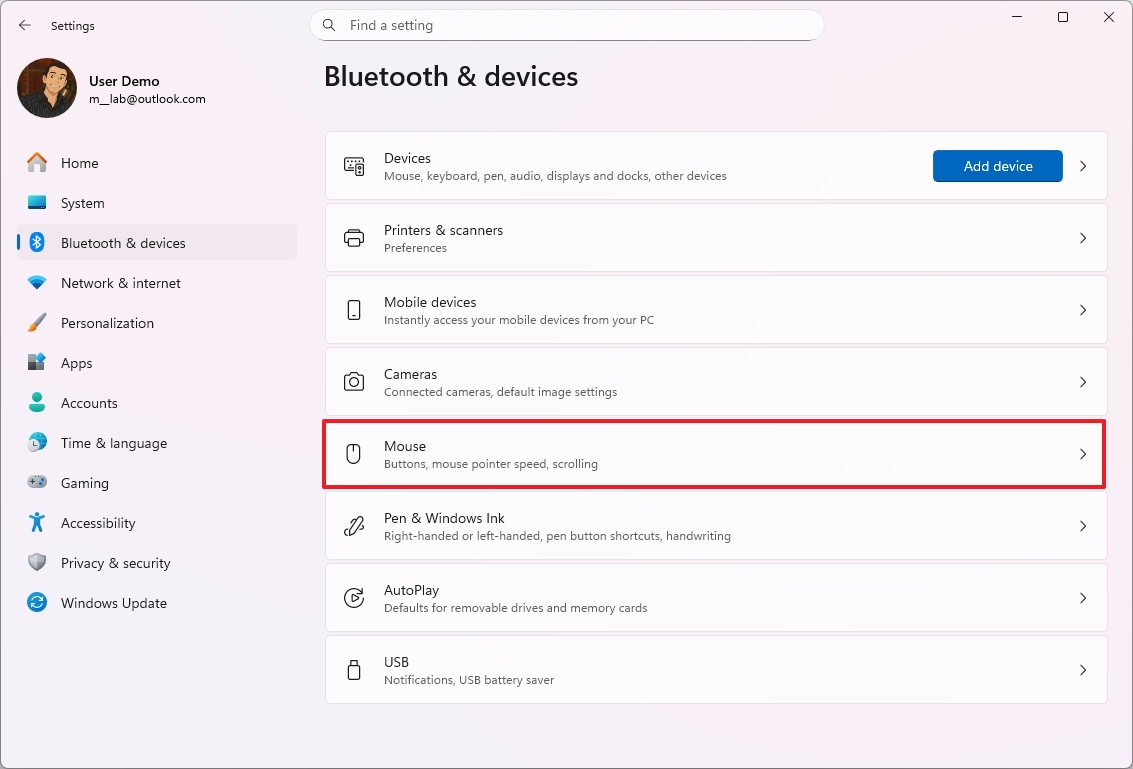
- Click on Bluetooth & devices.
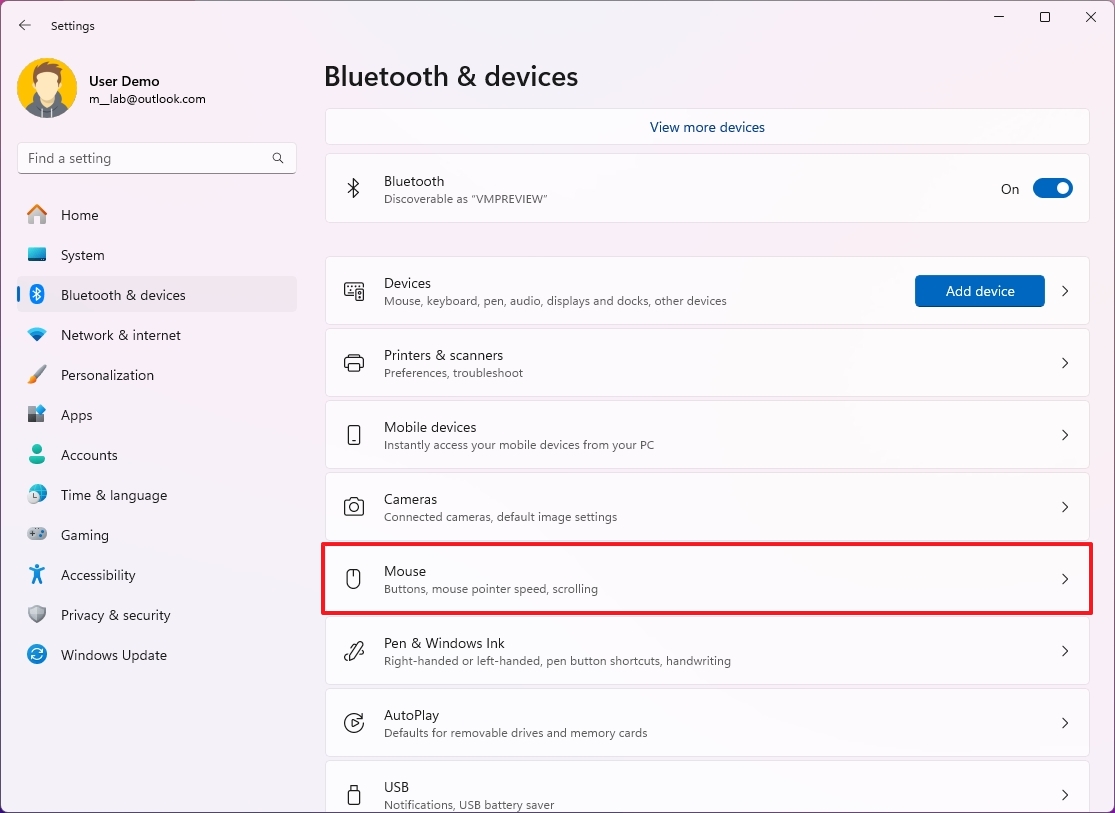
- Click the Mouse page on the right side.
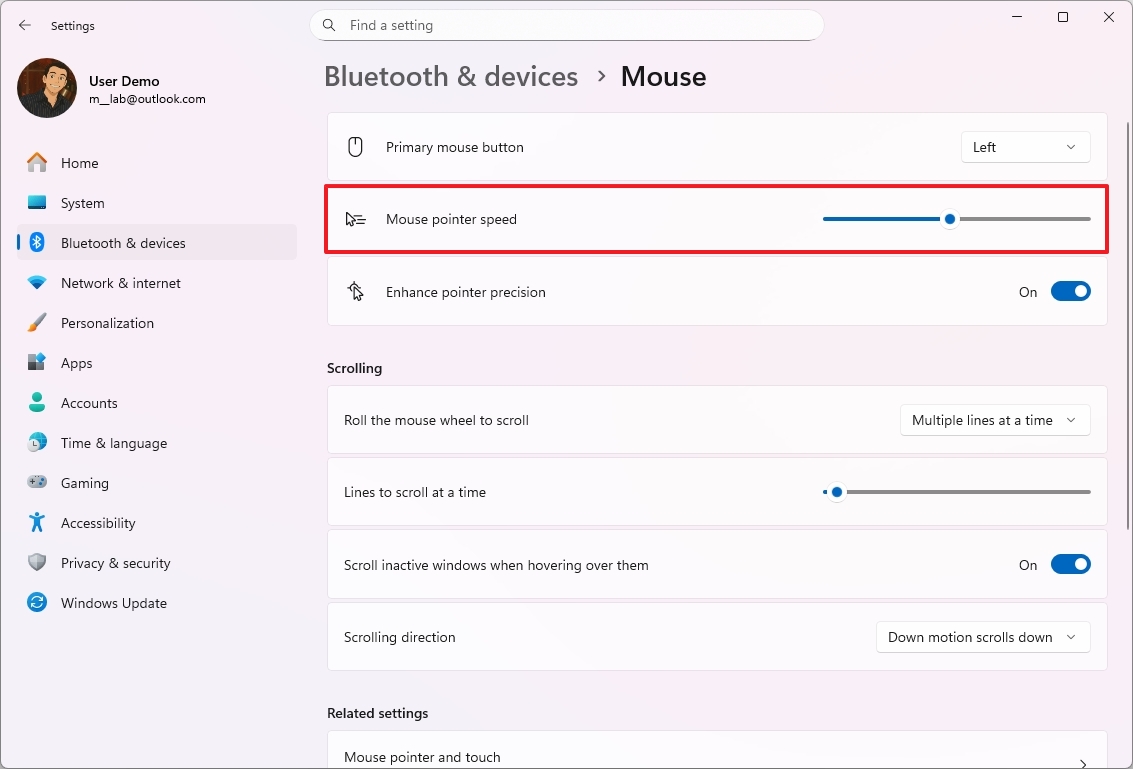
- Use the "Mouse pointer speed" slider to adjust the mouse acceleration.
- Turn on the "Enhance pointer precision" toggle switch.
From Control Panel
To change the mouse speed from the legacy Control Panel, use these steps:
All the latest news, reviews, and guides for Windows and Xbox diehards.
- Open Start.
- Search for Control Panel and click the top result to open the app.
- Change the "View by" to "Large icons" from the top-right.
- Click on Mouse.
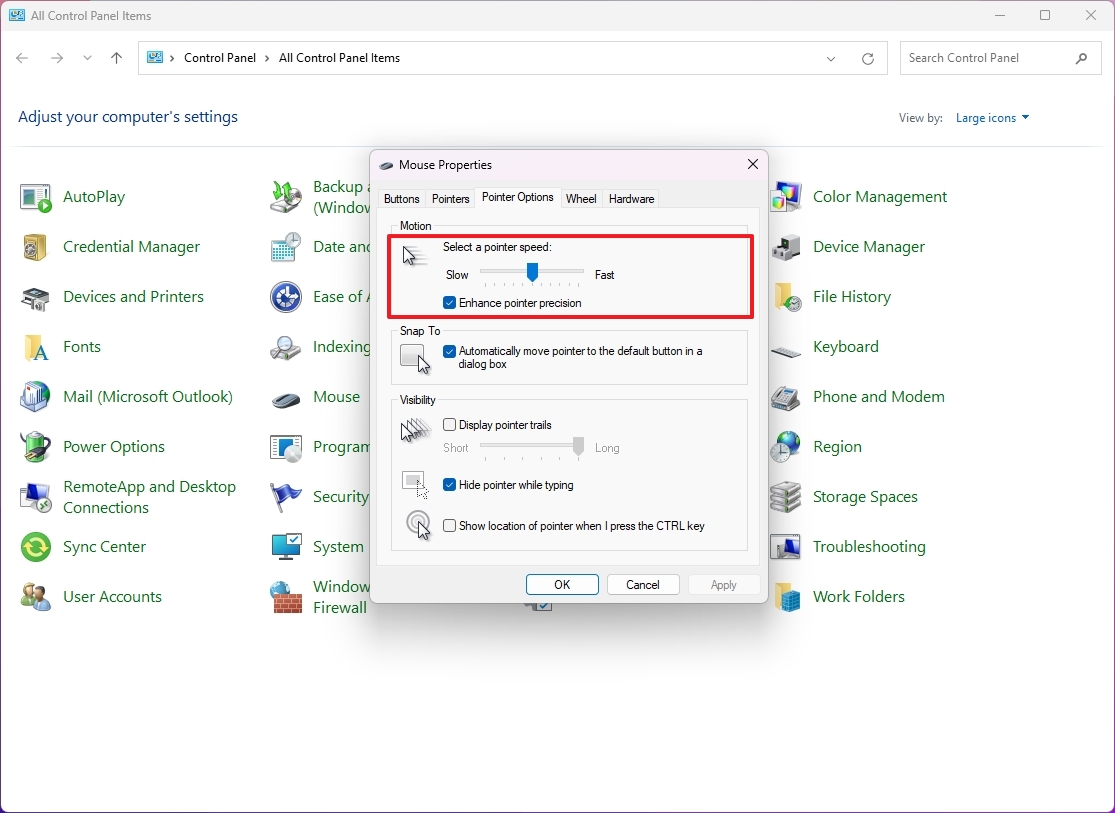
- Click the Pointer Options tab.
- Use the slider to control the pointer speed with the "Motion" setting.
- Check the "Enhance pointer precision" option.
- Click the Apply button.
- Click the OK button.
Once you complete the steps, the system will apply the new travel speed for the mouse pointer on Windows 11.
How to change mouse action button to left hand
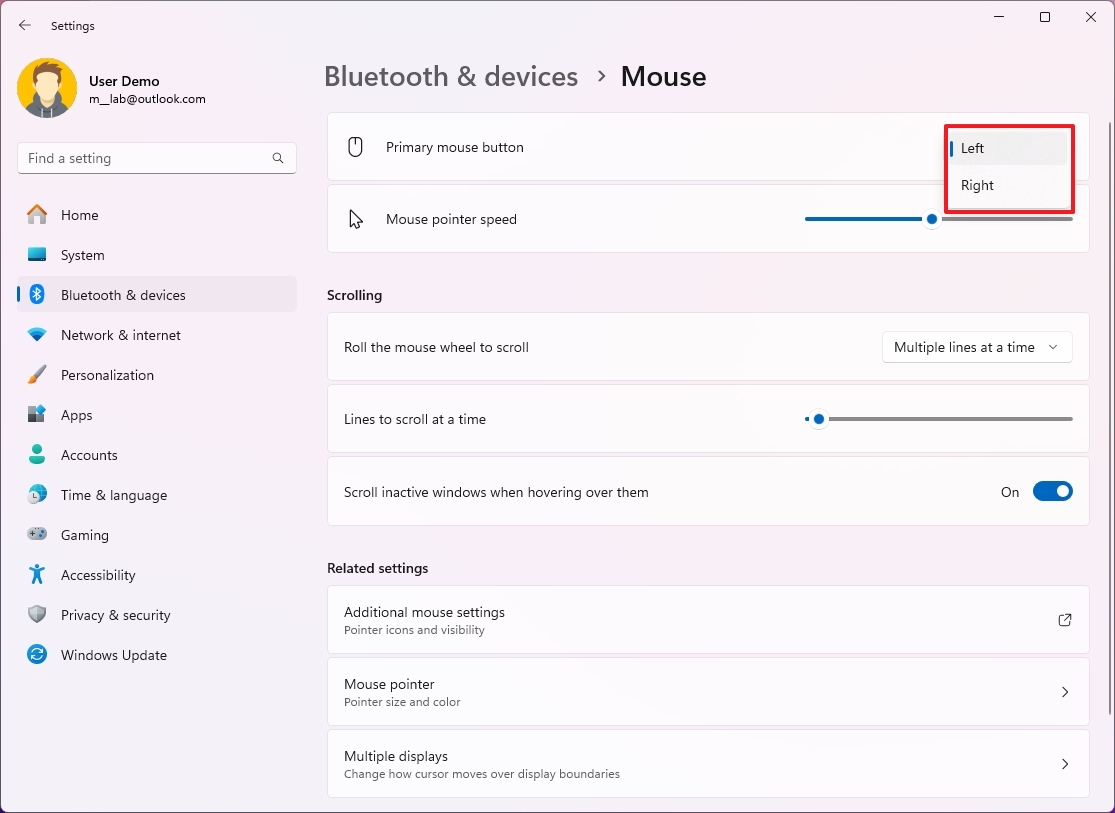
If you happen to be a left-handed person, you can change the behavior of the primary button to the right through the Settings app or Control Panel.
From Settings
To configure the mouse for left-handed people, use these steps:
- Open Settings.
- Click on Bluetooth & devices.
- Click the Mouse page on the right side.
- (Option 1) Choose the Right option in the "Primary mouse button" setting to configure the mouse for left-handed people.
- (Option 2) Choose the Left option in the "Primary mouse button" setting to configure the mouse for right-handed people.
From Control Panel
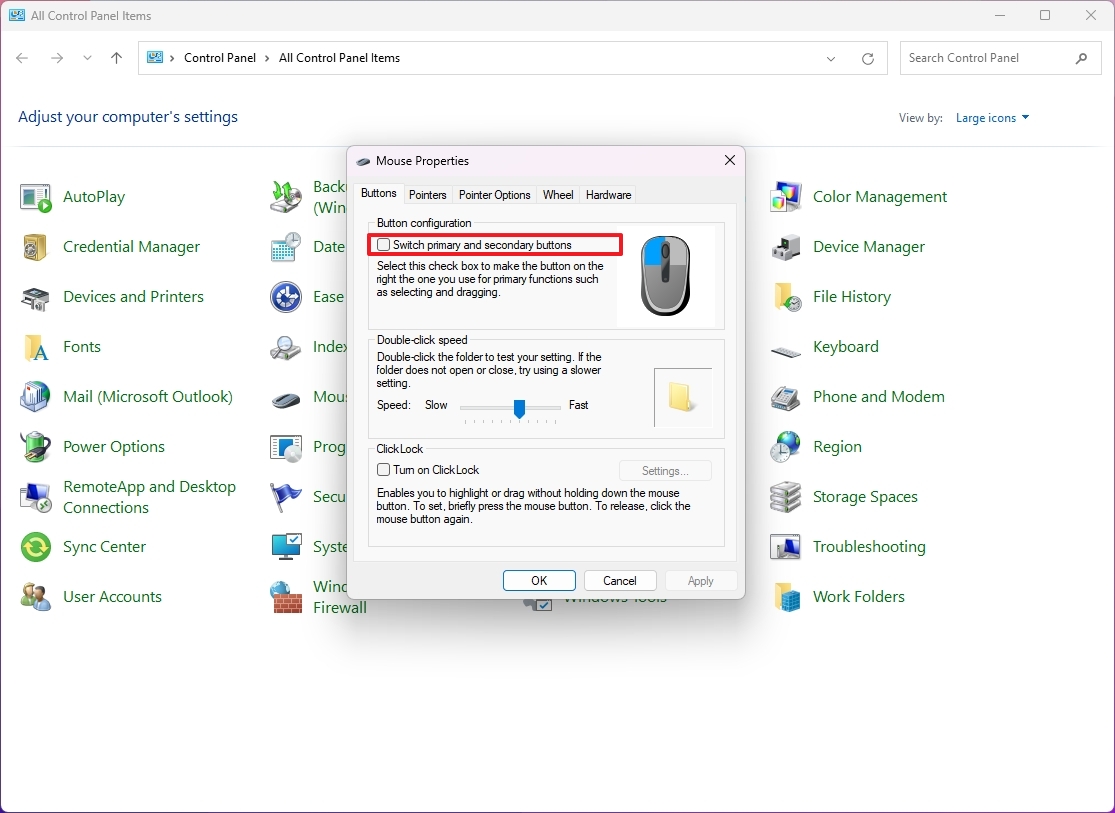
To set the mouse primary button for a left-handed person, use these steps:
- Open Start.
- Search for Control Panel and click the top result to open the app.
- Change the "View by" to "Large icons" from the top-right.
- Click on Mouse.
- Click the Buttons tab.
- Check the "Switch primary and secondary buttons" option.
- Click the Apply button.
- Click the OK button.
After you complete the steps, the system will switch the primary and secondary buttons of the mouse.
How to change scroll behavior for mouse
It's also possible to change the mouse wheel scrolling settings to make it faster or slower through the Settings app. If you use the Control Panel, you can also control the vertical scrolling behavior.
From Settings
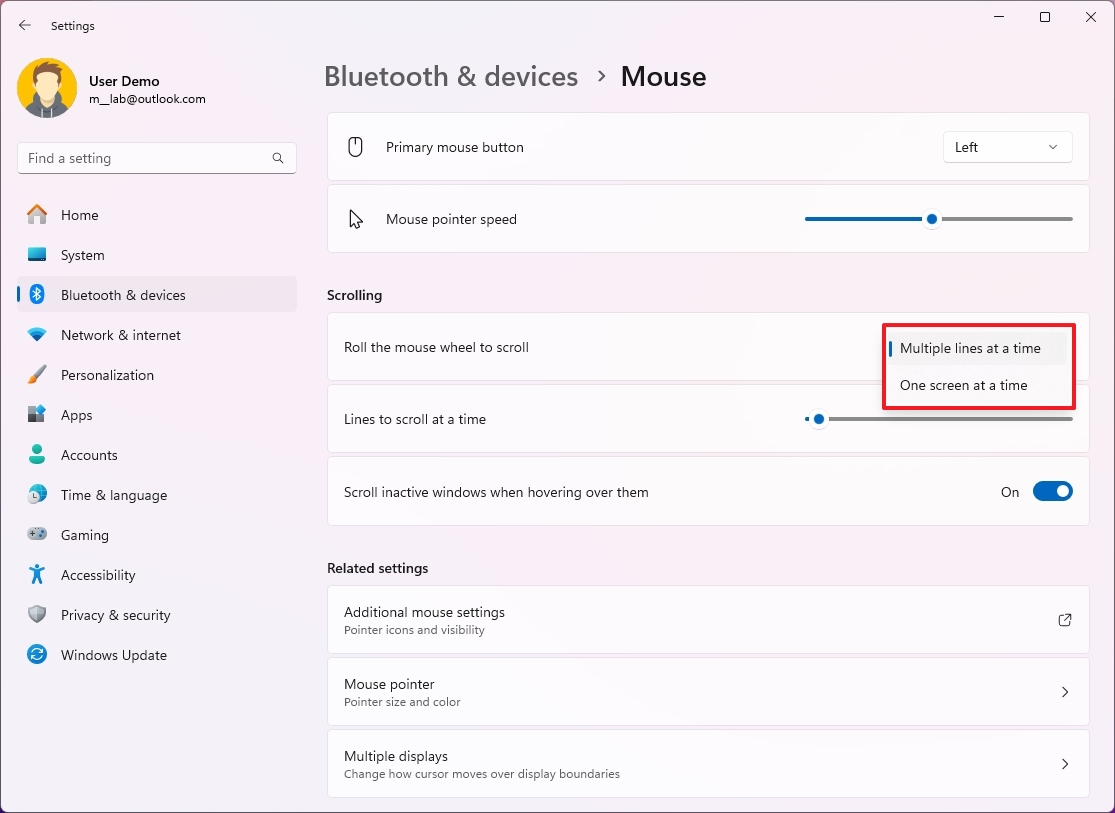
To change the mouse scroll settings on Windows 11, use these steps:
- Open Settings.
- Click on Bluetooth & devices.
- Click the Mouse page on the right side.
- Choose the "Multiple lines at a time" or "One screen at a time" option in the "Roll the mouse wheel to scroll" setting.
- Choose the number of lines to scroll at a time with the "Lines to scroll at a time" setting if you use the "Multiple lines at a time" option.
- Turn on the "Scroll inactive window when hovering over them" toggle switch.
- Quick note: If you use this option, whenever you have multiple windows open, you can scroll any window with the mouse wheel without shifting focus to the other window.
From Control Panel
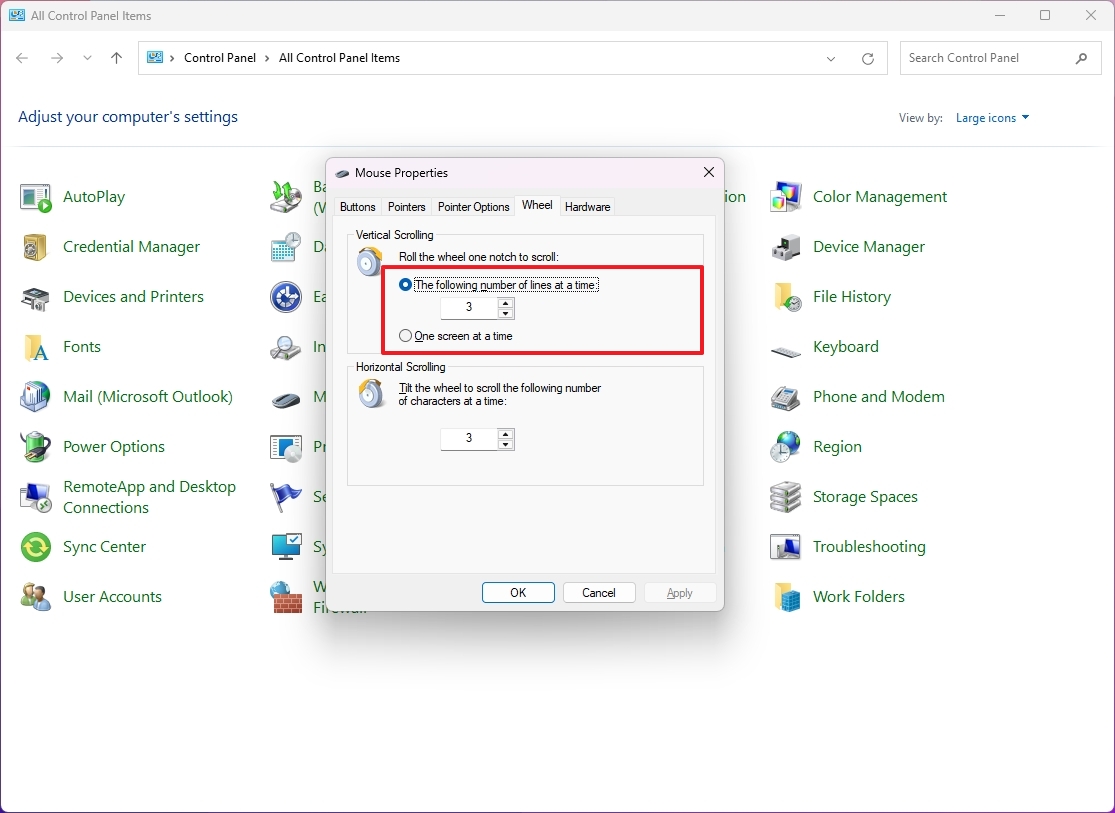
To configure the wheel scrolling behavior through the Control Panel, use these steps:
- Open Start.
- Search for Control Panel and click the top result to open the app.
- Change the "View by" to "Large icons" from the top-right.
- Click on Mouse.
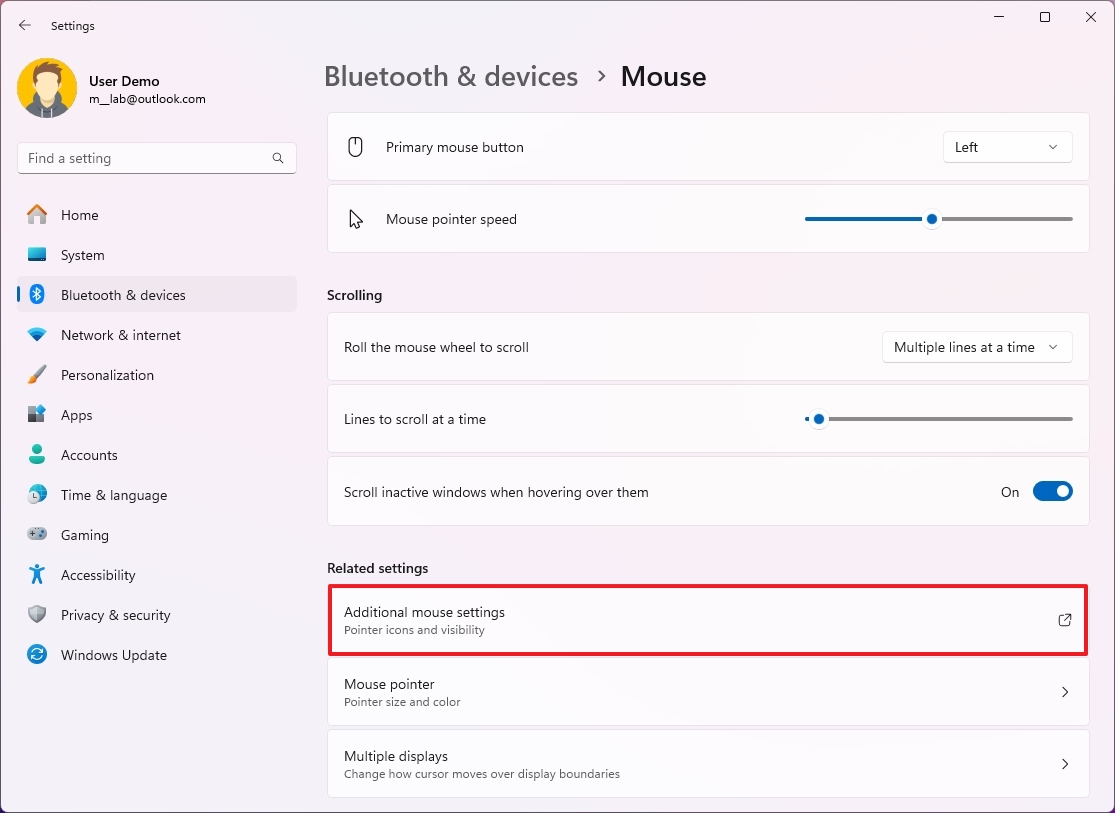
- Click on "Additional mouse settings" under the "Related settings" section.
- Click the Wheel tab.
- (Option 1) Choose "The following of lines at a time" in the "Roll the wheel one notch to scroll" setting to set the number of lines to scroll with the mouse wheel.
- (Option 2) Choose the "One screen at a time" option.
- (Optional) Select the number of characters to scroll for the "Horizontal Scrolling" setting.
- Click the Apply button.
- Click the OK button.
Once you complete the steps, you can use the mouse with the new scrolling settings.
How to change mouse double-click speed
On Windows 11, it's even possible to change the timing that the system registers as a double-click, using the Settings app or Control Panel.
From Settings
To change the double-click speed of your mouse, use these steps:
- Open Settings.
- Click on Accessibility.
- Click the Mouse page on the right side.
- Use the slider to increase or decrease the speed with the "Double click speed" setting.
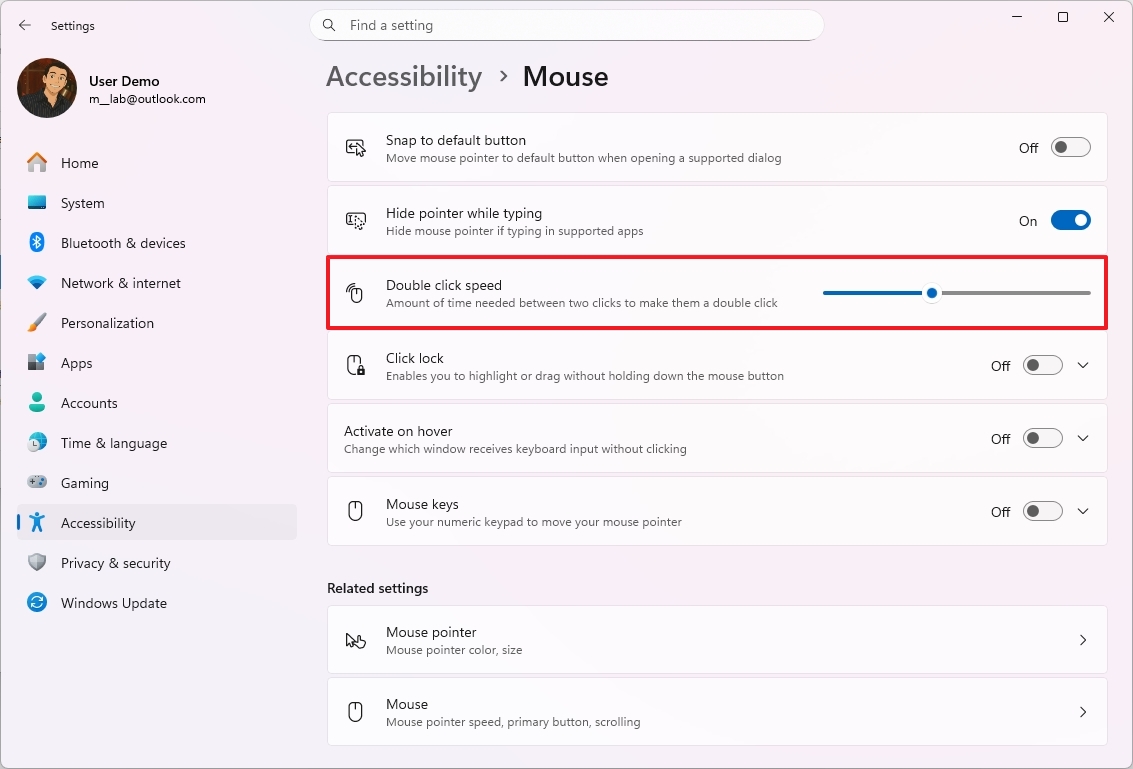
After you complete the steps, the system will apply the new speed for the double-click action on Windows 11.
From Control Panel
To change the double-click speed of the mouse from the Control Panel, use these steps:
- Open Start.
- Search for Control Panel and click the top result to open the app.
- Change the "View by" to "Large icons" from the top-right.
- Click on Mouse.
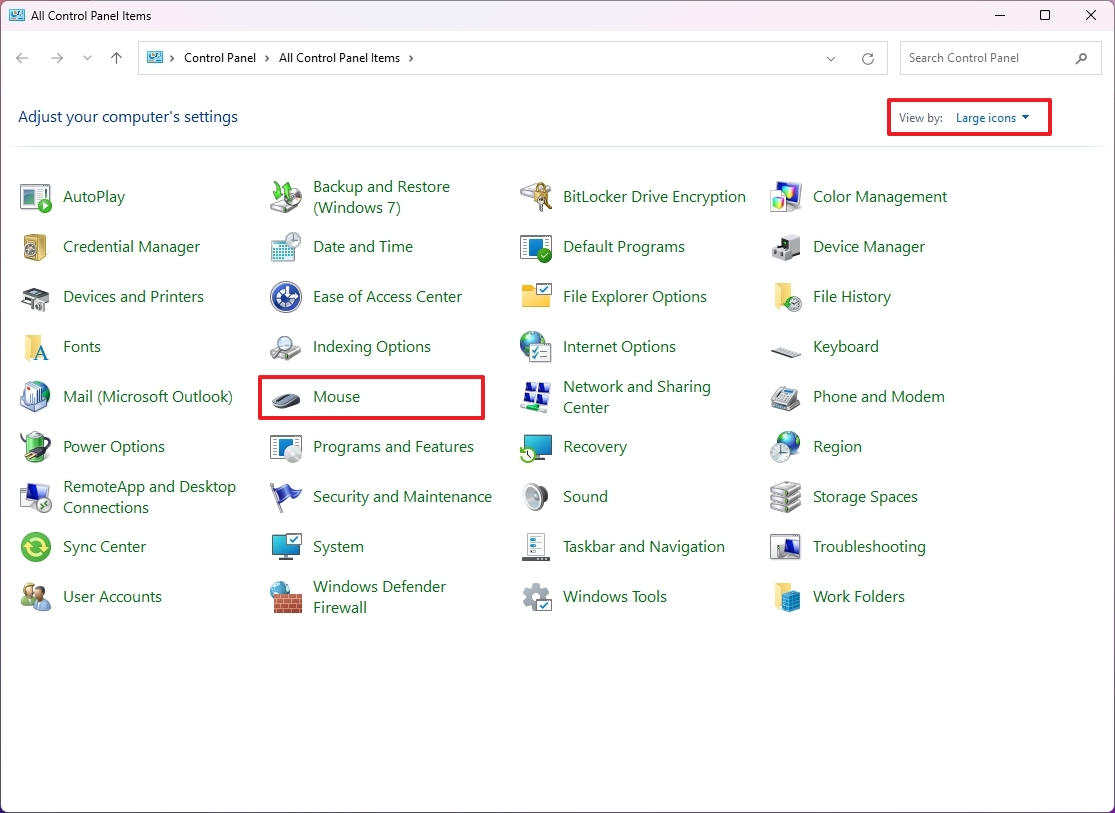
- Click the Button tab.
- Use the slider to increase or decrease the speed with the "Double-click speed" setting.

- Click the Apply button.
- Click the OK button.
Once you complete the steps, the new setting will apply immediately.
How to enable mouse ClickLock feature
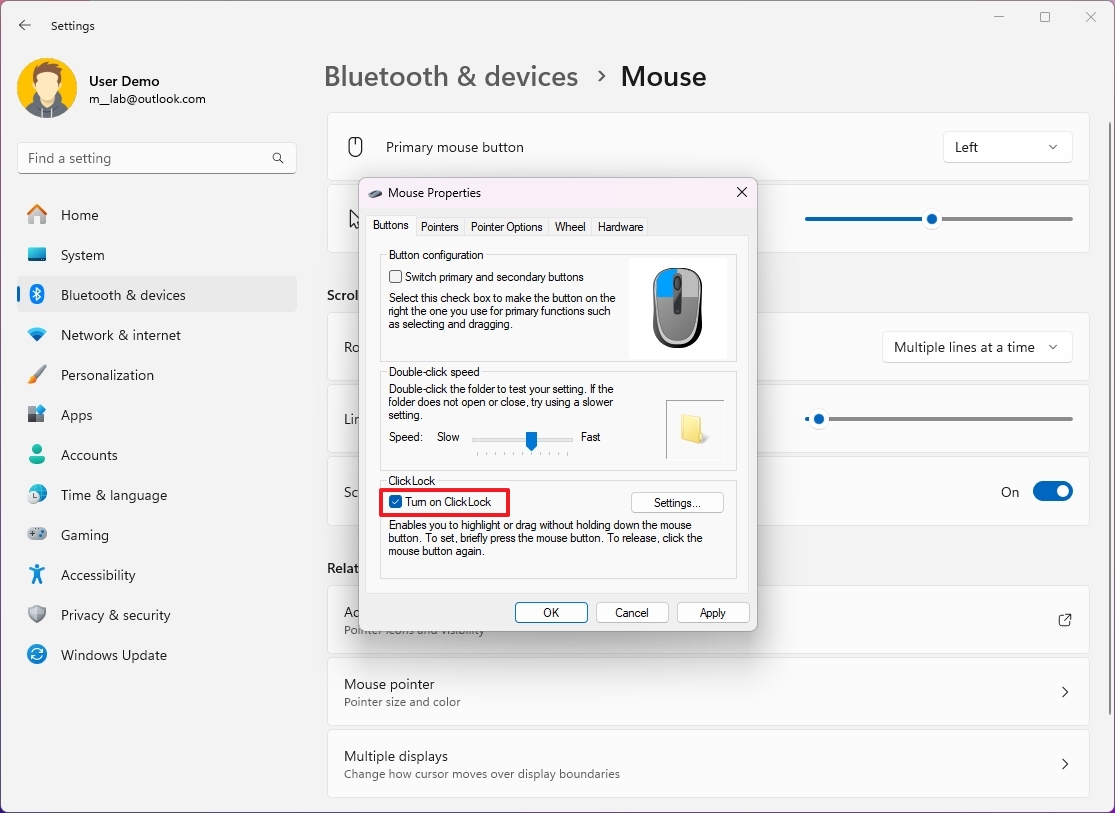
ClickLock is the action of clicking and holding for a specific period to lock the item to the mouse pointer without having to hold the click to drag it around.
On Windows 11, you can enable this feature only through the Control Panel settings, and here's how:
- Open Settings.
- Click on Bluetooth & devices.
- Click the Mouse page on the right side.
- Click "Additional mouse settings" under the "Related settings" section.
- Click the Buttons tab.
- Check the "Turn on ClickLock" option.
- (Optional) Click the Settings button.
- Change the hold-down time before the click is locked.
- Click the OK button.
- Click the Apply button.
- Click the OK button.
Once you complete the steps, you can highlight or drag without holding down the mouse button. The action requires a brief click to lock the item and another click to unlock and release the item.
How to change mouse pointer scheme
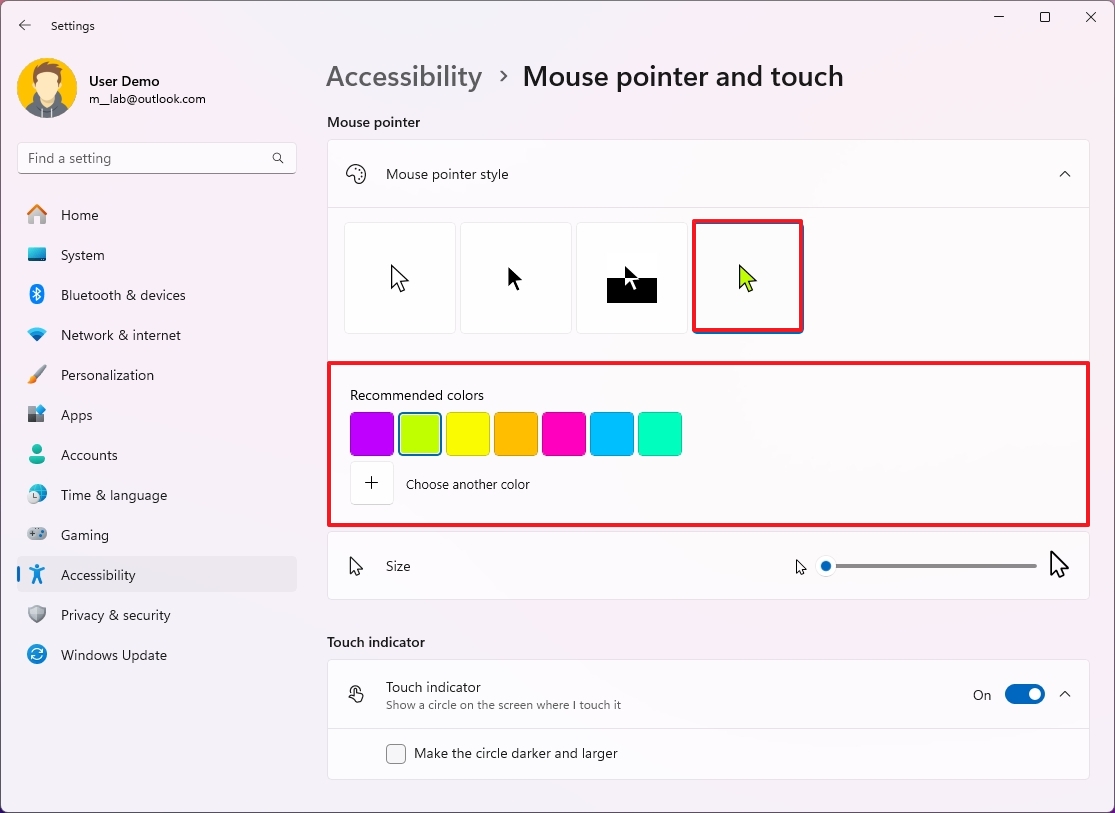
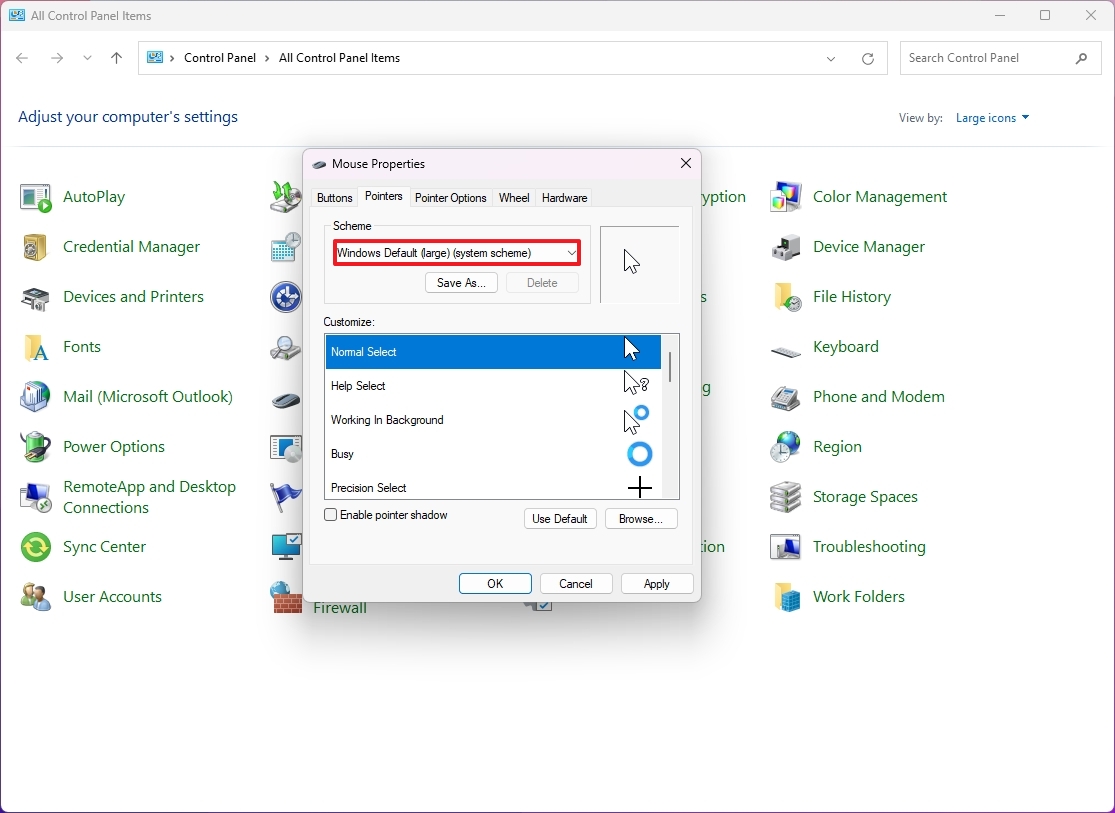
Windows 11 also provides the ability to change the color scheme to make the mouse pointer easier to identify on the screen. Although this is an "Accessibility" feature, anyone can use it to personalize the experience.
It's also possible to change the mouse scheme from the Control Panel, but the settings are more limited, and you can only choose from a few designs.
From Settings
To change the mouse pointer color scheme on Windows 11, use these steps:
- Open Settings.
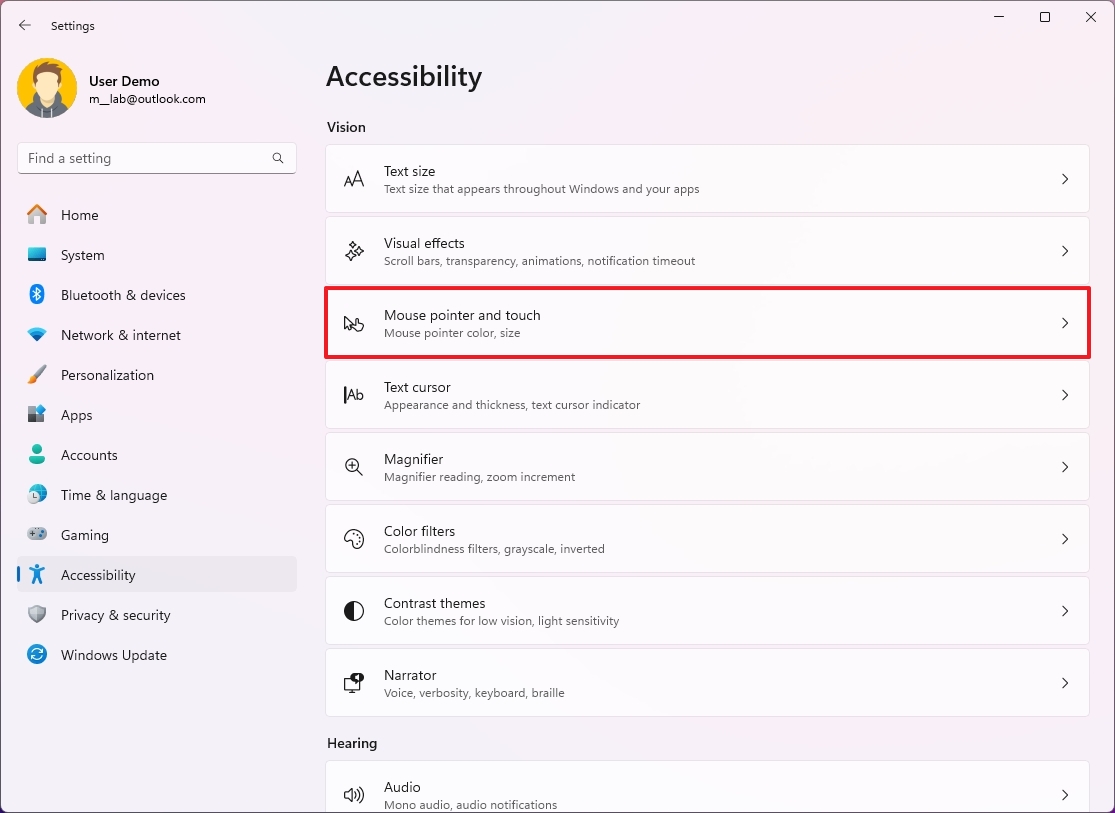
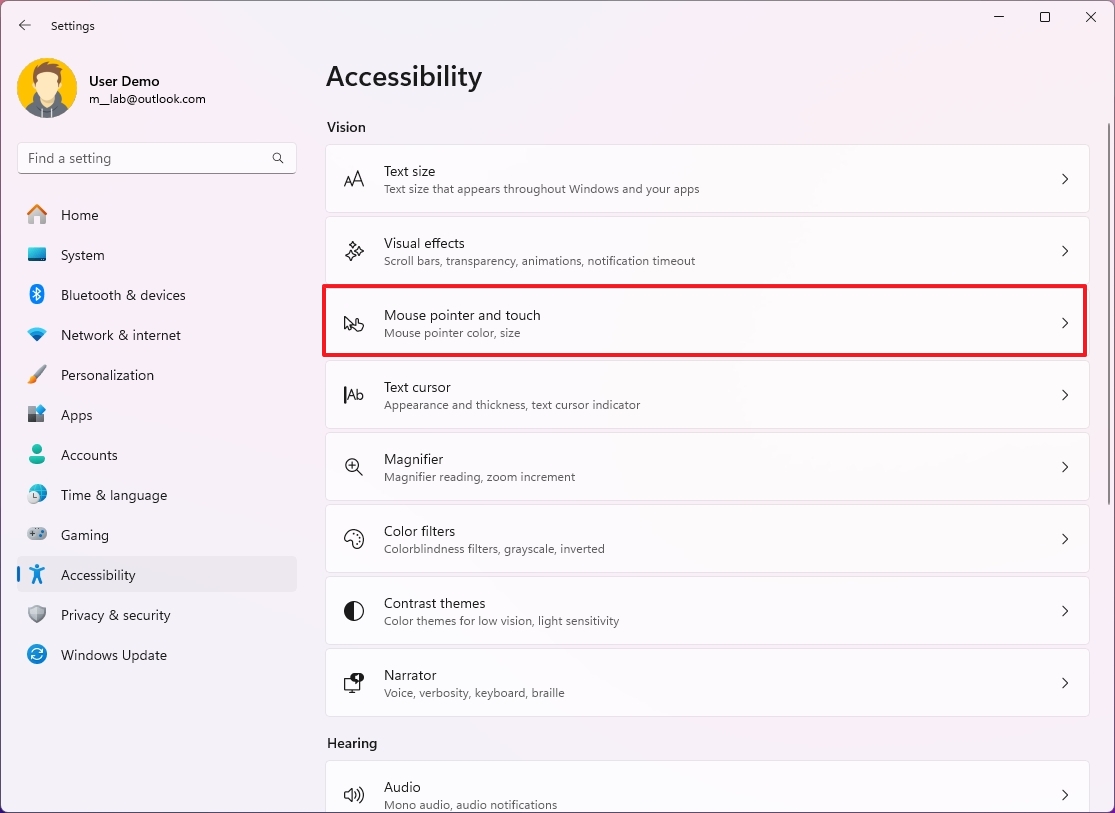
- Click on Accessibility.
- Click the "Mouse pointer and touch" page on the right side.
- Click the Custom option inside the "Mouse pointer style" setting.
- Choose the color scheme for the pointer.
- Quick tip: You can also choose the "Black" and "Inverted" schemes from this setting.
- (Optional) Click the "Choose another color" option to create a custom color.
From Control Panel
To change the mouse scheme from the Control Panel, use these steps:
- Open Start.
- Search for Control Panel and click the top result to open the app.
- Change the "View by" to "Large icons" from the top-right.
- Click on Mouse.
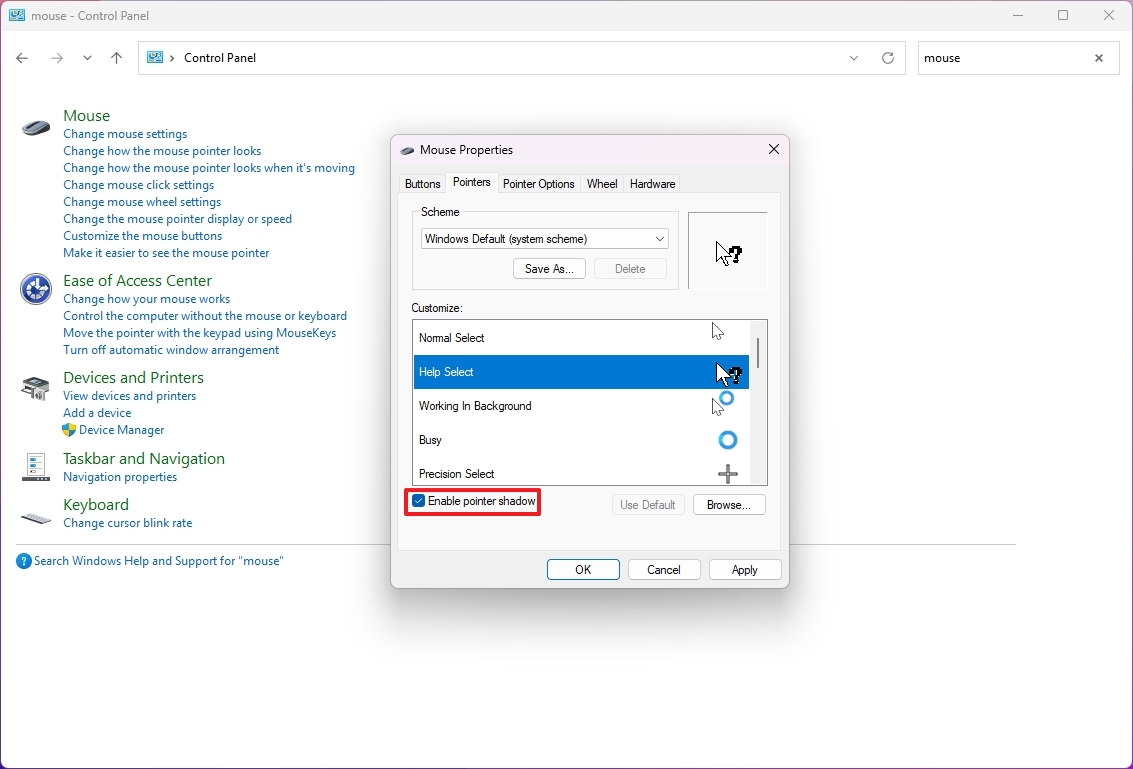
- Click the Pointer tab.
- Choose one of the available pointer schemes.
- (Optional) Check the "Enable pointer shadow" option to add a shadow around the mouse pointer to make it more visible.
- Click the OK button.
- Click the Apply button.
- Click the OK button.
After you complete the steps, the new scheme will apply to the mouse pointer and text cursor.
How to enable mouse Snap To feature
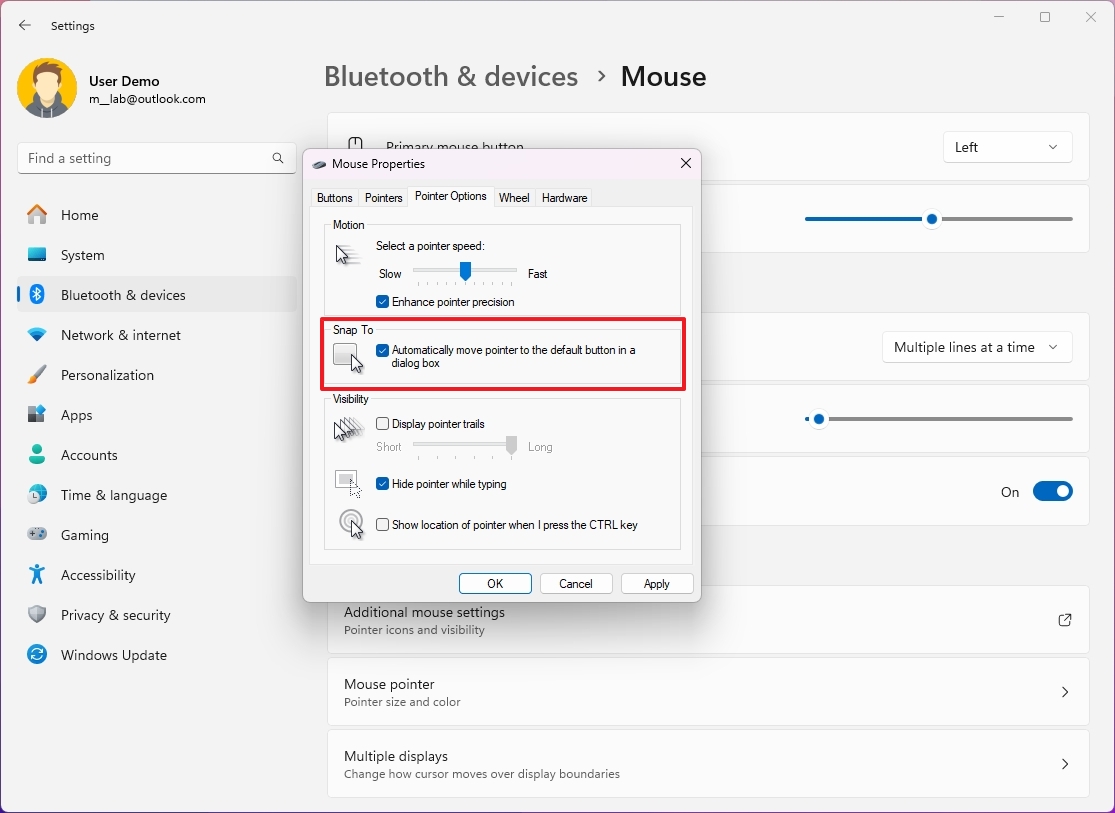
"Snap To" is a feature that automatically moves the pointer to the default button in a dialog box to speed up the configuration process. This is a legacy feature, but you can still use it on Windows 11.
To enable the Snap To feature on Windows 11, use these steps:
- Open Settings.
- Click on Bluetooth & devices.
- Click the Mouse page on the right side.
- Click "Additional mouse settings" under the "Related settings" section.
- Click the Power Options tab.
- Check the "Automatically move pointer to the default button in a dialog box" option.
- Click the Apply button.
- Click the OK button.
Once you complete the steps, the next time a dialog appears on the screen, the mouse pointer will move automatically to the default action button.
How to enable mouse finder settings
If you're one of those who miss the mouse pointer on the screen, especially on a multi-monitor display, you can enable a feature that allows you to press the "Ctrl" key to show the location of the pointer.
From Settings
To enable the mouse pointer indicator, use these steps:
- Open Settings.
- Click on Accessibility.
- Click the Mouse pointer and touch page on the right side.
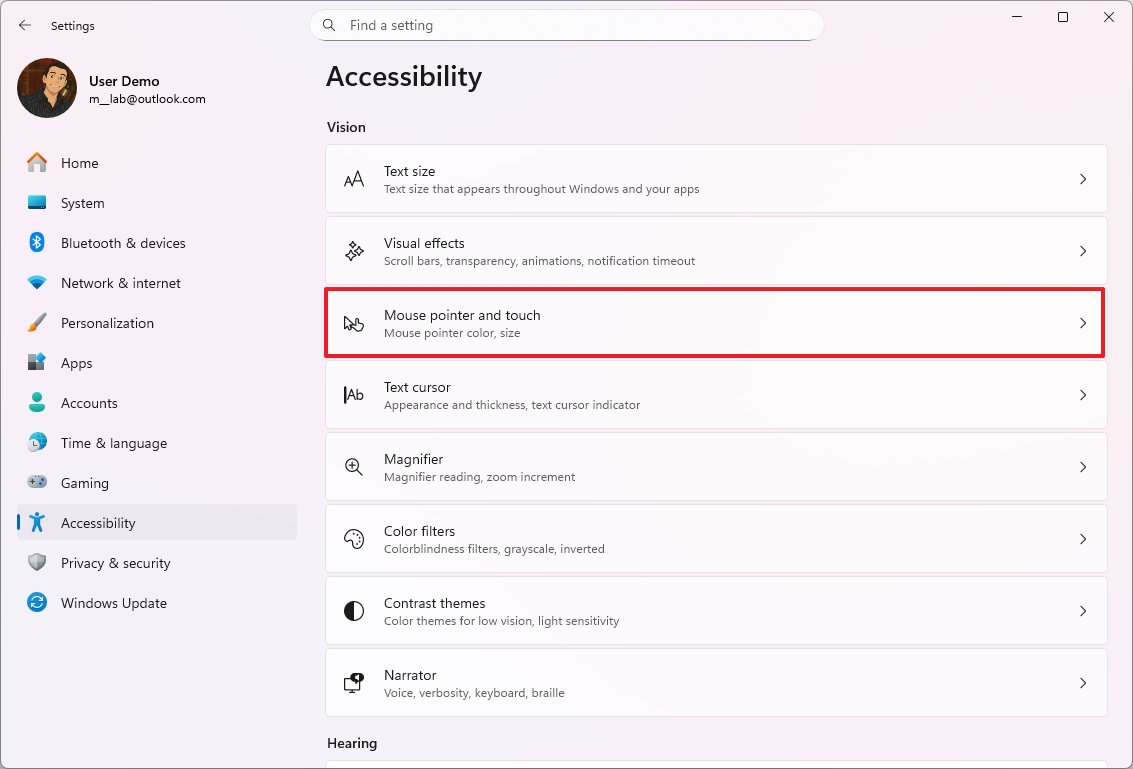
- Turn on the "Mouse indicator" toggle switch.
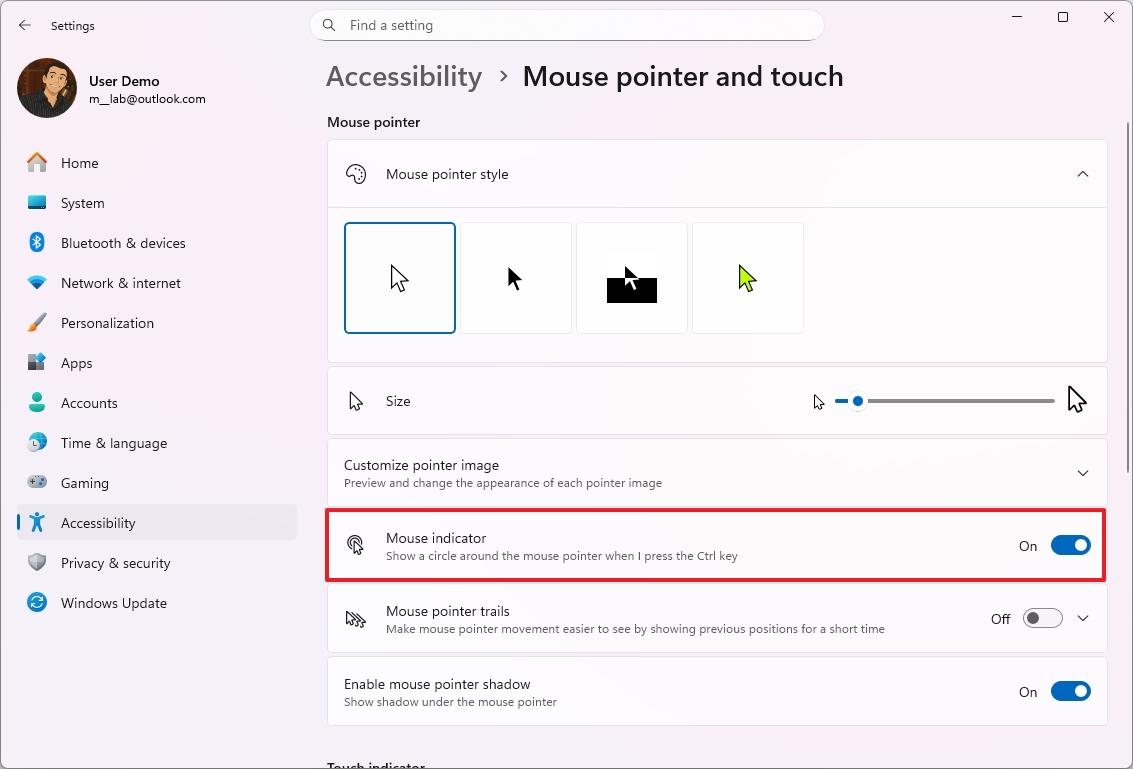
Once you complete the steps, you can start using the "Ctrl" key to view the visual feedback for the location of the mouse pointer.
From Control Panel
To enable the mouse pointer indicator from Control Panel, use these steps:
- Open Start.
- Search for Control Panel and click the top result to open the app.
- Change the "View by" to "Large icons" from the top-right.
- Click on Mouse.

- Click the Pointer Options tab.
- Check the "Show location of pointer when I press the CTRL key" option.
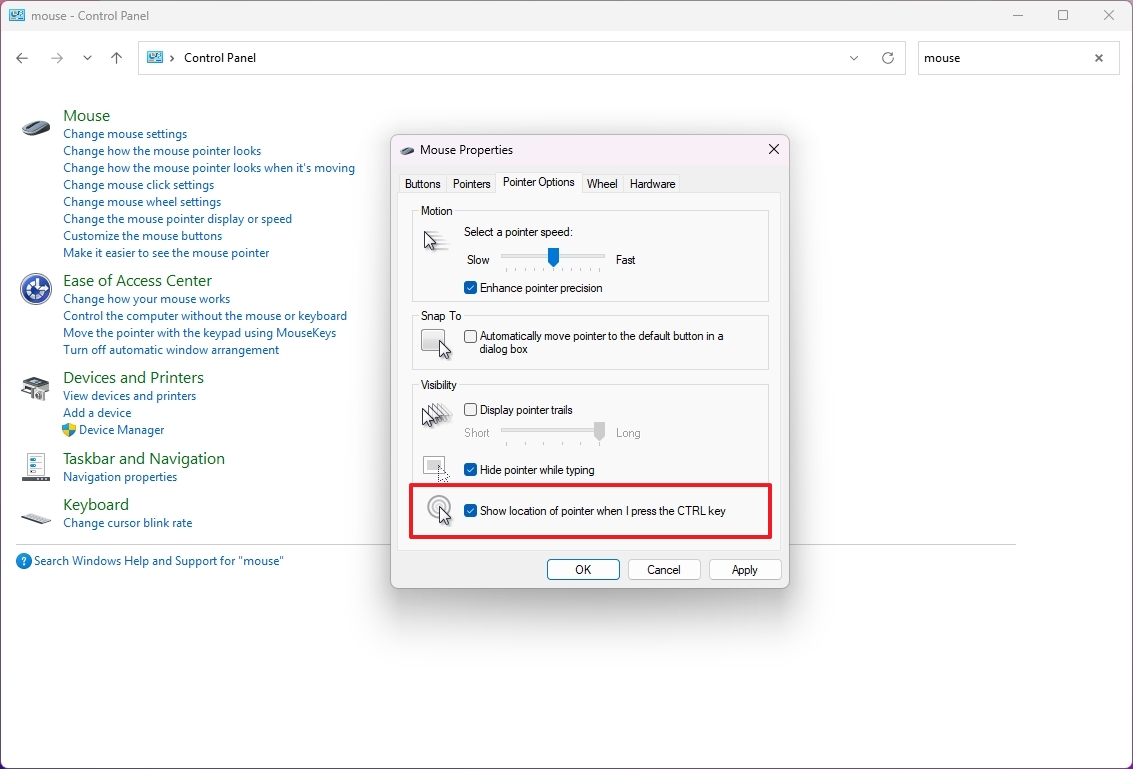
- Click the Apply button.
- Click the OK button.
After you complete the steps, similar to using the Settings app, you can use the "Ctrl" key to find the mouse pointer on the screen.
How to change mouse pointer size
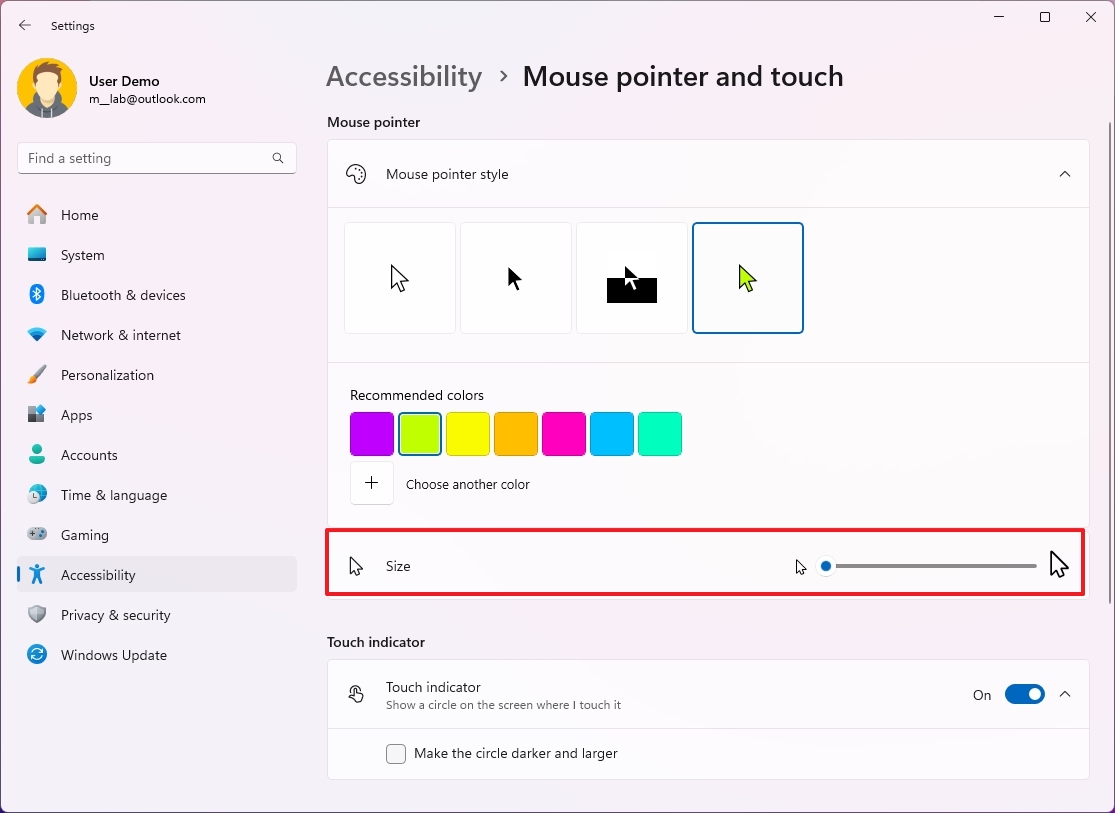
To change the mouse pointer size on Windows 11, use these steps:
- Open Settings.
- Click on Accessibility.
- Click the "Mouse pointer and touch" page on the right side.
- Use the slider for the Size settings to make the pointer larger or smaller.
Once you complete the steps, the pointer will reflect the smaller or larger size you specified.
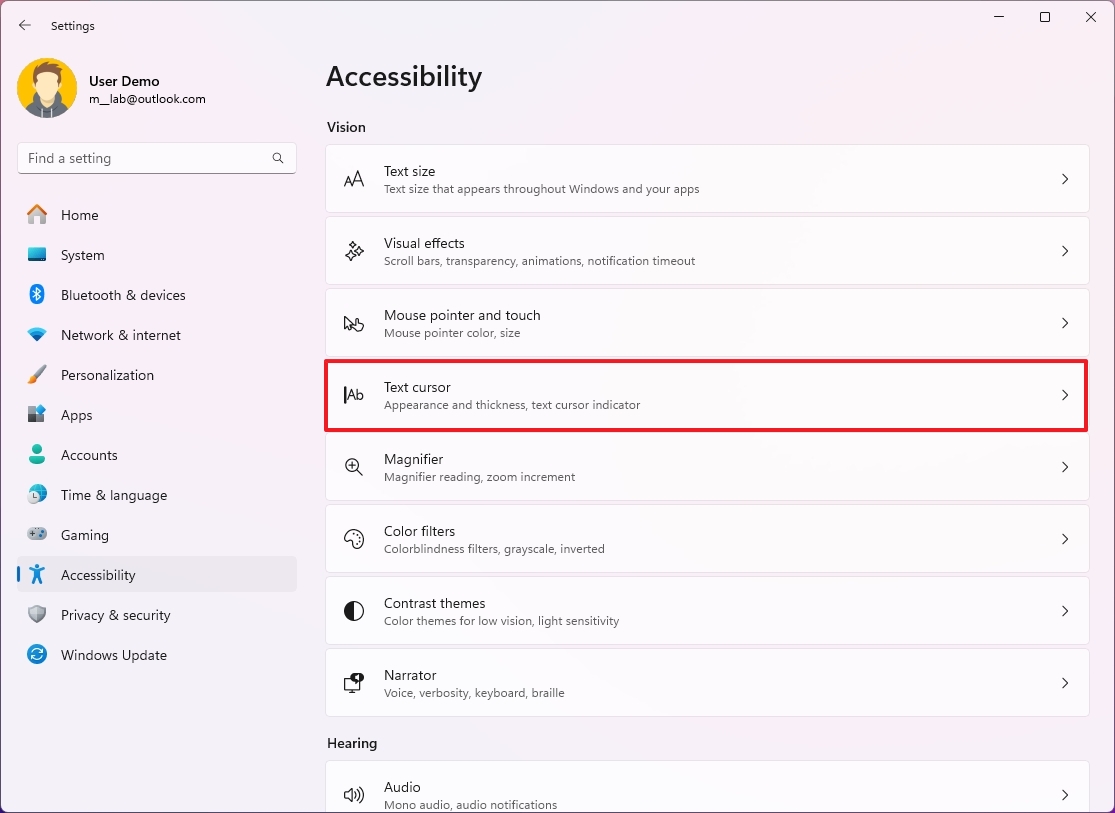
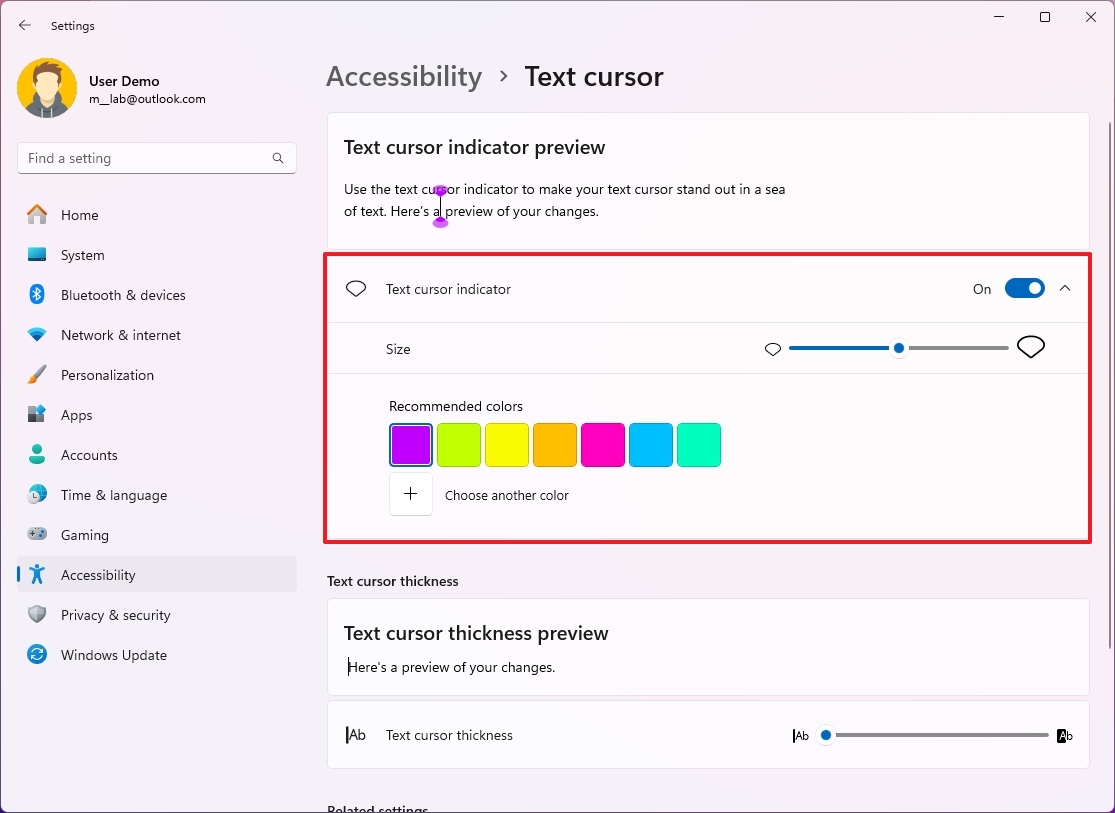
How to enable mouse text cursor
To enable the text cursor indicator on Windows 11, use these steps:
- Open Settings.
- Click on Accessibility.
- Click the Text cursor page on the right side.
- Turn on the "Text cursor indicator" toggle switch.
- Choose the color scheme for the cursor.
- (Optional) Use the Size slider to change the size of the text cursor.
- (Optional) Click the "Choose another color" option to create a custom color.
After you complete the steps, when clicking a text box or using an application, the indicator will make it easier to find the cursor.
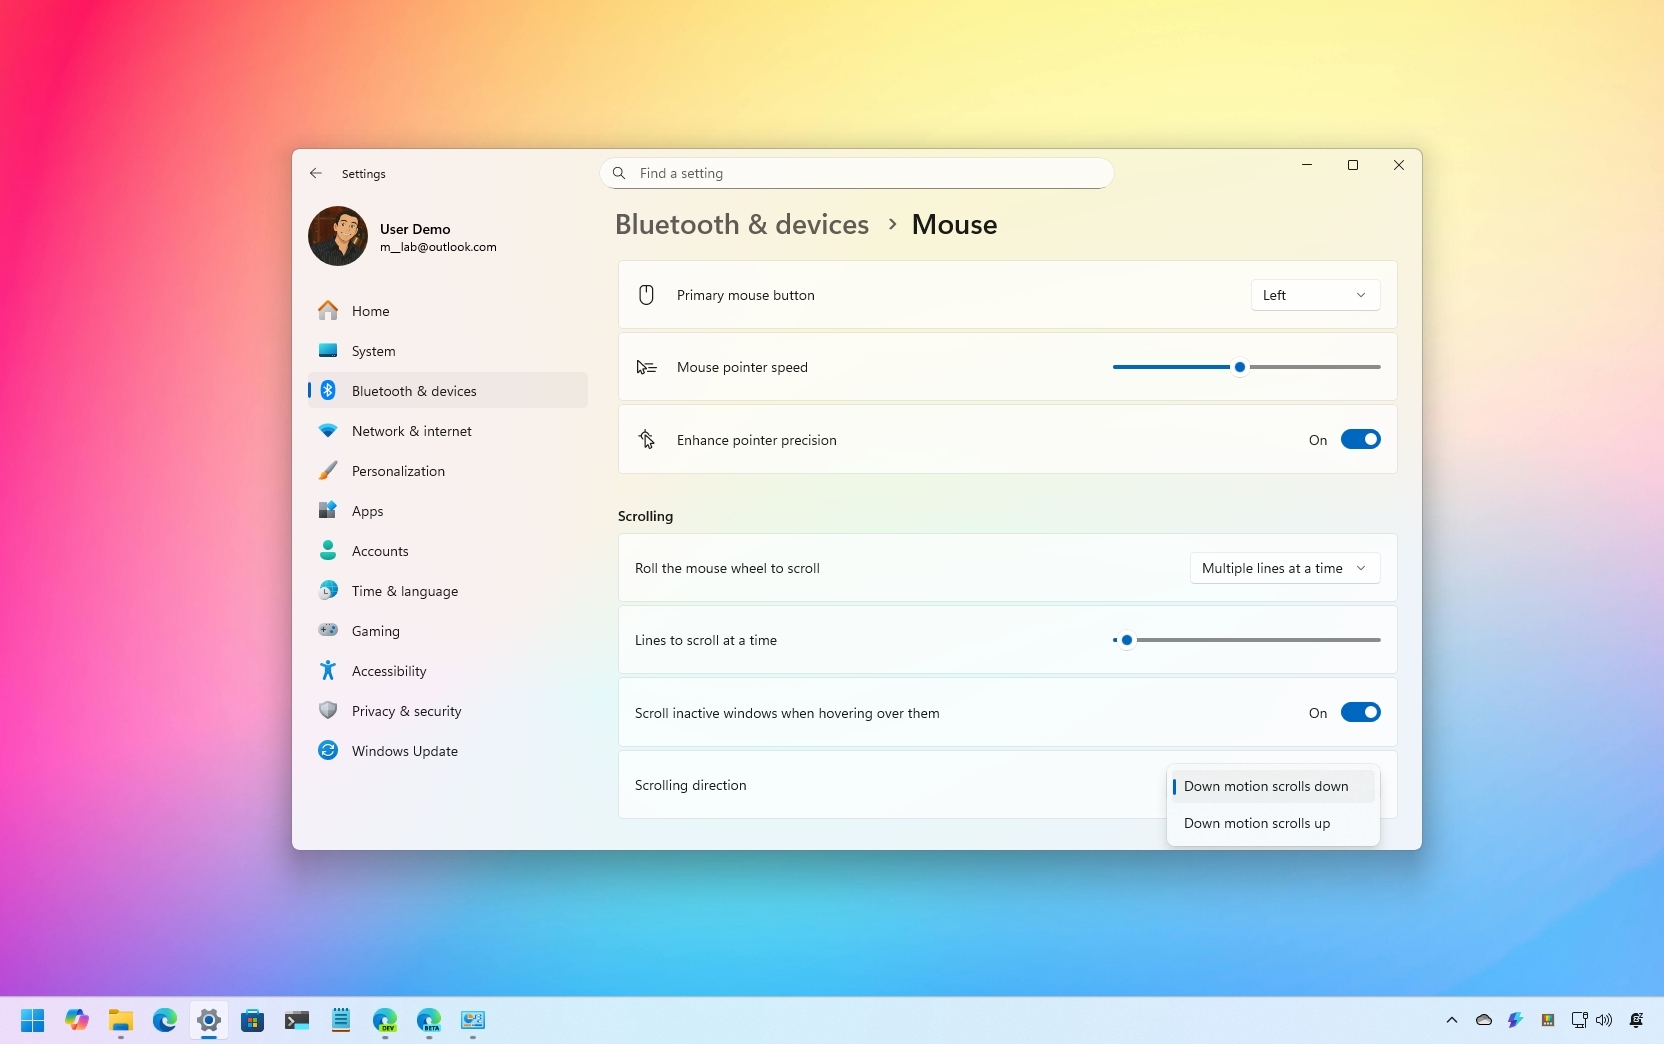
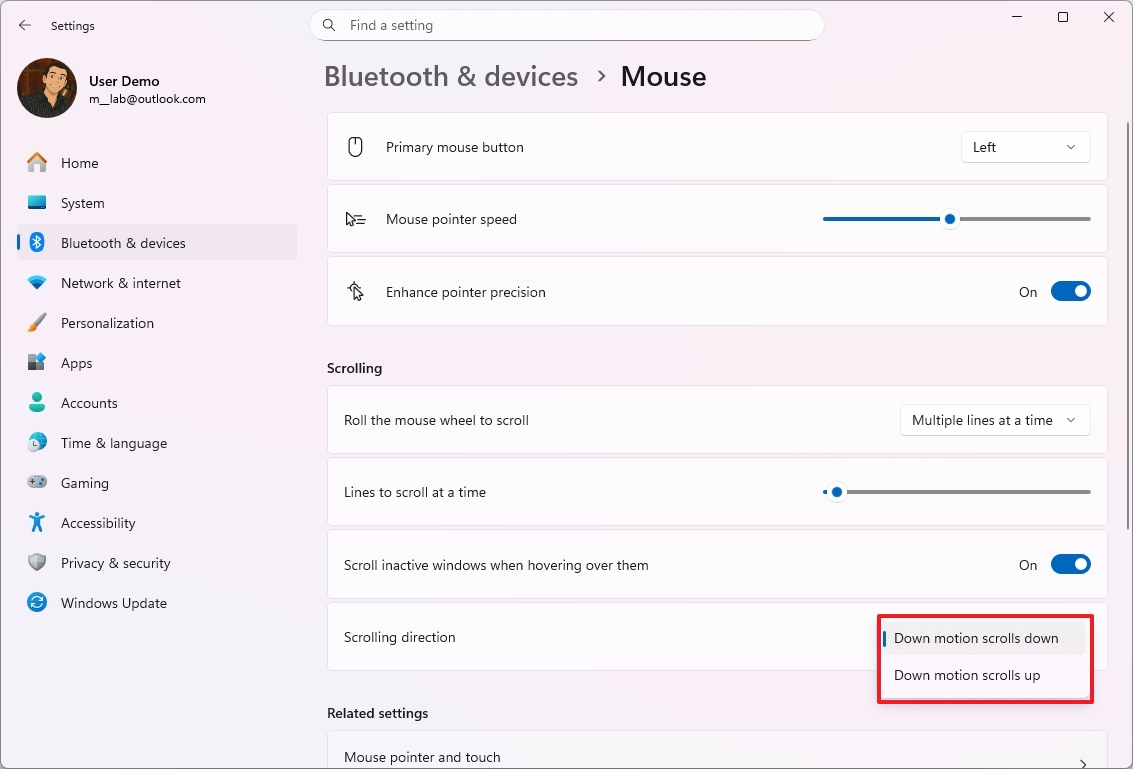
How to change the mouse scrolling direction
The ability to control the scrolling direction is relatively new, and it's only available through the Settings app.
To change the scrolling direction when using the mouse, use these steps:
- Open Settings.
- Click on Bluetooth & devices.
- Click the Mouse page on the right side.
- Select the "Down monition scrolls down" or "Down monition scrolls up" option to change directions under the "Scrolling direction" setting.
How to enable mouse trail effect
On Windows 11, you can also use the pointer trails to make the mouse movement easier to follow from the previous position.
From Settings
To enable the mouse pointer trails, use these steps:
- Open Settings.
- Click on Accessibility.
- Click the Mouse pointer and touch page on the right side.

- Turn on the "Mouse pointer trails" toggle switch.
- Click on the settings you recently enabled.
- Use the slider to manage the trail's length.
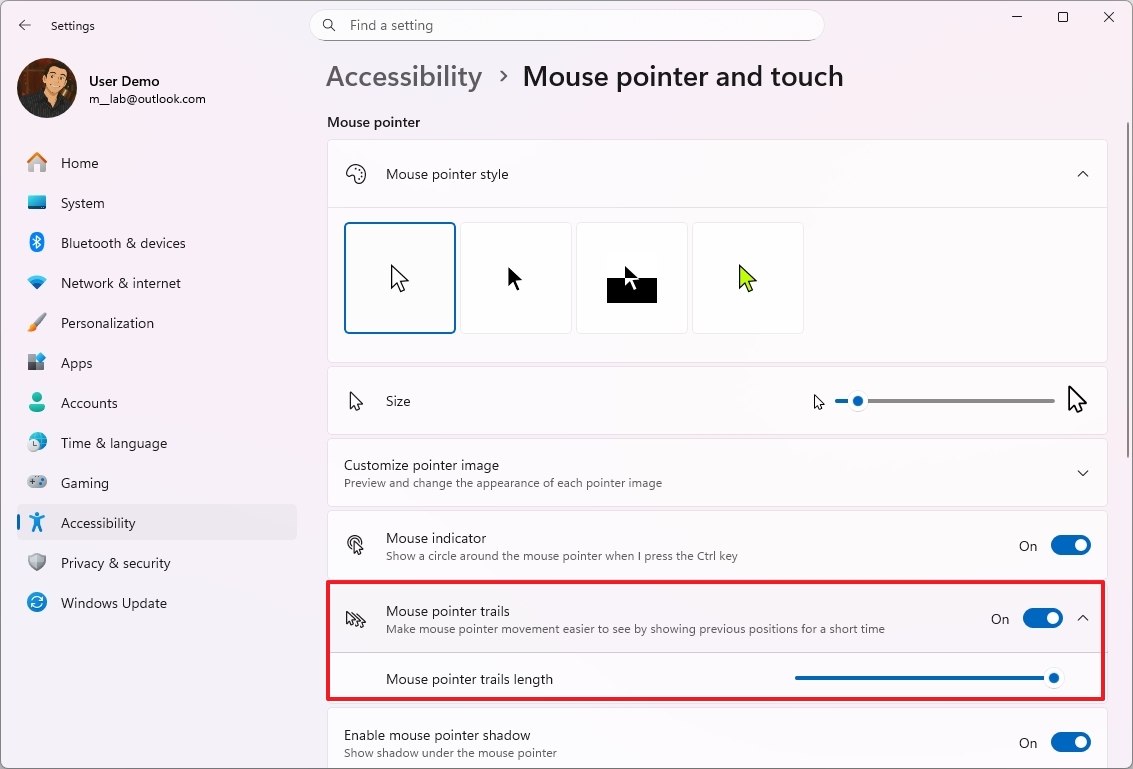
Once you complete the steps, moving the pointer around the screen will show the trails' visual effect.
From Control Panel
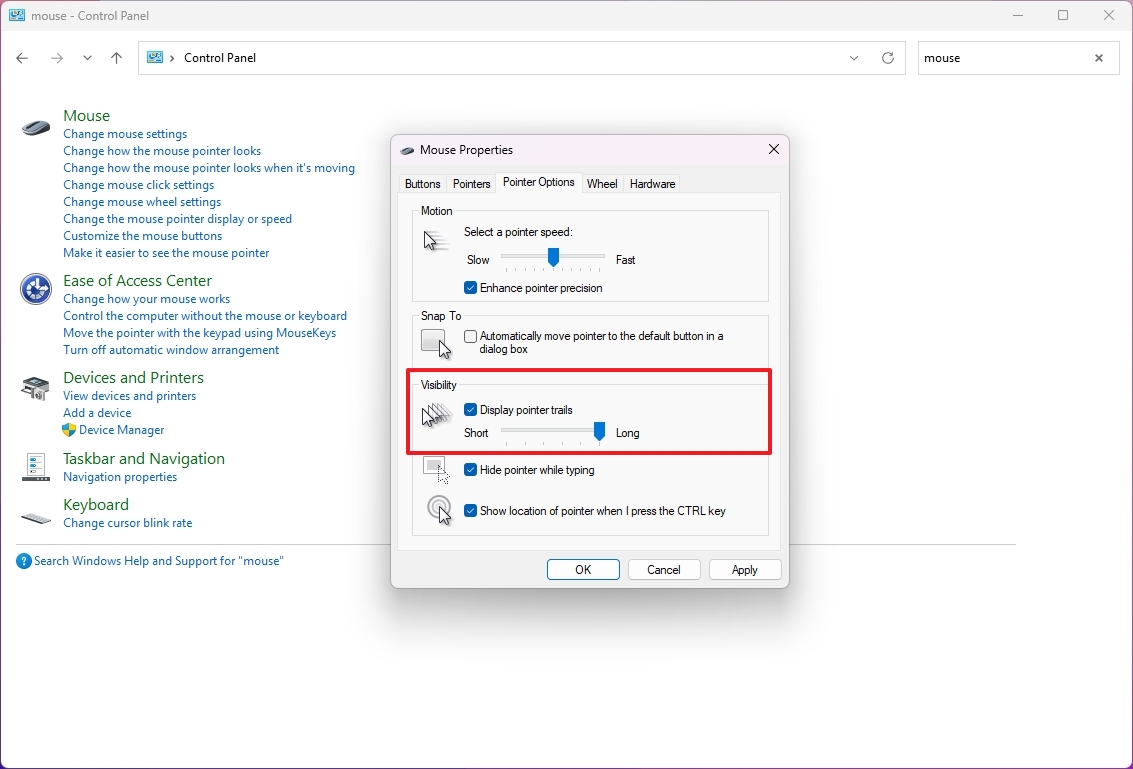
To enable the mouse pointer trails from Control Panel, use these steps:
- Open Start.
- Search for Control Panel and click the top result to open the app.
- Change the "View by" to "Large icons" from the top-right.
- Click on Mouse.

- Click the Pointer Options tab.
- Check the "Display pointer trail" option under the "Visibility" section.
- Click the Apply button.
- Click the OK button.
After you complete the steps, the pointer will show the trails effect as you move the mouse around the screen.
How to show mouse shadow effect under the pointer
Although the mouse shadow isn't a crucial setting for Windows users, it can help with visibility and visual aesthetics.
From Settings
To enable the mouse pointer trails, use these steps:
- Open Settings.
- Click on Accessibility.
- Click the Mouse pointer and touch page on the right side.

- Turn on the "Enable mouse pointer shadow" toggle switch.
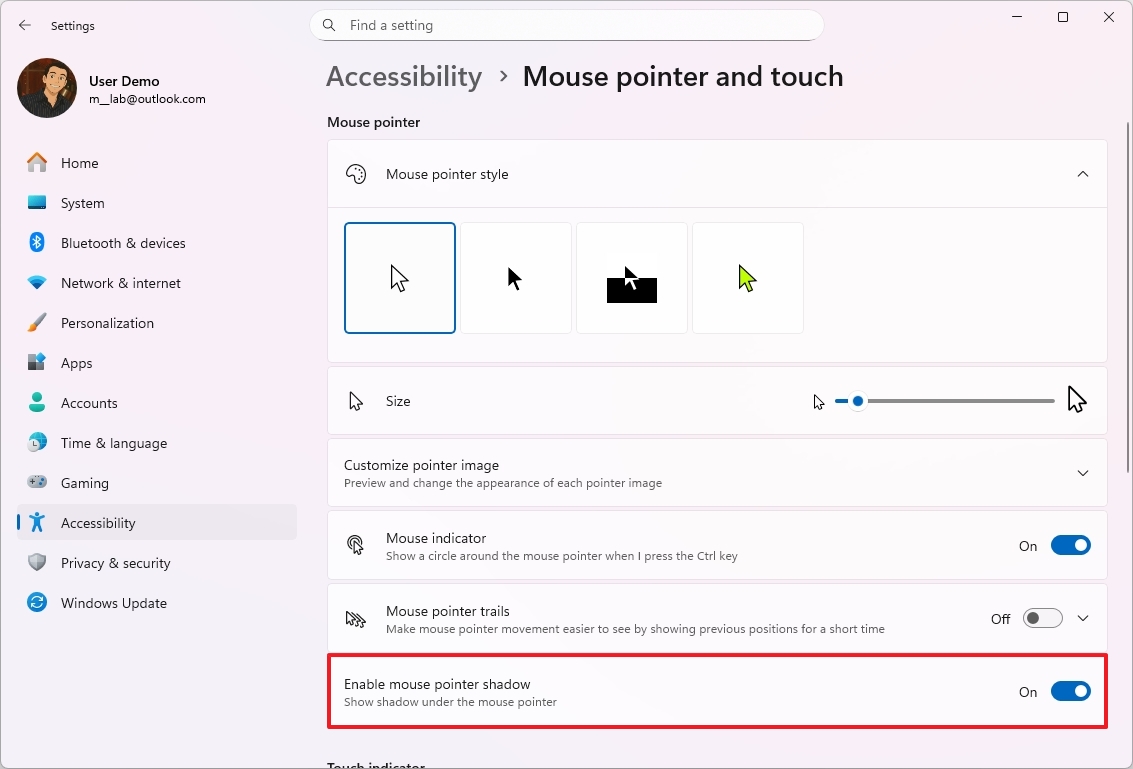
Once you complete the steps, the pointer will show a subtle shadow under the mouse.
From Control Panel
To enable the mouse pointer trails from Control Panel, use these steps:
- Open Start.
- Search for Control Panel and click the top result to open the app.
- Change the "View by" to "Large icons" from the top-right.
- Click on Mouse.

- Click the Pointers tab.
- Check the "Enable pointer shadow" option.
- Click the Apply button.
- Click the OK button.
After you complete the steps, the shadow under the mouse pointer will turn on.
How to set custom icons for the mouse pointer
If you want to personalize the mouse experience even further, you can change the pointer appearance to make it more practical and personalized.
Although the operating system includes a set of default cursor files, you'll need to provide the ".cur" file for each element you want to change, which you can easily find by doing an online search.
My only recommendation is to download the actual ".cur" files, and you don't have to install any third-party application to make these changes.
From Settings
To enable the mouse pointer trails, use these steps:
- Open Settings.
- Click on Accessibility.
- Click the Mouse pointer and touch page on the right side.

- Click the "Customize pointer image" setting.
- Click the Browse button for the element you want to change.
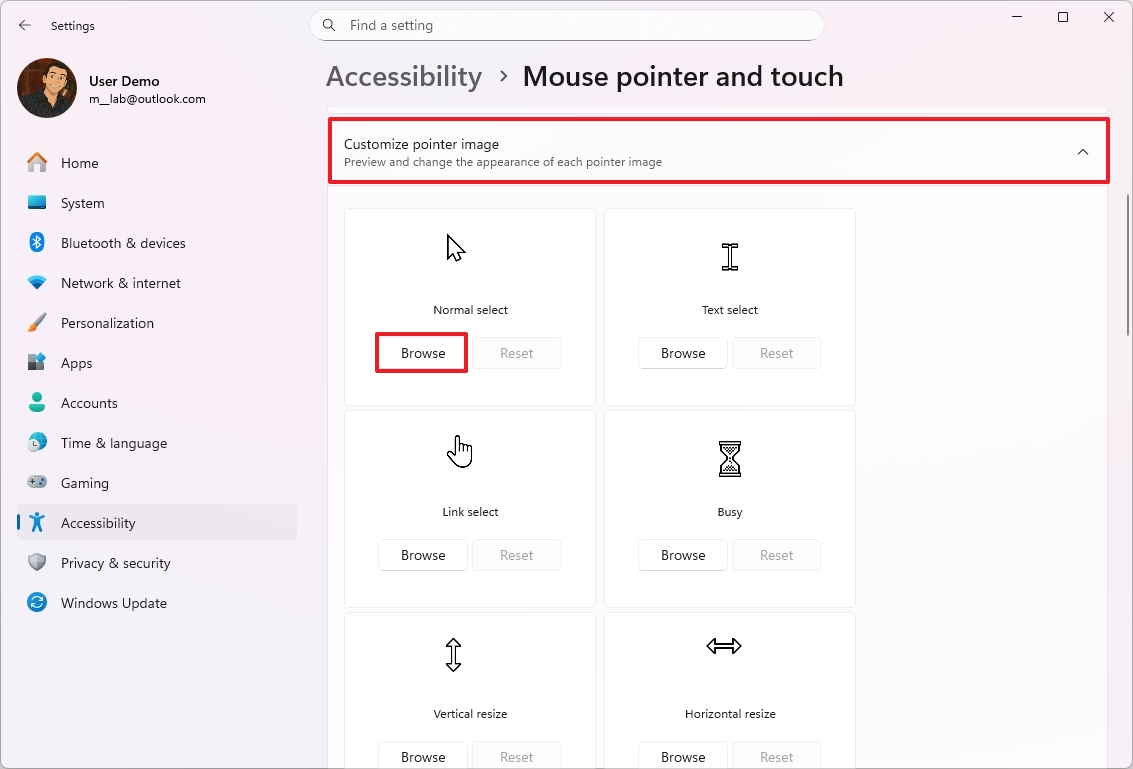
- Select the ".cur" file.
- Click the Open button.
- Repeat steps 6 through 9 to change the remaining elements.
- (Optional) Click the Reset button to restore the original settings.
Once you complete the steps, the mouse element will now appear with the custom cursor image.
From Control Panel
To enable the mouse pointer trails from Control Panel, use these steps:
- Open Start.
- Search for Control Panel and click the top result to open the app.
- Change the "View by" to "Large icons" from the top-right.
- Click on Mouse.

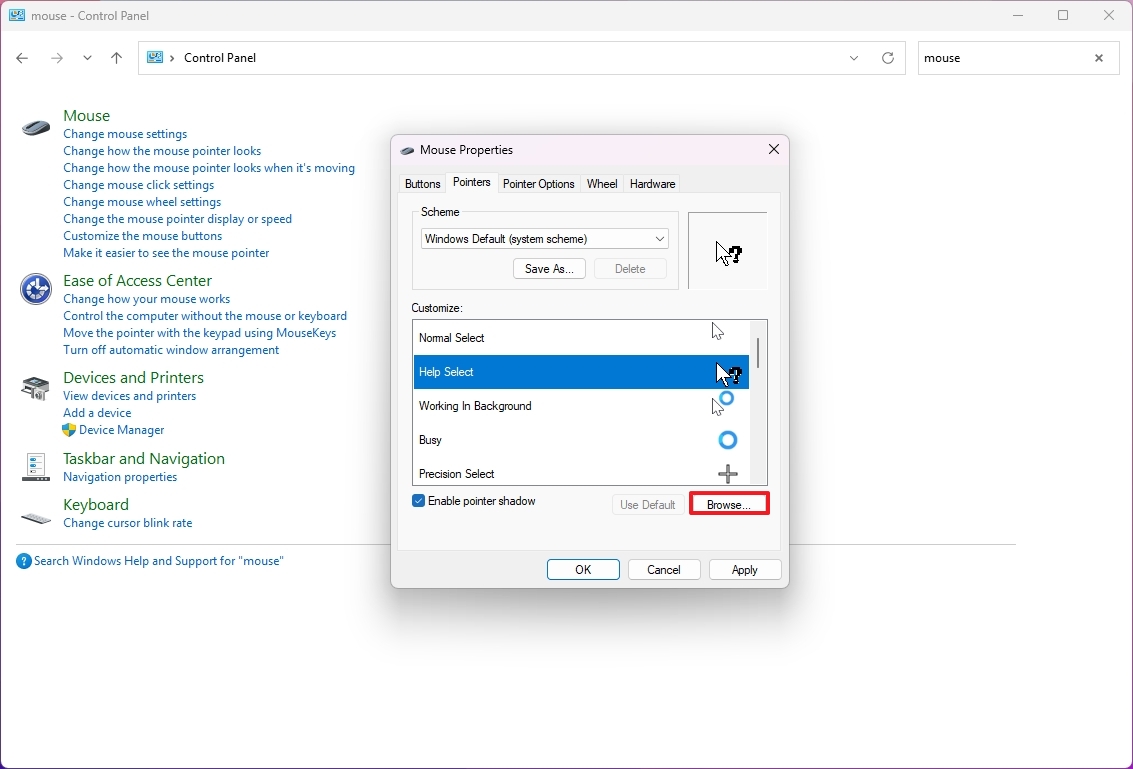
- Click the Pointers tab.
- Select the mouse element you want to change.
- Click the Browse button.
- Select from one of the available cursor files.
- Click the Open button.
- (Optional) Click the Use Default button to restore the original settings.
- Repeat steps 6 through 9 to change the remaining elements.
- Click the Apply button.
- Click the OK button.
After you complete the steps, similar to the Settings app, the mouse element will now show the custom cursor.
More resources
For more helpful articles, coverage, and answers to common questions about Windows 10 and Windows 11, visit the following resources:
- Windows 11 on Windows Central — All you need to know
- Windows 10 on Windows Central — All you need to know

Mauro Huculak has been a Windows How-To Expert contributor for WindowsCentral.com for nearly a decade and has over 22 years of combined experience in IT and technical writing. He holds various professional certifications from Microsoft, Cisco, VMware, and CompTIA and has been recognized as a Microsoft MVP for many years.
You must confirm your public display name before commenting
Please logout and then login again, you will then be prompted to enter your display name.
