How to convert a PC into a NAS on Windows 11
Yes, you can use Windows 11 as a NAS, and I will show you how in this guide.
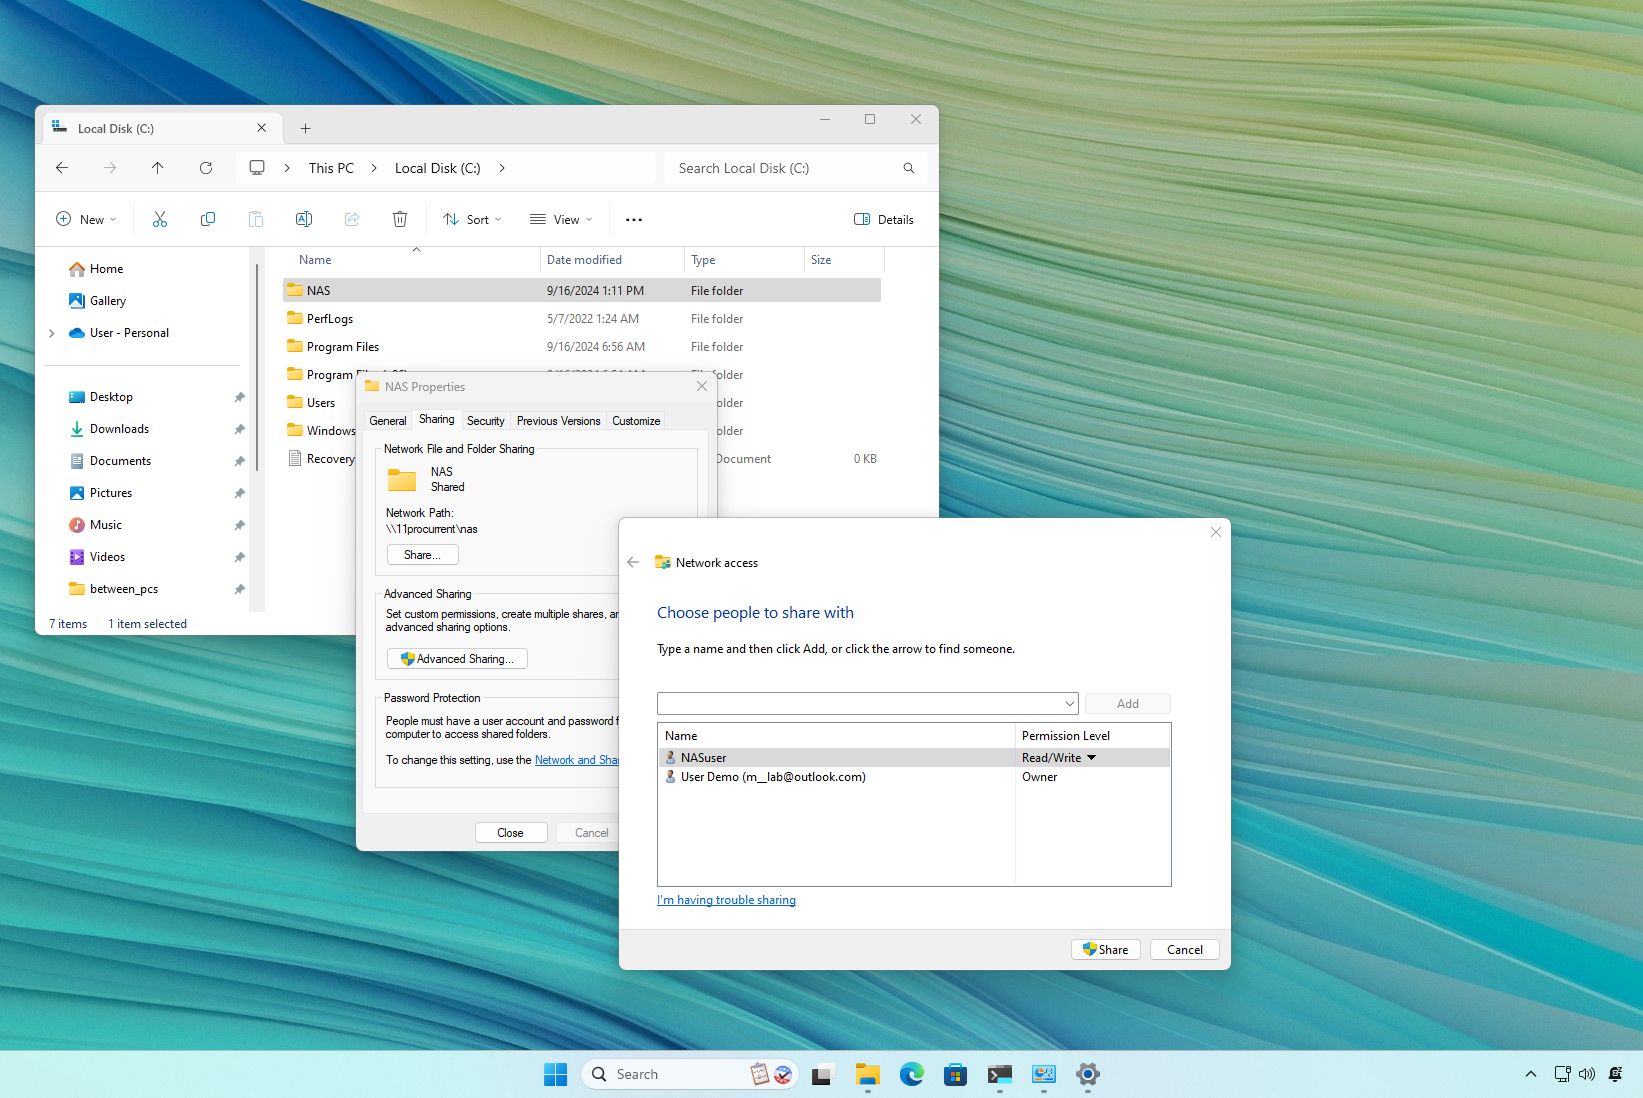
On Windows 11, you can turn your (or any) computer into NAS (network-attached storage) to share files and folders in the network with other users.
A NAS is a dedicated device designed specifically to store and share data over the network. Usually, you will build a file server by repurposing an older computer or server using free NAS software, such as TrueNAS, or purchase a dedicated NAS, such as those available through Synology. However, you can always configure virtually any Windows computer to work as a network-attached storage using the file-sharing capabilities.
In this how-to guide, I will explain the steps to turn your Windows 11 computer into a NAS. (Although you can virtually use any computer, I don't recommend configuring a laptop for this type of project.)
How to turn your PC into NAS on Windows 11
If you want to turn your desktop computer into a network-attached storage device, first, you need to configure the storage, set a static network configuration for the device, set and configure a network share folder, and then connect the devices you want to access the contents of the server.
Connect a secondary drive
Although you can always share files from the main drive, I always recommend setting up secondary storage to store and share files.
If you plan to convert your device into a more NAS-like device, installing an internal drive is best.
You can always connect external USB drives, but you must ensure they're always connected and online. Otherwise, users won't be able to access the data.
Get the Windows Central Newsletter
All the latest news, reviews, and guides for Windows and Xbox diehards.
Windows 11 also includes the Storage Space feature, which allows you to combine a group of drives to create storage with redundancy. However, while it's possible to use it for a file server, I recommend not using it for production data since you "may" encounter performance issues. Typically, you would use Storage Spaces for other tasks like archival purposes, such as to store a file backup.
Configure a static IP address
If you plan to set up your computer as a NAS, consider configuring a static IP address on the device. The reason is that computers usually receive a dynamic network configuration through the Dynamic Host Configuration Protocol (DHCP) server (usually the router), which can change anytime. If this happens, other computers in the network may not be able to access the resources in the Windows 11 devices acting as a file server.
It's not a requirement, but for the most optimal experience, it's best to have an Ethernet connection rather than a Wi-Fi connection since a wired connection is usually faster and more reliable.
To configure a static IP address on Windows 11, use these steps:
- Open Settings.
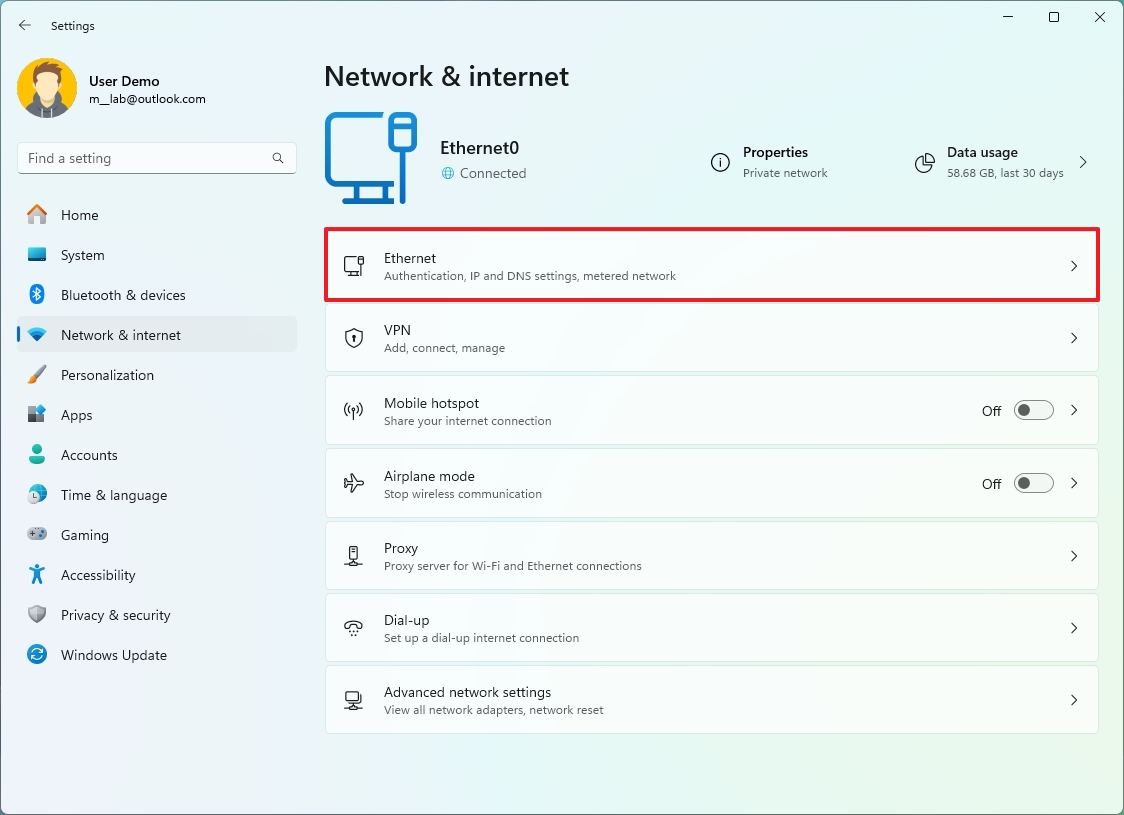
- Click on Network & internet.
- Click the Ethernet page on the right side.
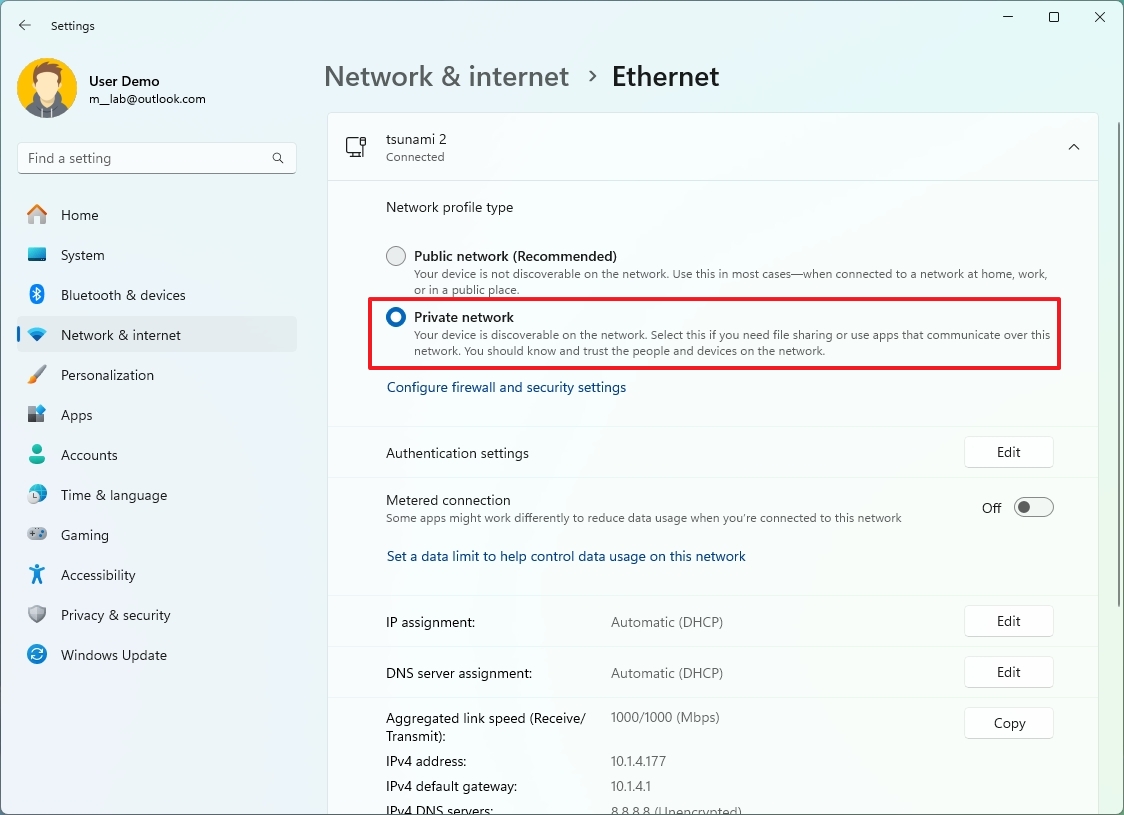
- Choose the Private network option to make the NAS discoverable in the network.
- Click the Edit button in the "IP assignment" setting.
- Choose the Manually option.
- Click the OK button.
- Turn on the IPv4 toggle switch.
- Confirm the new static IP address for the device. For example, 10.1.4.200.
- Quick note: You have to choose an address that is outside of the DHCP scope. Otherwise, the DHCP may assign the address to another device, causing networking conflicts. You can confirm or change the address assignment range on your router or the device acting as the DHCP server.
- Confirm the Subnet mask for the network. For example, 255.255.255.0.
- Confirm the Gateway address, which is typically the address of the router. For example, 10.1.4.1.
- Confirm the Preferred DNS address, which is also usually the address of the router. For example, 10.1.4.1.
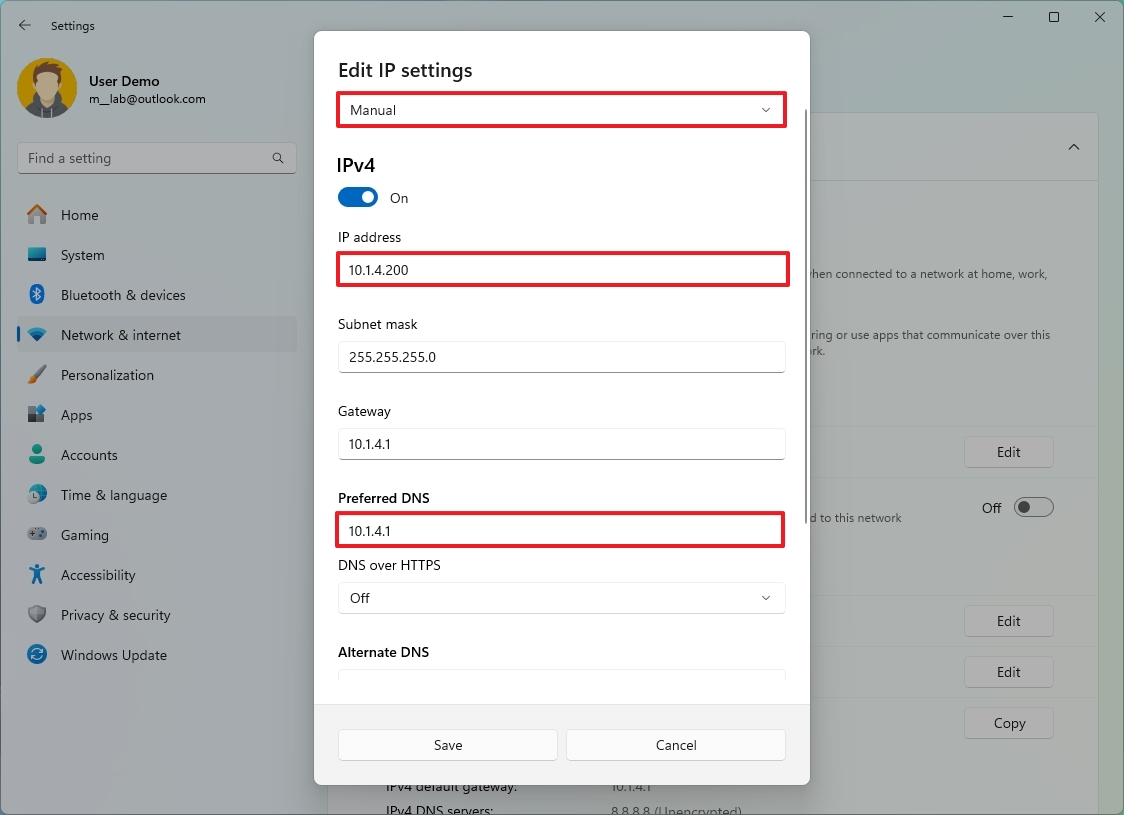
- Quick note: If you set the router's address, you don't have to worry about adding an alternate DNS address.
- Click the Save button.
- Click the back button to open the "Network & internet" page again.
- Click on Advanced network settings.
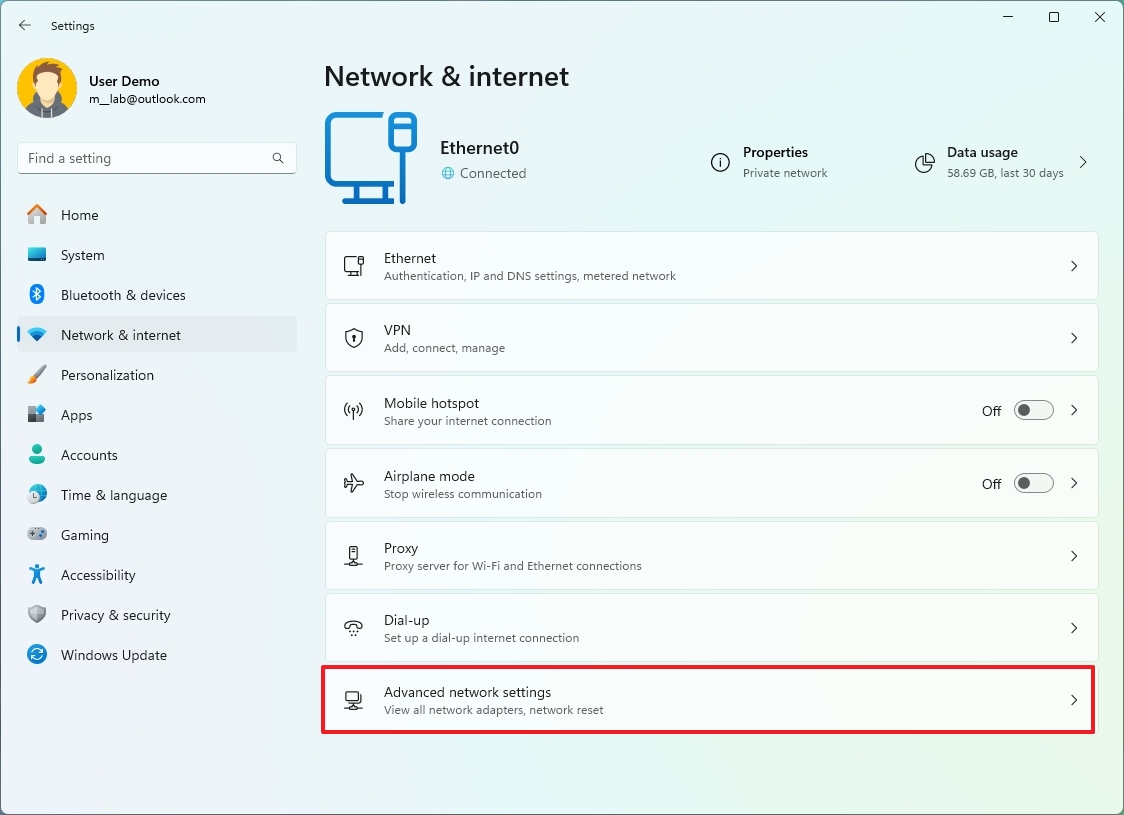
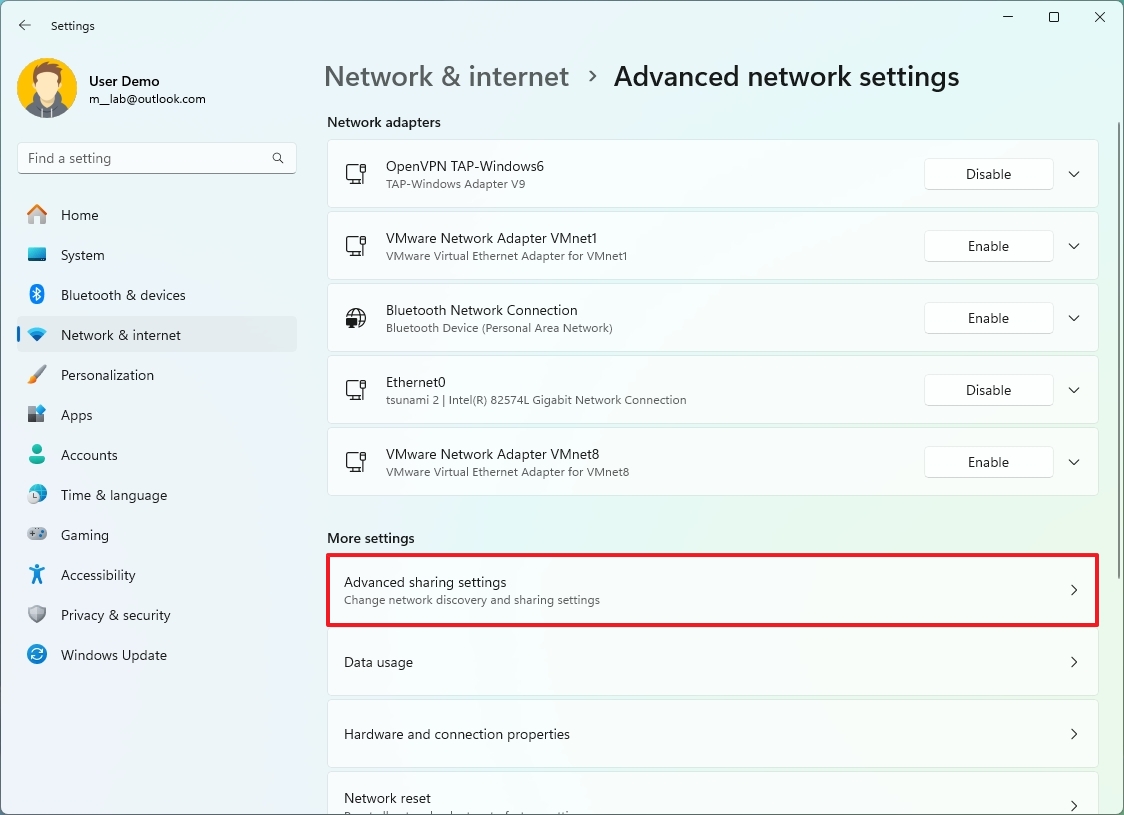
- Click "Advanced sharing settings" under the "More Settings" section.
- Turn on the Network discovery toggle switch (if applicable).
- Check the set up connected devices automatically option (if applicable).
- Turn on the "File and printer sharing" toggle switch (if applicable).
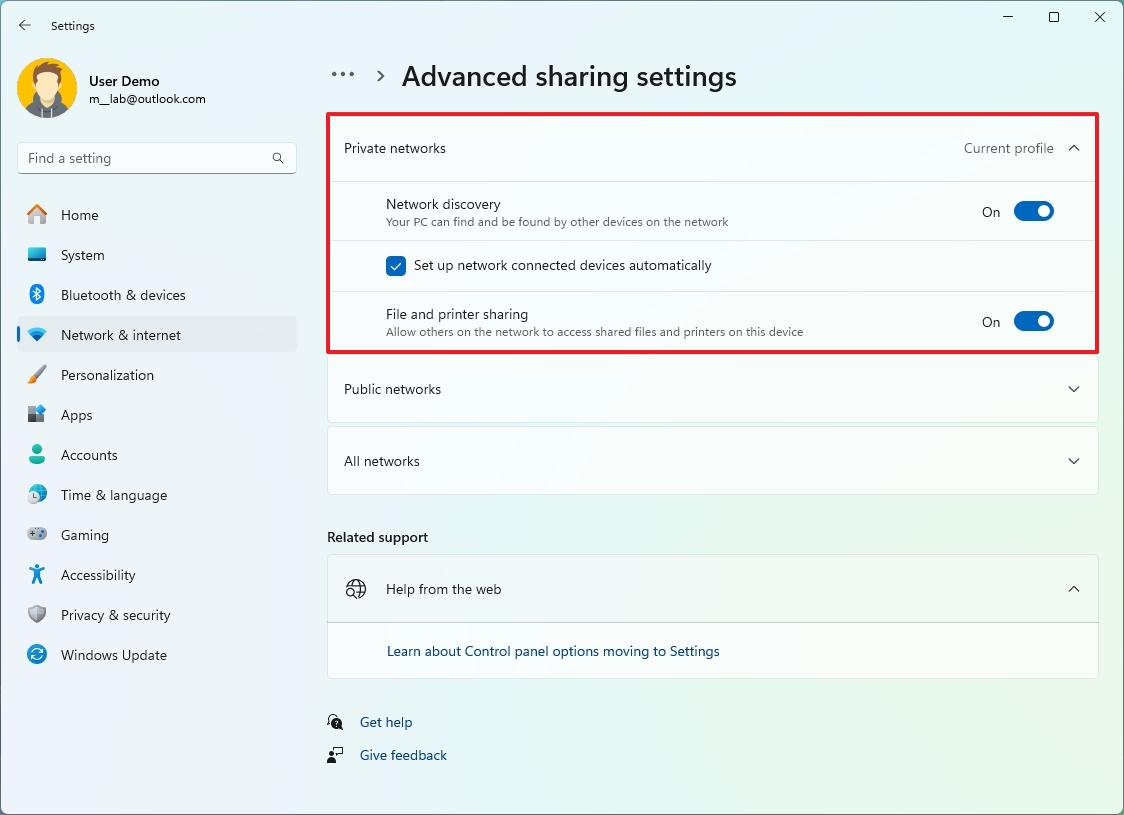
Once you complete the steps, the computer will always be accessible from the static IP address configuration.
Configure power settings
If you want a shared folder always available, you have to ensure the computer doesn't turn off automatically after some time of inactivity. You can do this by changing the power settings.
To change the power settings to prevent the computer from going to sleep mode, use these steps:
- Open Settings.
- Click on System.
- Click the Power (or Power & battery) page on the right.
- Click the "Screen and sleep" setting.
- Select the Never option for the "When plugged in, put my device to sleep after" setting (if applicable).
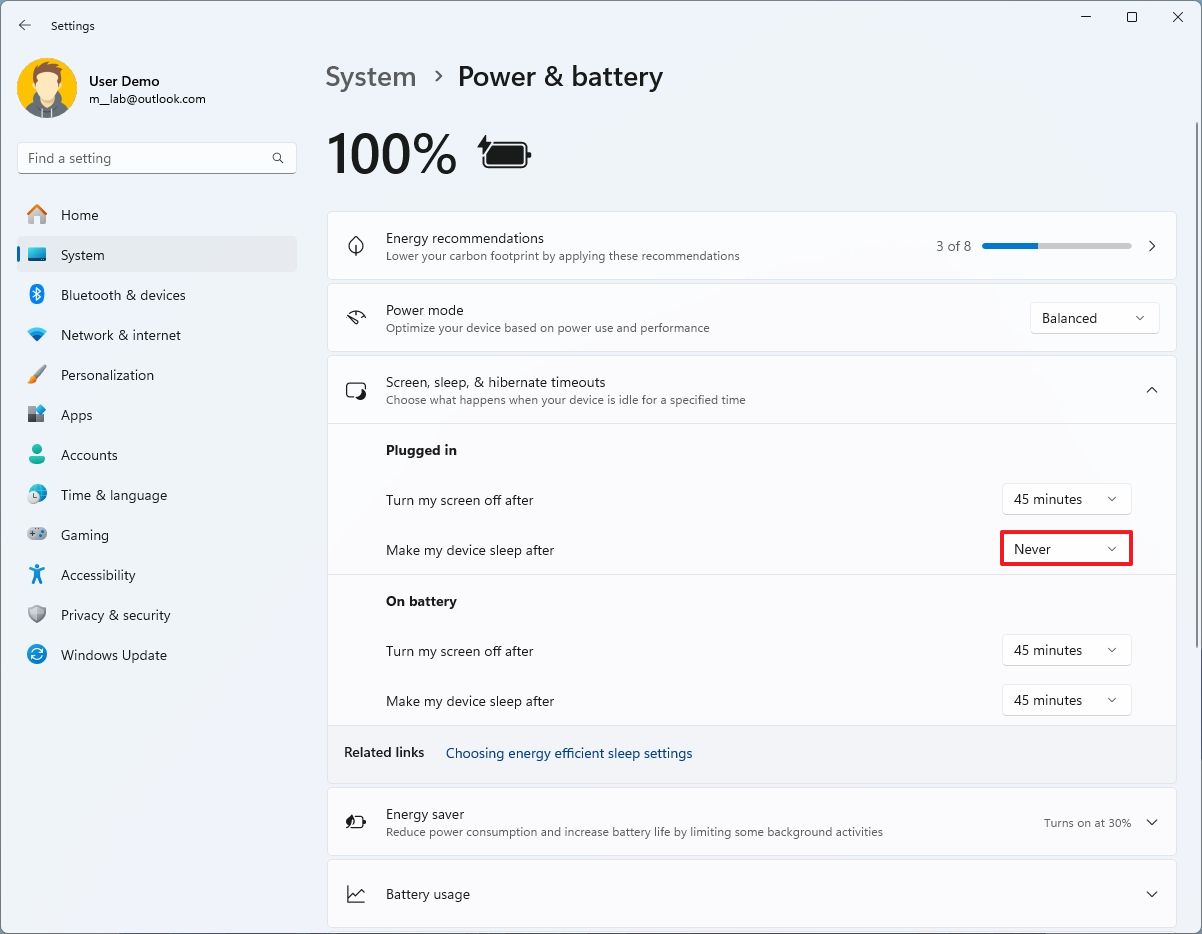
After you complete the steps, the computer will always stay awake, ensuring users have uninterrupted access to the files.
Set up a shared folder
If you want to share files with other users in the network, you first want to create a local account for each user you wish to access to access the shared folder, or you can create a master account that you can configure on every computer.
Create a user account to access the NAS
To create a network user account on Windows 11, use these steps:
- Open Settings.
- Click on Accounts.
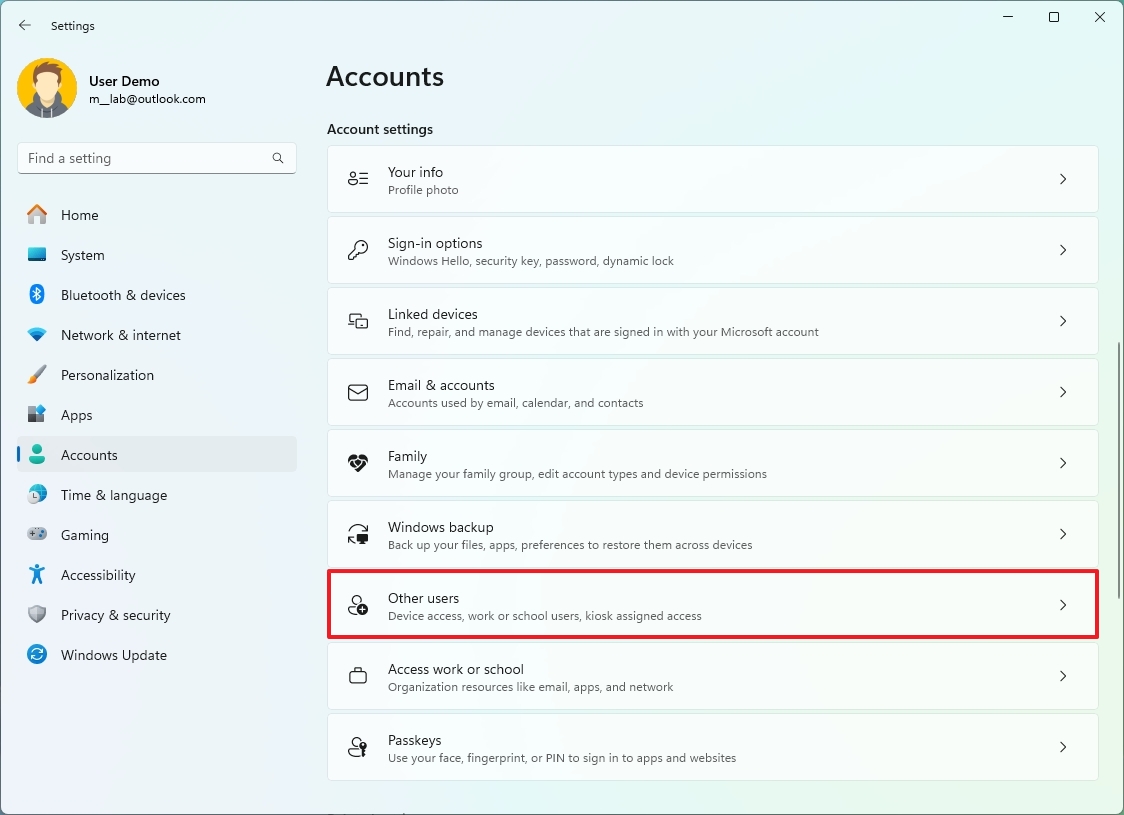
- Click the Other Users setting.
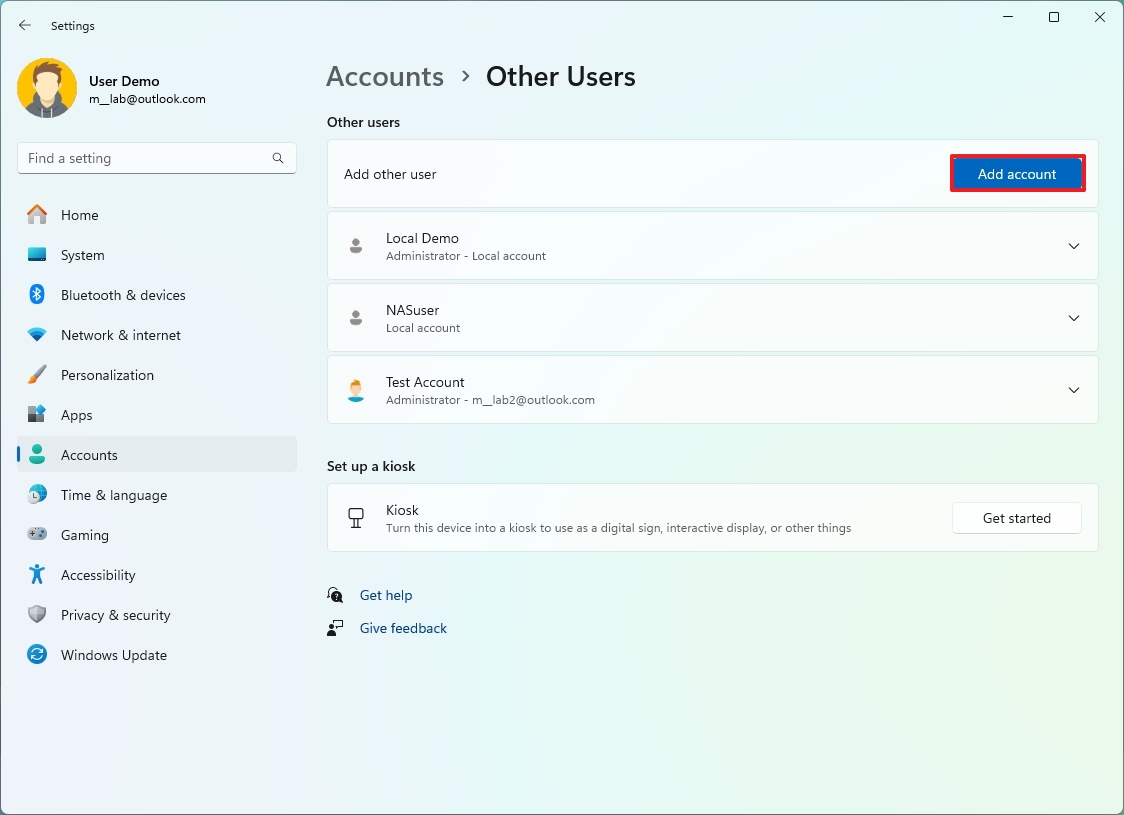
- Click the Add account button.
- Click the "I don't have this person's sign-in information" option.
- Click the "Add a user without a Microsoft account" option.
- Confirm the name of the account to access the shared folder. For example, NASuser.
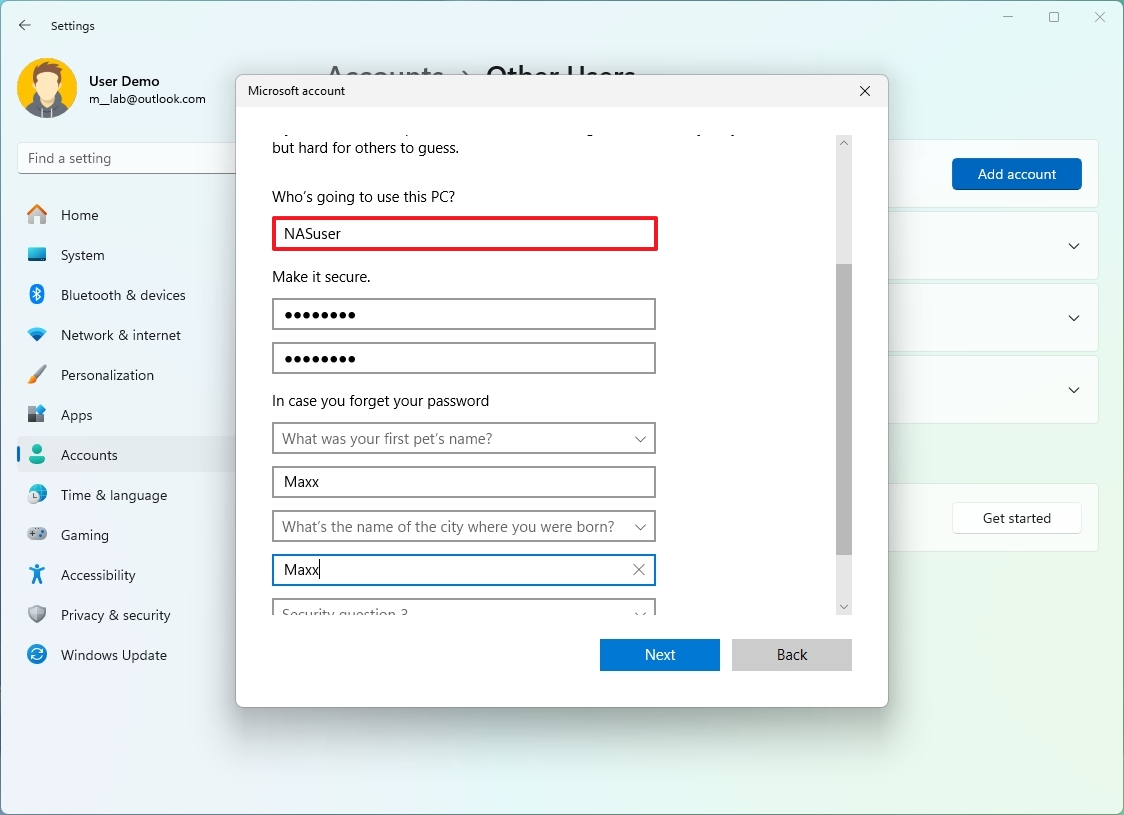
- Confirm a password for the account.
- Complete the security questions for the account recovery.
- Click the Next button.
Once you complete the steps, you can proceed to create and configure a folder that network users can access in the NAS.
In this guide, I'm creating a master account, but you can repeat the steps to create additional accounts.
Create a shared folder for the NAS
To create and configure a folder with network access, use these steps:
- Open File Explorer.
- Click on This PC from the left navigation pane.
- Open the "C" drive or the drive you want to create the shared folder.
- Quick note: I recommend creating the shared folder in the root of the "C" or another drive's root for the experience and security. You don't want to share folders from within your profile folders (Desktop, Documents, etc.).
- Use the "Ctrl + Shift + N" keyboard shortcut to create a new folder.
- Quick tip: You can also create new folder from the "New" menu and choose the "Folder" option.
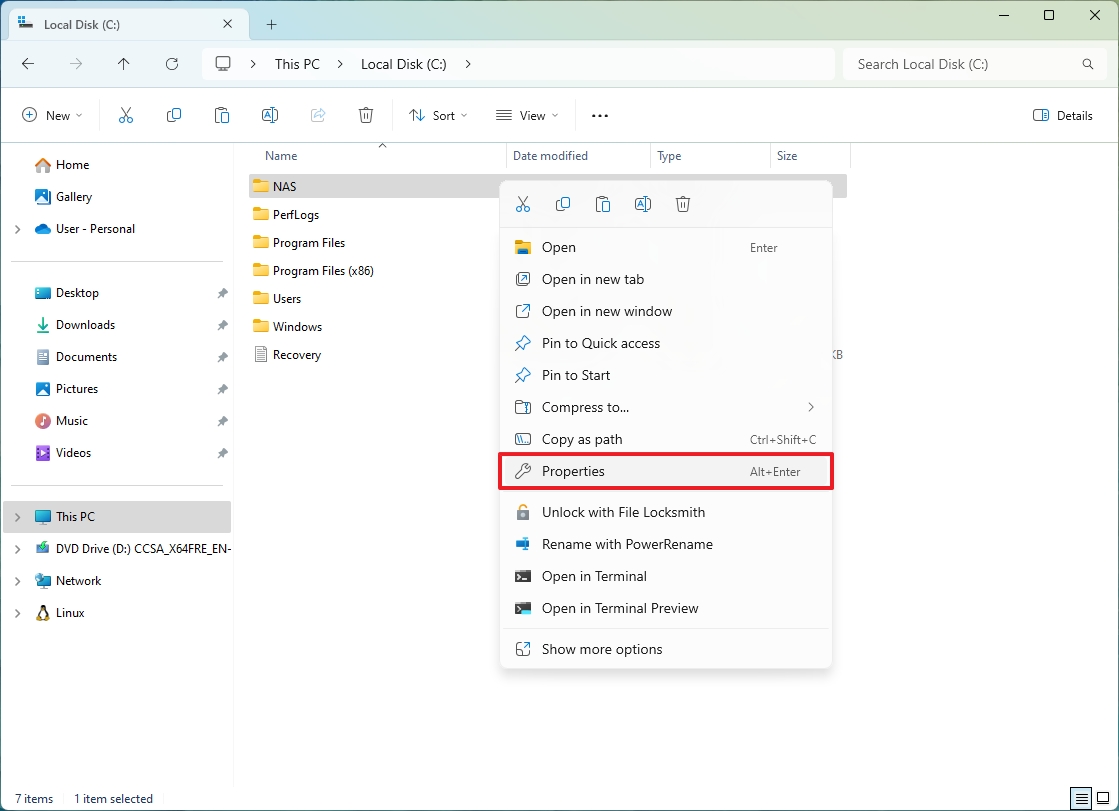
- Confirm a descriptive name for the folder, for example, "NAS," and press Enter.
- Right-click the newly created folder and select the Properties option.
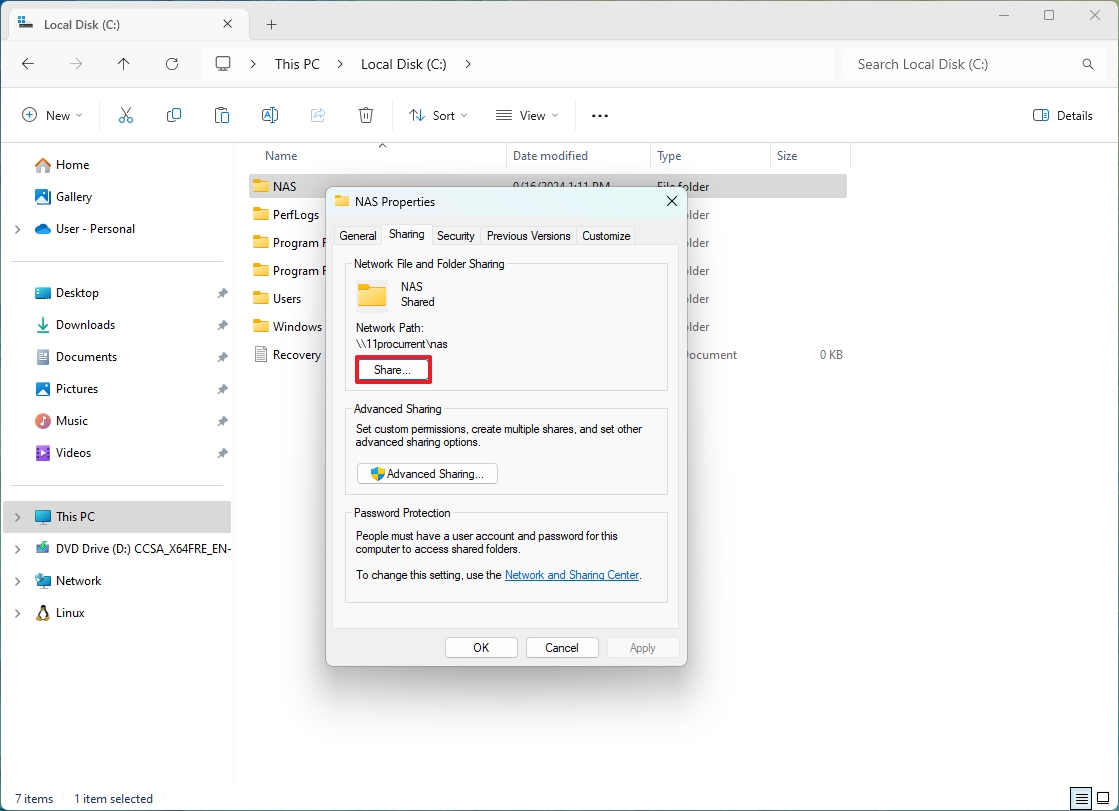
- Click the Sharing tab.
- Click the Share button.
- Select the NASuser account from the drop-down menu.
- Click the Add button.
- Open the permission level menu and choose the "Read/Write" option.
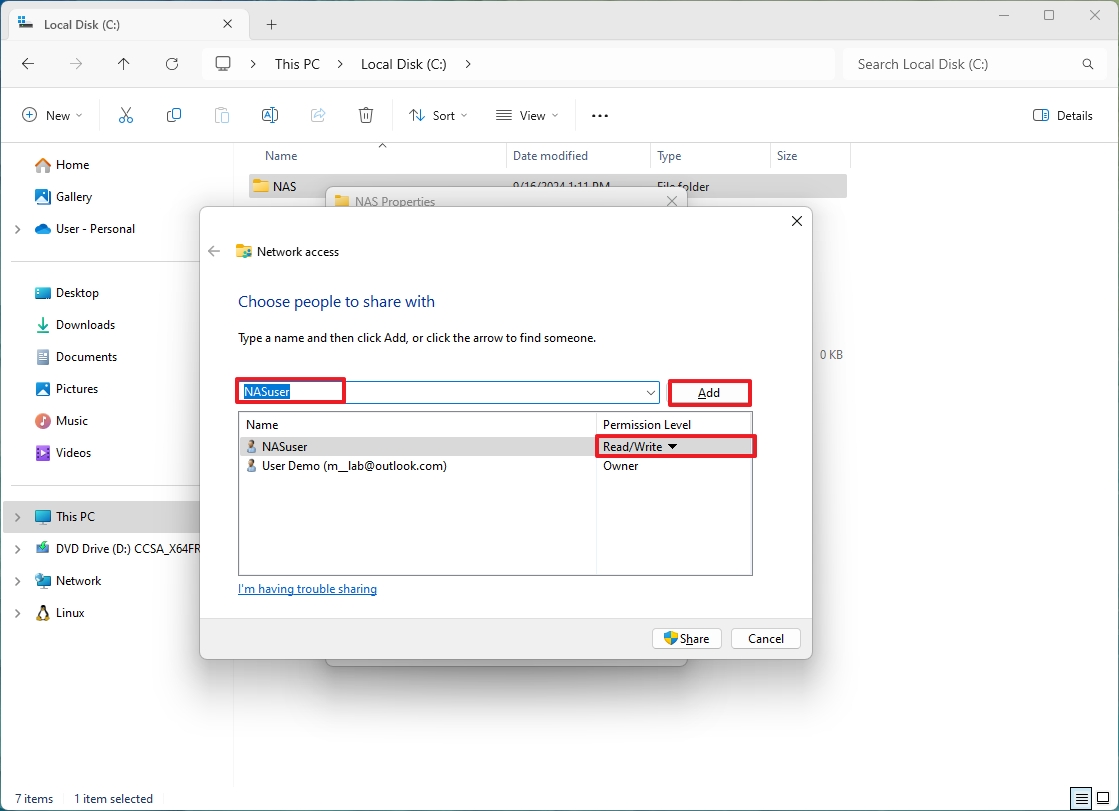
- Click the Share button.
- Click the No option (if applicable).
- Click the Done button.
- Click the Close button.
Once you complete the steps, the folder will be accessible to anyone with the account and password you created.
It's important that you create a structure for the folders you plan to share. For example, for the name home folder, you can use the "NAS" name, and inside the folder, you can create subfolders for "Media," "Documents," "Downloads," and "Backups."
Connect PCs to the NAS
To connect a Windows 10 or 11 computer to the shared folder in the NAS, use these steps:
- Open Start.
- Search for Control Panel and click the top result to open the app.
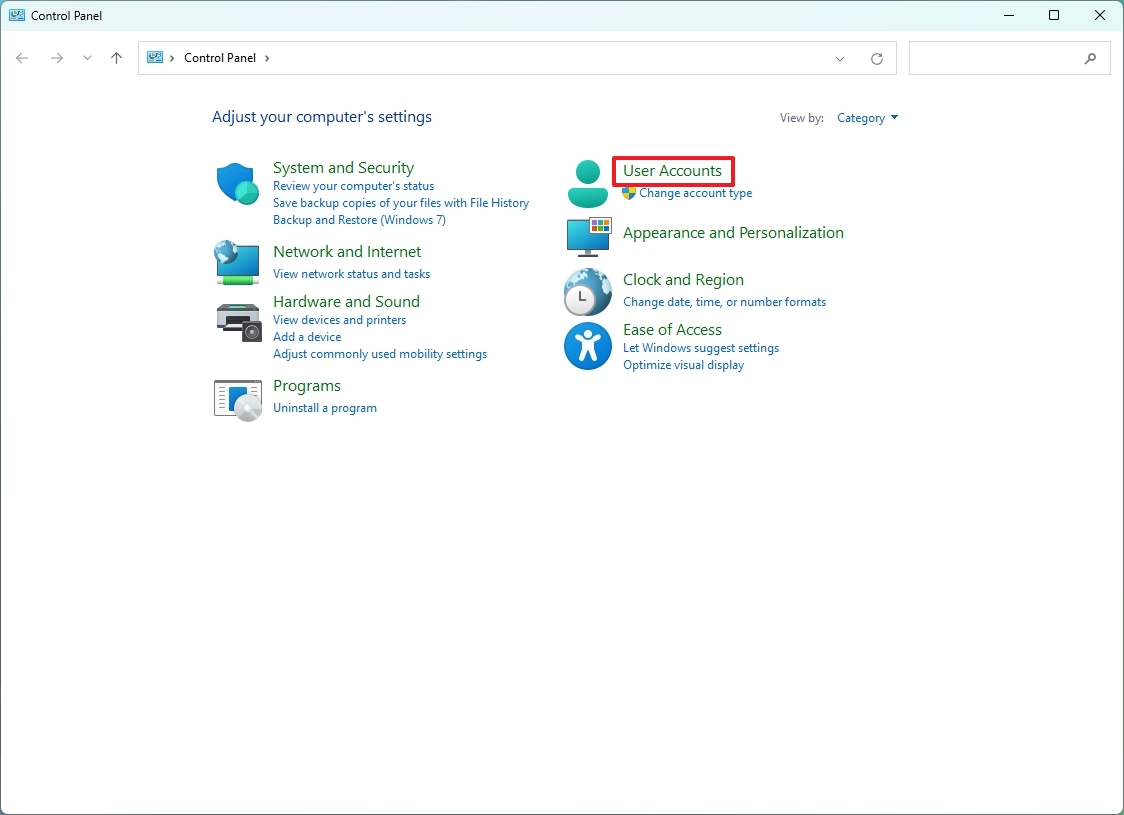
- Click on User Accounts.
- Click on Credential Manager.
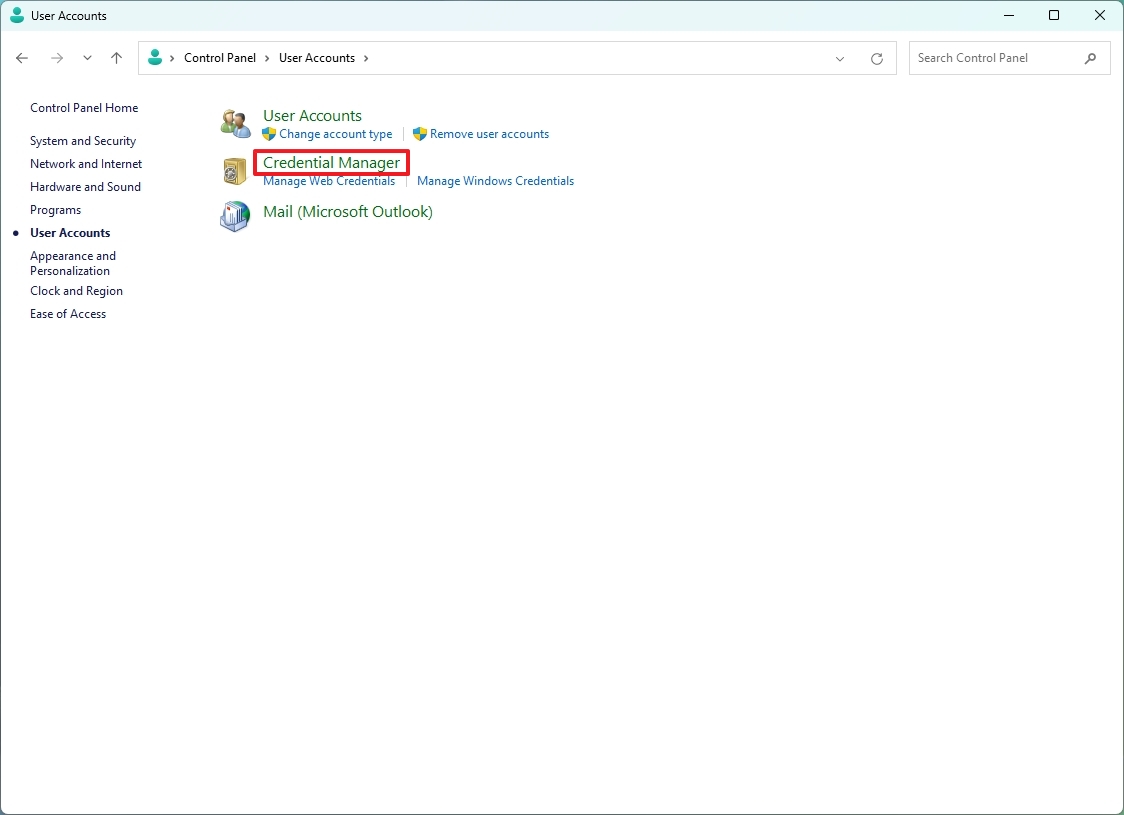
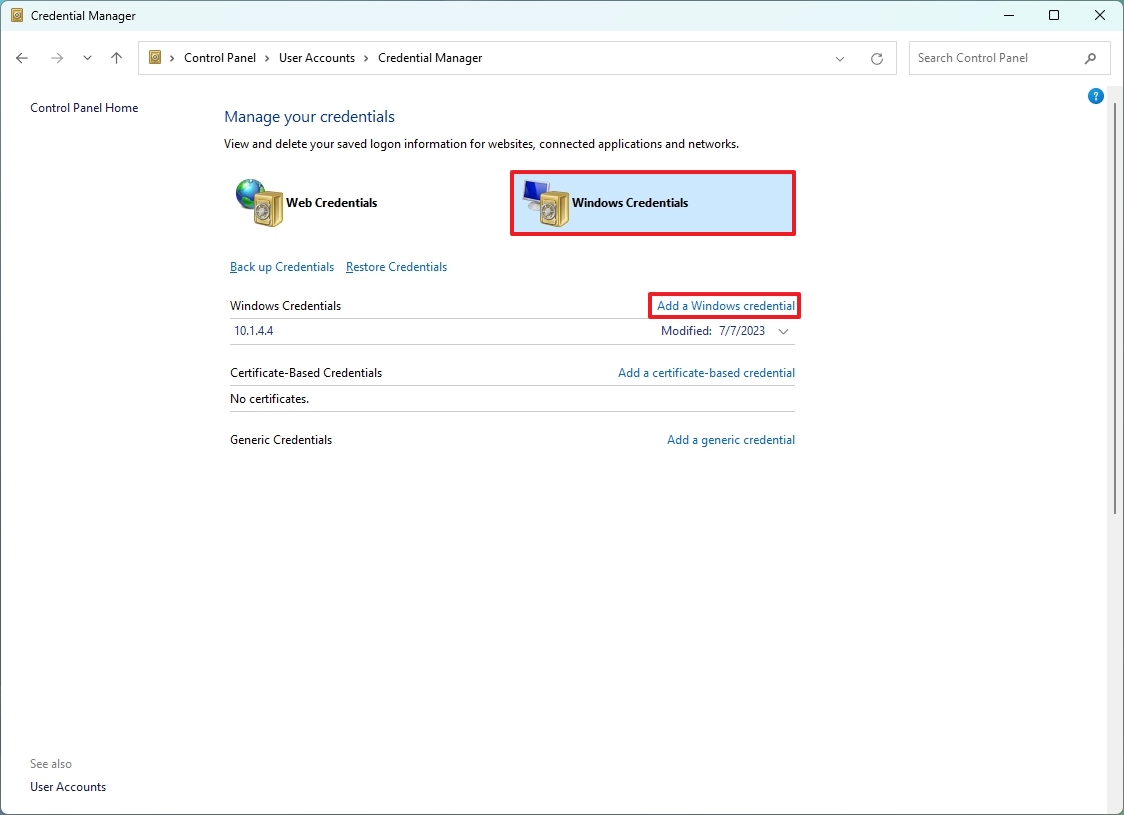
- Click on Windows Credentials.
- Click the "Add a Windows credential" option.
- Confirm the IP address of the NAS running Windows 11.
- Confirm the name of the account with access to a shared folder.
- Confirm the password for the account.
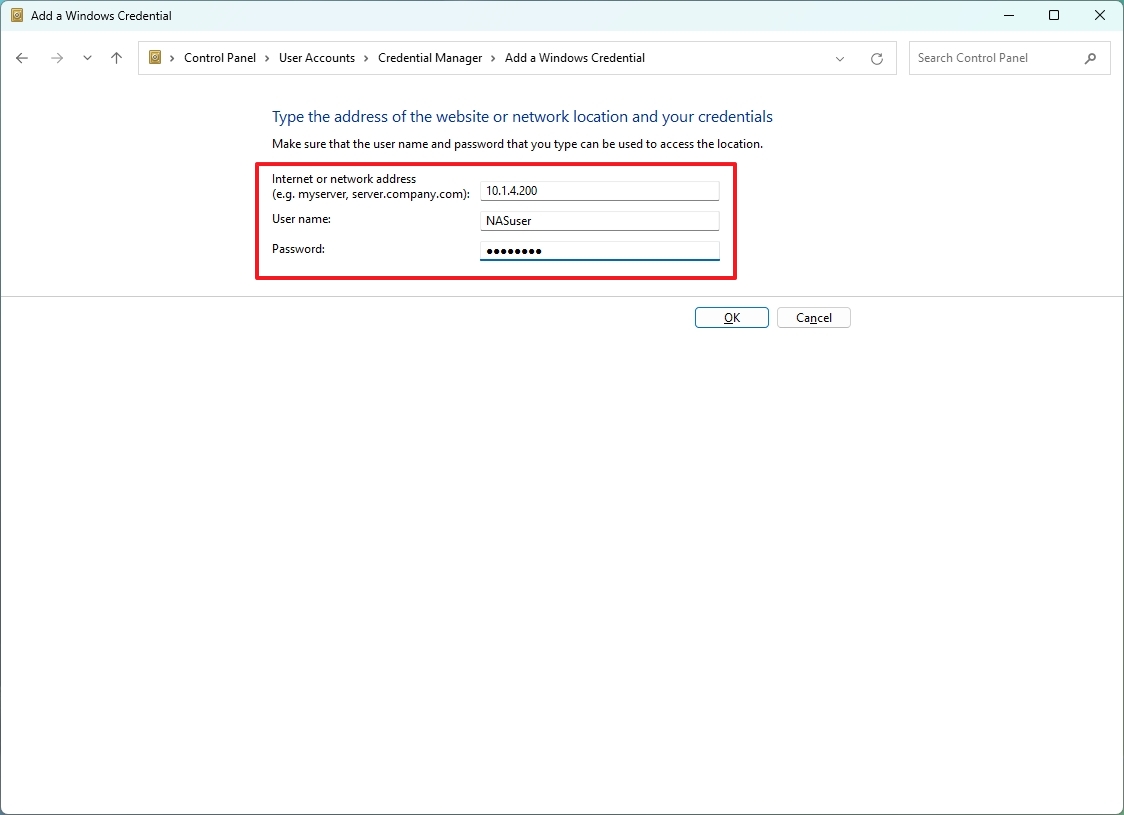
- Click the OK button.
- (Optional) Click the "Add a Windows credential" option.
- Confirm the name of the computer running the Windows 11 NAS.
- Confirm the name of the account with access to a shared folder.
- Confirm the password for the account.
- Click the OK button.
- Open File Explorer.
- Click on Network from the left pane.
- Right-click the NAS device and select the Open option.
- Right-click the NAS shared folder and choose the Open option.
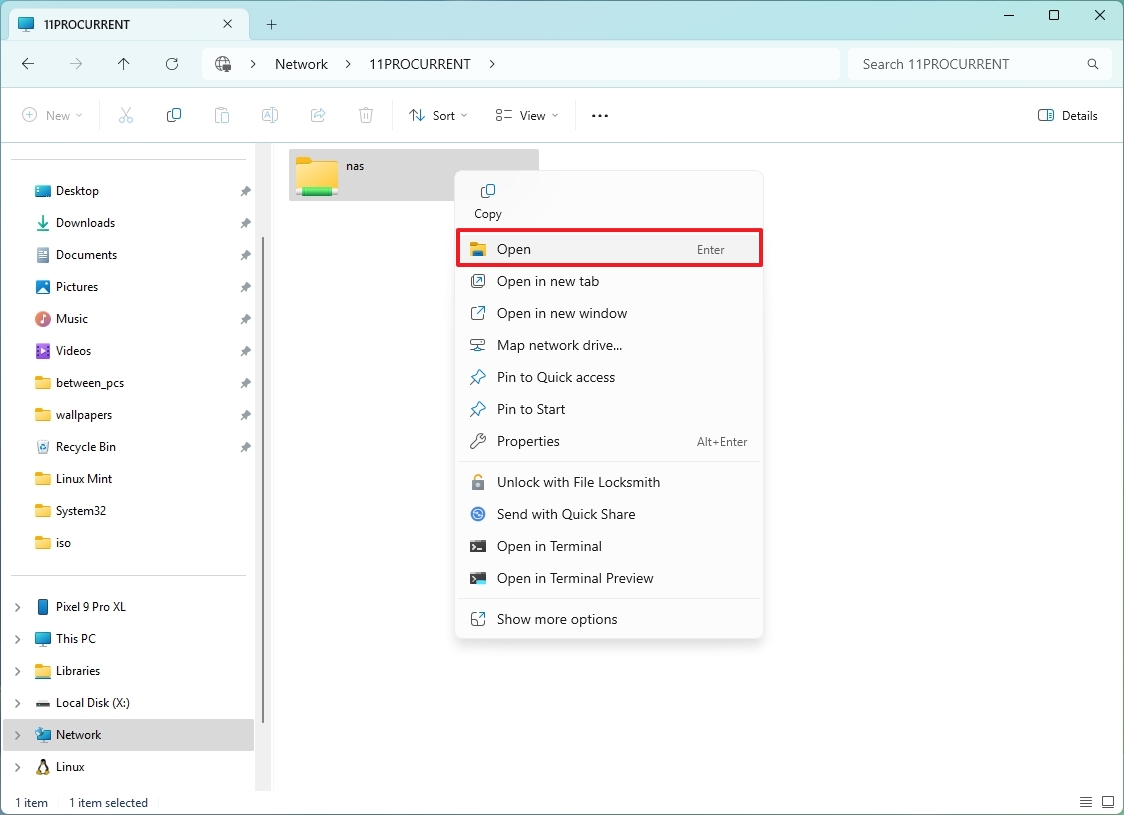
- Quick tip: You can always choose the "Pin to Quick access" option for faster access to files from the left navigation pane.
After you complete the steps, the user can access, create, and delete files and folders from the Windows 11 device acting as NAS.
It's important to note that in this guide, I added the credentials twice, so you can have access to the files using an IP address or the computer name. If you're comfortable using the IP address, you can skip adding the account a second time with the computer name.
Although you would typically set up a NAS as a dedicated server, if you don't have additional hardware, you can set up the file-sharing capabilities and continue to use the computer as you would normally. Of course, this is as long as you're setting this up for a few users on your home network.
More resources
For more helpful articles, coverage, and answers to common questions about Windows 10 and Windows 11, visit the following resources:
Mauro Huculak has been a Windows How-To Expert contributor for WindowsCentral.com for nearly a decade and has over 15 years of experience writing comprehensive guides. He also has an IT background and has achieved different professional certifications from Microsoft, Cisco, VMware, and CompTIA. He has been recognized as a Microsoft MVP for many years.

