How to change settings for Taskbar on Windows 11
You can still customize many settings in the Windows 11 Taskbar, and in this guide, I'll show you how.
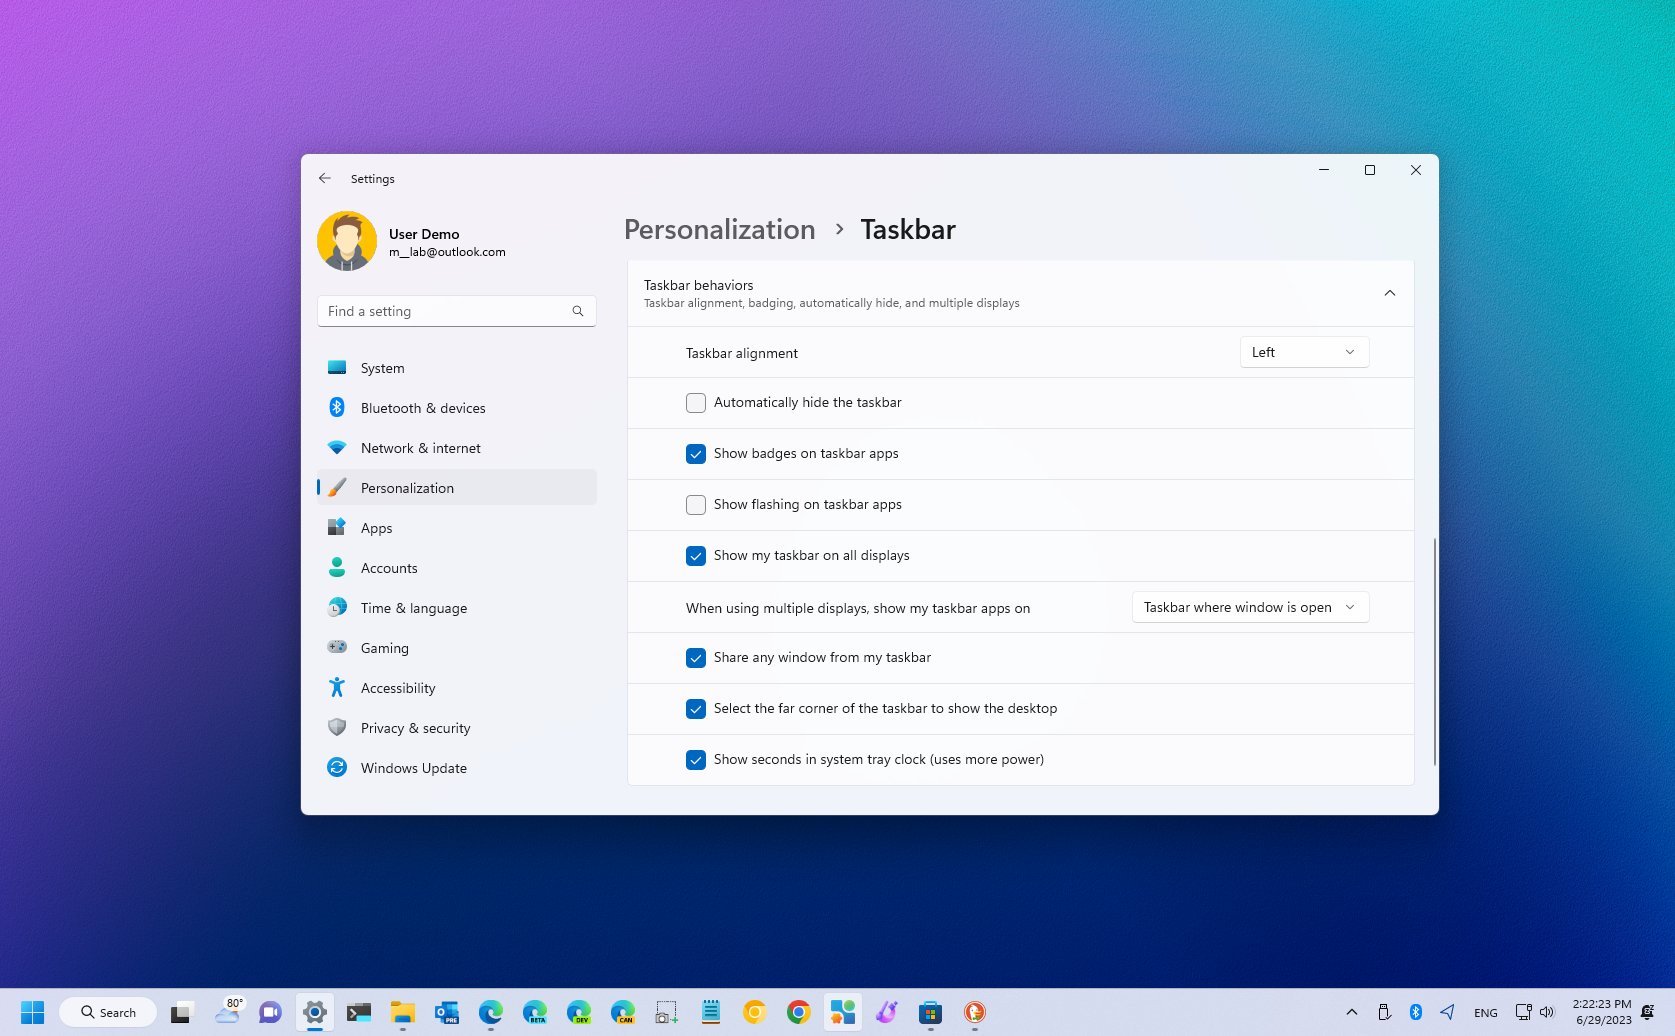
Although the Taskbar on Windows 11 removes many of the legacy features, you can still change many settings to personalize the experience, and in this guide, you will learn how.
As part of the Taskbar experience, you can, for example, choose the items that appear in Taskbar. You can align the app icons to the left instead of the centered view. You can manage the appearance of System Tray, including the ability to show seconds in the clock. It's also possible to keep the Taskbar hidden to make more space on the screen, control the Taskbar behavior across multiple monitors, and more.
This how-to guide will walk you through the settings you can customize in the redesigned Taskbar experience on Windows 11.
How to remove system items on Taskbar
In the Taskbar, you will find at least two types of items, including apps and system features, such as Windows Search, Widgets, Task View, and Chat. While you can always right-click and unpin an app from the interface, this is not possible with system items.
To add or remove system items from the Taskbar, use these steps:
- Open Settings.
- Click on Personalization.
- Click the Taskbar page on the right side.
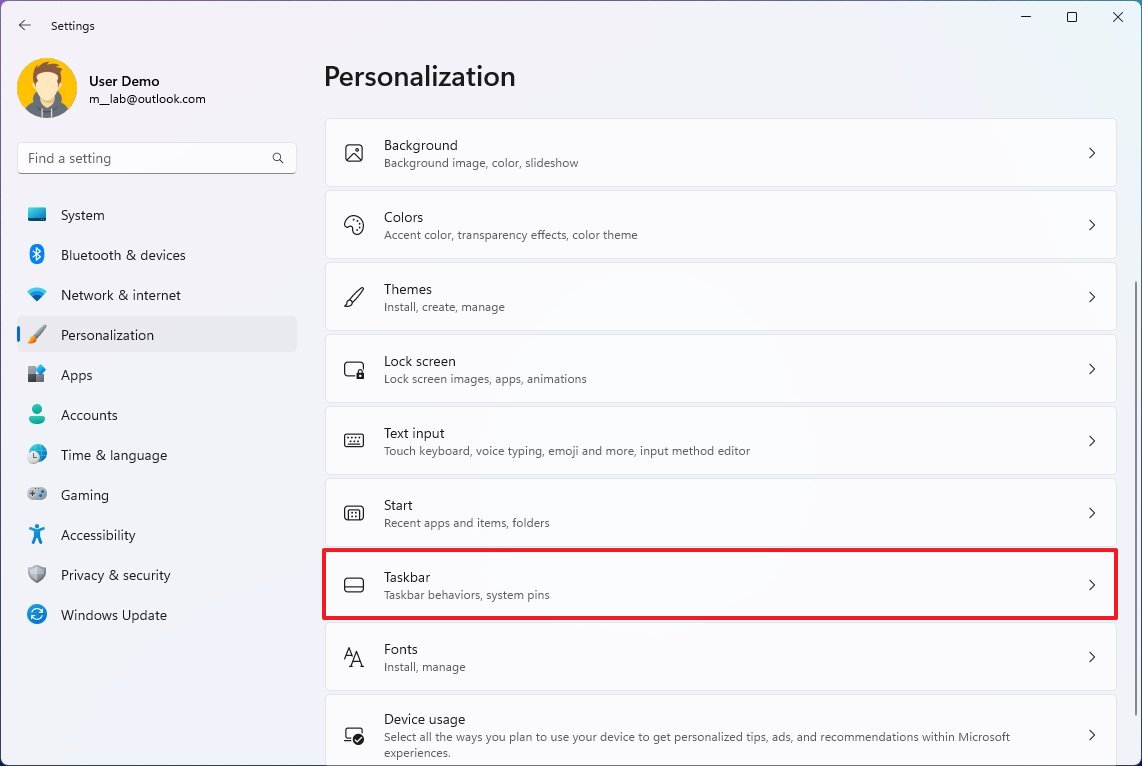
- Quick note: You can also right-click the Taskbar and select the "Taskbar settings" option to access the settings page.
- Click the Taskbar items setting.
- Turn off the Task View toggle switch to remove the app icon.
- Turn off the Chat toggle switch to remove the app icon.
- Turn off the Widgets toggle switch to remove the feature icon.
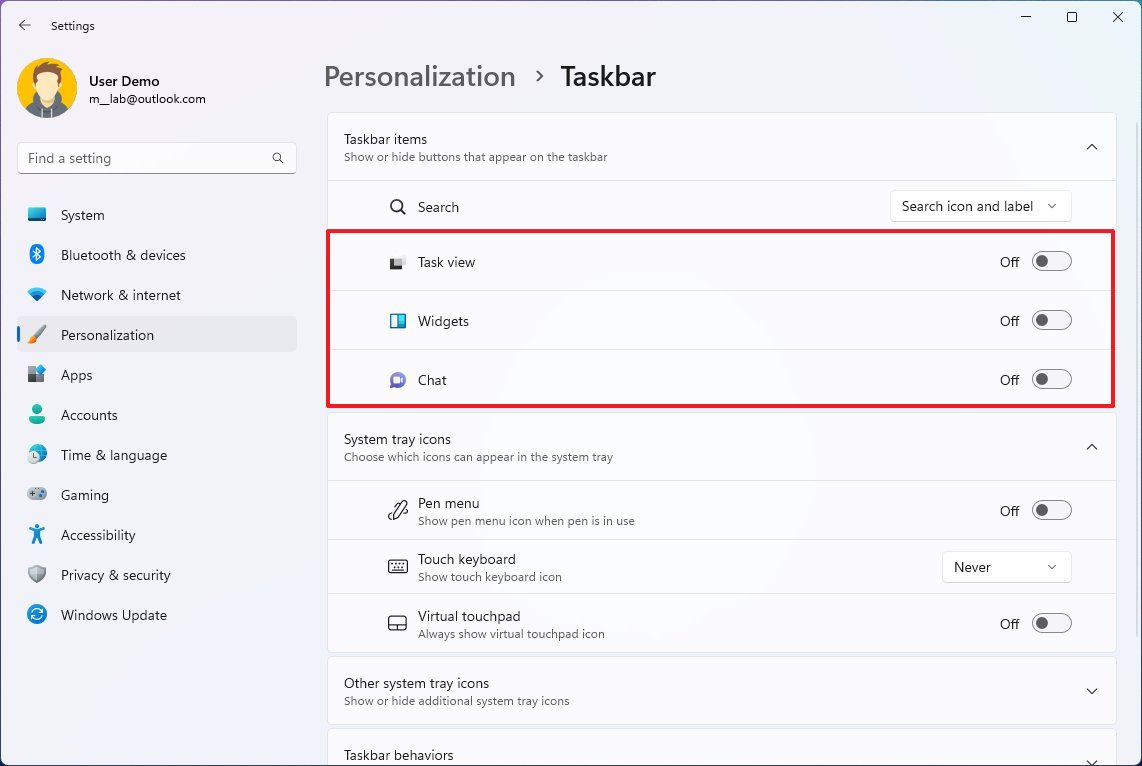
- Quick note: This option removes the icon but doesn't disable the feature. You can still access the dashboard with the "Windows key + W" keyboard shortcut.
Once you complete the steps, the items will be removed from the Taskbar.
At any time, you can enable the items again by using the instructions outlined above, but on steps 5, 6, and 7, turn on the toggle switch.
Get the Windows Central Newsletter
All the latest news, reviews, and guides for Windows and Xbox diehards.
How to customize Search box on Taskbar
To customize the Windows Search box experience, use these steps:
- Open Settings.
- Click on Personalization.
- Click the Taskbar page on the right side.
- Click the Taskbar items setting.
- Choose the experience from the Windows Search box setting:
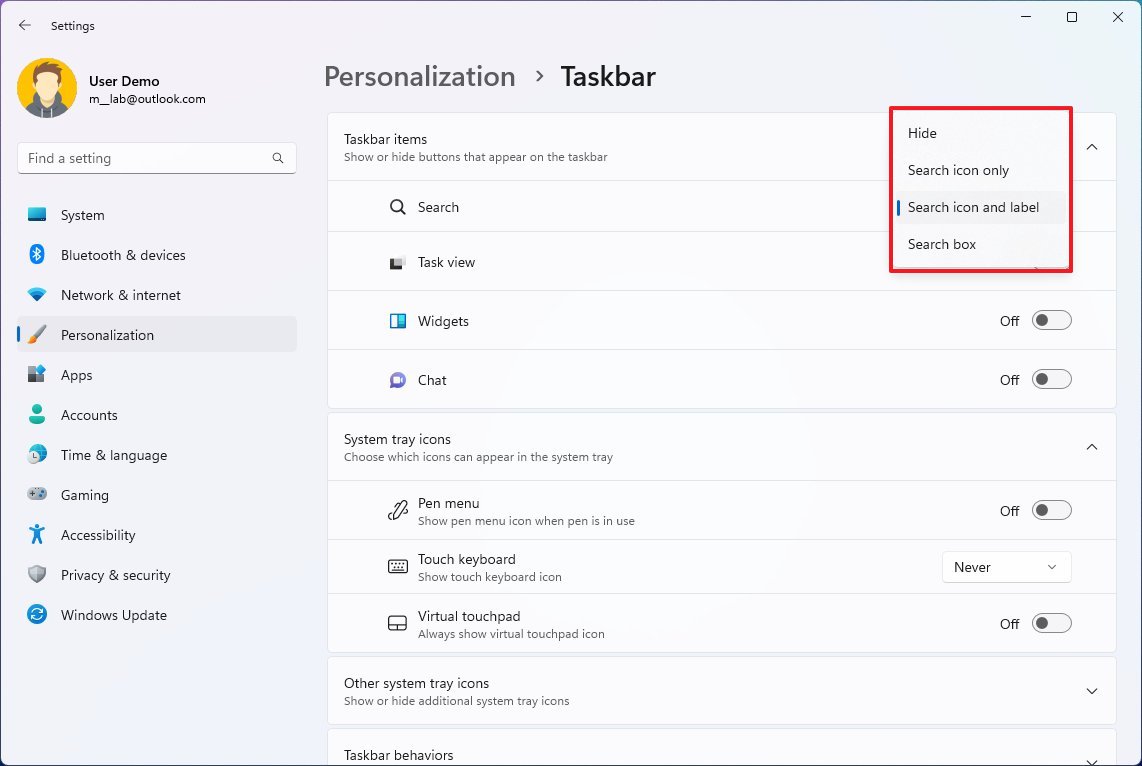
- Hide: Removes the box from the Taskbar. You can still access the experience from the Start menu or the "Windows key + S" keyboard shortcut.
- Show icon only: Removes the search box and displays an icon to access the Search home interface.
- Search icon and label: Shows a bigger button with a label to open the Search home interface.
- Search box: Enables the search box with the Bing Chat integration button on the right side.
After you complete the steps, the Windows Search will reflect the applied settings.
How to add or remove apps on Taskbar
On Windows 11, you can pin or unpin virtually any app in at least two ways through the Start menu or the Taskbar context menu.
To add or remove the app icon from the Taskbar, use these steps:
- Open Start.
- Click the All apps button.
- Right-click the app, select the More submenu, and choose the "Pin to Taskbar" option.
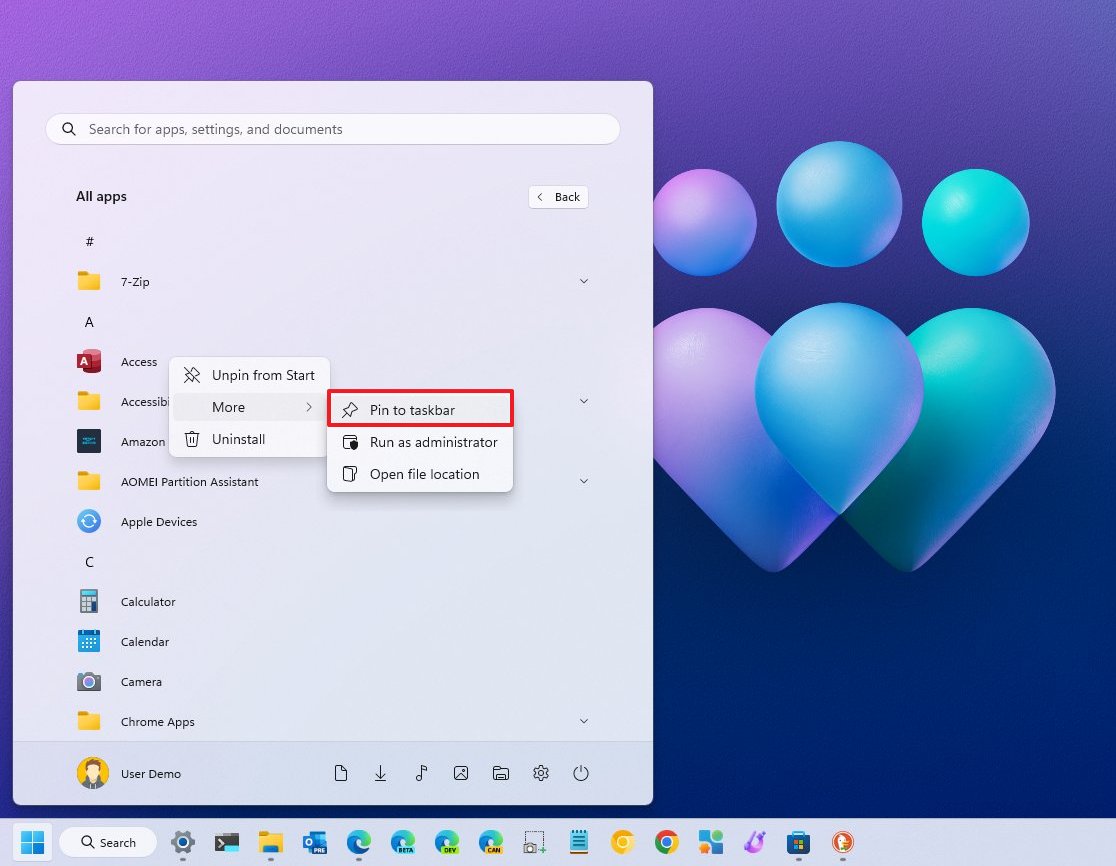
- (Optional) Start the app, right-click the app icon from the Taskbar, and choose the "Pin to Taskbar" option.
- Right-click the app icon and choose the "Unpin from Taskbar" option to remove the app.
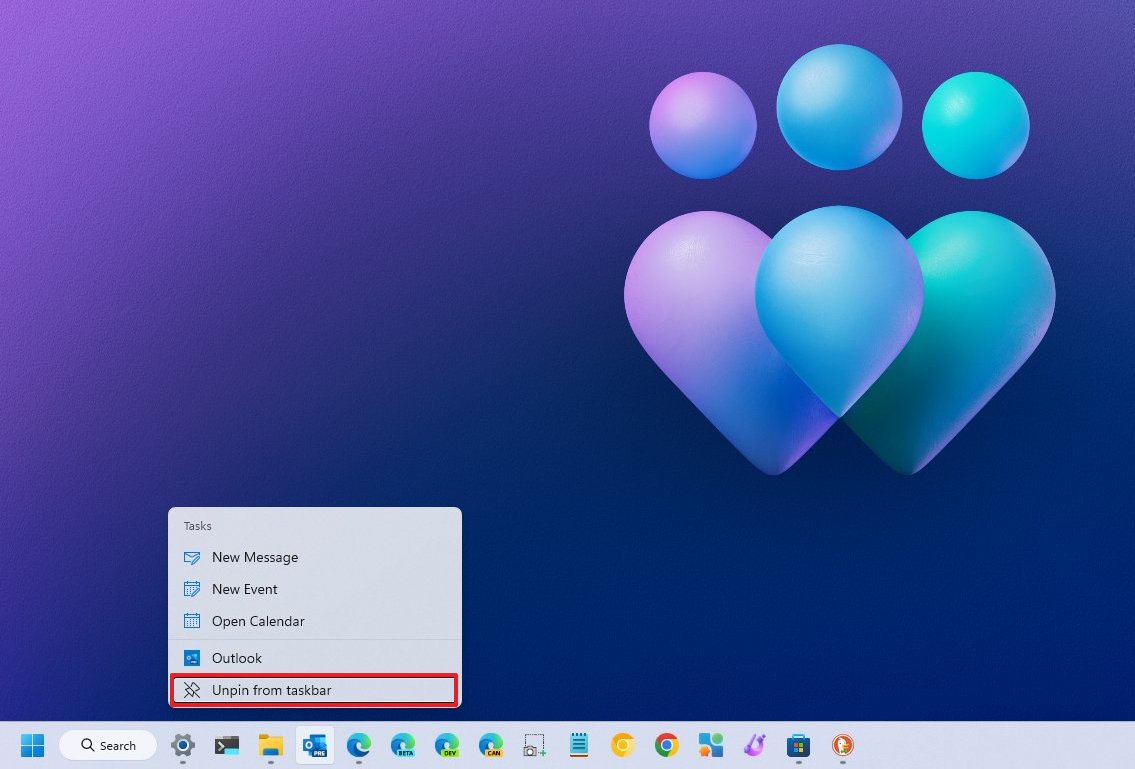
Once you complete the steps, the Taskbar will only include the app icons you specified.
How to turn on or off Snap groups on Taskbar
When snapping apps on the screen, when hovering over an app, the Taskbar can show you a preview of the groups, which makes it easier to switch to the group snapped after switching to another application. However, depending on your preferences, you can turn this feature on or off.
To turn Snap groups on or off in the Taskbar, use these steps:
- Open Settings.
- Click on System.
- Click the Multitasking page on the right side.
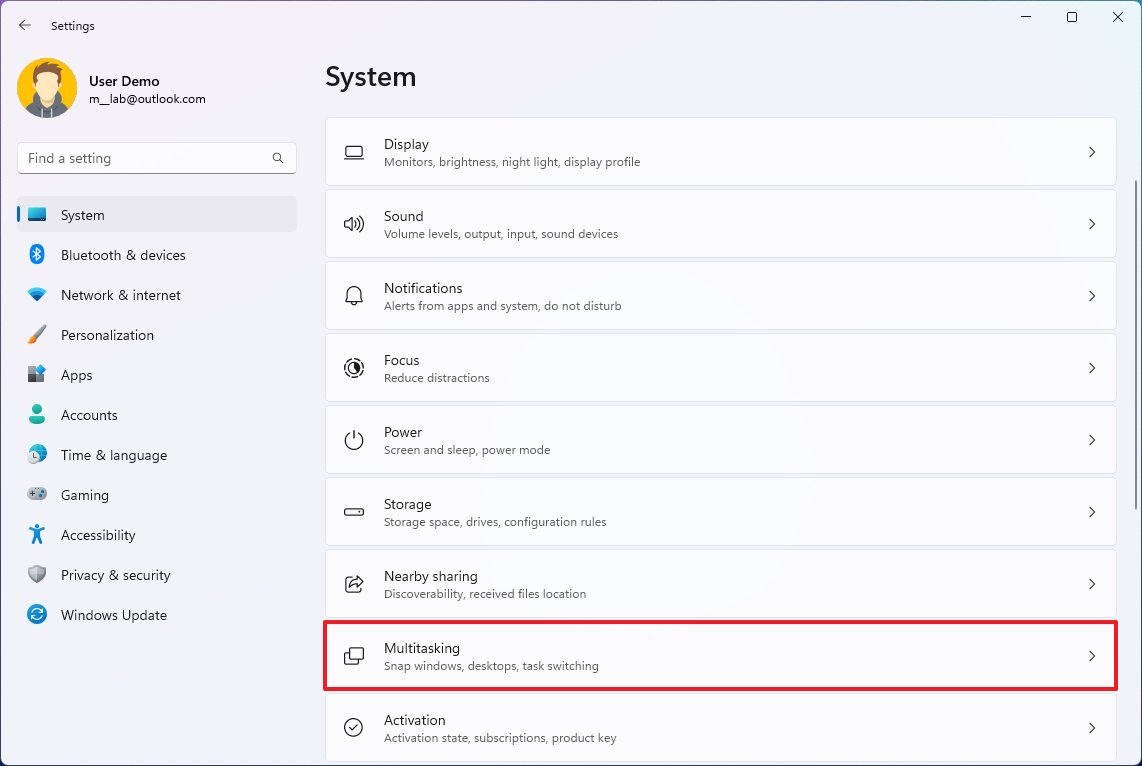
- Click the Snap windows setting.
- Check the "Show my snapped windows when I hover over taskbar apps, in Task View, and when I press Alt+Tab" option to enable the feature.
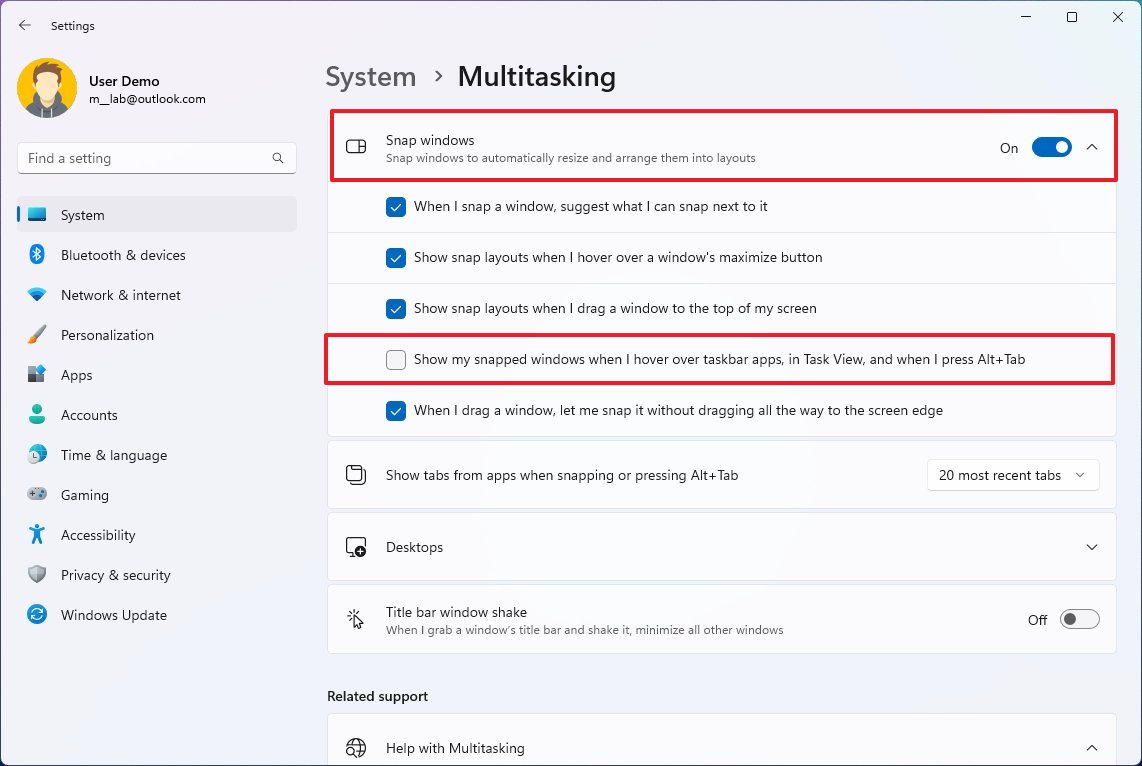
- (Optional) Clear the "Show my snapped windows when I hover over taskbar apps, in Task View, and when I press Alt+Tab" option to disable the feature.
After you complete the steps, the Taskbar will reflect the specified configuration.
How to manage System Tray icons on Taskbar
In the Taskbar settings, you can customize various aspects of the System Tray, including choosing the items that appear in the experience, and you can enable the overflow menu to view hidden icons.
To manage System Tray icons on the Taskbar, use these steps:
- Open Settings.
- Click on Personalization.
- Click the Taskbar page on the right side.

- Click the "System tray items" setting.
- Turn on or off the toggle switch to show the buttons to open the "Pen menu" or "Virtual touchpad."
- Use the "Touch keyboard" setting to choose the behavior:
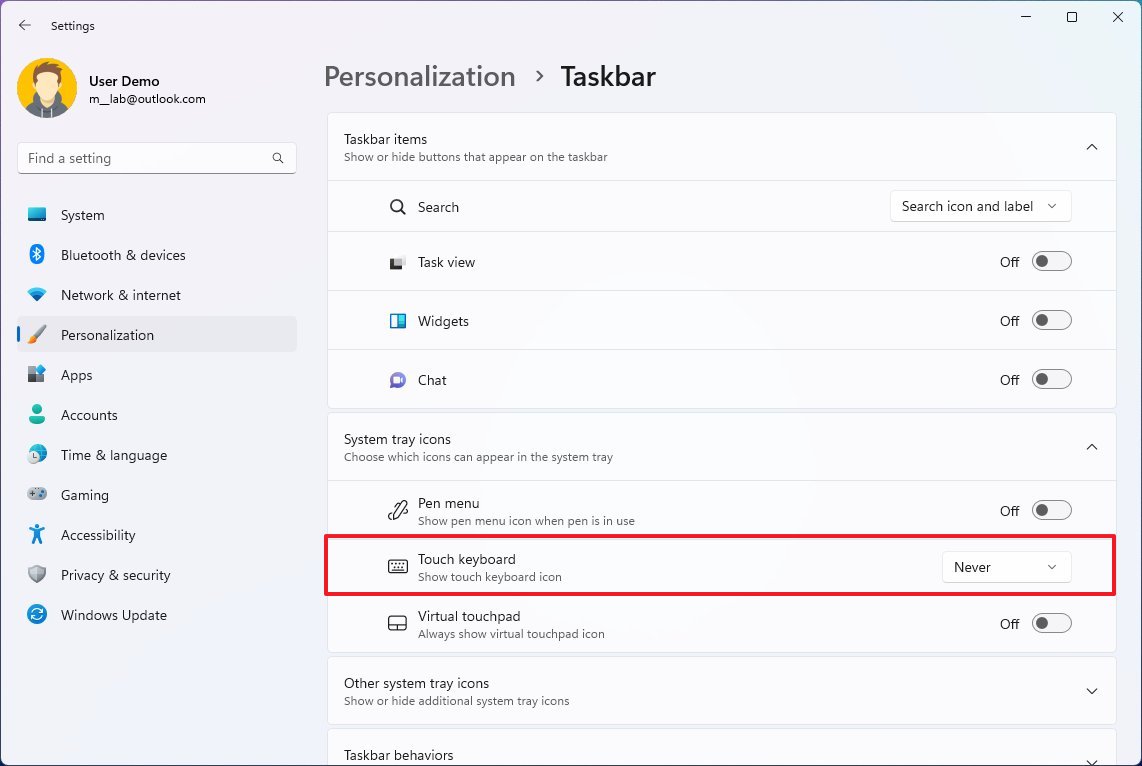
- Never: Disable the touch keyboard even when no hardware keyboard is attached.
- Always: Show the touch keyboard even when the hardware keyboard is attached.
- When no keyboard attached: Shows the touch keyboard only when the device is used as a tablet without the hardware keyboard.
- Click the "Other system tray icons" setting.
- Turn on the "Hiden icon menu" setting toggle switch to enable the menu to view hidden icons in the System tray.
- Turn on or off the toggle switch for the icons you want to show or hide from the System Tray.
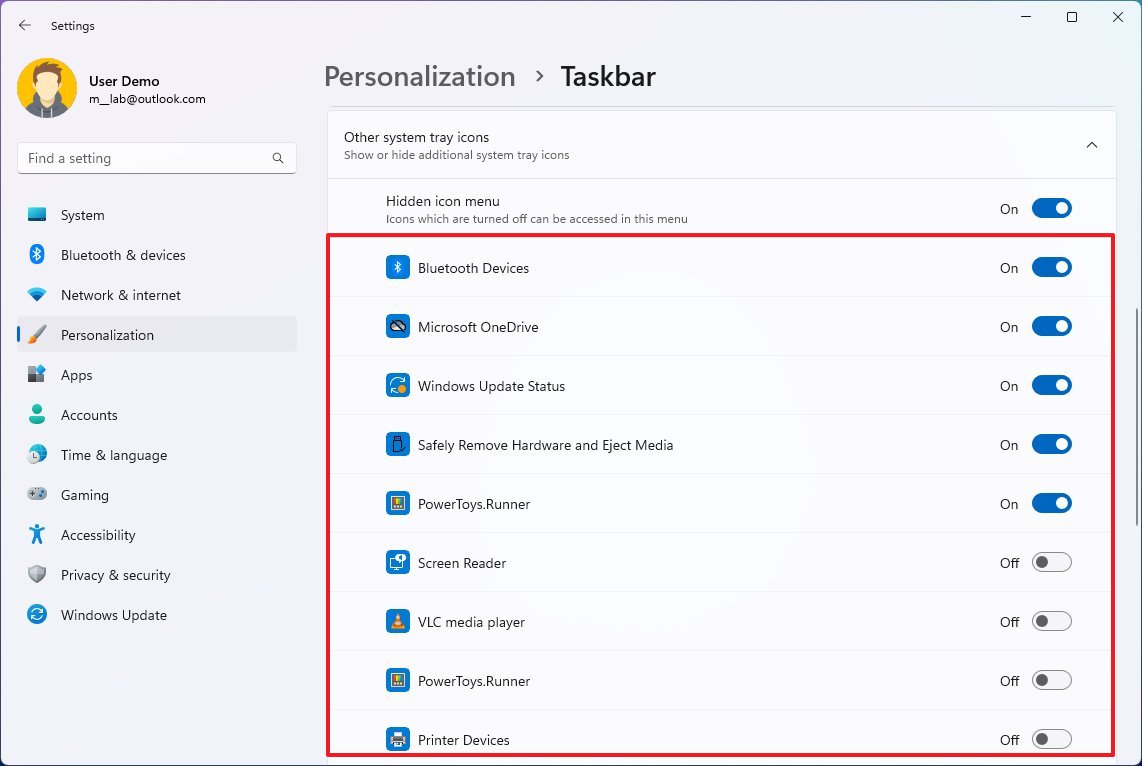
After you complete the steps, the System Tray will reflect the applied settings.
How to change icon alignment on Taskbar
Traditionally, the items in the Taskbar always appeared on the left side, but the new interface has a centered alignment. However, you can always change the alignment to the position of your choice.
To align the Taskbar items to the left side on Windows 11, use these steps:
- Open Settings.
- Click on Personalization.
- Click the Taskbar page on the right side.

- Click the Taskbar behaviors setting.
- Choose the Left option to align the Start button and apps to the left side of the Taskbar in the "Taskbar alignment" setting.
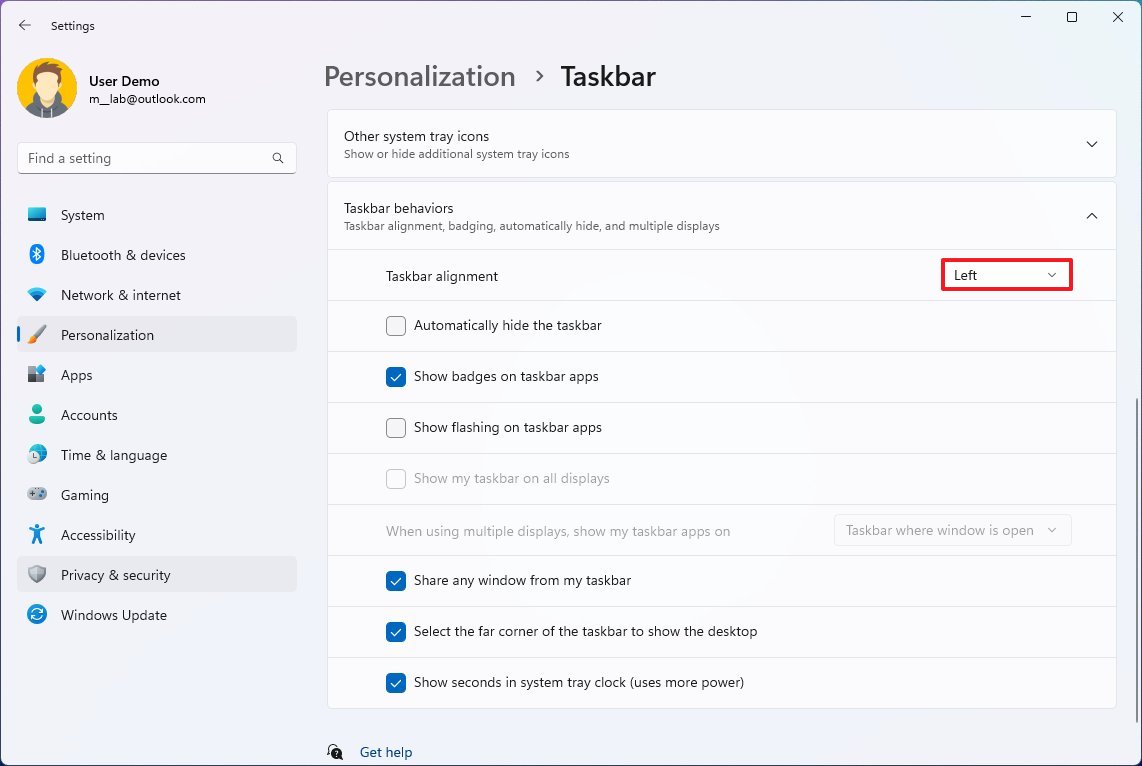
- (Optional) Choose the Center option to align the Start button and apps to the center of the Taskbar.
Once you complete the steps, the Start menu button, Widgets, Chat, Search, and app icons will align to the left side of the screen.
How to enable auto-hide on Taskbar
On Windows 11, you can also set the Taskbar to hide automatically when you move the mouse pointer away from the interface, freeing up space on the screen and making the Taskbar available when needed.
To hide the Taskbar automatically on Windows 11, use these steps:
- Open Settings.
- Click on Personalization.
- Click the Taskbar page on the right side.

- Click the "Taskbar behaviors" setting.
- Check the "Automatically hide the taskbar" option to enable the feature.
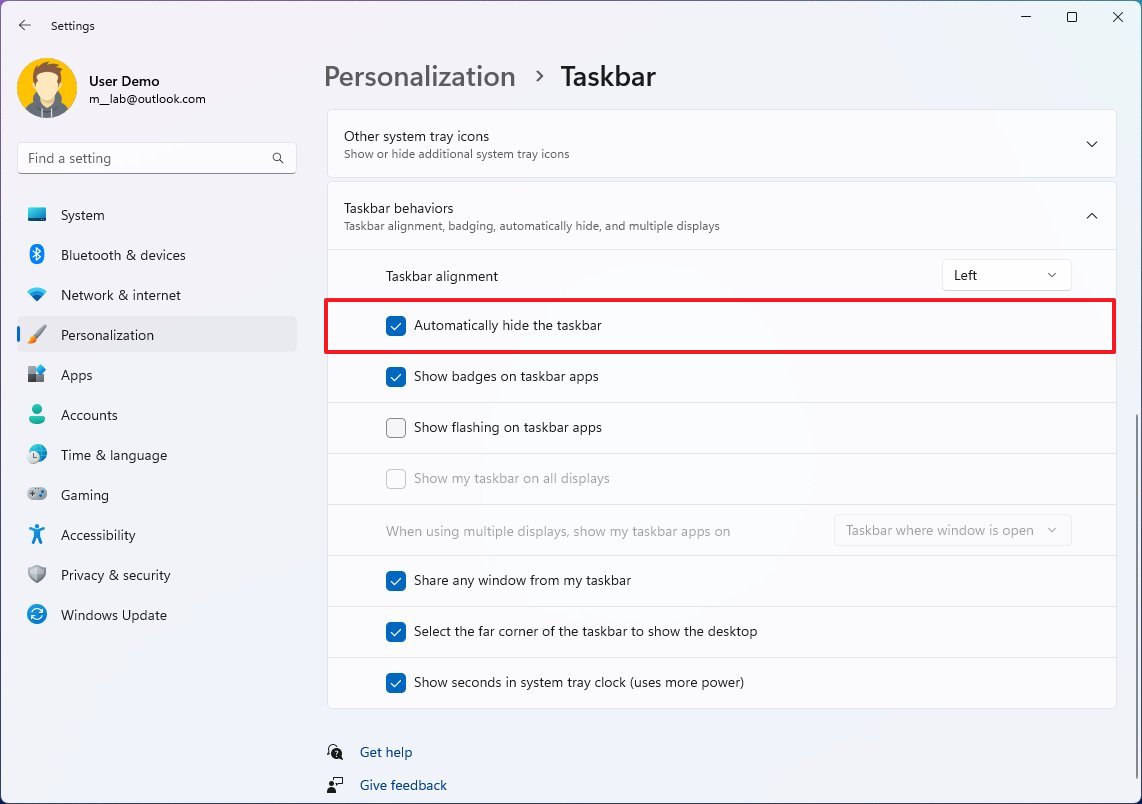
- (Optional) Clear the "Automatically hide the taskbar" option to turn off the feature.
After completing the steps, the Taskbar will automatically hide when you move the pointer away from it.
How to disable badge notifications on Taskbar
As part of the notification system, apps in the Taskbar can also show a badge with the number of unread messages. However, if you don't find this feature useful or distracting, you can disable it from the Settings app.
To disable badge notifications for app icons in the Taskbar, use these steps:
- Open Settings.
- Click on Personalization.
- Click the Taskbar page on the right side.

- Click the "Taskbar behaviors" setting.
- Clear the "Show badges on taskbar apps" option.
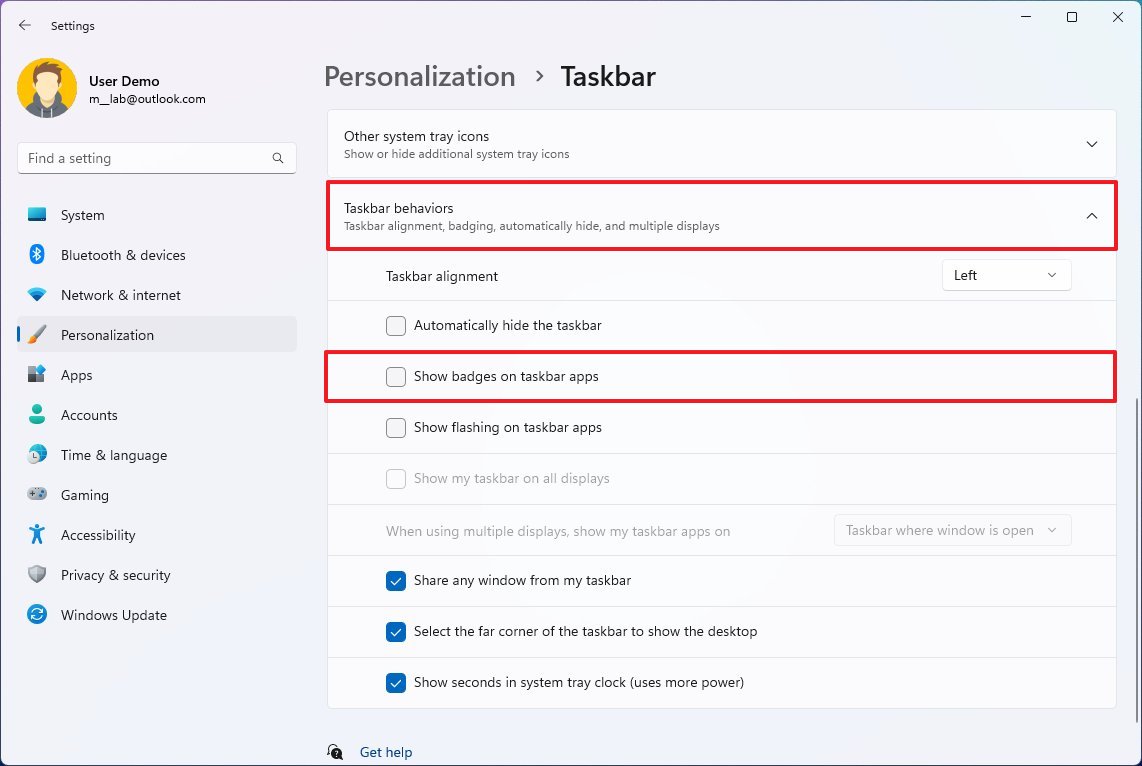
- (Optional) Check the "Show badges on taskbar apps" option.
Once you complete the steps, you will no longer see badge notifications on app icons with the number of unread messages in the Taskbar.
How to disable flashing icons on Taskbar
When an app requires your attention, the Taskbar will flash the icon, but you can always turn off this behavior.
To prevent apps from flashing to call for attention in the Taskbar, use these steps:
- Open Settings.
- Click on Personalization.
- Click the Taskbar page on the right side.

- Click the "Taskbar behaviors" setting.
- Clear the "Show flashing on taskbar apps" option to disable the feature.
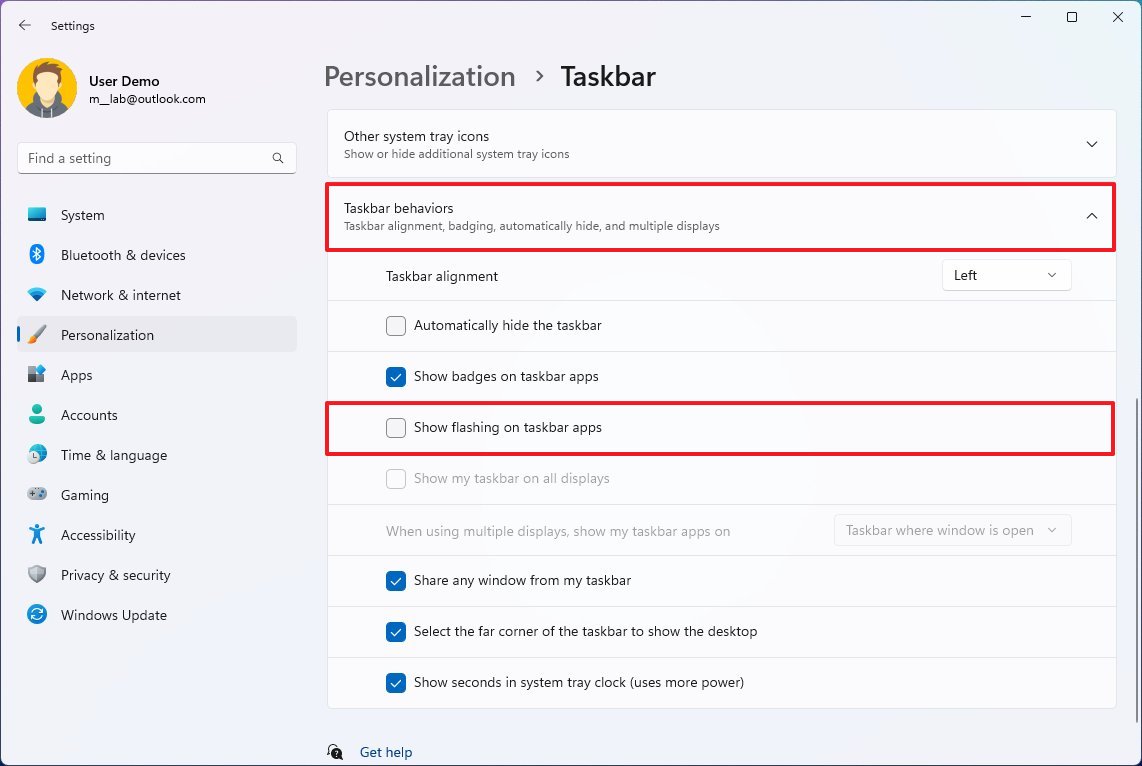
- (Optional) Check the "Show flashing on taskbar apps" option to enable the feature.
After you complete the steps, the Taskbar will no longer flash apps when they may require your attention to minimize distractions.
How to show Taskbar on all monitors on Windows 11
If you use a multi-monitor setup, you can configure the experience to show the Taskbar across every display. Also, you can change the behavior of how apps appear.
To show the Taskbar on every monitor on Windows 11, use these steps:
- Open Settings.
- Click on Personalization.
- Click the Taskbar page on the right side.

- Click the "Taskbar behaviors" setting.
- Check the "Show my taskbar on all displays" option to enable the feature.
- Choose how apps will appear across the Taskbars in the "When using multiple displays, show my taskbar apps on" setting:
- Taskbar where window is open.
- Main taskbar and taskbar where window is open.
- All taskbars.
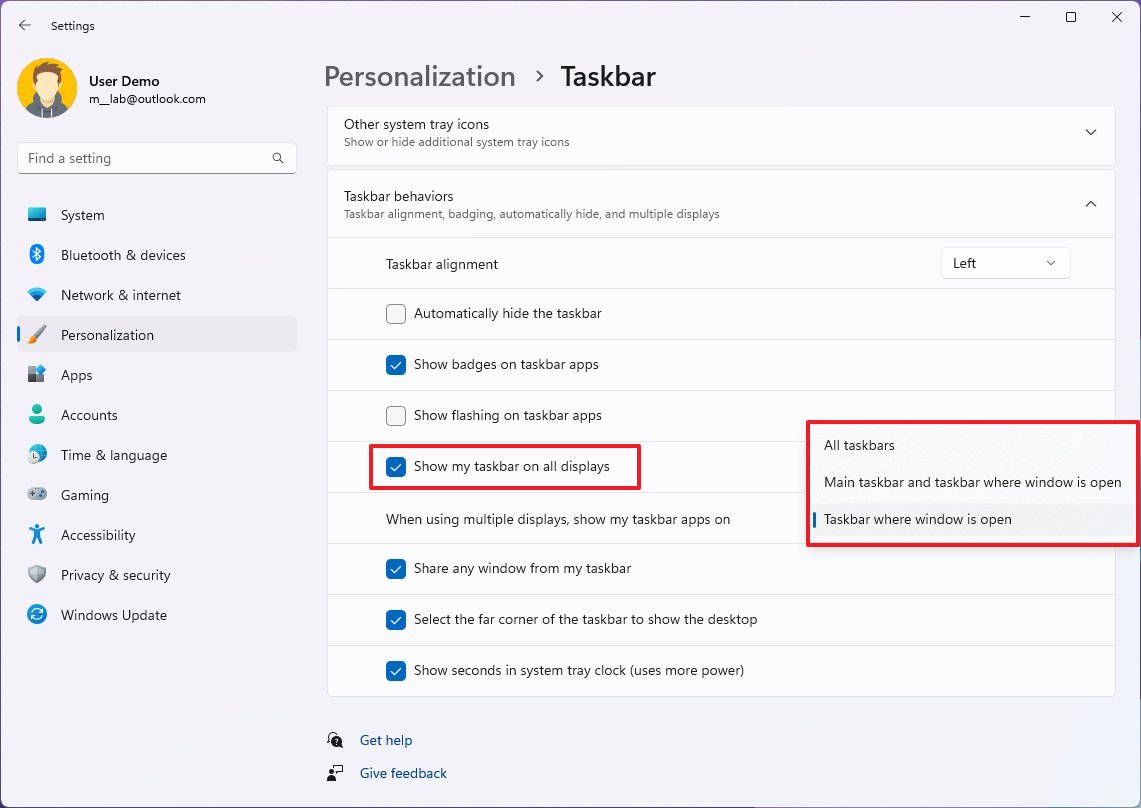
- (Optional) Clear the "Show my taskbar on all displays " option to disable the feature.
Once you complete the steps, the Taskbar will appear not only on the primary screen but across all the displays with the app behavior you specified.
How to show seconds in System Tray on Taskbar
On Windows 11, starting with the Moment 3 update, it's now possible to show seconds as part of the System Tray clock, but at the cost of wasting more system resources and battery.
To show seconds in the System Tray alongside the current date and time, use these steps:
- Open Settings.
- Click on Personalization.
- Click the Taskbar page on the right side.

- Click the "Taskbar behaviors" setting.
- Check the "Show seconds in system tray clock" option.
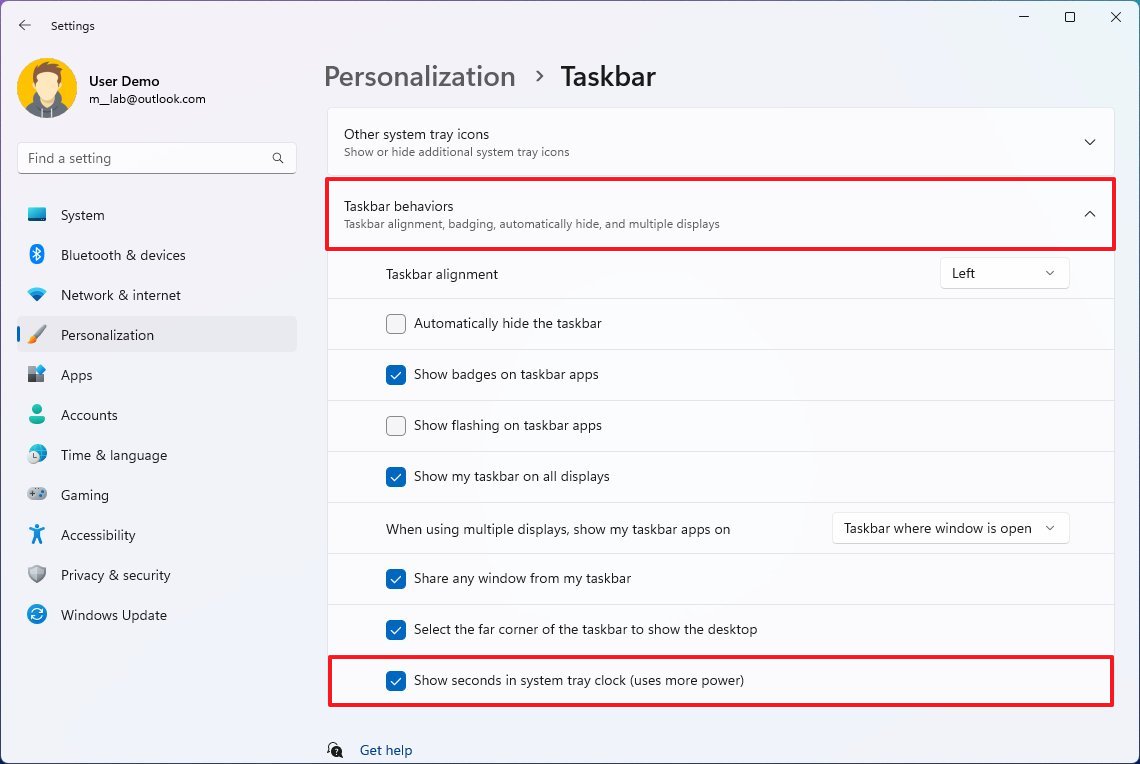
After you complete the steps, the Taskbar clock will show hours, minutes, and seconds in the System Tray.
More resources
For more helpful articles, coverage, and answers to common questions about Windows 10 and Windows 11, visit the following resources:
Mauro Huculak has been a Windows How-To Expert contributor for WindowsCentral.com for nearly a decade and has over 15 years of experience writing comprehensive guides. He also has an IT background and has achieved different professional certifications from Microsoft, Cisco, VMware, and CompTIA. He has been recognized as a Microsoft MVP for many years.

