Got a new Windows 11 PC or laptop? Do these 6 steps to make your device more secure
There are several security features available in Windows 11 that aren’t enabled by default or need to be configured properly.

Cybercrime is becoming an increasingly more lucrative endeavor luring in script kiddies that won’t hesitate to infect individual PCs in the hopes of stealing credit card, or bank login information. Microsoft is hard at work trying to fix its failures with security by using AI and new security policies. Also, with Microsoft's enterprise solutions, they are betting big on Security Copilot to help cybersecurity analysts defend from cyberattacks.
However, for consumer PCs, there isn't such a heavy focus and there is definitely less emphasis and support for do-it-yourself security from Microsoft. Don't worry though, these 6 steps are relatively easy, worthwhile changes to implement right now on your Windows 11 PC to make sure your PC is as secure as possible.
Enable 256-bit BitLocker in Windows 11
How to enable 256-bit BitLocker in Windows 11
You might already have BitLocker enabled on your PC if you're a security-minded individual, however, most people don't know that BitLocker defaults to 128-bit encryption. You can check if your encryption is 128-bit or 256-bit by running the command manage-bde -status without the quotes in an administration-privileged command prompt.
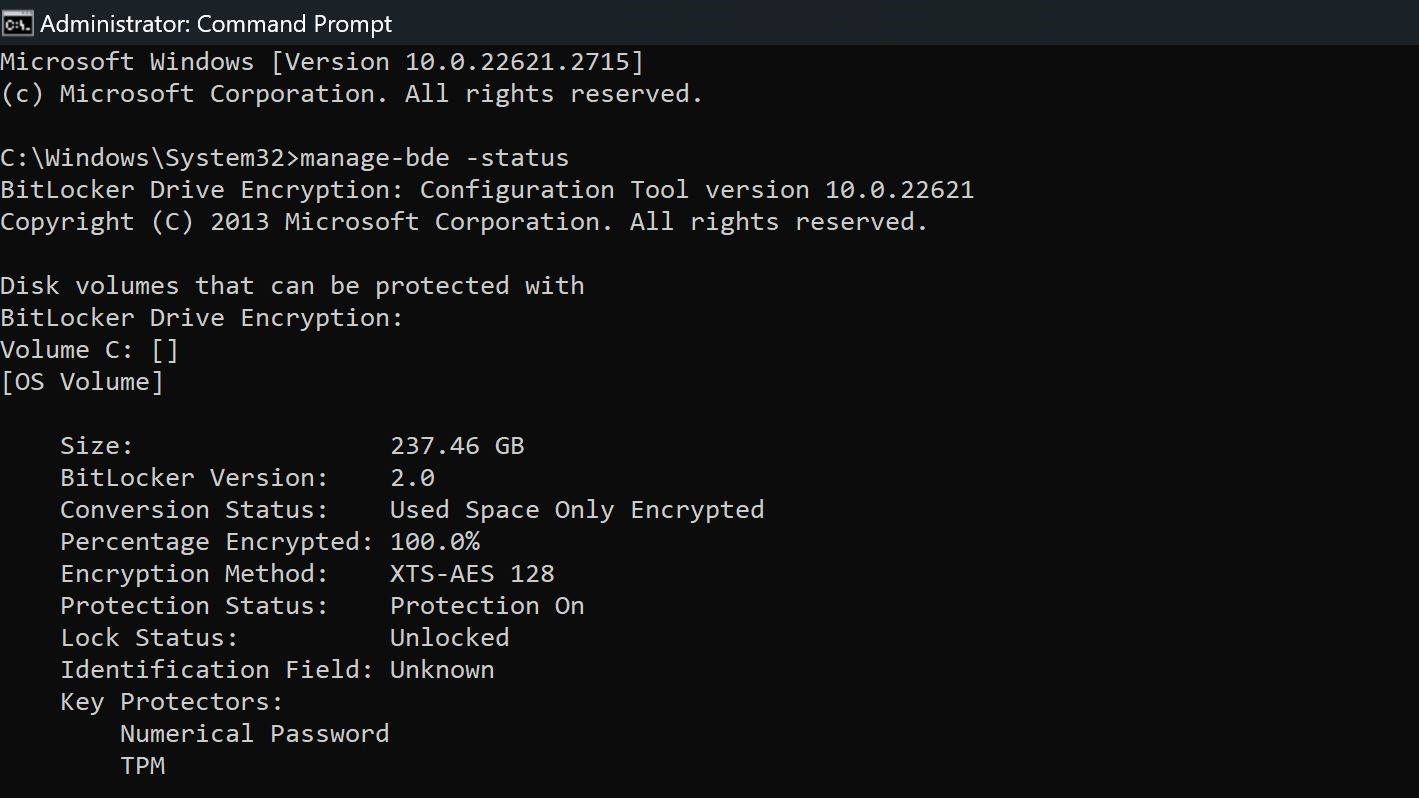
We strongly recommend specifying the encryption method. By default, BitLocker uses XTS-AES-128. You can opt XTS-AES-256 for stronger security.
Microsoft
If you already have enabled BitLocker on your PC, you will need to unencrypt your drives, enable 256-bit encryption in Windows group policy, and then re-enable BitLocker. If you haven't enabled BitLocker on your PC yet, follow the steps below to enable 256-bit encryption, and then make use of our guide on how to configure BitLocker encryption on Windows 11.
- Press Windows Key + R to open the Run dialog
- Type gpedit.msc and press Enter
- Go to Computer Configuration\Administrative Templates\Windows Components\BitLocker Drive Encryption. Look for the "Choose drive encryption method and cipher strength" option for the most recent operating version. For me it was Windows 10 (1511) and double click it.
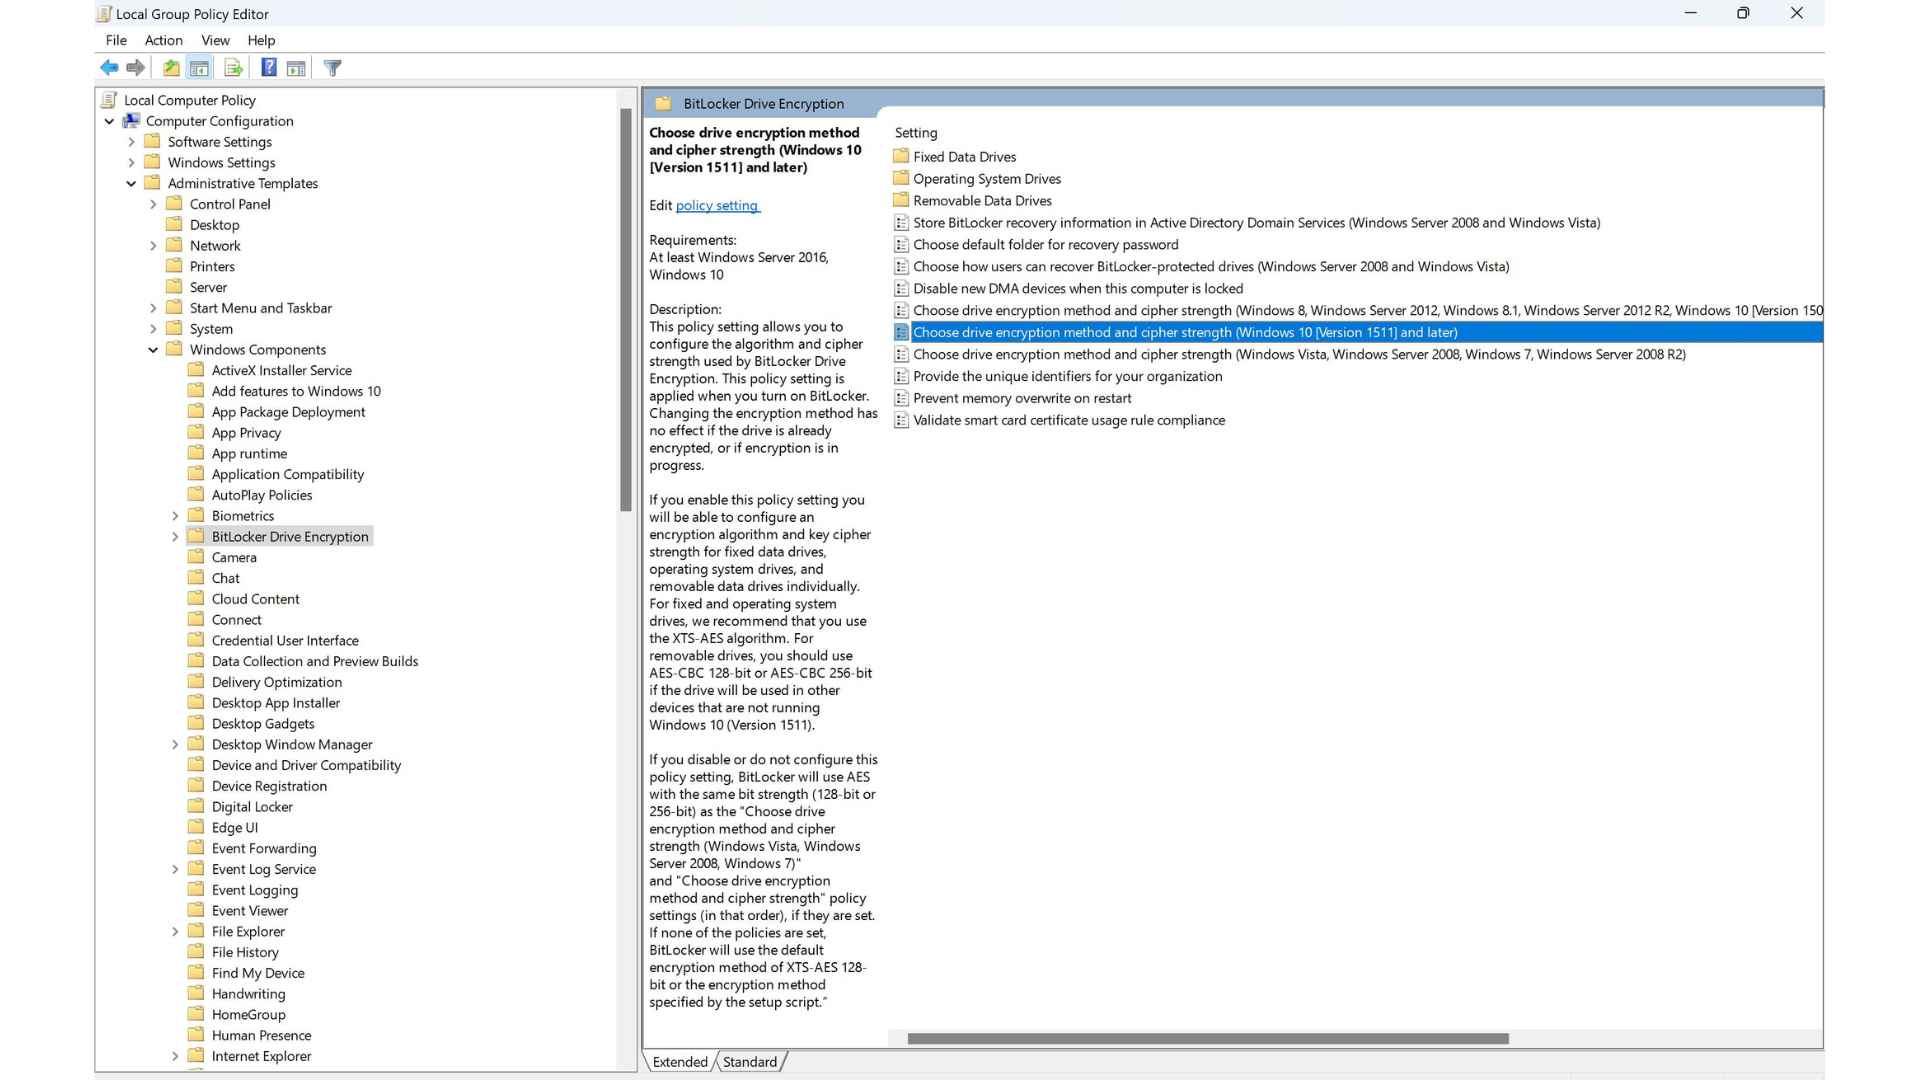
Make sure you choose the correct options:
It is best to use XTS-AES-256 for operating system drives and fixed drives. Use AES-CBC 256-bit for removable drives so it is more compatible with other devices.
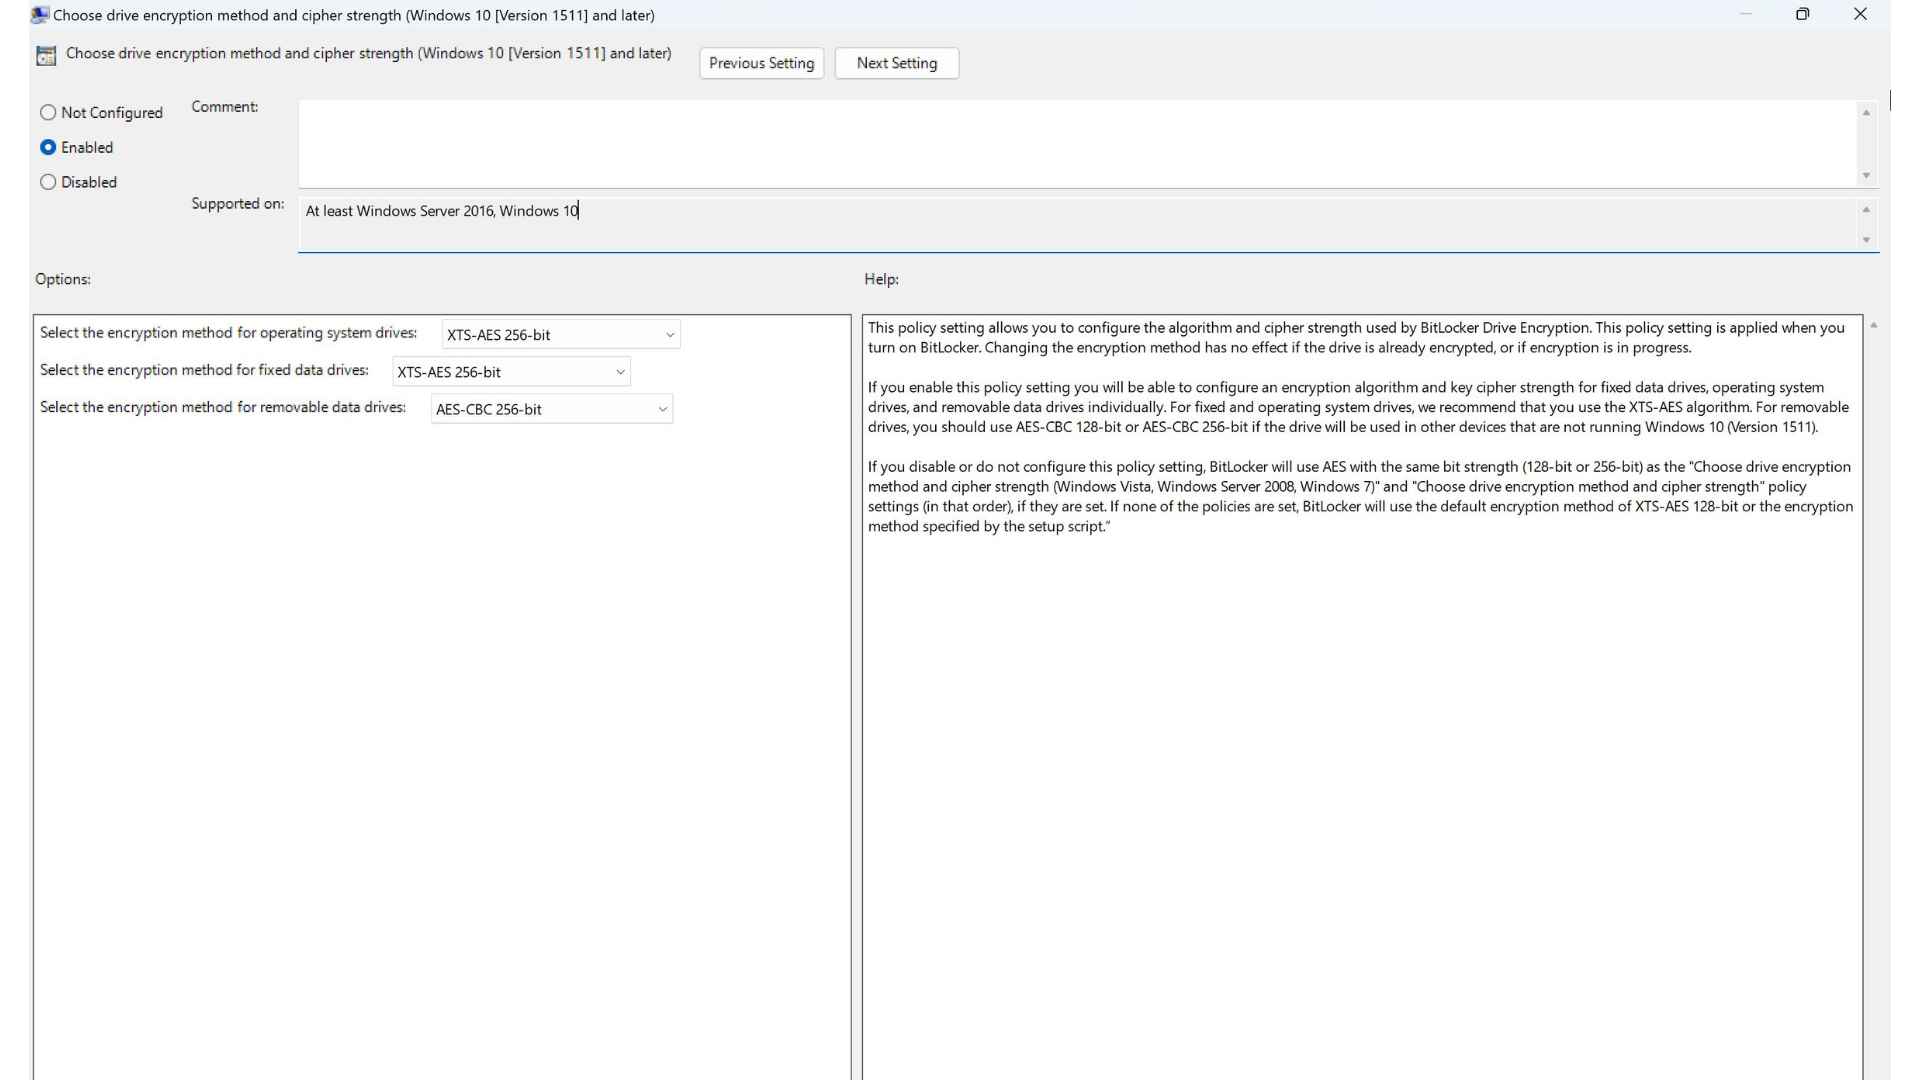
Microsoft gives some guidance for choosing the right choice in the group policy GUI, but it is worth repeating it here so that our readers are fully aware.
Get the Windows Central Newsletter
All the latest news, reviews, and guides for Windows and Xbox diehards.
"This policy setting allows you to configure the algorithm and cipher strength used by BitLocker Drive Encryption. This policy setting is applied when you turn on BitLocker. Changing the encryption method has no effect if the drive is already encrypted, or if encryption is in progress."
"If you enable this policy setting you will be able to configure an encryption algorithm and key cipher strength for fixed data drives, operating system drives, and removable data drives individually. For fixed and operating system drives, we recommend that you use the XTS-AES algorithm. For removable drives, you should use AES-CBC 128-bit or AES-CBC 256-bit if the drive will be used in other devices that are not running Windows 10 (Version 1511)."
Once you have the correct options selected, go ahead and hit apply and close out the group policy. Now you can follow our guide on How to configure BitLocker encryption on Windows 11.
How to enable all features in Windows Security
Most of the Windows Security features should be enabled by default when you first get your PC, however, in my experience, they seem to be disabled for various reasons. It is worth doing a double check and making sure they are all turned on and functioning.
Enable all features in Windows Security
To enable all features in Windows Security for Windows 11, use these steps:
- In the Windows Search Bar type in Windows Security and hit enter.
- Check to make sure all of the icons are green and enabled
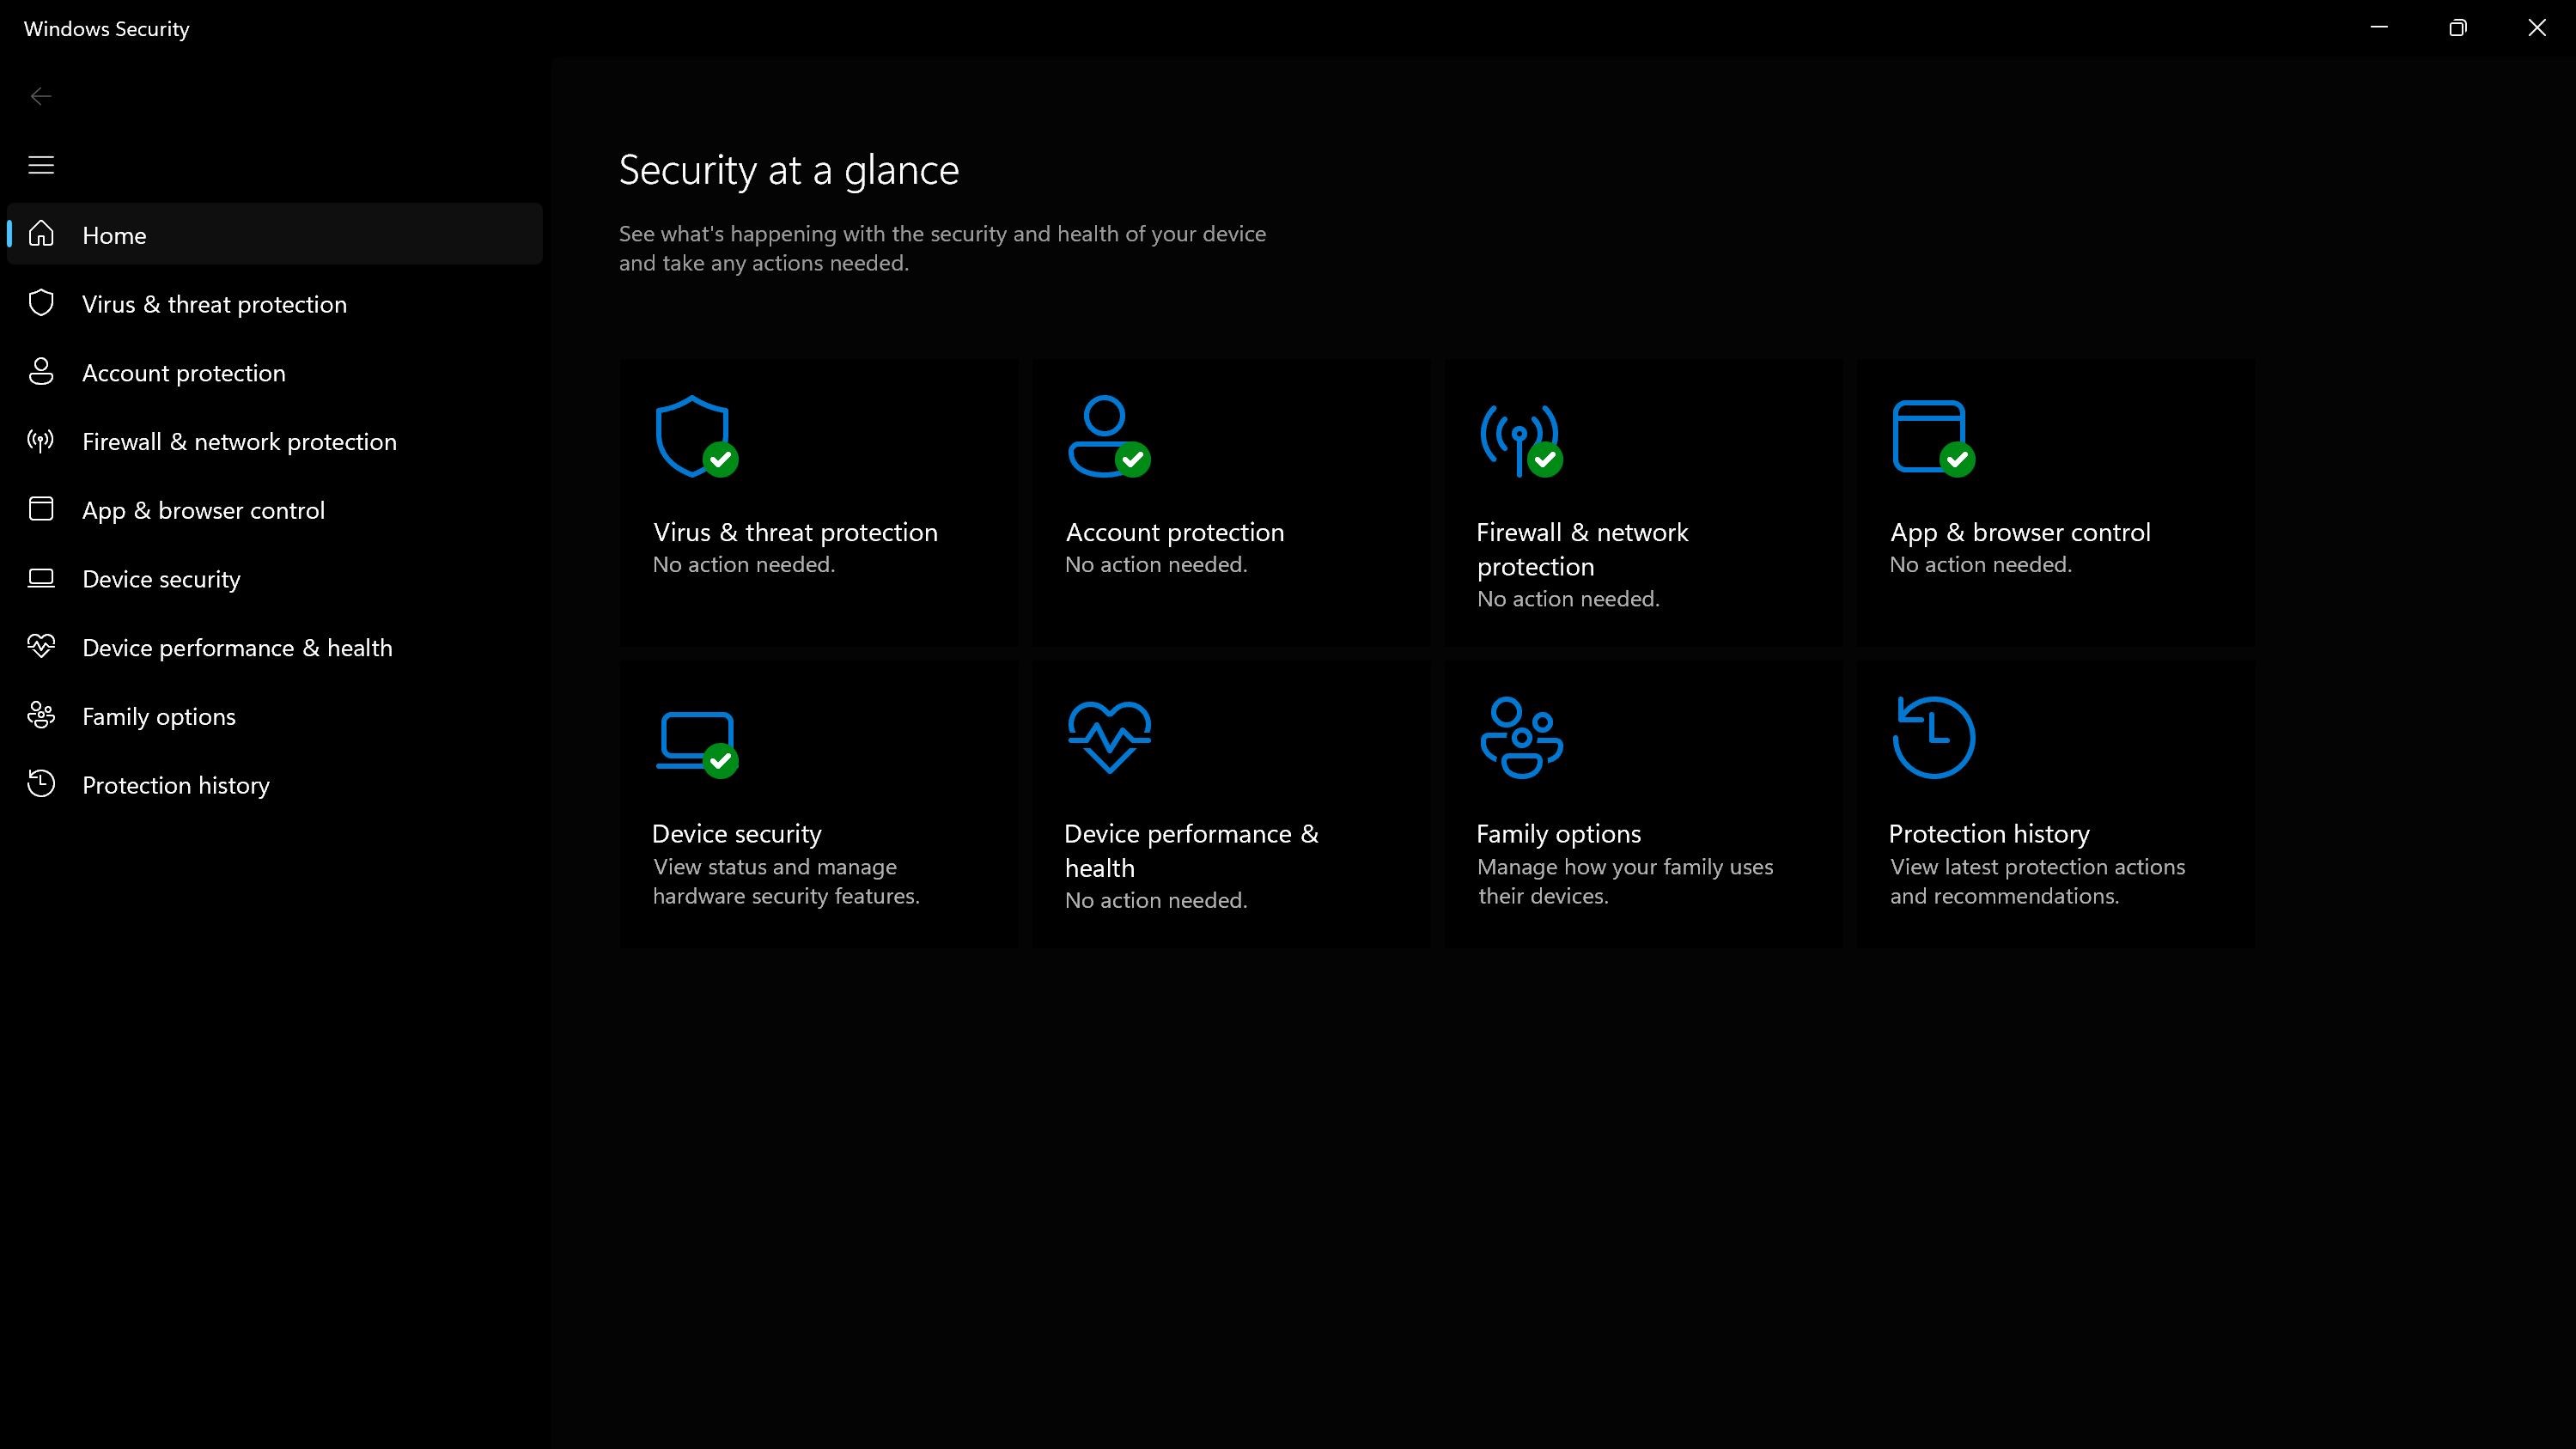
3. If any of the features are greyed out, go ahead and click the toggle and follow any of the steps required to enable them. Some of the features may require a PC restart to be completely enabled.
There are 5 major sections in the Windows Security application, and all of them are important and offer their own suite of protections for your PC. It is good to know why each of them is important.
What is virus and threat protection in Windows Security?
Virus and Threat Protection in Windows Security offers several features, and you can learn more about it on the Windows help site. I recommend making sure the Ransomware protection is enabled.
- Virus and Threat Protection helps you scan for threats on your device.
- Run different types of scans.
- See the results of your previous virus and threat scans.
- Get the latest protection offered by Microsoft Defender Antivirus.
What is account protection in Windows Security?
Account Protection in Windows Security has features to make sure your account and computer are more secure by protecting sign-ins and the computer if you leave it unlocked by accident.
- With Account Protection, sign into your Microsoft account for extra protections
- Use Windows Hello for more secure sign-in options such as facial recognition or fingerprint.
- Use Dynamic Lock to pair your PC to your phone, and any time your phone recognizes you have walked away, it will lock your PC.
Firewall & network protection is vital to protect your computer from being directly accessed by malicious external devices. Microsoft is always updating their Firewall settings to protect from new and emerging threats.
- Firewall & network protection in Windows Security lets you view the status of Microsoft Defender Firewall.
- See what networks your device is connected to.
- Allow an app through the firewall.
- Adjust the firewall notification settings to know when the firewall is blocking something.
What is app & browser control in Windows Security?
App & browser control in Windows Security makes sure you are safe while browsing the web or when installing applications that might be malicious. You can also manage the settings for Microsoft Defender SmartScreen, which helps protect your device from potentially dangerous apps, files, websites, and downloads.
- Reputation-based protection - Reputation-based protection leverages what Microsoft knows about various sites, services, and publishers, as well as threats we've seen in action to help protect you from malicious or potentially unwanted apps, files, or websites.
- Isolated browsing - Microsoft Defender Application Guard for Edge can help to protect you against untrusted and potentially dangerous sites by opening them in a virtualized container, isolated from your important files and folders.
- Exploit protection - Exploit protection automatically applies many exploit mitigation techniques to operating system processes and apps.
What is device protection in Windows Security?
Device protection in Windows Security is one of the most important and last lines of defense for your Windows PC. It sequesters your most important and powerful functions that can be hijacked by low-level drivers.
- Core isolation protects important core processes of Windows from malicious software by isolating them in memory. It does this by running those core processes in a virtualized environment.
- Memory integrity can help prevent malicious code from accessing high-security processes in the event of an attack.
- Security processor - Your security processor provides additional encryption for your device.
- Secure boot - prevents a sophisticated and dangerous type of malware—a rootkit—from loading when you start your device. Rootkits use the same permissions as the operating system and start before it, which means they can completely hide themselves.
Use Windows Backup to preserve your files and Settings
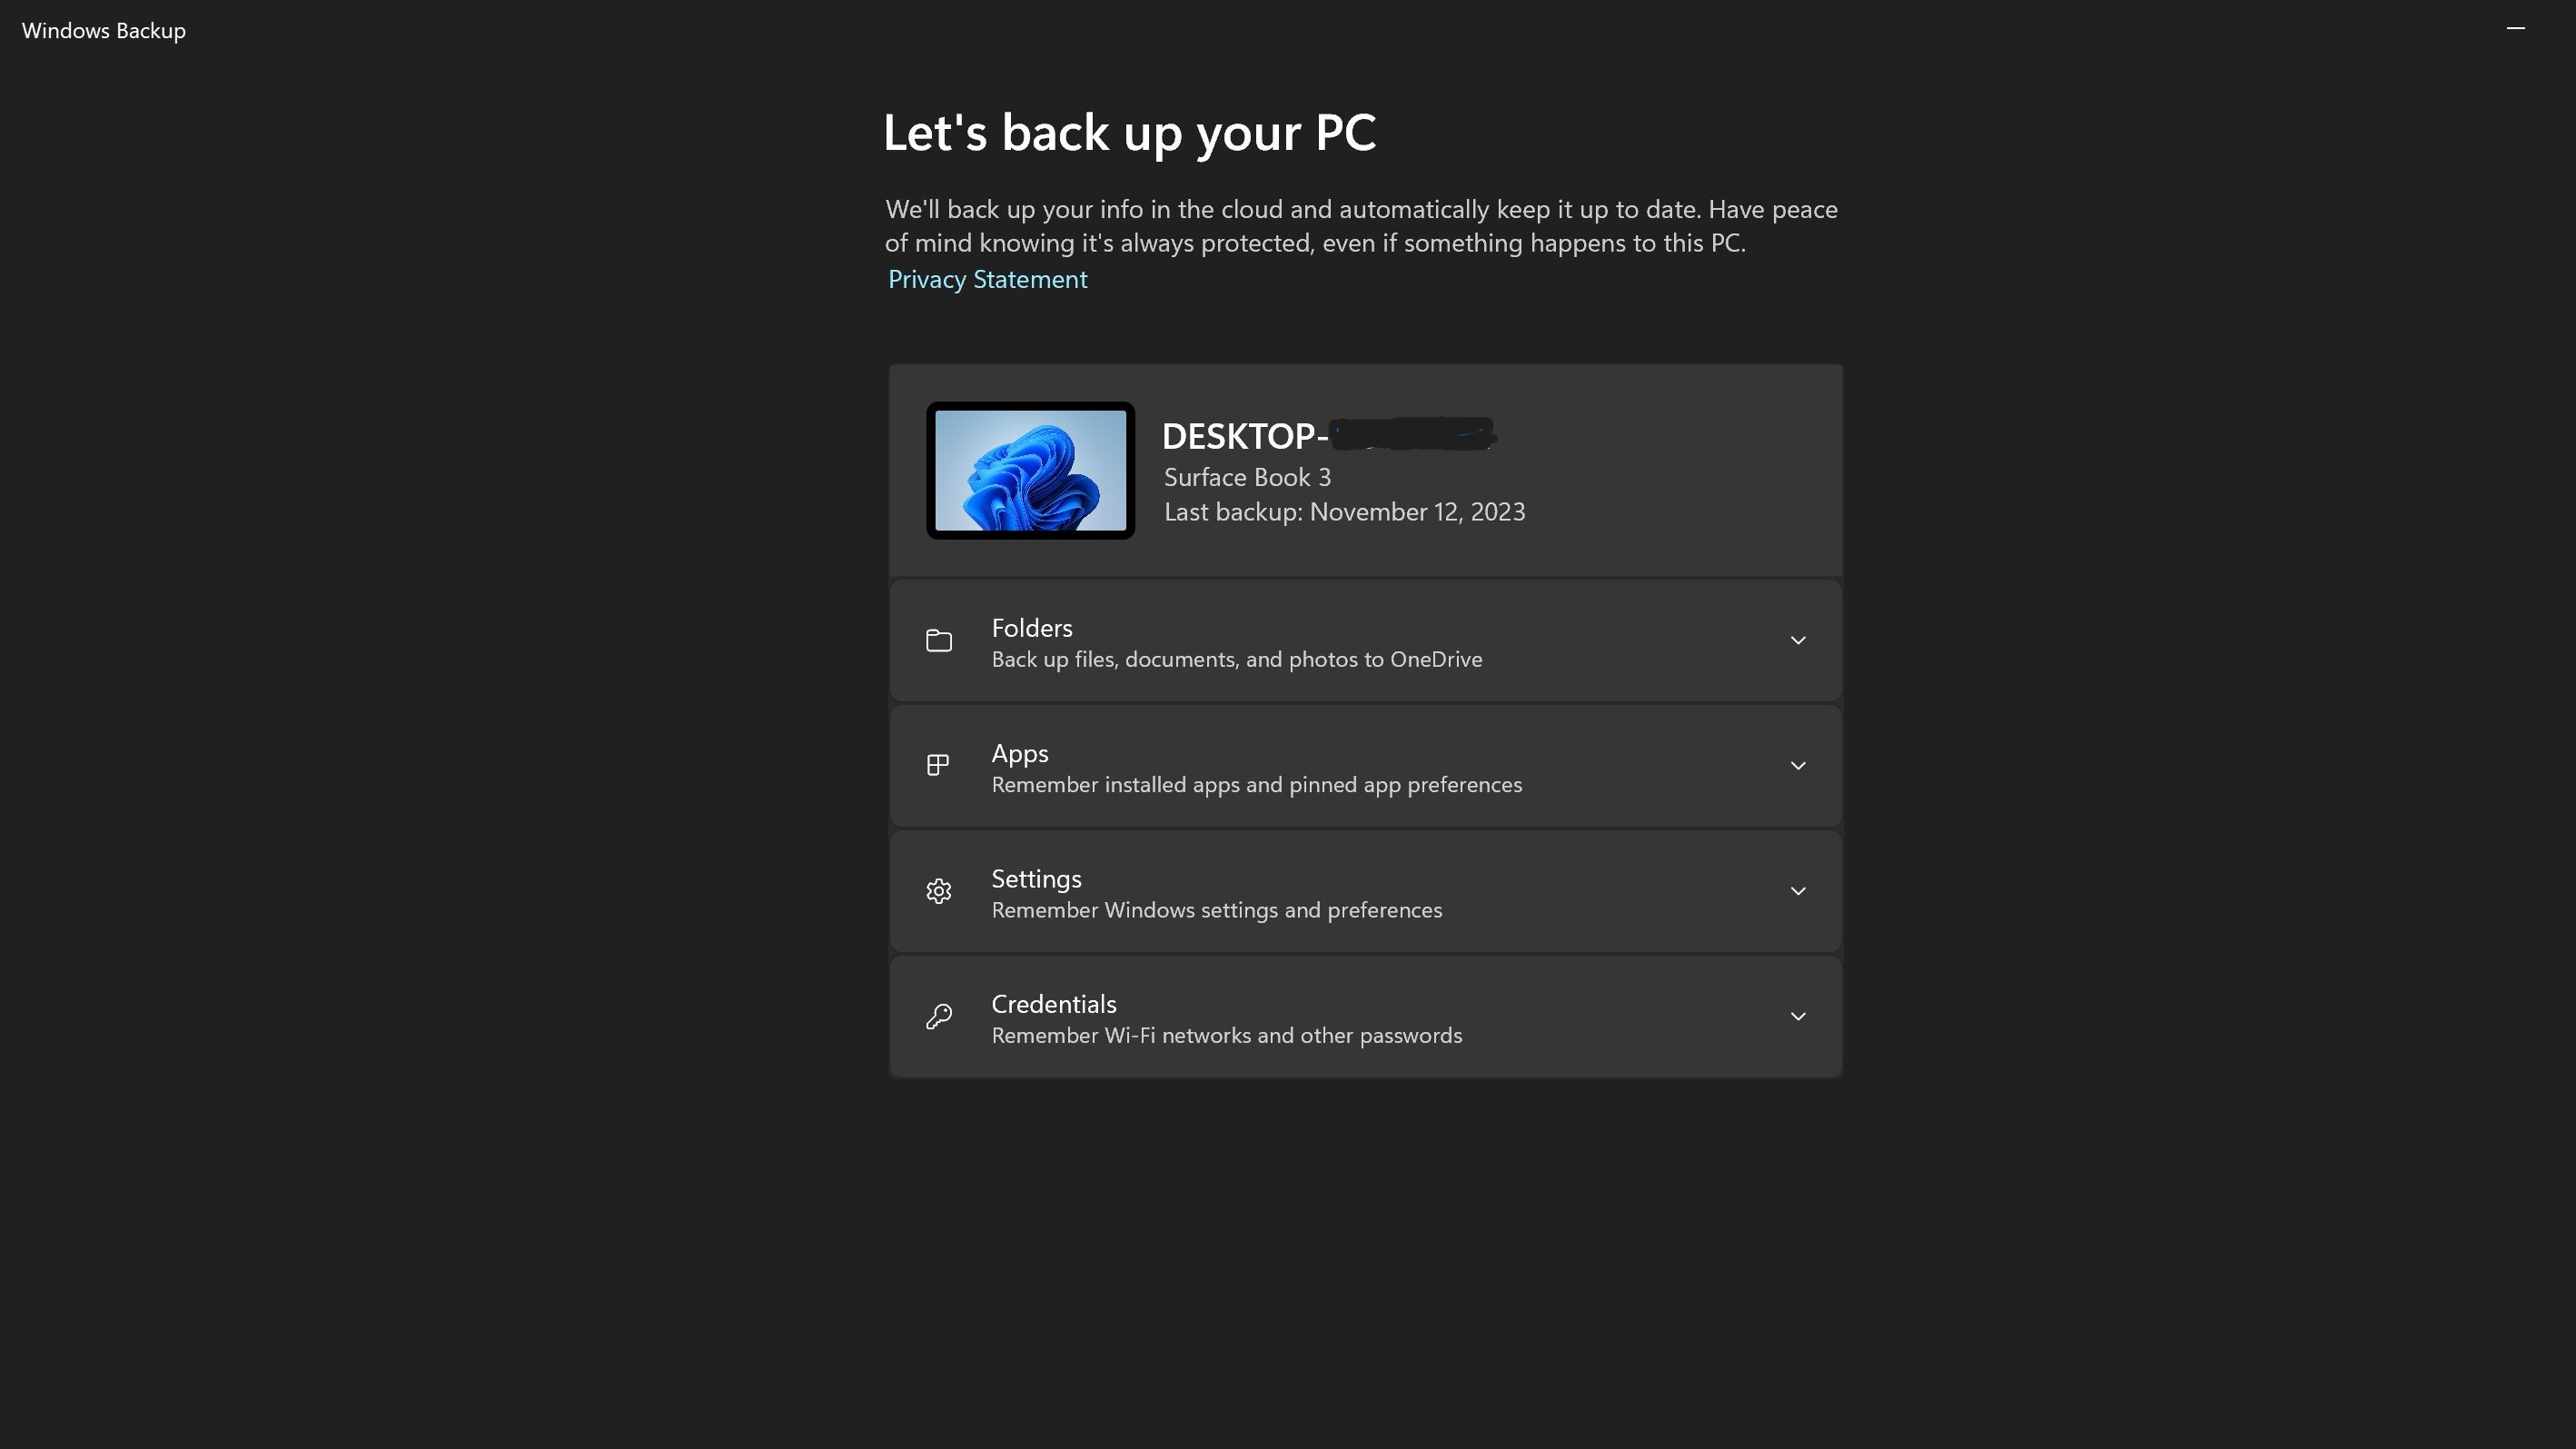
What is Windows Backup?
Windows Backup is a built-in feature in Windows 11 that backs up a copy of your files, and if you enable it, your settings so that if your computer gets infected, lost, or broken you won't lose all of your data.
Windows Backup should be enabled by default, but it is worth making sure that your settings are being backed up and that you haven't hit the 5GB limit that comes with a free Microsoft account.
We also have a guide on how to make a full backup of your PC in Windows 11, but if you just want to use Windows Backup, here is how to do that.
- In the Windows Search Bar type in Windows Backup and hit enter.
- Check each of the drop-downs to make sure all of the icons are green and enabled
- If there are any items not backed up, enable them and then hit the backup button
- If you are out of space and don't want to upgrade your account to get more space, use the guide to manually backup your PC.
Delete the Windows 11 page file at every shutdown
What is the page file?
The virtual memory paging file also called the page file stores important information from memory for the computer to improve performance. Some of the things stored there are your browser history, files, and pictures as well as system information.
The page file is a big target for hackers and there is no reason for your PC to store this information after being shut down, it can simply build a new page file the next time you turn on the PC. So, how do we make sure to clear the page file at every shutdown? Let's take a look.
Note: Making this change requires changing some registry entries, beware that tinkering with the registry can break Windows requiring a full re-install if you change the wrong registry entries. It is always best practice to back up the registry before making changes.
- In the Windows Search Bar, type in Regedit and hit enter.
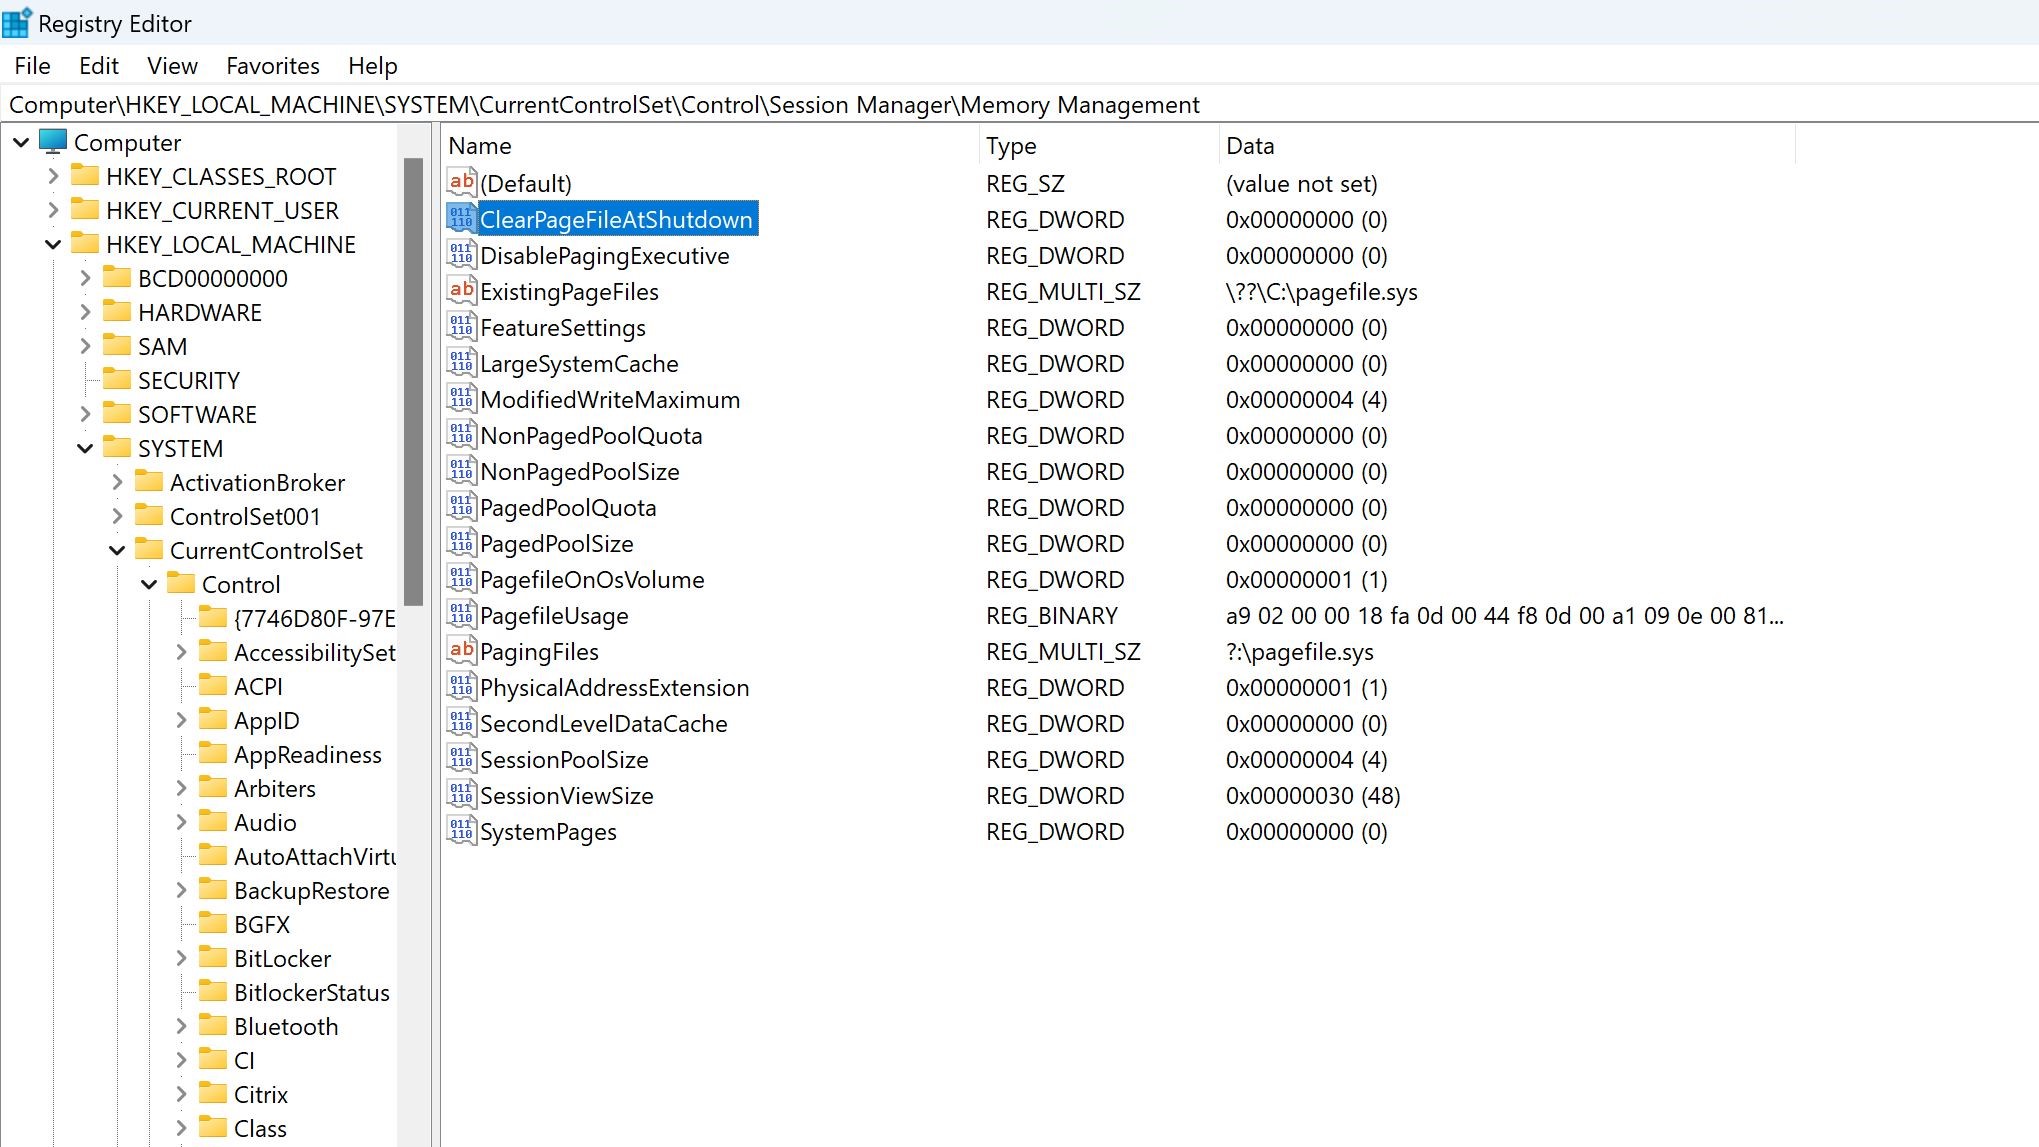
- Browse to: Computer\HKEY_LOCAL_MACHINE\SYSTEM\CurrentControlSet\Control\Session Manager\Memory Management

- Double-Click on Memory Management
- Double-click on ClearPageFileAtShutdown to open the settings for it.
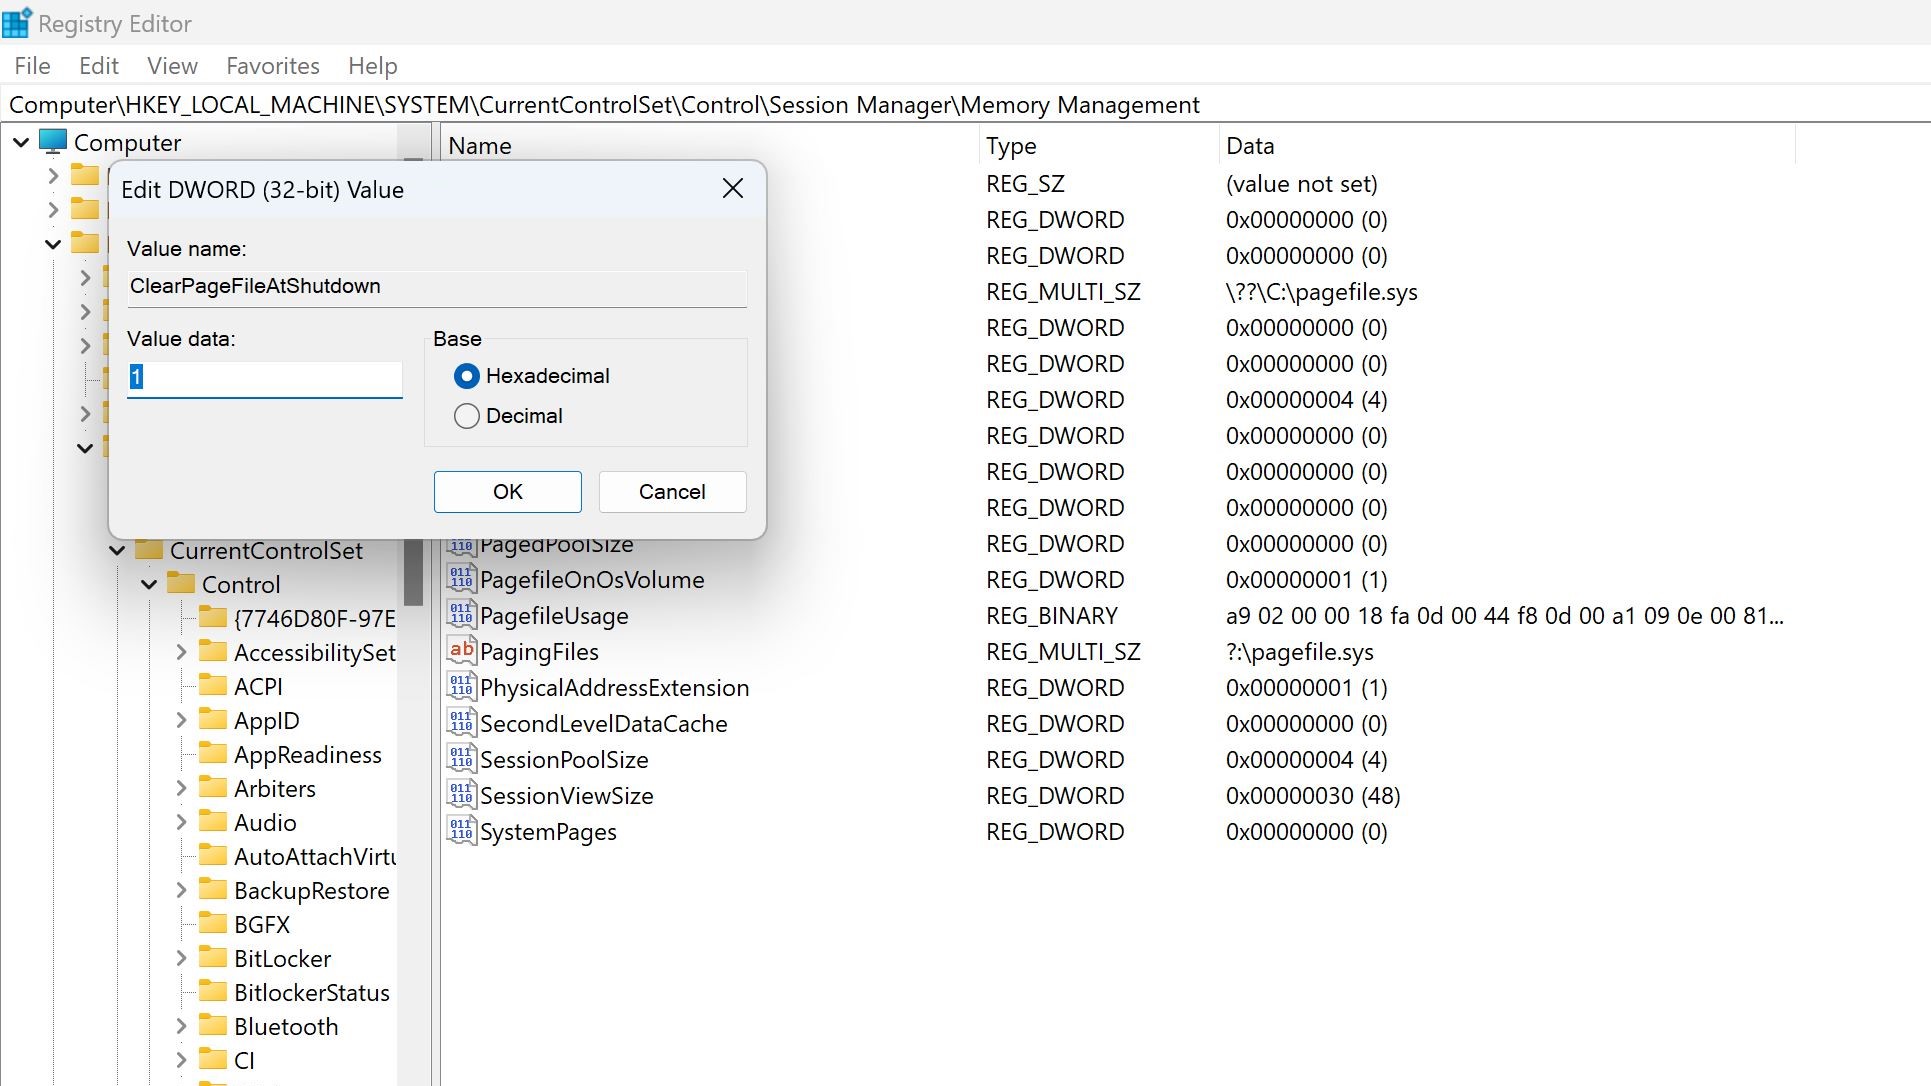
- Change the 0 to 1, enabling this setting in the registry editor, which will delete the page file at shutdown.
- Press OK, and close the registry editor. You can always change this back later by changing this setting back to 0 in the future if need be.
Download the Windows 11 security baseline
What is a Windows security baseline?
Microsoft offers a free security baseline for its different operating system versions. You can download them at the Microsoft Security Compliance Toolkit site. These are standards Microsoft creates mainly focused on enterprise customers, but consumers can use them as well. Microsoft's security baselines are "an industry-standard configuration that is broadly known and well-tested"
Microsoft will create custom policies and safeguards against new threats and attack vectors that weren't being used when the operating system first came out. This is more pervasive than a simple security update.
This is a more advanced option for security for those who enjoy tinkering with all facets of their security and permissions on their PC.
- Download the appropriate version of the security baseline for your PC from the Microsoft Security Compliance Toolkit site.
- Navigate to the location of the download and extract the file.
- Go to the scripts folder
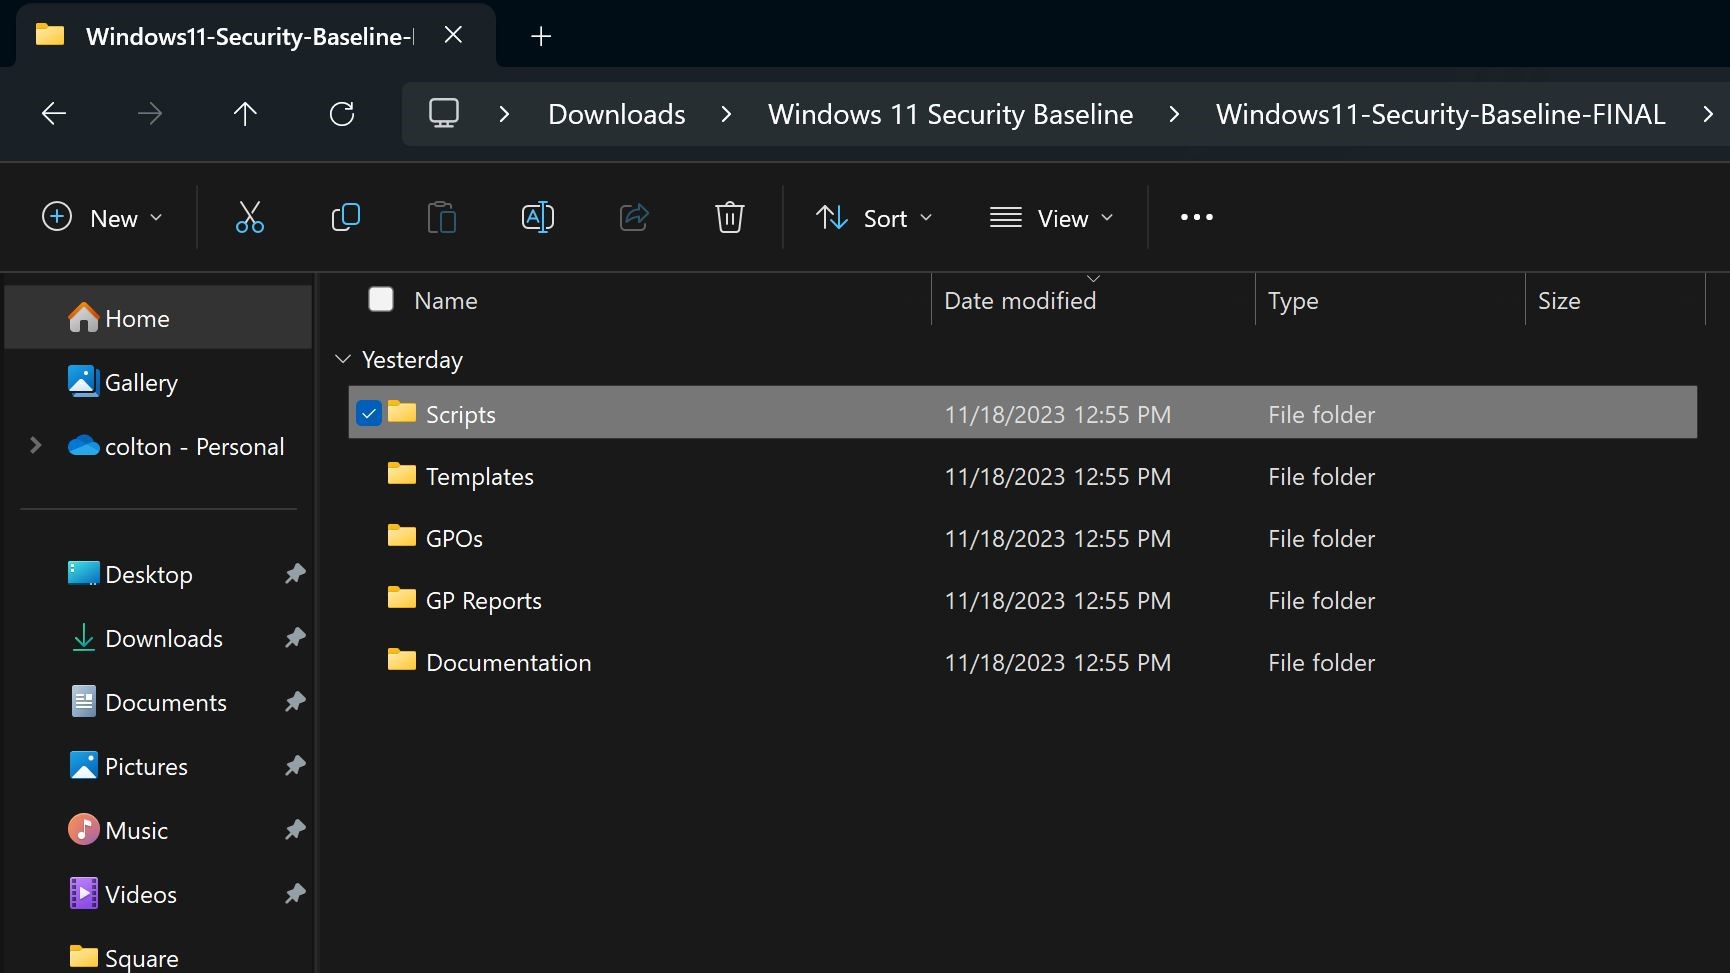
- Run the Baseline-LocalInstall.ps1 PowerShell script to install the baseline.
- With that, close all of the windows, and you are done.
This is a sweeping change to security settings and policies. It could require the manual disabling of several options if they interfere with any of your normal workflows, so this option should only be undertaken if you plan on introducing your PC to extra risky scenarios, like several people using your PC without your supervision, or activity that could lend itself to a high propensity for infection.
Improve User Access Control (UAC) security level
What is User Access Control (UAC) in Windows 11?
The User Access Control is a security feature that notified you when changes are made to your PC and asks for verification. If you want more information on handling user accounts, check out our comprehensive guide on user accounts in Windows 11.
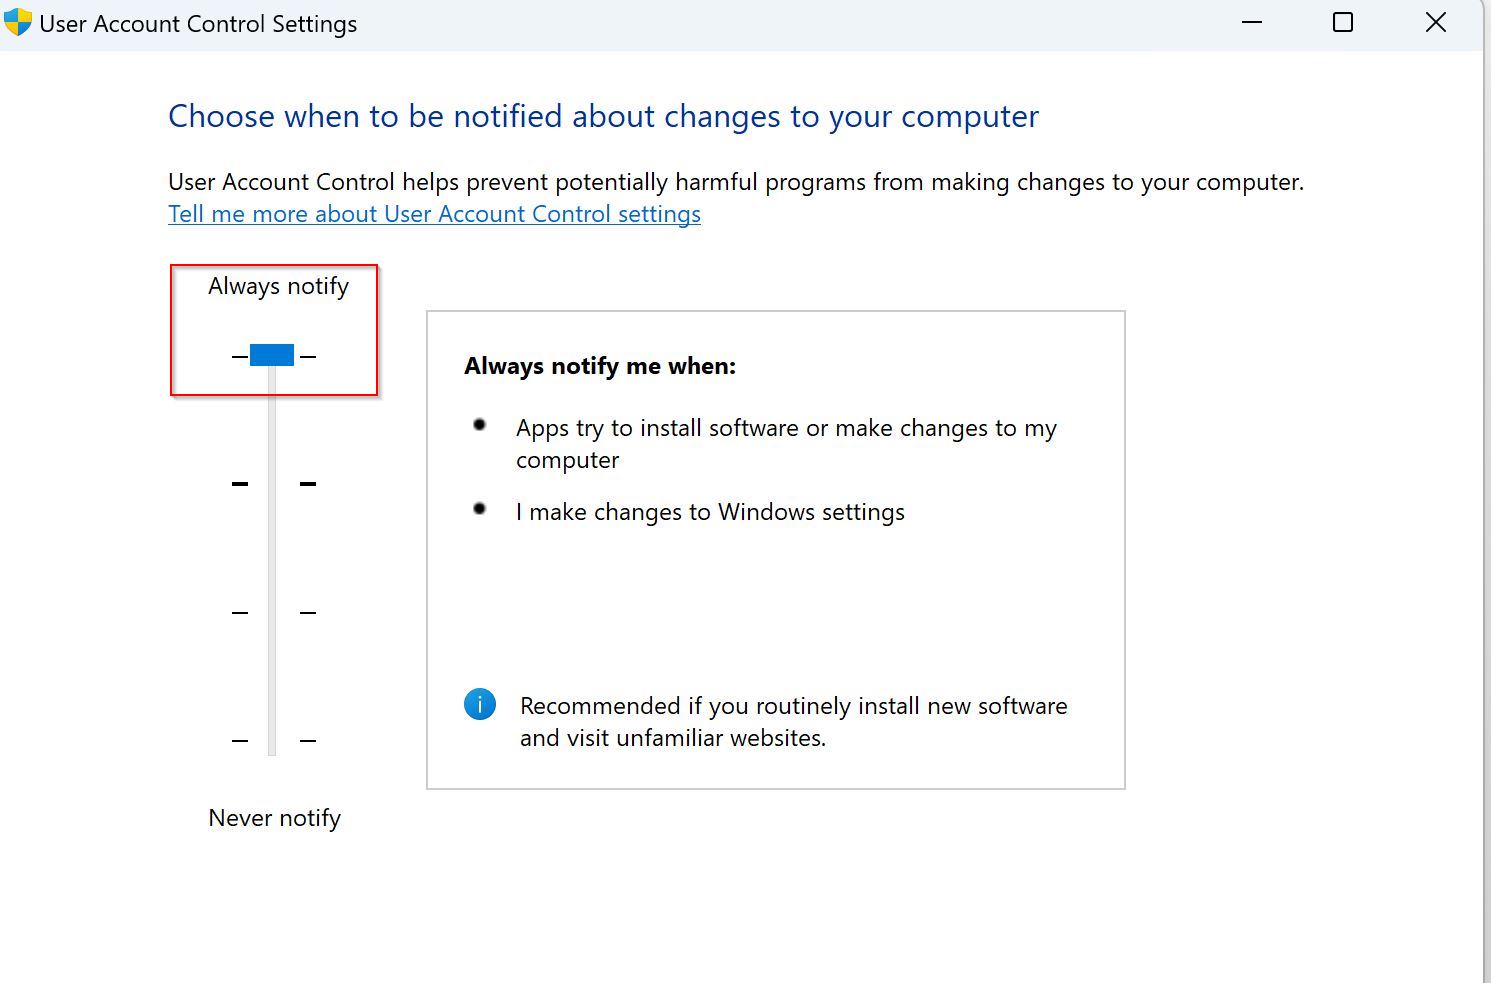
By default, Windows launches with this feature set to "Notify me only when programs try to make changes to my computer." However, for the most security, it is recommended to change this option to "Always Notify" which will do the following things.
- Notify you when programs try to install software or make changes to your computer.
- Notify you when you make changes to Windows settings.
- Freeze other tasks until you respond.
- Note: This option is recommended if you routinely install new software or visit unfamiliar websites.
Here are the steps to harden this security feature. It is one of the simplest changes on the list and besides the inconvenience of clicking a pop-up to approve changes more often, this is a pretty easy way to significantly secure your PC.
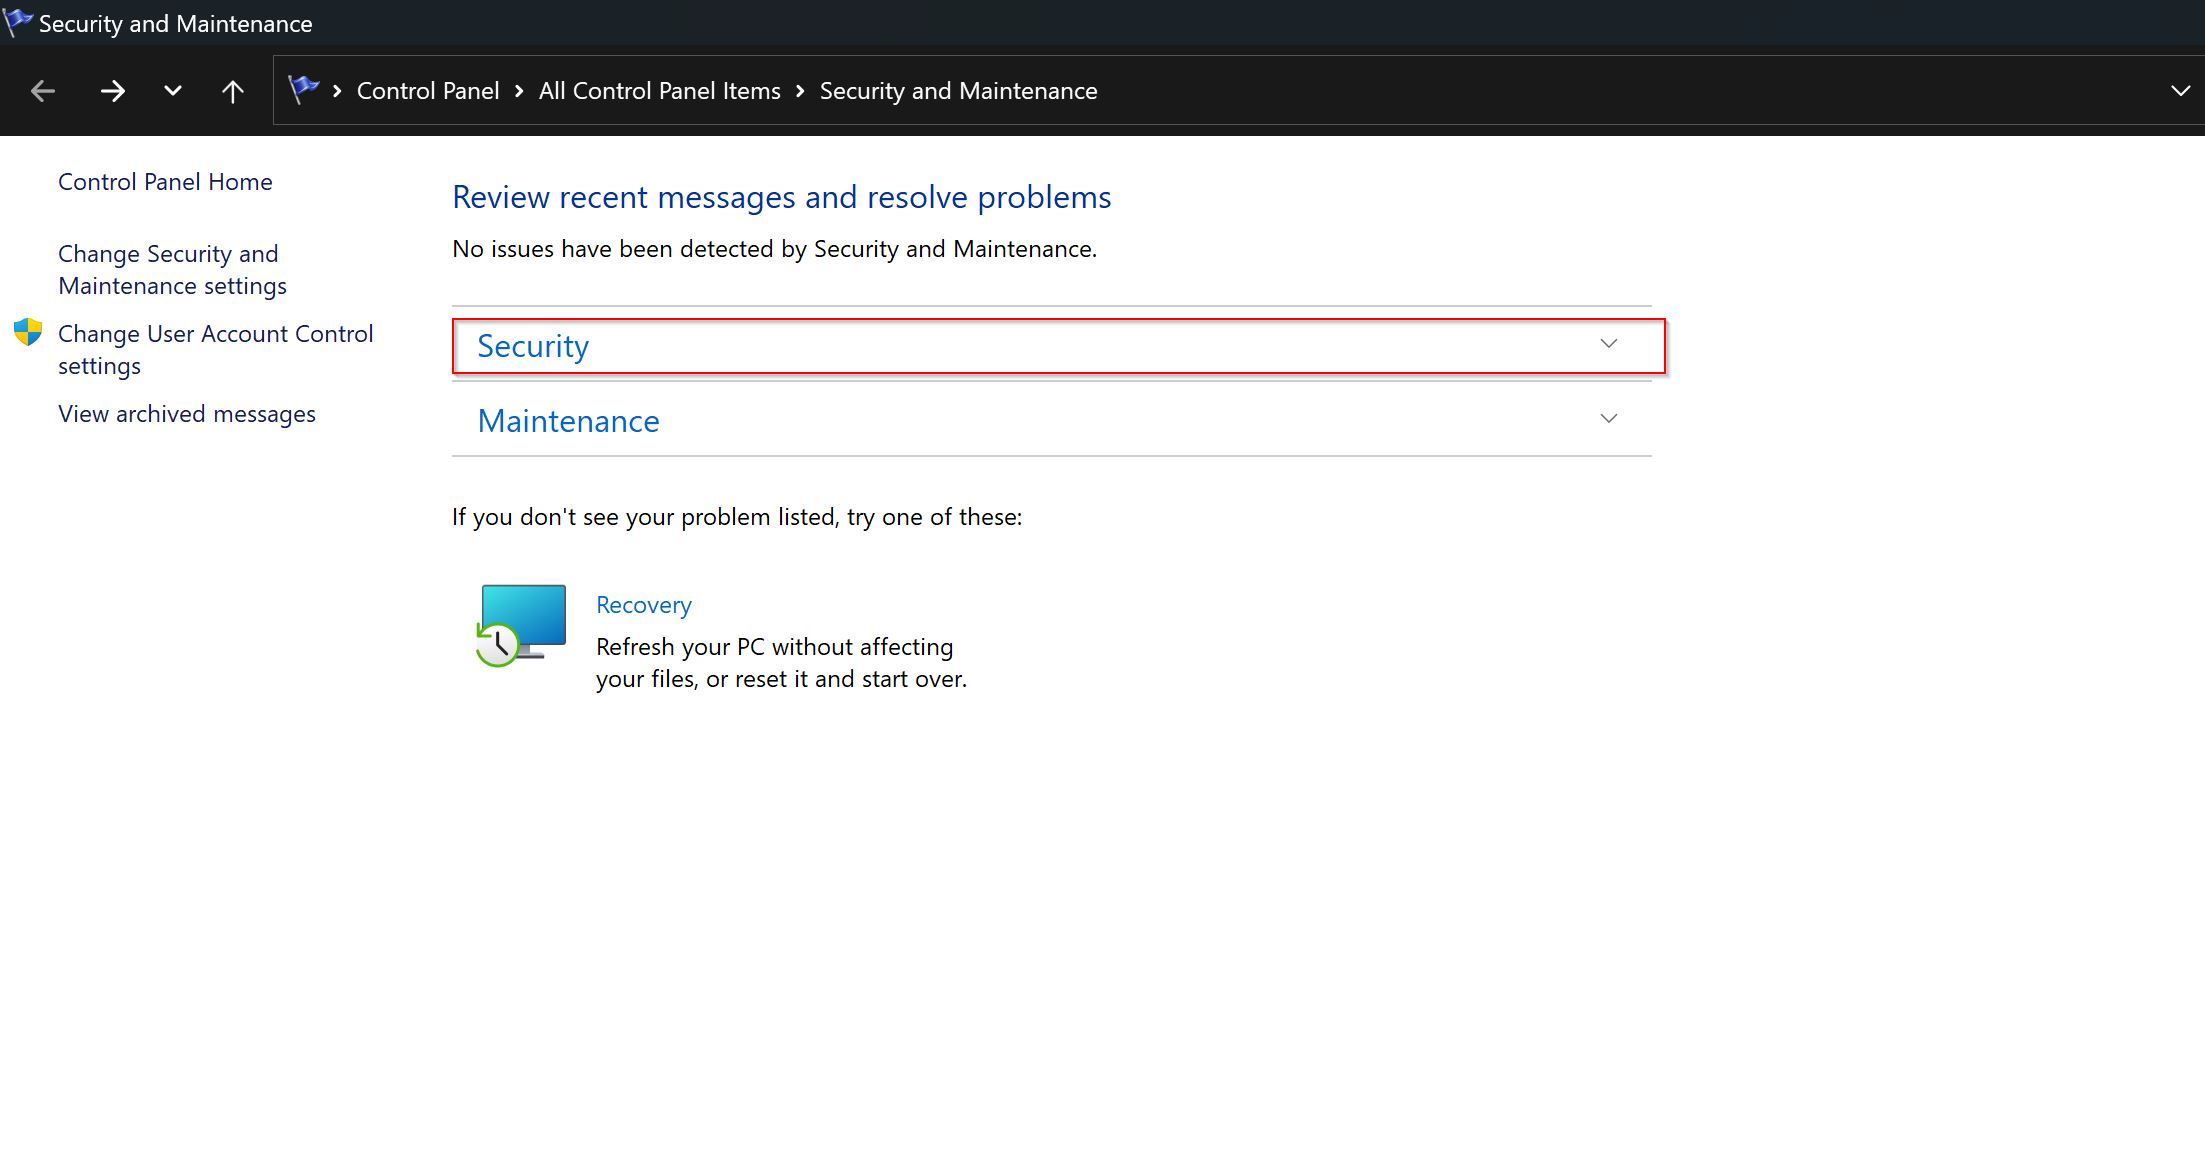
- In the Windows Search Bar type in Security and Maintenance and hit enter.
- Click on the Security option to open the drop-down menu.
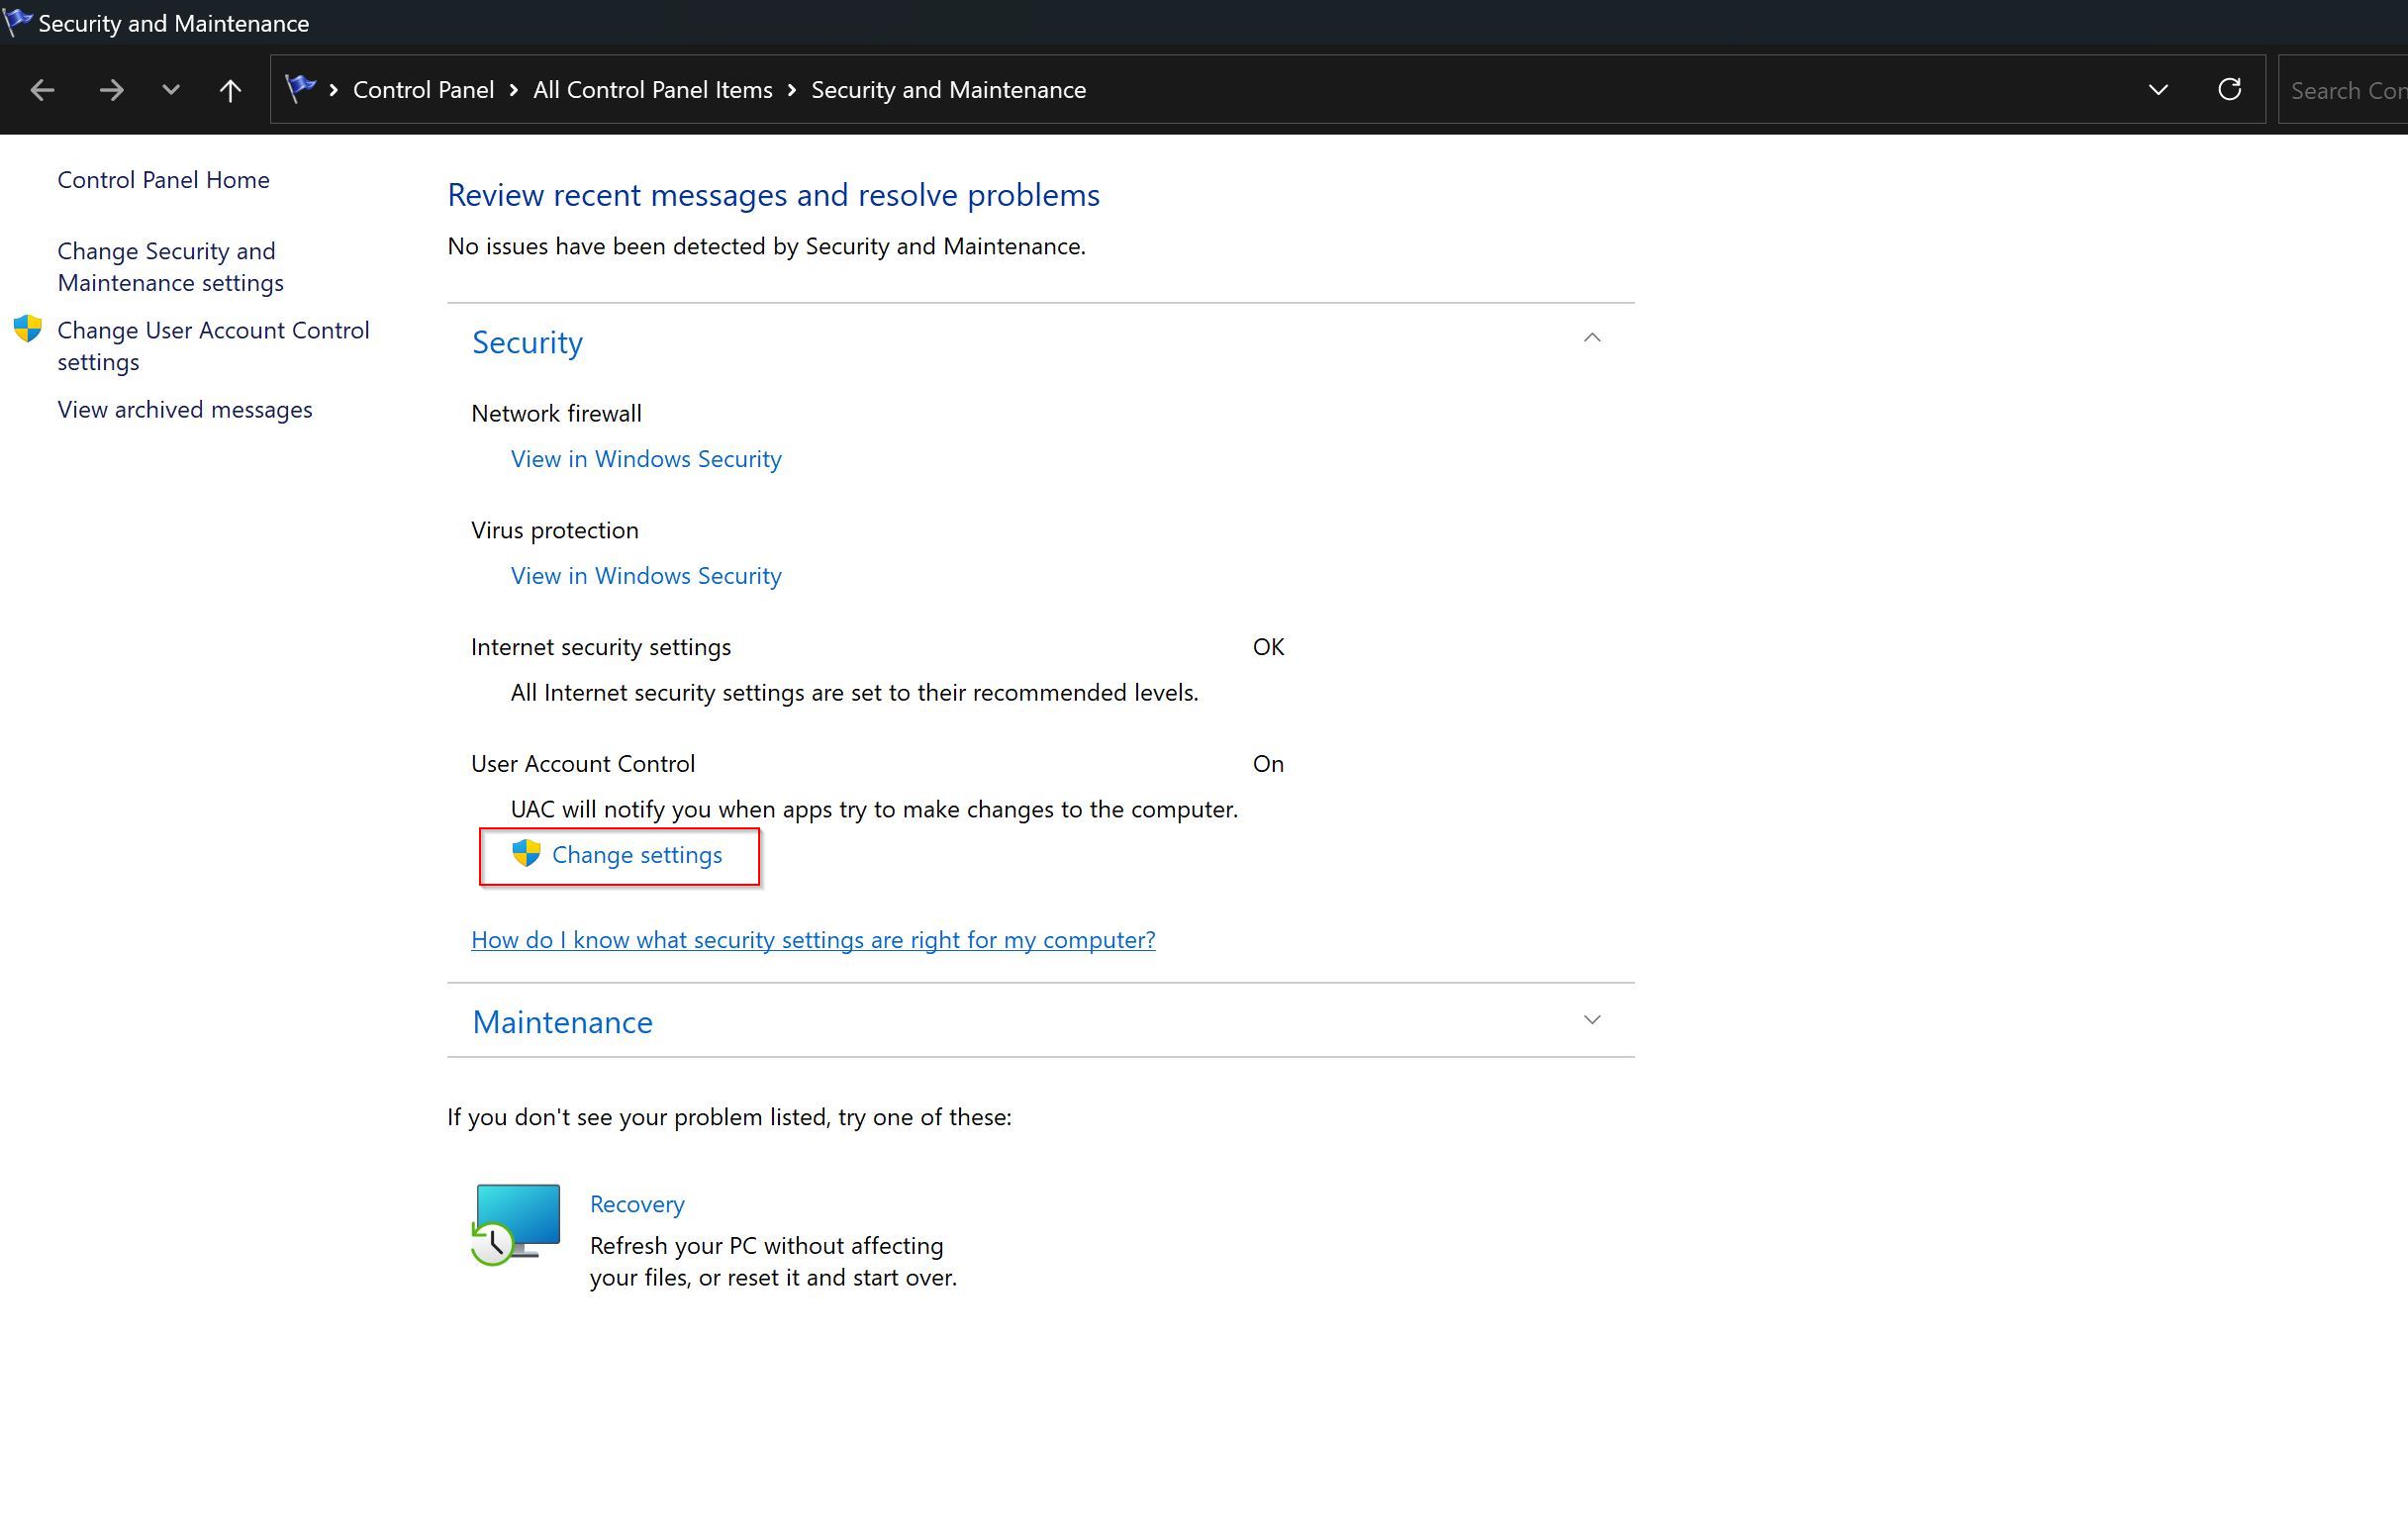
- Under User Account Controls, click on Change Settings.
- Under User Account Controls, click on Change Settings.
- Drag the slider to the top option for "Always Notify."
There you have it. 6 steps you can take today to improve the security of your Windows 11 PC. As cyber-attacks become a more pervasive part of our online, digital world, it is up to each of us to protect our own information. Remember to always keep your PC up to date, and choose unique and secure passwords keeping them stored in one of the top 10 best password managers.
If you know of some other easy, and substantial ways to harden a Windows 11 PC that I missed, please share it in the comments.
More resources
For more helpful articles, coverage, and answers to common questions about Windows 11, visit the following resources:

Colton is a seasoned cybersecurity professional that wants to share his love of technology with the Windows Central audience. When he isn’t assisting in defending companies from the newest zero-days or sharing his thoughts through his articles, he loves to spend time with his family and play video games on PC and Xbox. Colton focuses on buying guides, PCs, and devices and is always happy to have a conversation about emerging tech and gaming news.
