7 features in Windows 11 I wish were enabled by default
Microsoft should consider shipping Windows 11 with these features turned on out of the box.
When you install a fresh copy of Windows 11, the system comes preconfigured with a range of default settings that Microsoft believes are suitable for most users.
However, many of these defaults are designed to promote the company’s own products and services (such as Microsoft 365, PC Game Pass, and Microsoft Edge) rather than optimize the experience for all users.
Beyond these promotional features, Windows 11 also enables and disables various system settings by default, which sometimes may not align with what’s best for performance, security, or productivity.
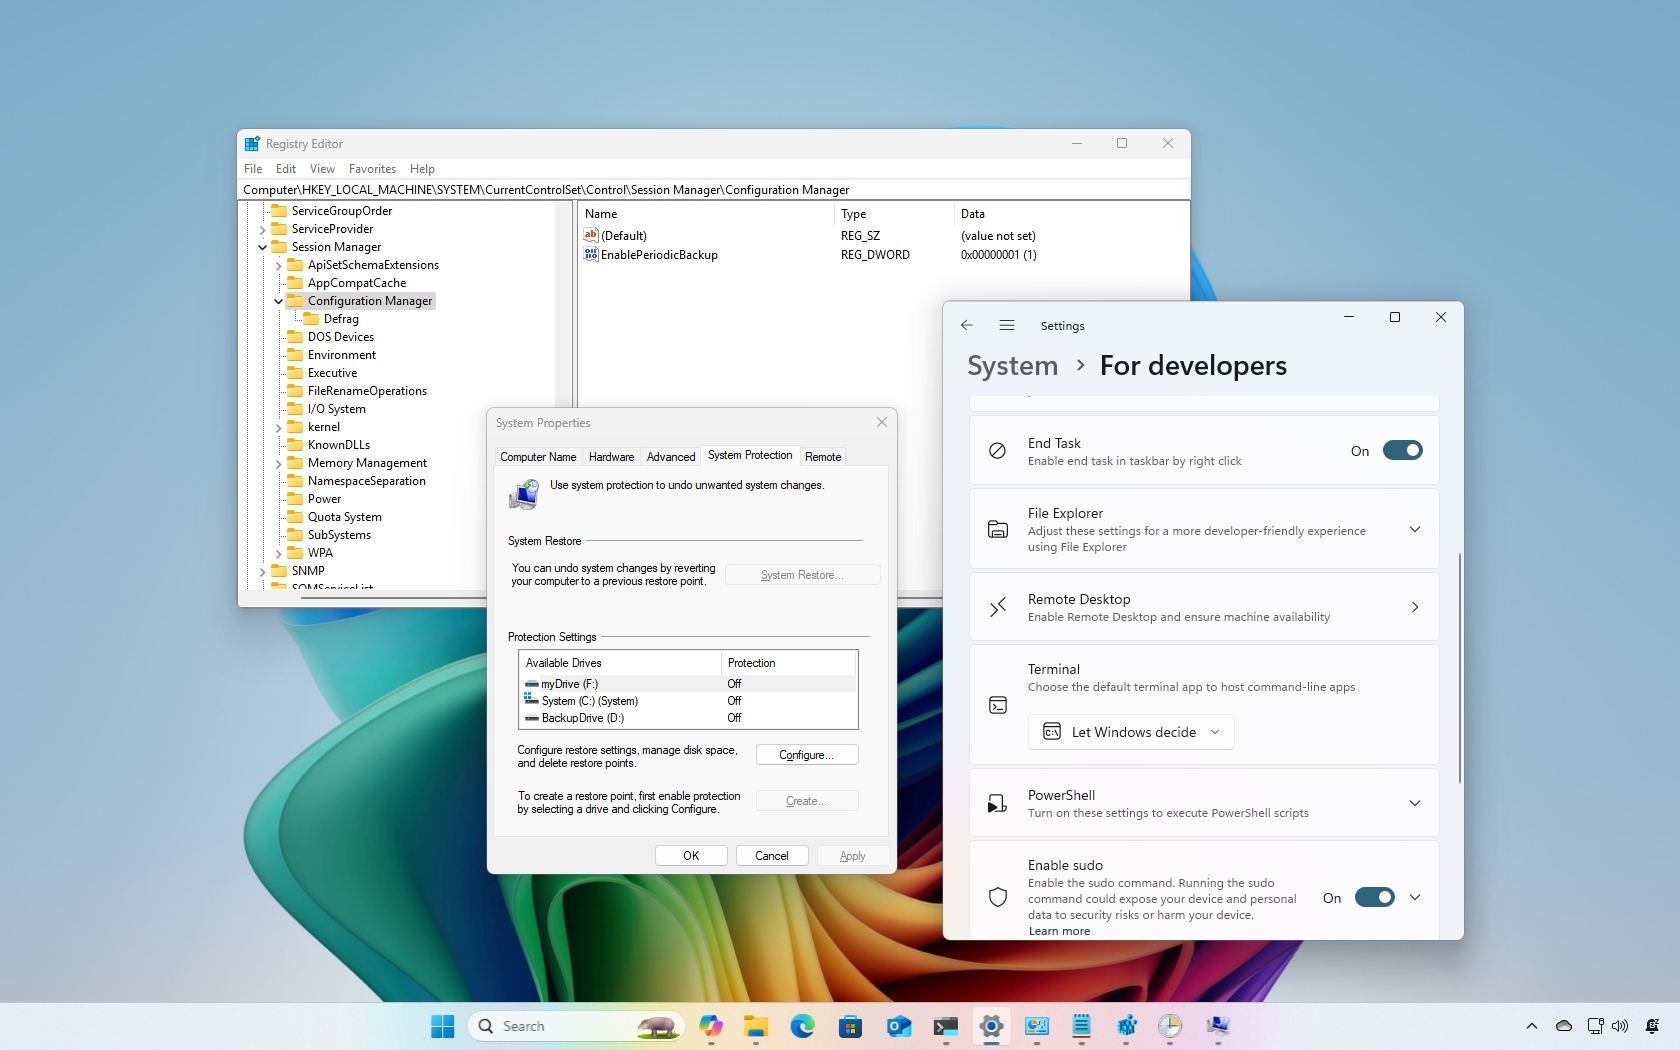
For instance, System Protection, a feature that allows you to undo unwanted system changes, is disabled by default for all drives, even though it used to be enabled for the main drive in earlier versions. Similarly, automatic Registry backups, a critical recovery safeguard, are no longer created by default.
File Explorer also continues to hide file extensions for known file types, which can make it harder to identify potentially harmful files or manage advanced file tasks.
Although new features like the "Sudo" command and "End Task" from the taskbar are now part of Windows 11, they remain disabled by default and reserved primarily for developers.
In this how-to guide, I'll highlight seven features that should be turned on by default on every installation of Windows 11.
All the latest news, reviews, and guides for Windows and Xbox diehards.
Windows 11 features that should be enabled by default
These seven features should be enabled on Windows 11 by default.
System Protection
On Windows 11, System Protection is a recovery feature designed to help safeguard your computer's system files, apps, Registry, and system settings. It works by creating and managing restore points, which are essentially snapshots of your current setup at a specific point in time.
This feature has saved my installation more than once, but to reduce the footprint of the setup, Microsoft decided to turn it off by default. However, you usually won't remember to turn it on until it's too late, and for this reason, I wish the company would ship the feature enabled by default on every installation.
To check and enable the System Protection feature on Windows 11, use these steps:
- Open Start.
- Search for Create a restore point and click the top result to open the System Properties page.
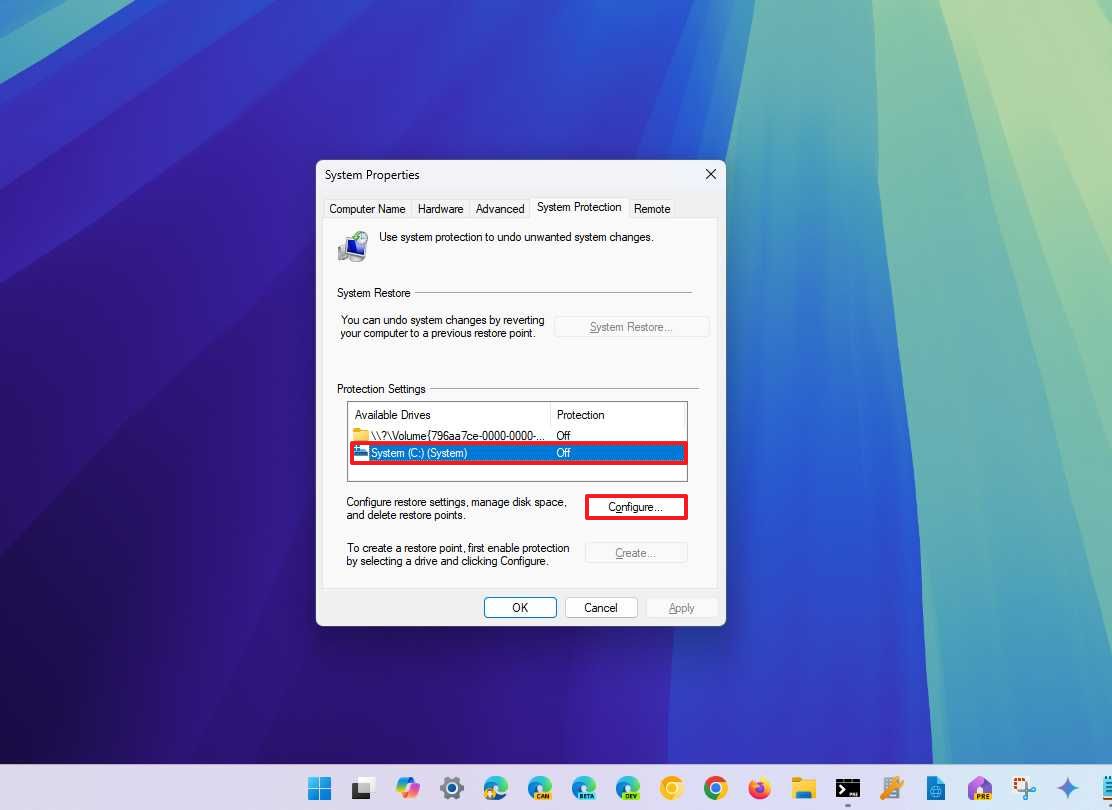
- Select the main "System" drive under the "Protection Settings" section.
- Click the Configure button.
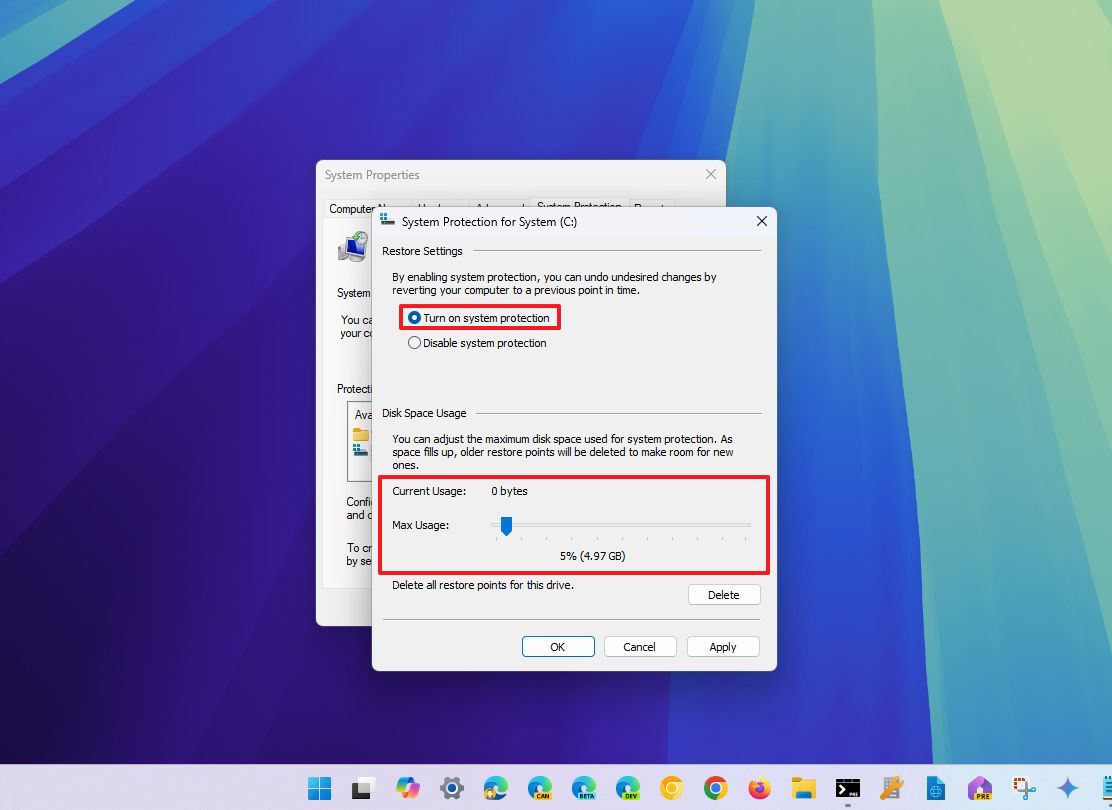
- Select the "Turn on system protection" option.
- (Optional) Use the "Max Usage" slider and select how much space the system should reserve to store restore points.
- Click the Apply button.
- Click the OK button.
Once you complete the steps, the system should create a restore point automatically during specific events, such as installing an update, driver, or app or applying changes to the Registry.
However, it's still recommended to create a restore point manually before making significant system changes.
You can also follow these instructions to set up, create, and recover your computer with System Protection.
Sudo command
Sudo (superuser do) is a tool that allows you to run commands with elevated rights without having to run the command-line console as an administrator.
If it sounds familiar, it's because it works similarly to the sudo command available in Unix-based operating systems, such as Linux and macOS. It's important to note that I said "similarly" because this version of the command is limited to the version available on the other platforms.
Although Windows 11 allows you to manage this feature from the Settings app, Microsoft should turn on the sudo command on every installation to make it easier to run commands without having to elevate the console.
To check and enable the Sudo command on Windows 11, use these steps:
- Open Settings.
- Click on System.
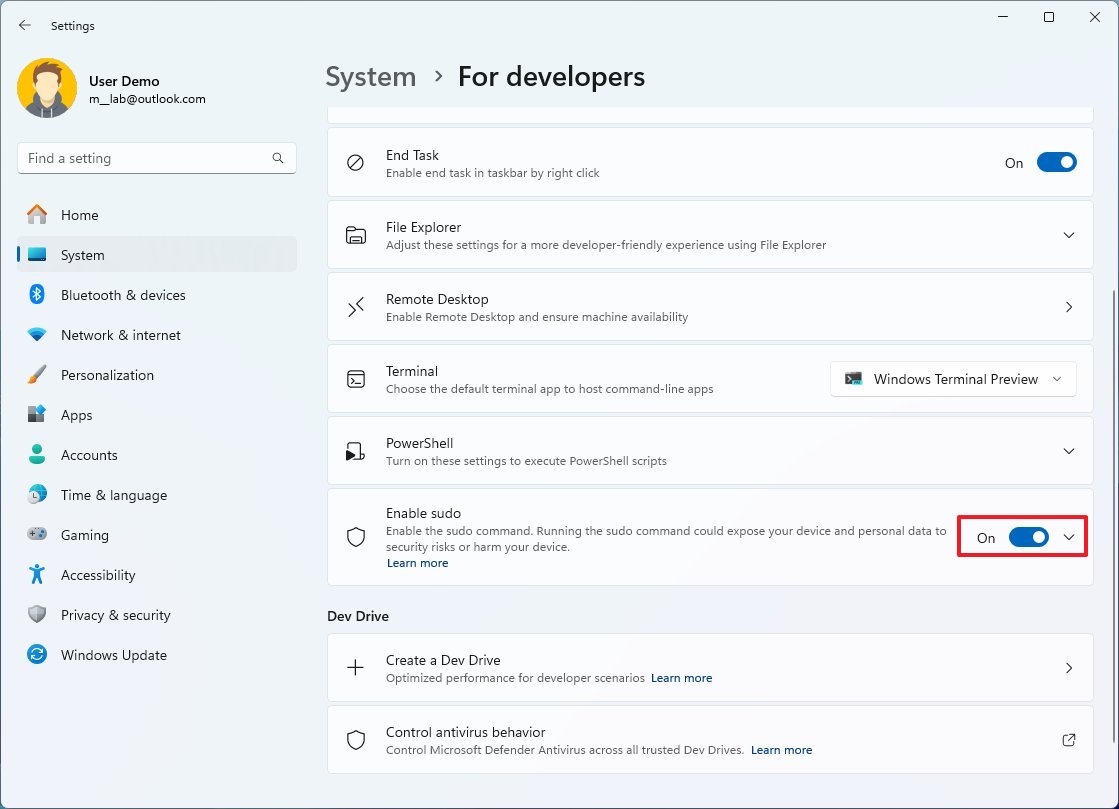
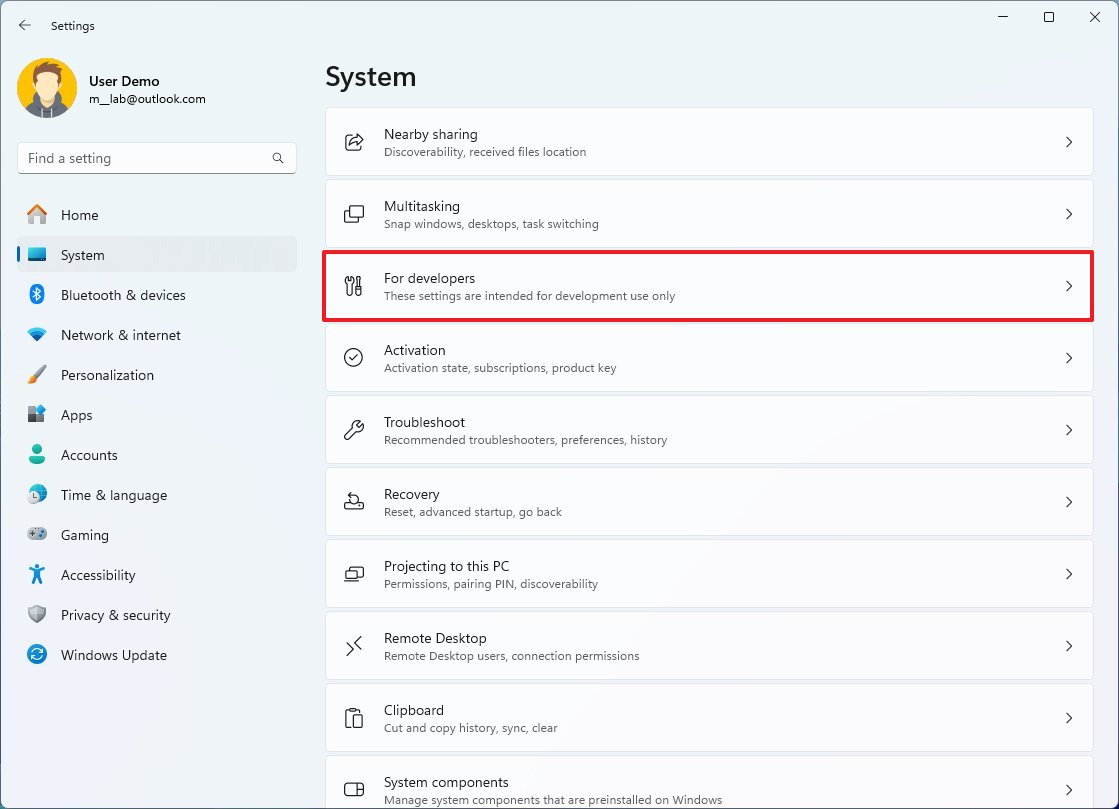
- Click the For developers page on the right side.
- Turn on the Enable sudo toggle switch.
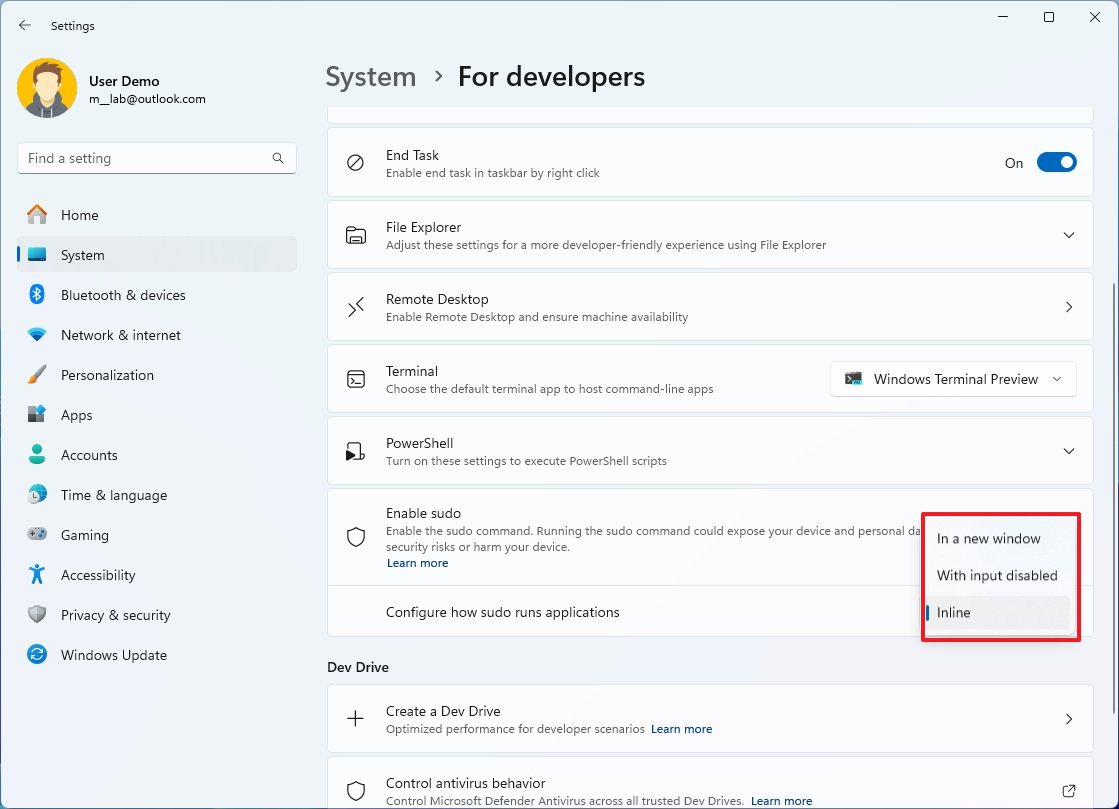
- Click the sudo setting to reveal the available option.
- Select the sudo behavior with the "Configure how sudo runs applications" setting:
- Inline: The command runs in the same window, identical to Linux and macOS.
- With input disabled: The command runs in a new window but doesn't accept additional inputs.
- In a new window: The command triggers a new, elevated window.
After you complete the steps, you will be able to run elevated commands without launching the command console as an administrator.
You can follow this Windows 11 guide for more details on how to get the most out of the Sudo command.
End Task option
On Windows 11, when you are done using an app, you usually click the "Close" button, but when it becomes unresponsive, clicking the "X" button may not work.
If the app freezes, you typically open Task Manager, select the application and forcibly terminate the app. However, the operating system includes an "End Task" option to quickly terminate an unresponsive application without having to open Task Manager, but it's disabled by default because Microsoft thought this out as a tool for developers.
If you want to have quick access to the End Task feature, use these steps:
- Open Settings.
- Click on System.
- Click the For developers page on the right side.
- Turn on the End Task toggle switch.
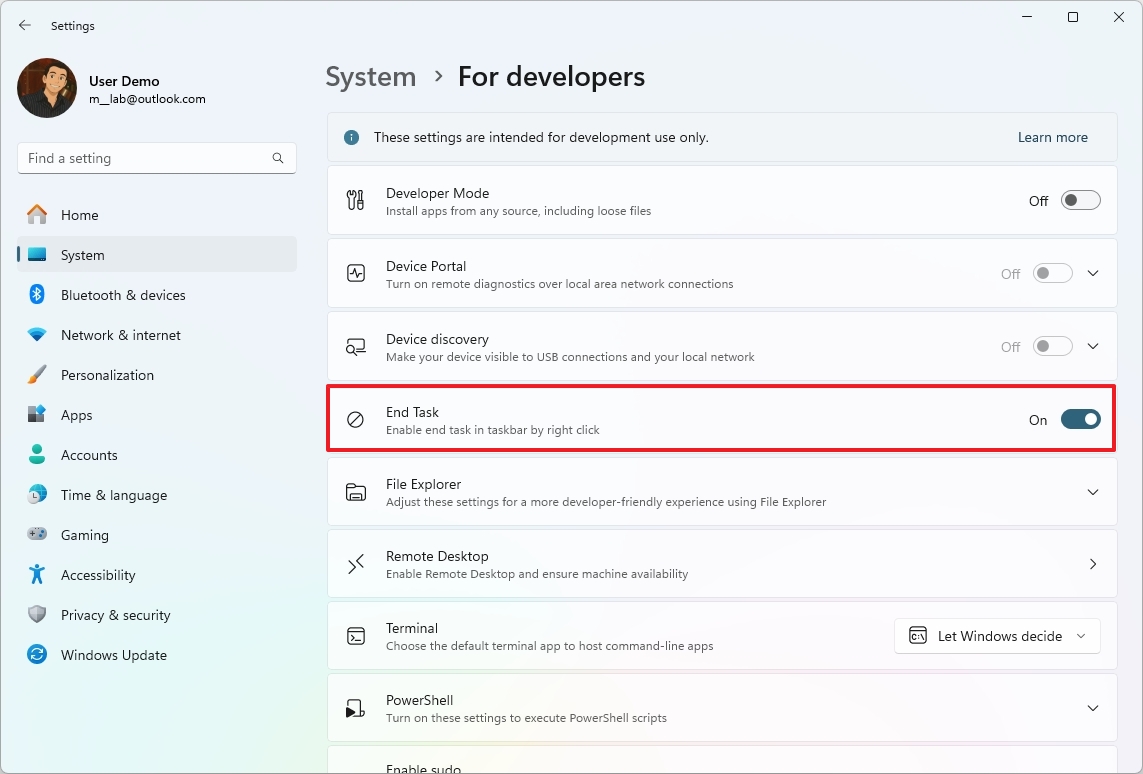
Once you complete the steps, you can right-click an app in the Taskbar, and the context menu will include the "End Task" option to terminate the application.
Automatic Registry backup
In previous versions of the operating system, the system automatically created a backup of the Registry every time the computer started up correctly in the "REgBack" folder. However, on Windows 10 (version 1803), Microsoft removed this functionality to reduce the footprint of the setup.
Although not many users knew about this behavior, it was a great feature to recover the system after a buggy update or making system changes that prevented the operating system from booting correctly.
It's important to note that you can still enable this feature, but it requires modifying the Registry and creating a custom task with the Task Scheduler.
To enable Registry backups on Windows 11, use these steps:
- Open Start.
- Search for regedit and click the top result to open the Registry.
- Browse the following path: HKLM\System\CurrentControlSet\Control\Session Manager\Configuration Manager
- Right-click the Configuration Manager key, select New, and click the "DWORD (32-bit) Value" option.
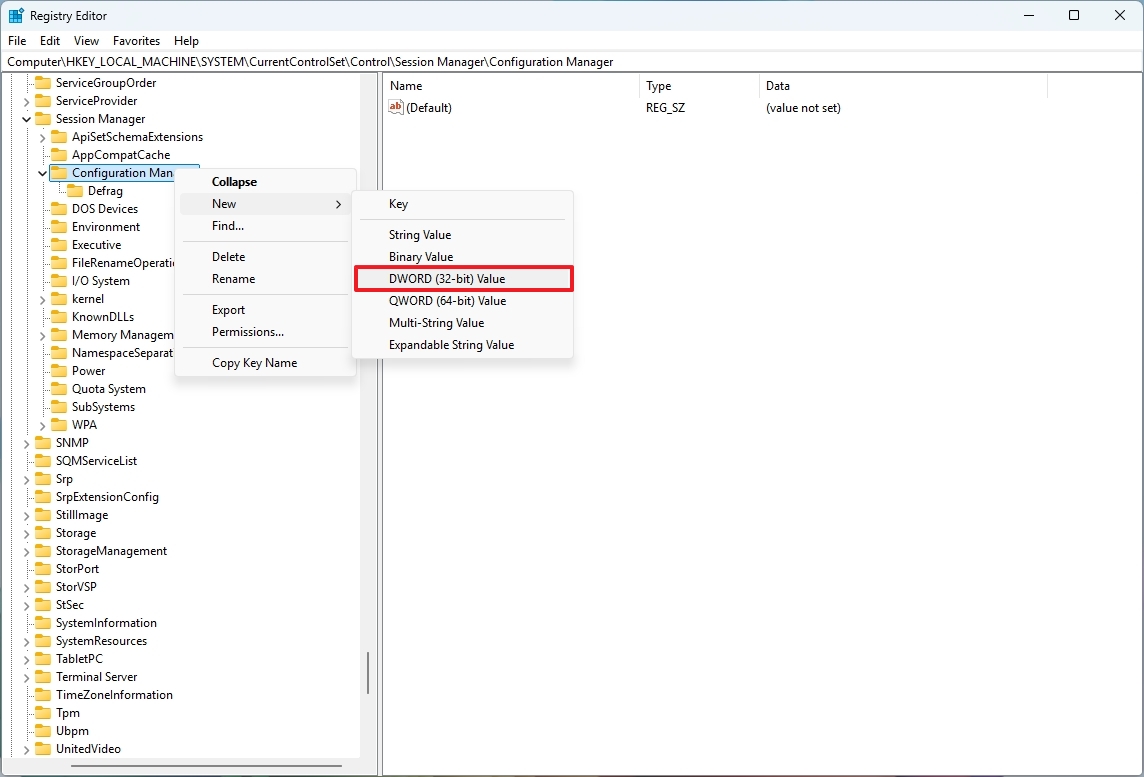
- Confirm the key EnablePeriodicBackup name and press Enter.
- Right-click the newly created DWORD and choose the Modify option.
- Set the value to 1.
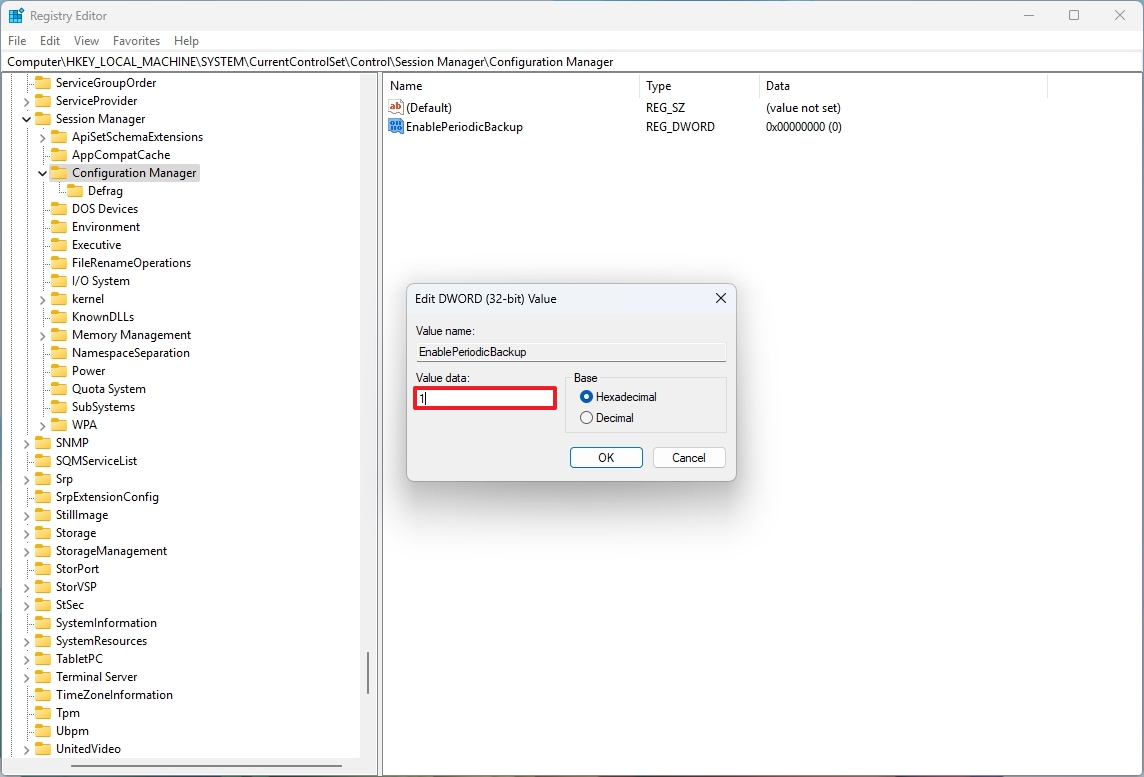
- Click the OK button.
- Open Start.
- Search for Task Scheduler and click the top result to open the console.
- Browse the following path: Task Scheduler Library > Microsoft > Windows > Registry
- Right-click the Registry key and choose the "Create Basic Task" option.
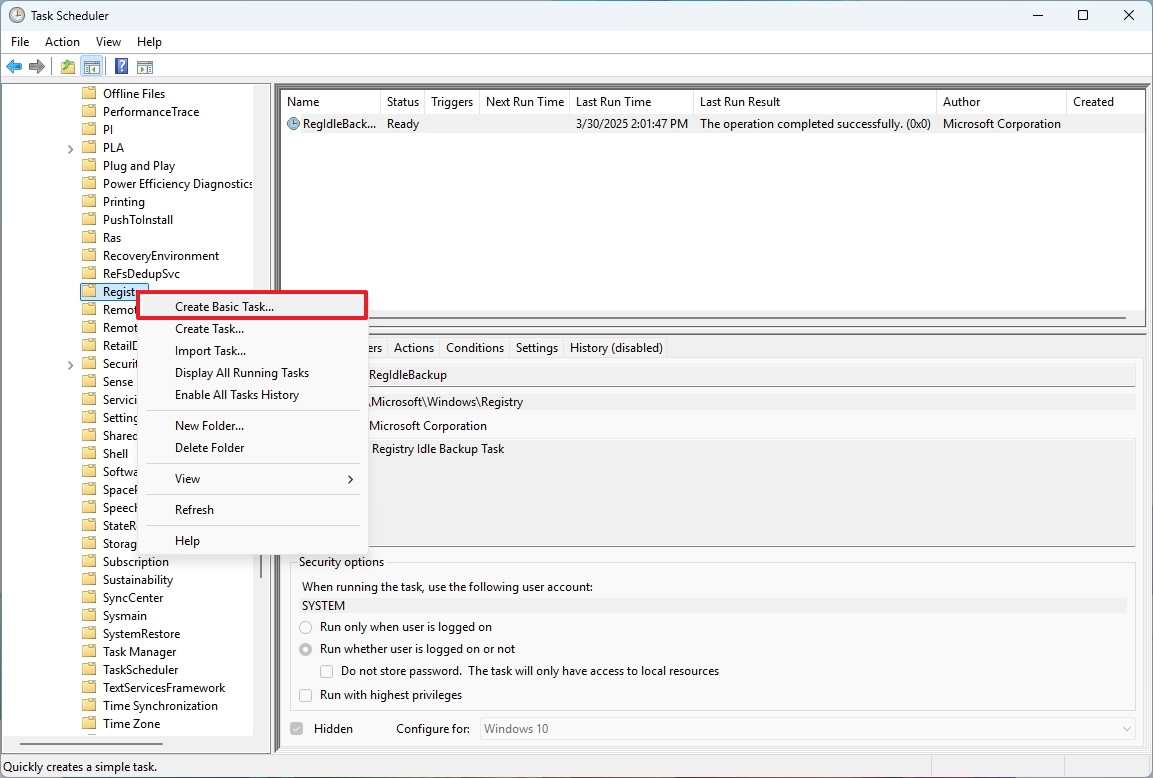
- Confirm a name for the task.
- Click the Next button.
- Choose the Daily option for the "Trigger" setting.
- Click the Next button.
- Configure the schedule of the task.
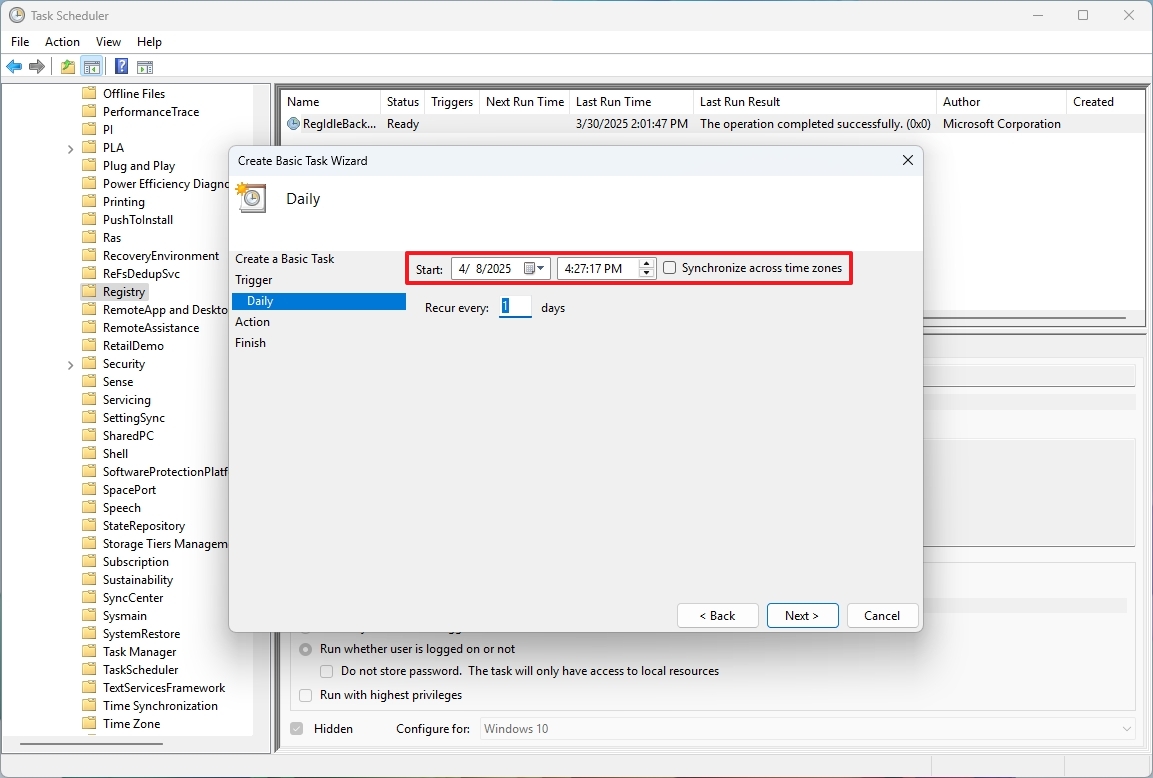
- Click the Next button.
- Select the "Start a program" for the "Action" setting.
- Click the Next button.
- Type the schtasks command in the "Program/script" setting.
- Type the /run /i /tn "\Microsoft\Windows\Registry\RegIdleBackup" command in the "Add argument" setting.
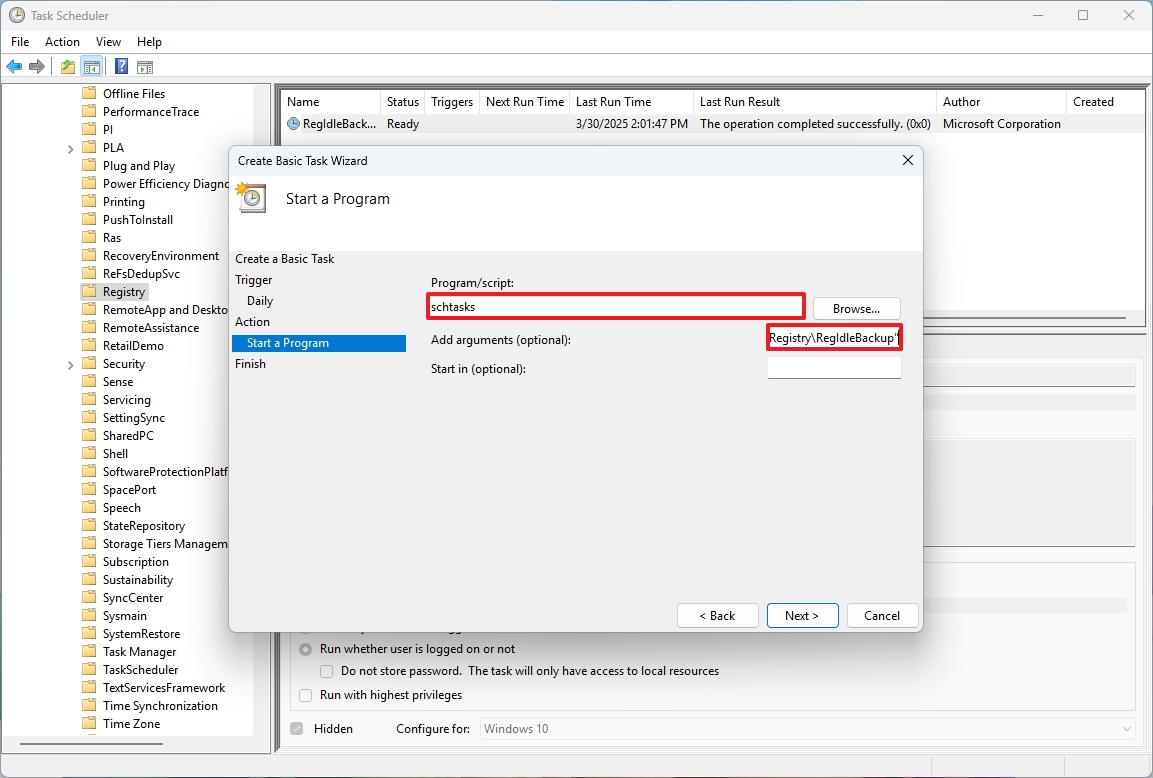
- Click the Next button.
- Check the "Open the Properties dialog for this task when I click Finish" option.
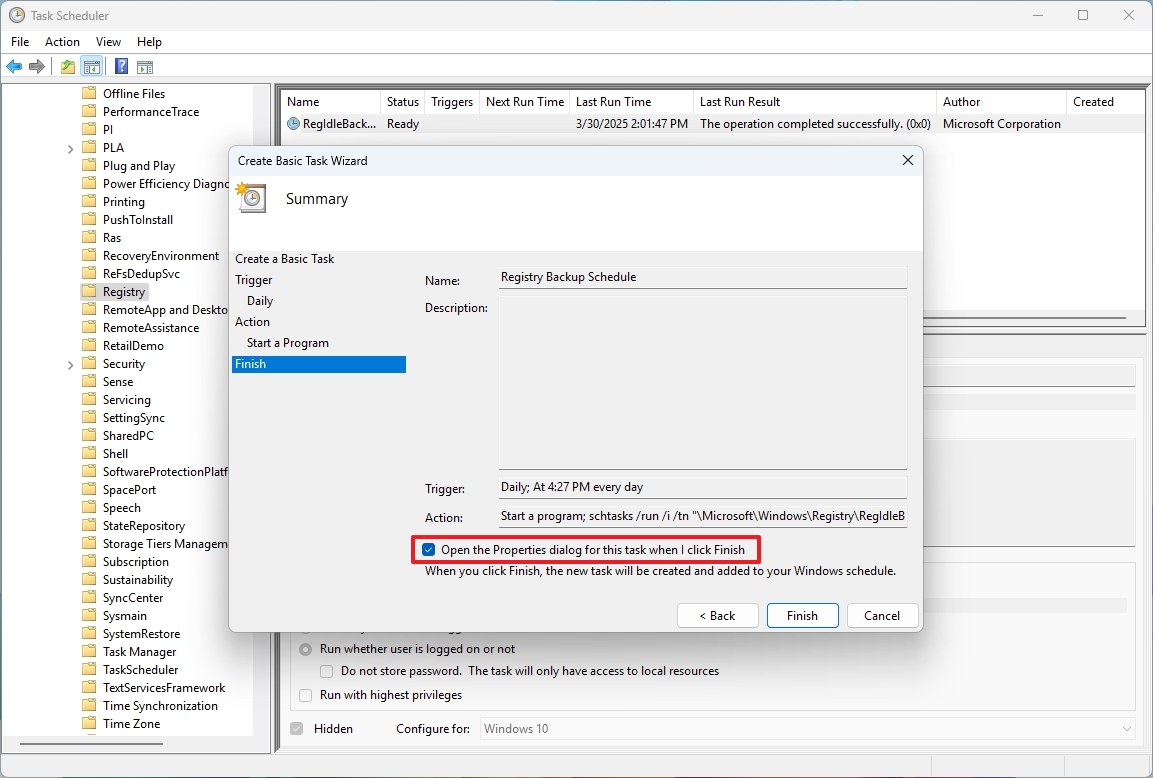
- Click the Finish button.
- Click the "Change User or Group" button.
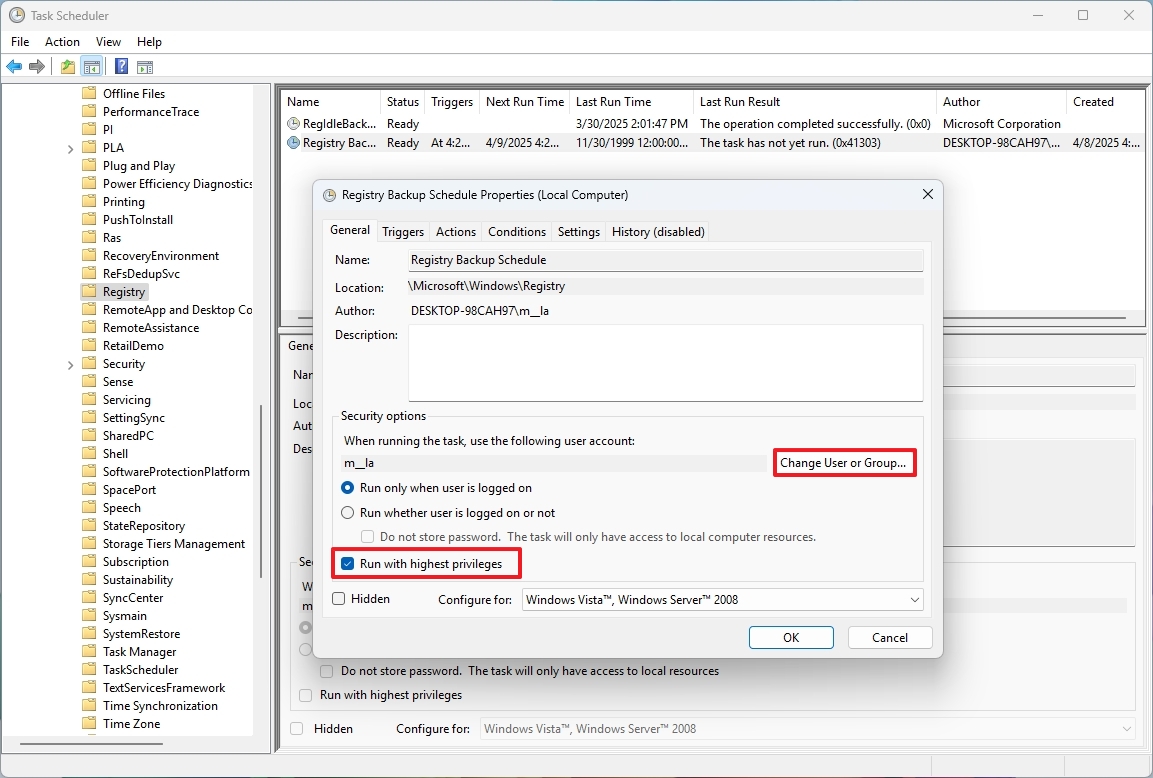
- Click the Advanced button.
- Click the Find Now button.
- Select the SYSTEM group.
- Click the OK button.
- Click the OK button again.
- Check the "Run with highest privileges" option.
- Click the OK button.
After you complete the steps, the system will create a backup of the Registry when you schedule the task.
File Explorer with file extensions
File Explorer, by default, lists files in folders and subfolders but without extensions (such as ".txt," ".docx," etc.), but the default configuration on every installation should be set to show extensions.
Although hiding extensions for known file types can make the experience look cleaner and help to reduce the chances of accidentally changing the extension, you may also find some benefits in showing extensions by default.
For example, always showing extensions for known files can help to identify files more quickly, and it makes it easier to rename a file and change its extension, such as changing a file from a ".txt" to ".bat" or ".ps1" to create a script.
To show file extensions on Windows 11, use these steps:
- Open File Explorer.
- Click on View.
- Select the Show menu and choose the "File name extensions" option.
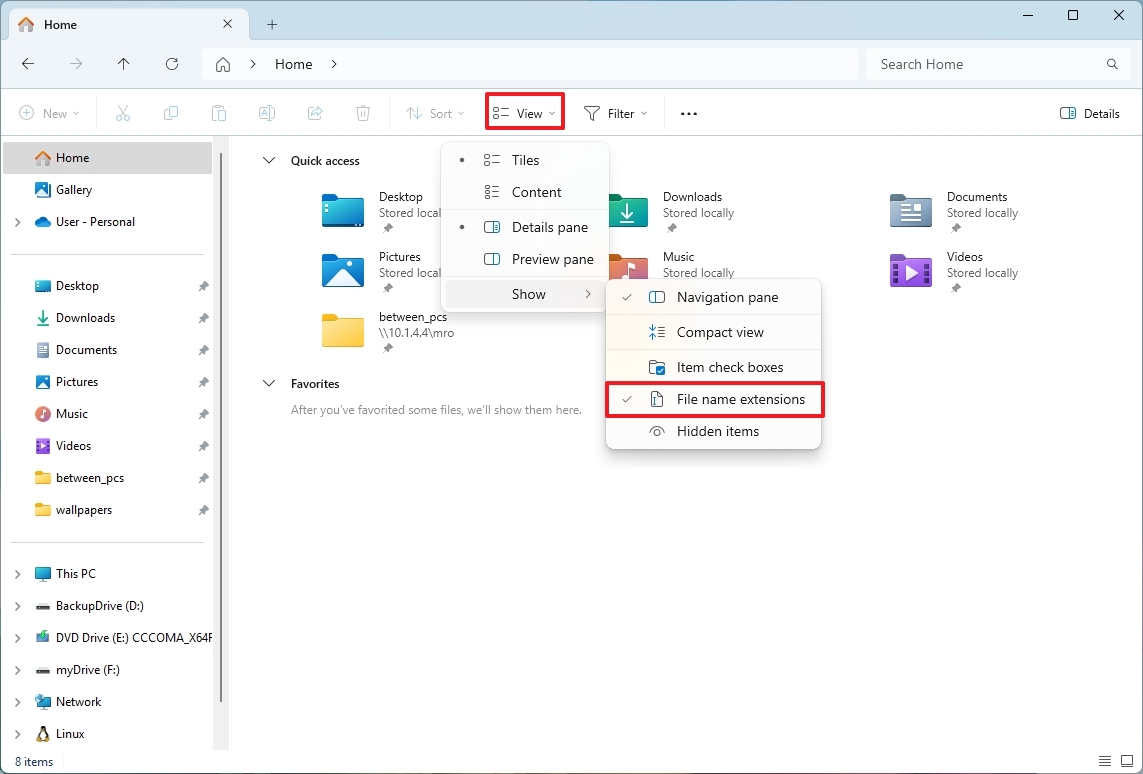
Once you complete the steps, File Explorer will show extensions after the file name.
Hibernate in Power menu
On Windows 11, Hibernate is a feature that saves the contents of the current session loaded in memory onto the main drive. This allows you to shut down the computer and resume the same session the next time you power on the device.
This feature usually comes in handy to save energy on your desktop computer or laptop. Also, if your laptop is running low on battery, you can use the Hibernate option to shut down the device while preserving the current session until you find an outlet to connect it.
Regardless of the reason, the system should be able to detect and enable the feature and display the option in the "Power" menu automatically on supported hardware.
To enable Hibernate on Windows 11, use these steps:
- Open Start.
- Search for Command Prompt, right-click the top result, and select the Run as administrator option.
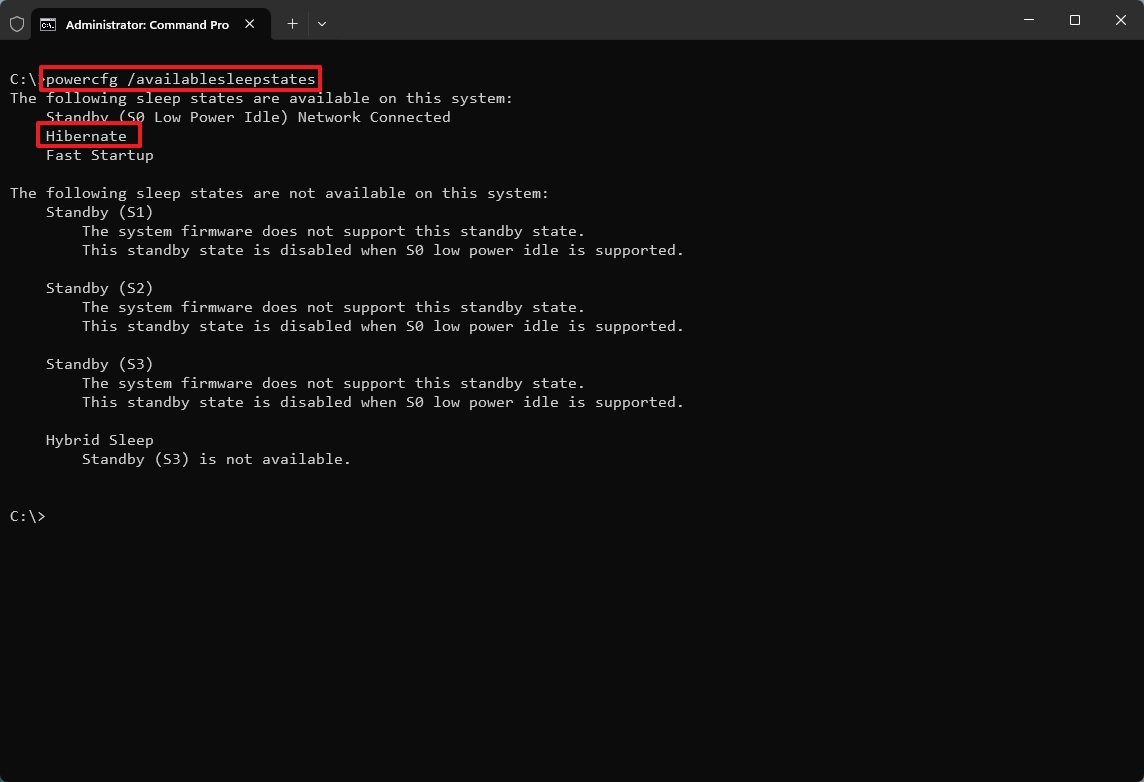
- Type the following command to confirm the hibernation status and press Enter: powercfg /availablesleepstates
- Confirm whether Hibernate appears disabled.
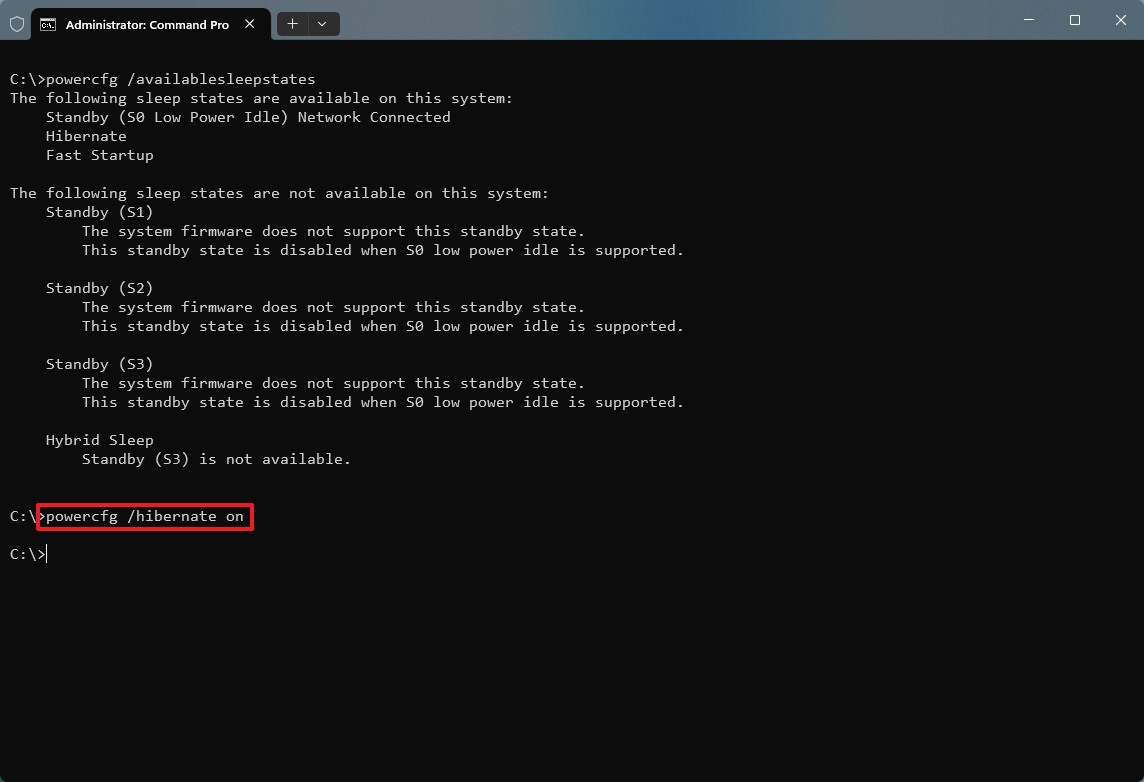
- Type the following command to enable the Windows 11 Hibernate feature and press Enter: powercfg /hibernate on
- Open Start.
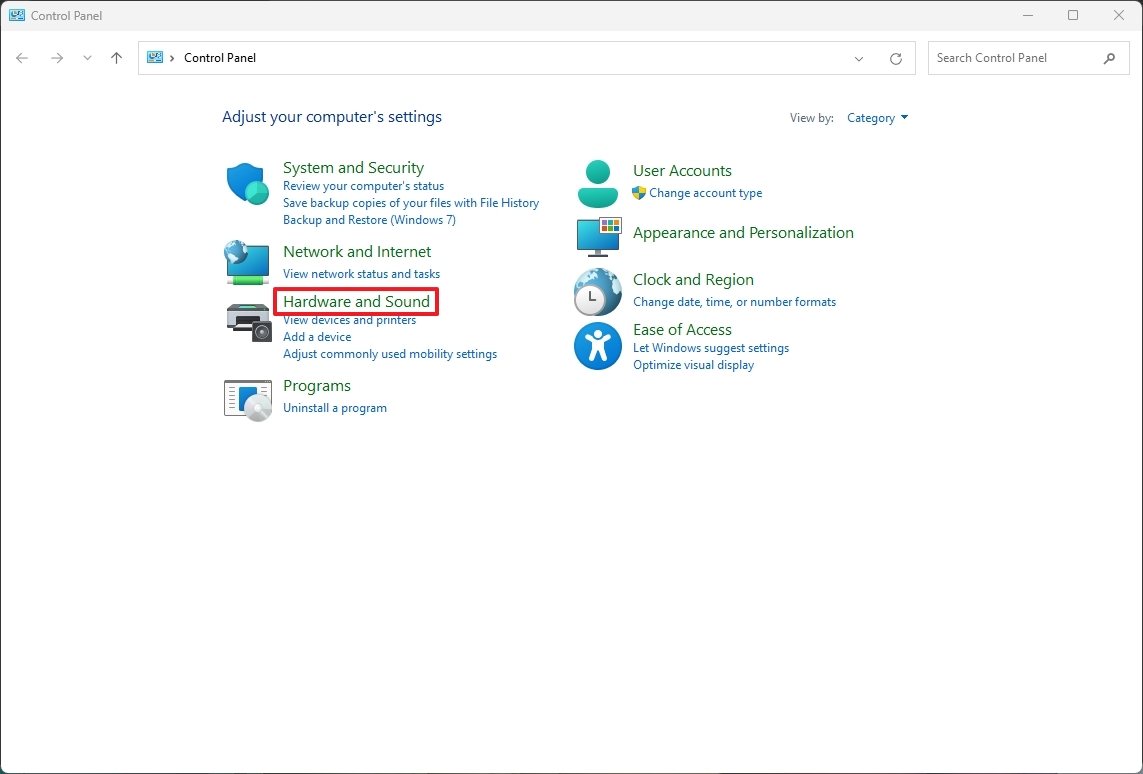
- Search for Control Panel and click the top result to open the app.
- Click on Hardware and Sound.
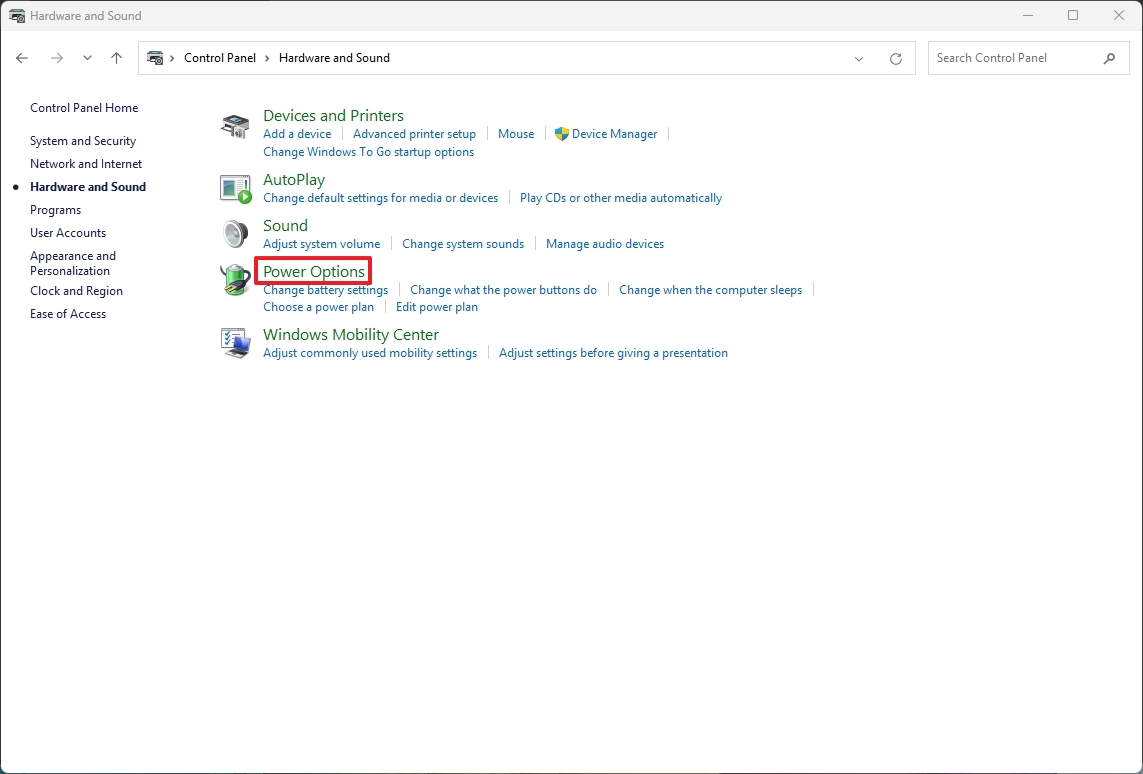
- Click on Power Options.
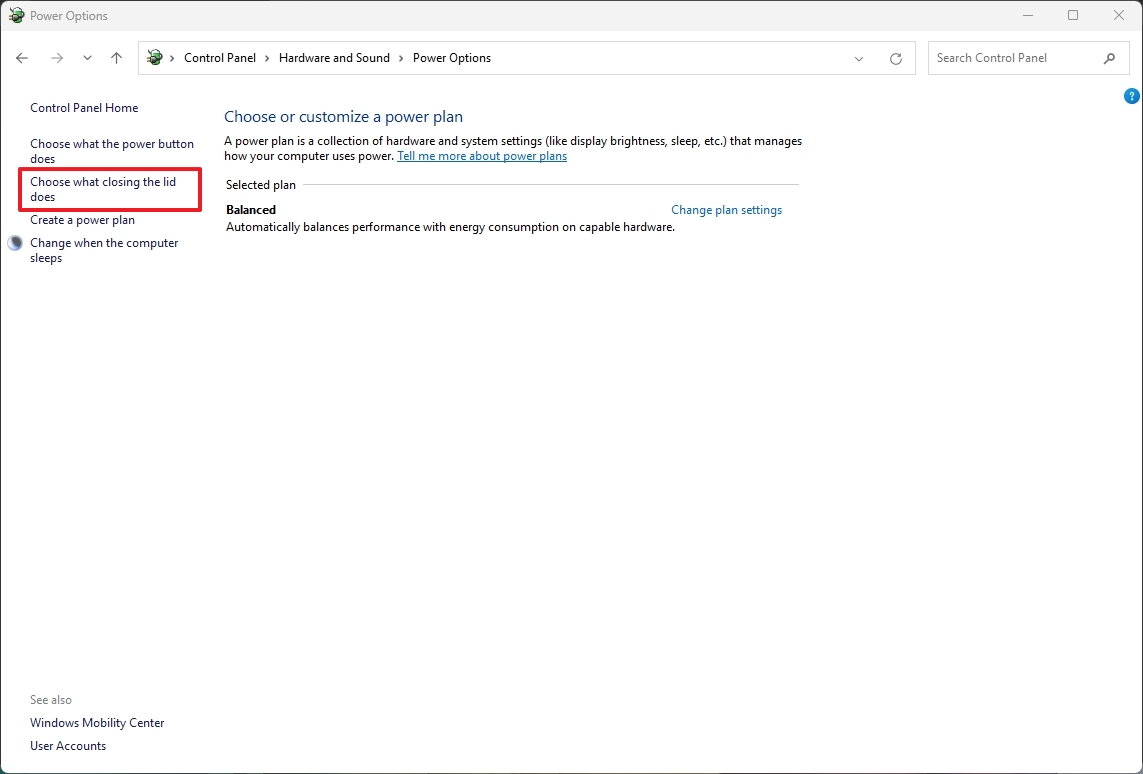
- Click the "Choose what closing the lid does" option from the left pane.
- Quick tip: If you're using a desktop computer, you can select the "Choose what the power button does" option to get to the settings.
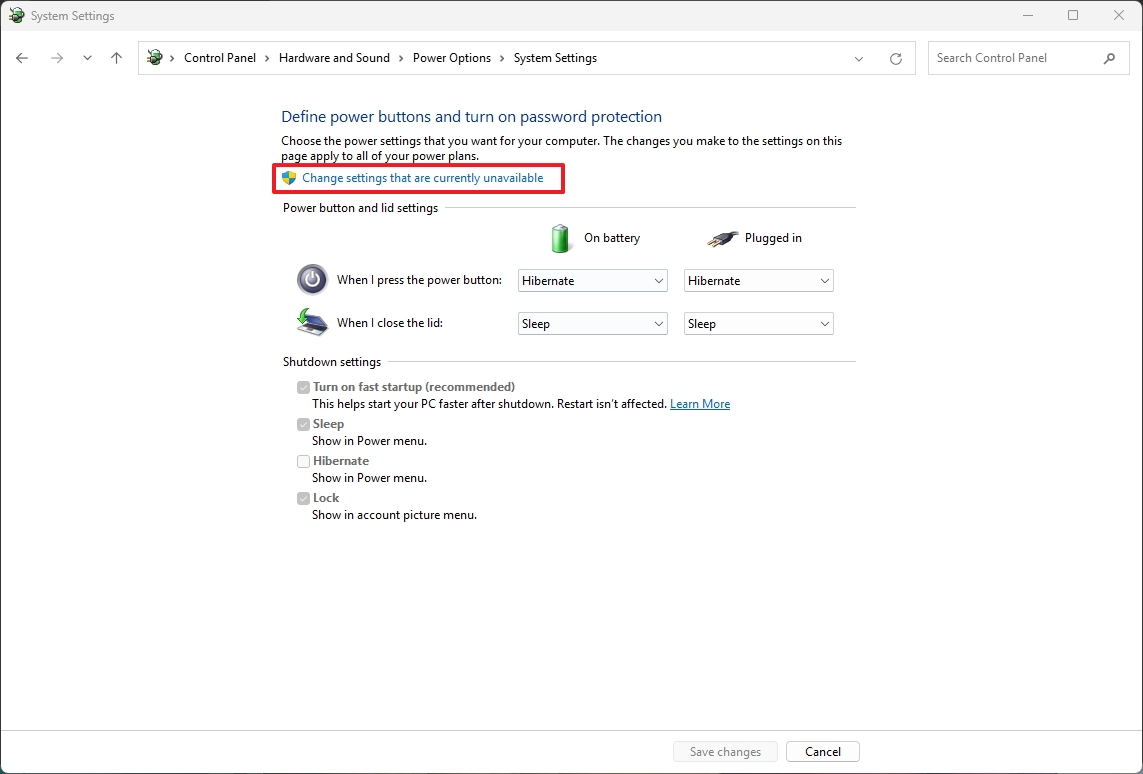
- Click the "Change settings that are currently unavailable" option to modify the Shutdown settings.
- Check the Hibernate option.
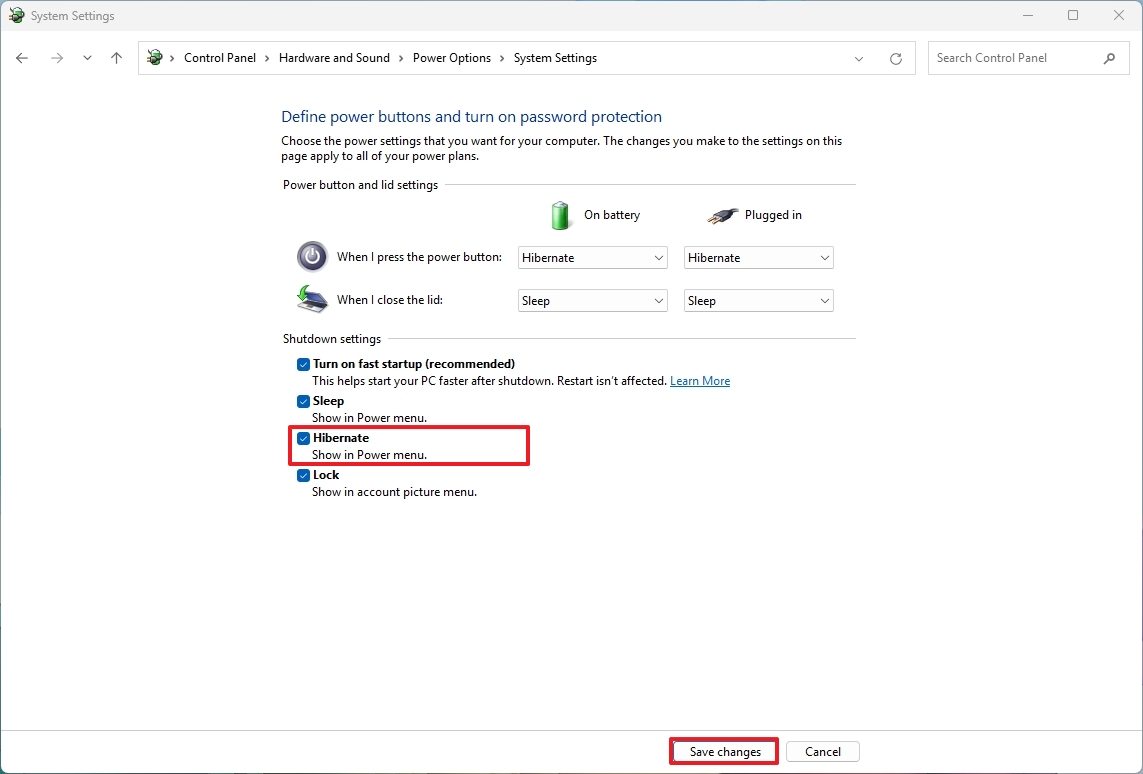
- Click the Save changes button.
Once you complete the steps, hibernation will be enabled on your computer, and the "Hibernate" option will appear in the Power menu.
Taskbar with left alignment
Starting with Windows 11, Microsoft introduced an updated version of the desktop experience that includes a new design for the Taskbar and Start menu, but now, by default, the Taskbar icons and Start menu have a center alignment.
Although you still have the option to change the alignment to the left side, the operating system should have kept the left alignment with the option to change to the center, as most people are used to are already used to legacy alignment.
If you're still new to Windows 11, you can use these instructions to change the Taskbar alignment on your computer:
- Open Settings.
- Click on Personalization.
- Click the Taskbar page on the right side.
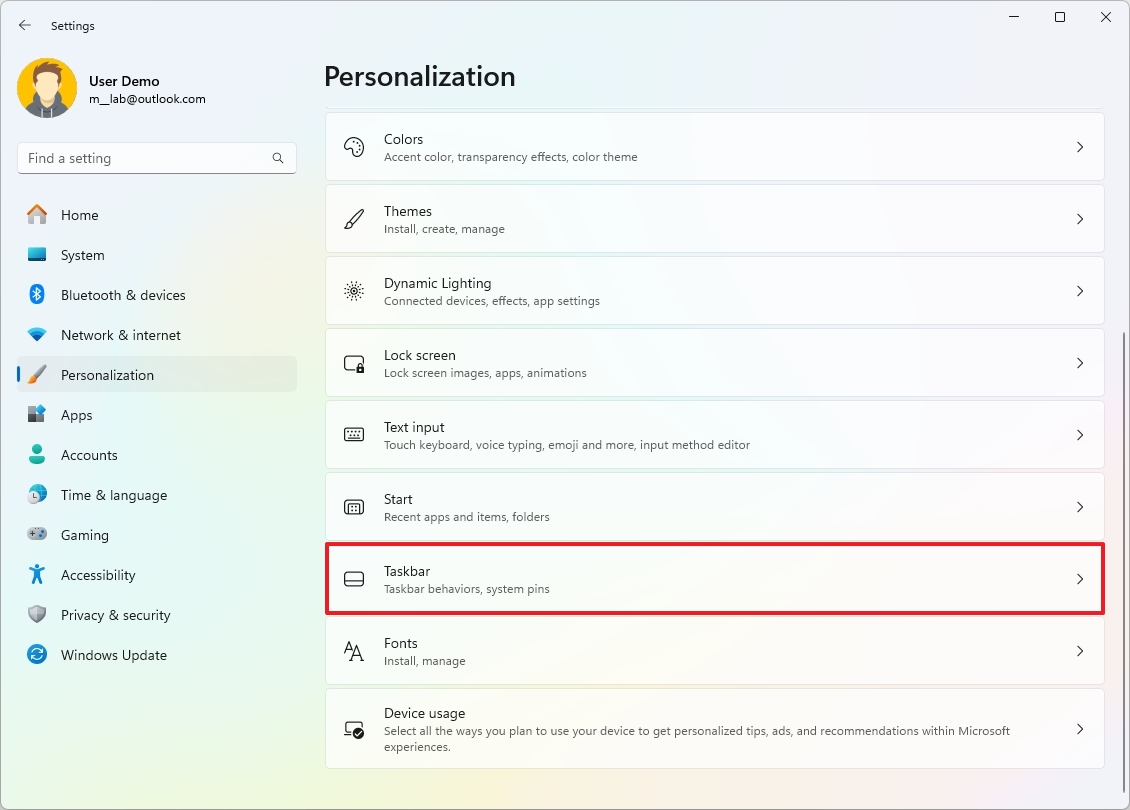
- Click the Taskbar behaviors settings.
- Select the Left option for the "Taskbar alignment" setting.
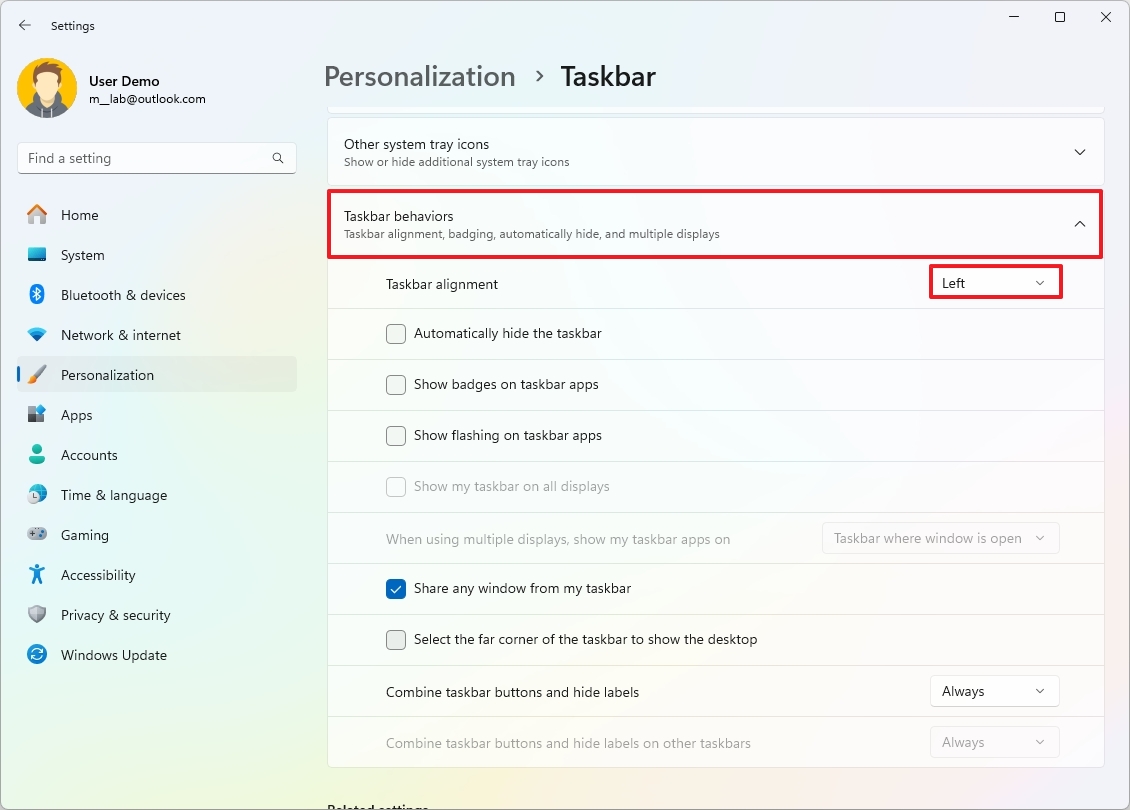
After you complete the steps, the Taskbar icon and Start menu will align to the left, like in previous versions.
It's important to note that this guide includes suggestions of features that should come back enabled by default, and then there are others that were turned on by default, but they should.
What other feature should Microsoft consider to enable by default on Windows 11? Let me know in the comments.
More resources
Find in-depth guides, troubleshooting tips, and the latest updates on Windows 11 and 10 here:

Mauro Huculak has been a Windows How-To Expert contributor for WindowsCentral.com for nearly a decade and has over 22 years of combined experience in IT and technical writing. He holds various professional certifications from Microsoft, Cisco, VMware, and CompTIA and has been recognized as a Microsoft MVP for many years.
You must confirm your public display name before commenting
Please logout and then login again, you will then be prompted to enter your display name.
