How to use PowerPoint transitions to improve presentations
Your slide show presentation already contains compelling information. However, the finishing touch, the added flair, is the use of transitions.


Even the most confident communicator needs a little help sometimes. PowerPoint is the program to use in order to capture details in a presentation format. Taking advantage of the slide transition options in PowerPoint will develop a flow that helps to keep your audience engaged without distraction. Here's how to get started with transitions.
Managing PowerPoint slide transitions
Some may confuse transition and animation effects in PowerPoint. Animation effects in PowerPoint are only applied to objects within the slide whereas transitions are applied to the slide itself. This means that you can have one slide transition effect while the slide can contain multiple animation effects.
How to add a slide transition
To add a PowerPoint transition:
- Click on the slide that is the endpoint of the transition process.
- Click on the Transitions tab in the navigation ribbon.
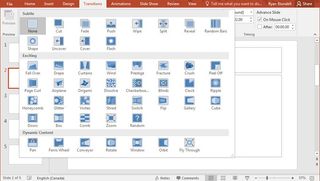
- In the Transition gallery, click on the More (...) button to view the entire gallery.
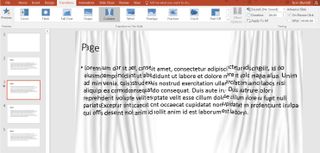
- Click on a transition to preview the animation effect.
You will notice that a star icon has been placed next to the slide thumbnail on the left side of the window. This indicates that a transition has been applied. Next to the Transitions gallery, you will also see an Effects Icon command.

If you choose to display all transitions in the gallery, you will see that they are grouped into one of three categories:
- Subtle: This group contains the simplest transition effects. They typically make use of basic motion or animation.
- Exciting: The transitions in this group are more involved than in Subtle. The animations within are typically longer and more complex in nature.
- Dynamic Content: This group provides transitions of a different manner. The animation is applied to the content of the slide, not the background. By using the same background, you can visually link content. Dynamic transitions also work in reverse, if you need to switch back to the previous slide.

How to remove a PowerPoint transition
To delete a transition:
- Click on the slide marked with a star.
- Click on the Transitions tab in the ribbon.
- Select None from the Transitions gallery.
If you want to remove transitions from all slide simultaneously, all slides must be selected before selecting None from the transitions gallery. The easiest way to do this is to use the CTRL + A keyboard shortcut to select all.
Get the Windows Central Newsletter
All the latest news, reviews, and guides for Windows and Xbox diehards.
How to modify a PowerPoint transition

To edit transitions:
- Select a transition from the gallery.
- Locate the Timing group.
- Select a sound clip from the Sound drop-down list.
- Specify the duration of the transition animation. Choose between 0.01 and 59 seconds. (Values increase in 0.25-second increments.)
- Choose to advance to the next slide manually (by mouse) or after a specific time has elapsed. This can be increased or decreased in one-second intervals.
- Select Apply To All to create a uniform transition pattern for all slides in the presentation.
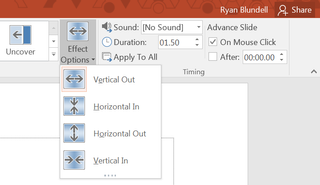
Depending on the transitions style that you have chosen, you can also modify the direction in which they move to and from.
Morph transitions
If you have an Office 365 account, your organization may have another transition option for you to try. While Morph may seem like an animation nestled within a presentation, it is, in fact, a transition that could increase fluidity between slides. Essentially, you want to make sure that the two slides involved in the transition have at least one comment element, be it an image, title or graph.
How to apply PowerPoint Morph transitions
To add a Morph transition:
- Access the Transition gallery in the Transition tab.
- Select Morph from the Transition Effects group.
- Click the Effect Options next to the Transition Gallery.
- Select the elements you want to work with. (Choose from Objects, Words or Characters.)
- Click Preview to review the Morph transition.
Morph is a handy feature for providing clean animated transitions without having to dip into potentially complex animation components themselves. Here are some examples of what you can accomplish with the Morph command.
How to apply animation-style PowerPoint effects to words
To apply animated word transitions:
- Enter text on a slide.
- Duplicate the slide and text onto another slide.
- Click and hold on the text box of the duplicate slide.
- Use your mouse or trackpad to move the text to its end position.
- Apply any additional alterations to the text such as font size, color or style.
- Click the Transitions tab in the ribbon.
- Select Morph from the Transition gallery.
- Click Effect Options.
- Select Words from the drop-down list.
- Click Preview to review the results.
How to apply animated PowerPoint transitions to images
To add an animated image transition:
- Insert an image onto a slide.
- Duplicate the slide and its contents onto the next slide.
- Apply changes to the image on the duplicate slide. You can drag the corners of the picture to resize, alter the shape or move to another position on the slide.
- Click on the Transitions tab.
- Select Morph from the transitions gallery.
- Click Preview to review.
If you are sharing a presentation containing geographical data, you could use Morph to zoom in on specific locations on a map. Combine this with text transitions and you can create a powerful message without having to use the Animations tab.
How to view transitions in a PowerPoint slideshow
Once your transitions have been applied to the slideshow, you may want to run the presentation to get a sense of the audience experience. You can set up the Slide Show to play at the optimal pace. Your best bet would be to set up the Slide Show to progress automatically.
To change the Slide Show settings:
- Click on Slide Show on the navigation ribbon
- Click Set Up Slide Show in the Set Up group.
- Locate the Advance Slide section.
- Select the Using timings, if present option.
- Click Ok.
If you set up specific times under Transitions > Timing, you can then sit back and analyze your slide show to see how effective your transitions are. It is important to point out that transitions should compliment the content you are presenting, not distract from it. For a more professional presentation, you should stick with Subtle or Dynamic transitions, as Exciting offers a more fun and casual approach to transitions.
Wrapping up
Content will always be the key component of a fantastic PowerPoint presentation. Transitions are an elegant way to help you and your audience move from slide to slide, without an abrupt visual interruption.
Do you use transitions with your slides? Do you ever use Exciting transitions? Let us know in the comments.
Microsoft Office 101: Help, how-tos and tutorials
