Outlook features you should be using right now
At its core, Outlook 2016 is one of the most powerful email and personal information managers. Are you using one of these features?

It may seem strange to get excited about an email client but Outlook 2016 is worth the hype. From SharePoint integration to adding an email signature, there are a plethora of features to use. Here are some that can and should be frequently used.
- Focused Inbox
- OneDrive Integration
- Events from an email
- Voting Buttons
- Schedule your sent emails
- Moving faster with Quick Steps
- Using Quick Parts for easy composition
Focused Inbox
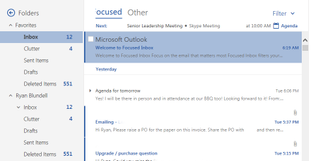
Focused Inbox is one of the newest additions to Outlook 2016. The more you use it, the more focused it will become. It will eventually replace the Clutter feature and sort your messages between the Focused and Other tabs.
How to manage your messages
To turn on and use Focused Inbox:
- Click on the View tab in the navigation ribbon.
- Click Show Focused Inbox in the Focused Inbox group. This displays the Focused and Other tabs.
- Click on Focused or Other to switch between views.
- Click on a message in the current view.
- Right-click on the message.
- Select Move to… to move the specific message to the inactive view.
- Select Always Move to… to move all messages from the sender of the message to the inactive view.
The Focused and Other tabs can be deactivated by clicking again on Show Focused Inbox option in the View tab.
OneDrive Integration
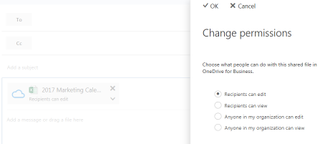
Being able to access files in OneDrive rather than content that is saved locally allows your colleagues to see the most current version of the file. You can also control what type of access they have.
How to upload a file from Onedrive
To attach a file:
- Click the Home tab in the navigation ribbon.
- Click New Message in the New group.
- Click on the Message tab in the ribbon of the new email window.
- Click Attach File in the Include group.
- Select OneDrive to select the files to be attached.
How to upload and attach a local file as a OneDrive file
To upload and attach a file:
Get the Windows Central Newsletter
All the latest news, reviews, and guides for Windows and Xbox diehards.
- Click New on the top bar.
- Select Email message from the dropdown list.
- Click the Attach icon.
- Select Computer on the left pane.
- Select a file and click Open.
- Select Upload and attach as a OneDrive file under How do you want to attach this file?.
- Click the down arrow next to the attachment.
- Click Change permissions.
- Choose to allow editing or view only for either recipients or the entire organization.
- Click Send.
If choosing to upload and attach, the file is uploaded to the OneDrive Email attachments folder. Those you choose to send the email to will be able to participate in real-time collaboration.
Events from an email
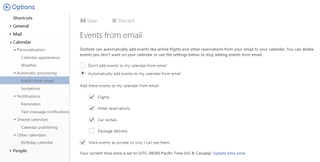
Outlook 2016 for Web automatically adds important events from messages into your calendar. While extremely useful, you may not want items displaying in the calendar for others to potentially see. Luckily, Outlook can help you modify your view.
How to modify events in your calendar
To manage calendar events:
- Select the Settings icon in the top right corner.
- Select Calendar in the Your app settings section.
- Select Events from email under Automatic processing.
- Choose to click Don't add events to my calendar from email.
- Select/deselect Flights, Hotel reservations, Car rentals and Package delivery.
- Select/deselect Mark events as private so only I can see them.
Voting buttons
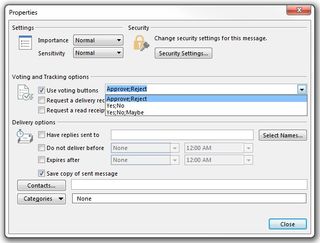
Rather than asking open ended questions and expecting direct answers, you can create a poll to help you gather quick, to-the-point responses. This saves you, and those voting, a fair bit of time.
How to access voting buttons
To use voting buttons:
- Select the Home tab in the navigation ribbon.
- Click on New Message.
- Click on Options in the new message pop up.
- Click Use Voting Buttons.
- Select from the presented options or choose Custom.
- Delete the text in the drop down list in the Voting and Tracking options.
- Type in specific values.
- Select alternative recipients under Delivery options.
- Click Close.
- Click Send.
You can then use the Tracking option in the Message tab to gather the poll results.
Schedule your sent emails
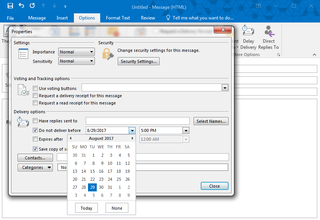
Timing is everything, even when it comes to messages. Outlook offers a way to delay specific messages to be sent or all messages entirely.
How to delay a single message
To delay a message:
- Click the Options tab in a message window.
- Select Delay Delivery from the More Options group.
- Select Do not deliver before under delivery options.
- Select the delivery date and time.
- Click Close.
The message will sit in your outbox until it is time to send. You can use Rules to apply the delay to all out going messages.
How to delay all sent messages
To delay outgoing messages:
- Click the Home tab
- Select Rules in the move group
- Select Manage Rules and Alerts in the drop-down.
- Select New Rule.
- Select ****Apply Rule on messages I send in Step 1: Select a template.
- Click Next.
- Select conditions to apply to all sent messages under Step 1: Select condition(s).
- Click Next.
- Select Defer delivery by a number of minutes in the Step 1: Select action(s) list.
- Select a number of in the Step 2: Edit the rule description (click an underlined value) box.
- Enter a time value up to 120 minutes.
- Click Ok, then Next.
- Insert a name for the rule.
- Select the Turn on this rule check box.
- Click Finish.
Moving faster with Quick Steps
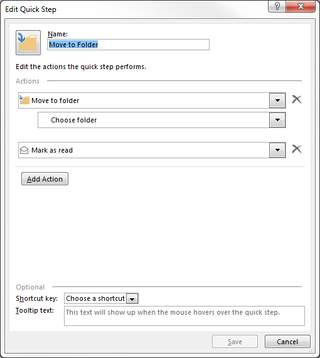
What used to take multiple steps can now be covered in one with Quick Steps. Your frequent, repetitive actions in Outlook can be completed with a single click, such as moving an email to a specific folder while marking it as read.
How to create a Quick Step
To create a Quick Step:
- Click on the Home tab in Mail's navigation ribbon.
- Select Create New from the Quick Steps group.
- Enter a name for the quick step in the Name field.
- Select an action to perform.
- Click Add Action to add up to 11 additional actions.
- Optionally choose a shortcut key.
- Enter a tooltip text.
- Click Finish.
How to delete a Quick Step
To delete a Quick Step:
- Click on the drop-down icon in the quick steps group.
- Select Manage Quick Steps.
- Select a Quick Step from the left pane.
- Click Delete.
- Click OK.
How to edit a Quick Step
To modify a Quick Step:
- Select Manage Quick Steps from the Quick Steps drop-down.
- Click on a Quick Step on the left pane. Select Edit.
- Modify the Quick Step name and possible actions.
- Click Save.
- Click OK.
Using Quick Parts for easy composition
Quick Parts is an essential feature for those who rely on sharing similar messaging to a different recipient. You can create reusable texts known as building blocks. You can combine multiple building blocks to quickly compose a message.
How to create building blocks
To create a building block:
- Highlight the text or object you wish to store.
- Click on the Insert tab in the message window.
- Select Quick Parts in the Text Group.
- Select Save Selection to Gallery Name Gallery in the dropdown list.
- Enter values for the building block name, location gallery, category, and description.
- Select a template to save the building block to.
- Choose to insert the building block as its own paragraph or insert as content only.
- Click OK.
How to delete a building block
To delete a building block:
- Click on Quick Parts in the Insert tab.
- Right-click on the selection in the gallery pane.
- Select Organize and Delete.
- Make sure the correct building block is selected.
- Click Delete.
- Click Yes to confirm.
- Click Close.
Wrapping Up
With so many features built into Outlook, you'll be discovering new ways to be more productive all of the time. Which features are your favorite? Let us know in the comments!
Microsoft Office 101: Help, how-tos and tutorials
