Voicemeeter Banana lets you control your Windows PC's audio for streaming
The Voicemeeter Banana donationware application for Windows could solve all your audio woes, especially if you're a streamer.
Controlling audio on Windows 10 can sometimes get a little messy, particularly if you have a lot of different apps or devices to funnel it all through. In the case of streamers, in particular, control over which piece of audio goes where is crucial to ensure your stream isn't a complete disaster.
There are hardware solutions, like an external mixing deck, that can take care of everything for you. Those are great, but they're not cheap and they require a fair bit of room. And lots of cables.
You might be better off with Voicemeeter Banana, a free-to-use application for Windows that simulates a mixing deck within the confines of your PC. It is fantastic. But there's a bit of a learning curve.
Setting up Voicemeeter Banana
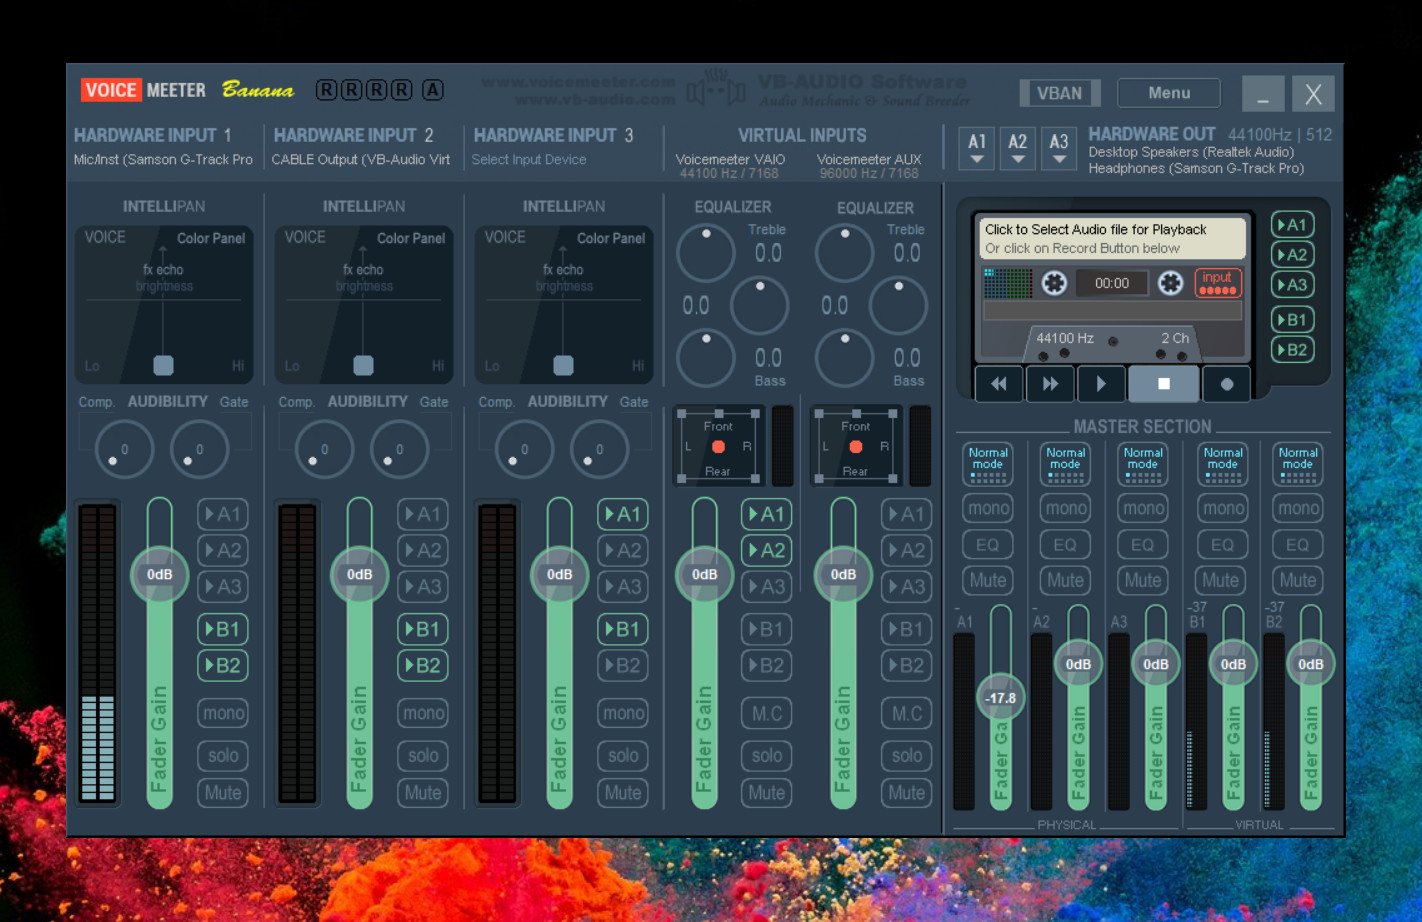
First, you want to download the application at the link below, but make sure you get the Voicemeeter Banana app, not the regular Voicemeeter.
Download Voicemeeter Banana for Windows
From the same link, you should also download a free virtual audio cable. You're allowed one for free, and you'll see why it's important in later steps. This comes as a zip file, so unpack it and open the executable within for your version of Windows (x86 or x64).
Before you go tinkering with it, you need to set Voicemeeter Banana as your default audio device for Windows 10. That way everything will be funneled through the app.
Get the Windows Central Newsletter
All the latest news, reviews, and guides for Windows and Xbox diehards.
Click on the speaker icon in the bottom-right corner and select Voicemeeter Input (VB-Audio Voicemeeter VAIO). Confusing, yes, but that's how it needs to be.
Adding your output devices
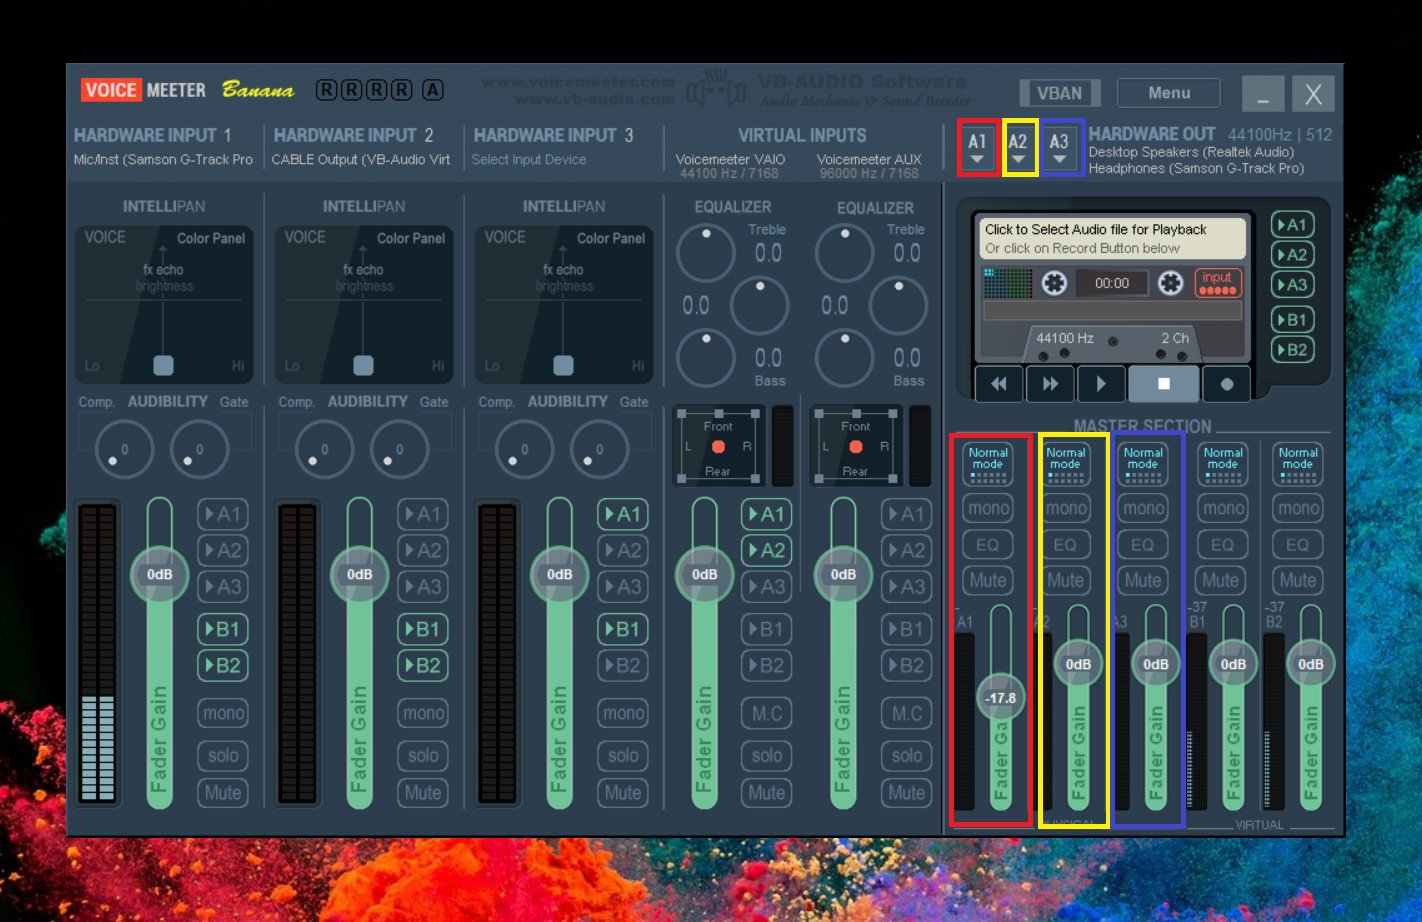
First, let's look at the output device area of Voicemeeter Banana. In order to hear audio from your PC, you'll need to set up any hardware you have for the job. There are three outputs (A1, A2, and A3), with corresponding controls. The colored boxes in the image above show you which correlates with which.
You can have three separate pieces of hardware that Voicemeeter can send audio to. In my case, I have a set of desktop speakers, a pair of headphones and a gaming headset all connected to an output.
Click on the relevant output and you'll be presented with a list of everything that's connected to your PC that can handle audio. You'll also notice that everything is there twice, prefaced by either WDM or MME (there are others but these are the two we care about right now). Select the audio device with WDM by it first, and if you have any issues try MME instead. But you always need to make sure you're consistent.
That goes for audio input devices, too; input and output need to match. So WDM for WDM or MME for MME.
Each individual audio output can be controlled with the slider and adjacent controls in the bottom right of the Voicemeeter Banana window. The slider has a ton of range for getting volume just right, but you can also mute each individually, add EQ settings, or go from stereo to mono if you wish.
Setting up your audio inputs
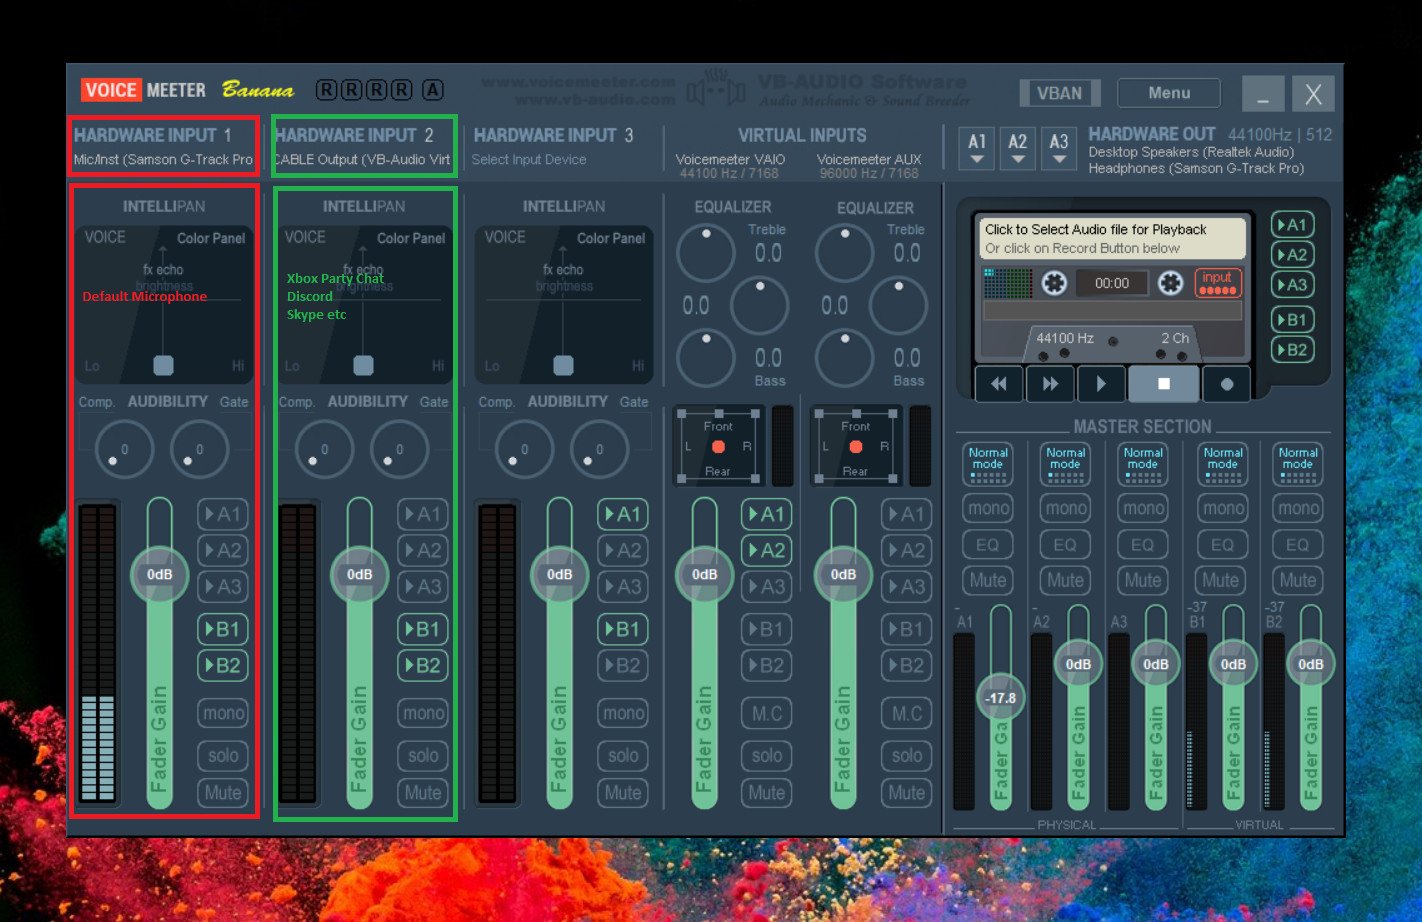
Selecting an input device is exactly the same as selecting outputs, but you do it on the left of the window. Grabbing the free virtual audio cable detailed above comes into play here, as it presents you with an extra input you can use. If you want more, throw the developer some money and stack them up.
The principle is the same as outputs. The difference is that an input doesn't have to be hardware. Thanks to the virtual cable, you can tell Voicemeeter Banana to treat an application on your PC like a piece of hardware and deliver it into the mixer.
This is great for streamers to integrate Skype or Teamspeak or Discord, or in my case, I'm setting it up to pull in Xbox party chat from the Xbox app on my PC.
Your first hardware input should be your microphone (remembering to match WDM or MME. The next can be anything you like, hardware or software.To do this with the Xbox app or Skype or Discord, you simply need to tell the relevant app to use the virtual cable as its output.
In the case of the Xbox app, my output for the party chat is set as Cable Input (VB-Audio Virtual Cable). In the second hardware input, simply select the corresponding item, noting it is now labeled as Cable Output. You're telling the Xbox app that you want the audio to go down a cable input to an audio device, and Voicemeeter Banana to pull the output from that cable.
Virtual inputs
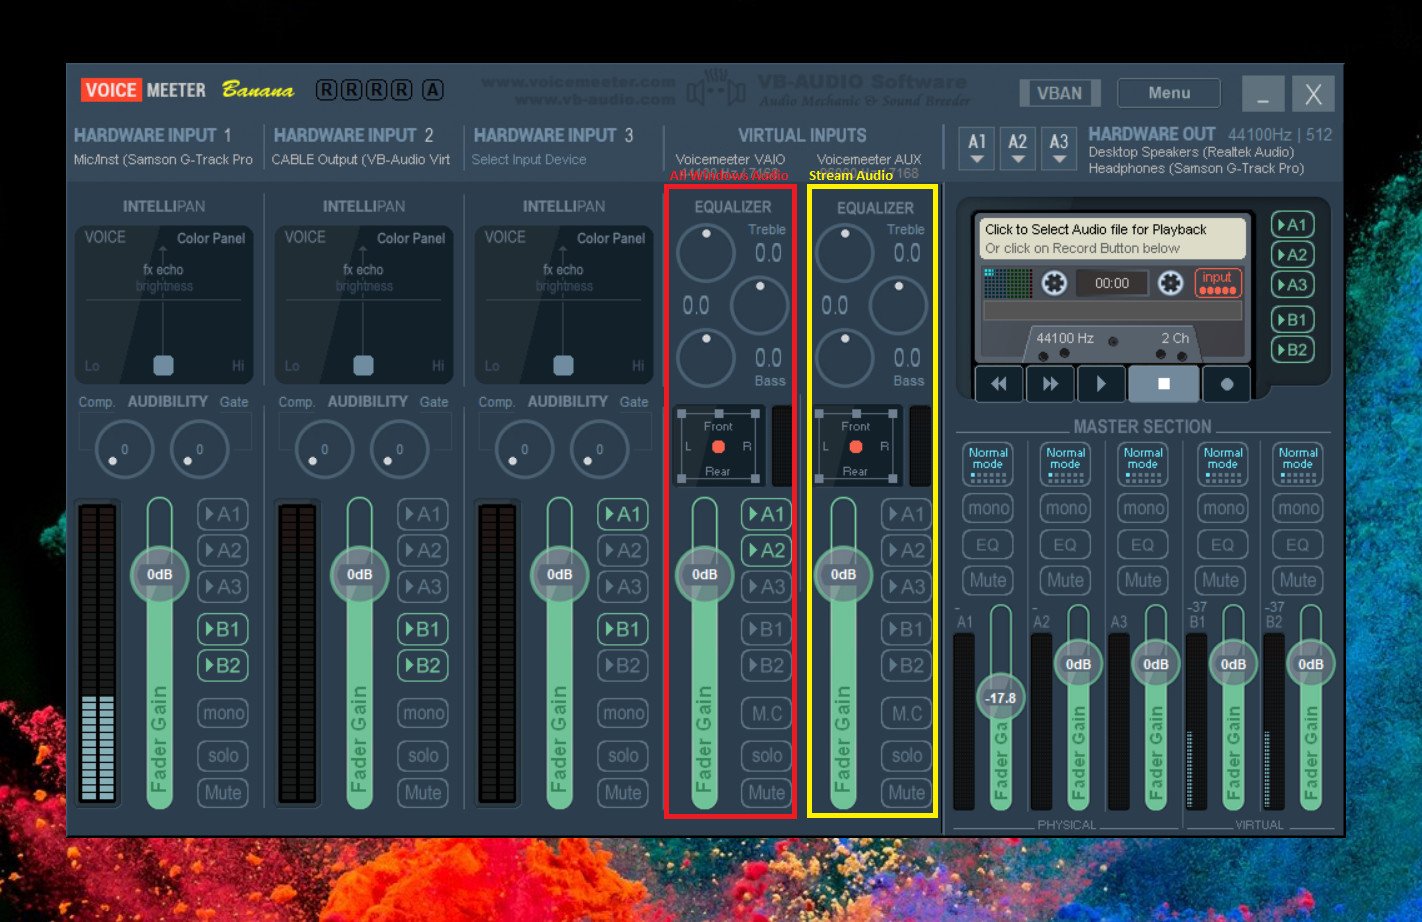
So far we've set up mostly hardware (and fake hardware). Audio goes into the PC, then goes out to the speakers or headphones you tell it to. But then we get to the virtual inputs.
As I'm looking at this from a streaming perspective, the colored boxes above demonstrate how to approach the B1 and B2 virtual inputs. B1 is all your Windows audio (remember earlier setting Voicemeeter Input as the default playback device) and should be set up in such a way that you're going to be hearing sound from whatever outputs you connected to your PC. B2 is your stream audio, that is, everything that gets sent to your viewers via software like XSplit and OBS.
Why is this important? You don't necessarily want your stream to hear audio from certain inputs, and you certainly don't want your stream audio doubling up with your Windows audio and going to the same speakers.
What you need to remember is that anything you want to be mixed together with your Windows audio, you send to the B1 channel. You can then send B1 to output A1, A2 or A3, or a combination of the three.
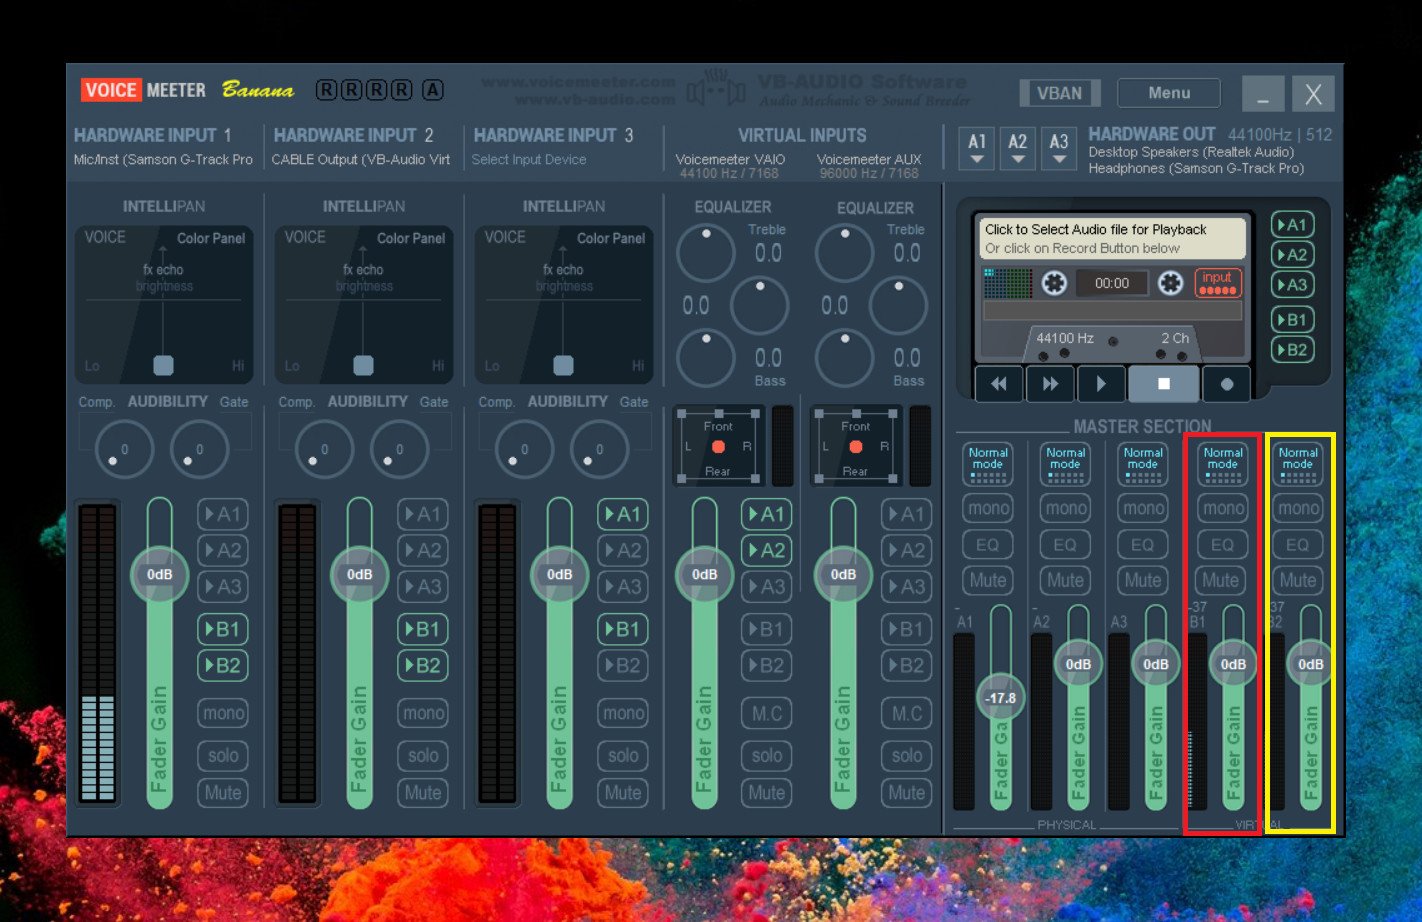
You might want to start changing this and sending only selected hardware inputs to an output if you want to isolate a particular piece of audio. If you want to monitor your microphone, for example, without mixing it with any other audio or sending it to your stream, you can set its output to be your headphones and mute everything else.
As with the hardware outputs, the B1 and B2 channels have their own controls in the bottom right.
Using Voicemeeter Banana with XSplit and OBS for your streams
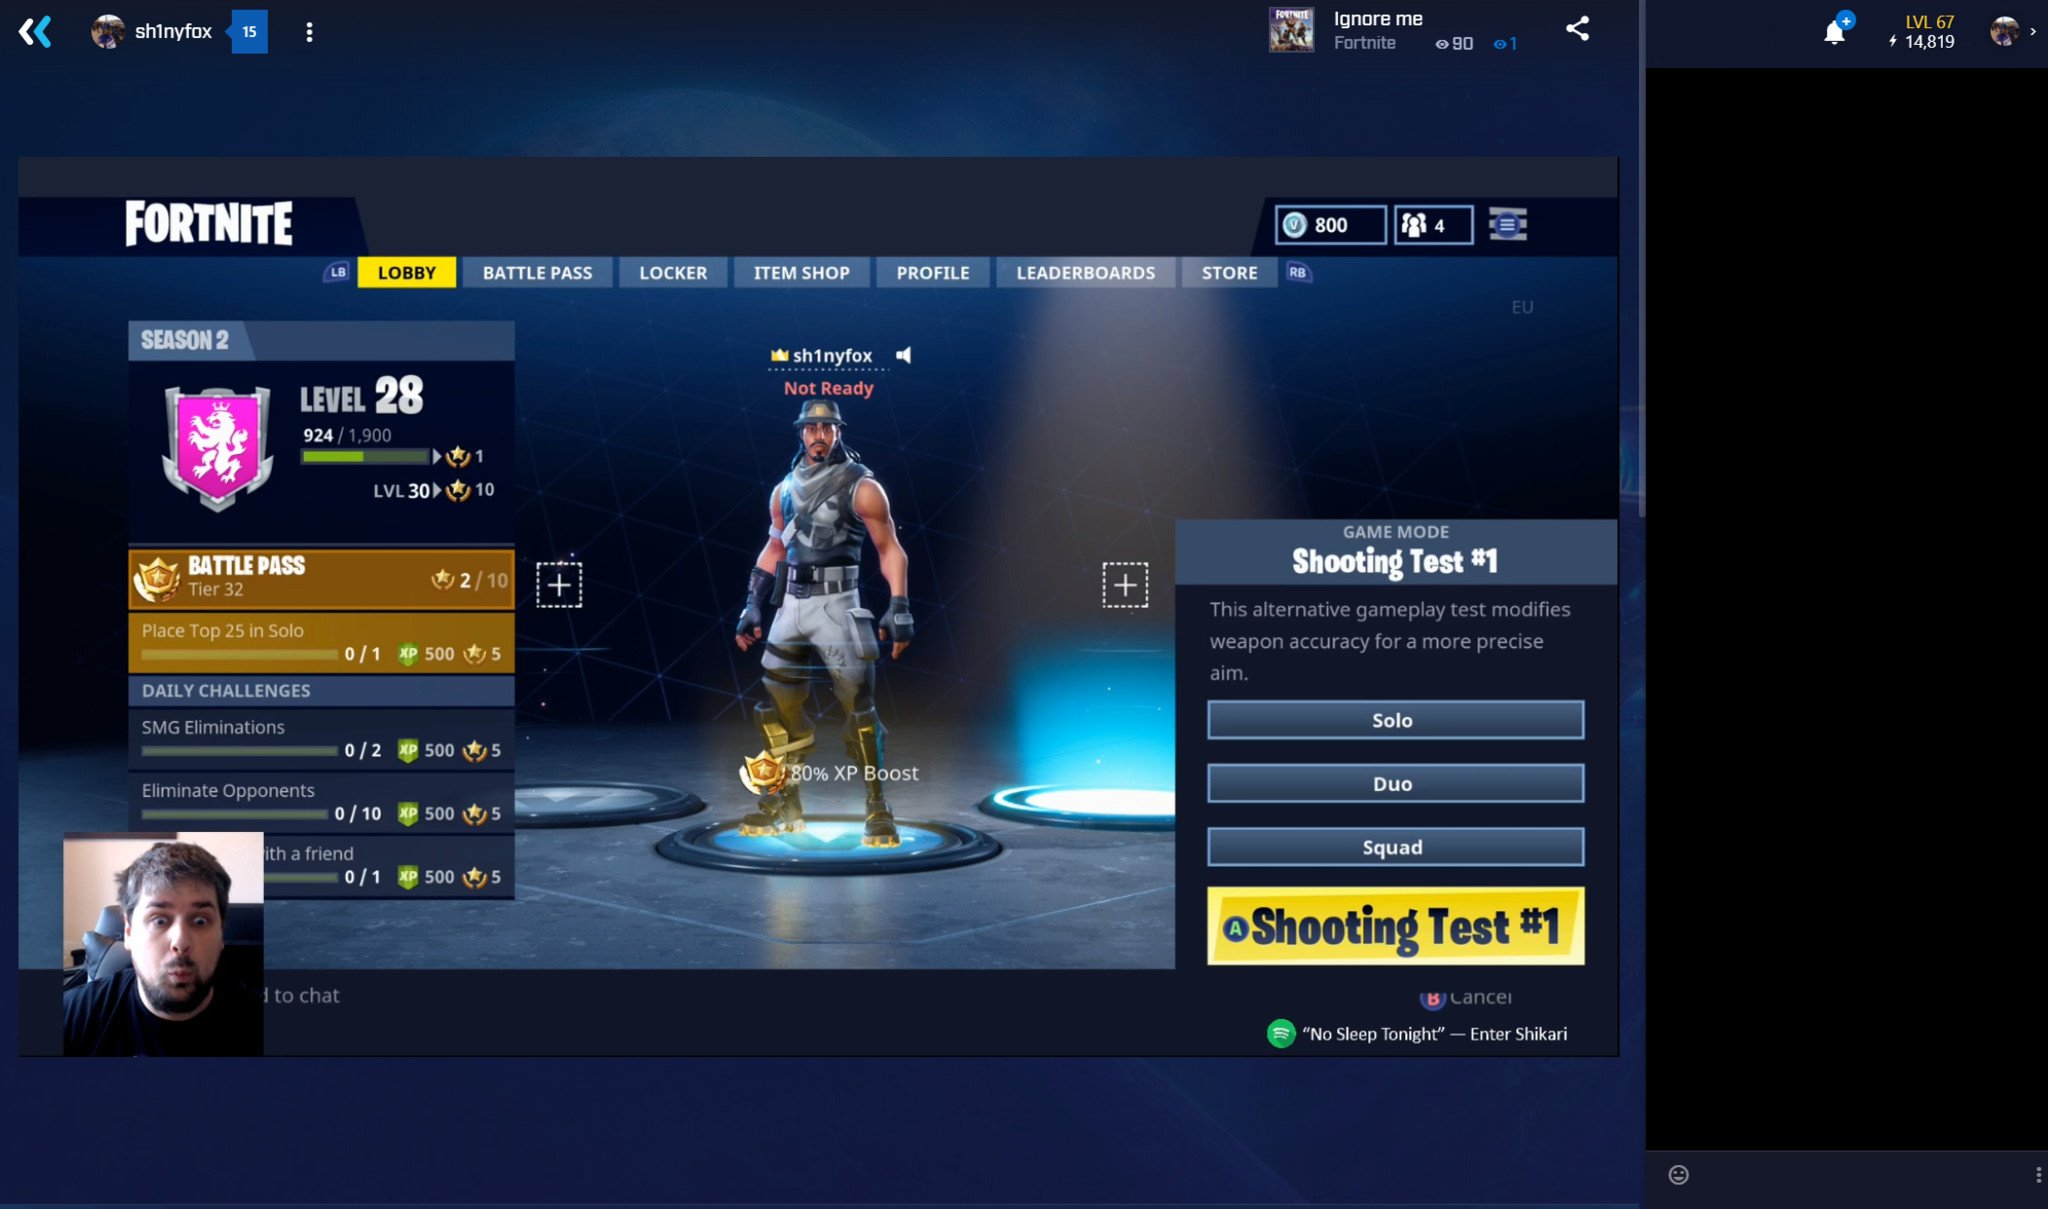
Now that we're all set up, we can turn to getting the right audio to your stream. Since everything is controlled by Voicemeeter Banana, there's very little to do with your streaming software.
Here's how to get set up in XSplit and OBS.
Adding Voicemeeter Banana audio to XSplit
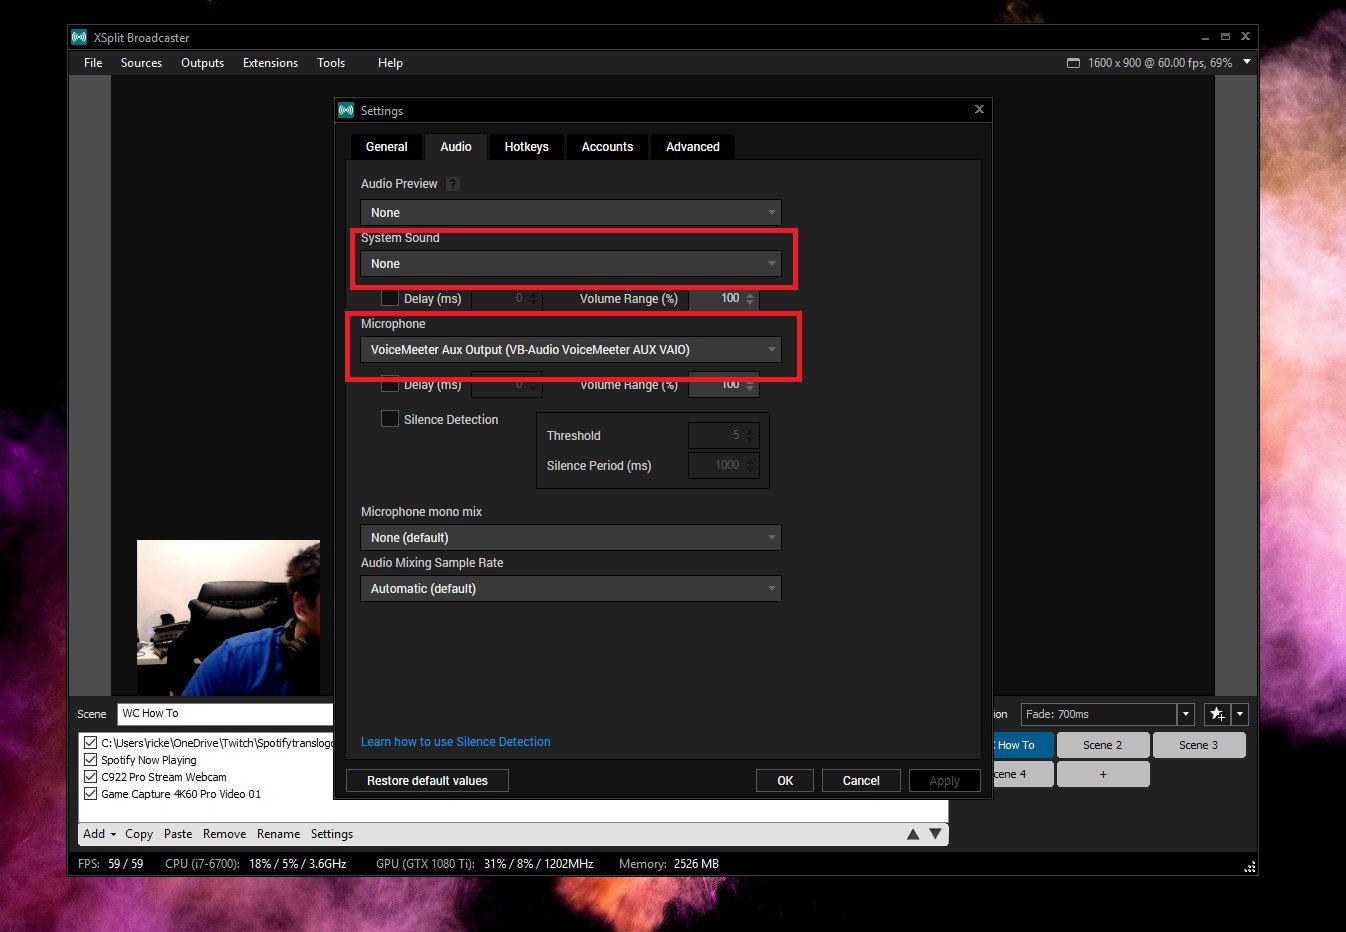
Follow these quick steps:
- In your XSplit window click on the settings cog.
- Select the audio tab.
- Set system sound to none.
- Set microphone to Voicemeeter Aux Output (VB-Audio Voicemeeter Aux VAIO)
Now, everything you send to the B2 channel in Voicemeeter Banana will be pulled into XSplit.
Adding Voicemeeter Banana audio to OBS
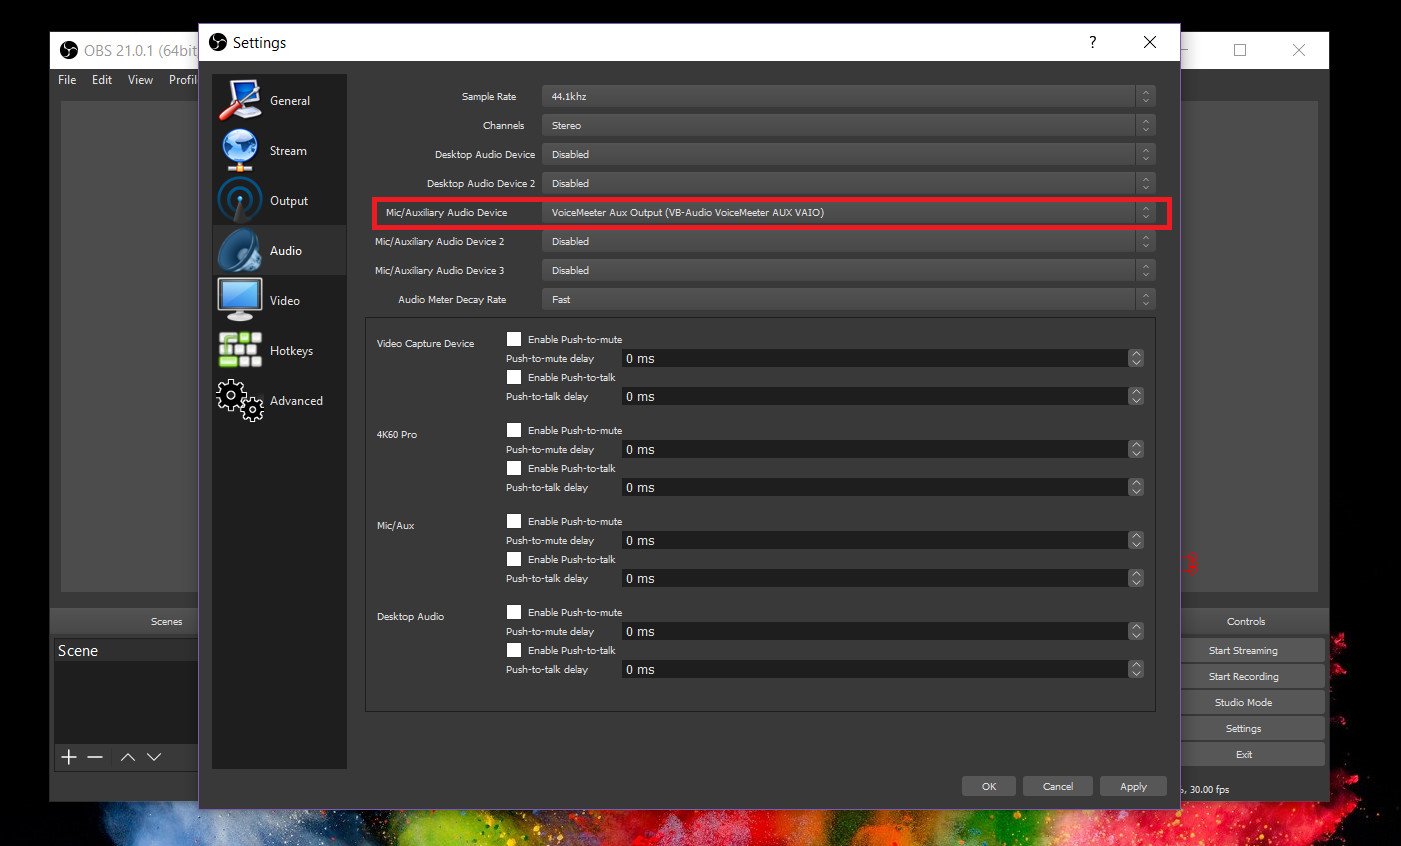
Follow these easy steps:
- Go to settings in OBS.
- Select audio.
- Set mic/auxiliary audio device to Voicemeeter Aux Output (VB-Audio Voicemeeter Aux VAIO).
- Disable all other audio devices.
Now everything you send to the B2 channel in Voicemeeter Banana will be pulled into OBS, while everything attached to the PC is muted so you don't end up with any doubling up or echoes.
Final thoughts on Voicemeeter Banana
Voicemeeter Banana is one of those pieces of software you didn't know you needed, but then you can't live without. It's elegantly designed, and once you figure out the basics, it's not particularly difficult to use.
If you like it, definitely donate to help keep the project going. It's worth it.

Richard Devine is a Managing Editor at Windows Central with over a decade of experience. A former Project Manager and long-term tech addict, he joined Mobile Nations in 2011 and has been found on Android Central and iMore as well as Windows Central. Currently, you'll find him steering the site's coverage of all manner of PC hardware and reviews. Find him on Mastodon at mstdn.social/@richdevine
