How to use DISM command tool to repair Windows 10 image
When there's a missing or corrupted file on Windows 10, you can fix the problem using the DISM and SFC command tools, and here's how.
Deployment Image Servicing and Management (DISM) is a command-line tool built into Windows 10 that allows network administrators to prepare, modify, and repair system images, including Windows Recovery Environment, Windows Setup, and Windows PE (WinPE). However, you can also use the tool with the local recovery image to fix most system problems.
When you try to fix a specific error, figure out why the computer stopped booting correctly, or resolve performance problems, the System File Checker (SFC) is one of the best tools to replace missing or corrupted system files using the recovery image. The only caveat with this approach is that if one or more system files in the local image are damaged, the SFC command won't work. In this scenario, you can use the "install.wim" image file with DISM to repair the image and then use the SFC tool to fix the setup without reinstalling the operating system.
In this how-to guide, I will show you how, in 2025 and beyond, the DISM and SFC are the best tools for restoring a computer from a broken to a healthy working state without reinstallation.
Warning: The commands outlined in this guide are non-destructive, but since you will be making system changes, it is still recommended to create a temporary full backup before proceeding.
These instructions have been updated on September 16, 2025, to ensure accuracy and reflect changes to the process in the operating system.
How to use DISM to repair image of Windows 10
The DISM command tool includes multiple features to repair a system image, including "CheckHealth," "ScanHealth," and "RestoreHealth," and you want to use them in that order. Also, depending on the issue, you can use the "RestoreHealth" option to fix the locally available image using different source files.
DISM command with CheckHealth option
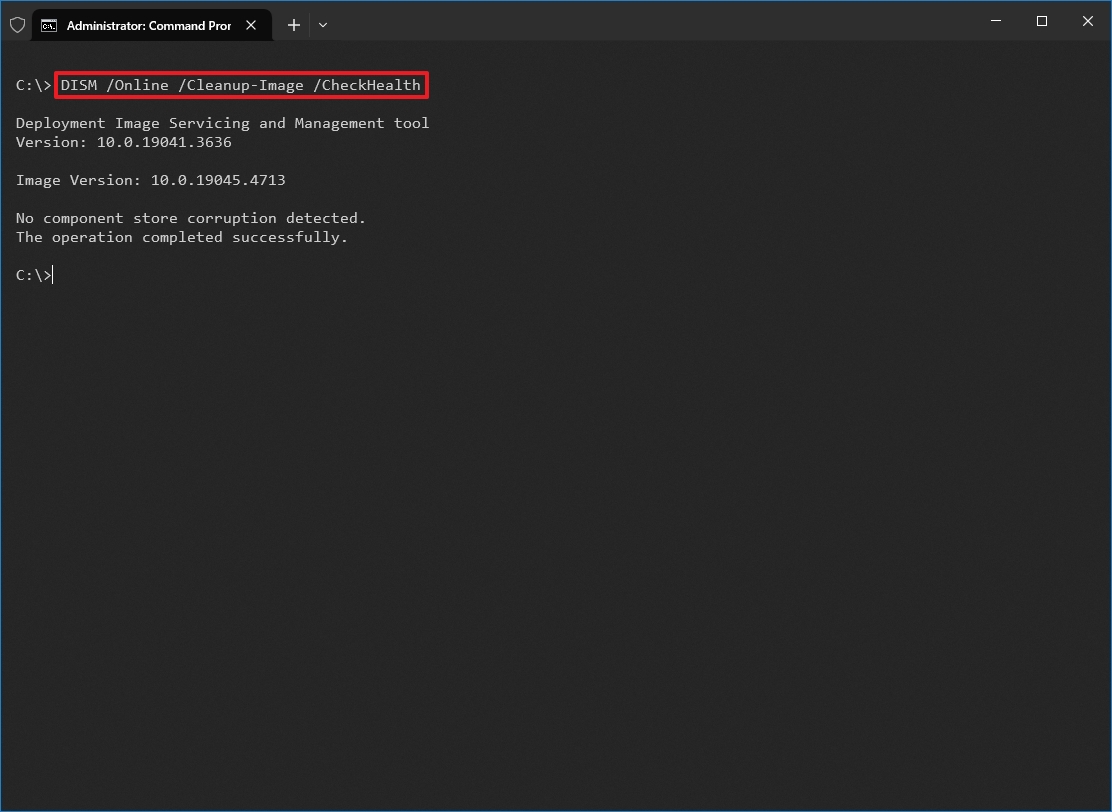
The "CheckHealth" option with the DISM determines any corruptions inside the local Windows 10 image. However, this option does not perform any sort of repair.
To check the image of Windows 10 for issues with DISM, use these steps:
All the latest news, reviews, and guides for Windows and Xbox diehards.
- Open Start.
- Search for Command Prompt, right-click the top result, and select the Run as administrator option.
- Type the following command to perform a quick check and press Enter: DISM /Online /Cleanup-Image /CheckHealth
Once you complete the steps, the DISM tool will run and verify any data corruption that may require fixing inside the local image.
DISM command with ScanHealth option
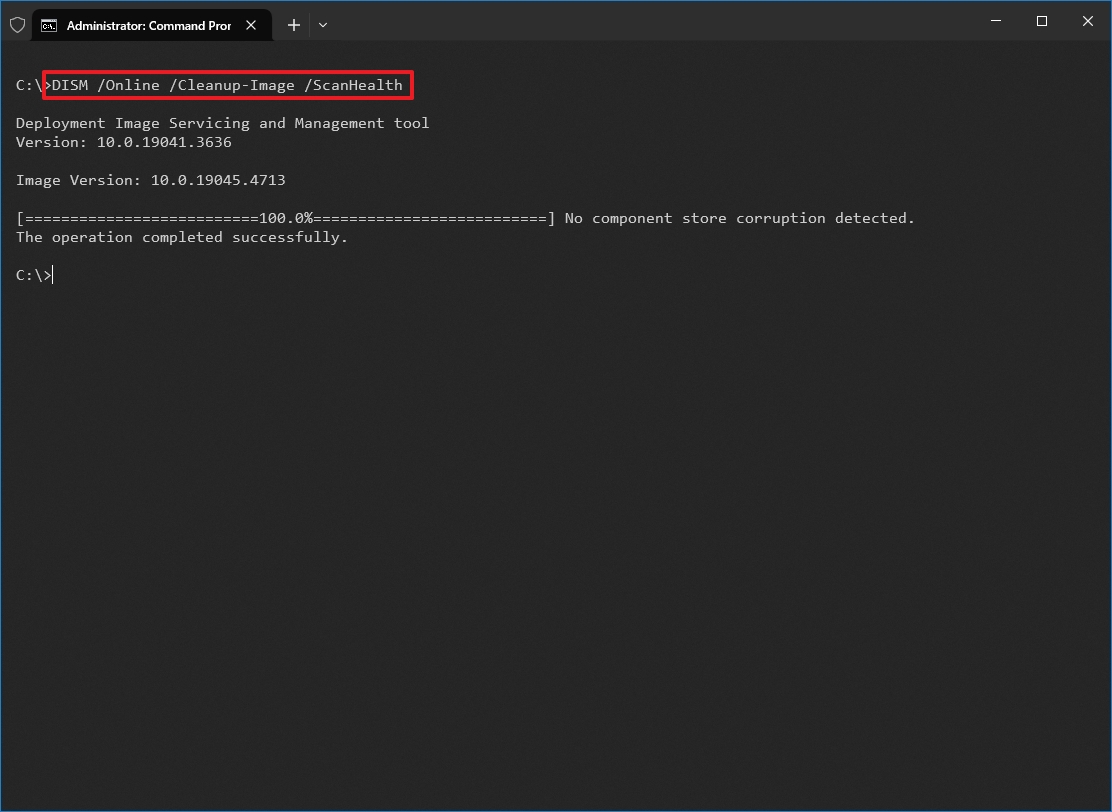
The "ScanHealth" option performs a more advanced scan to find out whether the image has any issues.
To check image problems with the "ScanHealth" option, use these steps:
- Open Start.
- Search for Command Prompt, right-click the top result, and select the Run as administrator option.
- Type the following command to perform an advanced DISM scan and press Enter: DISM /Online /Cleanup-Image /ScanHealth
After completing the steps, the scan may take some time to check whether the image needs fixing.
DISM command with RestoreHealth option
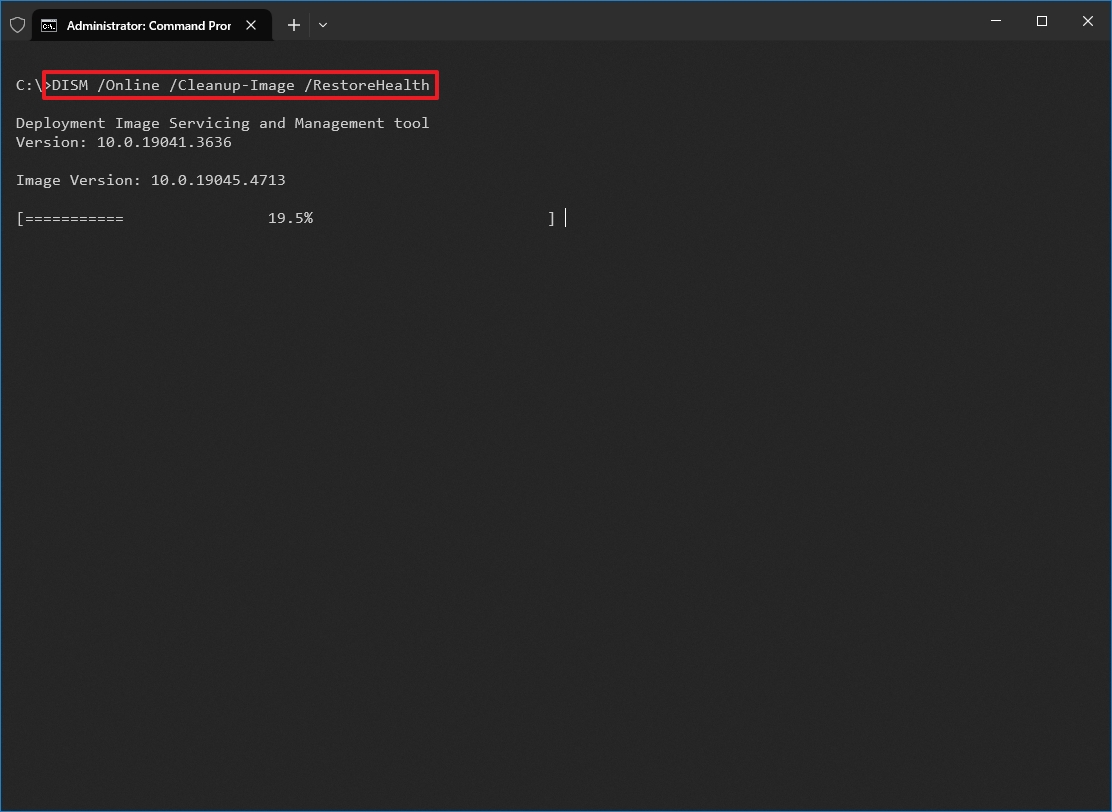
If the system image has problems, the "RestoreHealth" option scans and repairs common issues automatically.
To repair Windows 10 local image problems with DISM, use these steps:
- Open Start.
- Search for Command Prompt, right-click the top result, and select the Run as administrator option.
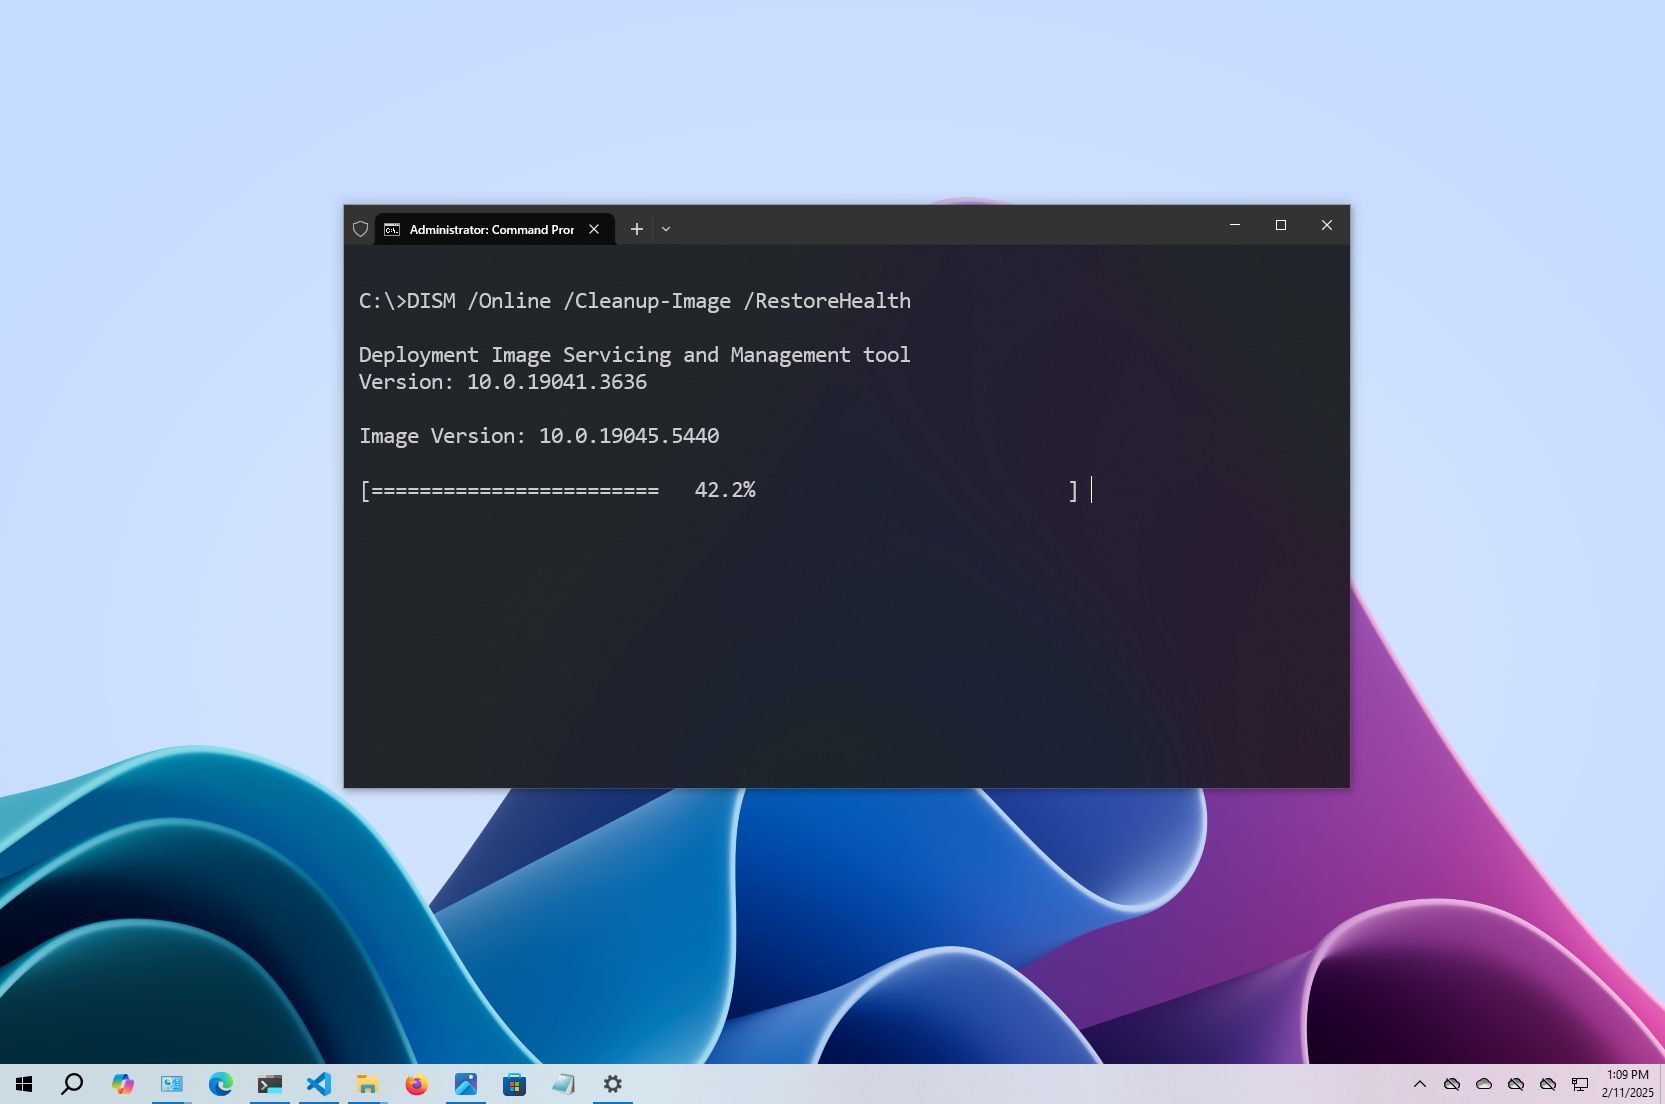
- Type the following command to repair the image and press Enter: DISM /Online /Cleanup-Image /RestoreHealth
- Quick note: It's normal if the command appears stuck. After a few moments, the process will be completed successfully.
Once you complete the steps, the Deployment Image Servicing and Management tool will connect to the "Windows Update" servers to download and replace damaged files (if applicable).
Fix problems with DISM using install.wim image
The Deployment Image Servicing and Management commands typically don't cause issues. However, if the tool finds problems replacing the damaged files or the computer doesn't have an internet connection, you can use another image using the "Source" option. Usually, you can use an "install.wim" or "install.esd" file from another device, install media, or ISO file. You only need to ensure the files match the version, edition, and language of the version you are trying to fix.
Download Windows 10 ISO file
If you need another file source, use the Media Creation Tool to download a fresh copy of Windows 10.
To download the ISO file of Windows 10, use these steps:
- Open this Microsoft support website.
- Click the Download Now button.
- Double-click the MediaCreationTool_xxxx.exe file to launch the setup.
- Click the Accept button to agree to the terms.
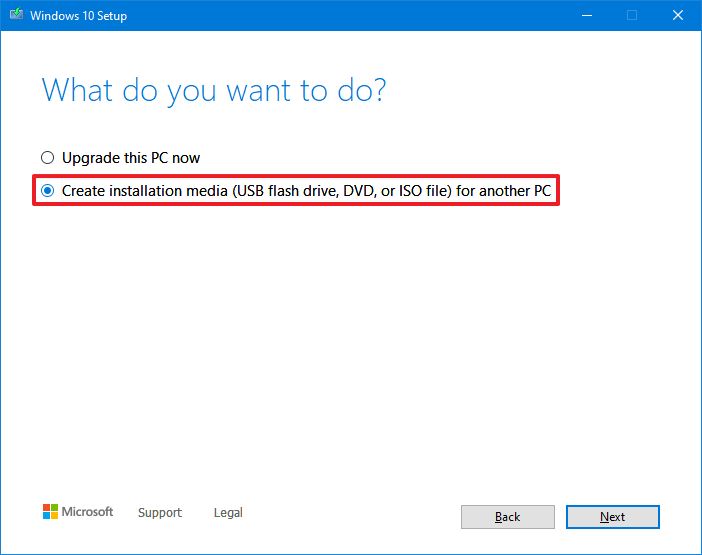
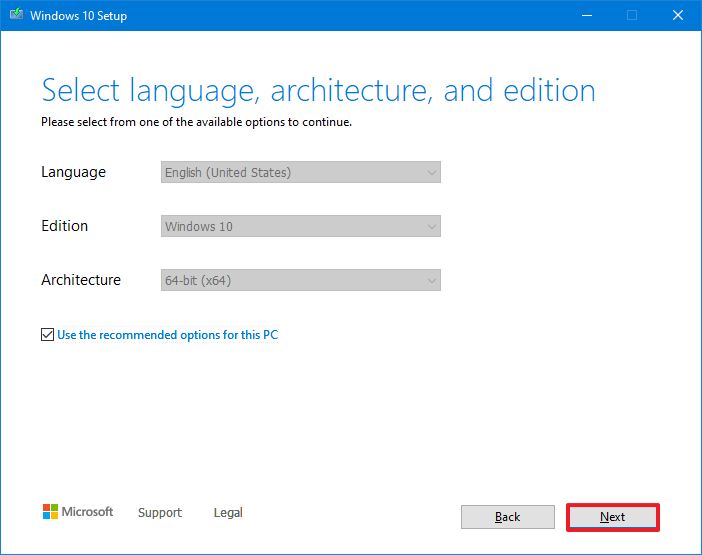
- Select the "Create installation media (USB flash drive, DVD, or ISO file) for another PC" option.
- Click the Next button.
- Click the Next button again.
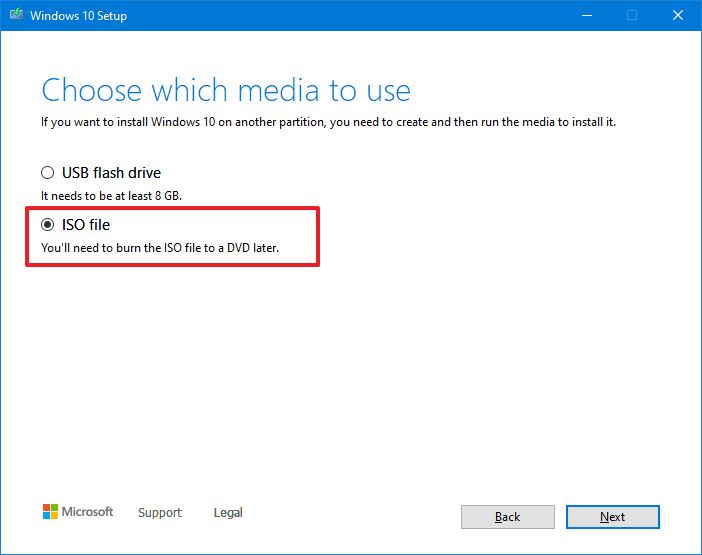
- Select the ISO file option.
- Click the Next button.
- Select the destination to store the Windows 10 ISO file.
- Click the Save button.
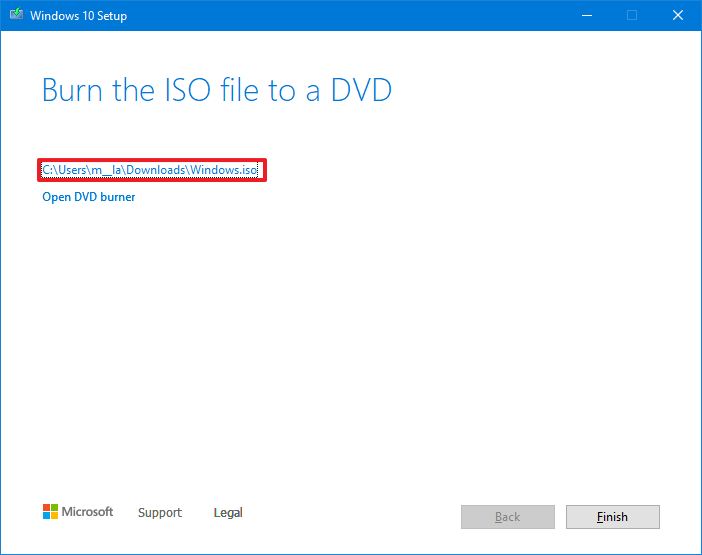
- Click the link to open the file location on File Explorer.
- Click the Finish button.
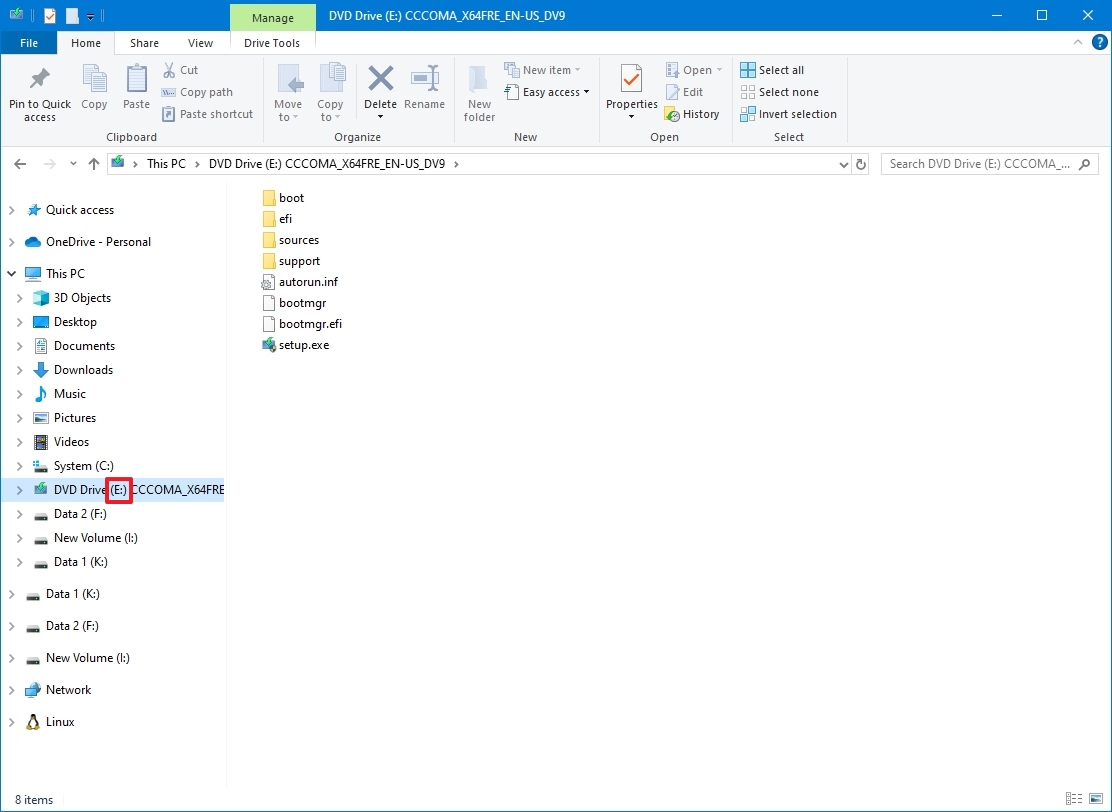
- Double-click the Windows.iso file to mount the image.
- Confirm the drive letter for the mount point of the ISO file under the "This PC" section.
After you complete the steps, continue with the DISM tool using the "Source" option to repair the image locally stored on the computer.
Fix Windows 10 recovery image
To run the Deployment Image Servicing and Management tool with an alternate source (install.wim) image, use these steps:
- Open Start.
- Search for Command Prompt, right-click the top result, and select the Run as administrator option.
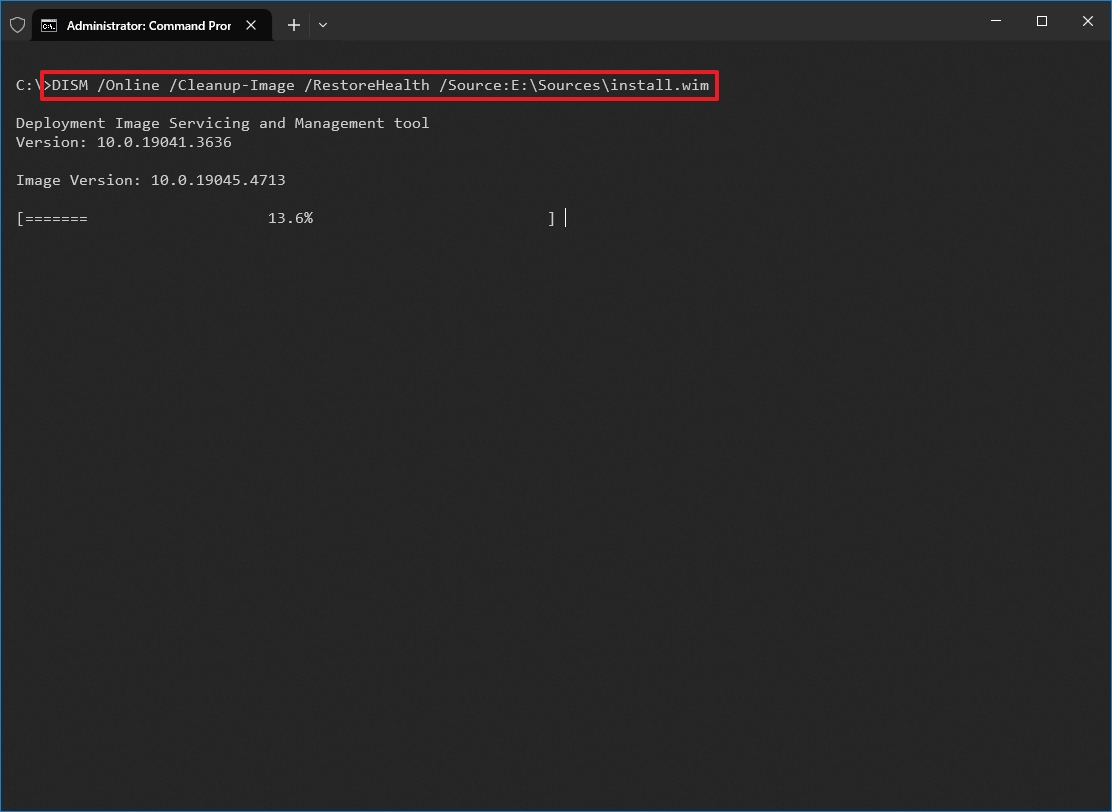
- Type the following command to repair the image and press Enter: DISM /Online /Cleanup-Image /RestoreHealth /Source:E:\Sources\install.wim
In the command, replace "E" with the mount point drive letter on File Explorer.
- (Optional) Type the following command to limit the use of Windows Update and press Enter: DISM /Online /Cleanup-Image /RestoreHealth /Source:G\Sources\install.wim /LimitAccess
- (Optional) Type the following variant of the previous command to accomplish the same task and press Enter: DISM /Online /Cleanup-Image /RestoreHealth /Source:wim:G:\Sources\install.wim:1 /LimitAccess
In the command, change "G:\Sources," for the path to the "install.wim" file.
Once you complete the steps, the command will scan and repair the problems using the "install.wim" file you specified as the alternative source.
Fix problems with DISM using ESD image
In case you have an encrypted "install.esd" image, it's possible to use that image to repair the damaged system files on Windows 10.
To use DISM with an "install.esd" image file as the source to repair Windows 10, use these steps:
- Open Start.
- Search for Command Prompt, right-click the top result, and select the Run as administrator option.
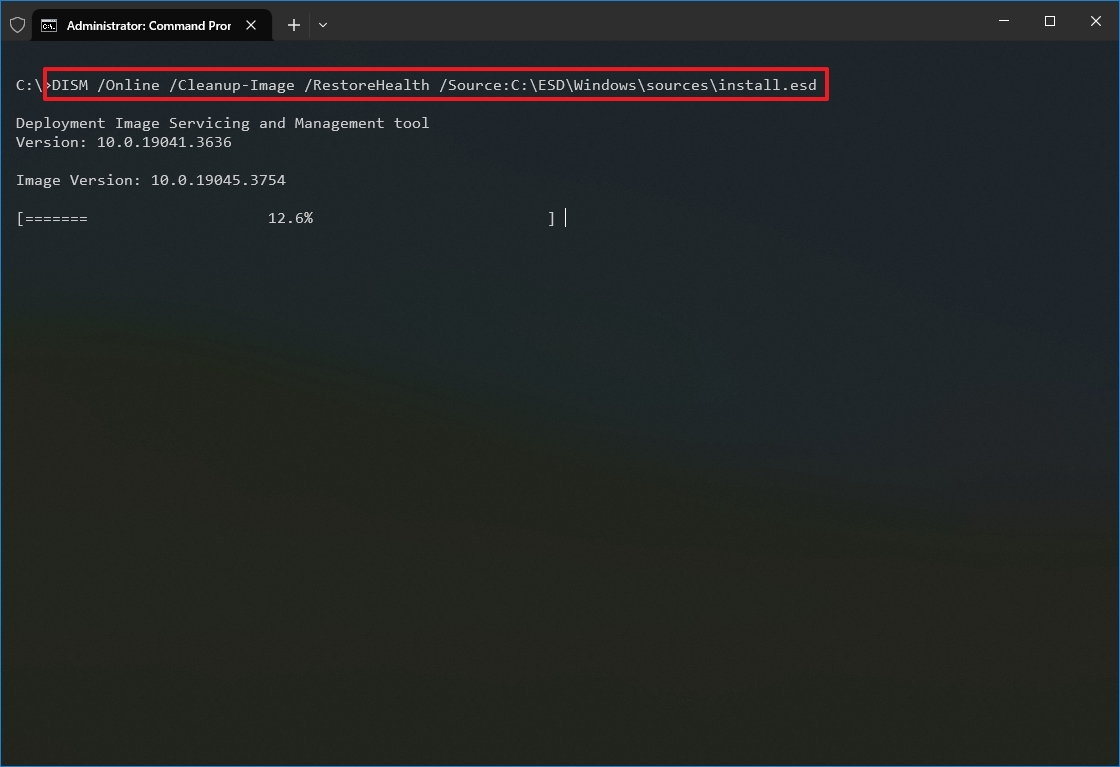
- Type the following command to repair the image with an "install.esd" file and press Enter: DISM /Online /Cleanup-Image /RestoreHealth /Source:C:\ESD\Windows\sources\install.esd
In the command, change "C:\ESD\Windows\sources" with the path to the location of the ".esd" file (if different).
- (Optional) Type the following command to limit the use of Windows Update and press Enter: DISM /Online /Cleanup-Image /RestoreHealth /Source:C:\ESD\Windows\sources\install.esd /LimitAccess
- (Optional) Type the following variant of the previous command to accomplish the same task and press Enter: DISM /Online /Cleanup-Image /RestoreHealth /Source:esd:C:\ESD\Windows\sources\install.esd:1 /LimitAccess
- (Optional) Type the following command to use an install.esd file located in another drive and press Enter: DISM /Online /Cleanup-Image /RestoreHealth /Source:E:\Sources\install.esd
In the command, replace "E:\Sources" with the path to the location of the "install.esd" file.
After you complete the steps, the tool will repair the damaged files using the files included in the "install.esd" image.
Troubleshooting common errors
If the RestoreHealth command fails, depending on the error, you can try these fixes:
- Error 0x800f081f: The source files could not be found – You can resolve this error by running the DISM /Online /Cleanup-Image /RestoreHealth /Source:wim:D:\sources\install.wim:1 /LimitAccess command.
- Error 87: The parameter is incorrect – Check the command for typos and re-try it. Commands are case-insensitive, but spaces must be exact.
- DISM stuck at 20%, 40%, or 80% – Restart the computer and try again. It can also help run the chkdsk C: /f /r /x command to check for disk errors. However, before taking any actions, consider that sometimes, if the command appears stuck, it could also mean the tool is busy repairing the system.
- Error 0x800f0906: DISM fails to download files – This error indicates that the tool is having issues downloading files from Windows Update. In this case, ensure your internet connection is stable. Try using a local Windows installation source using the above steps.
You can also examine the command-line tool log file located at C:\WINDOWS\Logs\DISM\dism.log to find clues to determine the exact problem.
If you're unable to get this DISM command working and the current setup has problems, you may want to consider resetting the computer to the factory default with the Reset this PC feature or by performing a clean installation of Windows 10.
How to run SFC to repair problems on Windows 10
The above steps are meant to repair issues with the system image, not the problems with the installation of Windows 10. After restoring the image to a healthy state, you can use the System File Checker command tool to repair the current setup of Windows 10.
To use the SFC command tool to repair system problems, use these steps:
- Open Start.
- Search for Command Prompt, right-click the top result, and select the Run as administrator option.
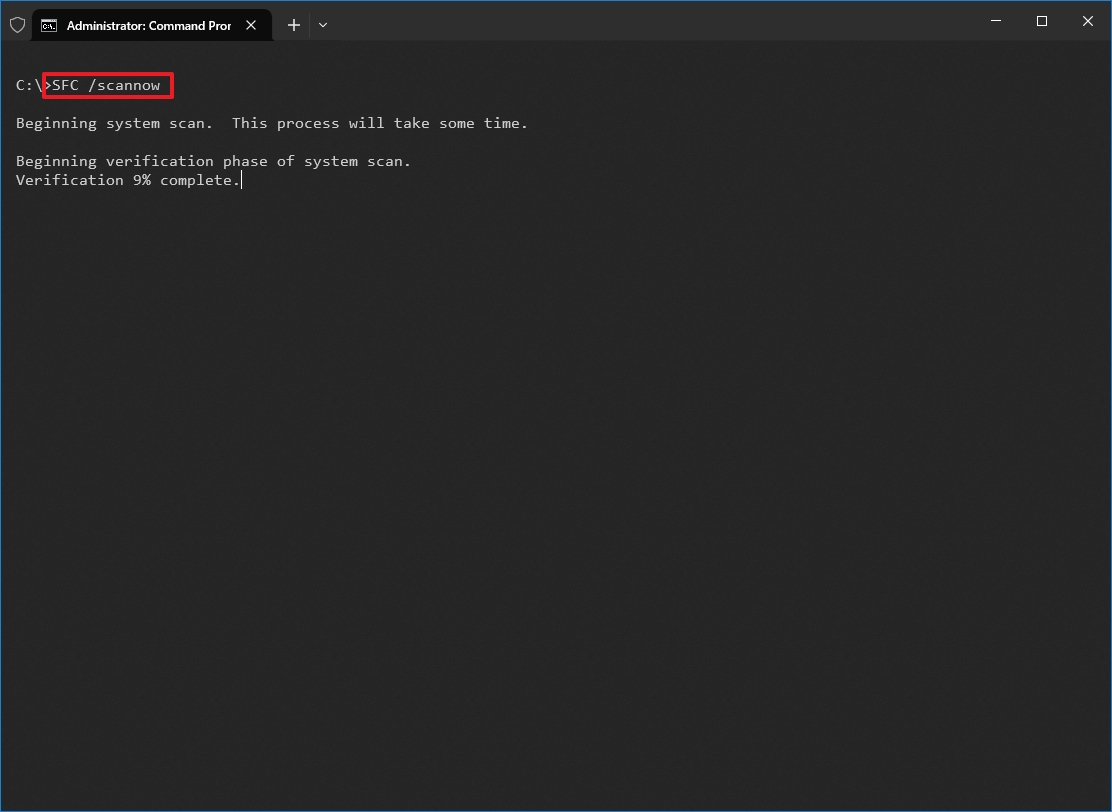
- Type the following command to repair the installation and press Enter: SFC /scannow
- Quick tip: If errors are found, you may want to run the command around three times to ensure that everything was fixed correctly.
Once you complete the steps, the System File Checker tool will repair the system files using the local image files, and the log files will be saved on "%windir%/Logs/CBS/CBS.log" and "%windir%\Logs\DISM\dism.log," which you can view to get more details about the process.
You can use these instructions to learn more ways to use the SFC tool to fix problems on Windows 10.
FAQs
These are common questions when using DISM on Windows 10.
How do I access Safe Mode on Windows 10?
To access Safe Mode, restart your PC while holding "Shift" and click "Restart." Then choose Troubleshoot > Advanced options > Startup Settings, and click "Restart". When the options appear, press 4 for Safe Mode, 5 for Safe Mode with Networking, or 6 for Safe Mode with Command Prompt.
How do I boot into Safe Mode on Windows 10?
You can boot into Safe Mode by going to Settings > Update & Security > Recovery and clicking "Restart now" under "Advanced startup." Then open Troubleshoot > Advanced options > Startup Settings, click "Restart," and select the Safe Mode option you need to continue.
What is DISM?
Deployment Image Servicing and Management (DISM) is a Microsoft command-line tool that repairs and services system images. Also, it’s commonly used to fix corrupted system files.
What is the DISM Host Servicing Process?
The DISM Host Servicing Process (DismHost.exe) is a background process that runs when you use the Deployment Image Servicing and Management tool on your computer.
Can I run DISM in Safe Mode on Windows 10?
Yes, you can run DISM in Safe Mode, but its capabilities are limited. Typically, you want to run this command tool in normal mode or while in the Windows Recovery Environment.
Does DISM delete files?
No, DISM does not delete your files. It only checks and repairs system files by replacing damaged or missing ones.
How do I run DISM on Windows 10?
To run DISM on your computer, open Start, search, and launch Command Prompt (admin), and then run the DISM /Online /Cleanup-Image /RestoreHealth command to scan and repair your installation of Windows 10.
How long does DISM RestoreHealth take?
The process can take anywhere from several minutes to over an hour, depending on your system speed and the level of corruption. It's always important to let it finish.
How do I run DISM from the recovery console?
To run the Deployment Image Servicing and Management tool from the Windows Recovery Environment, open Command Prompt from Troubleshoot > Advanced options.
While in Command Prompt, run the DISM /Image:C:\ /Cleanup-Image /RestoreHealth command.
In the command, remember to replace "C" with the drive letter that corresponds to the setup letter. You can always find this information using the List Volume command in DiskPart.
More resources
For more helpful articles, coverage, and answers to common questions about Windows 10 and Windows 11, visit the following resources:

Mauro Huculak has been a Windows How-To Expert contributor for WindowsCentral.com for nearly a decade and has over 22 years of combined experience in IT and technical writing. He holds various professional certifications from Microsoft, Cisco, VMware, and CompTIA and has been recognized as a Microsoft MVP for many years.
You must confirm your public display name before commenting
Please logout and then login again, you will then be prompted to enter your display name.
