How to use Remote Desktop to run desktop (win32) apps from outside the Store on Windows 10 S
Did you get a Surface Laptop and don't want to ditch Windows 10 S, but you need to run win32 apps? Here's one way to use desktop apps on Windows 10 S.
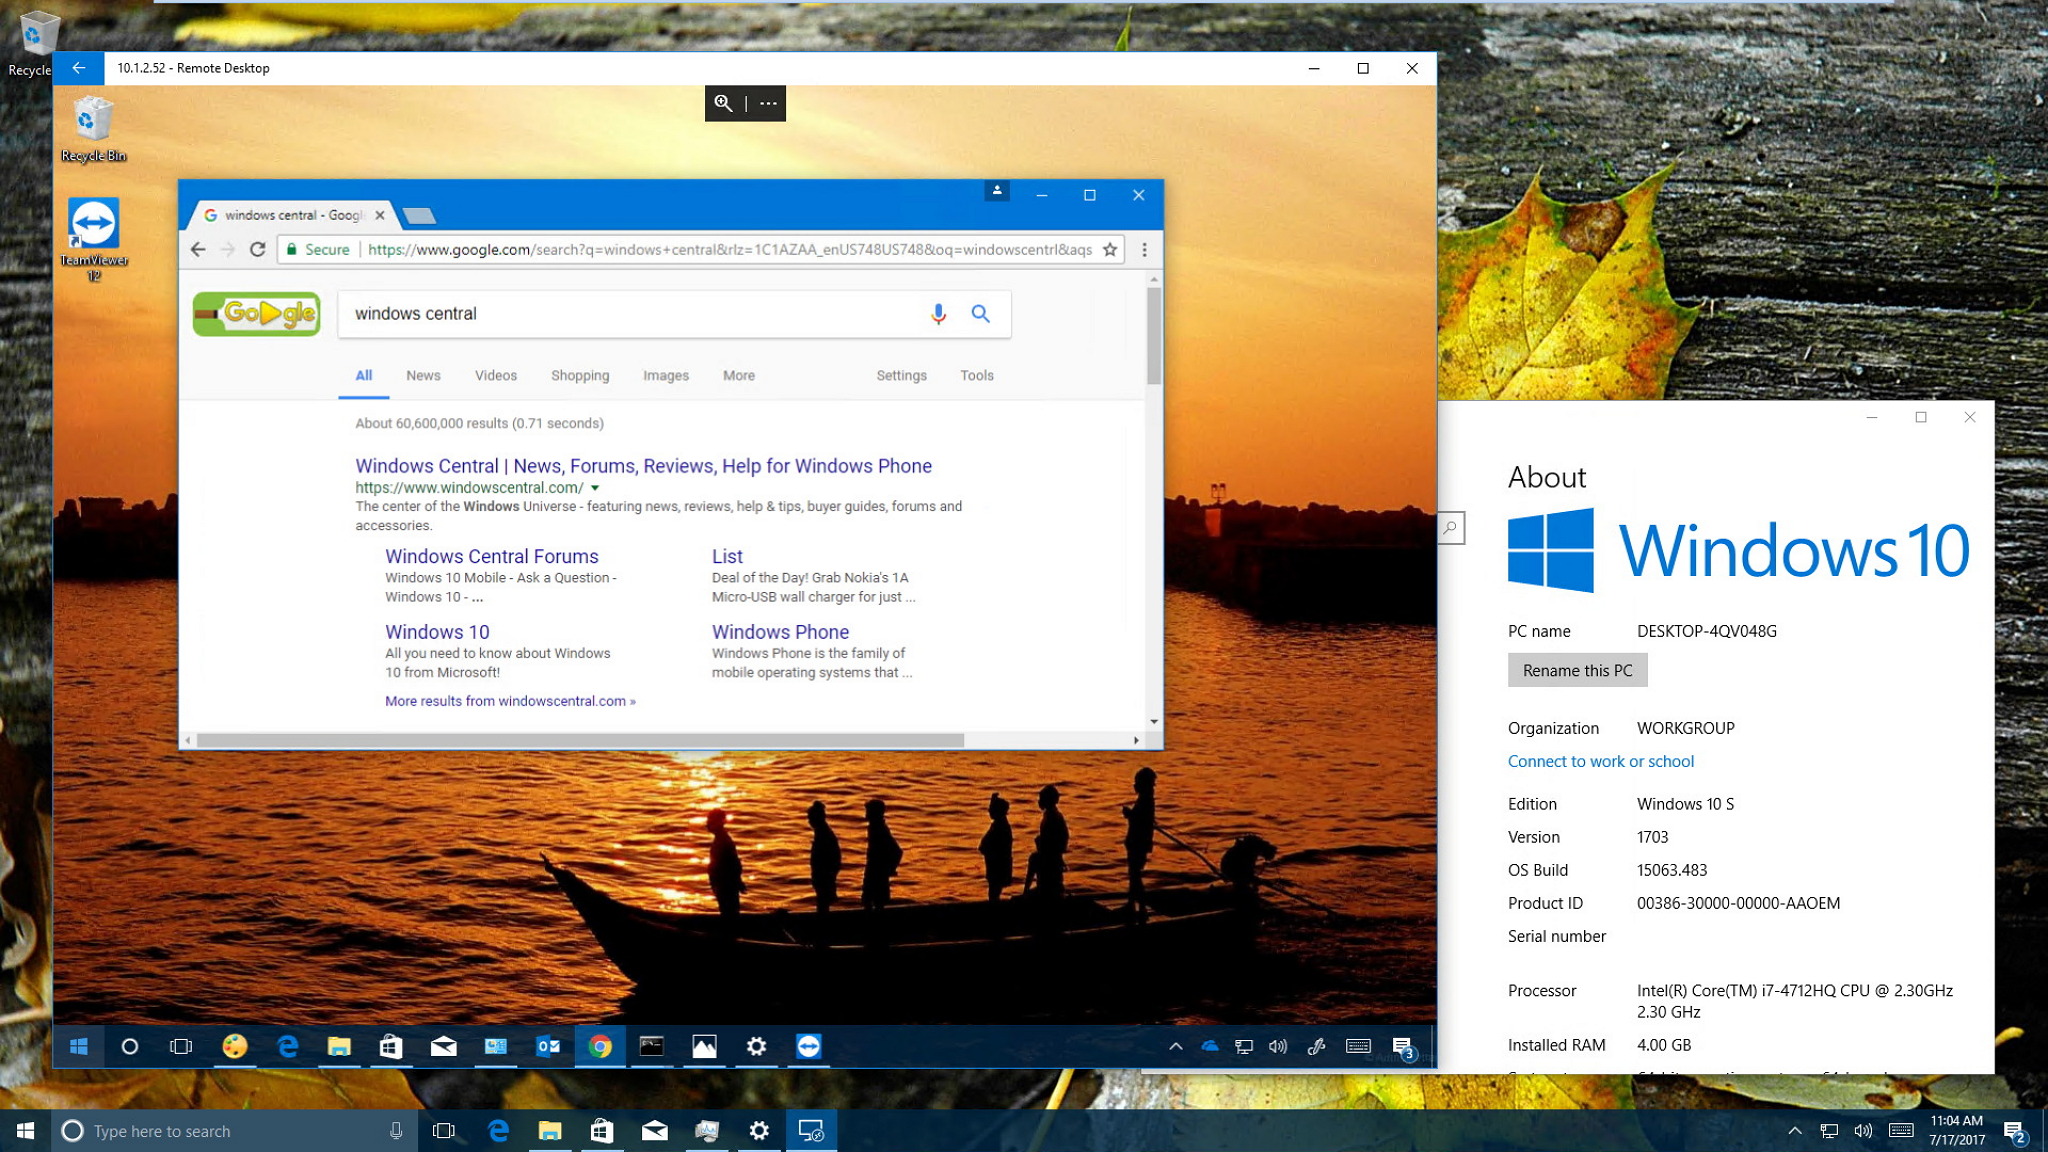
Windows 10 S is technically Windows 10 Pro with a special configuration that aims to improve performance and security while retaining the same familiar experience. However, it can only run apps available in the Windows Store. And the fact that you can't run executable files makes it impossible to install desktop programs that you download from the internet.
Although a more restricted version of Windows seems like a good idea for non-technical users, the stock of apps in the Windows Store is still light, and some apps, such as those converted using Windows Desktop Bridge do not always work.
Of course, you can switch to Windows 10 Pro, but if you want to keep your device secure and performing at top speeds, as an alternative option, you can set up remote desktop on a second machine to use non-Store apps on your Windows 10 S device.
In this Windows 10 guide, we walk you through the steps to use desktop (win32) applications on your Surface Laptop running Windows 10 S by setting up a remote connection to a device running Windows 10 Pro or Home.
- How to use non-Store apps on Windows 10 S using a remote connection to Windows 10 Pro
- How to use non-Store apps on Windows 10 S using a remote connection to Windows 10 Home
How to use non-Store apps on Windows 10 S using a remote connection to Windows 10 Pro
Although Windows 10 S limits you to use only apps from the Store, you can still use traditional desktop apps using Remote Desktop on Windows 10 Pro (Windows 8.1 Pro or Windows 7 Professional).
How to enable Remote Desktop on Windows 10 Pro
If you're looking to access another computer on a local network, you only need to make sure that Remote Desktop is enabled.
- Open Control Panel.
- Click on System and Security.
- Click on Allow remote access.
- Under Remote Desktop make sure to select Allow remote connections to this computer.

- Click OK.
- Click Apply.
- Click OK.
After you've completed the steps, your Windows 10 Pro device will allow remote desktop connections from other devices, including those running Windows 10 S.
Get the Windows Central Newsletter
All the latest news, reviews, and guides for Windows and Xbox diehards.
If you are accessing desktop programs through the internet, you'll need to perform additional steps, including setting a static IP address on your computer, figuring out which is your public IP address, and configuring port forwarding on your router to allow remote connections. (You can refer to our set up remote access through the internet guide for more details.)
How to disable sleep and hibernation
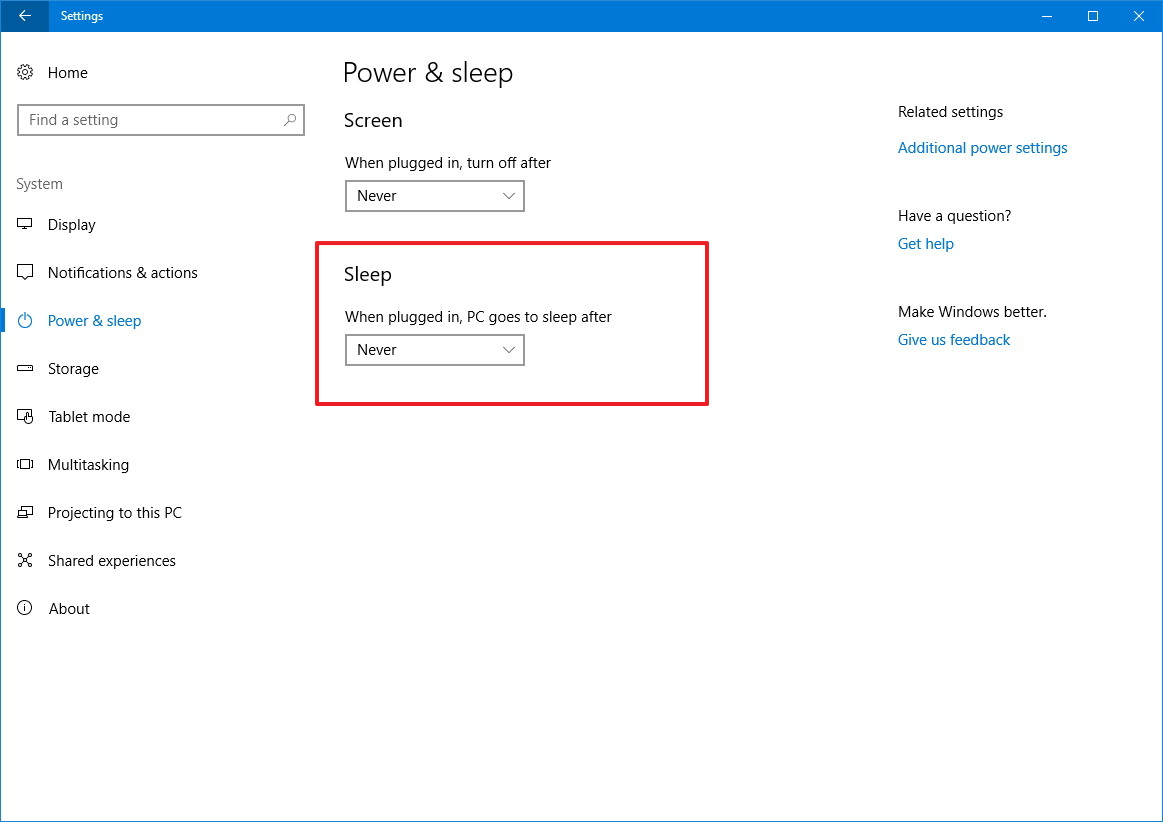
Additionally, you need to make sure to keep your computer awake to establish a remote session. You can do this by disabling sleep and hibernation on Windows 10.
Disabling sleep
- Open Settings.
- Click on System.
- Click on Power & sleep.
- Under "Sleep," select Never from the drop-down menu.
Disabling hibernation
- Open Start.
- Search for Command Prompt, right-click the result, and click select Run as administrator.
- Type the following command and press Enter:
powercfg.exe /h off

Identifying your PC's IP address and name
In order to connect remotely to your machine hosting the non-Store applications, you need to know the device name or IP address.
There is a number of ways to figure out the name and IP address of your machine, but you can quickly get the required information using these steps:
- Use the Windows key + R keyboard shortcut to open the Run command.
- Type cmd and click OK.
- In Command Prompt, type the following command to get the computer name and press Enter:
hostname - Type the following command to get the computer IP address and press Enter:
ipconfig

How to set up a Remote Desktop connection on Windows 10 S
There are at least two ways to start a Remote Desktop connection on Windows 10 S. You can use the built-in Remote Desktop Connection tool, or you can install the Remote Desktop app from the Store.
Here we show you the steps to access another device remotely using the Remote Desktop app because it's easier for non-technical users.
Installing Remote Desktop app
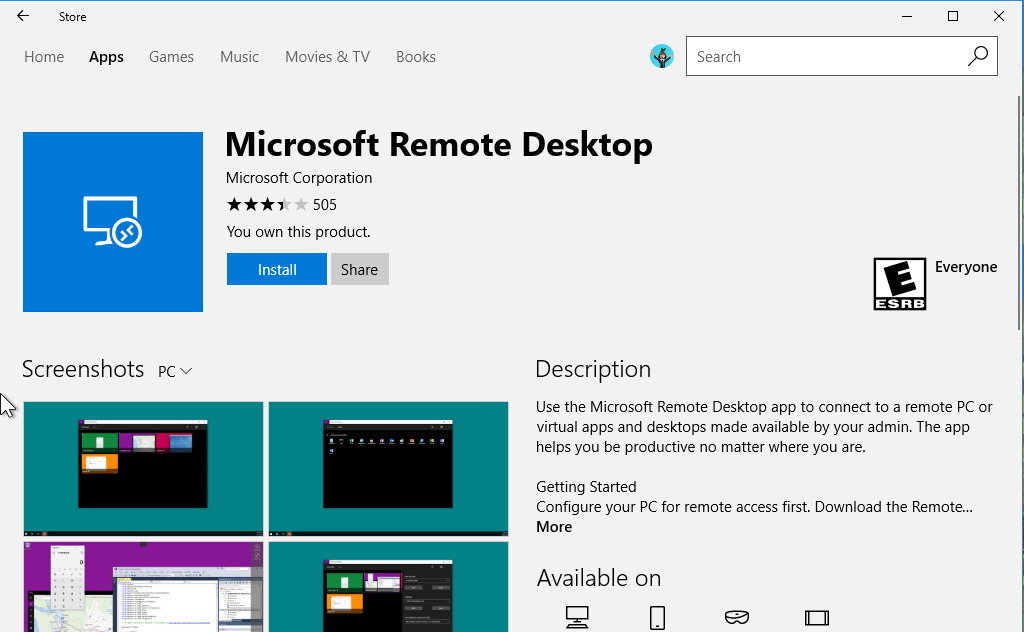
- Open the Windows Store.
- Search for Microsoft Remote Desktop.
- Click the Install button.
Configuring a Remote Desktop connection
After the installation, use these steps to set up a new remote connection.
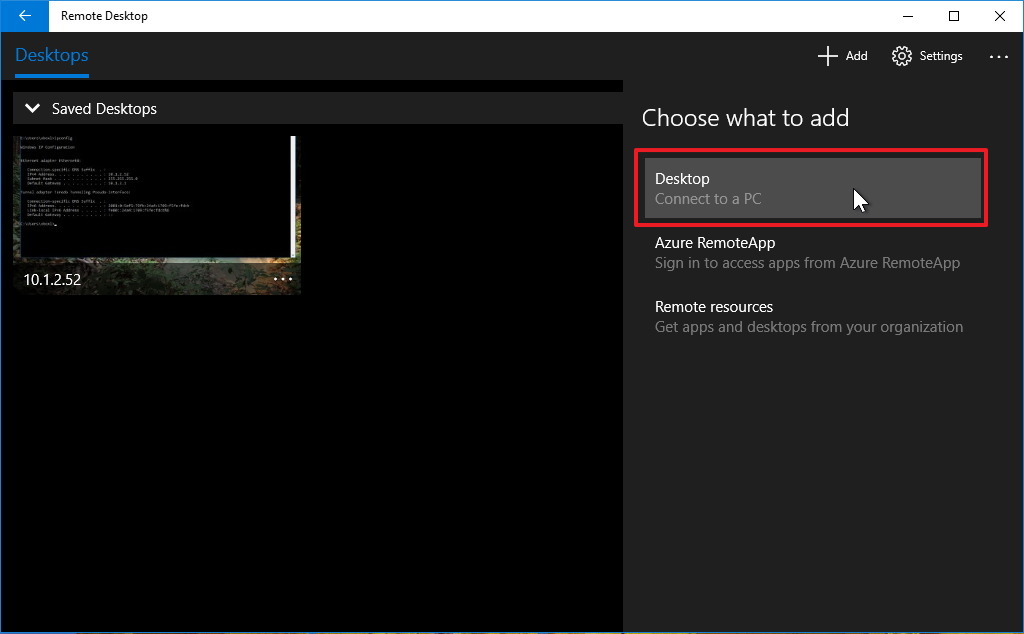
- Open Remote Desktop.
- Click the + Add button from the top-right corner.
- Click on the Desktop option.
- Type the IP address of the remote computer.
- Note: You can also use your computer's name, but if you don't have an environment with a DNS server correctly configured, Windows 10 may not be able to resolve the name to the correct IP address to contact the remote host.
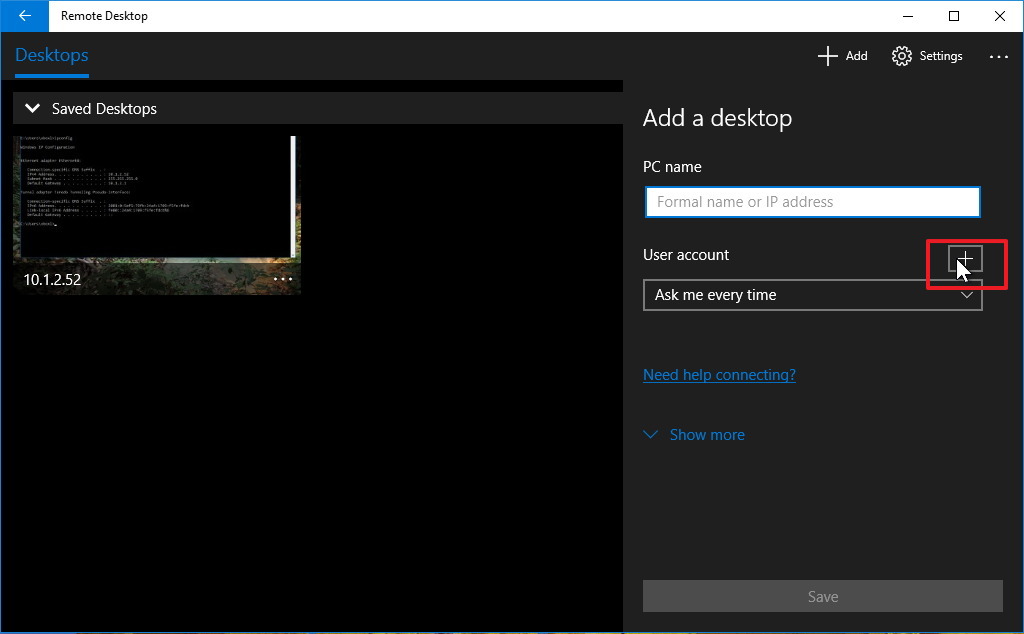
- On "User account," click the + button.
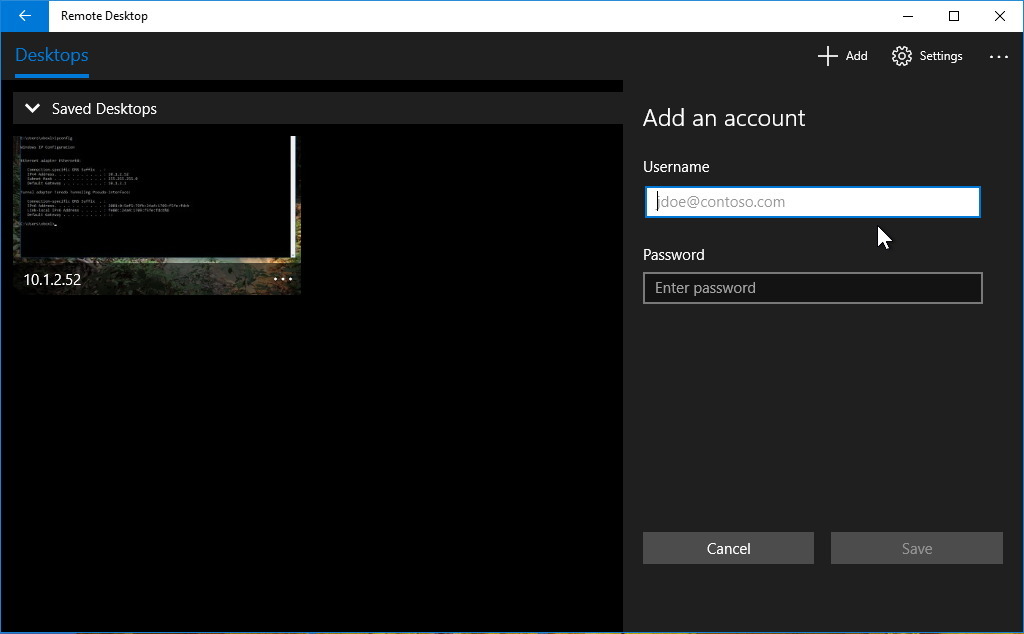
- Type your username, or email address if you're using a Microsoft account, and your password.
- Click the Save button.
- Click the Save button again.
Establishing a Remote Desktop session
- On the right side, under Saved Desktops, click the computer tile to start a connection.
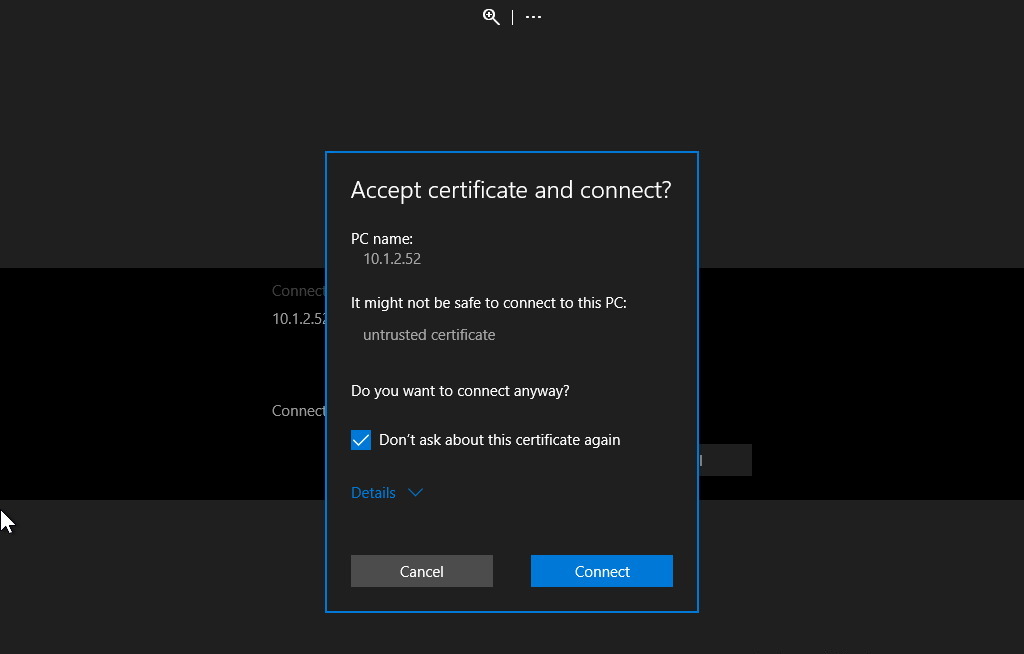
- If you're prompted to accept a certificate, check the Don't ask about this certificate again option.
- Click the Connect button.
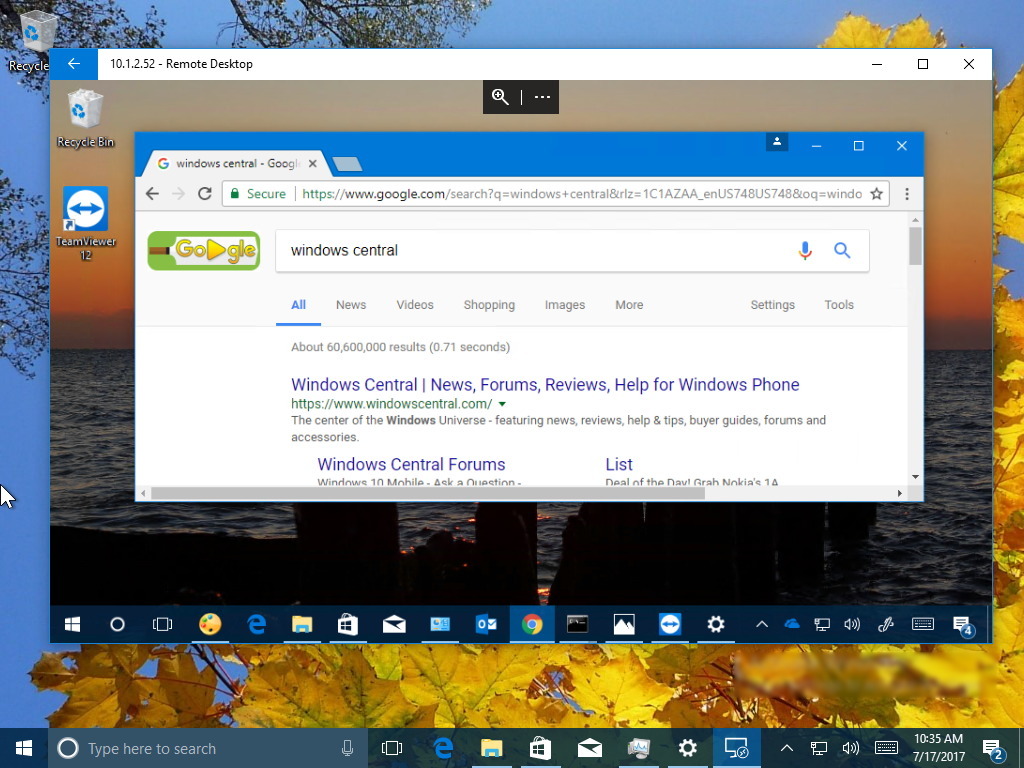
Once you complete these steps, you'll connect to your remote computer running Windows 10 Pro, and you can then start using your traditional desktop (win32) applications as you would normally on any device.
How to use non-Store apps on Windows 10 S using a remote connection to Windows 10 Home
Remote Desktop isn't available on Windows 10 Home, but you can still access non-Store apps from your Windows 10 S device using third-party tools.
While there is a number of remote desktop software options available, for this guide, we'll be using TeamViewer because is easy to set up, and it has a remote desktop client app in the Store, which you can install on Windows 10 S.
Quick Tip: If TeamViewer isn't for you, when choosing another solution, make sure it offers a client that you can download from the Store, or at least it provides a way to connect using Microsoft Edge on Windows 10 S.
How to configure remote desktop on Windows 10 Home
Setting up TeamViewer on Windows 10 Home
- Download TeamViewer.
- Double-click the TeamViewer_Setup.exe file to start the installation.
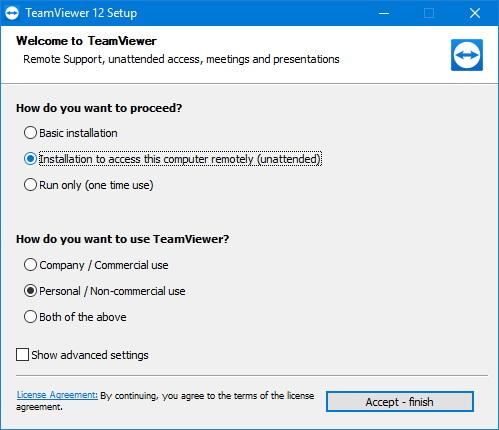
- Select the Installation to access this computer remotely (unattended) option.
- Select the Personal / Non-commercial use option.
- Click the Accept - finish button.
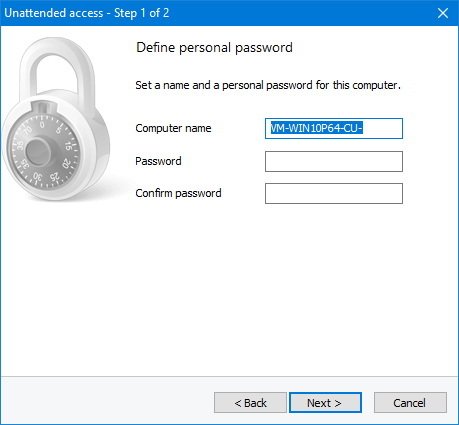
- After the installation, the unattended access setup will appear, click Next.
- Set the password to access your computer.
- Click Next.
- If you don't already have an account, select Create a free TeamViewer account and enter the required information. Otherwise, select I already have a TeamViewer account and complete the information needed.
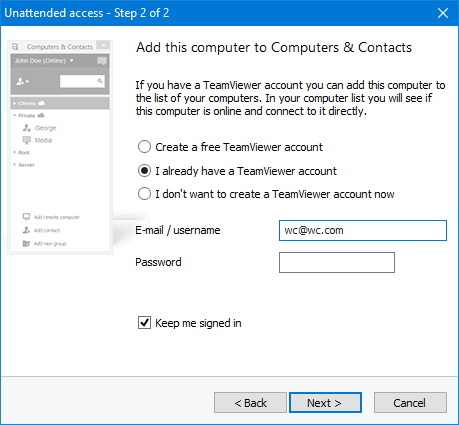
- Click Next.
- Click Finish.
- Note: You may be prompted to add your machine to the list of trusted devices to connect. If you don't see the prompt and you can't connect, login to your TeamViewer account and manually add the device.
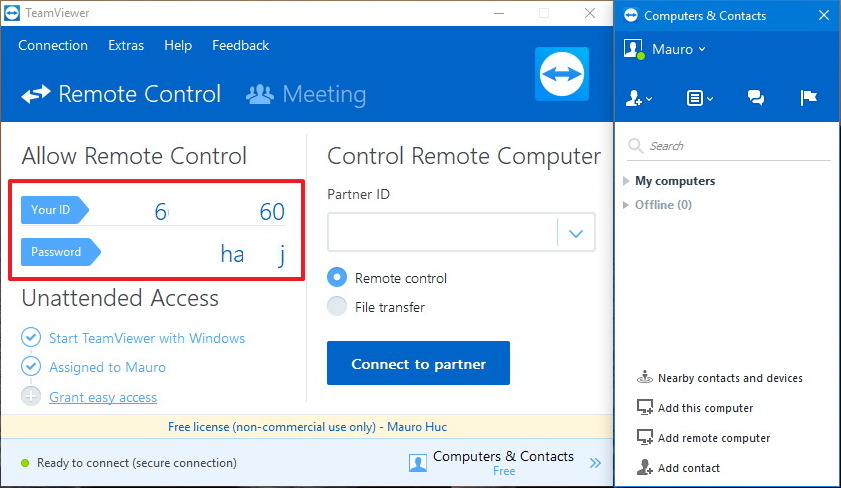
After completing the steps note your ID number and password, which you'll need to configure a remote session using your Windows 10 S device.
How to set up a remote desktop connection on Windows 10 S
Setting up TeamViewer on Windows 10 S
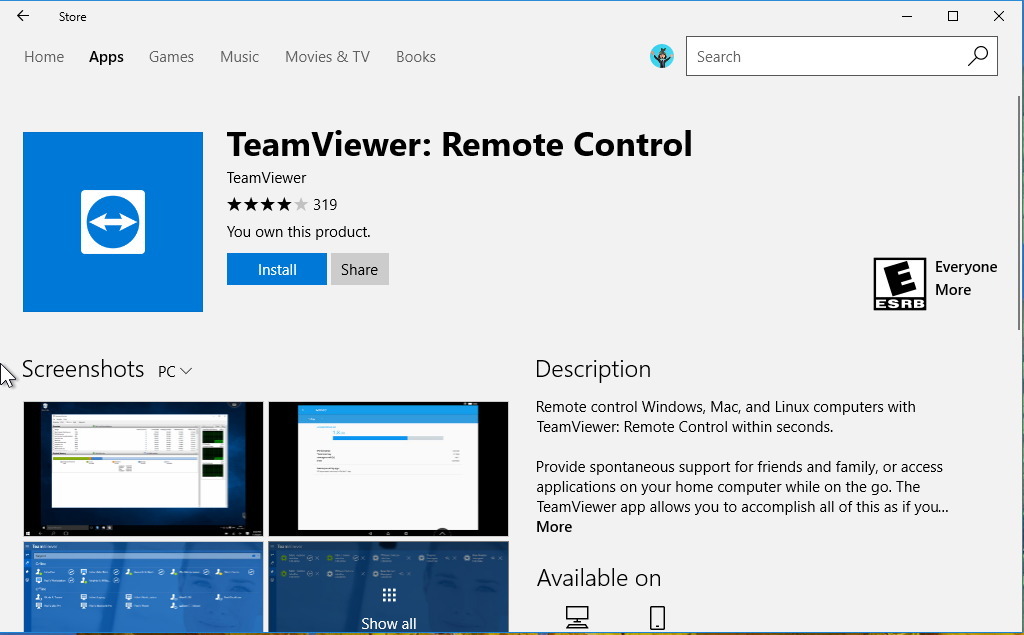
- Open the Windows Store.
- Search for TeamViewer: Remote Control.
- Click the Install button.
Establishing a remote connection to Windows 10 Home
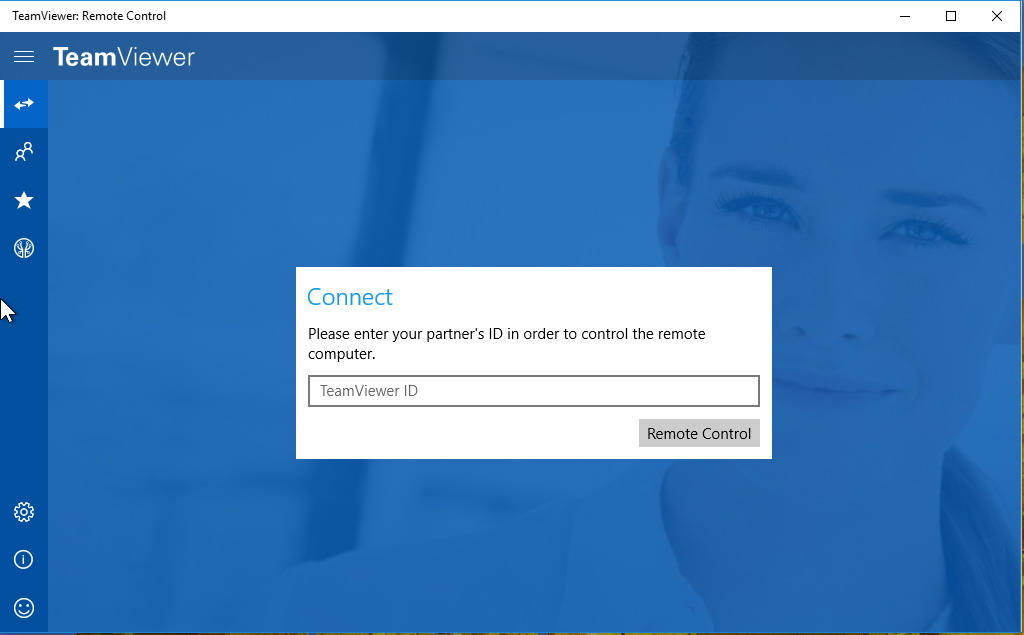
- Open TeamViewer: Remote Control.
- In the "Connect" box, type your nine-digit TeamViewer identification number.
- Click the Remote Control button.
- In the "Authentication" box, type your password.
- Click OK to connect.
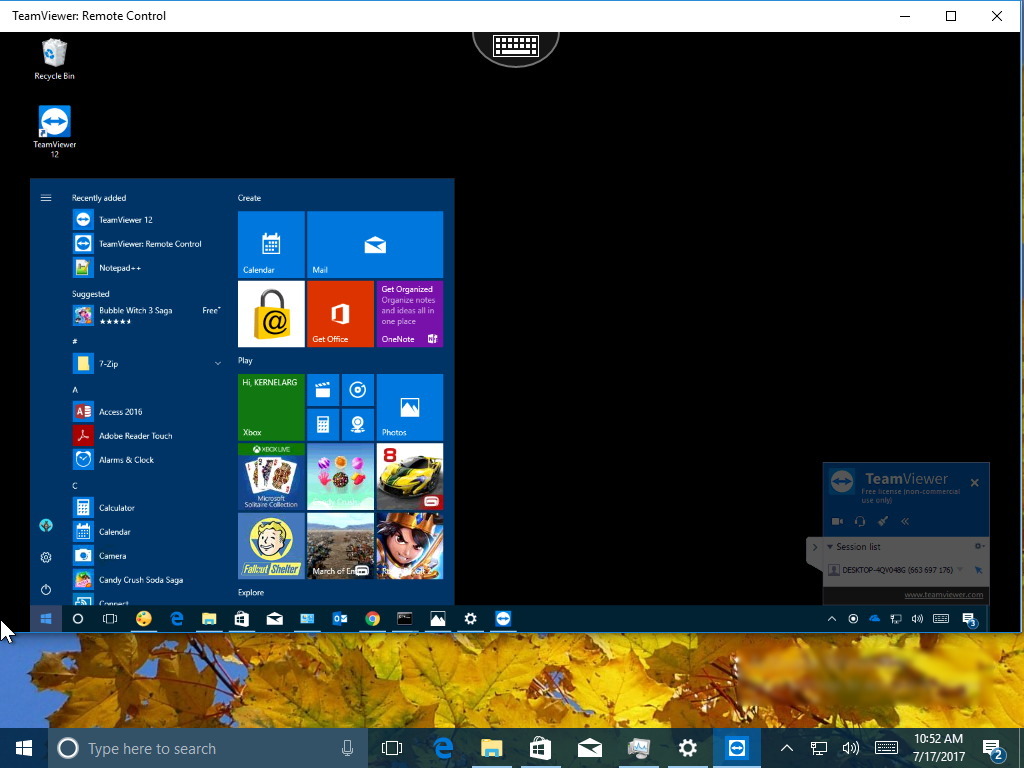
Once you complete these steps, you'll be connected to your Windows 10 Home computer, and you can start using your traditional desktop (win32) applications as you normally would.
Wrapping things up
In this guide, we outlined two different ways you can use non-Store apps on Windows 10 S, but if you find them too challenging, you can always switch to Windows 10 Pro quite easily using these instructions.
While we're using TeamViewer to bring remote desktop capabilities to Windows 10 Home, remember that you can also use this tool on any major release of Windows. However, on Windows 10 Pro, I personally prefer Microsoft's Remote Desktop (even though it requires extra steps to configure), because TeamViewer is a paid service, and while you can use it for free, it'll nag you to get the paid version. And you can't use it without an internet connection.
Also, remember that if you're only planning to use desktop apps in a local network, you can enable Project to this PC on devices with Miracast support and use the Connect app on Windows 10 S as an alternative remote connection solution.
It should be noted that the experience using Remote Desktop or TeamViewer will vary depending on the network connection quality.
More Windows 10 resources
For more helpful articles, coverage, and answers to common questions about Windows 10, visit the following resources:
- Windows 10 on Windows Central – All you need to know
- Windows 10 help, tips, and tricks
- Windows 10 forums on Windows Central
Mauro Huculak has been a Windows How-To Expert contributor for WindowsCentral.com for nearly a decade and has over 15 years of experience writing comprehensive guides. He also has an IT background and has achieved different professional certifications from Microsoft, Cisco, VMware, and CompTIA. He has been recognized as a Microsoft MVP for many years.

