How to upgrade an unsupported computer to Windows 11
If you use this Microsoft workaround, you can still install Windows 11 on an unsupported computer, as support for Windows 10 ends.
On October 14, 2025, support for Windows 10 will end. If you have a computer that doesn't meet the minimum hardware requirements to upgrade to Windows 11, you can still switch to a different version of the operating system by creating custom installation media to bypass the requirements.
It's worth noting that running Windows 11 on incompatible hardware is strongly discouraged. Microsoft does not provide support for devices that don't meet the minimum specifications, and while updates might still be accessible, their functionality isn't guaranteed.
Furthermore, running the operating system without essential security features like Trusted Platform Module (TPM) 2.0 and Secure Boot can expose the system to security risks. Microsoft has reiterated its commitment to these requirements, emphasizing that TPM 2.0 is "non-negotiable" for Windows 11, reinforcing its impact on security hardening and long-term system integrity.
In this how-to guide, I'll explain how to upgrade a Windows 10 computer that doesn't meet the minimum system requirements.
Warning: Although the clean installation is the only method that deletes everything on the computer, the in-place upgrade process can always go wrong. As a result, it's critical to create a full backup of your system before proceeding.
These instructions have been updated to ensure accuracy and reflect changes to the process in the operating system. Additionally, it's important to note that installing Windows 11 on unsupported hardware doesn't bring the device to a supported state. However, it'll continue to receive updates to help you stay more secure than if you hadn't upgraded and remained on a discontinued operating system.
How to upgrade unsupported device to Windows 11
Upgrading a device that does not meet the minimum requirements for Windows 11 is a three-step process. First, you need to download the installation files. Then, you need to use a third-party tool, such as Rufus, to create custom installation media. Finally, you must proceed with either an in-place upgrade or a clean installation.
If you choose to perform an in-place upgrade, you will be able to keep your files and apps. On the other hand, if you choose a clean installation, the process will delete everything on the computer, and a fresh copy of the operating system will be installed.
All the latest news, reviews, and guides for Windows and Xbox diehards.
Since you'll likely be upgrading due to the end of support for Windows 10, I recommend using a clean installation to minimize the number of issues you may encounter during and after the upgrade.
Download Windows 11 media files
To download and create a Windows 11 USB installation media, use these steps:
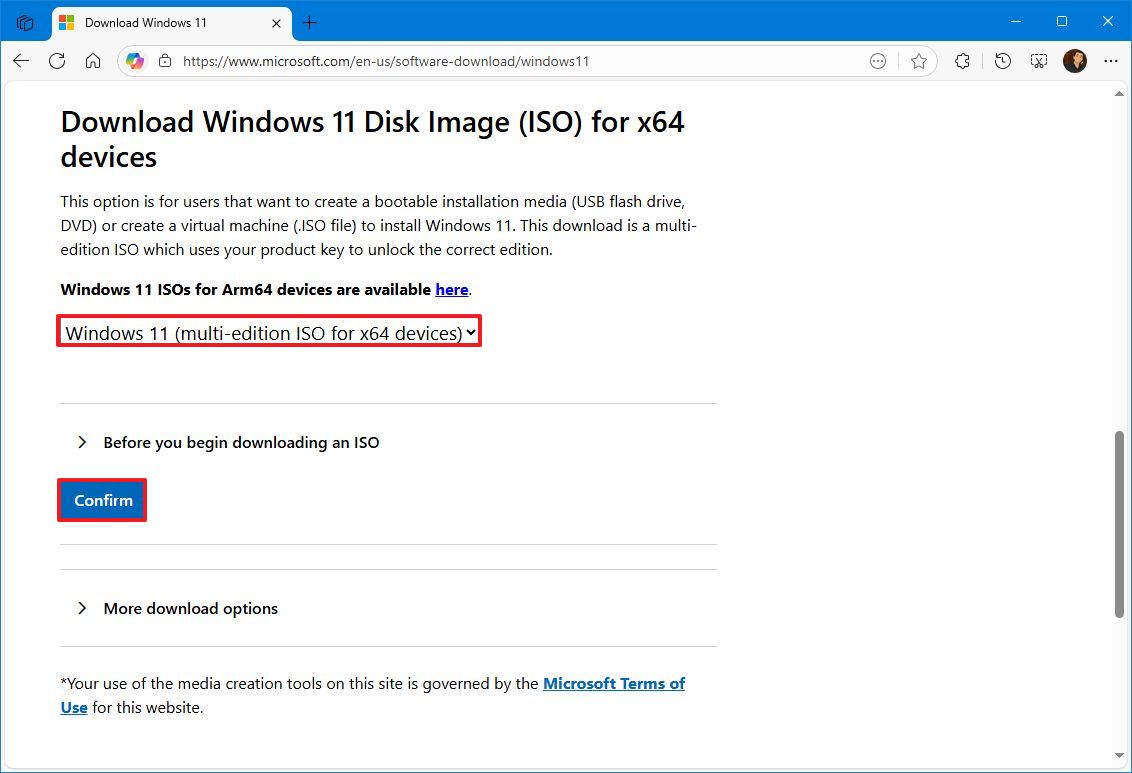
- Open the Microsoft download website.
- Select the only Windows 11 option.
- Click the Confirm button under the "Download Windows 11 Disk Image (ISO) for x64 devices" section to save the file to your device.
- Choose the installation language.
- Click the Confirm button.
- Click the "64-bit Download" button.
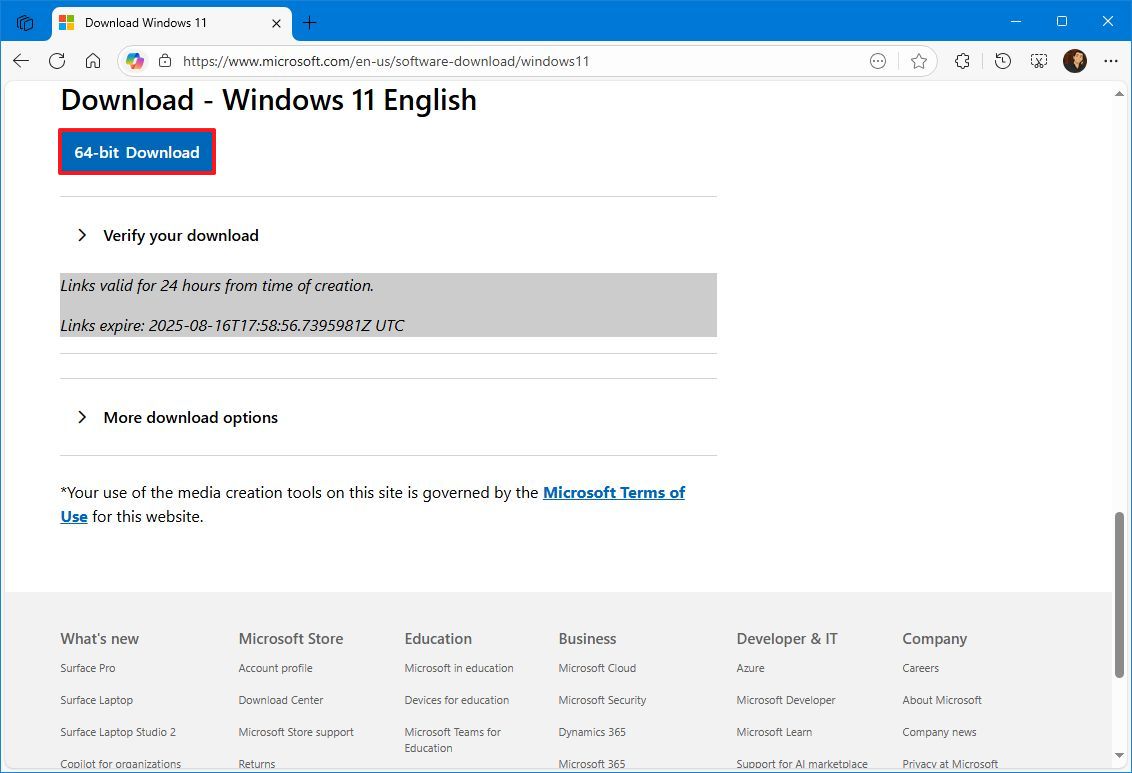
Once you complete the steps, continue with the instructions below to edit the Registry to bypass the Windows 11 system requirements.
Create Windows 11 USB installer
To create a USB bootable media, connect a flash drive of at least 8GB of space and use these steps:
- Open the Rufus download page.
- Click the Rufus-4.x.exe (standard) option and save the file on your computer under the "Download" section.
- Double-click the Rufus-x.x.exe file to launch the tool.
- Select the USB flash drive under the "Device" section.
- Click the Select button on the right side under the "Boot selection" section.
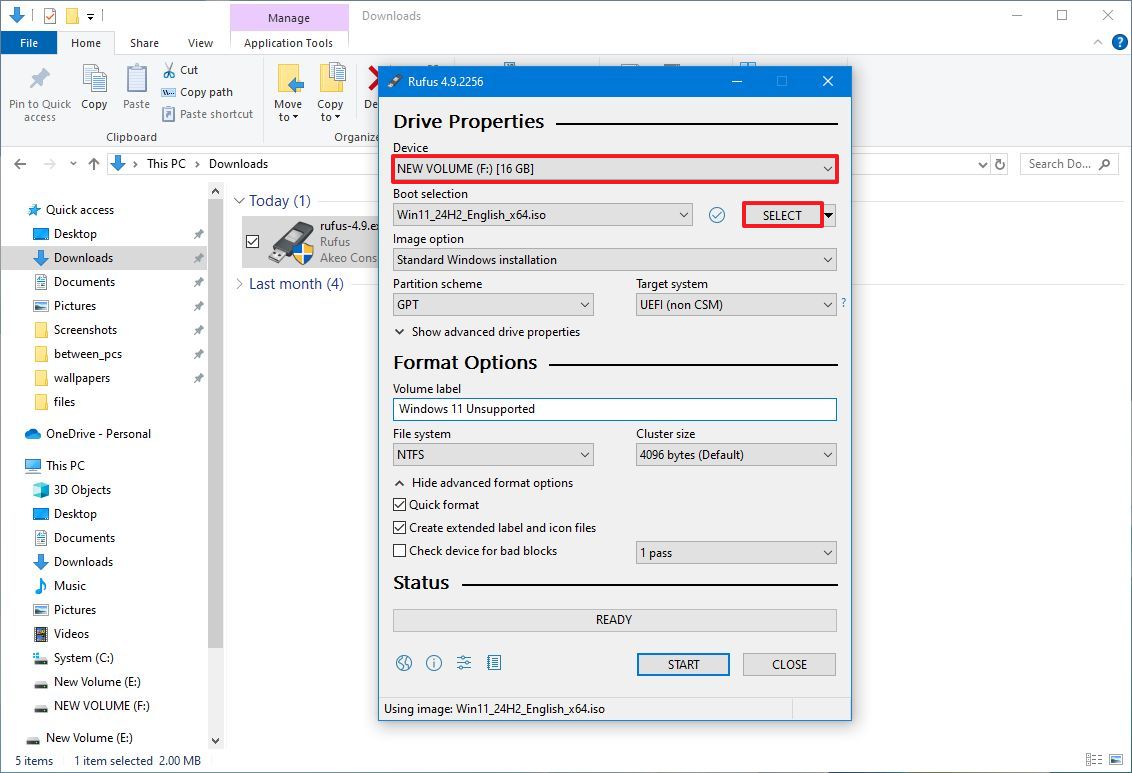
- Select the Windows 11 ISO file from the folder location.
- Click the Open button.
- Select the "Standard Windows Installation" option in the "Image option" setting.
- Select the GPT option in the "Partition scheme" setting.
- Select the "UEFI (non CSM)" option in the "Target system" setting.
- Under the "Show Advanced drive properties" section, do not change the default settings (unless you know what you are doing).
- Under the "Volume label" field, confirm a name for the bootable media — for example, "Windows 11 Unsupported."
- In the "File system" and "Cluster size" options, do not change the default settings.
- Click the "Show advanced format options" button.
- Check the Quick format option.
- Check the "Create extended label and icon files" option.
- Click the Start button.
- (Optional) Check the "Remove requirement for 4GB+RAM, Secure Boot and TPM 2.0" option to create a USB flash drive for unsupported devices.
- (Optional) Check the "Remove requirement for an online Microsoft account" option to set up an installation with a local account.
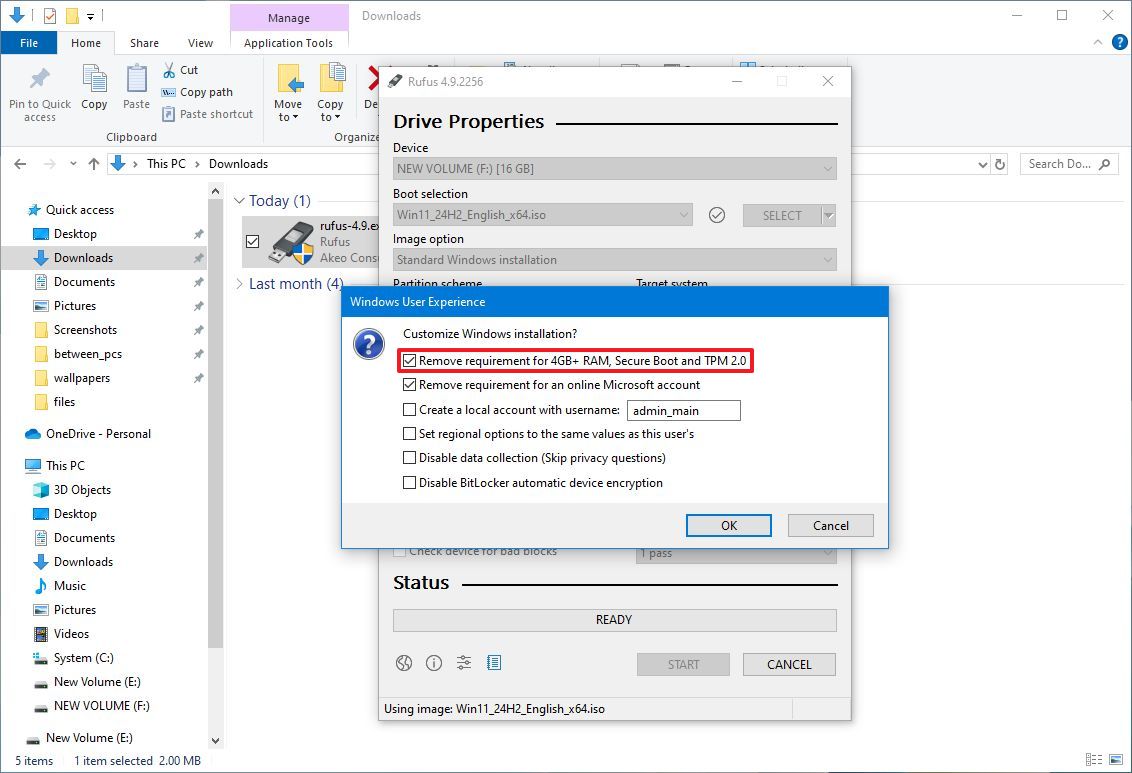
- Quick note: Rufus allows you to customize several other settings as part of the "Windows User Experience" settings, including the ability to set up an installation without a Microsoft account, create a local account, change the regional settings, and disable data collection and BitLocker.
- Click the OK button to confirm.
- Click the Close button.
After you complete the steps, you'll be able to install the newer version of the operating system to continue receiving updates after Windows 10 support ends.
Windows 11 in-place upgrade
To upgrade an unsupported Windows 10 device to 11, connect the USB bootable media, and use these steps:
- Open File Explorer.
- Click on This PC from the left pane.
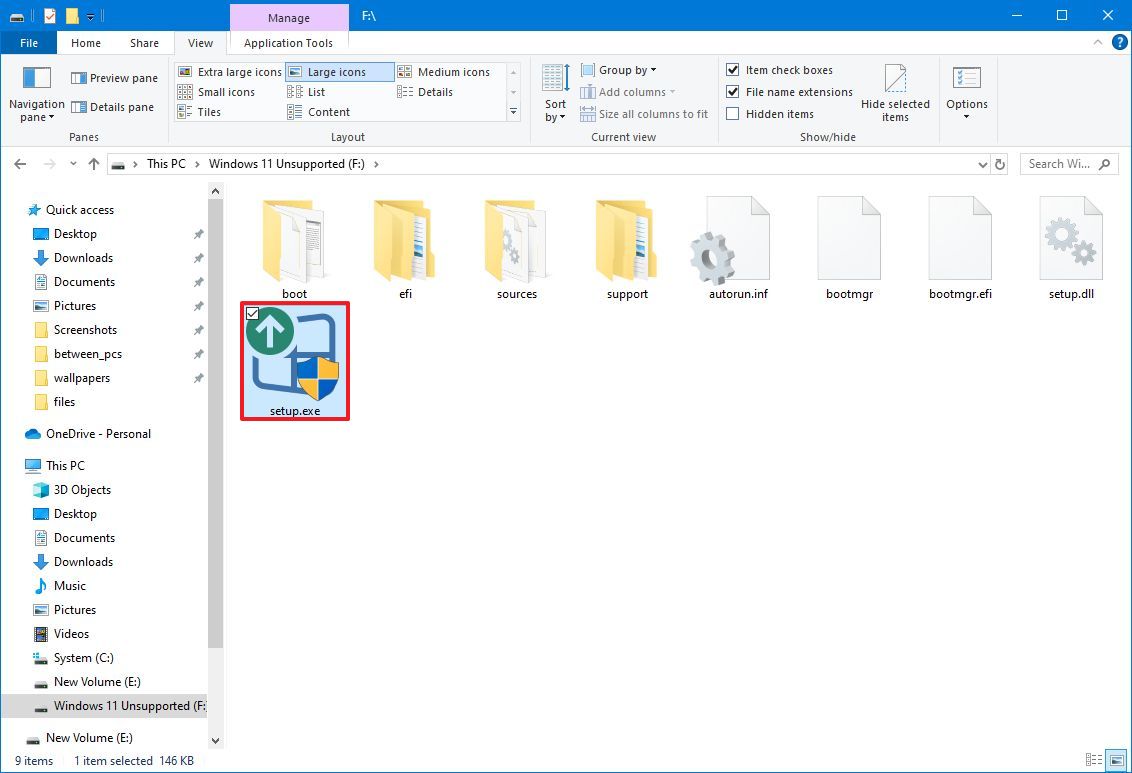
- Open the USB installation media under the "Devices and drives" section.
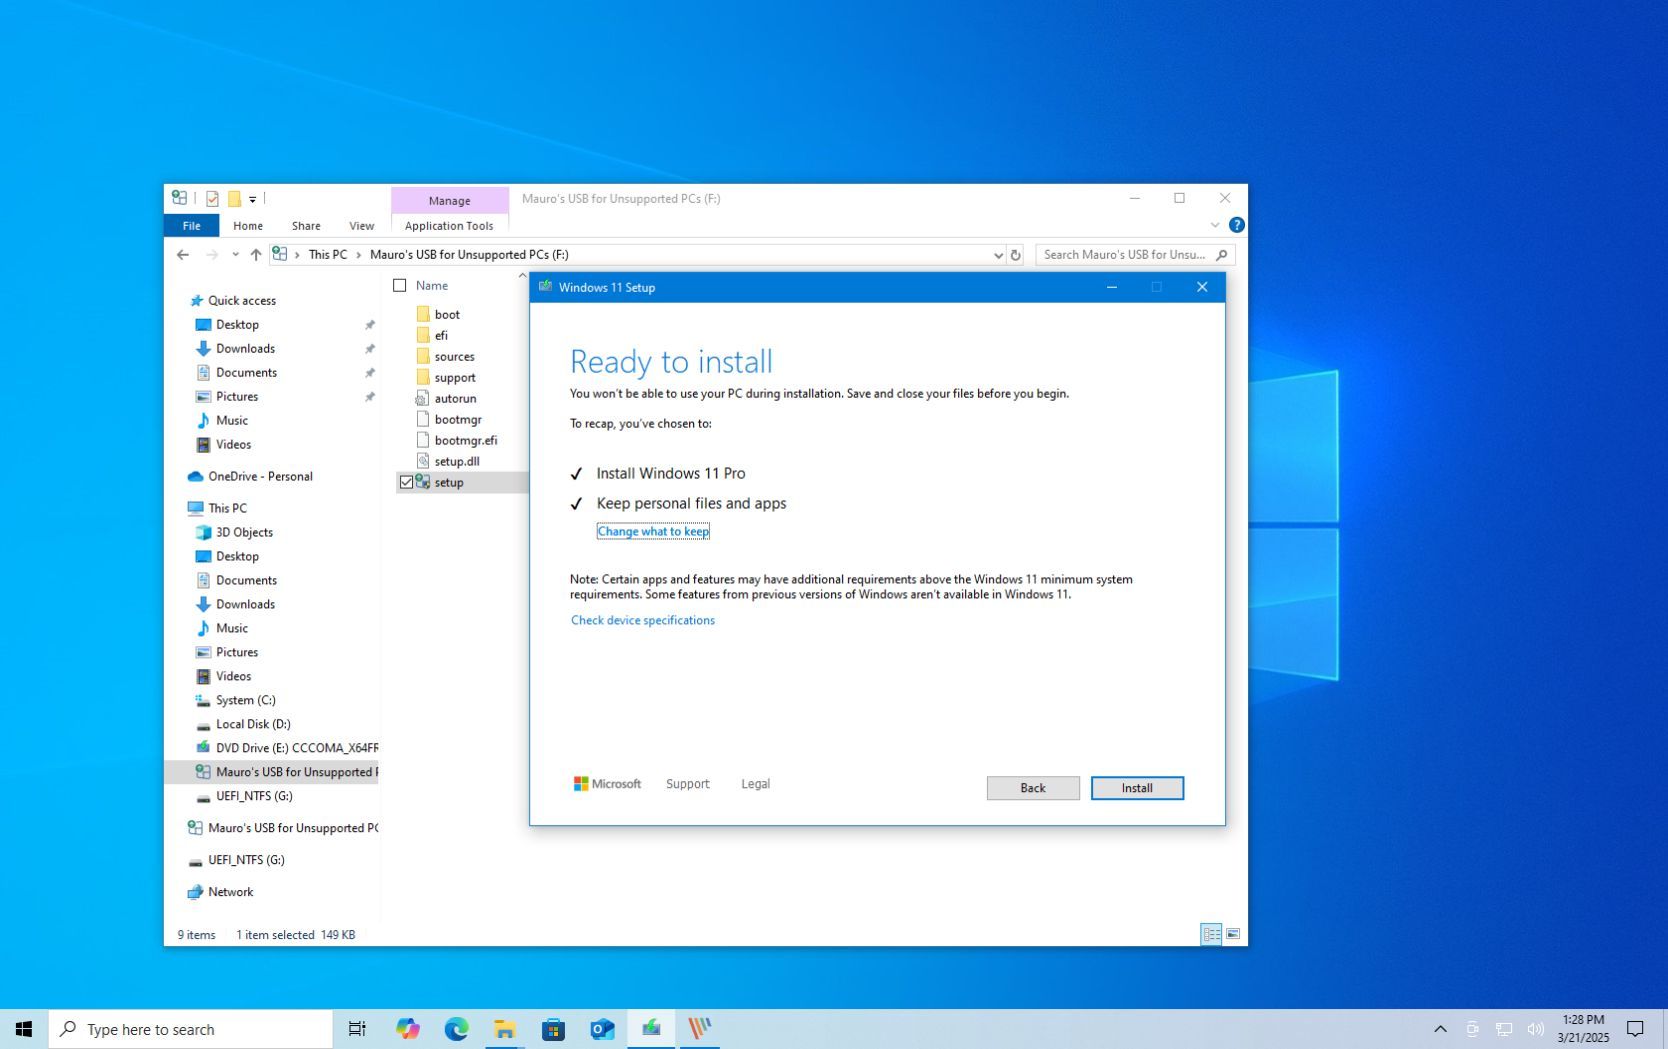
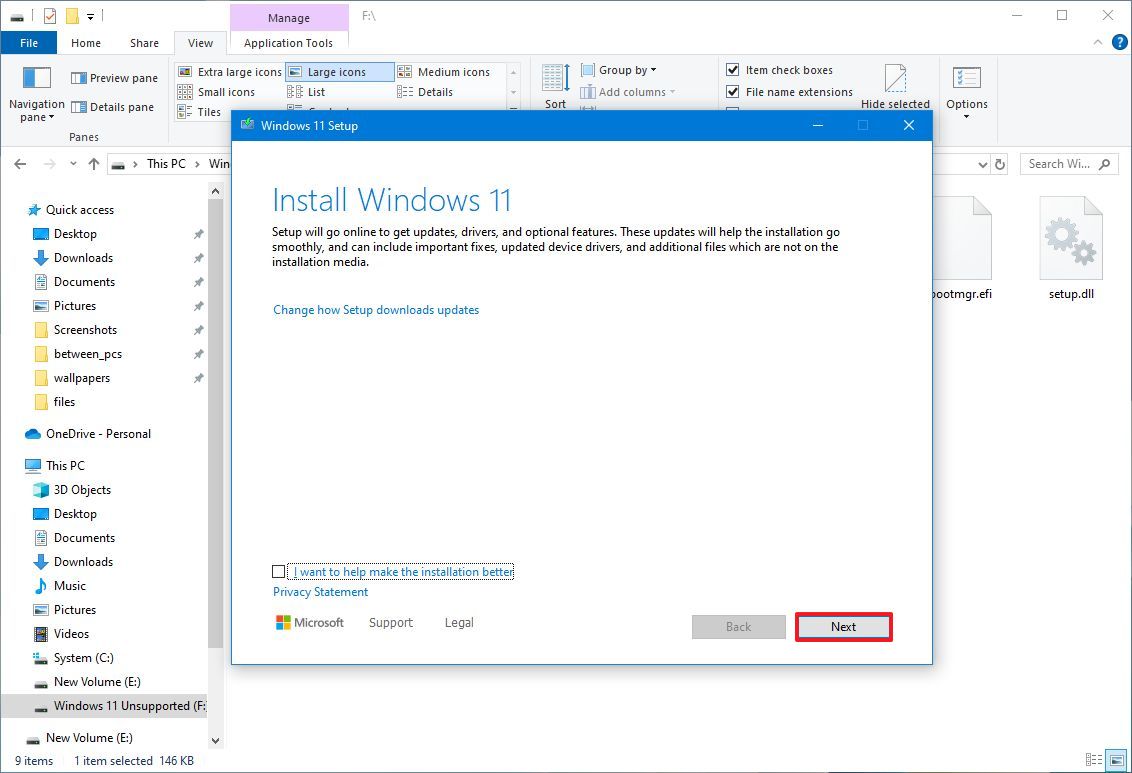
- Double-click the setup.exe file to begin the upgrade process.
- Click the Next button.
- Click the Accept button.
- Click the Install button.
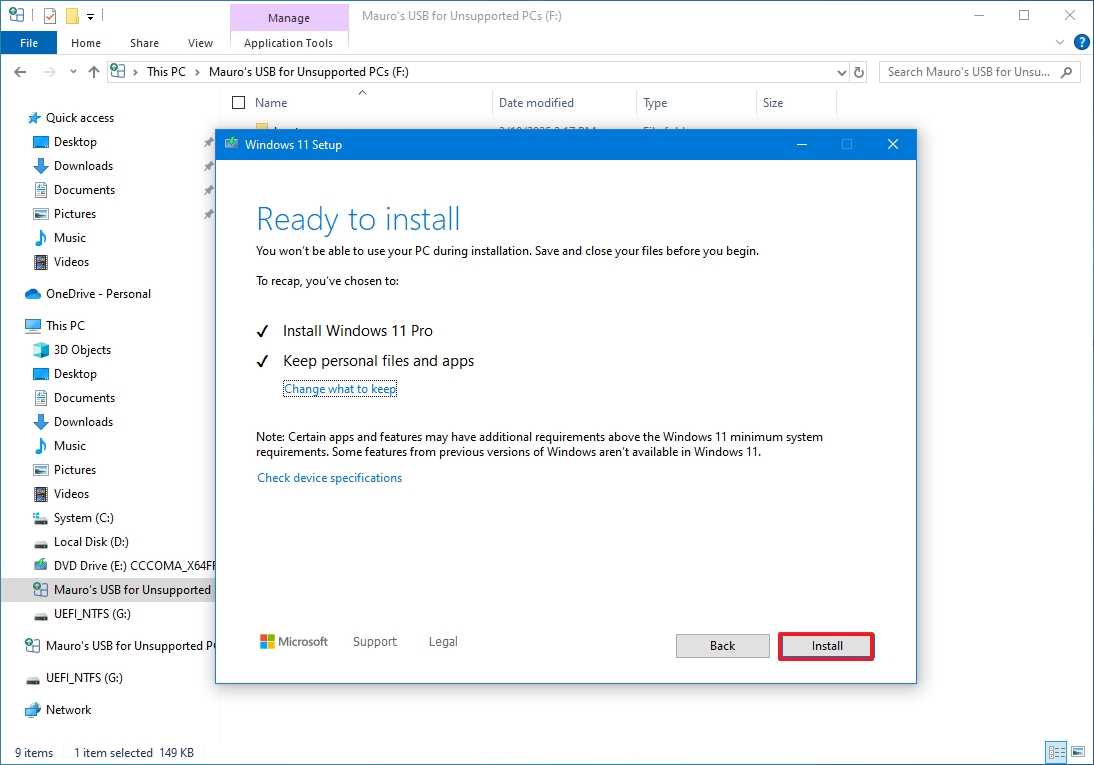
Once you complete the steps, the computer should upgrade to Windows 11, bypassing the TPM 2.0 requirement (although the device will still require TPM 1.2 to proceed) and the processor requirements (which will also require the "POPCNT" instruction). Since this is an in-place upgrade, the settings, apps, and files will be automatically transferred to the new setup.
If you're having issues with the upgrade, the best approach is to create a full backup of your computer, copy your files to an external storage device, and then proceed with the clean installation option. Then, restore your files in the new installation.
Alternatively, you can also use the Flyoobe app, which you can run on your computer to bypass the hardware requirements and debloat the setup.
Windows 11 clean install process
To do a clean installation of Windows 11 on unsupported hardware, use these steps:
- Start the computer with the USB installer.
- Press any key to continue with the setup.
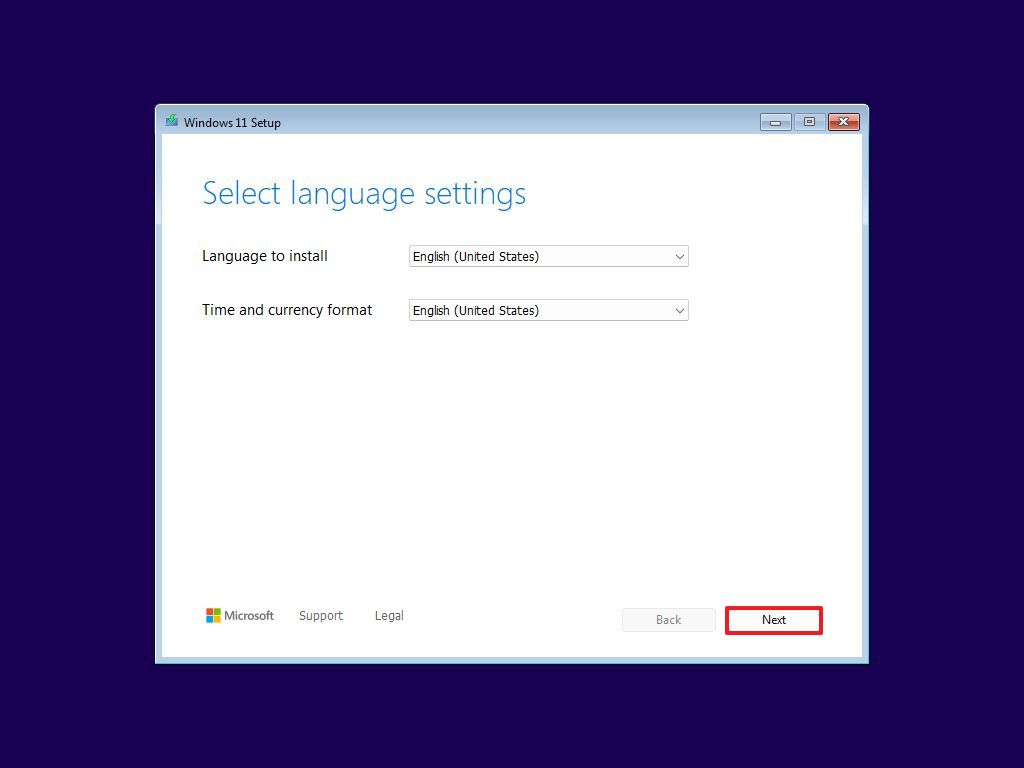
- Select your language settings.
- Click the Next button.
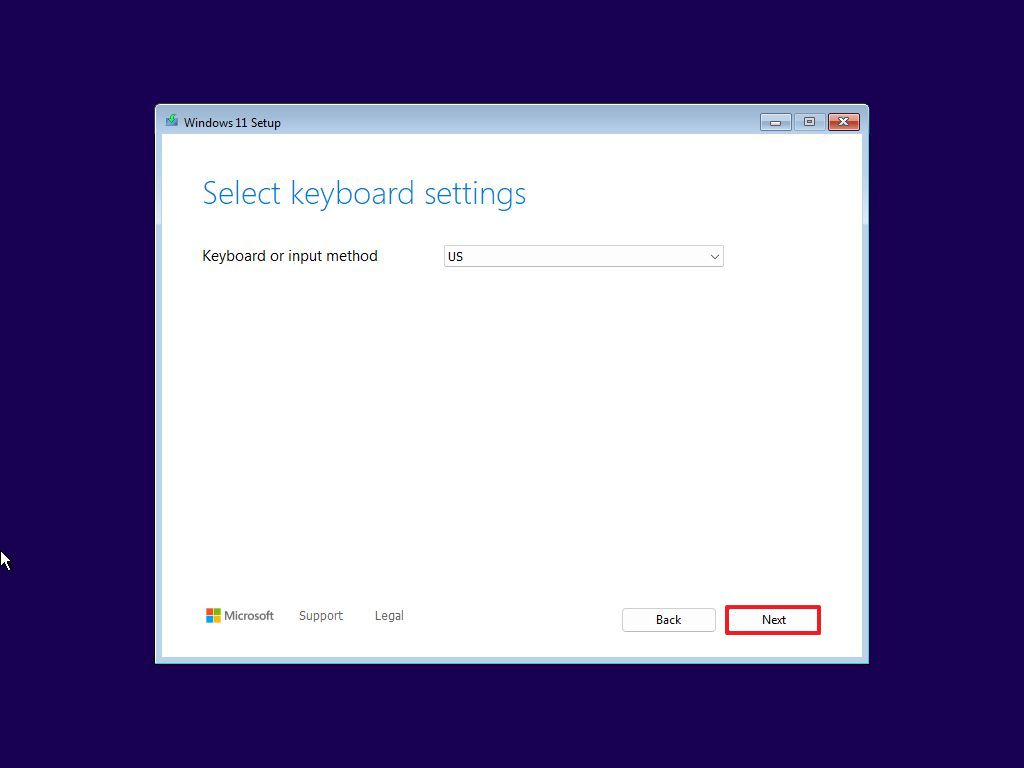
- Select your keyboard settings.
- Click the Next button.
- Choose the "Install Windows 11" option.
- Check the "I agree everything will be deleted including files, apps, and settings" option.
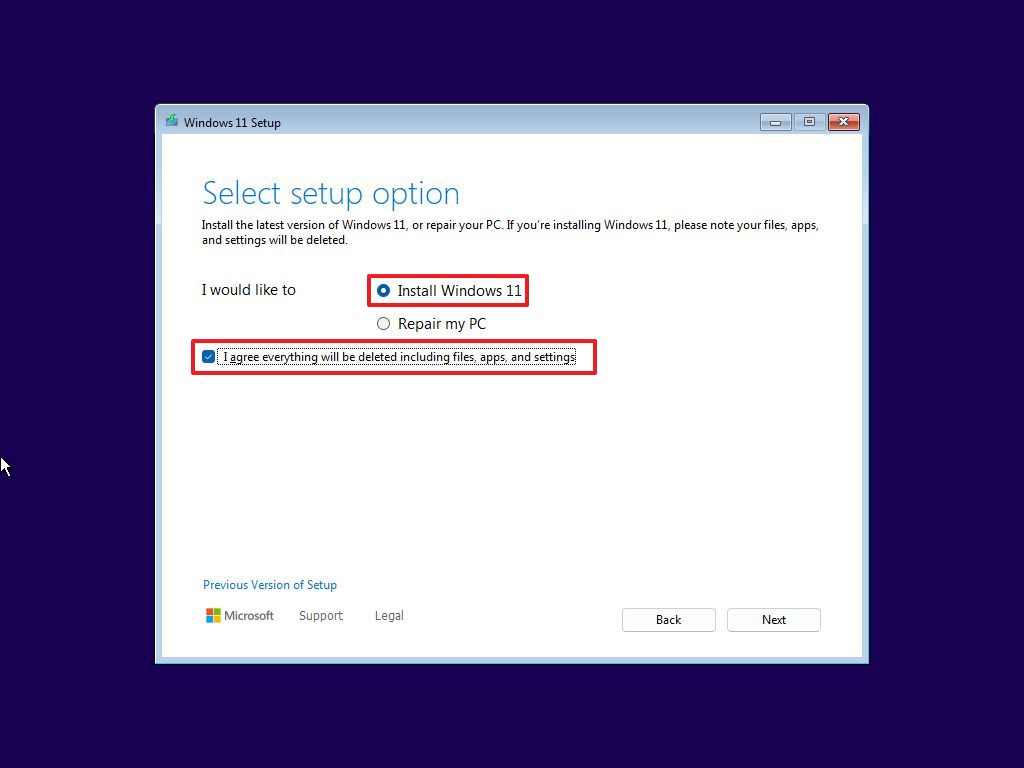
- Click the Next button.
- Click the "I don't have a product key" option.
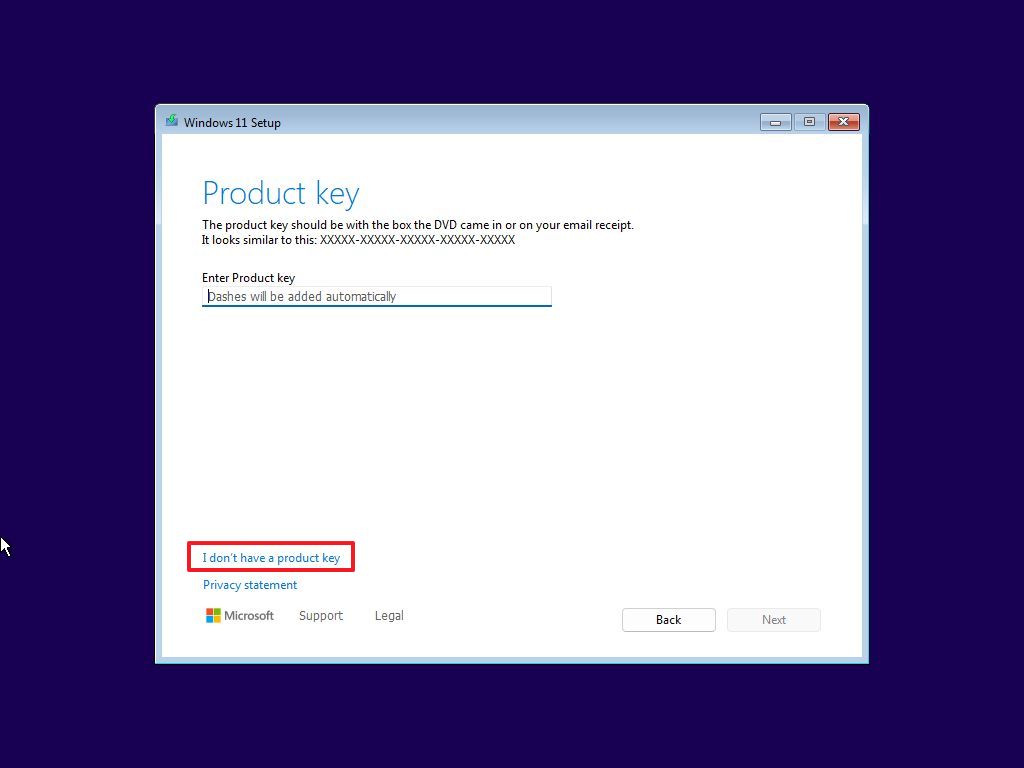
- Quick note: The system should activate automatically after the installation.
- Select the edition of the operating system (if applicable).
- Click the Next button.
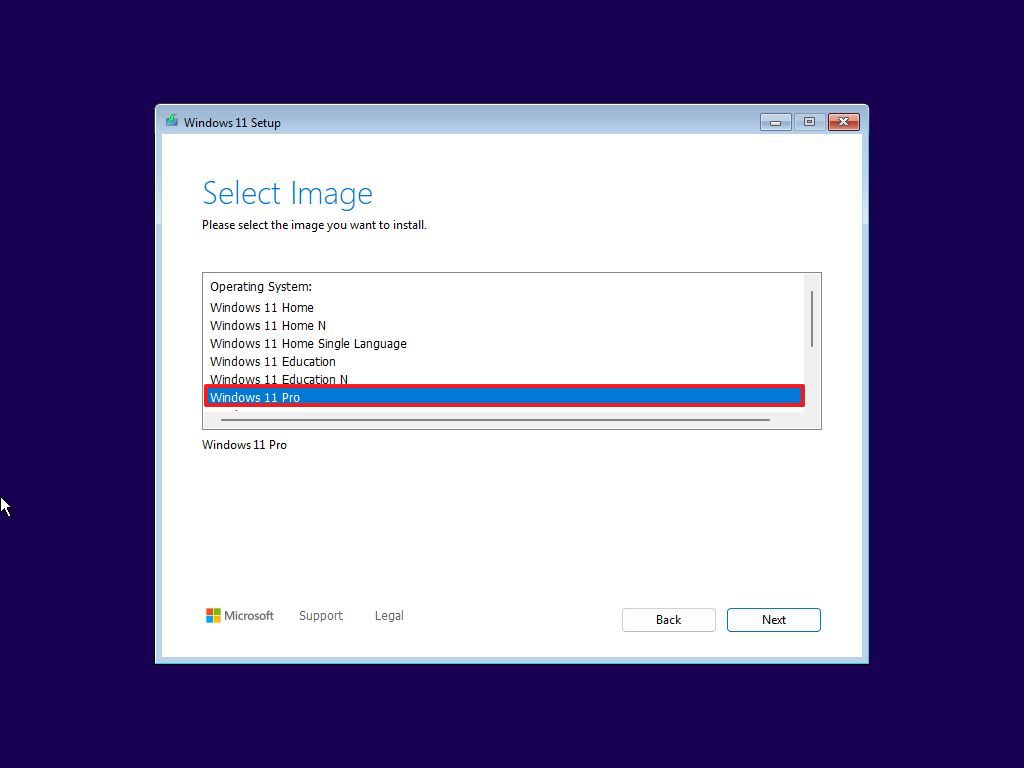
- Click the Accept button.
- Select each partition and click the Delete button.
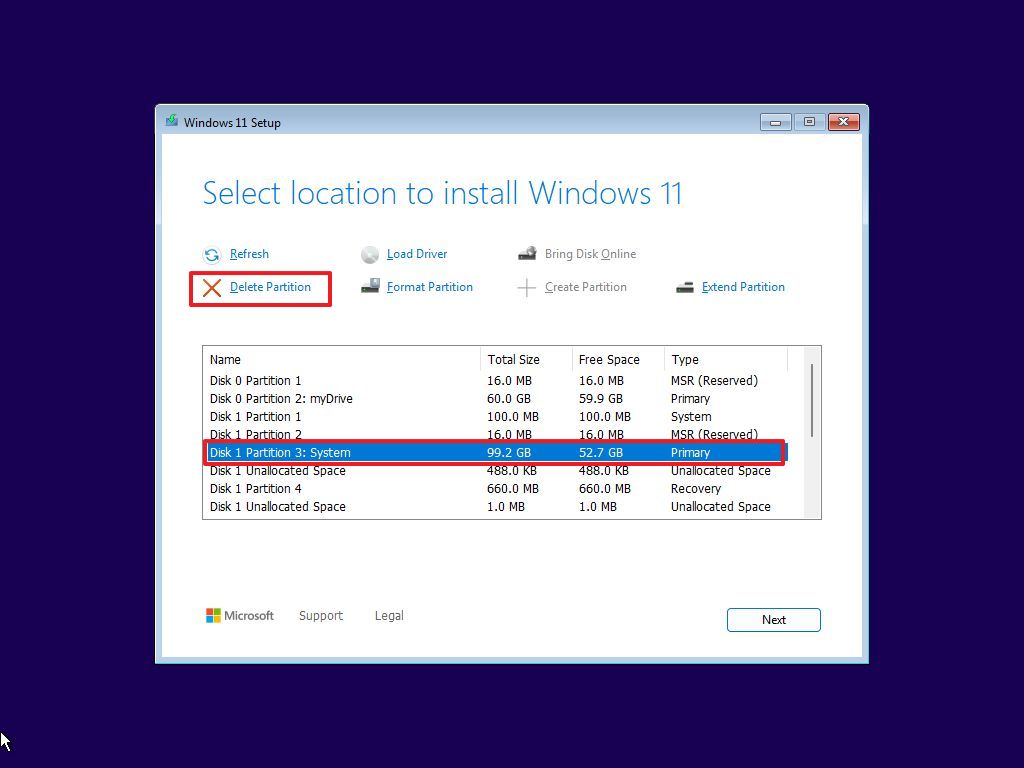
- Quick tip: You don't need to delete the partition where you store data.
- Select the "Drive 0 Unallocated Space" item.
- Click the Next button.
- Click the Install button.
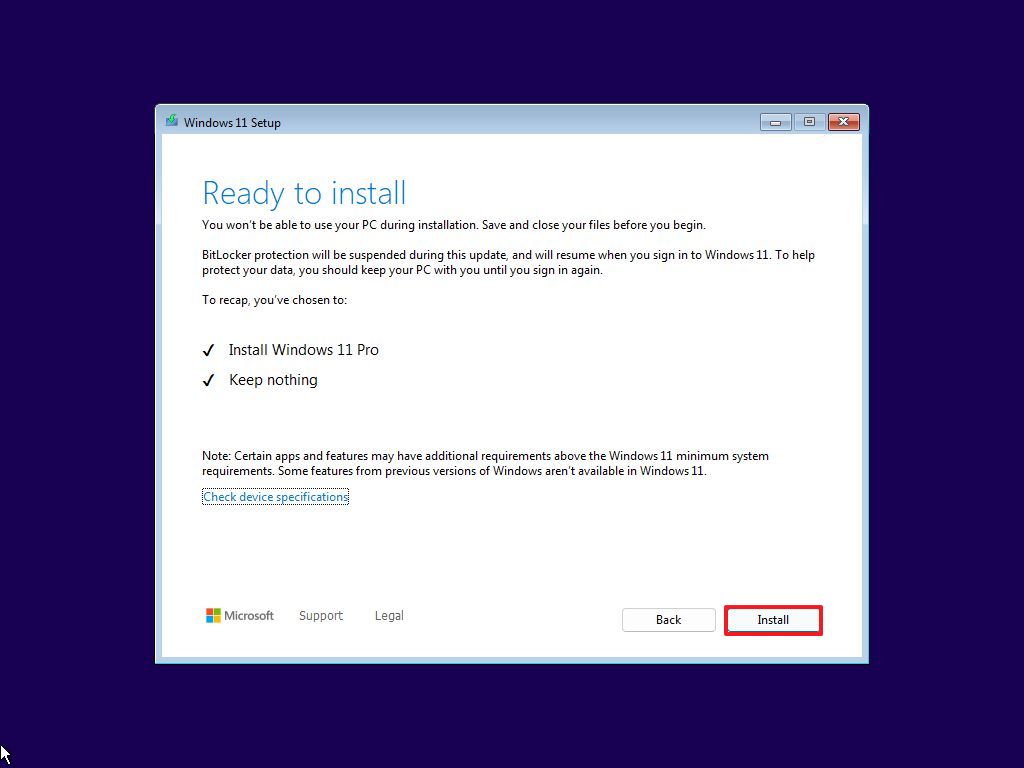
After completing the steps, you will need to go through the out-of-the-box experience (OOBE) to set your preferences and create an account.
In addition to using the Rufus tool, you can also use the Ventoy utility to create a bootable USB to perform a clean installation of the operating system.
More resources
For more helpful articles, coverage, and answers to common questions about Windows 10 and Windows 11, visit the following resources:

Mauro Huculak has been a Windows How-To Expert contributor for WindowsCentral.com for nearly a decade and has over 22 years of combined experience in IT and technical writing. He holds various professional certifications from Microsoft, Cisco, VMware, and CompTIA and has been recognized as a Microsoft MVP for many years.
You must confirm your public display name before commenting
Please logout and then login again, you will then be prompted to enter your display name.
