How to set up multiple partitions on a USB flash drive on Windows 10
If you have a flash drive with several gigabytes of storage, you can configure multiple partitions to use different file systems or protect files with encryption. Here's how to do just that on Windows 10.
On Windows 10, you usually connect a USB flash drive to your device, use the format tool to set up the compatible file system, and then start dumping files on it. While there's nothing wrong with this approach, there a number of scenarios where dividing the drive into multiple partitions can bring additional benefits.
For instance, if you work in a mixed OS environment, and you would typically format your USB flash drive using the exFAT file system on Windows 10, unless you use workarounds, you won't be able to access the files from a Linux machine. Instead of switching to a different file system, you can configure one partition compatible with Windows 10 and another compatible with Linux.
If you have to work with a flash drive formatted using FAT32, you can only use up to 32GB of space, and if the drive is large, you could be wasting a lot of storage. The ability to divide the storage on the device lets you create additional partitions with the same or a different file system to take advantage of the entire drive. Also, if you carry around a thumb drive with sensitive data, creating multiple partitions can create storage for easy access to app installers and other non-critical files and another one that you can encrypt with BitLocker to protect sensitive data.
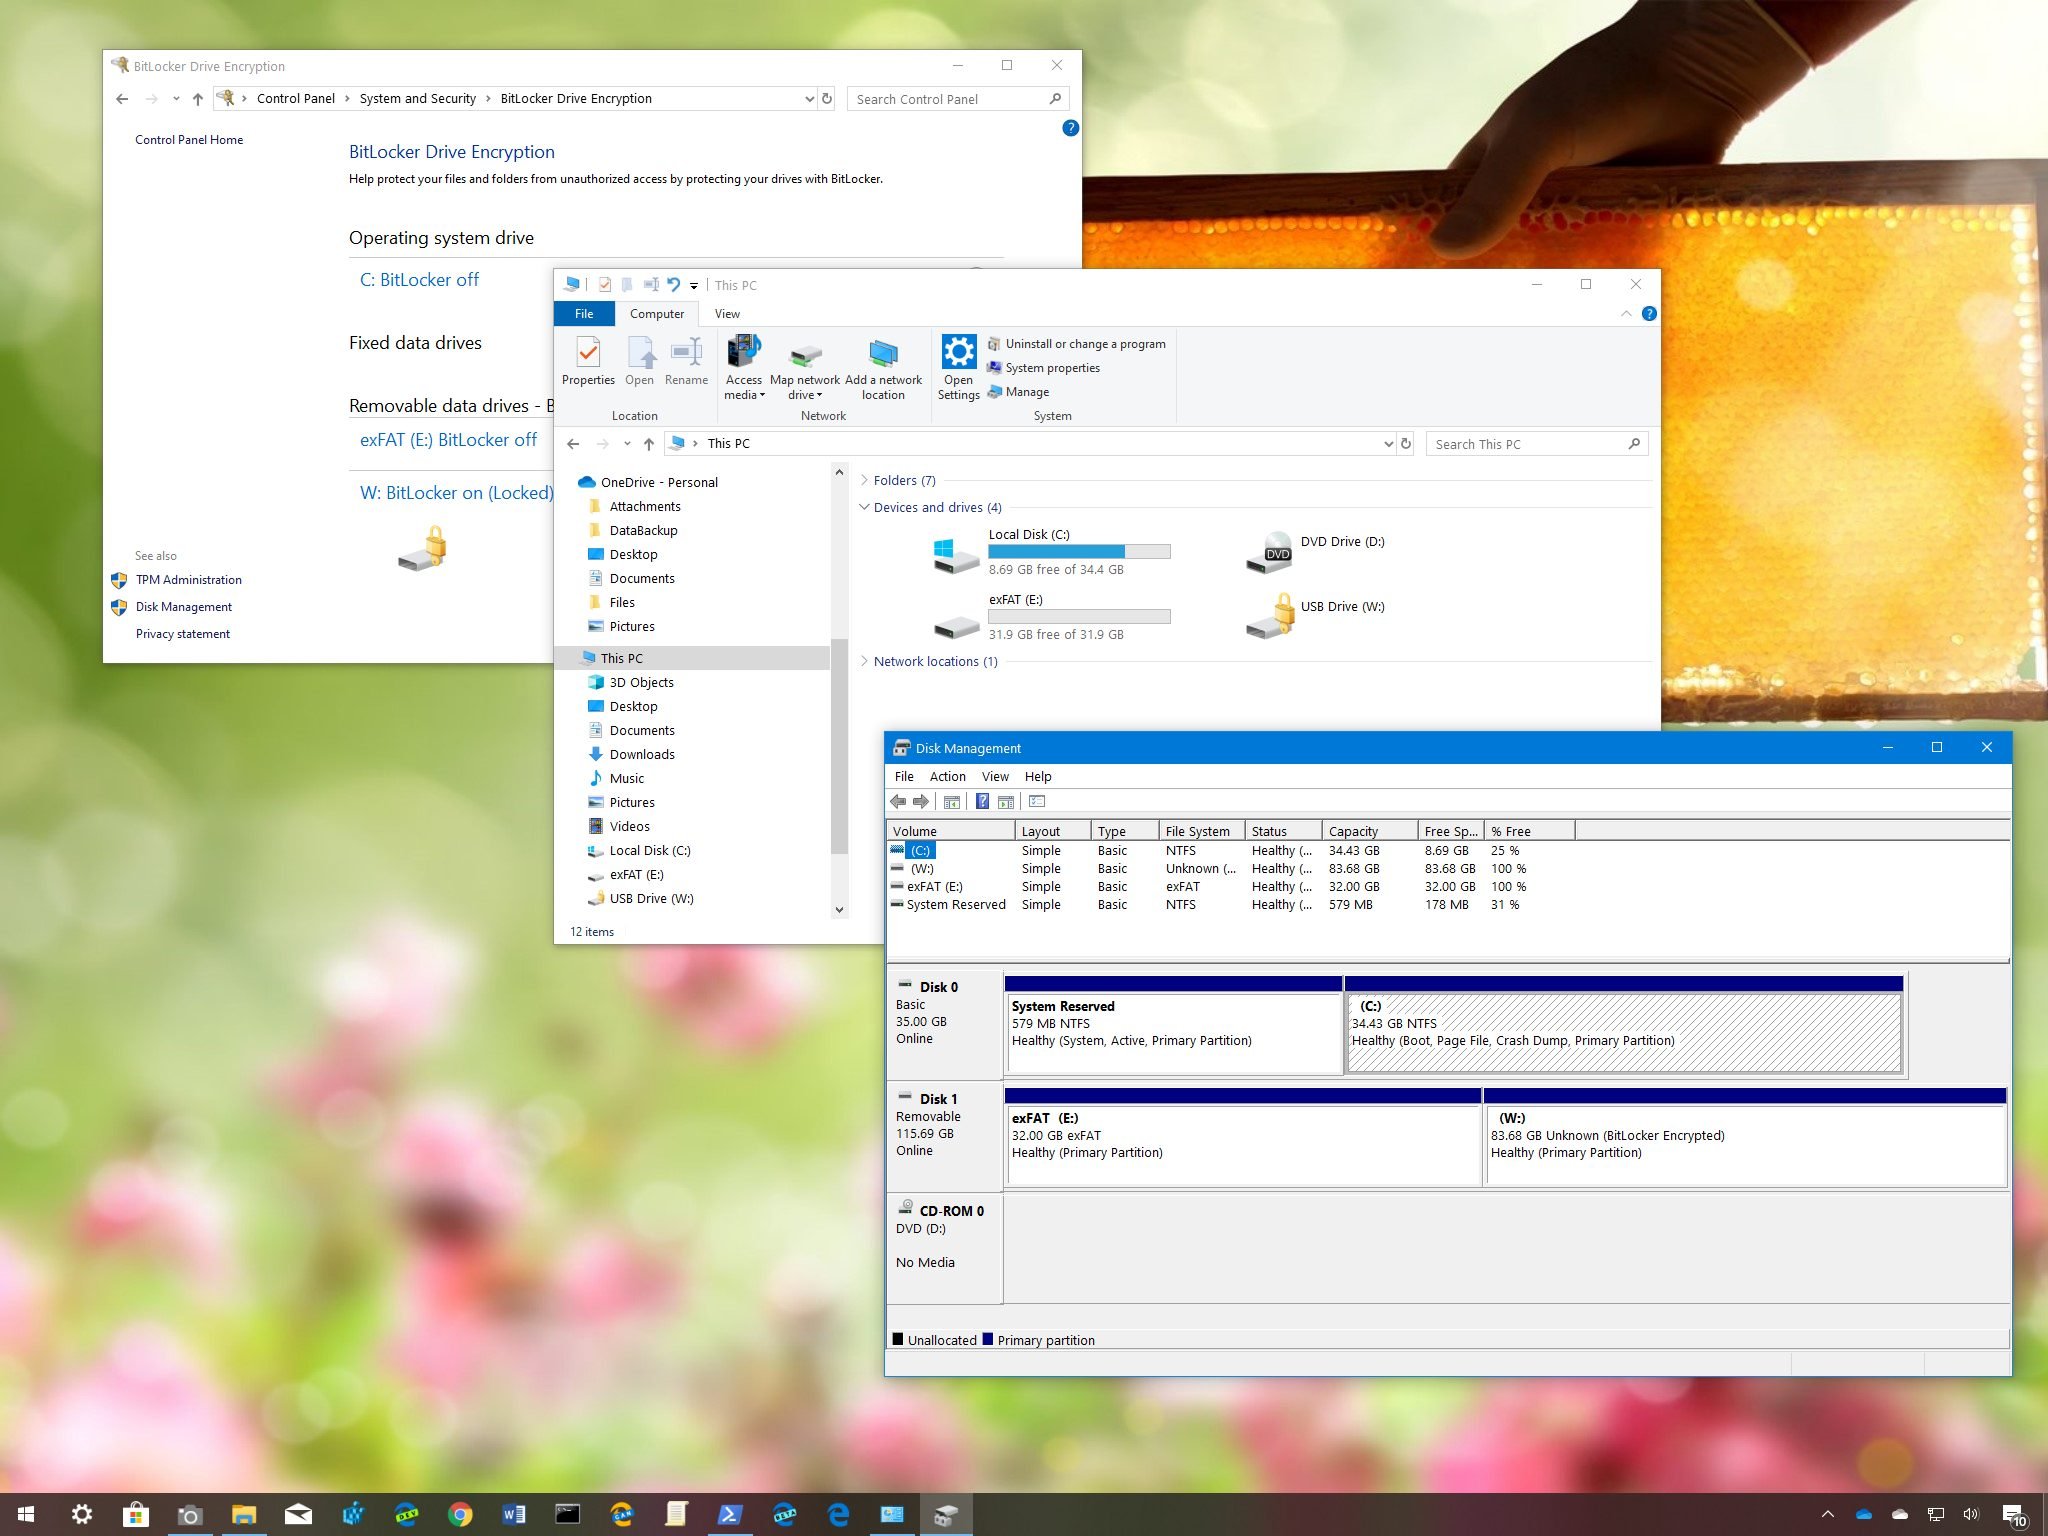
Whatever the reason, you can use the Disk Management tool on Windows 10 to set up multiple partitions on a USB flash drive to keep different groups of data separate or configure a drive with various file systems.
In this Windows 10 guide, we walk you through the steps to divide a flash drive into multiple partitions, and we show you the steps to password-protect a partition using BitLocker.
- How to create multiple partitions on a USB flash drive
- How to create multiple partitions with password protection on a USB flash drive
Important: This process will delete everything on the drive, so you should back up any data of the flash drive before proceeding.
How to create multiple partitions on USB flash drive
Although the process to create multiple partitions on a removable drive involves a number of steps, it's not complicated. You only need to erase the drive and set up the new storage layout.
All the latest news, reviews, and guides for Windows and Xbox diehards.
Erasing a flash drive
To clean a removable flash drive using Disk Management, use these steps:
- Open Start.
- Search for Disk Management and click the top result to open the experience.
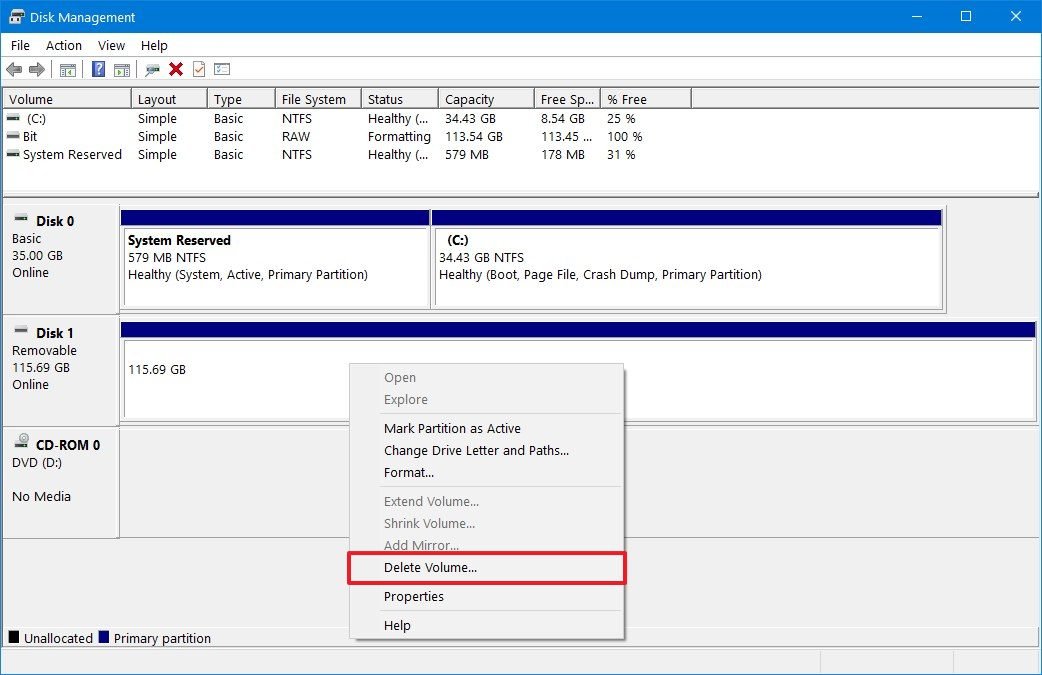
- Right-click the flash drive that you want to configure, select the Delete volume option.
- Click the Yes button.
Once you complete these steps, the data on the drive will be deleted, and you'll end up with a large unallocated space.
Creating multiple partitions flash drive
To create multiple partitions on a USB flash drive, use these steps:
- Open Start.
- Search for Disk Management and click the top result to open the experience.
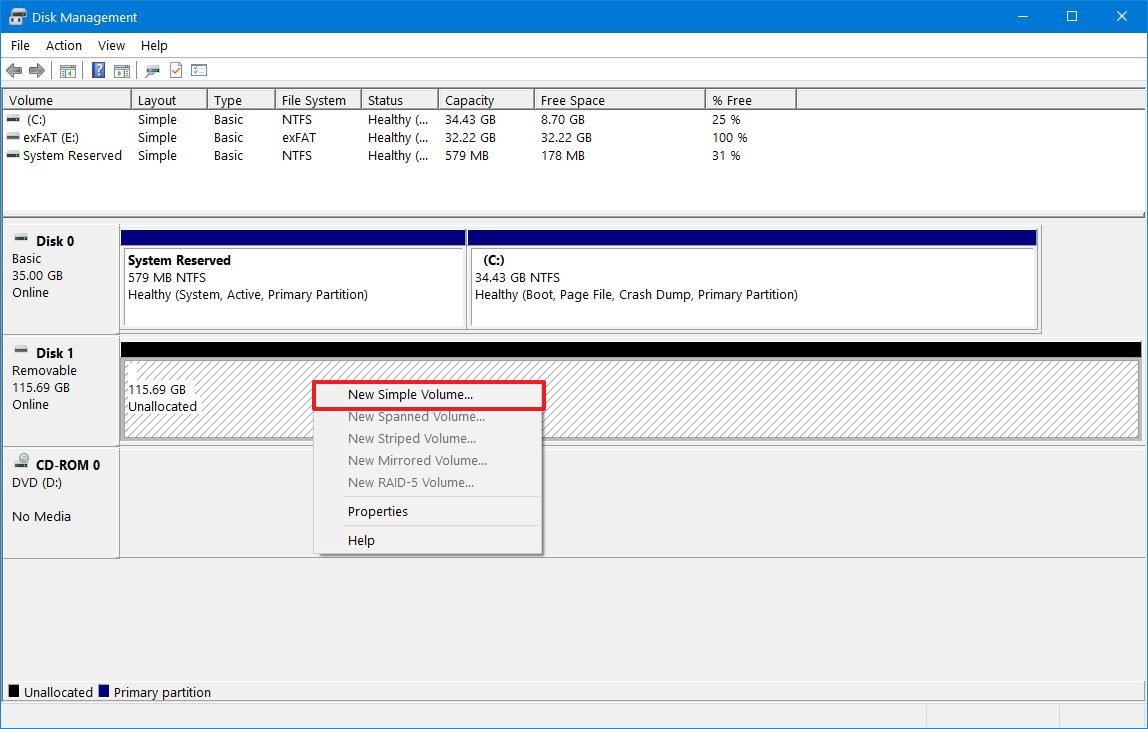
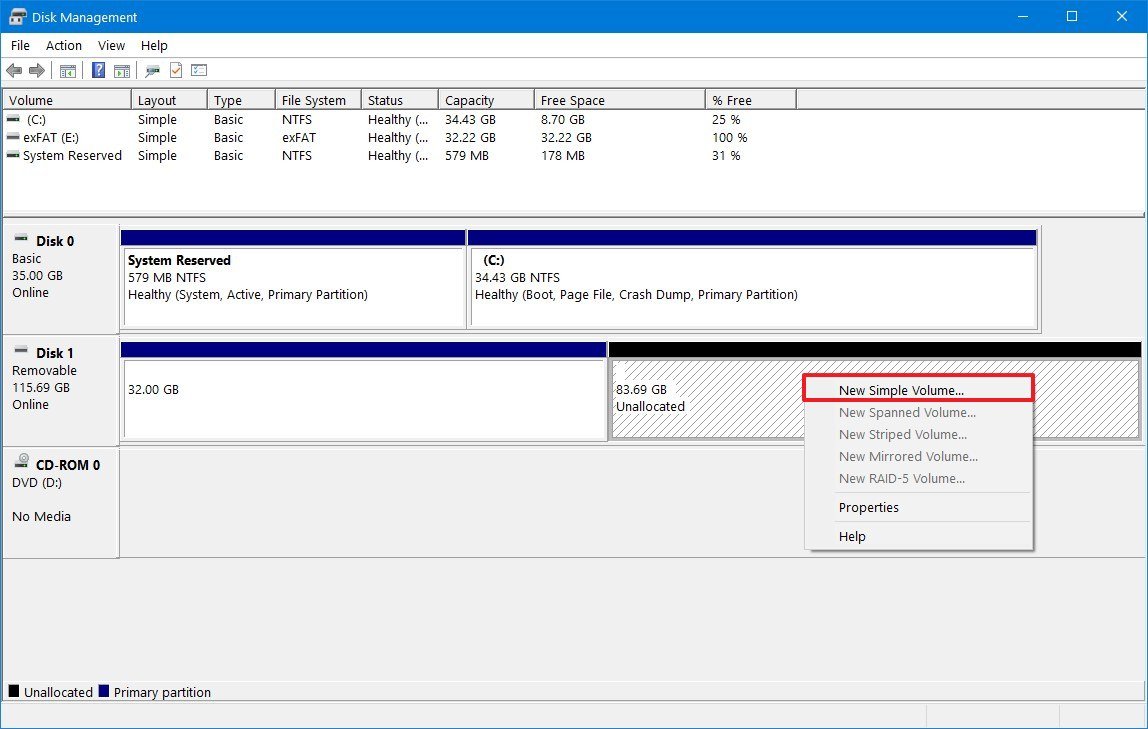
- Right-click the Unallocated space, and select the New Simply Value option.
- Click the Next button.
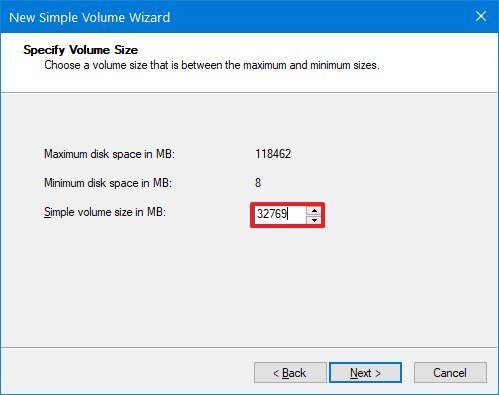
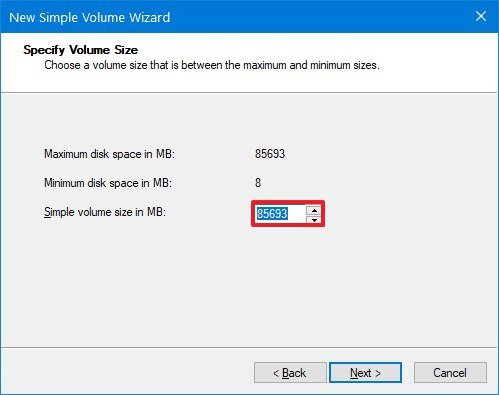
- Under the "Simple volume size in MB" section, specify the amount of space in megabytes that you want to allocate for the first partition.
- Click the Next button.
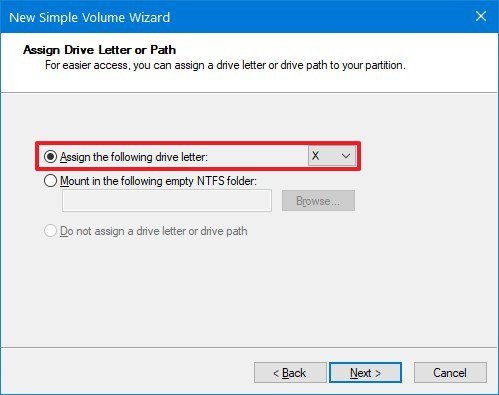
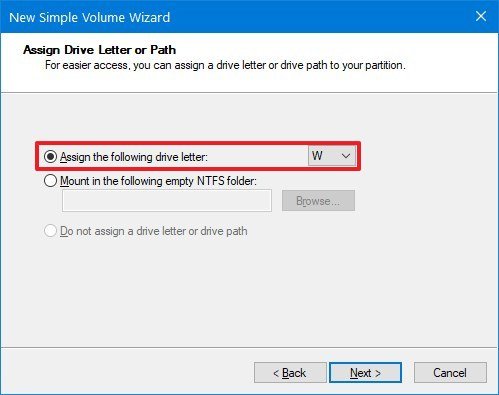
- Use the "Assign the following drive letter" drop-down menu to select a letter for the new drive.
- Click the Next button.
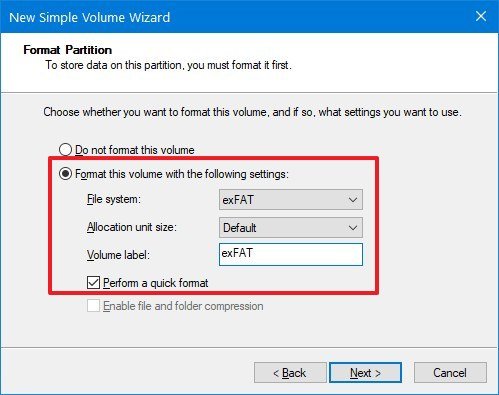
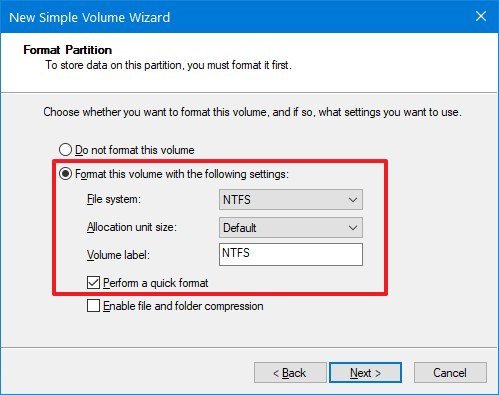
- Use the "File system" drop-down menu, and select the exFAT option.Tip: If you're using a flash drive larger than 32GB, you won't see the option to format using the FAT32 file system. In the event that you need to use the FAT32 option, make the partition size less than 32768 megabytes. If you want to use the exFAT option, make the partition larger than 32769 megabytes. If you want to use exFAT on a partition that's less than 32GB, create a FAT32 partition, and then use the "Format" tool to change the file system to exFAT.
- Use the "Allocation unit size" drop-down menu, and select the Default option.
- In the "Value label" field, type a descriptive name for the drive.
- Check the Perform a quick format option.
- Unless necessary, clear the Enable file and folder compression option.
- Click the Next button.
- Click the Finish button.
- Right-click the remaining Unallocated space, and select the New Simply Value option.
- Click the Next button.
- Under the "Simple volume size in MB" section, specify the amount of space that you want to allocate for the second partition. (If you're only creating two partitions, you don't need to change this setting.)
- Click the Next button.
- Use the "Assign the following drive letter" drop-down menu to select a letter for the new drive.
- Click the Next button.
- Use the "File system" drop-down menu, and select the NTFS option (or the file system that you want to use).
- Use the "Allocation unit size" drop-down menu, and select the Default option.
- In the "Value label" field, type a descriptive name for the drive.
- Check the Perform a quick format option.
- Unless necessary, clear the Enable file and folder compression option.
- Click the Next button.
- Click the Finish button.
After completing the steps, you'll end up with a USB flash drive that includes multiple partitions and different file systems (depending on your configuration), so you can use the drive on different OSes without worrying about compatibility or to keep content separate.
If you're in the market for a large USB flash drive you can use to create multiple partitions, we recommend the SanDisk Extreme Go because of its storage capacity, reliability, and price.
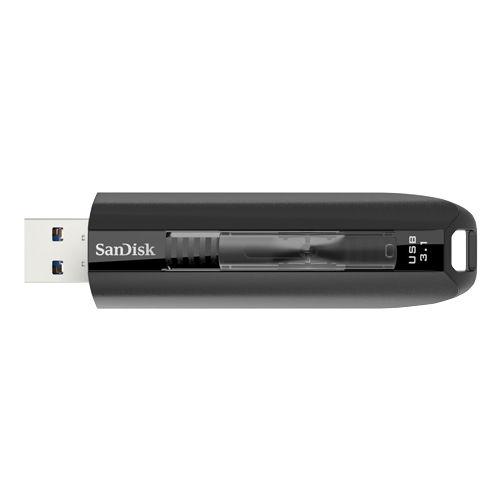
When you have to take a lot of files on the go, the SanDisk Extreme Go (CZ800) is an excellent choice. The USB drive offers up to 128GB of storage with fast transfers speeds up to 200MB/s, it's backed by the strong brand, and it's also affordable, at around $32 for 128GB.
How to create multiple partitions with password protection on a USB flash drive
Another case when using multiple partitions can come in handy is to set up a USB flash drive with a partition to store non-critical files, and another one protected with BitLocker to carry sensitive data. (BitLocker is only available for Windows 10 Pro and Enterprise. Also, you won't be able to unlock the drive on non-Windows devices.)
Partitioning flash drive
To create two partitions on a USB flash drive, use these steps:
- Open Start.
- Search for Disk Management and click the top result to open the experience.
- Right-click the Unallocated space, and select the New Simply Value option.
- Click the Next button.
- Under the "Simple volume size in MB" section, specify the amount of space in megabytes that you want to allocate for the partition that will be available to anyone who connects the drive to a computer.
- Click the Next button.
- Use the "Assign the following drive letter" drop-down menu to select a letter for the new drive.
- Click the Next button.
- Use the "File system" drop-down menu, and select the exFAT option.
- Use the "Allocation unit size" drop-down menu, and select the Default option.
- In the "Value label" field, type a descriptive name for the drive.
- Check the Perform a quick format option.
- Unless necessary, clear the Enable file and folder compression option.
- Click the Next button.
- Click the Finish button.
- Repeat steps No. 3 through No. 15 to create another partition to protect with BitLocker.
After you complete these steps, you'll end up with two partitions on the removable drive, and the only thing left to do is to use BitLocker to encrypt the partition that will hold your important files.
Setting up BitLocker on a flash drive
To set up BitLocker on a USB flash drive, use these steps:
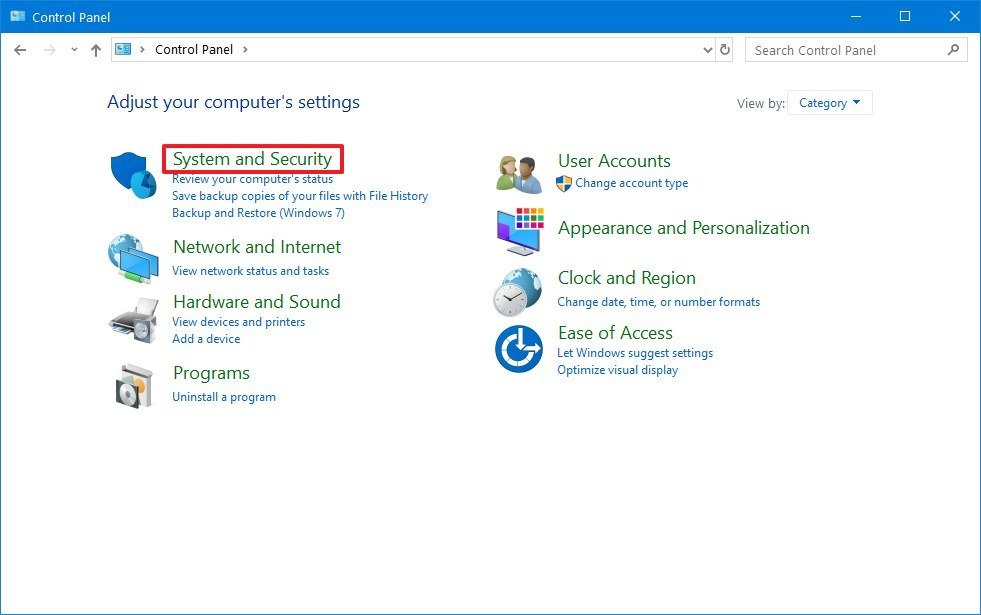
- Open Control Panel.
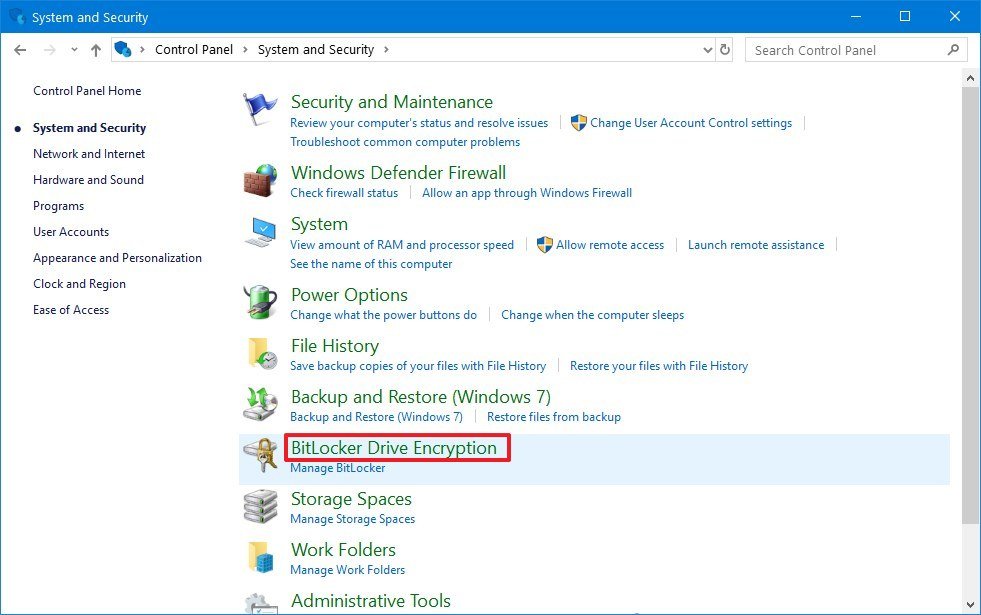
- Click on System and Security.
- Click on BitLocker Drive Encryption.
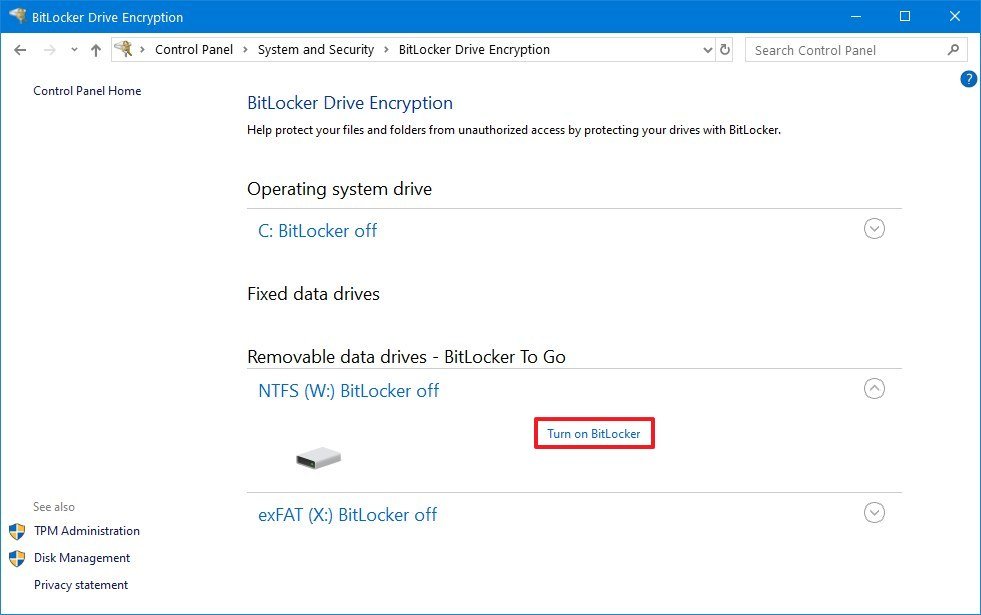
- Under the "Removable data drives" section, expand the storage that you want to protect with BitLocker.
- Click the Turn on BitLocker option.
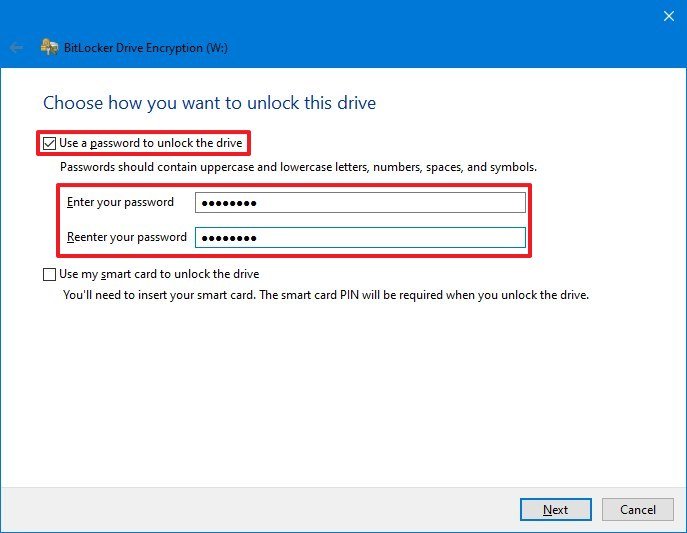
- Check the Use a password to unlock the drive option.
- Create a password to encrypt the thumb drive partition.
- Click the Next button.
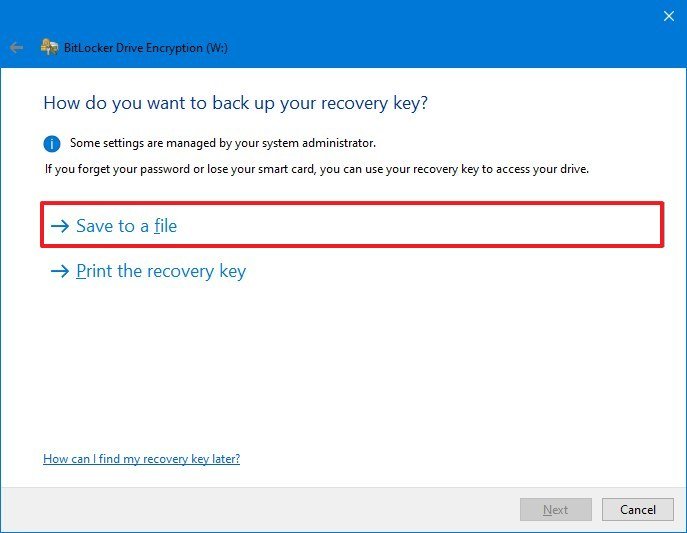
- Click the Save to a file button.
- Select a location to store the recovery key.Tip: If you forget the password or lose the recovery key, you won't be able to recover your files, so make sure to keep this file in a secure place.
- Click the Save button.
- Click the Next button.
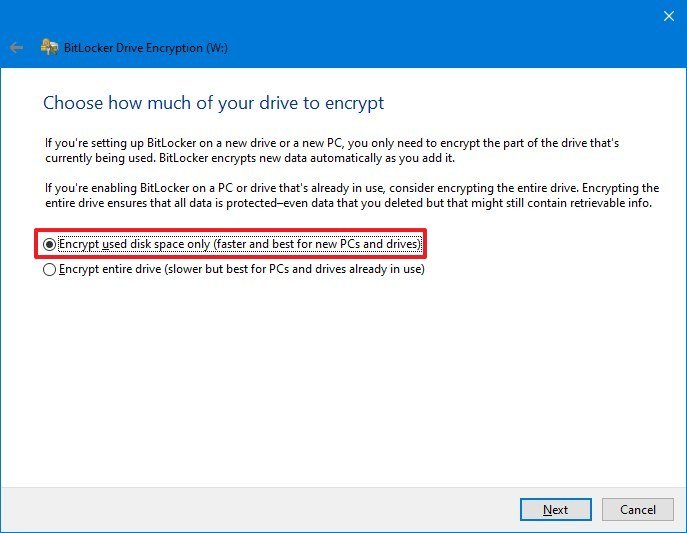
- Select the Encrypt used disk space only option.
- Click the Next button.
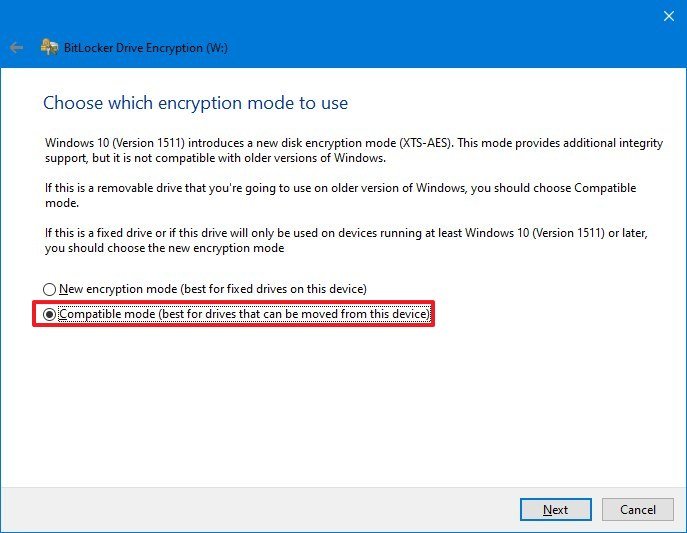
- Select the Compatibility mode option.
- Click the Next button.
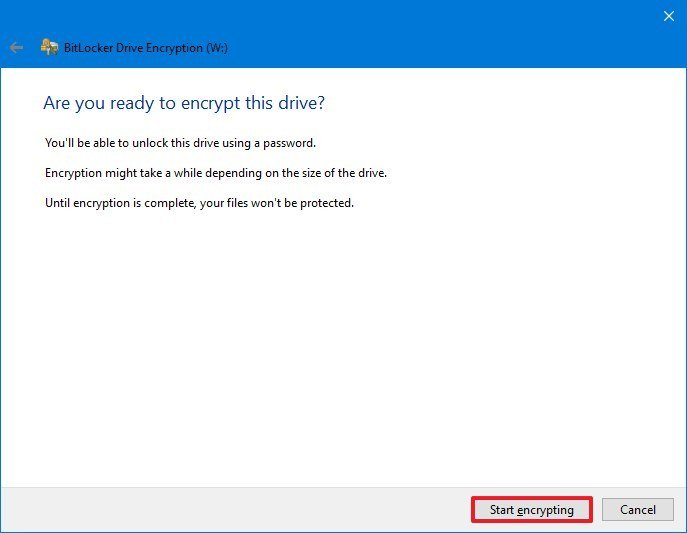
- Click the Start encryption button.
- Click the Close button once the encryption has finished.
After completing these steps, the flash drive will include a partition to store any files using a compatible file system and another password-protected partition to save important data.
Accessing an encrypted drive
To access the partition encrypted with BitLocker, connect the flash drive to a Windows device, and use these steps:
- Open File Explorer.
- Click on This PC from the left pane.
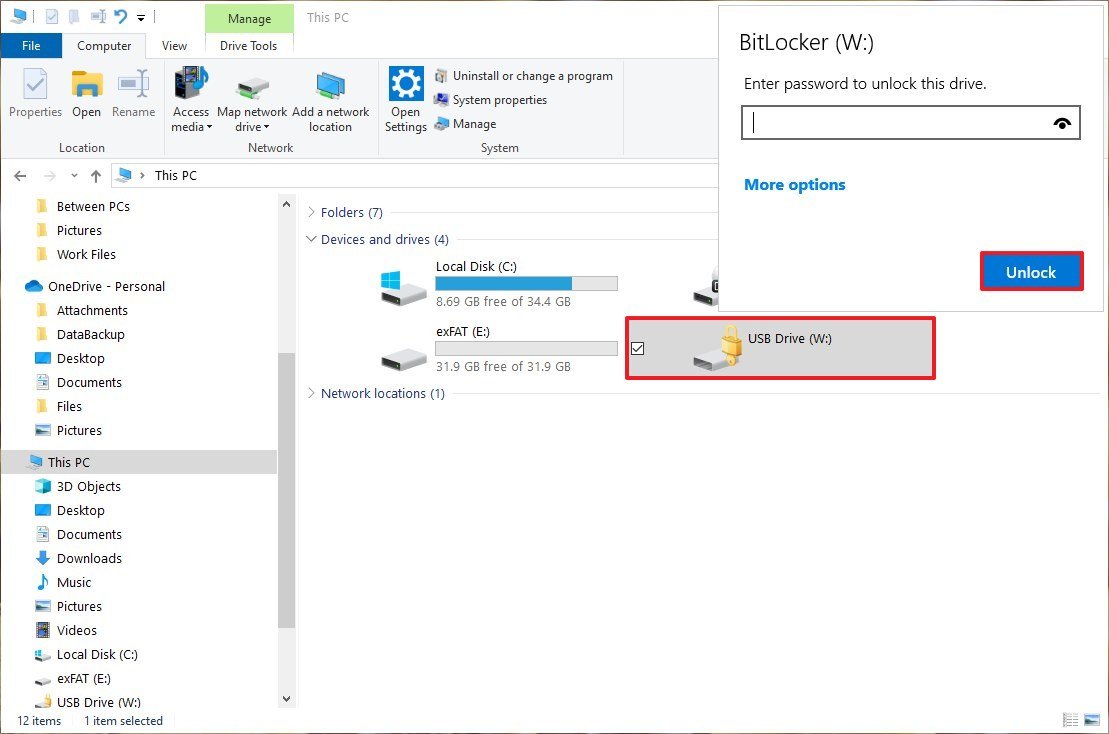
- Under the "Devices and drives" section, double-click the encrypted drive (the one with the lock icon).
- Type the BitLocker password.Quick tip: If you can't remember the password, click the More options link, click the Enter recovery key option, and type the 48-digit recovery key available in the text file that you should have saved when setting up BitLocker.
- Click the Unlock button.
After you complete these steps, you'll be able to access the drive and its contents. If you want to lock it, you'll need to disconnect and reconnect the drive again. Also, because you're using BitLocker To Go, you'll be able to unlock the drive on any compatible computer.
This guide is focused on flash drives, but you can apply these instructions to any kind of removable or fixed storage drive. Also, you can use these steps on virtually any version of the OS, including Windows 8.1 and Windows 7.

Mauro Huculak has been a Windows How-To Expert contributor for WindowsCentral.com for nearly a decade and has over 22 years of combined experience in IT and technical writing. He holds various professional certifications from Microsoft, Cisco, VMware, and CompTIA and has been recognized as a Microsoft MVP for many years.
