How to restrict document editing in Microsoft Office
If you need to prevent users from making unintentional changes to an Office document, in this guide we show you how to accomplish the task in Word, Excel, and PowerPoint.
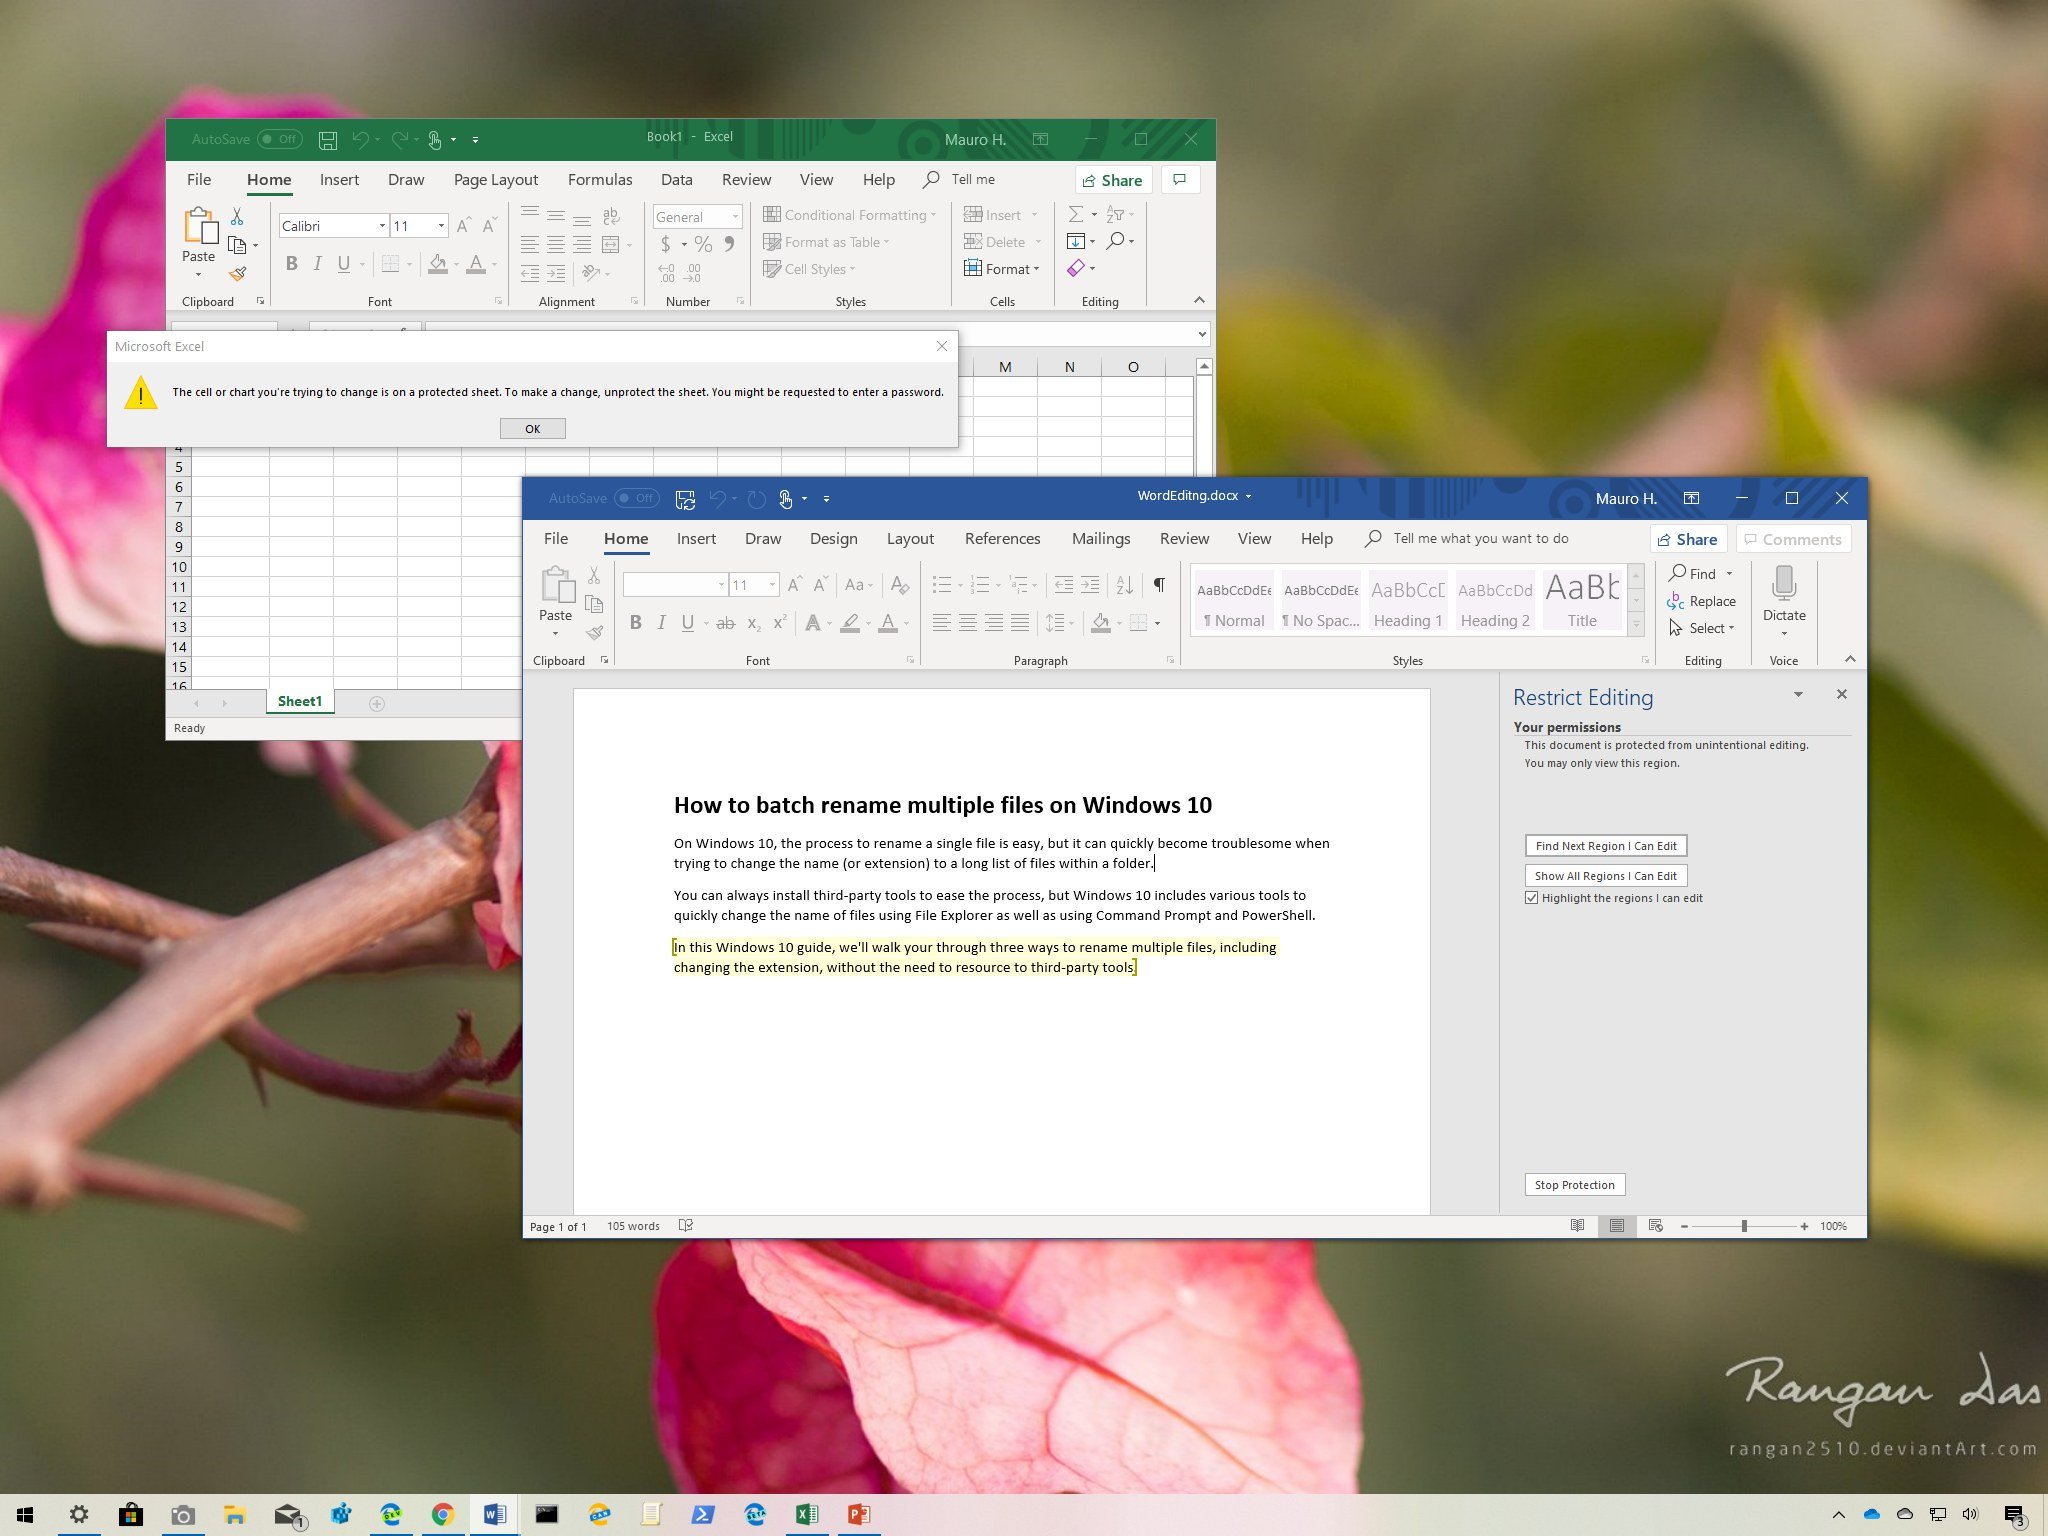
When sharing an Office document with colleagues or a group, making sure the content remains accurate is critical. Although you can add a password to protect a document, people with access can still make unwanted changes, which can result in delays or communication of the wrong information.
If you use Office 365, Office 2019, or an older version, you can use several features to restrict editing to a section or entire document, spreadsheet, or presentation to prevent users from making changes accidentally.
In this Windows 10 guide, we walk you through multiple methods to restrict document editing and prevent accidental changes on Word, Excel, and PowerPoint documents.
- How to prevent unwanted edits by restricting changes in Microsoft Office
- How to prevent unwanted edits using the read-only option in Microsoft Office
- How to prevent unwanted edits by marking documents as final in Microsoft Office
How to prevent unwanted edits by restricting changes in Microsoft Office
In Microsoft Office, you can use the restrict editing tools to control formatting, style, and the types of content users are allowed to update to prevent unwanted changes.
Restricting modifications in Word
To restrict style and formatting editing in Word, use these steps:
- Open the Word document.
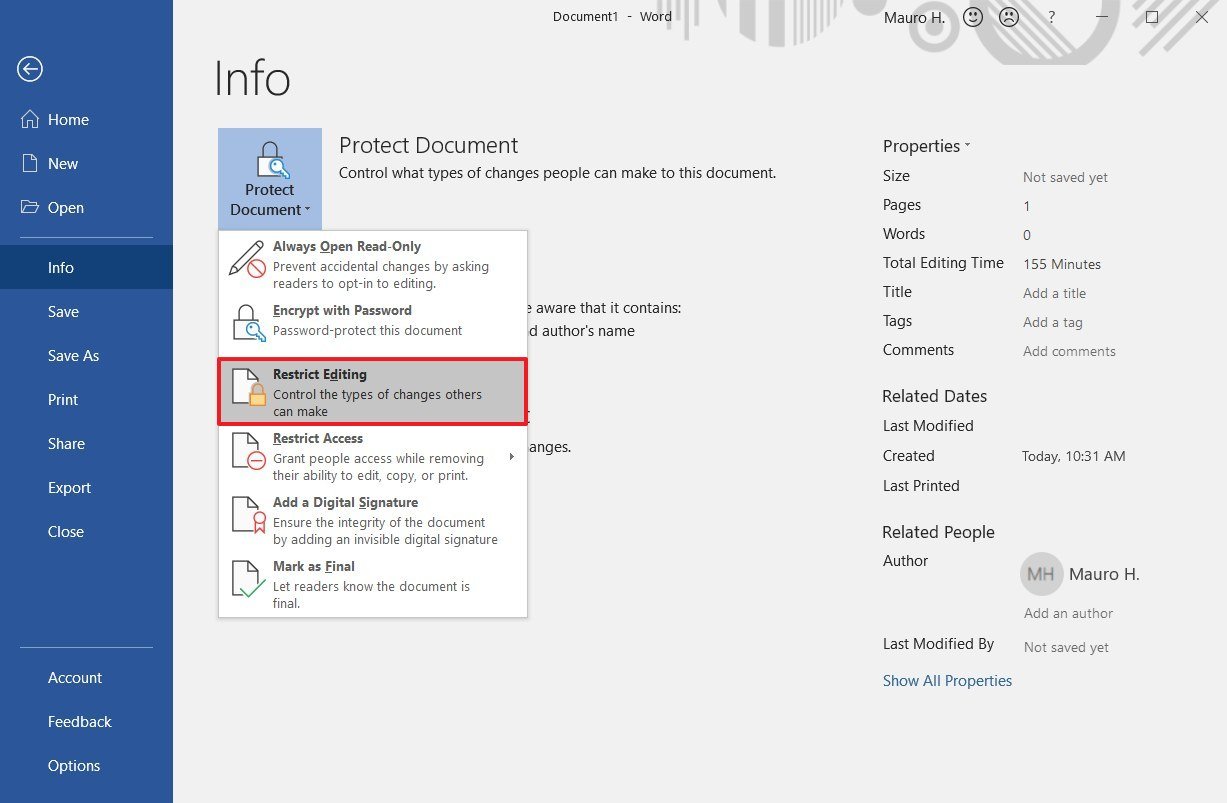
- Click on File.
- Click on Info.
- On the right side, click the Protect document menu.
- Select the Restrict Editing option.
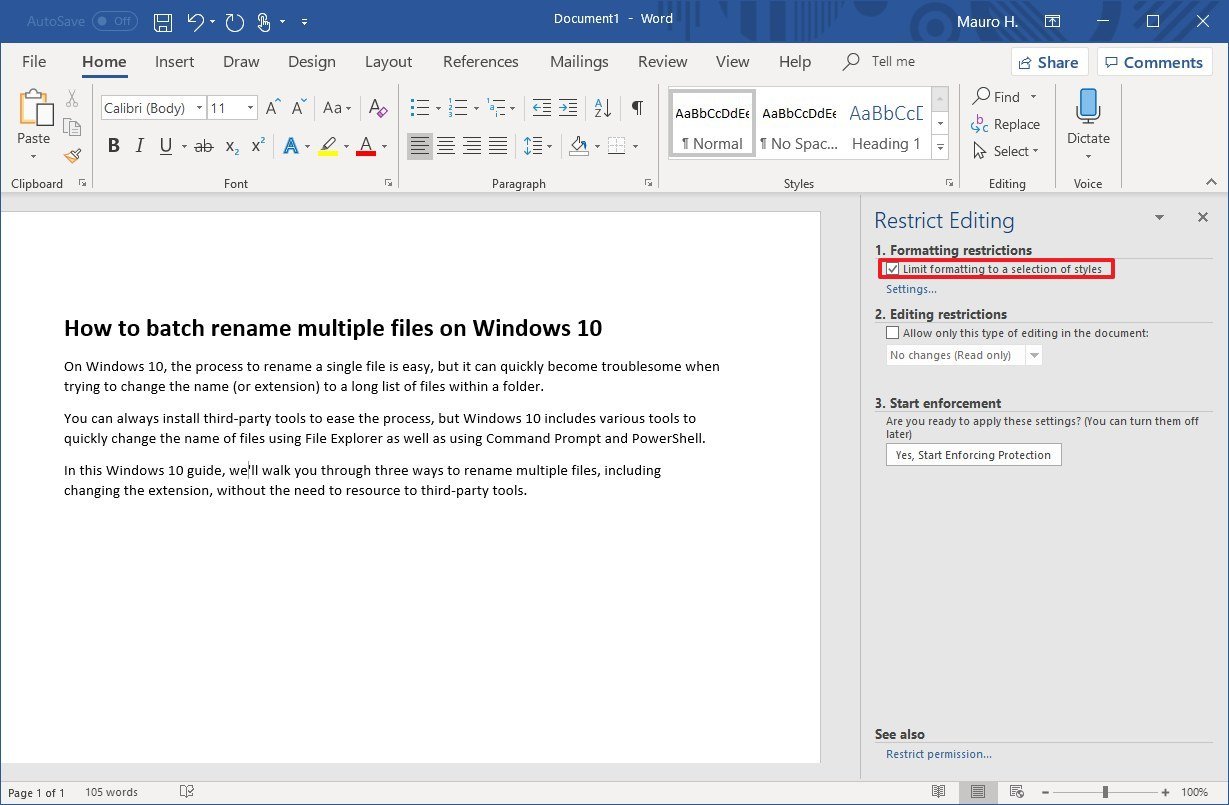
- Under the "Formatting restrictions" section, check the Limit formatting to a selection of styles option.
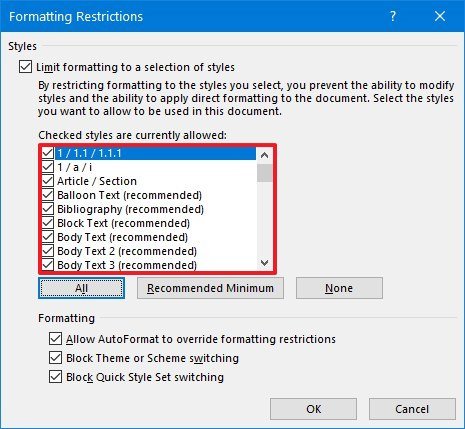
- Click the Settings option.
- Clear the styles that you want to restrict from editing.Tip: You can also use the "All," "Recommended Minimum," and "None" buttons to quickly allow or deny a group of styles.
- (Optional) Under the "Formatting" section, select the formatting that you want to allow or deny:
- Allow AutoFormat to override formatting restrictions.
- Block Theme or Scheme switching.
- Block Quick Style Set switching.
- Click the OK button.
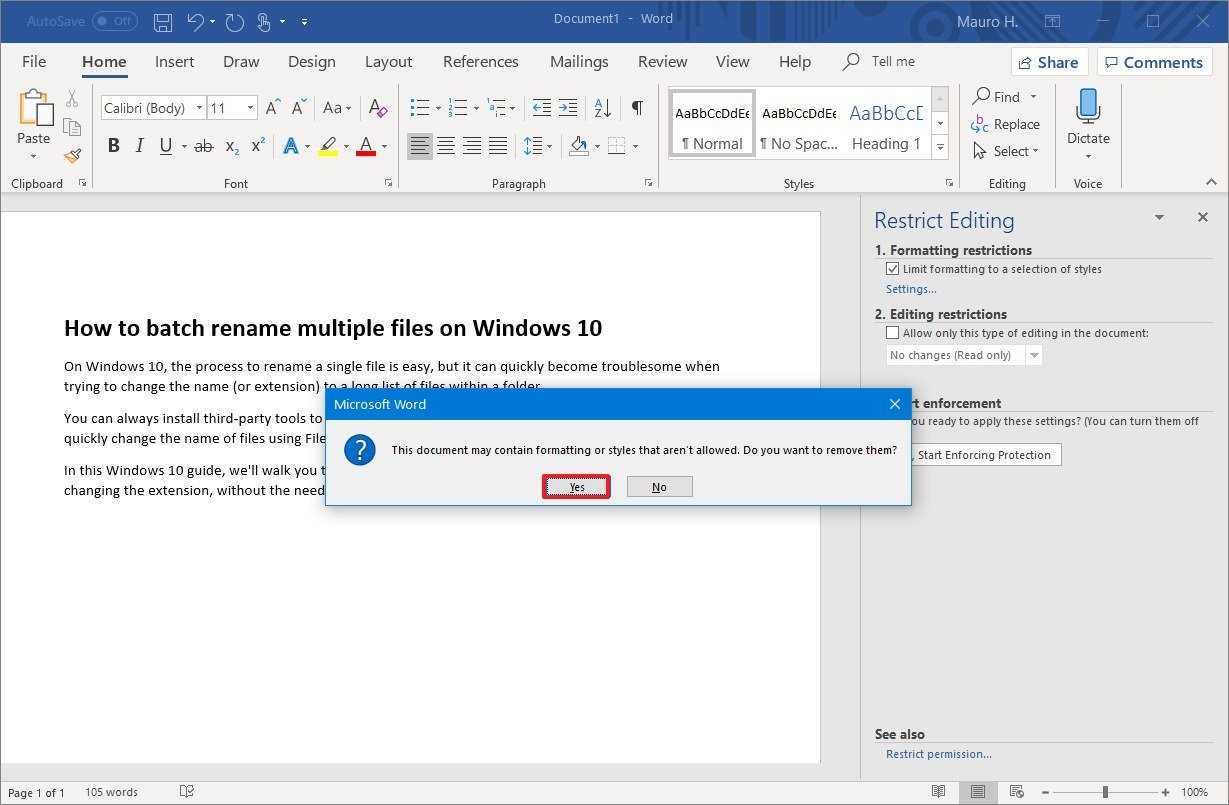
- Click the Yes button to remove (or the No button to retain the original changes) formatting or styles that are now restricted.
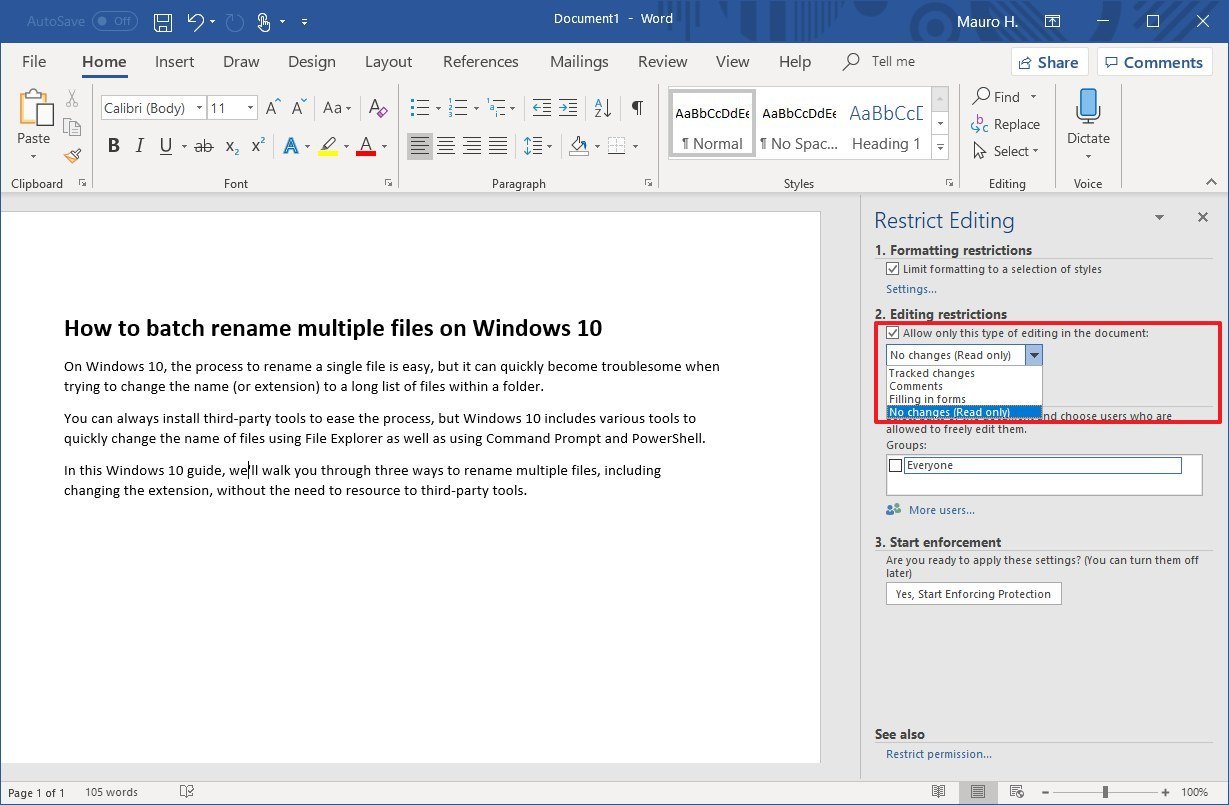
- Check the Allow only this type of editing in the document option.
- Use the drop-down menu to select an option that best suits your situation, including:
- No changes (Read only).
- Tracked changes.
- Comments.
- Filling in forms.
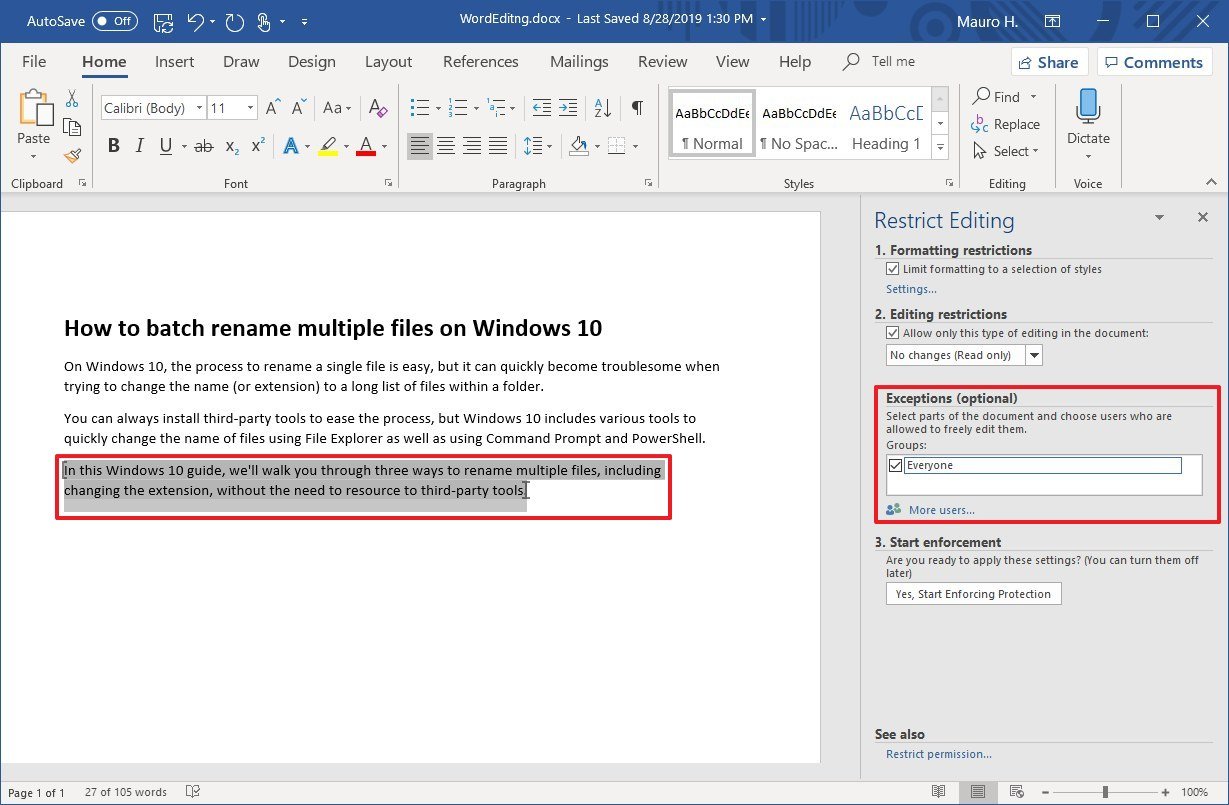
- (Optional) Using the mouse, select the part of the document that users are allowed to edit without restrictions.
- Under the Exceptions section, select the group or user (click the More users option) you want to allow to edit the part of the document selected.
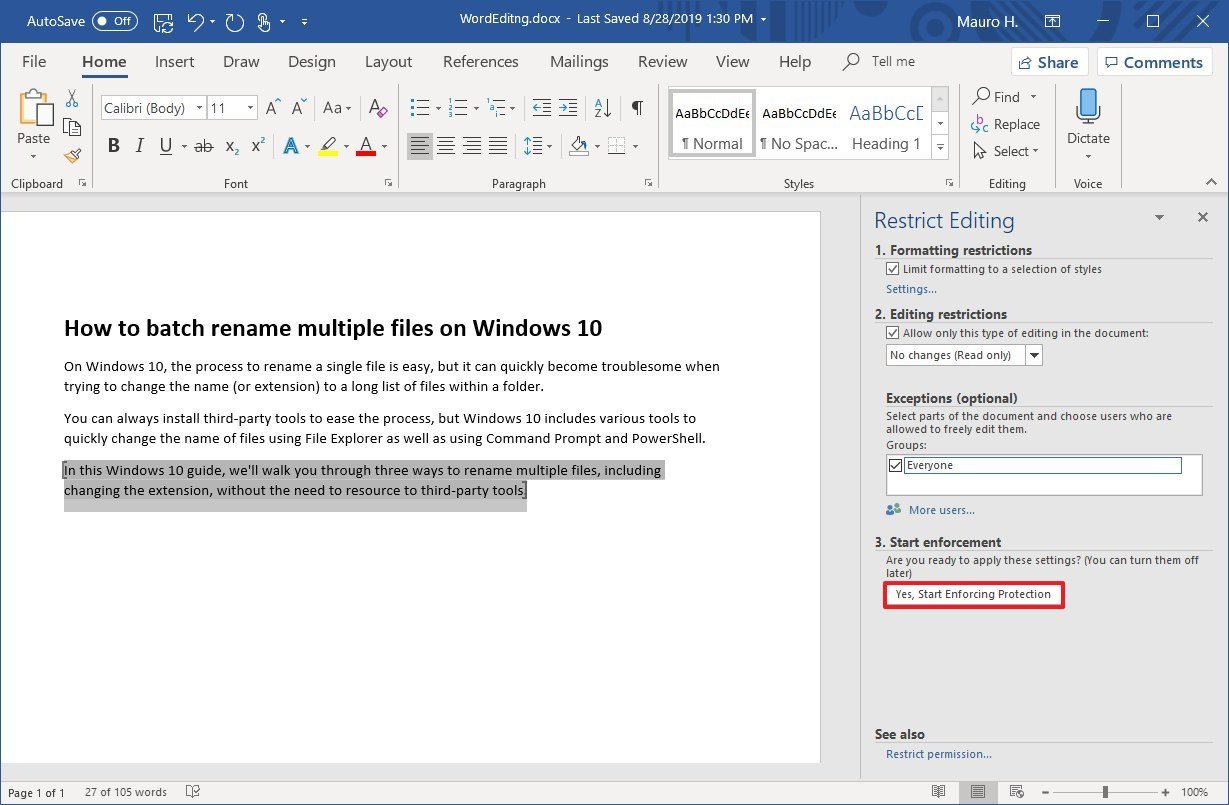
- Under the "Start enforcement" section, select the Yes, Start Enforcing Protection button.
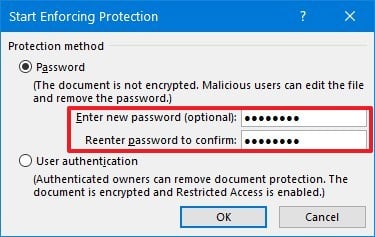
- (Optional) Select the Password option.
- Click the OK button.
Once you complete these steps, the application will block users from making unwanted changes based on your configuration.
If you change your mind, you can always revert the settings using the same instructions, but on step No. 6, click the Stop Protection button at the bottom of the "Restrict Editing" pane in the right side.
All the latest news, reviews, and guides for Windows and Xbox diehards.
Restricting modifications in Excel
To restrict editing to a sheet in Excel, use these steps:
- Open the Excel document.
- Click on File.
- Click on Info.
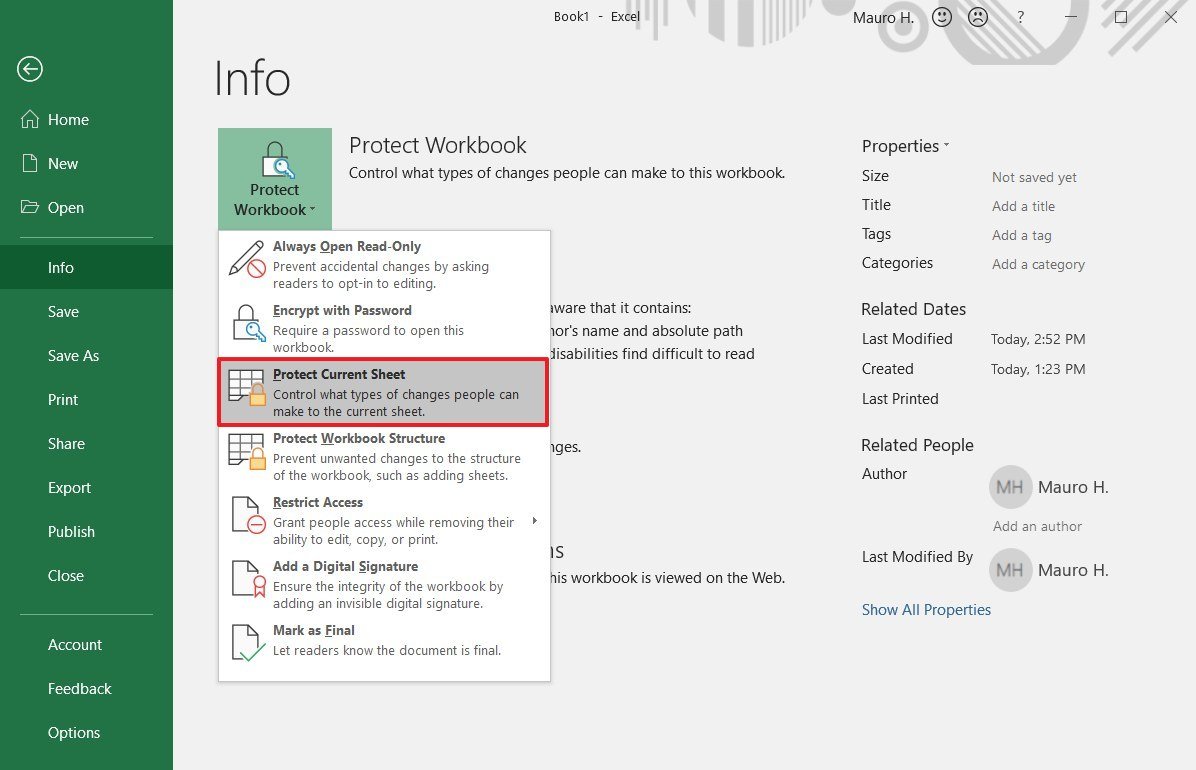
- On the right side, click the Protect Workbook menu.
- Select the Protect current sheet option.
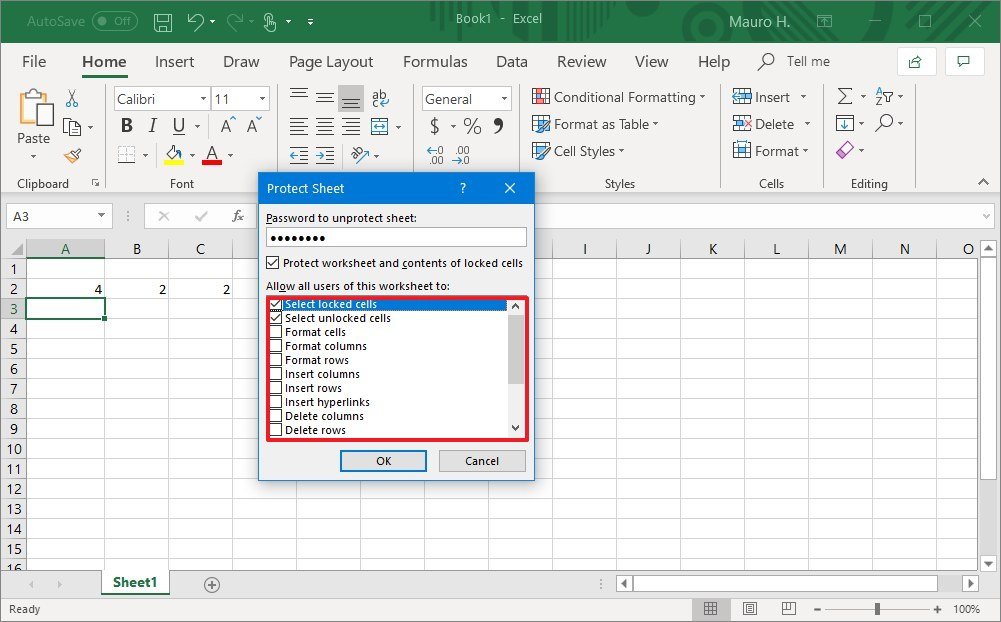
- (Optional) Set a password to unlock the sheet.
- Check the Protect worksheet and contents of locked cells option.
- Select the edits users are allowed to make.
- Click the OK button.
- Re-enter the password to confirm.
- Click the OK button.
After completing the steps, users will only be allowed to make changes based on the settings that you specified.
If you no longer need to protect an Excel sheet, you can revert the changes using the same instructions, but on step No. 4, make sure to click the Unprotect option on the right side.
Protect workbook structure
In addition to restricting edits to the sheet, you can also prevent unwanted changes to the structure of the workbook with these steps:
- Open the Excel document.
- Click on File.
- Click on Info.
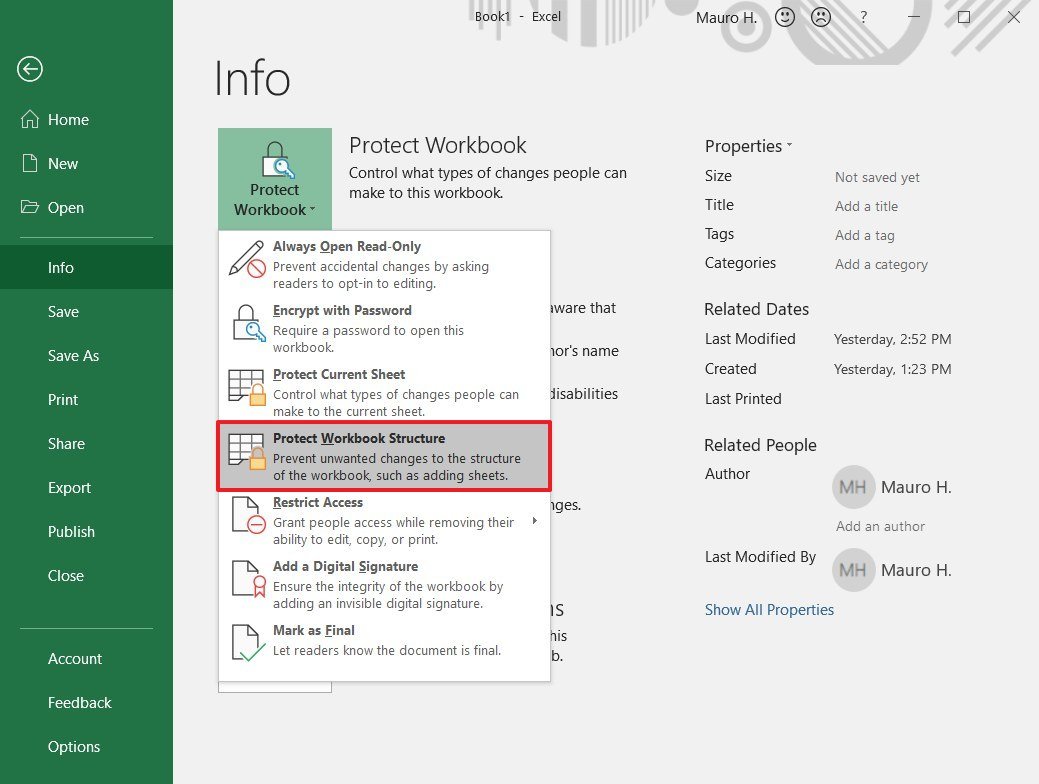
- On the right side, click the Protect Workbook menu.
- Select the Protect Workbook Structure option.
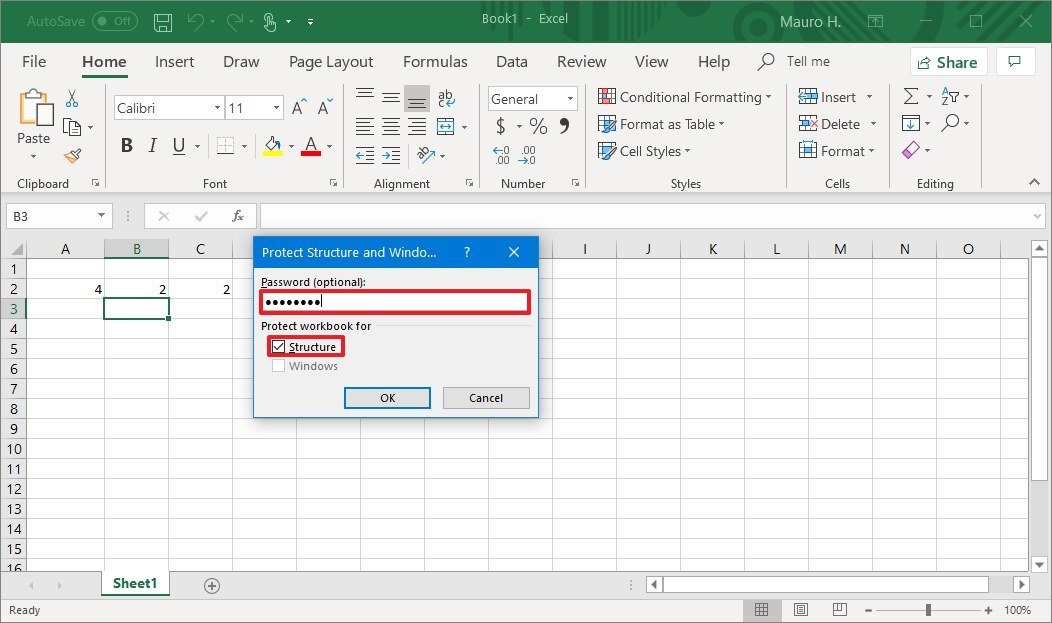
- (Optional) Set a password to allow changes.
- Under the "Protect workbook for" section, check the Structure option.
- Click the OK button.
- Re-enter the password to confirm.
- Click the OK button.
Once you complete these steps, users won't be able to modify the structure of the workbook, including adding, moving, deleting, hiding or renaming worksheets.
You can always undo the changes using the same instructions until step No. 5.
How to prevent unwanted edits using the read-only option in Microsoft Office
If you don't want anyone to make accidental changes to a Word, Excel, or PowerPoint document, you can configure the file to always open as read-only.
To open a document always in read-only mode, use these steps:
- Open the Office document.
- Click on File.
- Click on Info.
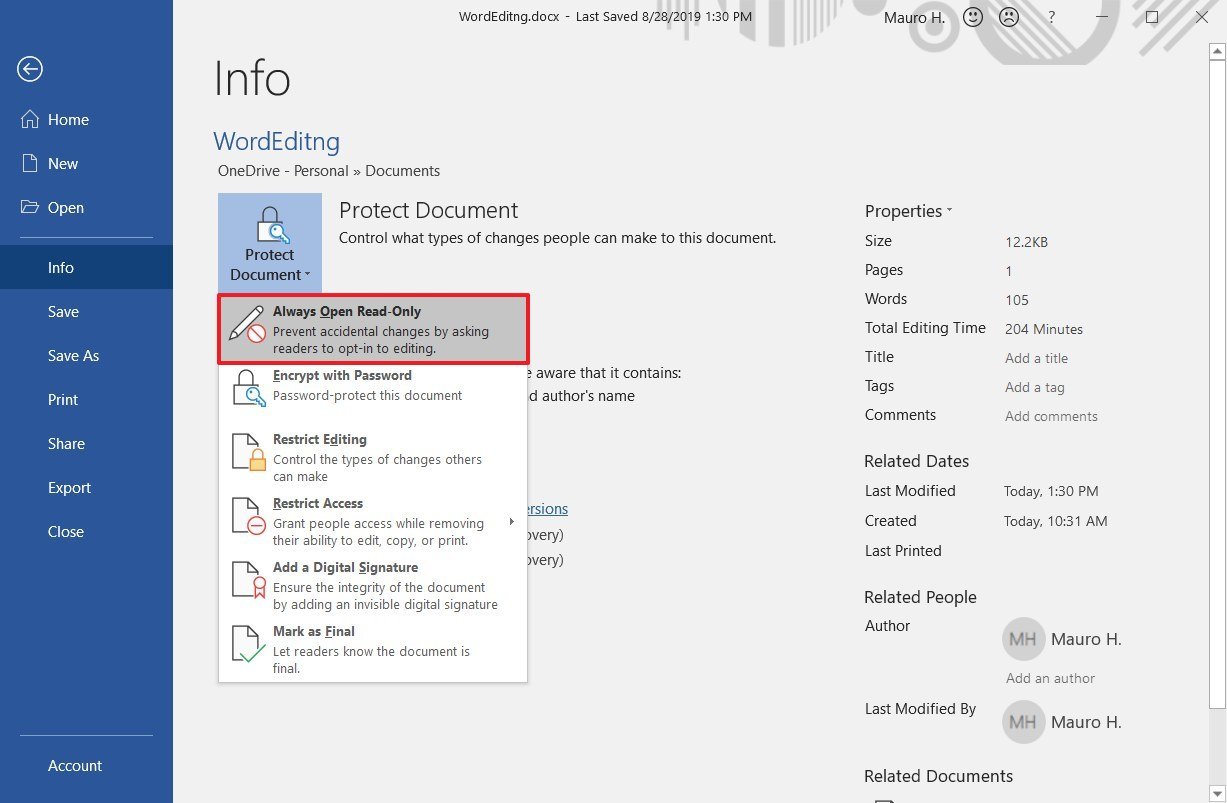
- On the right side, click the Protect document menu.
- Select the Always Open Read-Only option.
After completing these steps, the document will always open in read-only mode to prevent accidental changes. If you must input an update, close and re-open the document, and click the No button in the dialog box.
How to prevent unwanted edits by marking documents as final in Microsoft Office
Alternatively, you can also mark a Word, Excel, and PowerPoint document as final to prevent unintentional changes.
To mark an Office document as final, use these steps:
- Open the Office document.
- Click on File.
- Click on Info.
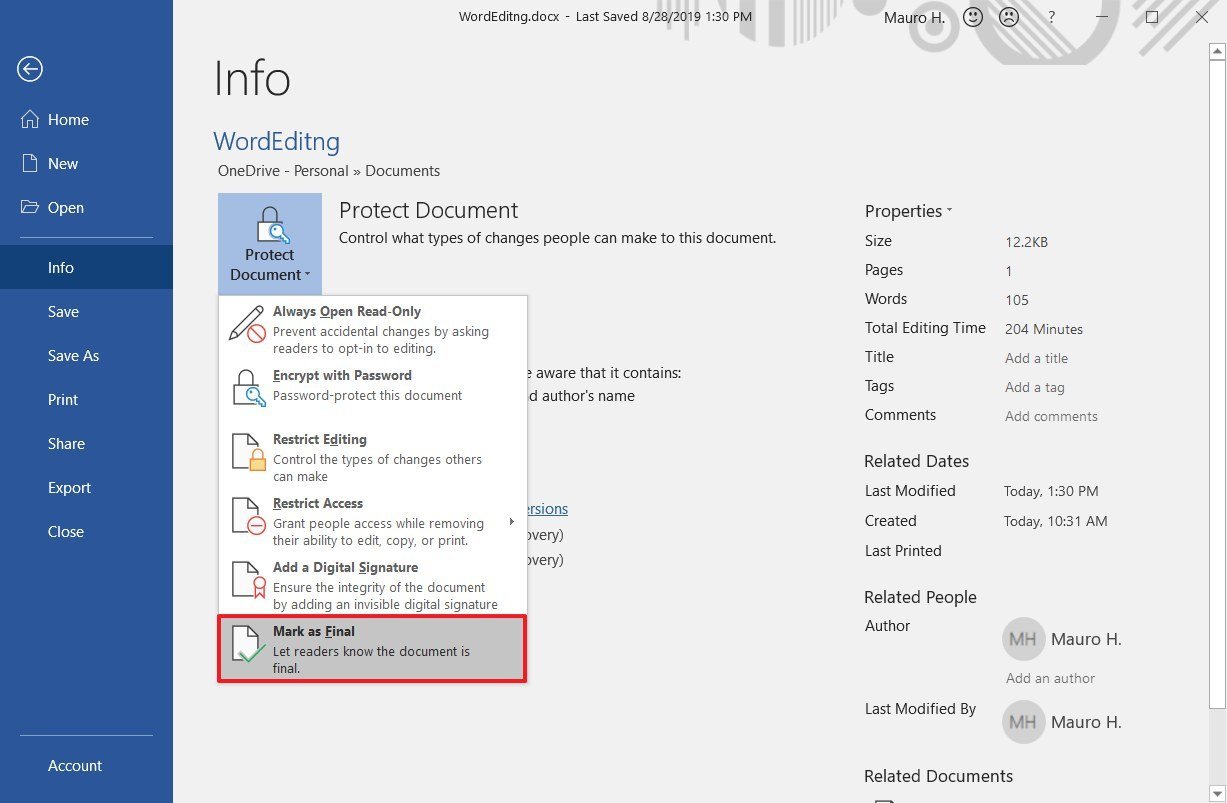
- On the right side, click the Protect document menu.
- Select the Mark as Final option.
- Click the OK button.
- Click the OK button again.
Once you complete these steps, the document will be marked as final, and as a result, changing comments, typing, and proofing will be disabled, preventing users from making changes.
You can always undo the setting using the same instructions until step No. 5.
While marking a document as final disables editing, users will still able to unlock the document to make changes. However, it's a handy feature to let users know that the file has been finalized and to prevent unintentional changes that can go unnoticed.

Mauro Huculak has been a Windows How-To Expert contributor for WindowsCentral.com for nearly a decade and has over 22 years of combined experience in IT and technical writing. He holds various professional certifications from Microsoft, Cisco, VMware, and CompTIA and has been recognized as a Microsoft MVP for many years.
