How to manage Storage sense settings using Group Policy on Windows 10 May 2019 Update
You can now control Storage sense settings with Group Policy, and in this guide, we'll show you how on the Windows 10 May 2019 Update.
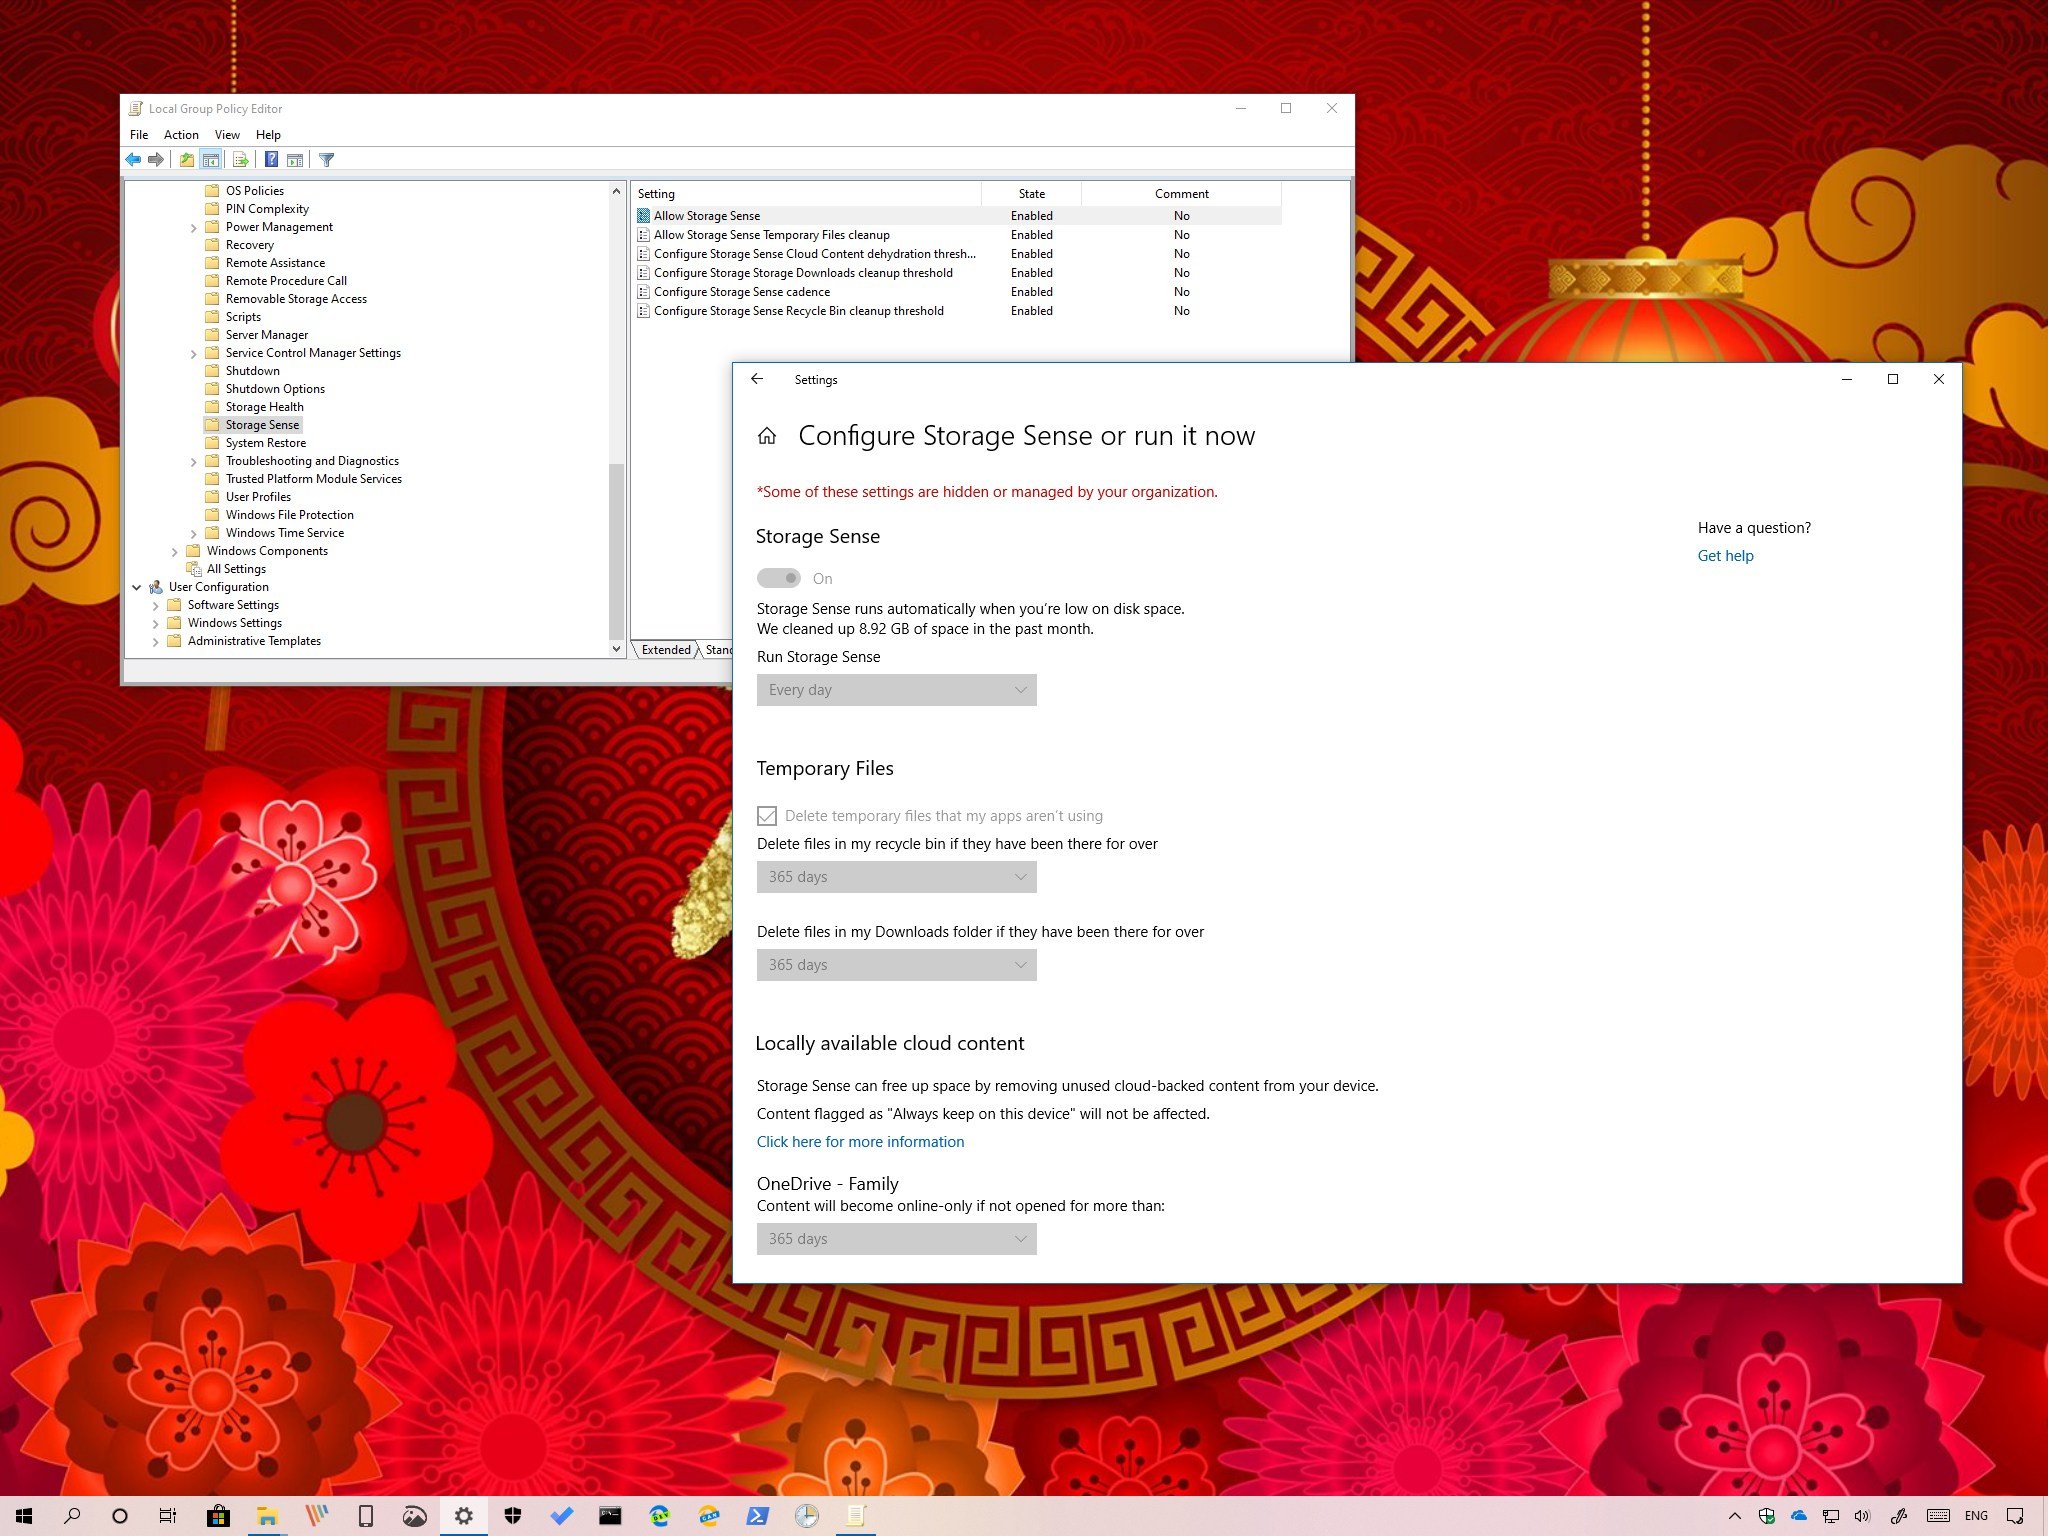
On Windows 10, Storage sense is a built-in tool designed to free up space automatically. When it's enabled, the feature monitors your device, and when it's running low on space, it deletes temporary files, empties the Recycle Bin, cleans up the Downloads folder, removes previous installation files, and more to make space to install new updates or store more important data.
Although you can control most aspects of the experience using the Settings app, starting with the Windows 10 May 2019 Update (version 1903), you can also manage the same settings with more flexibility using the Group Policy Editor on Windows 10 Pro, Enterprise, or Education, which will come in handy in many scenarios. For example, when sharing your device with other people, you want to restrict users access to the feature, or when managing multiple devices in a network environment.
In this Windows 10 guide, we'll walk you through the steps to manage Storage sense settings using Group Policy with the new policies available with the May 2019 Update and later.
- How to enable or disable Storage sense settings
- How to disable temporary files deletion using Storage sense
- How to set OneDrive folder content retention using Storage sense
- How to set Downloads folder content retention using Storage sense
- How to set Recycle Bin content retention using Storage sense

Windows 10 May 2019 Update full reviewHow to get the May 2019 Update ASAPMay 2019 Update common problems and how to fix themFull list of changes in the May 2019 UpdateAll of our May 2019 Update resources in one place
How to enable or disable Storage sense settings
Starting with the May 2019 Update, you can use policies to enable, disable, and restrict users access to manage the Storage sense feature using the Settings app.
Enabling or disabling Storage sense
To enable or disable Storage sense using Group Policy, use these steps:
- Open Start.
- Search for gpedit.msc and click OK to open the Local Group Policy Editor.
- Browse the following path:
Computer Configuration > Administrative Templates > System > Storage sense - On the right side, double-click the Allow Storage Sense policy.
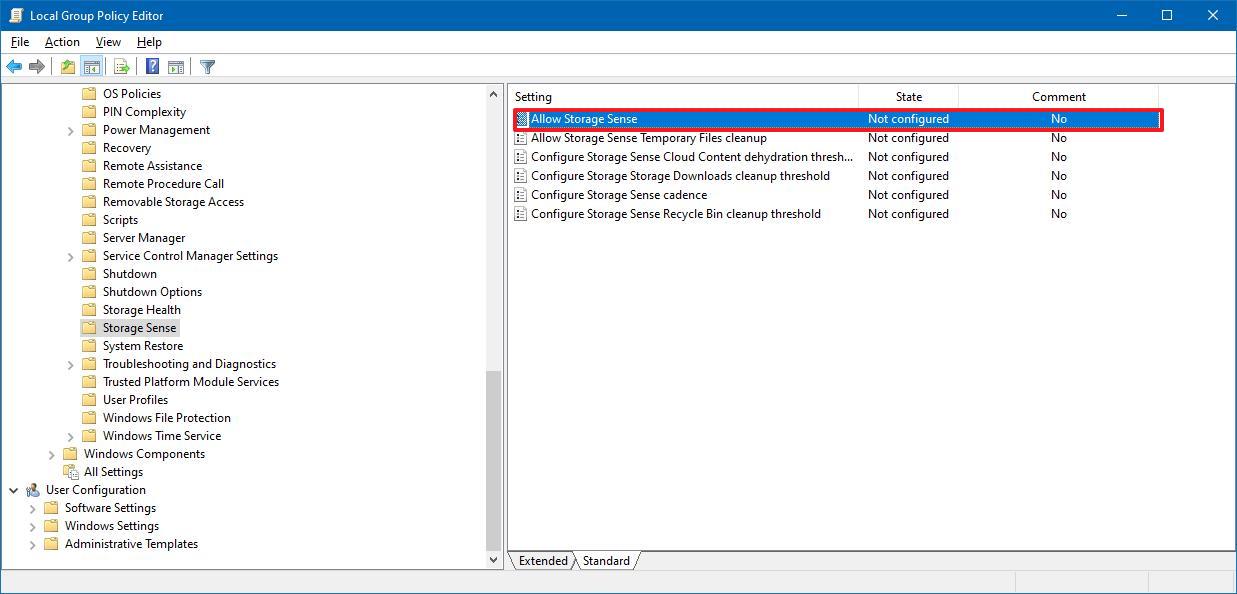
- Select the Enabled or Disabled option.Quick note: Using the Enabled or Disabled option will prevent users from changing the state of the feature using the Settings app.
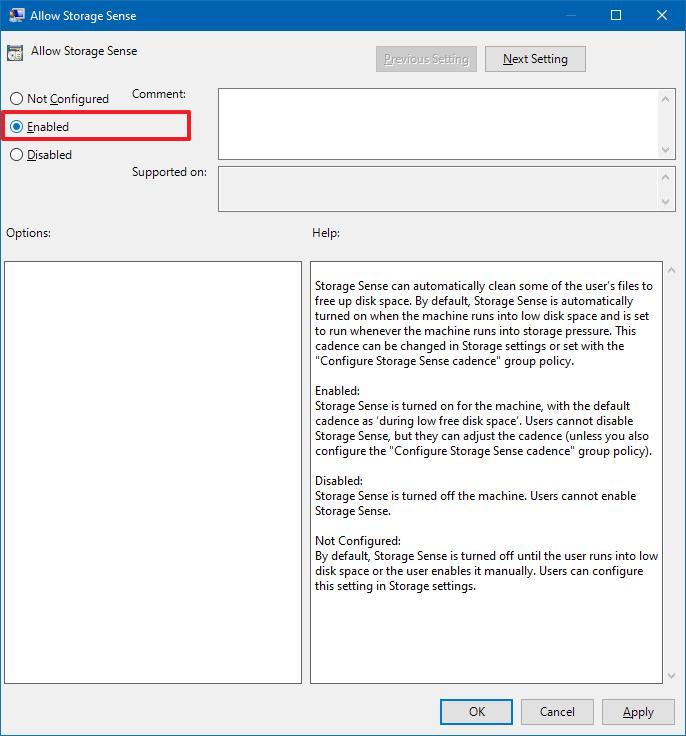
- Click the Apply button.
- Click the OK button.
Once you complete the steps, if you enabled the option, then Storage sense will run automatically. In the case that you selected the Disabled option, then Storage sense will no longer run automatically, and users will not be able to enable the feature, but they'll be able to access the settings page to free up space manually.
Also, if you're disabling this policy, then all the remaining Storage sense policies available through Group Policy won't have any effect. In the case that you're planning to configure each policy individually, then use the same instructions outlined above, but on step No. 5, make sure to select the Not Configured option.
Get the Windows Central Newsletter
All the latest news, reviews, and guides for Windows and Xbox diehards.
Scheduling automatic cleanup
If you want to configure when Storage sense should run automatically while preventing users from changing the settings, use these steps:
- Open Start.
- Search for gpedit.msc and click OK to open the Local Group Policy Editor.
- Browse the following path:
Computer Configuration > Administrative Templates > System > Storage sense - On the right side, double-click the Configure Storage Sense cadence policy.
- Select the Enabled option.
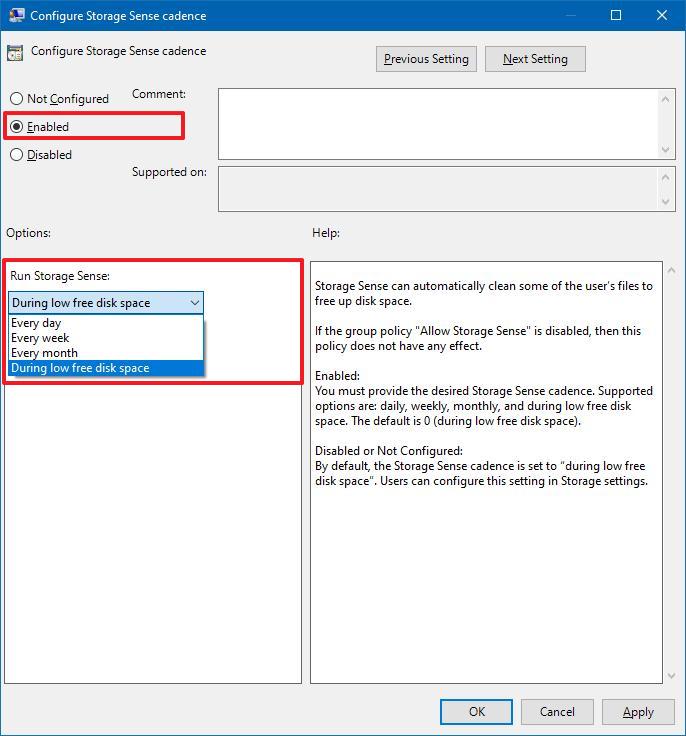
- Under the Options section, use the drop-down menu to specify when to run Storage sense automatically. Options available, include:
- Every day.
- Every week.
- Every month.
- During low free disk space.
- Click the Apply button.
- Click the OK button.
After you complete the steps, the feature will free up space during the cadance you specified.
How to disable temporary files deletion using Storage sense
If you want to prevent Storage sense from deleting temporary files automatically on Windows 10, use these steps:
- Open Start.
- Search for gpedit.msc and click OK to open the Local Group Policy Editor.
- Browse the following path:
Computer Configuration > Administrative Templates > System > Storage sense - On the right side, double-click the Allow Storage Sense Temporary Files cleanup policy.
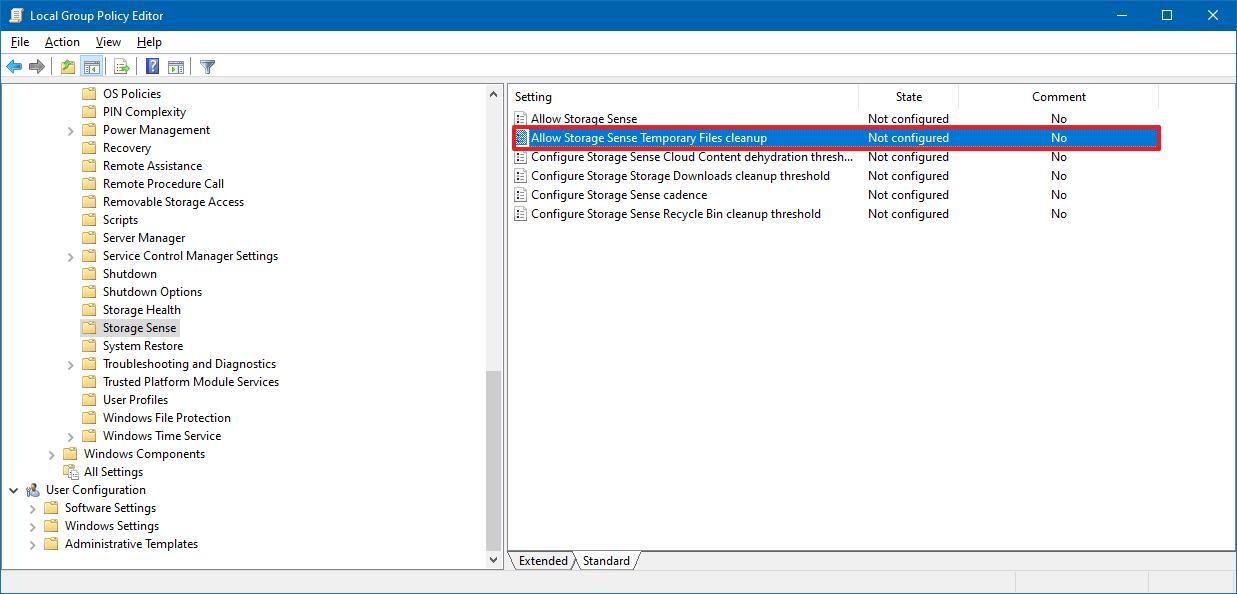
- Select the Disabled option.Quick note: If you're looking to lock the feature to prevent users from modifying this option in the Settings app, then you should select the Enabled option.
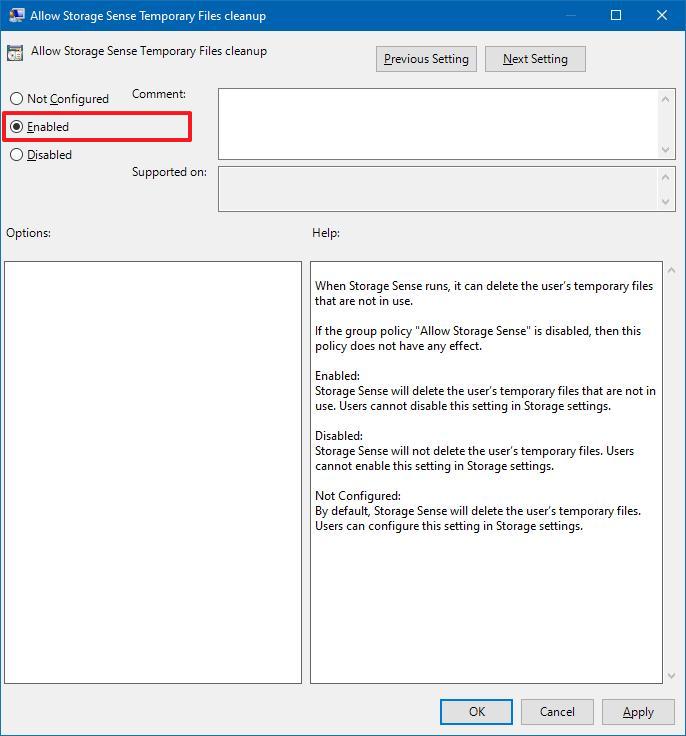
- Click the Apply button.
- Click the OK button.
Once you complete the steps, Storage sense will no longer delete temporary files automatically. However, users will still be able to remove junk files manually to free up space on the device.
You can always revert the changes using the same instructions, but on step No. 5, make sure to select the Not Configured option.
How to set OneDrive folder content retention using Storage sense
Storage sense can free up space by making fully downloaded files online-only content, and starting with the May 2019 Update, using Group Policy, you can now disable the option or set a number of days before dehydrating files (remove the local copy) for up to one year with these steps:
- Open Start.
- Search for gpedit.msc and click OK to open the Local Group Policy Editor.
- Browse the following path:
Computer Configuration > Administrative Templates > System > Storage sense - On the right side, double-click the Configure Storage Sense Cloud Content dehydration threshold policy.
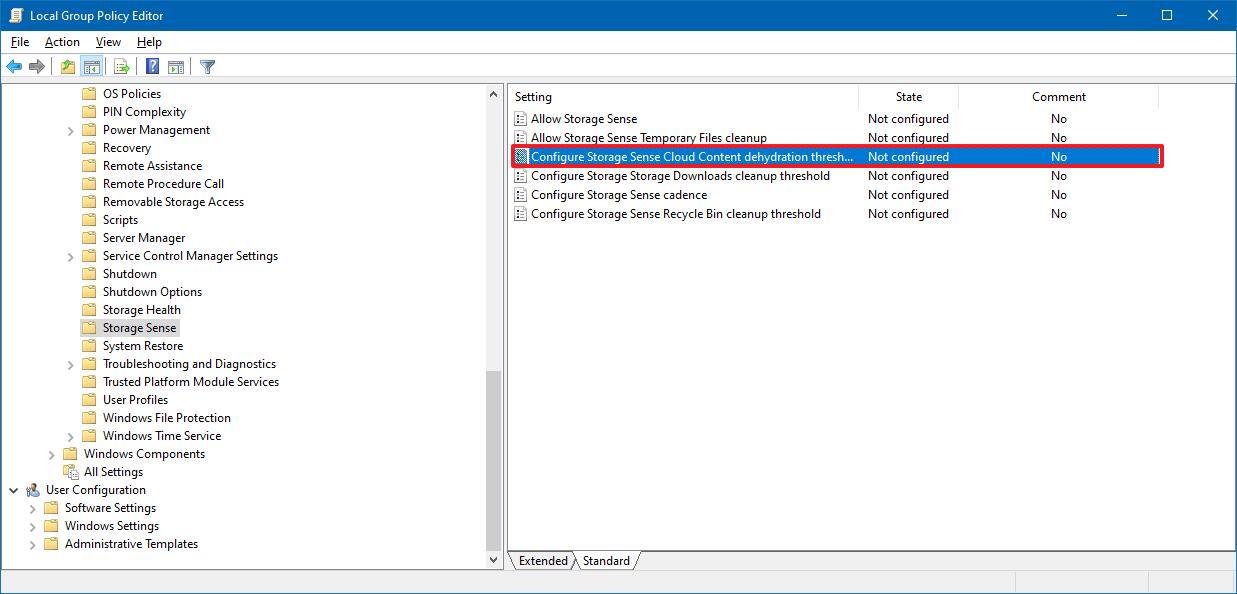
- Select the Enabled option.Quick note: Selecting the Disabled option will stop Storage sense from making unused OneDrive files available only in the cloud to free up space automatically, but users will continue to be able to use this feature manually.
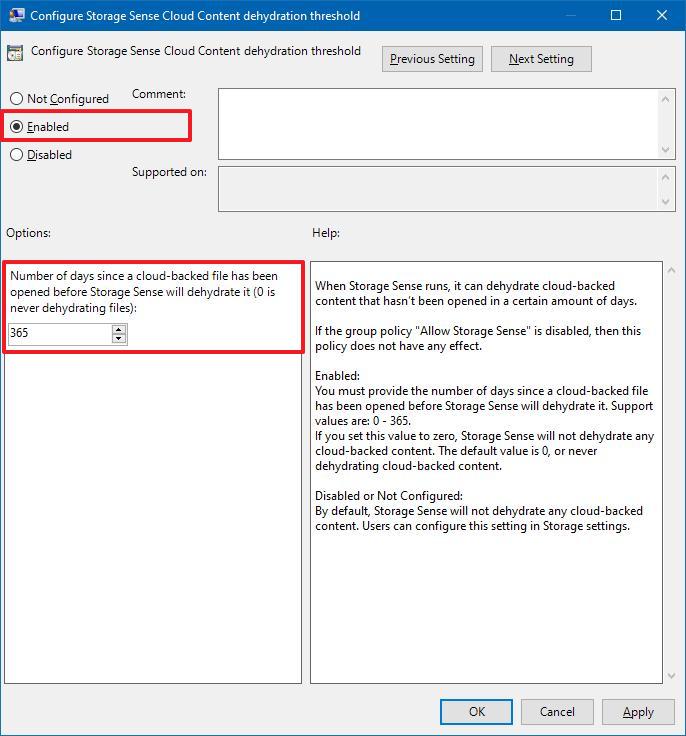
- Under the Options section, select the number of days (up to 365 days, instead of 60 using the Settings app) since a OneDrive file has been opened before making it available only in the cloud.
- Click the Apply button.
- Click the OK button.
After you complete the steps, the feature will only dehydrate files that haven't been open according to your configuration. However, if you used the Disabled option, then Storage sense will no longer dehydrate unused files to free up space.
If you want to undo the changes, use the same instructions, but on step No. 5, make sure to select the Not Configured option.
How to set Downloads folder content retention using Storage sense
The cleanup tool can also delete older files from the Downloads folder, but you can disable this option or set the age of the files before deletion up to one year with these steps:
- Open Start.
- Search for gpedit.msc and click OK to open the Local Group Policy Editor.
- Browse the following path:
Computer Configuration > Administrative Templates > System > Storage sense - On the right side, double-click the Configure Storage Sense Downloads cleanup threshold policy.
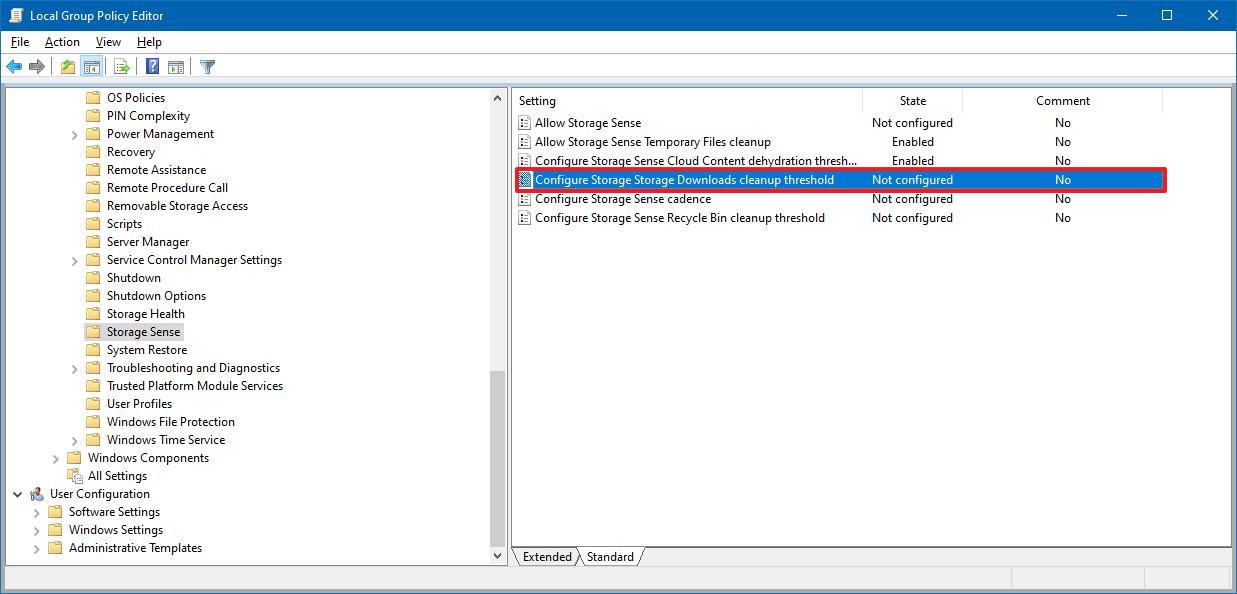
- Select the Enabled option.
- Under the Options section, select the number of days (up to 365 days, instead of 60 using the Settings app) for the age of the file before deletion.Quick note: You can select the Disabled option to turn off the feature, but users will still manage it manually using the Settings app.
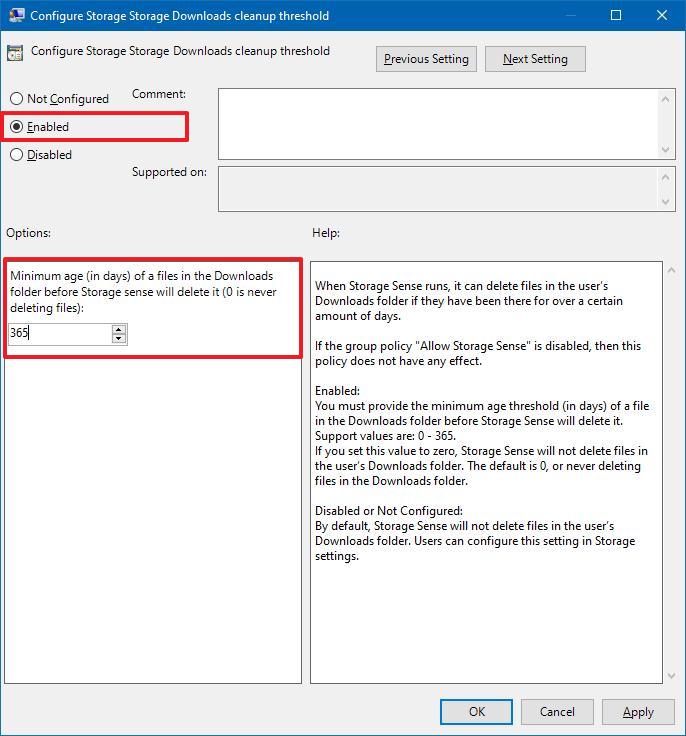
- Click the Apply button.
- Click the OK button.
Once you complete the steps, older files inside the Downloads folder will be removed according to your configuration. If you disabled the feature, then Storage sense will stop deleting files from the folder.
If you change your mind, you can remove the changes using the same instructions, but on step No. 5, make sure to select the Not Configured option.
How to set Recycle Bin content retention using Storage sense
As part of the options to optimize the space usage on your device, Storage sense can also empty the Recycle Bin files. If you prefer to keep the deleted files a little longer, using Group Policy, you can disable the feature or set the number of days (up to one year) before deleting these files automatically using these steps:
- Open Start.
- Search for gpedit.msc and click OK to open the Local Group Policy Editor.
- Browse the following path:
Computer Configuration > Administrative Templates > System > Storage sense - On the right side, double-click the Configure Storage Sense Recycle Bin cleanup threshold policy.
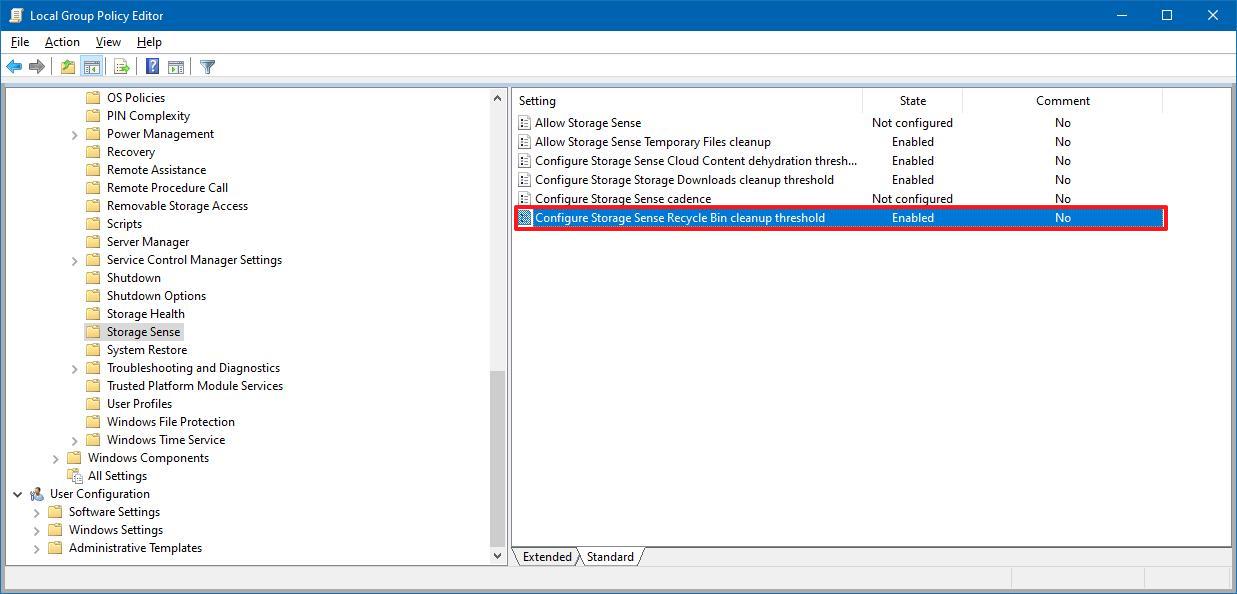
- Select the Enabled option.
- Under the Options section, select the number of days (up to 365 days, instead of 60 using the Settings app) before Storage sense empties the Recycle Bin automatically.Quick note: You can select the Disabled option to prevent Storage sense from removing deleted files, but users will still be able to manage it manually using the Settings app.

- Click Apply.
- Click OK.
After you complete the steps, deleted files will continue in the Recycle Bin until you manually delete them. Or if you specified the Enabled option, then deleted files will be removed according to your new settings.
The Group Policy Editor is only available for devices running Windows 10 Pro, Enterprise, and Education, which means that these set of instructions won't apply to Windows 10 Home. However, you can always upgrade to unlock the Group Policy Editor and other features by getting a new product license from the Microsoft Store.
More Windows 10 resources
For more helpful articles, coverage, and answers to common questions about Windows 10, visit the following resources:
- Windows 10 on Windows Central – All you need to know
- Windows 10 help, tips, and tricks
- Windows 10 forums on Windows Central
Mauro Huculak has been a Windows How-To Expert contributor for WindowsCentral.com for nearly a decade and has over 15 years of experience writing comprehensive guides. He also has an IT background and has achieved different professional certifications from Microsoft, Cisco, VMware, and CompTIA. He has been recognized as a Microsoft MVP for many years.

