How to manage storage devices on Windows 11
These are the ways you can manage storage devices on your computer.
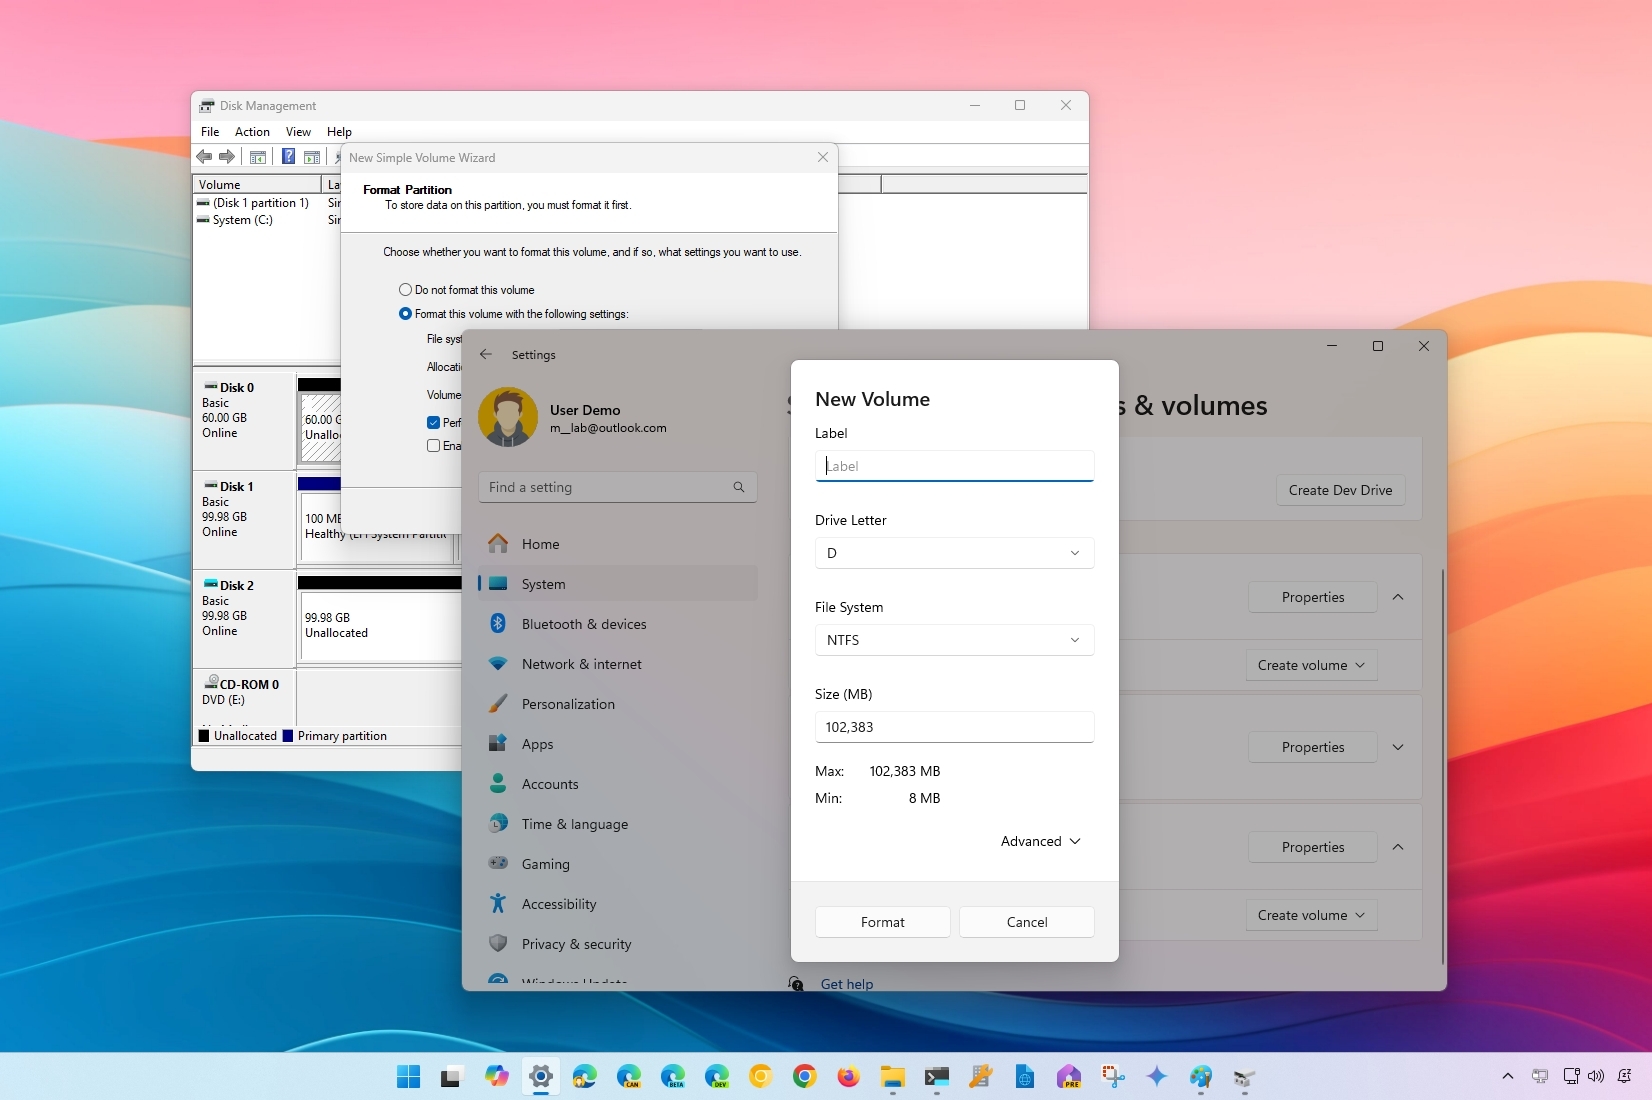
On Windows 11, every drive needs to have a volume with a compatible file system and letter to make it usable. Usually, when you connect an internal or external hard drive, it comes already formatted with the necessary settings to make it plug-and-play. However, sometimes, you will need to manage the storage device manually.
For example, you may need to reformat a previously connected drive to a computer or resolve file corruption problems. You may need to change the drive letter or label to make the storage more meaningful for the data you will be storing. Or, instead of using the entire drive to store files, you may want to resize the volume to create additional volumes to store different types of files.
Regardless of the reason, Windows 11 includes many ways to manage storage devices, including the "Disks & Volumes" settings and "Disk Management." The Disk Management tool has been around for a long time and is a console that allows you to view all drives (such as SSDs, HDDs, and USB drives). You can use the available tools to create, resize, format, and change volumes' letters and labels.
On the other hand, "Disks & volumes" is the new experience designed to replace the Disk Management console. It's available through the Storage settings. Similar to the legacy console, it offers an interface to view the drives (if they haven't been initialized). You can create and delete, change size and format, and choose different letters and labels for storage volumes.
In this how-to guide, I will outline the steps to manage the drives connected to your computer.
How to manage drives from Settings on Windows 11
Windows 11 has a new "Disks & volumes" experience to manage storage drives from the Settings app. Using this experience, you can create new volumes, format, change drive letters and labels, and more. The new settings page is meant to replace Disk Management, but the legacy app is still available.
Create new volume
The "Disks & volumes" settings make it easy to format and create a new volume on a hard drive. You don't need to bring the storage online or initialize the drive using this interface. The wizard will automatically bring the storage online, initialize it, and set a default partition style.
Get the Windows Central Newsletter
All the latest news, reviews, and guides for Windows and Xbox diehards.
To create a new volume on Windows 11, use these steps:
- Open Settings.
- Click on System.
- Click the Storage page on the right side.
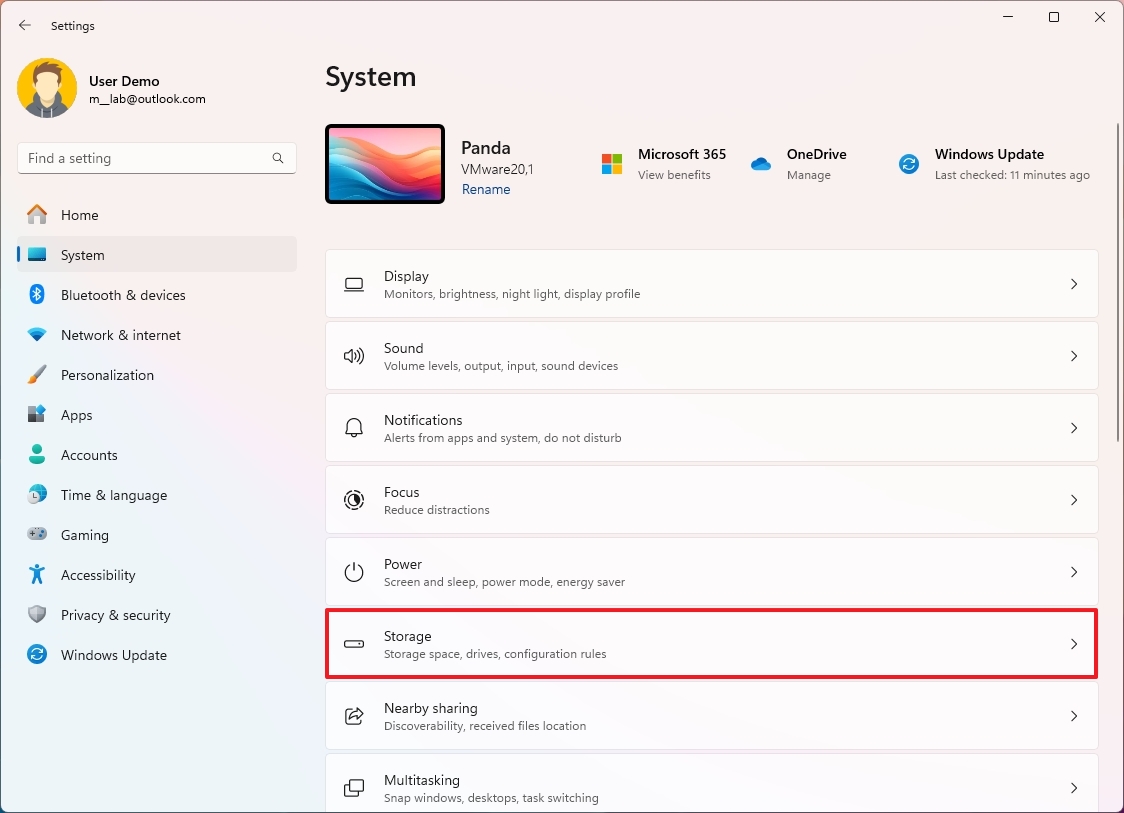
- Click on Advanced storage settings under the "Storage management" section.
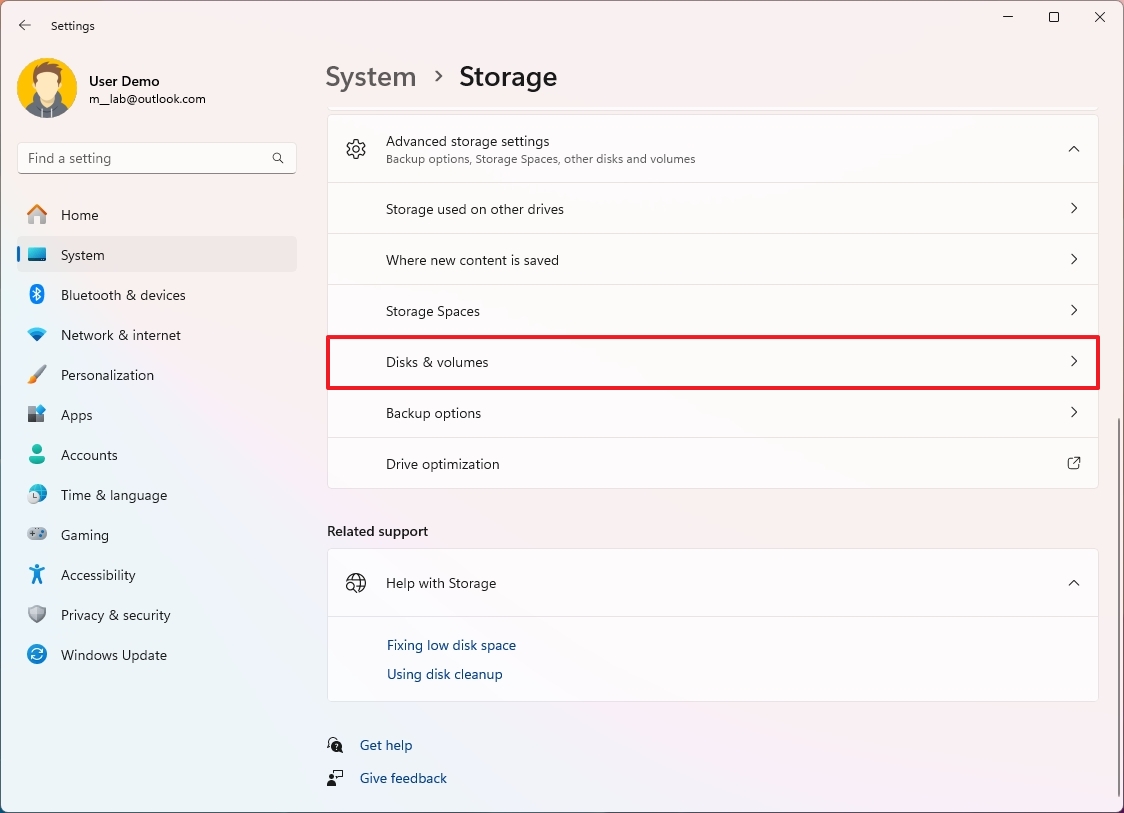
- Click the "Disks & volumes" setting.
- Select the drive to create a new volume.
- Select the Unallocated space, click the Create volume button, and choose the "Create Simple Volume" option.
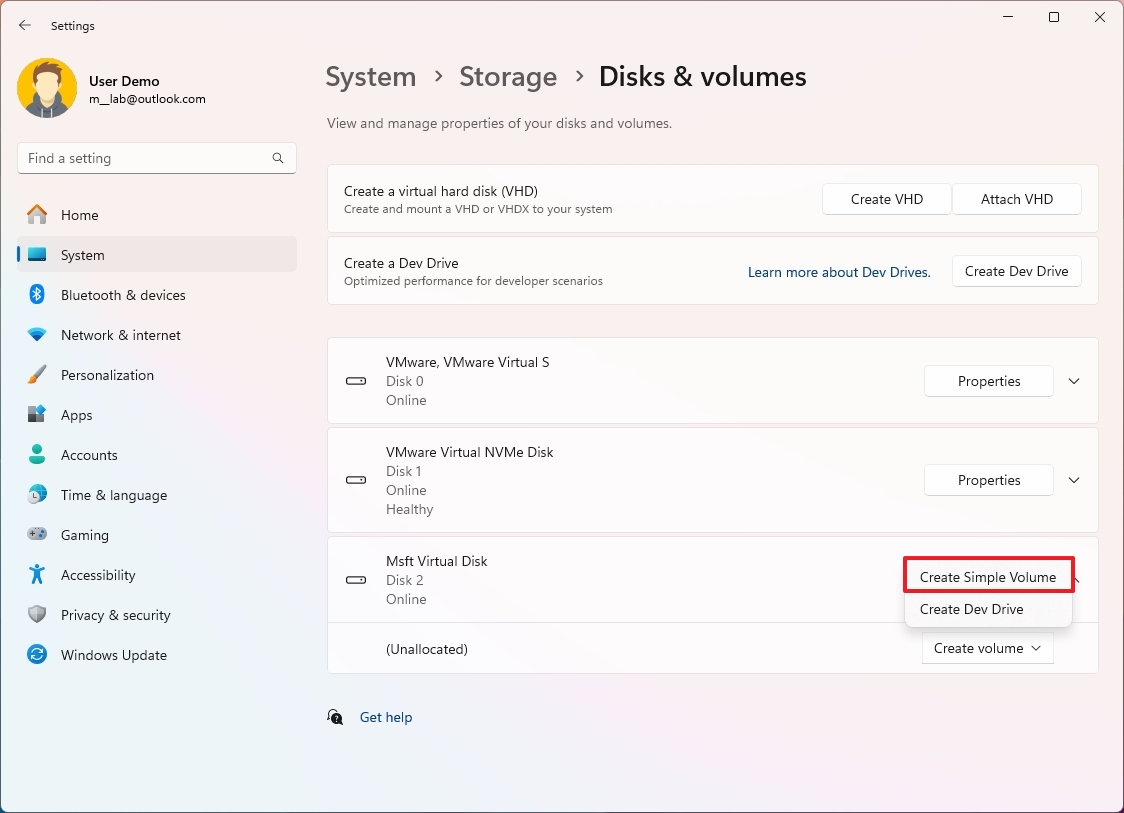
- Confirm a drive label in the "Label" field.
- Select the drive letter with the "Drive letter" drop-down menu.
- Select the NTFS option with the "File System" drop-down menu.
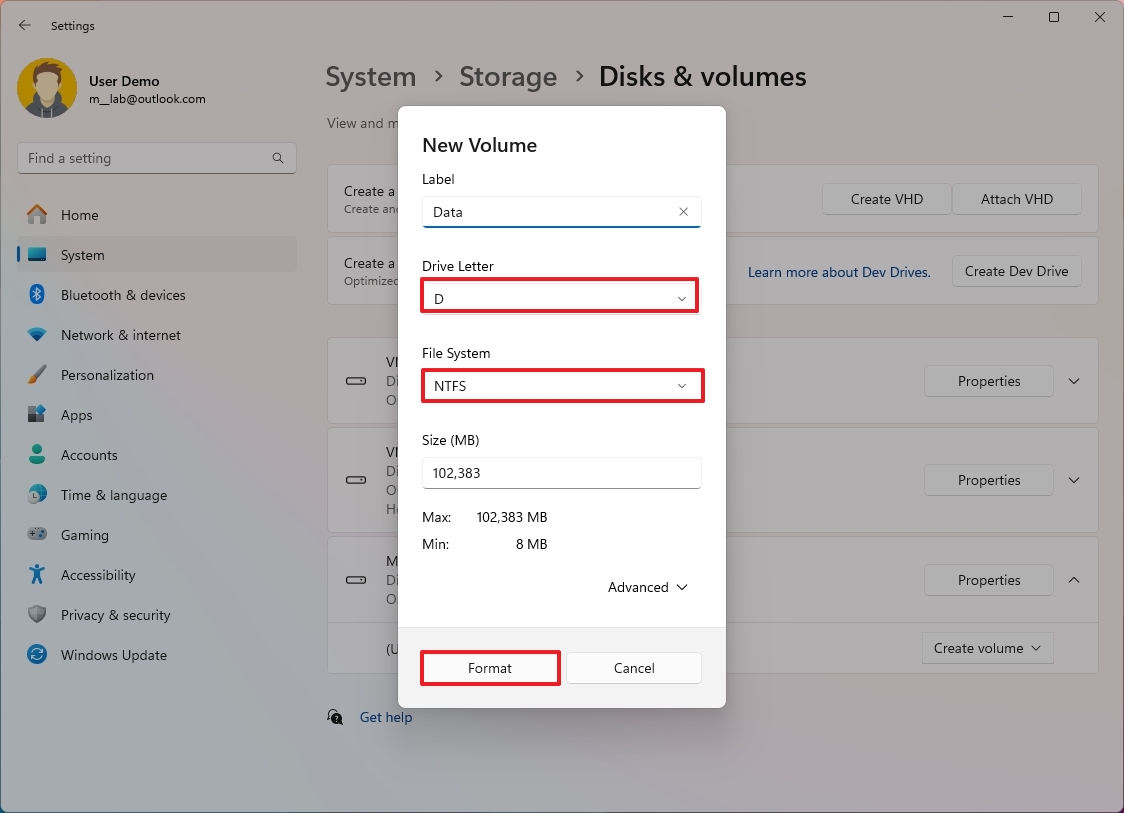
- (Optional) Confirm the size of the volume if you plan to create multiple volumes.
- Click the Format button.
Once you complete the steps, the wizard will create a new volume that will appear in File Explorer with a file system, drive letter, and label.
Change drive letter
To change the drive letter from the Settings app on Windows 11, use these steps:
- Open Settings.
- Click on System.
- Click the Storage page on the right side.

- Click on Advanced storage settings under the "Storage management" section.
- Click the "Disks & volumes" setting.

- Select the drive to create a new volume.
- Select the available volume and click the Properties button.
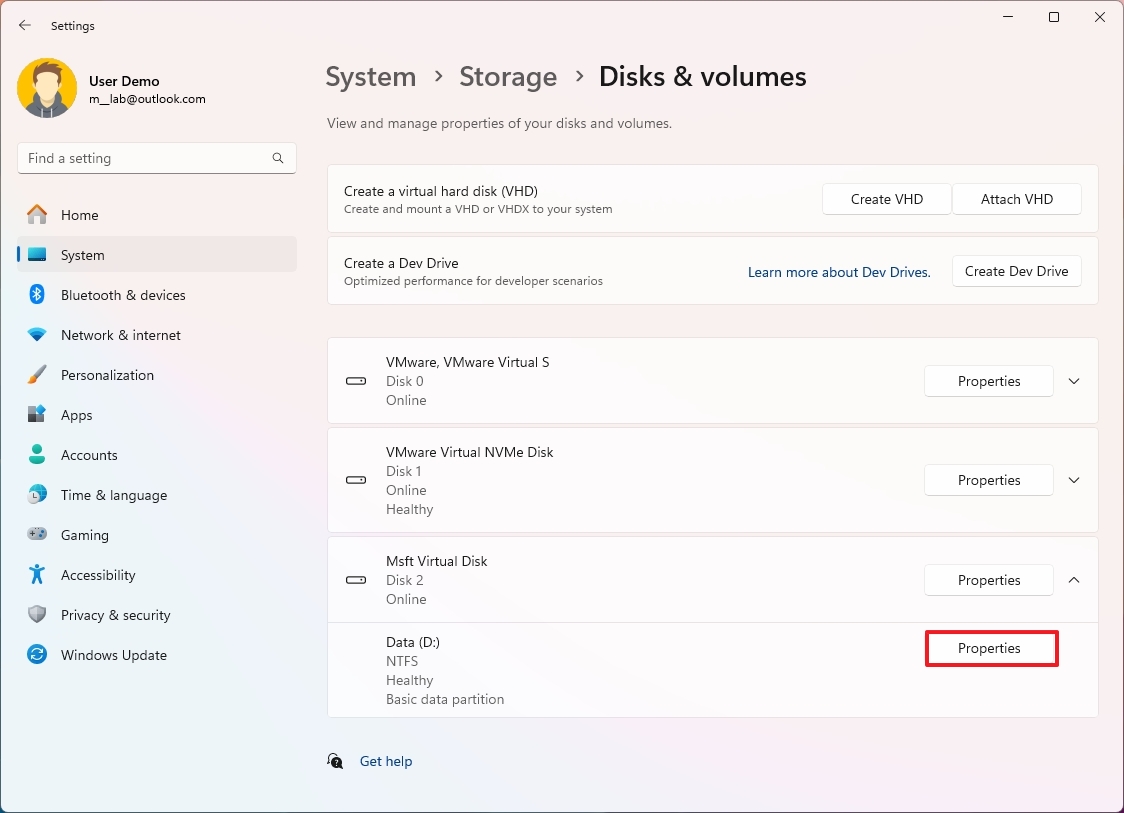
- Click the "Change drive letter" button.
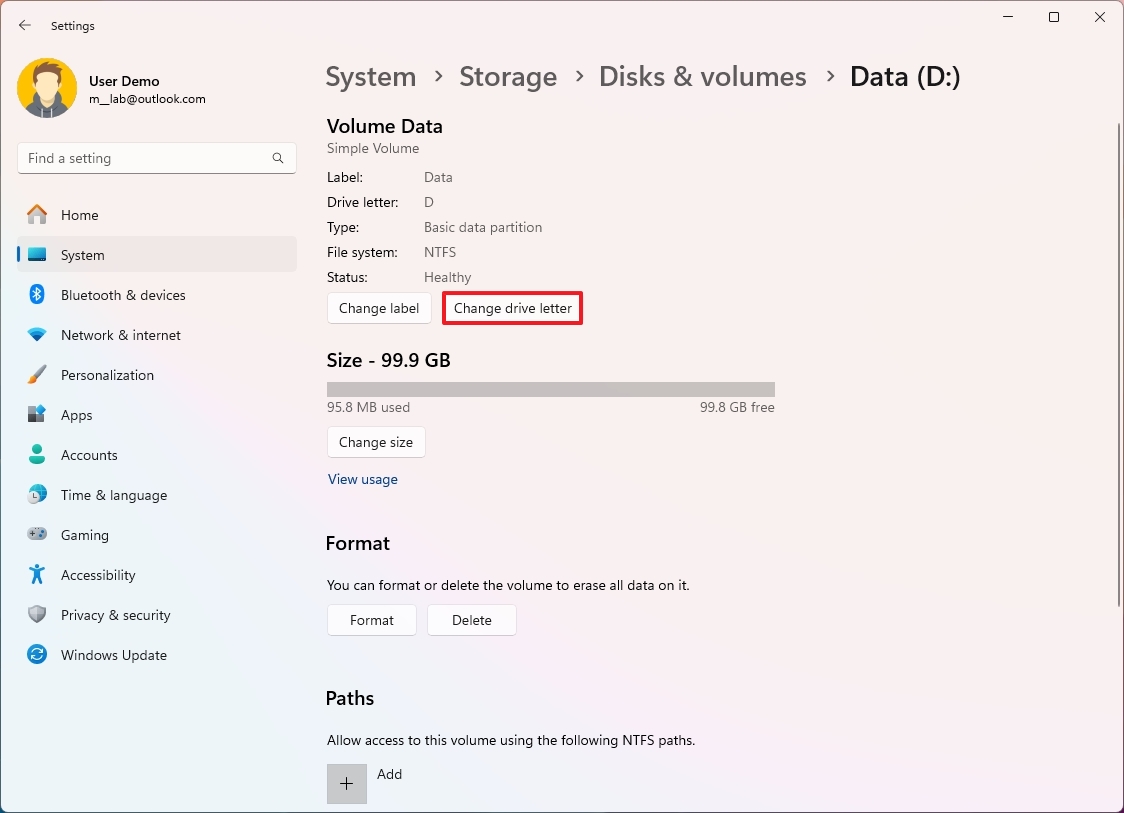
- Choose the new drive letter for the volume.
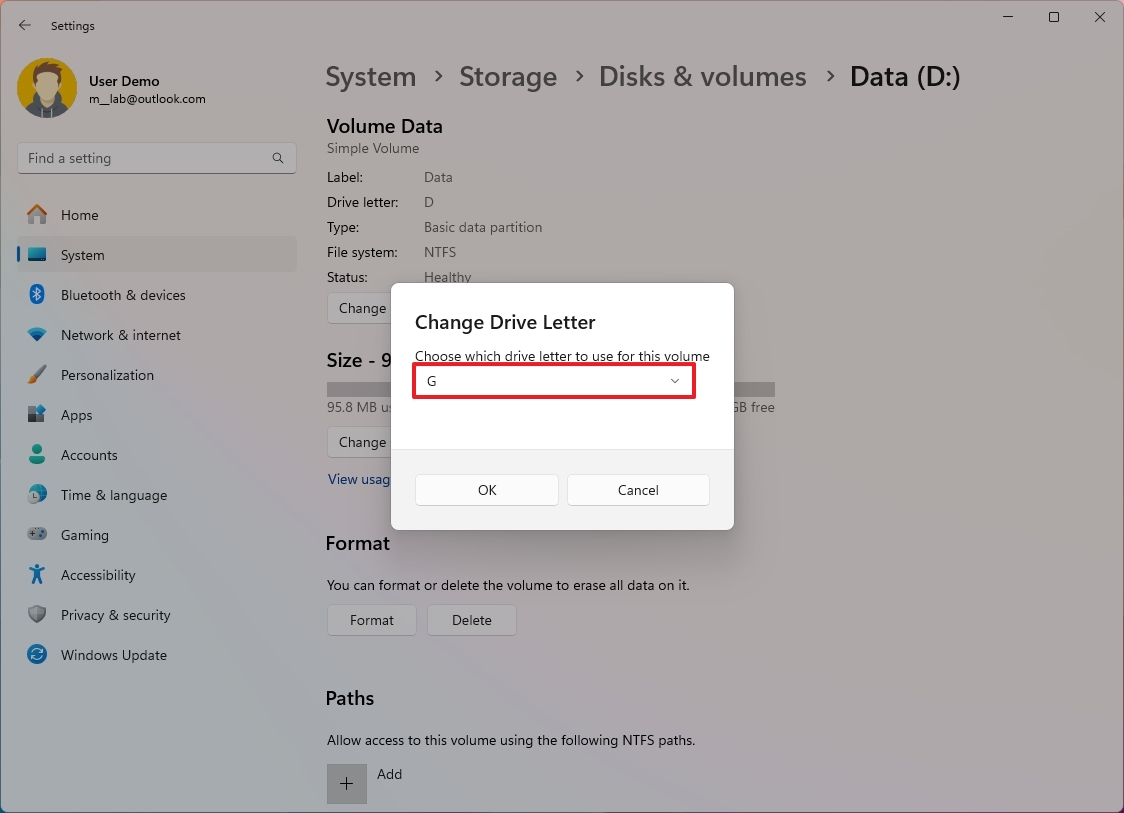
- Click the OK button.
After you complete the steps, the new letter will apply to the drive.
Change volume label
To change the volume label on Windows 11, use these steps:
- Open Settings.
- Click on System.
- Click the Storage page on the right side.

- Click on Advanced storage settings under the "Storage management" section
- Click the "Disks & volumes" setting.

- Select the drive to create a new volume.
- Select the available volume and click the Properties button.

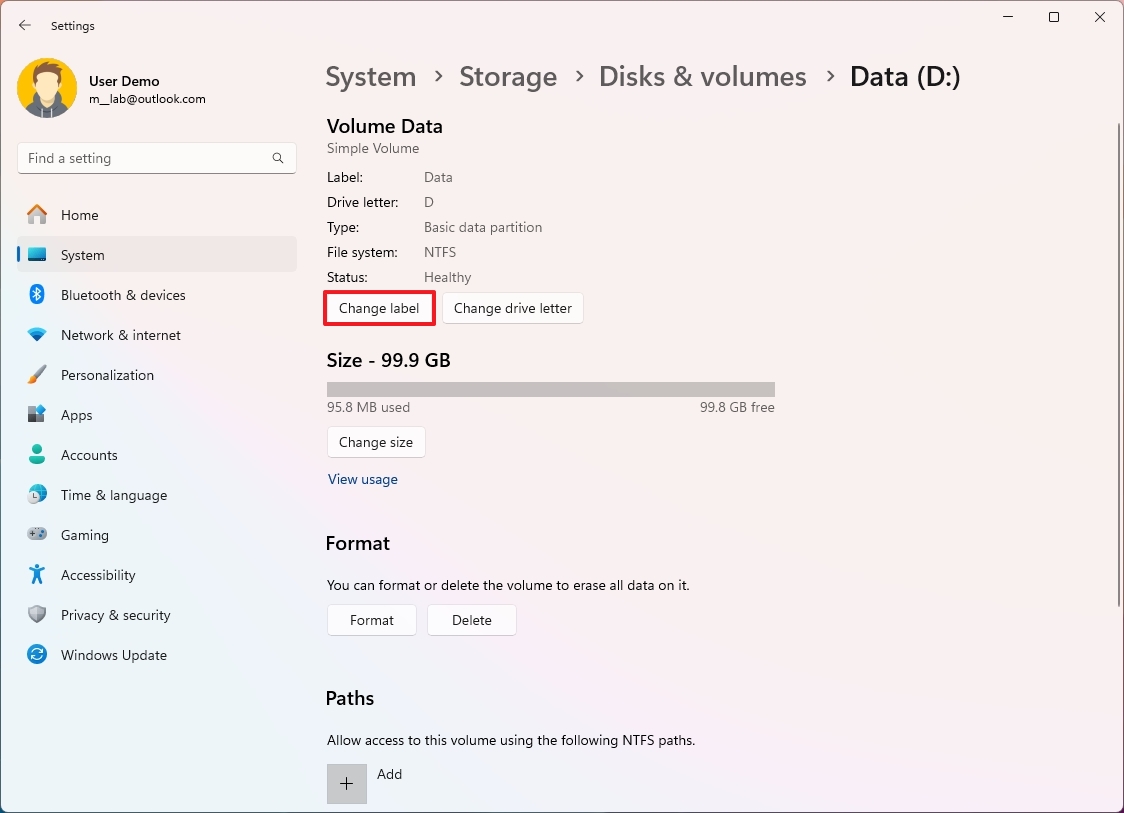
- Click the Change label button.
- Confirm a new label for the drive.
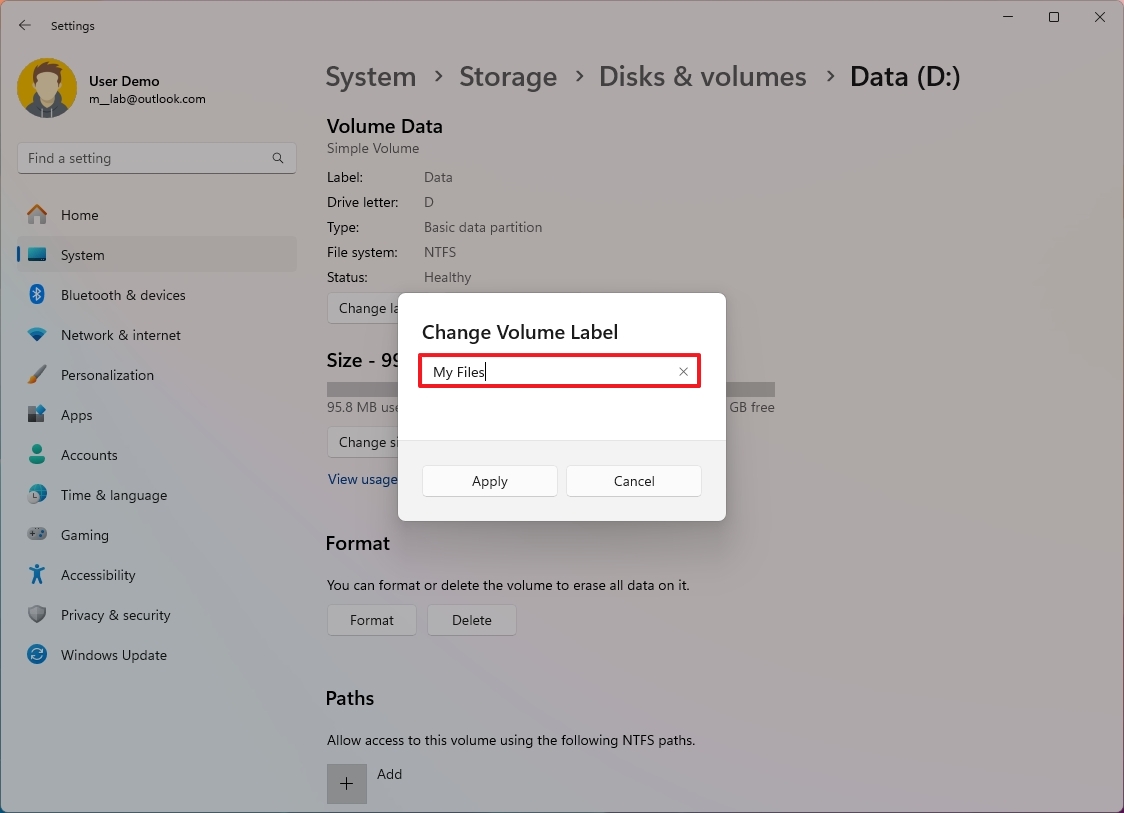
- Click the Apply button.
Once you complete the steps, the new label will be reflected on the drive across the desktop experience.
Format drive
To format a drive with a new volume and file system with the Disks & volumes settings, use these steps:
- Open Settings.
- Click on System.
- Click the Storage page on the right side.

- Click on Advanced storage settings under the "Storage management" section.
- Click the "Disks & volumes" settings.

- Select the drive to format.
- Select the available volume and click the Properties button.

- Click the Format button under the "Format" section.
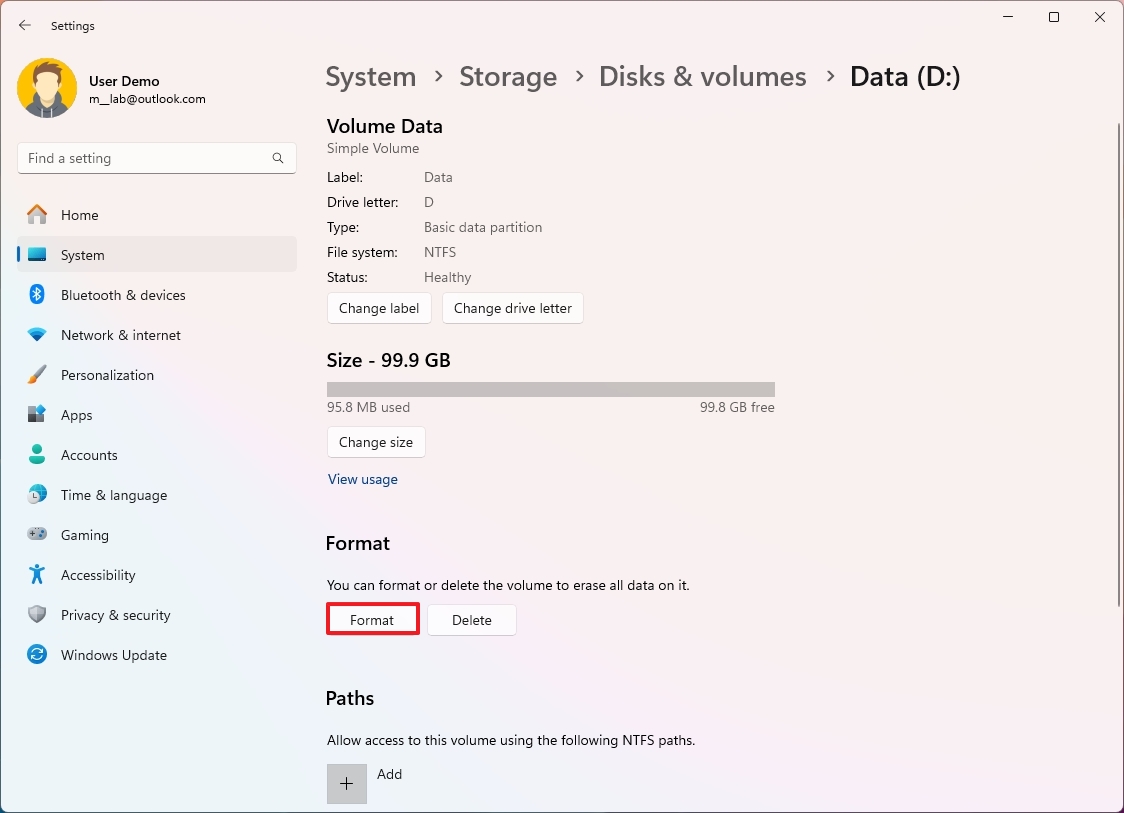
- Confirm a drive label in the "Label" field.
- Select the NTFS option with the "File System" drop-down menu.
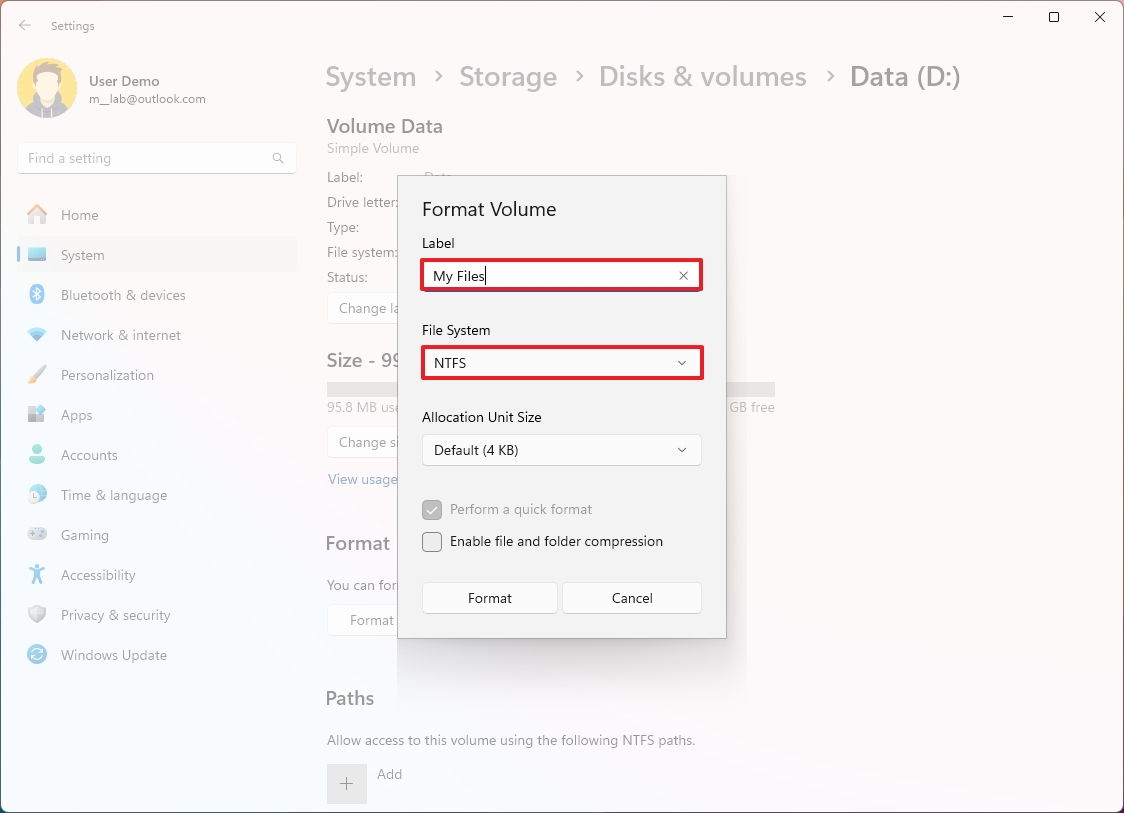
- (Optional) Check the "Enable file and folder compression" option.
- Click the Format button.
After you complete the steps, the data will be erased, and the volume will be formatted with a new file system, drive letter, and label.
Change file system
You can also change the file system from NTFS to FAT32, but the process will delete everything on the storage. As a result, it's recommended to back up any important data before proceeding.
To change the partition file system on Windows 11, use these steps:
- Open Settings.
- Click on System.
- Click the Storage page on the right side.

- Click on Advanced storage settings under the "Storage management" section.
- Click the "Disks & volumes" settings.

- Select the drive to change the file system on Windows 11.
- Select the available volume and click the Properties button.

- Click the Format button under the "Format" section.
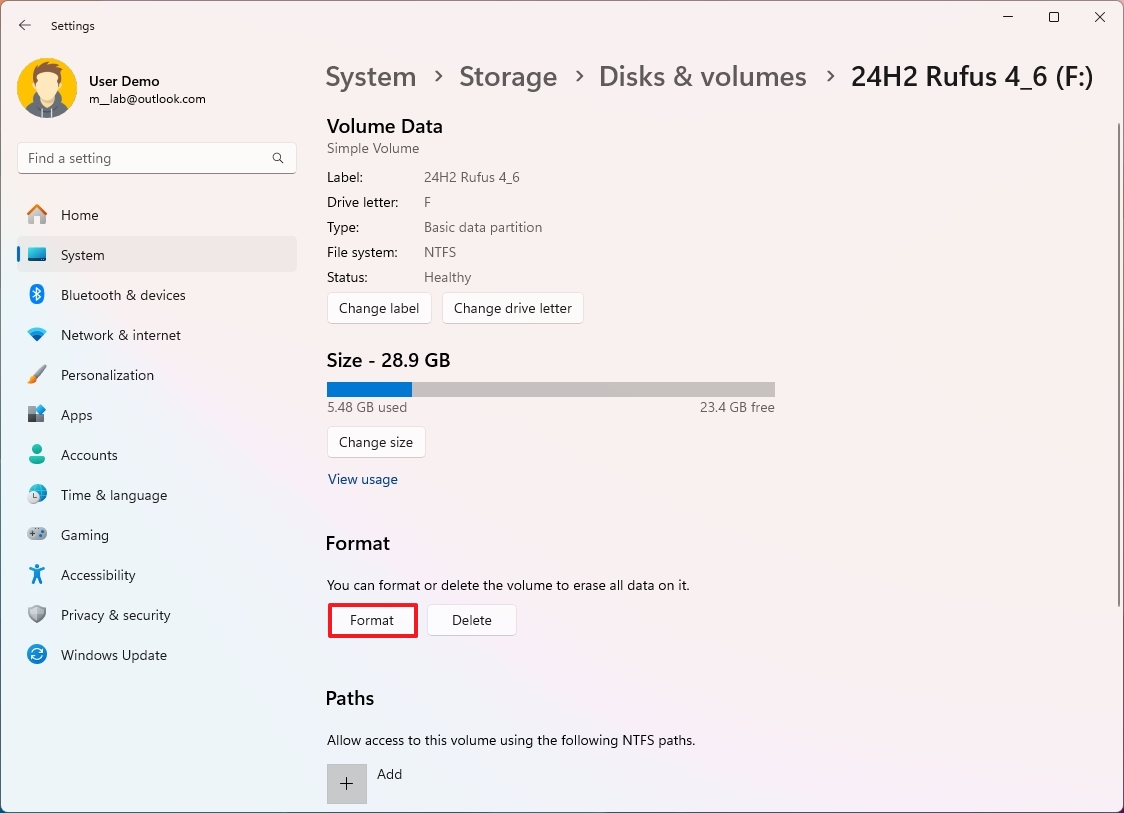
- Confirm a drive label in the "Label" field.
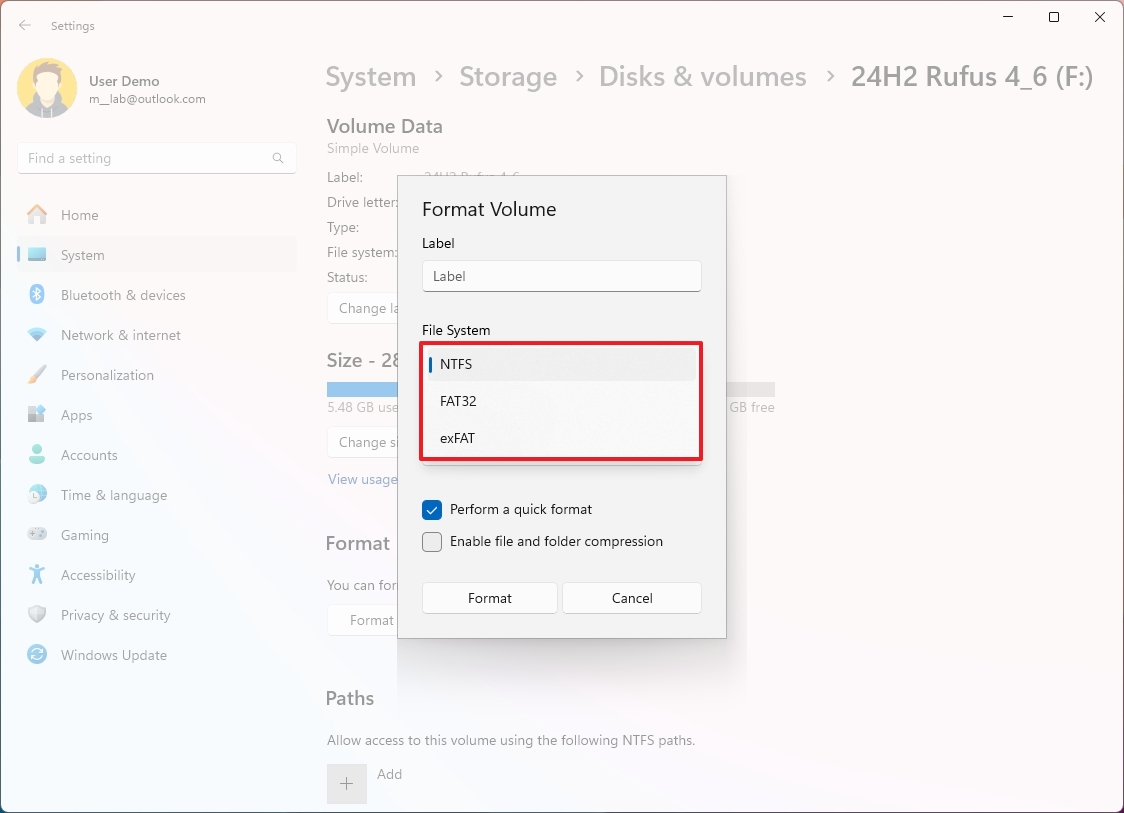
- Select the NTFS, FAT32, or exFAT option with the "File System" menu.
- Quick note: The FAT32 and exFAT options are available only the storage is supported, such as when formatting a flash drive, not a secondary internal drive.
- Check the "Perform a quick format" option.
- (Optional) Check the "Enable file and folder compression" option.
- Click the Format button.
Once you complete the steps, the new file system will apply to the volume, and it'll appear as an empty drive on File Explorer.
Change volume size
To change the size of a volume on Windows 11, use these steps:
- Open Settings.
- Click on System.
- Click the Storage page on the right side.

- Click on Advanced storage settings under the "Storage management" section.
- Click the "Disks & volumes" settings.

- Select the drive to change the volume size on Windows 11.
- Select the available volume and click the Properties button.

- Click the Change size button.
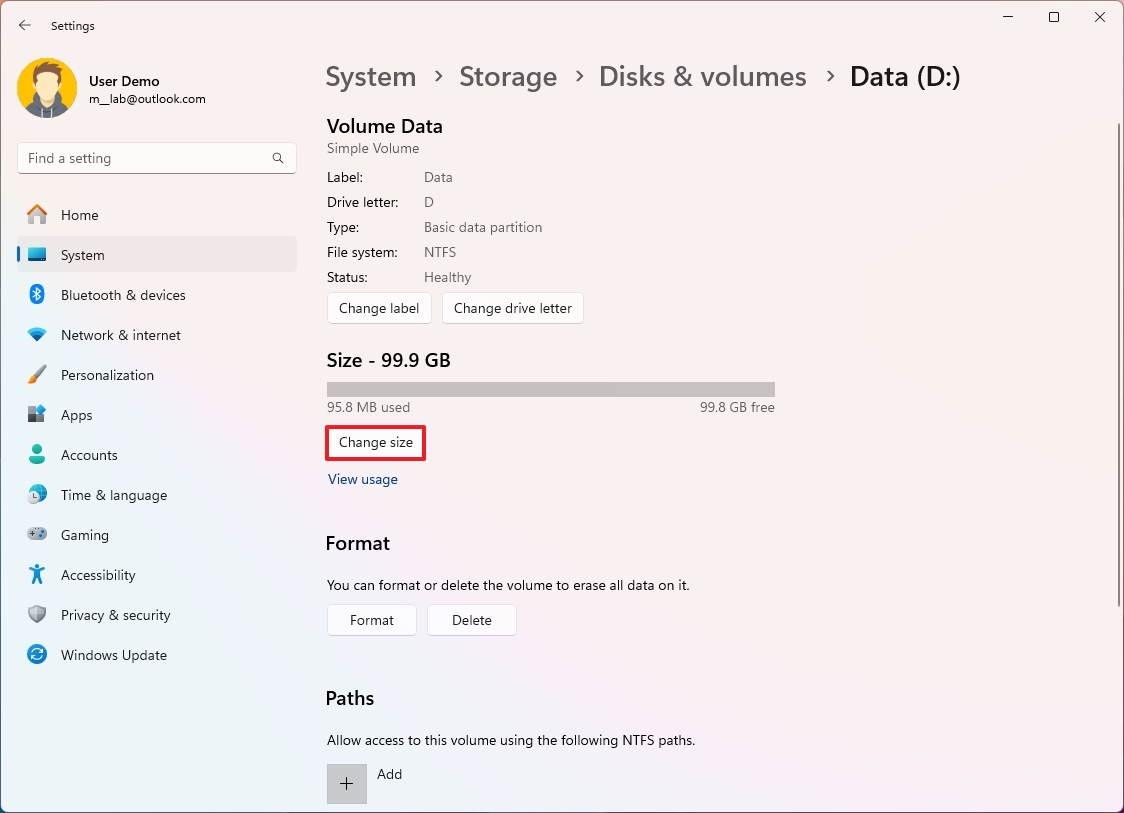
- Specify the new size (in megabytes) to shrink or expand the space of the volume.
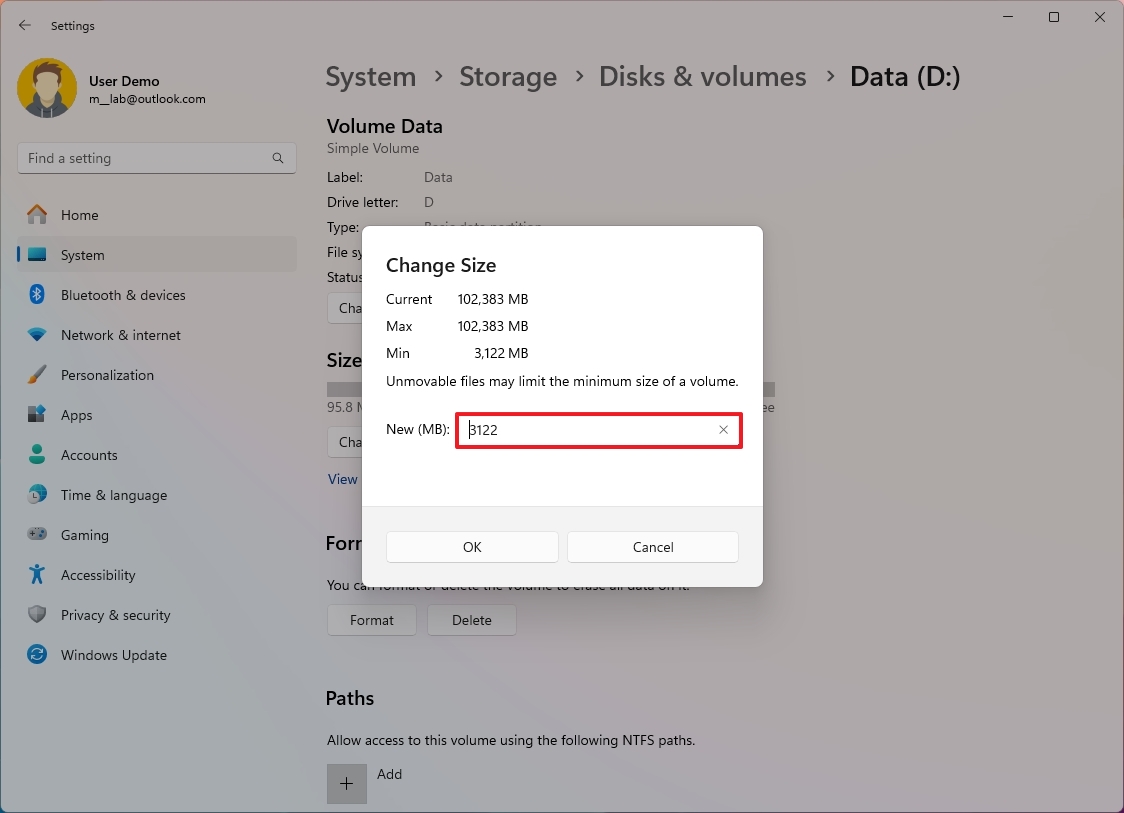
- Click the OK button.
After you complete the steps, the volume will appear with the new size on the system.
Mount drive as folder
On Windows 11, you can also mount a drive as a folder instead of using a drive letter to reduce the number of system drives.
To mount a drive as a folder on Windows 11, use these steps:
- Open Settings.
- Click on System.
- Click the Storage page on the right side.

- Click on Advanced storage settings under the "Storage management" section.
- Click the "Disks & volumes" settings.

- Select the drive to mount as a folder on Windows 11.
- Select the available volume and click the Properties button.

- Click the Add button under the "Paths" section.
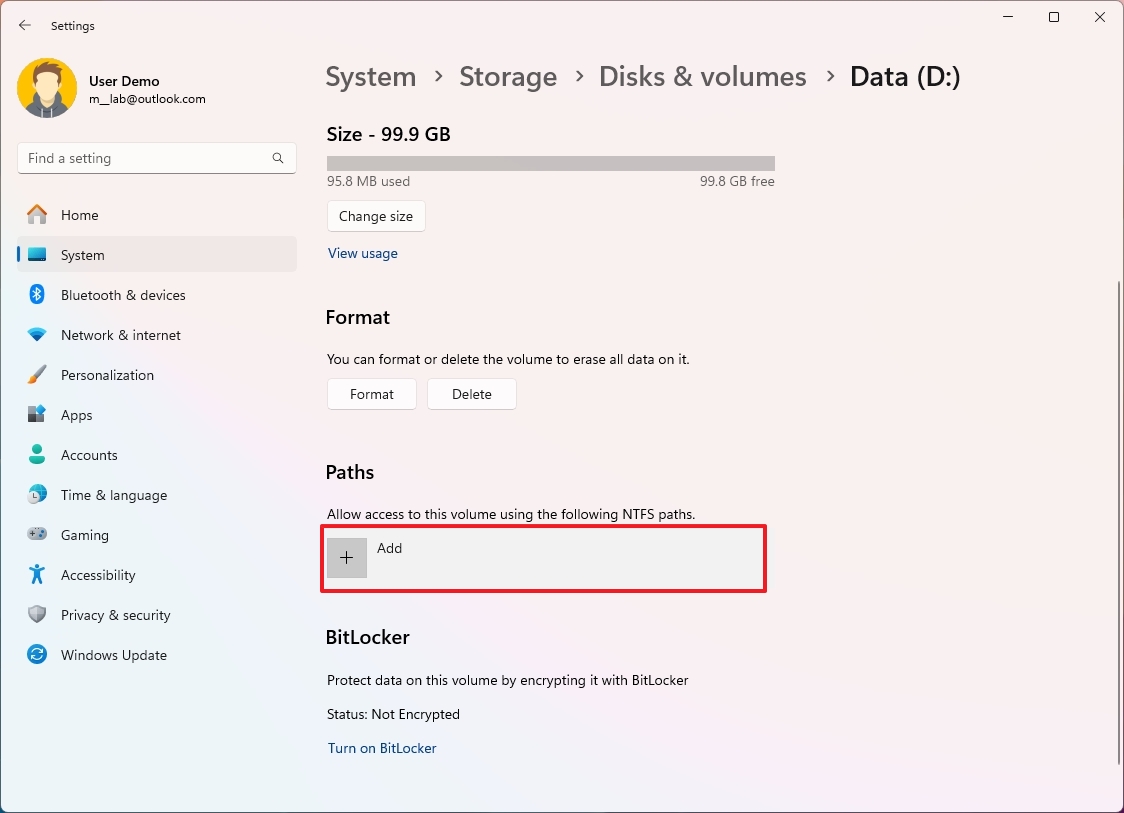
- Click the Browse button.
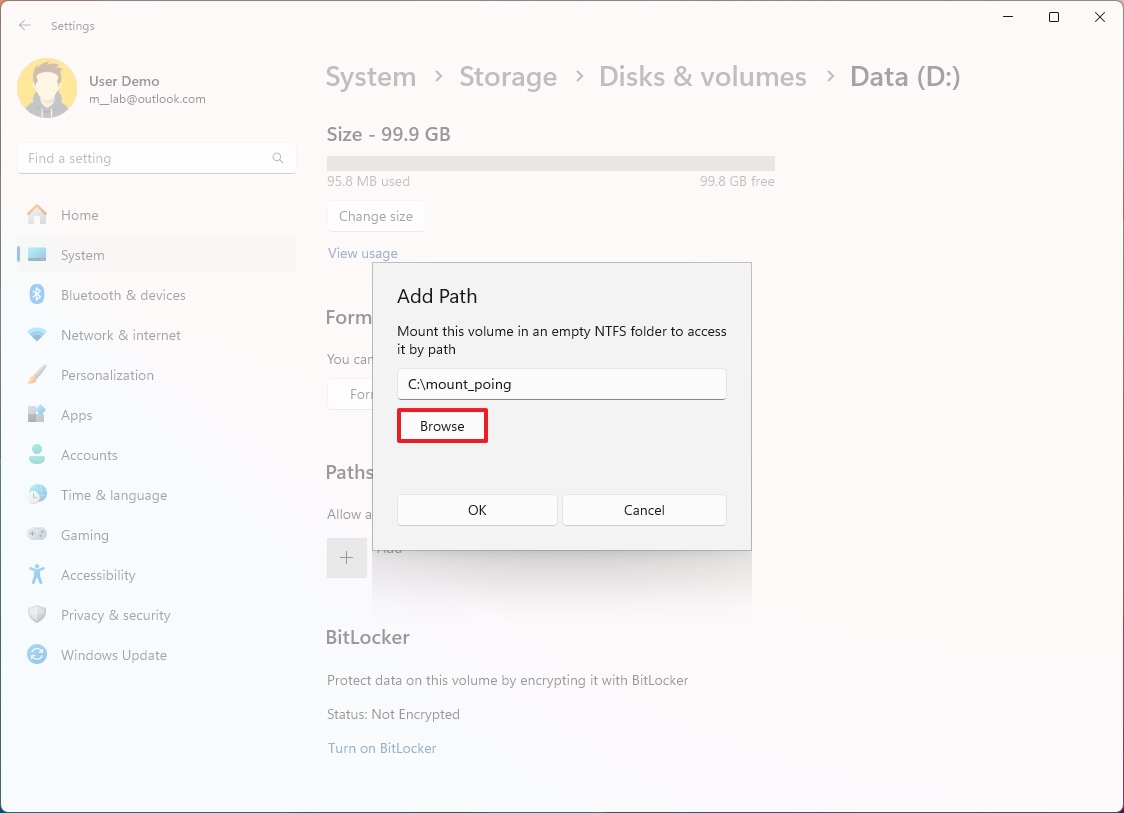
- Open the location to mount the volume.
- (Optional) Click the New folder button and confirm a name for the folder — for example, mount_point.
- Click the Select folder button.
- Click the OK button.
Once you complete the steps, you will be able to access the files from the folder path and the drive letter.
Check drive properties
To view the drive properties to determine the model, serial number, and other information, use these steps:
- Open Settings.
- Click on System.
- Click the Storage page on the right side.

- Click on Advanced storage settings under the "Storage management" section.
- Click the "Disks & volumes" settings.

- Select the drive and click the Properties button.
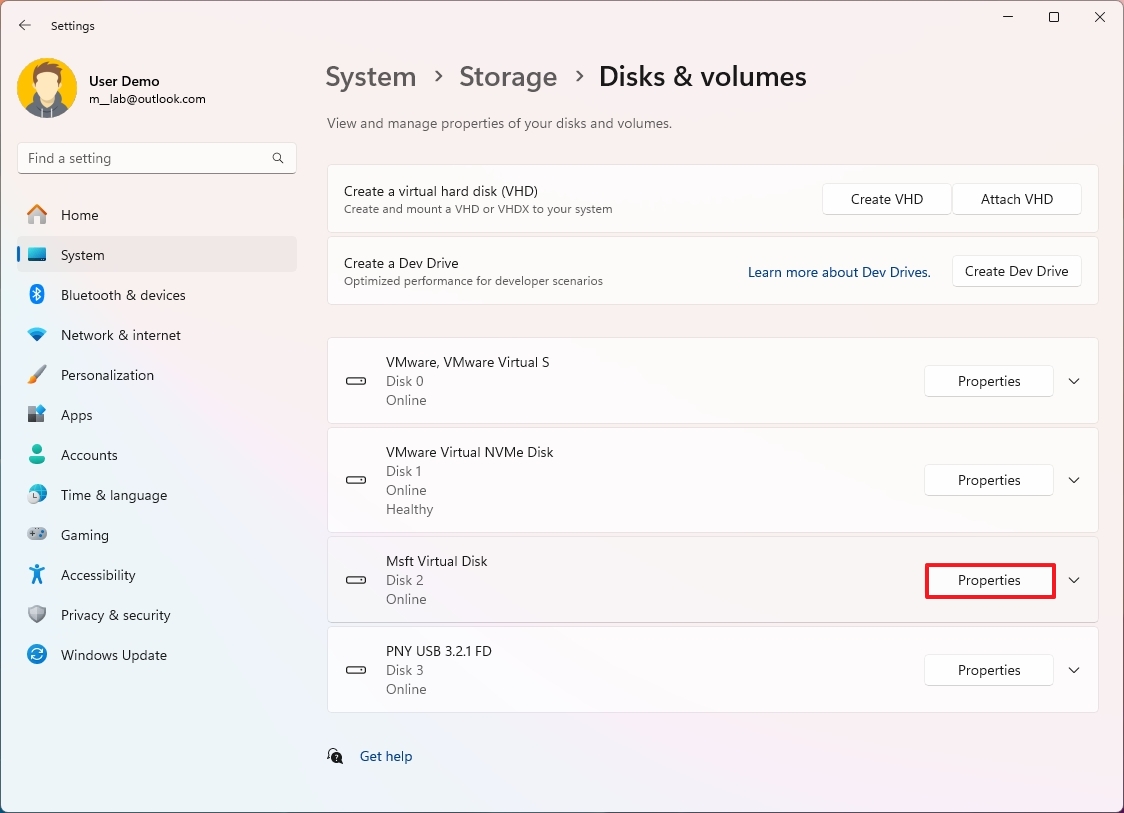
- Confirm drive information, such as drive ID, manufacturer, model, serial number, media type, etc.
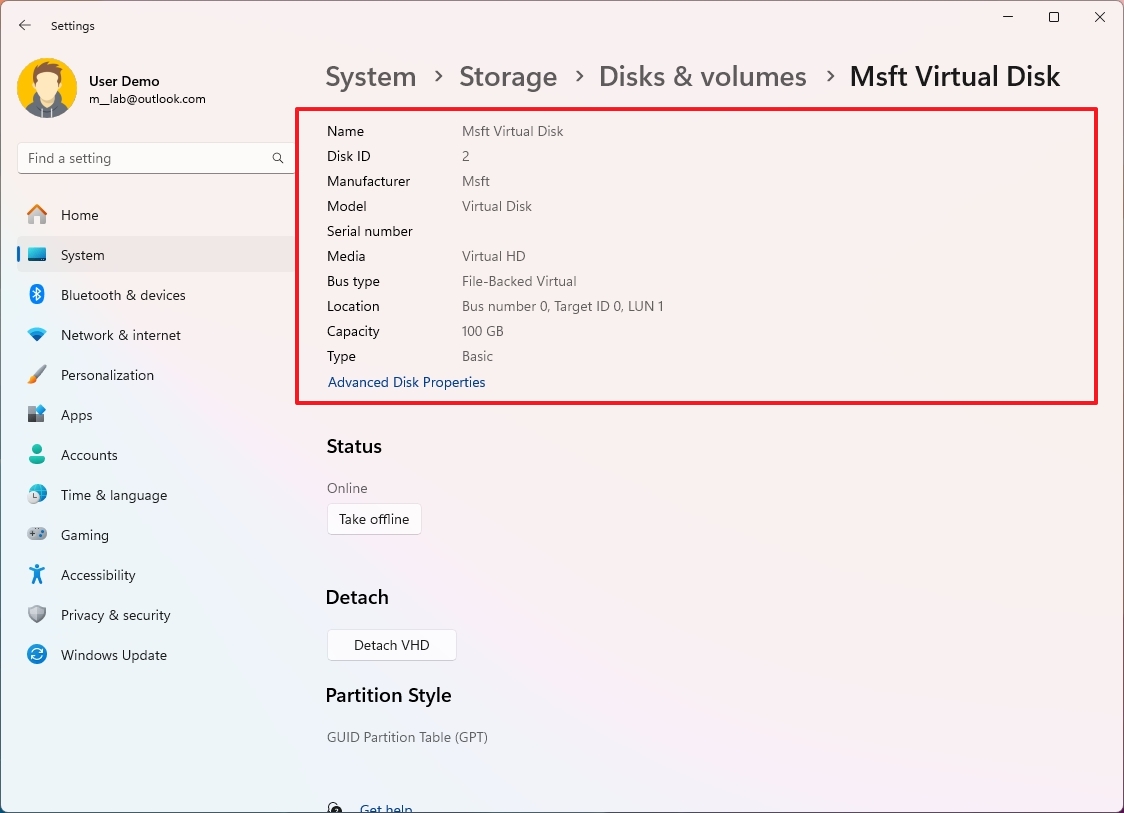
- (Optional) Click the "Advanced Disk Properties" option to view the legacy information, details, and event information.
After you complete the steps, you will be able to confirm many details about the hard drive, including serial and model numbers and other information.
Check drive health (SSD only)
Windows 11 can also monitor the health of NVME drives and report any problems before a critical error occurs to give you enough time to back up your data before it's too late. However, you can check the estimated remaining life, spare information, and temperature at any time.
To check the drive health on Windows 11, use these steps:
- Open Settings.
- Click on System.
- Click the Storage page on the right side.

- Click on Advanced storage settings under the "Storage management" section
- Click the "Disks & volumes" settings.

- Select the drive and click the Properties button.
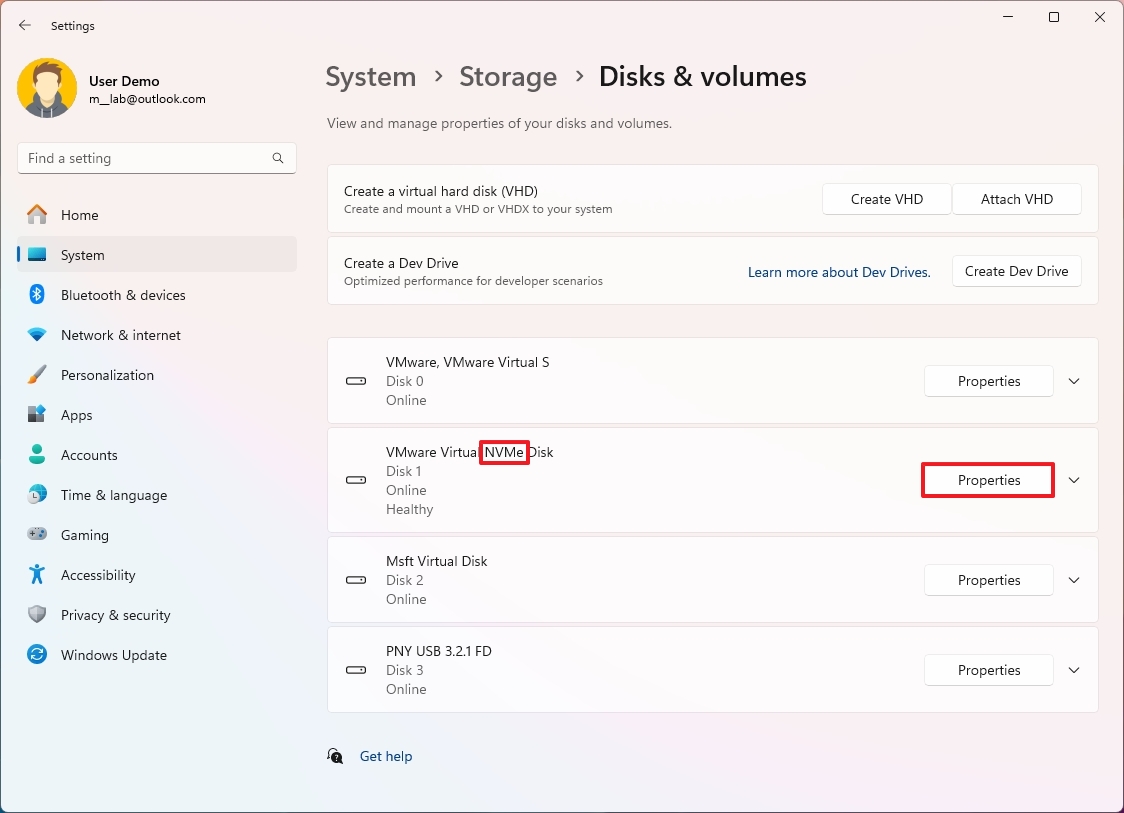
- Confirm the drive health, including estimated remaining life and temperature.
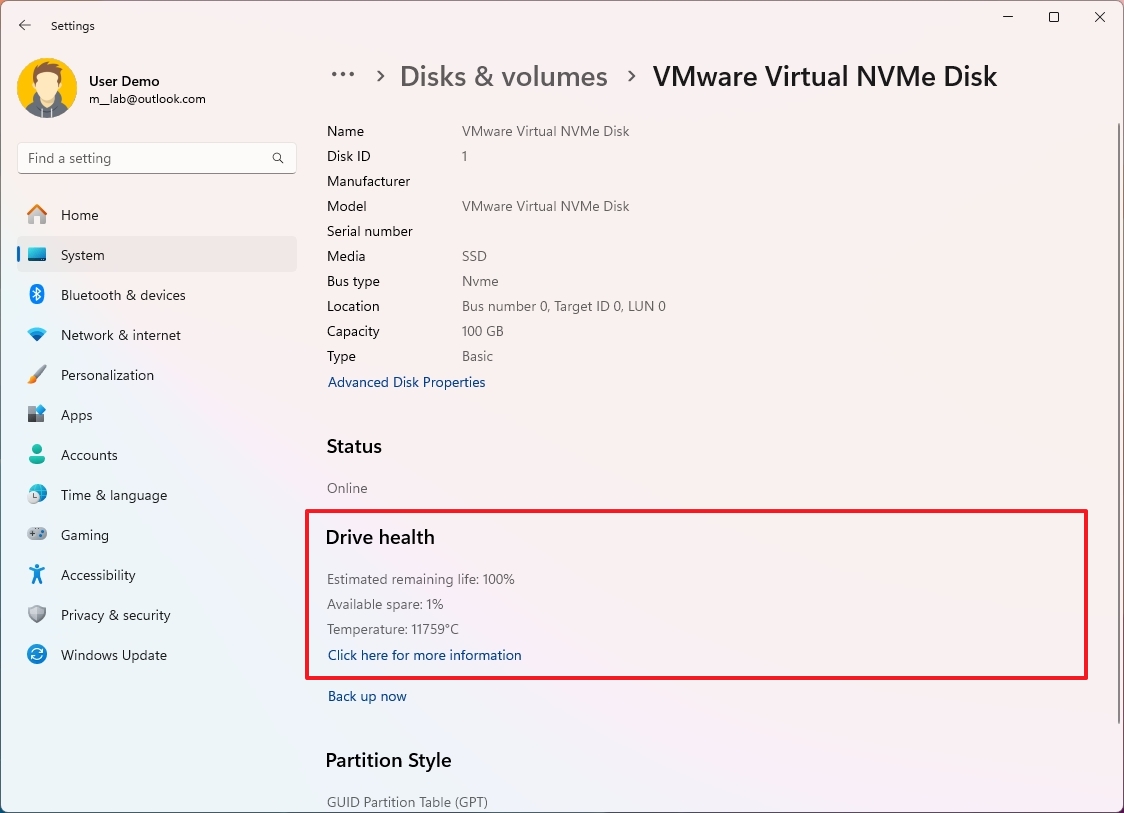
Once you complete the steps, you will have a better understanding of the current health of the drive.
Check volume properties
To check the volume information on Windows 11, use these steps:
- Open Settings.
- Click on System.
- Click the Storage page on the right side.

- Click on Advanced storage settings under the "Storage management" section.
- Click the "Disks & volumes" settings.

- Select the drive to view the volume information.
- Select the available volume and click the Properties button.

- Confirm the volume properties, such as label, letter, type, file system, status, and more.
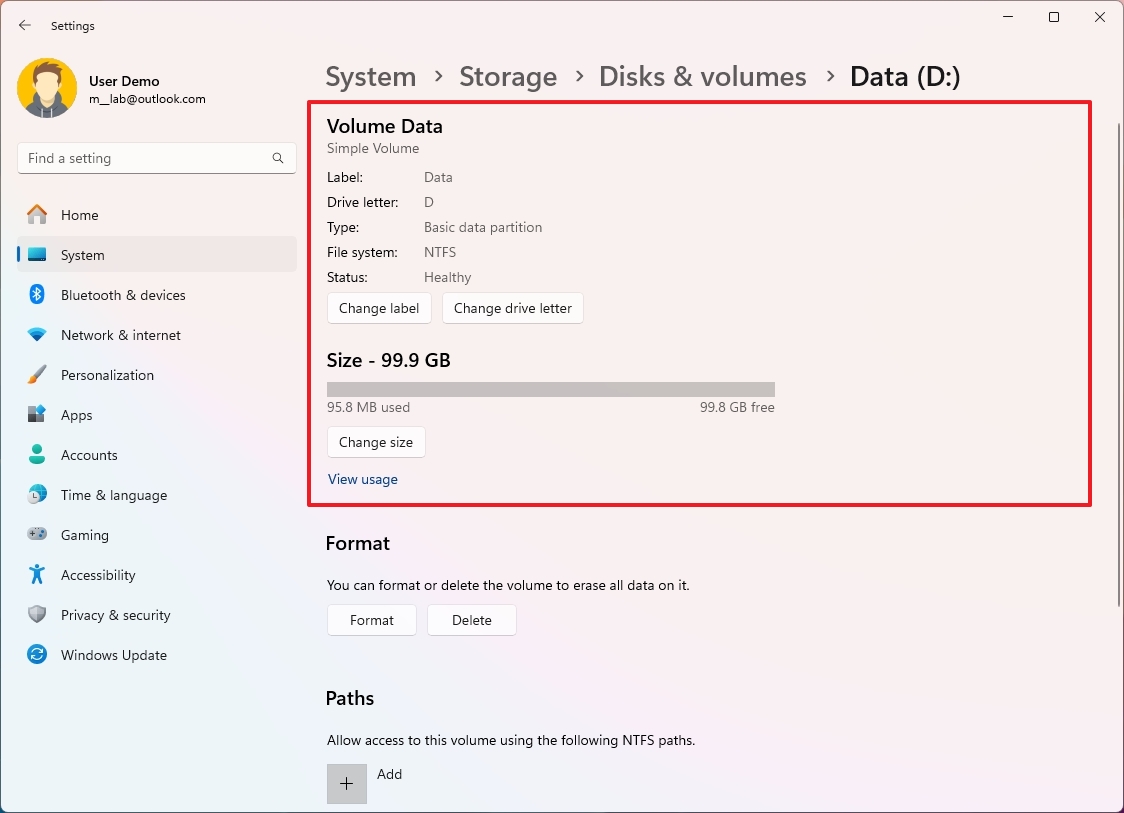
After you complete the steps, you will find detailed information about the volume.
Bring drive online or take offline
To turn the drive on or off without disconnecting it on Windows 11, use these steps:
- Open Settings.
- Click on System.
- Click the Storage page on the right side.

- Click on Advanced storage settings under the "Storage management" section.
- Click the "Disks & volumes" settings.

- Select the drive and click the Properties button.

- Click the Take offline button.
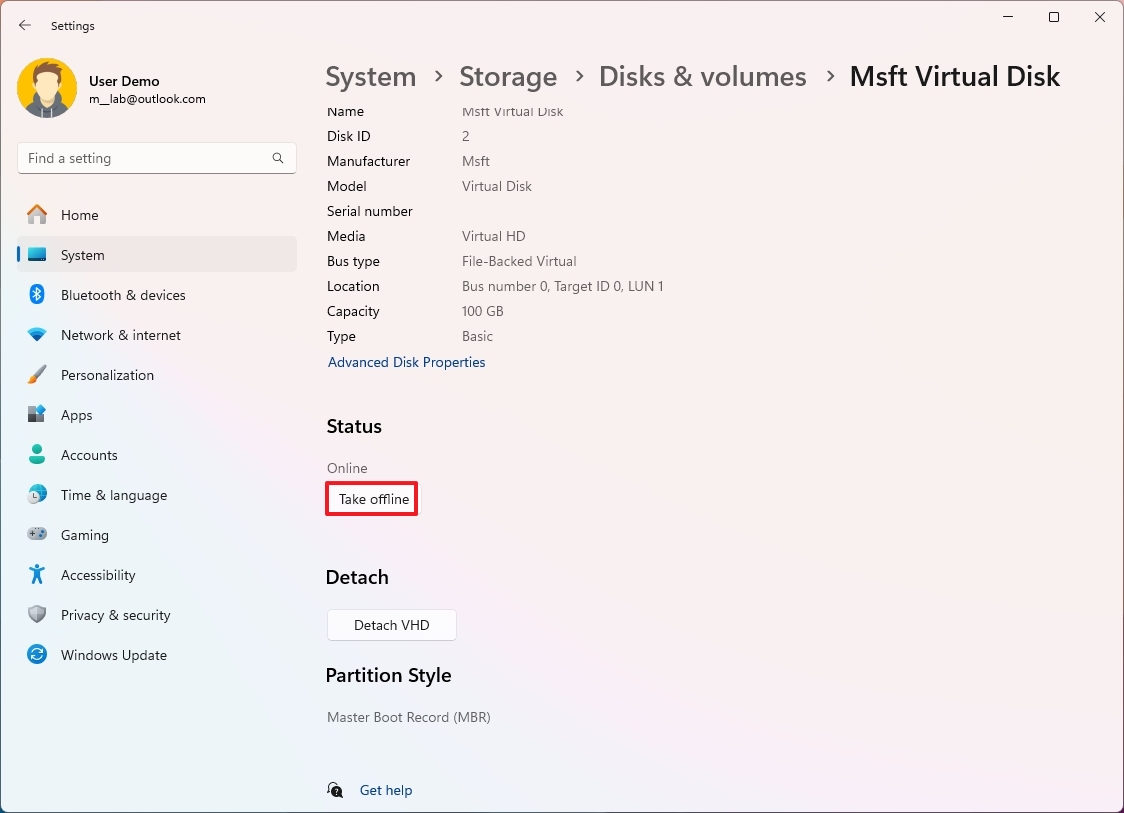
- Click the Bring online button.
After you complete the steps, the drive will go offline or come back up online, depending on the action.
Delete volume on drive
To delete a drive volume and its data on Windows 11, use these steps:
- Open Settings.
- Click on System.
- Click the Storage page on the right side.

- Click on Advanced storage settings under the "Storage management" section.
- Click the "Disks & volumes" settings.

- Select the available volume and click the Properties button.

- Click the Delete button.
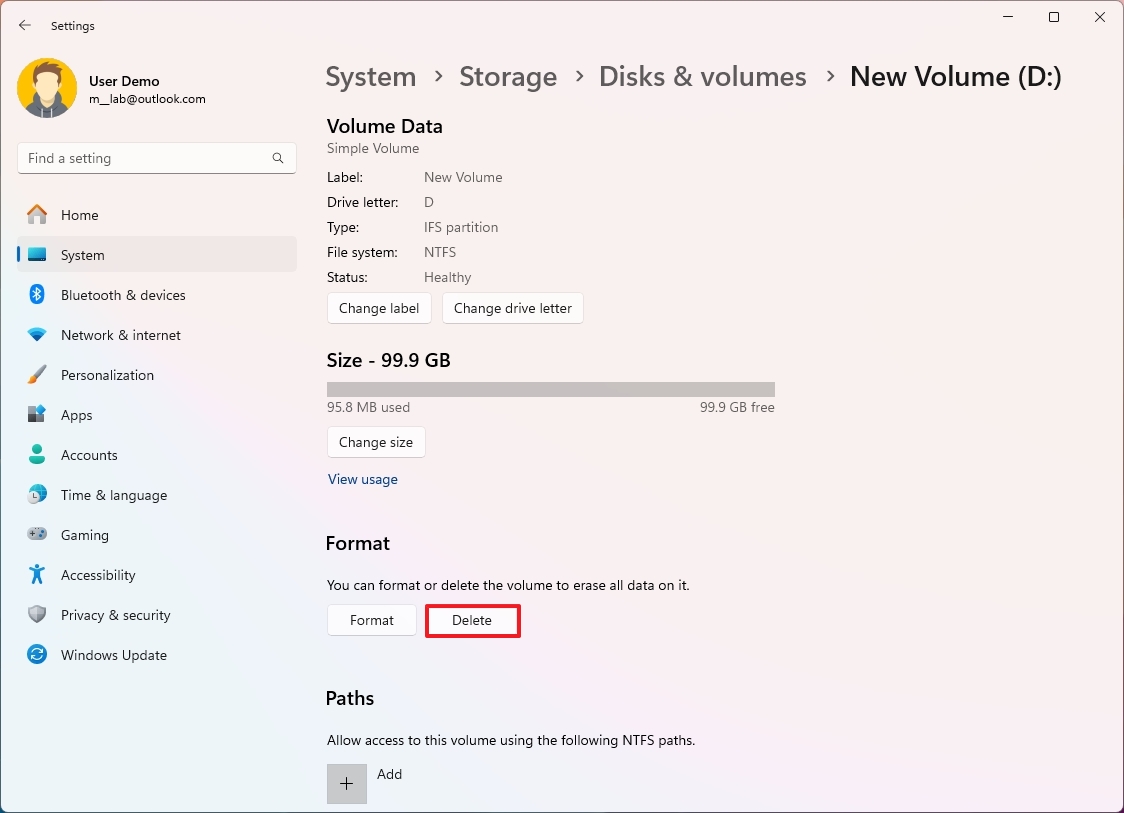
- Click the Delete volume button.
Once you complete the steps, the data will be erased, and the volume deleted from the hard drive.
How to manage drives from Disk Management on Windows 11
On Windows 11, you can still use the legacy Disk Management app to manage primary, secondary, and removable drives connected to your computer. Similar to the new "Disks & Volumes" settings, the legacy application has the tools to set up new volumes, including formatting, changing labels and letters, enabling compression, and changing volume size.
Initialize drive
When you connect a drive with raw data, meaning that it was never formatted, you will first need to initialize it.
To initialize a hard drive on Windows 11, use these steps:
- Open Start.
- Search for Create and format hard disk partitions and click the top result to open the Disk Management app.
- Right-click the disk and select the Initialize Disk option (if you are not prompted automatically).
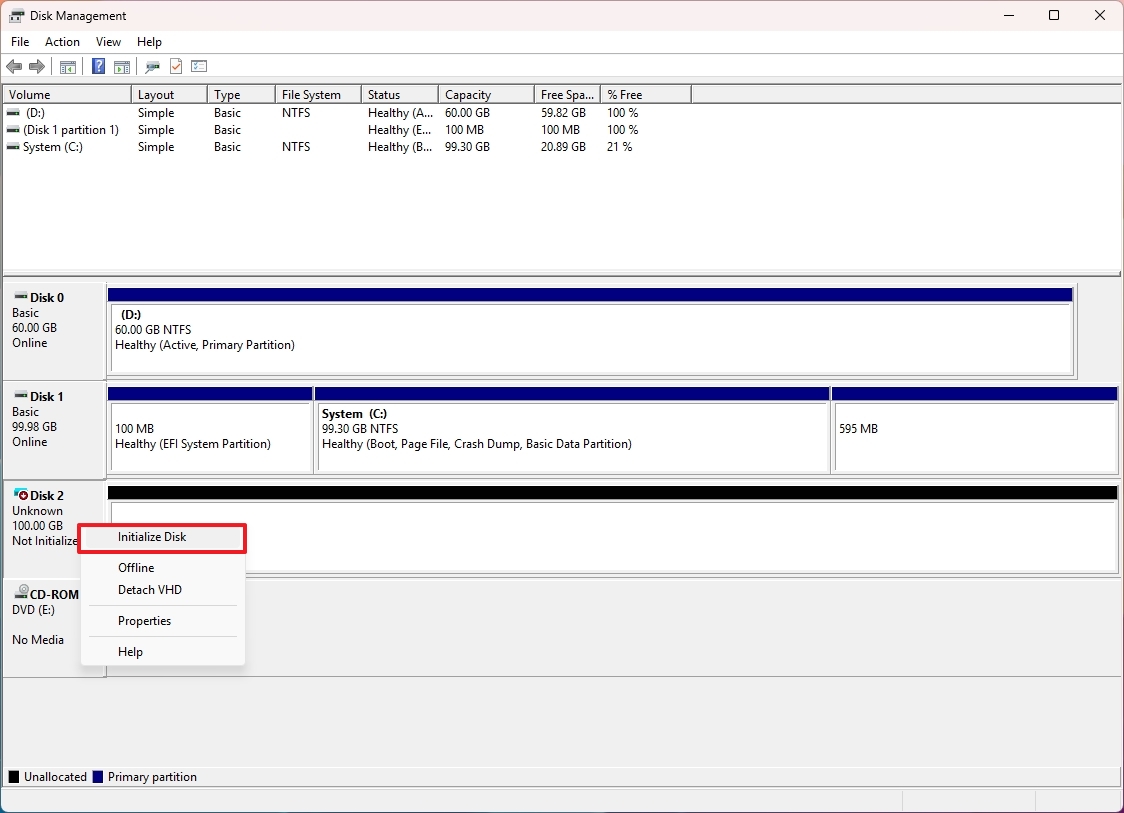
- Select the disk from the list (if applicable).
- Choose the MBR (Master Boot Record) or GPT (GUID Partition Table) (recommended) partition type.
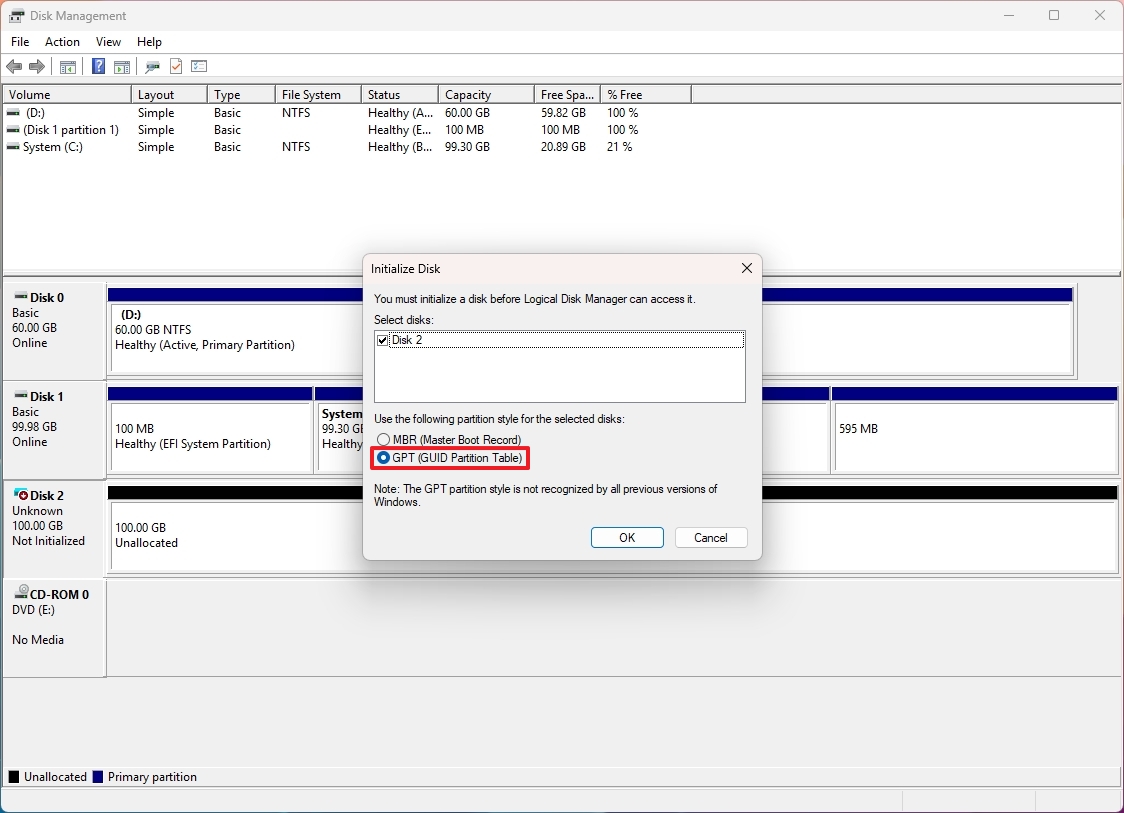
- Click the OK button.
After you complete the steps, the hard drive will initialize, allowing the system to connect with the storage to manage partitions and data.
Convert to Dynamic Disk
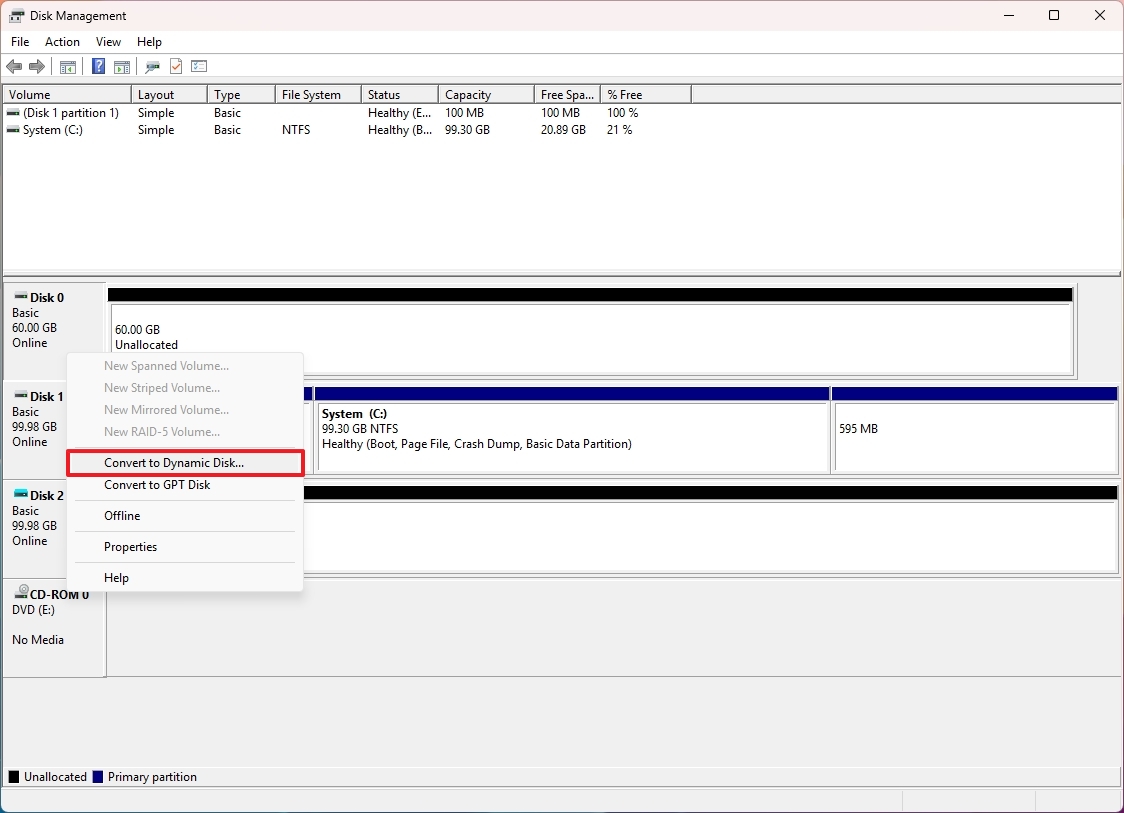
The Disk Management tool also lets you start a drive as "Basic Disk" or "Dynamic Disk." A "Basic Disk" is the default option when initializing a drive that allows you to manage partitions and data. However, you can also convert the storage to a "Dynamic Disk" to take advantage of many other storage features. For example, you may need to convert a drive to dynamic to set up simple, spanned, striped, mirrored, and RAID 5 volumes.
This is a non-destructive process, which means that you should be able to convert the drive without worrying about the data. However, it's still recommended to create a backup of the data before proceeding.
If you must convert from Basic to Dynamic Disk on Windows 11, use these steps:
- Open Start.
- Search for Create and format hard disk partitions and click the top result to open the Disk Management app.
- Right-click the disk and select the "Convert to Dynamic Disk" option.
- Quick note: You can also convert the storage drive. You can't convert bootable drives that contain an installation of Windows.
- Select the disk from the list (if applicable).
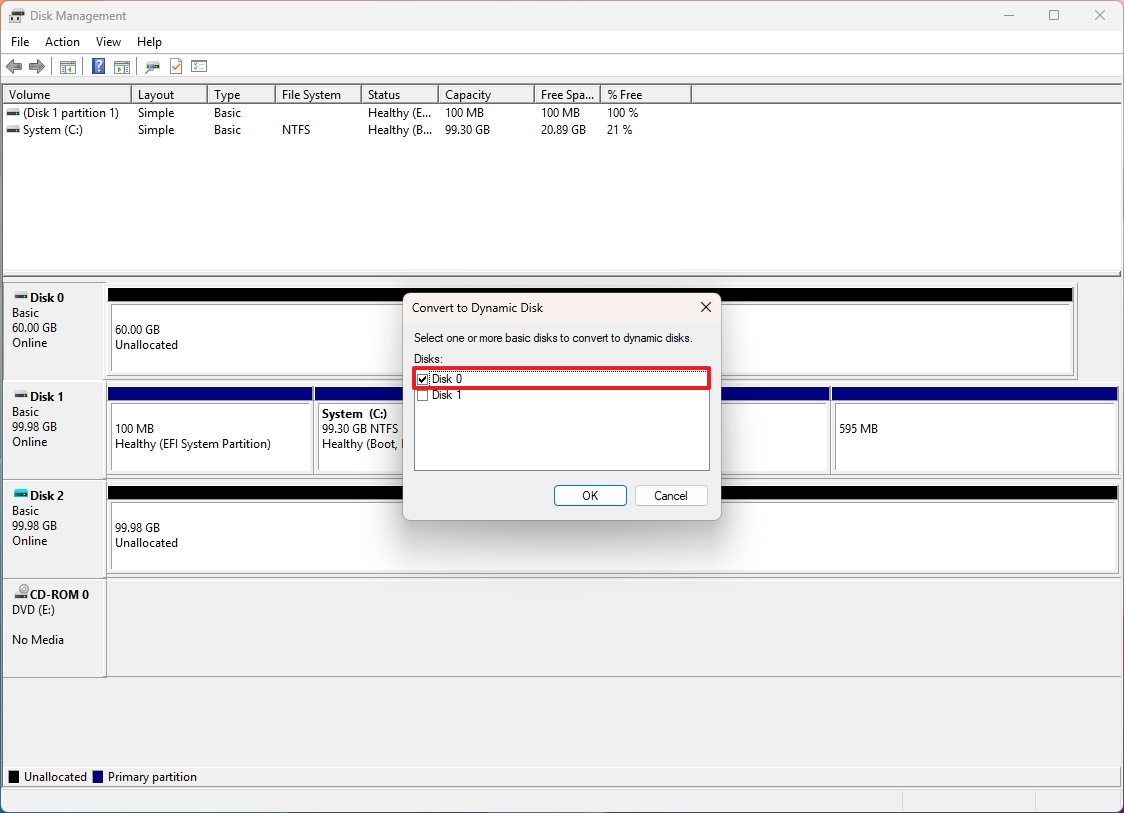
- Click the OK button.
Once you complete the steps, the drive will become dynamic to allow you access to other storage features, such as mirror, stripped, and parity, and you will also have the ability to expand the storage across multiple drives.
Create new volume
To create a new data volume with Disk Management, use these steps:
- Open Start.
- Search for Create and format hard disk partitions and click the top result to open the Disk Management app.
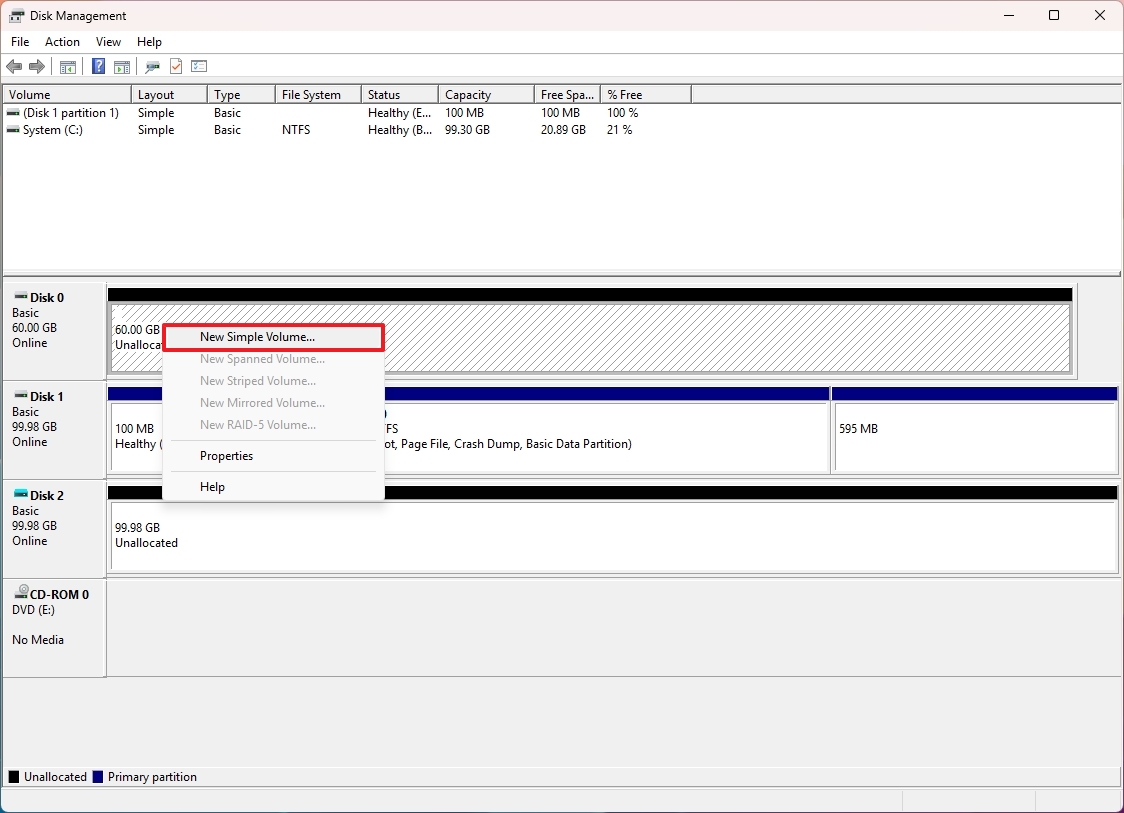
- Right-click the unallocated space and select the "New Simple Volume" option.
- Click the Next button.
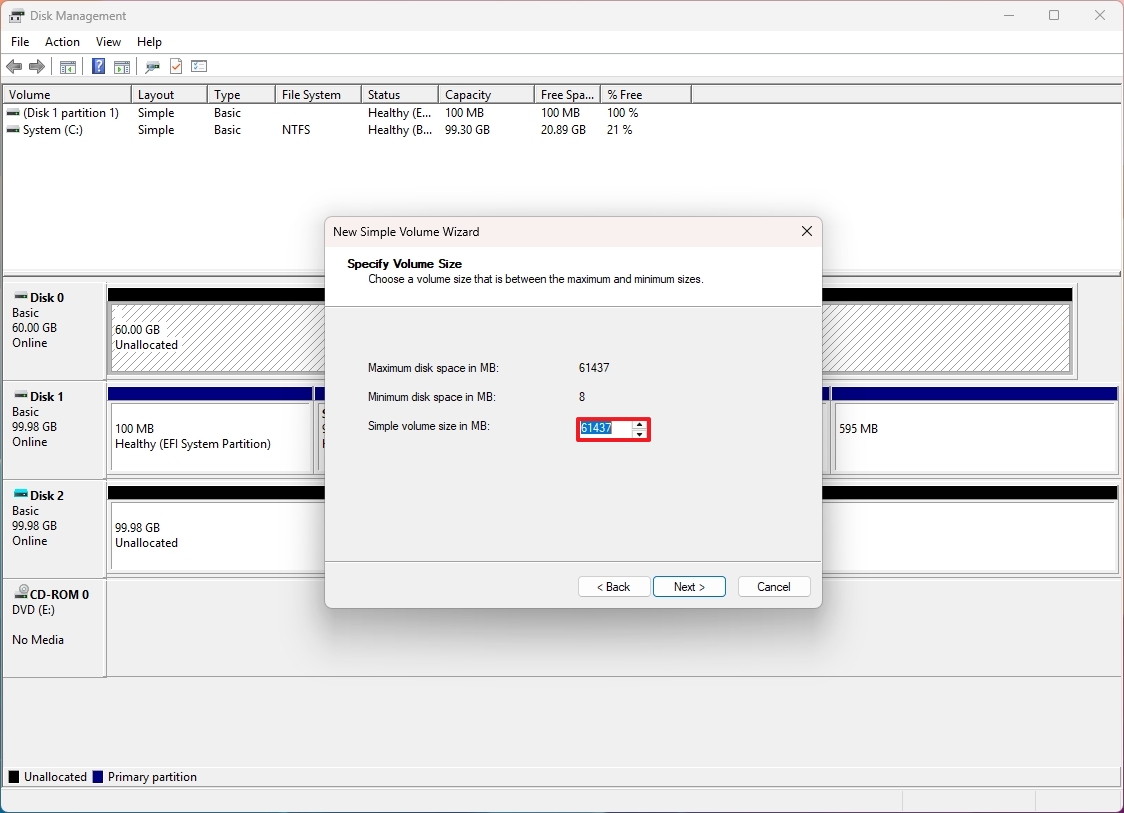
- (Optional) Confirm the volume size if you plan to create multiple volumes.
- Click the Next button.
- Select the "Assign the following drive letter" option.
- Choose a letter for the drive.
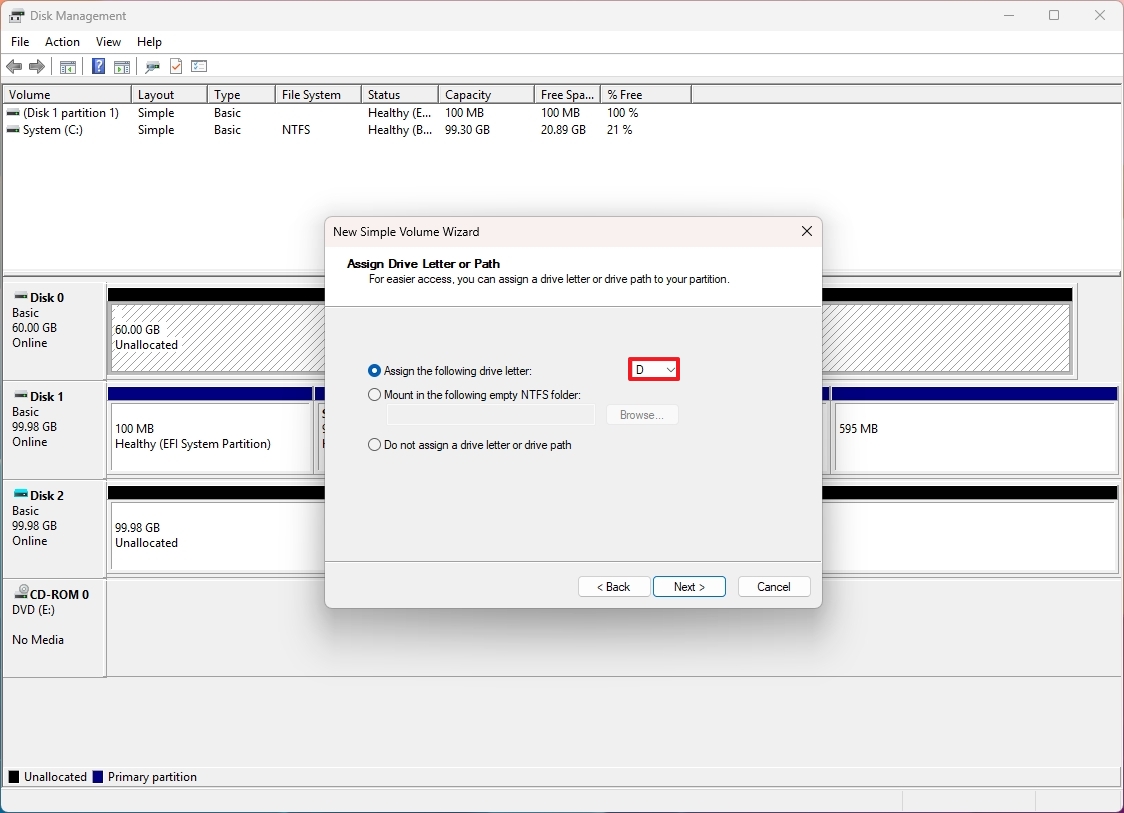
- Click the Next button.
- Select the Format this volume with the following settings option.
- Select the NTFS option from the "File System" menu.
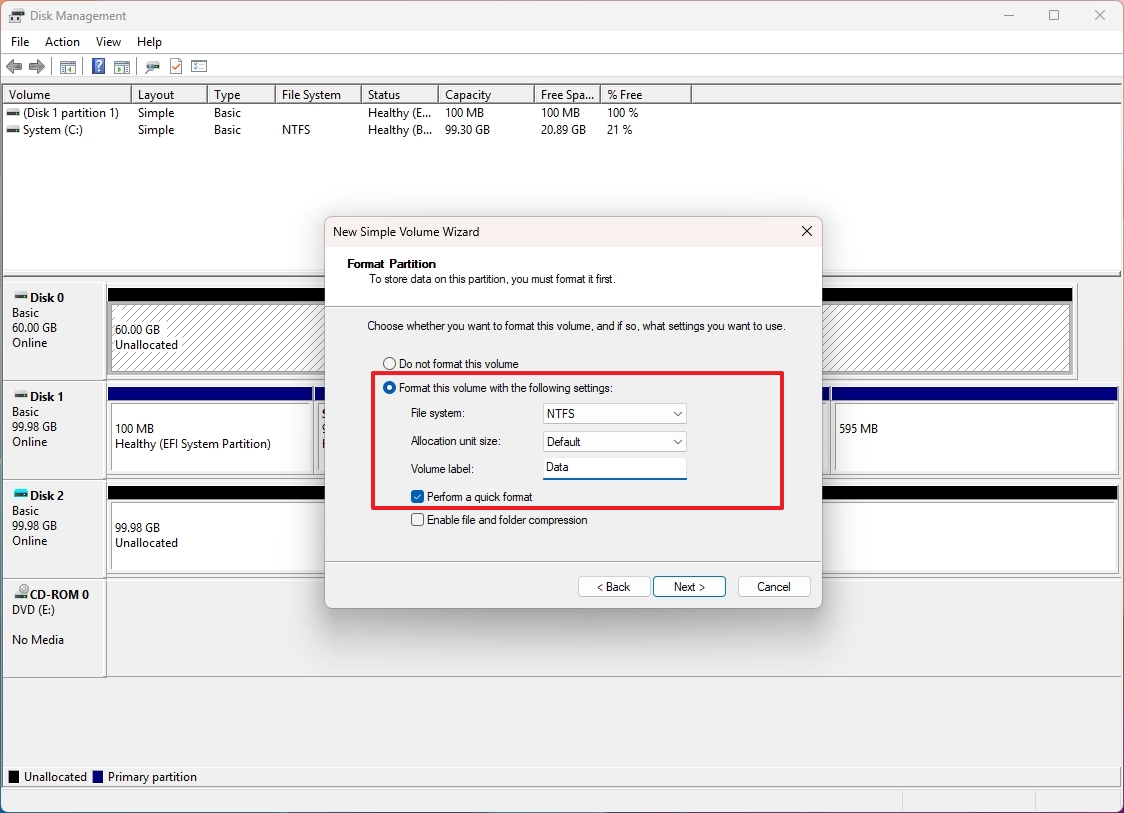
- Select the Default option with the "Allocation unit size" drop-down menu.
- Confirm a drive label in the "Volume label" field.
- Check the "Perform a quick format" option.
- (Optional) Check the "Enable file and folder compression" option.
- Click the Next button.
- Click the Finish button.
After you complete the steps, you will end up with a new volume that will appear in File Explorer with a file system, drive letter, and label you specified.
Change drive letter
To change the letter of drive with Disk Management, use these steps:
- Open Start.
- Search for Create and format hard disk partitions and click the top result to open the Disk Management app.
- Right-click the volume and select the "Change Drive Letter and Paths" option.
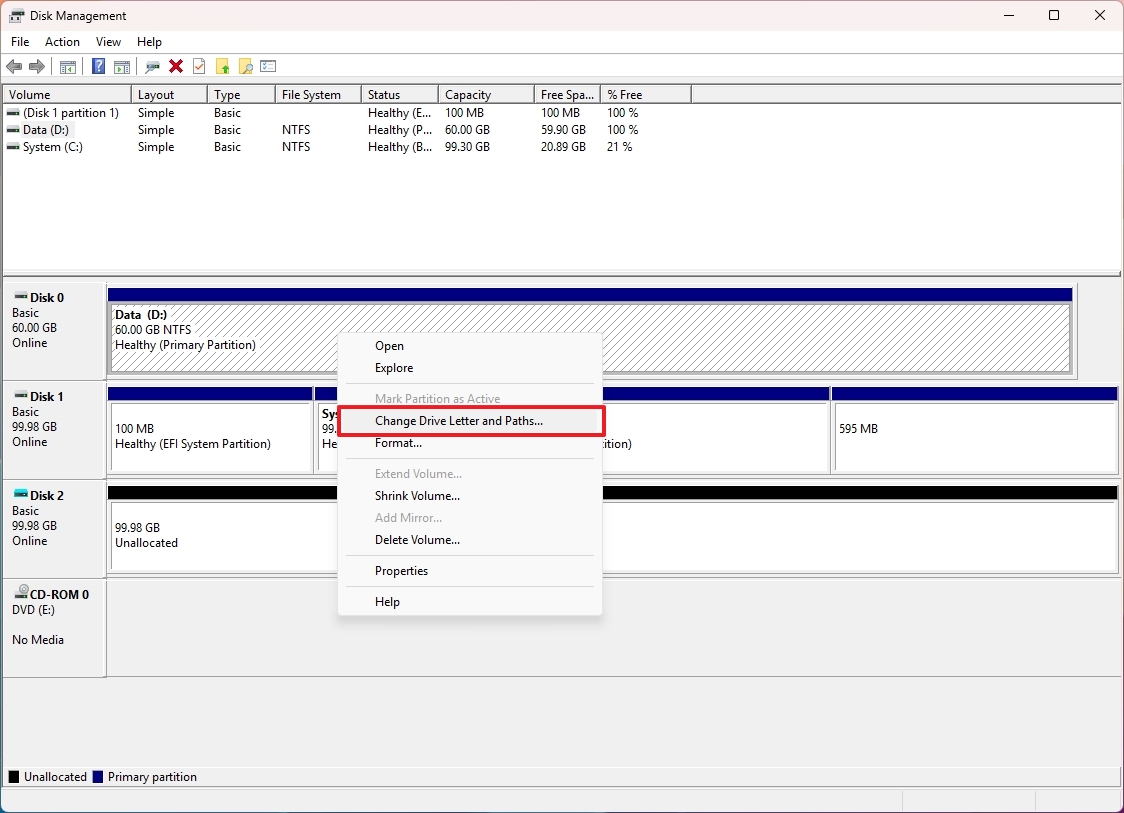
- Click the Change button.
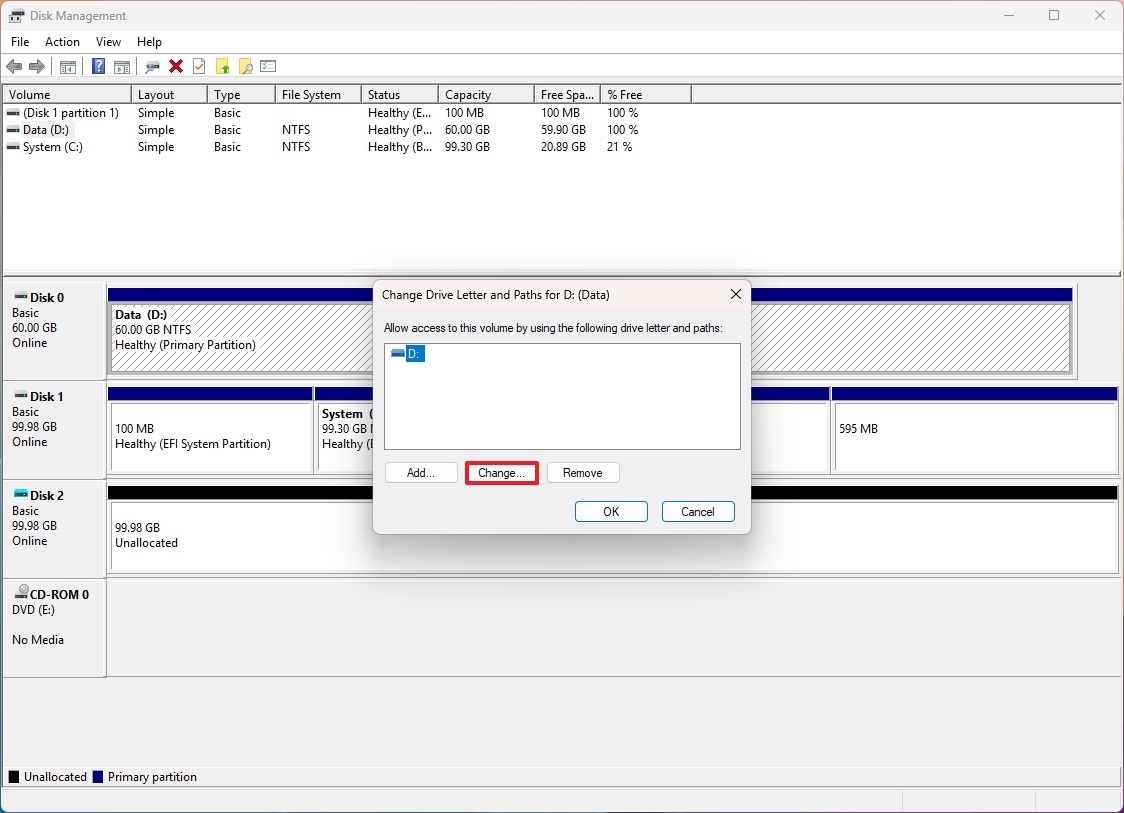
- Select the "Assign the following drive letter" option.
- Choose a letter for the drive.
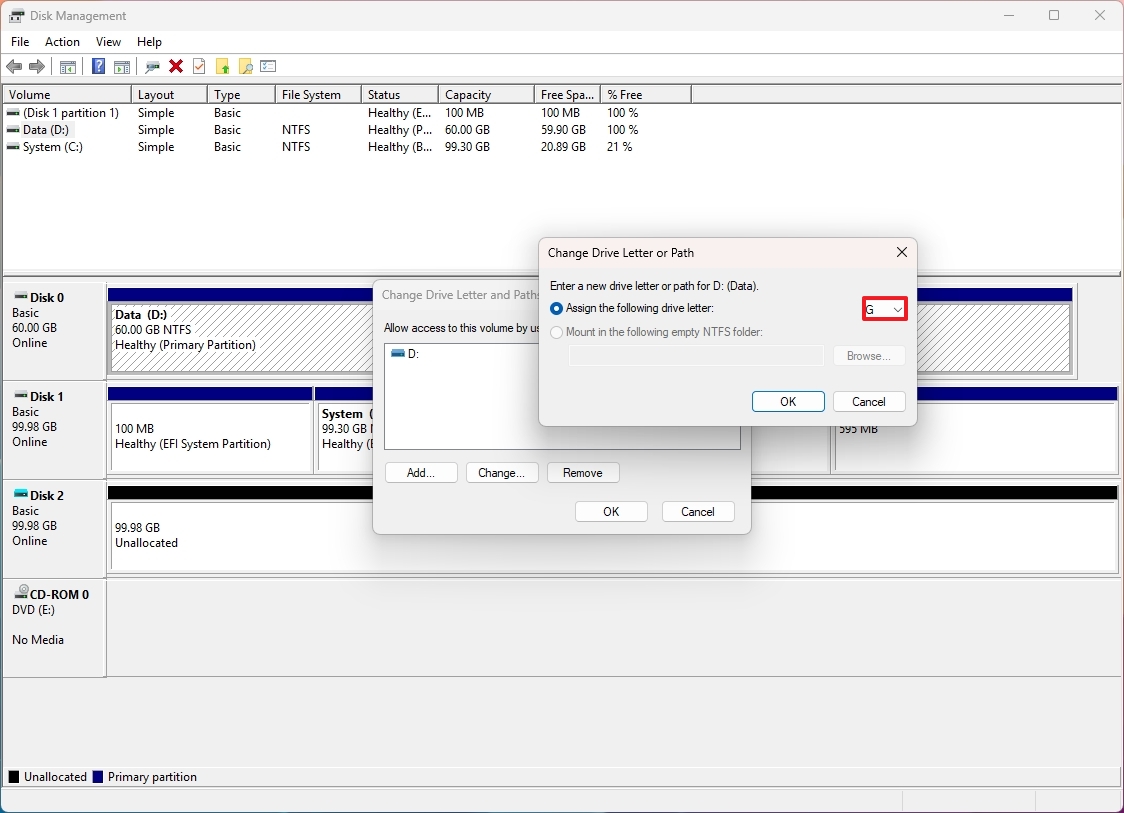
- Click the OK button.
Once you complete the steps, the letter will be reflected on the drive.
Change drive label
To change the display name of the drive on Windows 11, use these steps:
- Open Start.
- Search for Create and format hard disk partitions and click the top result to open the Disk Management app.
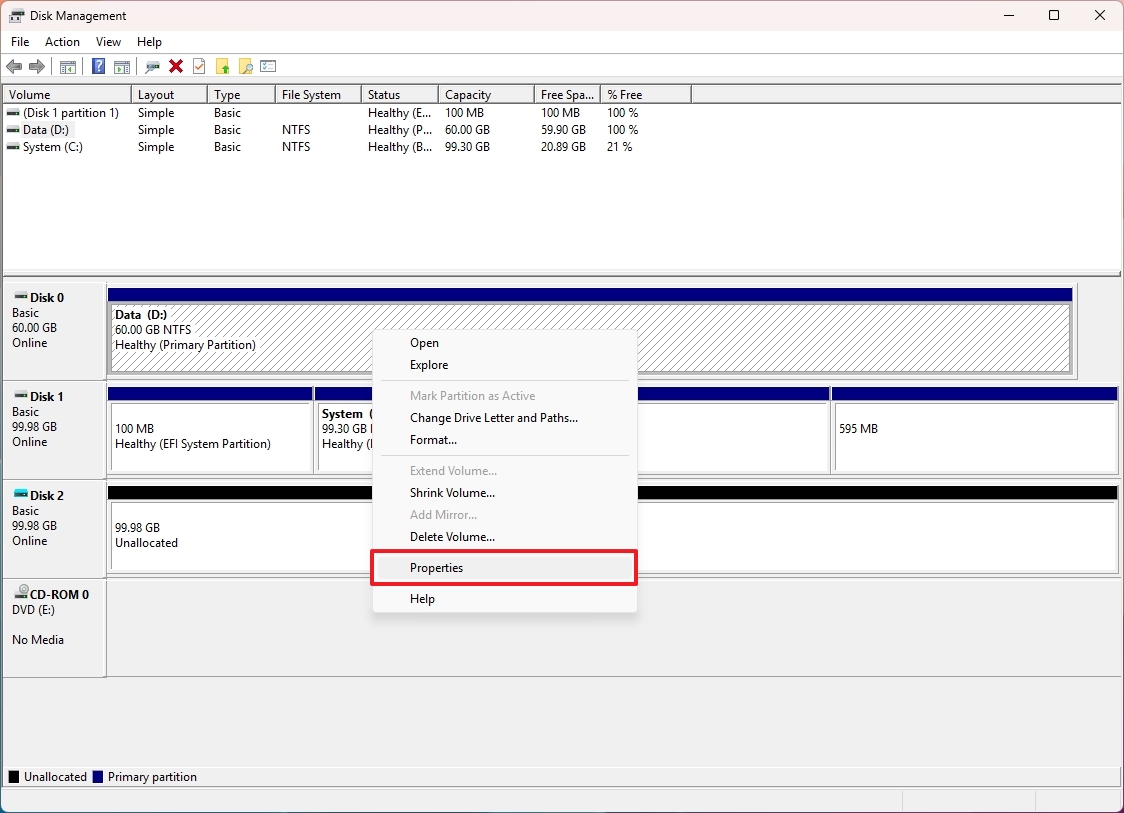
- Right-click the volume and select the Properties option.
- Click the General tab.
- Change the label for the drive.
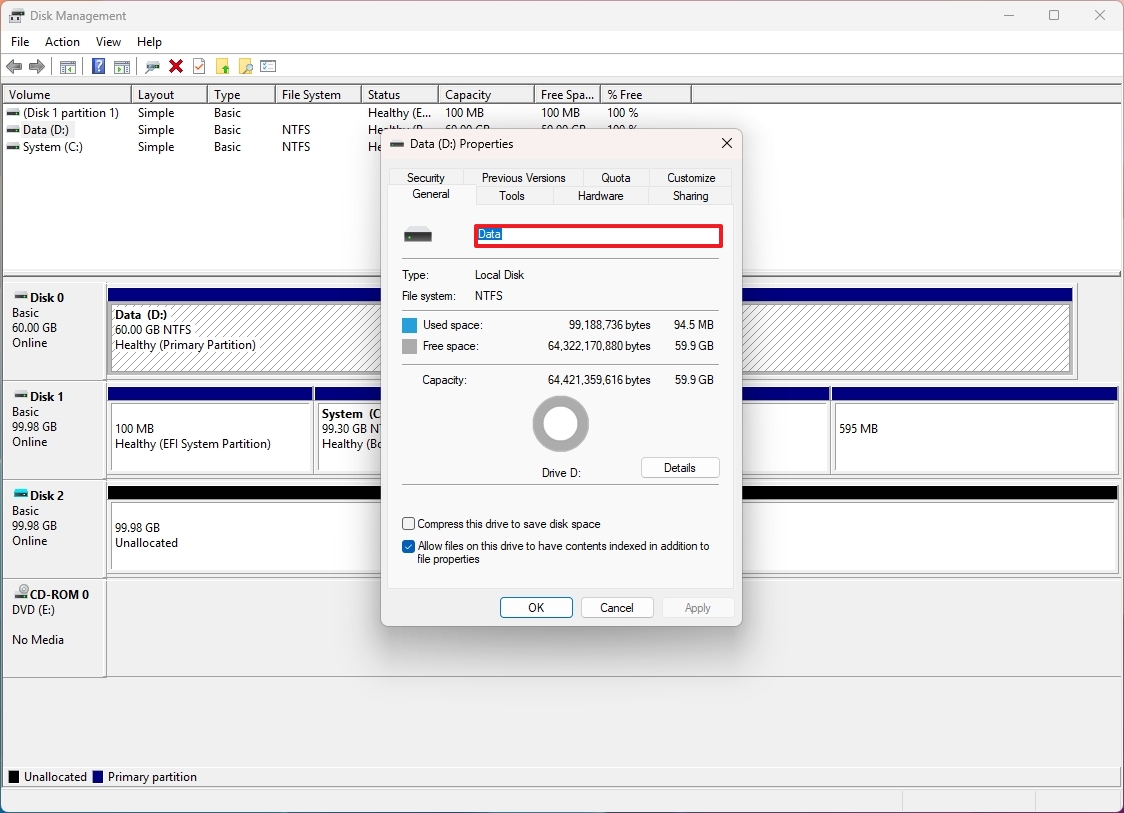
- Click the Apply button.
- Click the OK button.
After you complete the steps, the label will appear on the hard drive.
Format drive
To format a hard drive with a new volume and file system on Windows 11, use these steps:
- Open Start.
- Search for Create and format hard disk partitions and click the top result to open the Disk Management app.
- Right-click the volume and select the Format option.
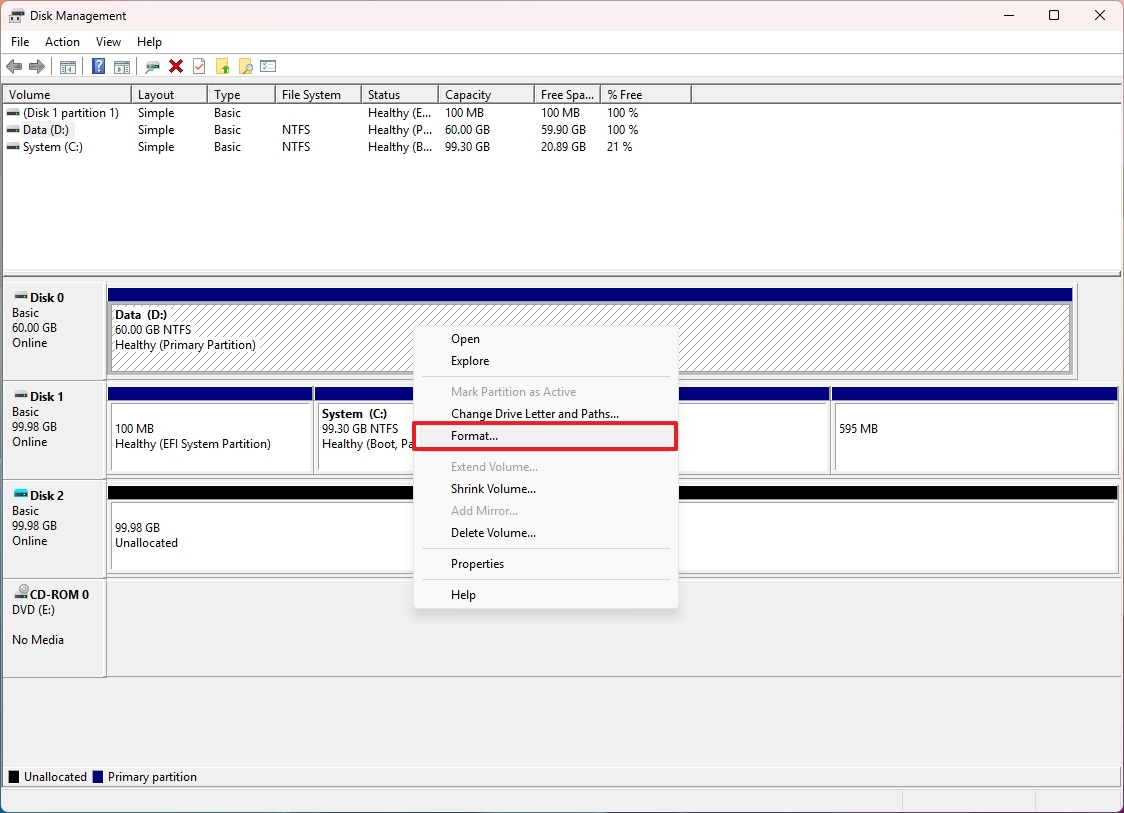
- Confirm a drive label in the "Volume label" field.
- Select the NTFS option with the "File System" drop-down menu.
- Select the Default option with the "Allocation unit size" drop-down menu.
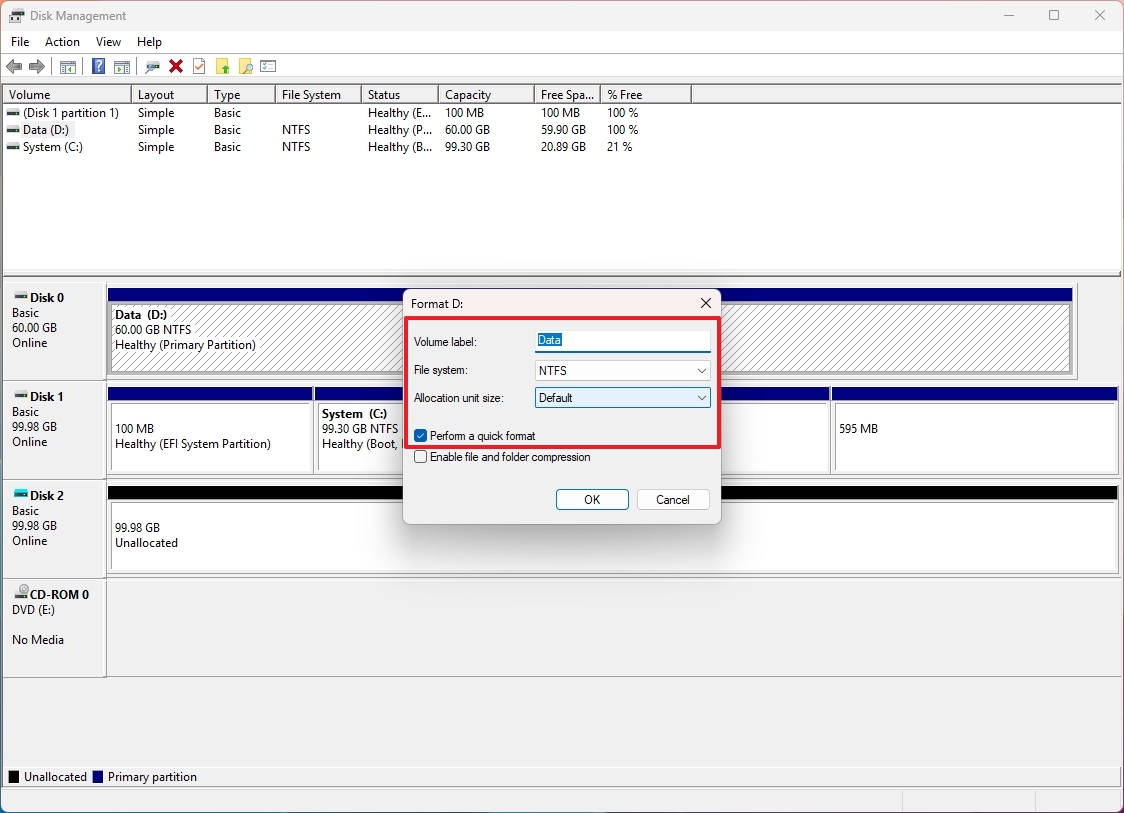
- Check the "Perform a quick format" option.
- Click the Apply button.
- Click the OK button.
Once you complete the steps, the tool will wipe out the drive, and it will create a new volume formatted with a new file system, drive letter, and label you specified.
Enable file compression
The NTFS file system available on Windows 11 also includes a lightweight compression feature, which allows you to reduce the size of files and save space while retaining normal access without manual decompression. Since compression and decompression happen on the fly, enabling this feature will require additional system resources. You may not benefit from this feature if you have a hard drive with multiple terabytes and don't store any files.
To enable file compression at the drive level on Windows 11, use these steps:
- Open Start.
- Search for Create and format hard disk partitions and click the top result to open the Disk Management app.
- Right-click the volume and select the Properties option.

- Click the General tab.
- Check the "Compress the drive to save disk space" option.
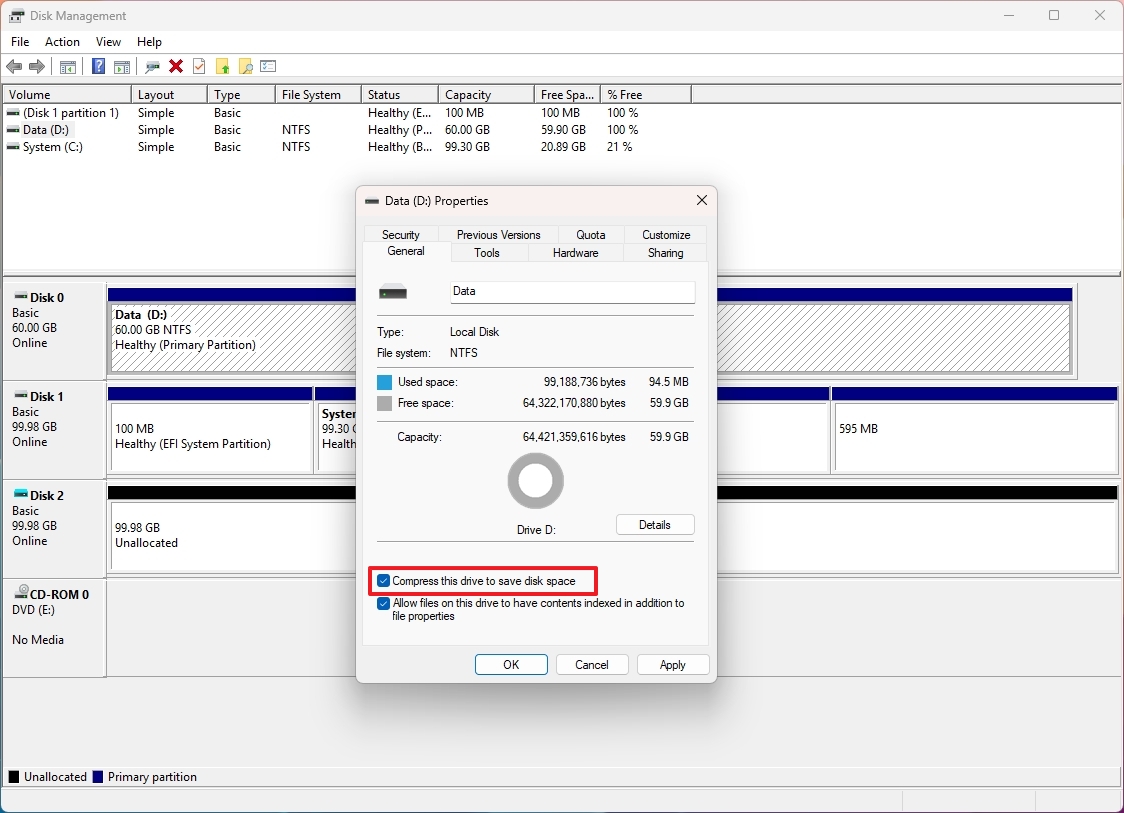
- Click the Apply button.
- Click the OK button.
After you complete the steps, files and folders that you store on the drive will use compression to reduce the space usage.
Change file system
Similar to using the Settings app, Disk Management can also be used to change the file system. However, the process will erase everything on the drive. If you have important data, it's recommended that you export the files to an alternate location, format the drive with the new file system, and restore the files.
To change the partition file system with Disk Management, use these steps:
- Open Start.
- Search for Create and format hard disk partitions and click the top result to open the Disk Management app.
- Right-click the volume and select the Format option.

- Confirm a drive label in the "Volume label" field.
- Select the NTFS, FAT32, or exFAT option with the "File System" menu.
- Quick note: The FAT32 and exFAT options are available only the storage is supported, such as when formatting a flash drive, not a secondary internal drive.
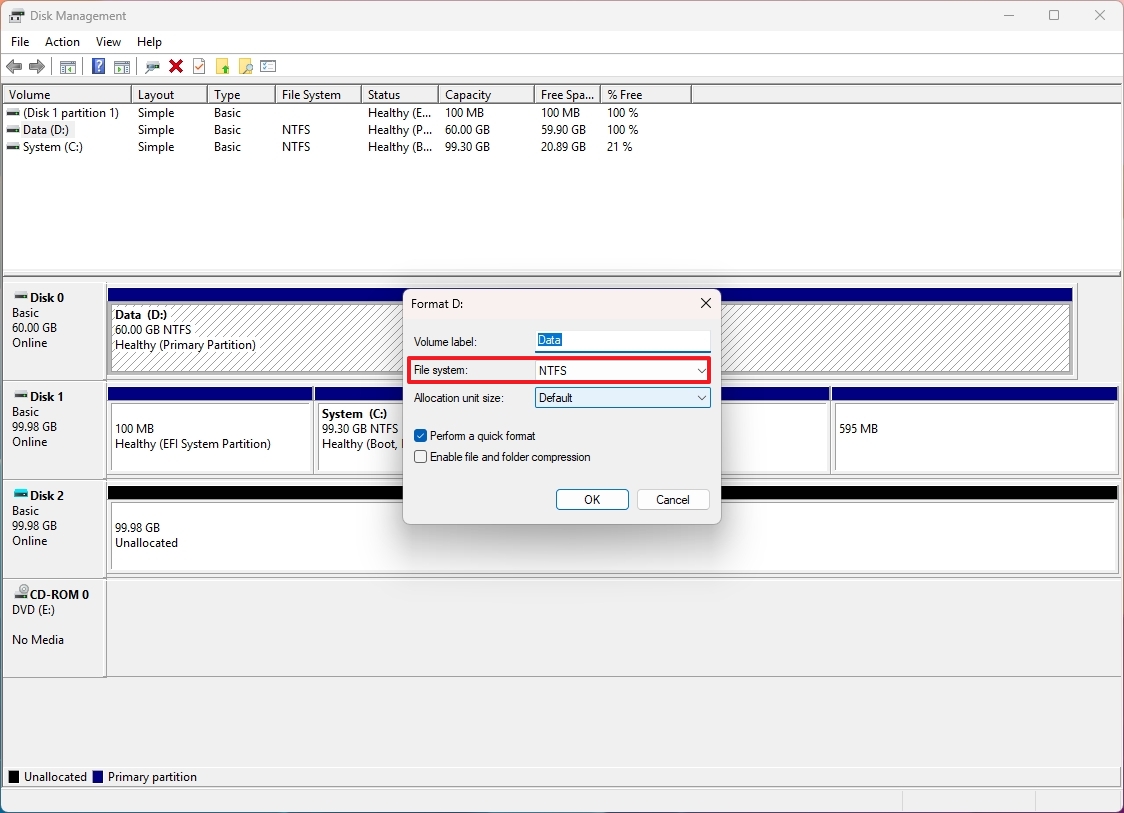
- Select the Default option with the "Allocation unit size" drop-down menu.
- Check the "Perform a quick format" option.
- Click the Apply button.
- Click the OK button.
Once you complete the steps, the data on the hard drive will be erased, and the new file system will apply.
Change volume size
The Disk Management console includes an option to shrink or extend the size of the drive to manage multiple volumes on the same drive.
To change the size of a volume on Windows 11, use these steps:
- Open Start.
- Search for Create and format hard disk partitions and click the top result to open the Disk Management app.
- Right-click the volume and select the Shink Volume option.
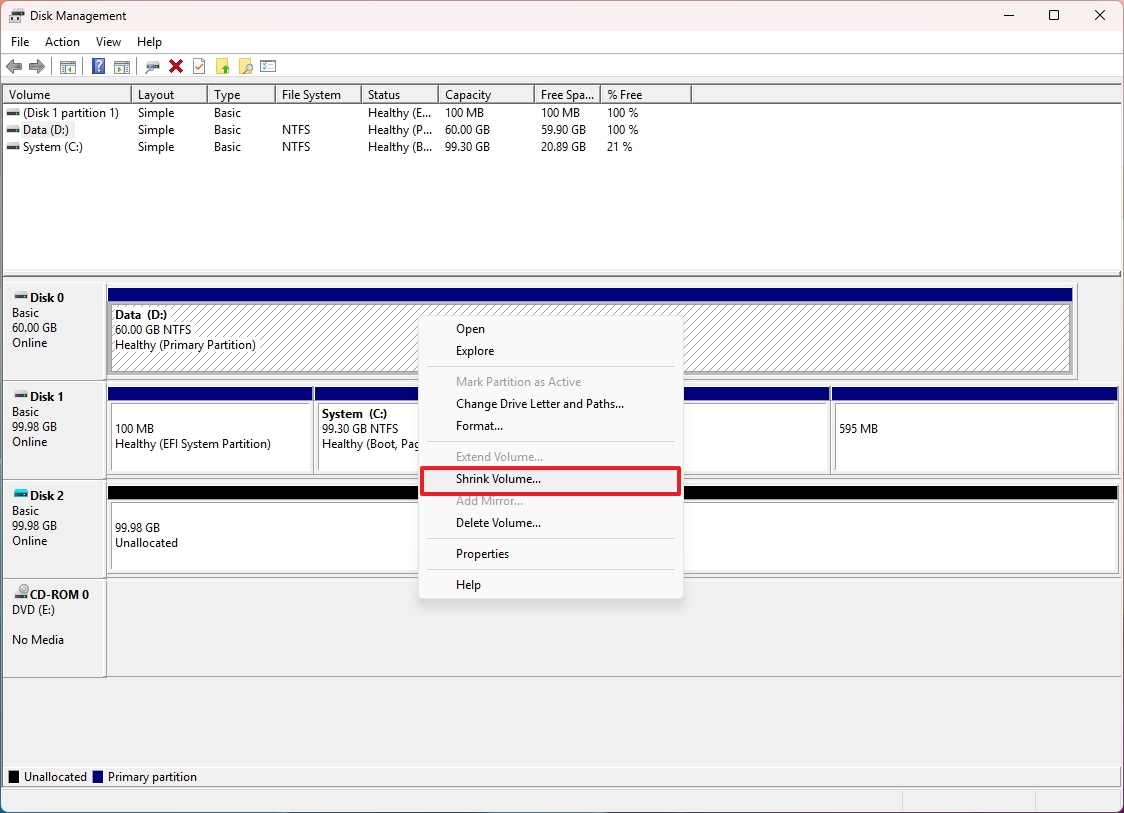
- Specify the new size (in megabytes) to shrink or expand the space of the volume.
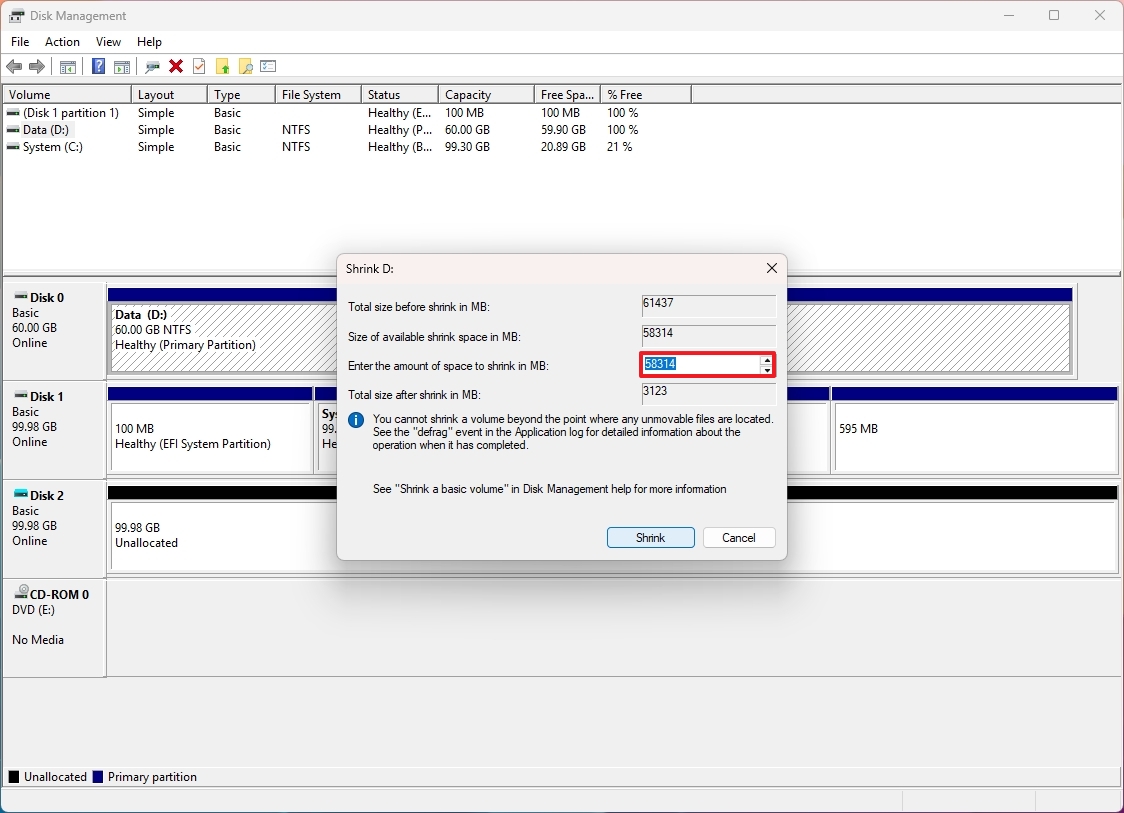
- Click the Shrink button.
After you complete the steps, the volume will appear with the new size on the computer.
Mount drive as folder
To mount a drive as a folder path on Windows 11, use these steps:
- Open Start.
- Search for Create and format hard disk partitions and click the top result to open the Disk Management app.
- Right-click the volume and select the "Change Drive Letter and Paths" option.
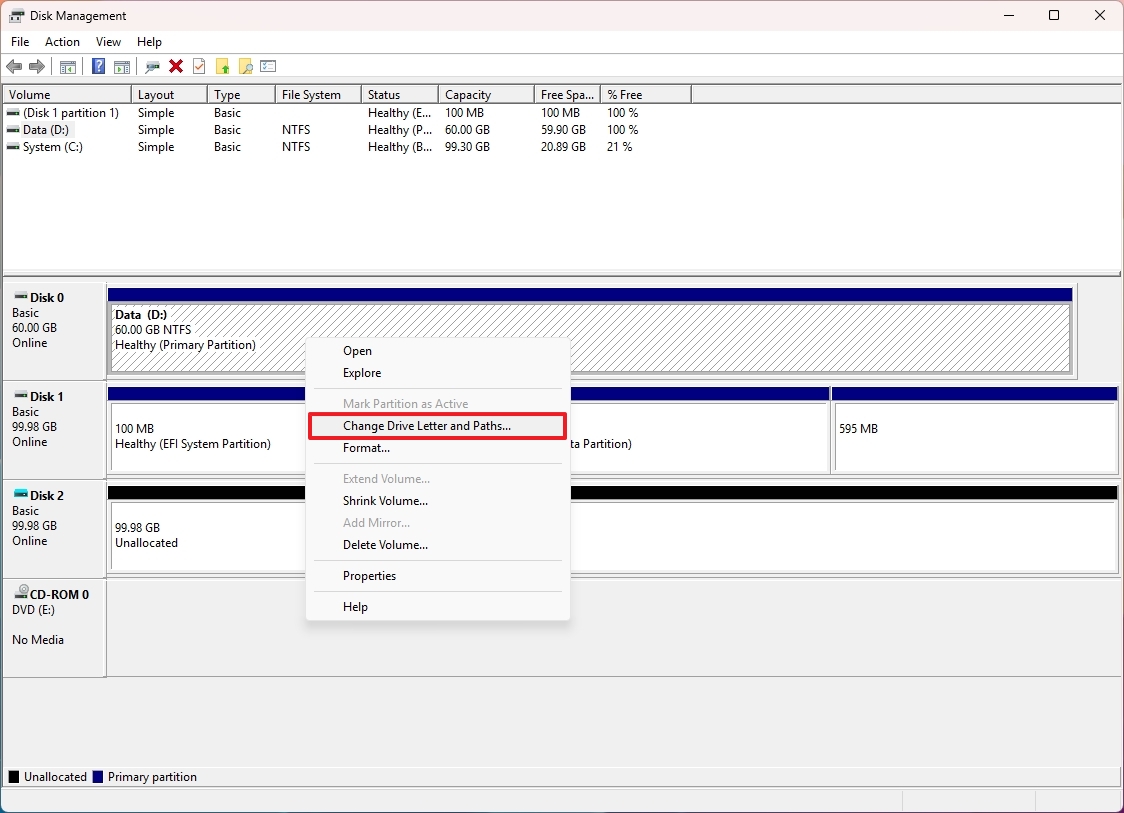
- Select the current drive letter option.
- Click the Remove button.
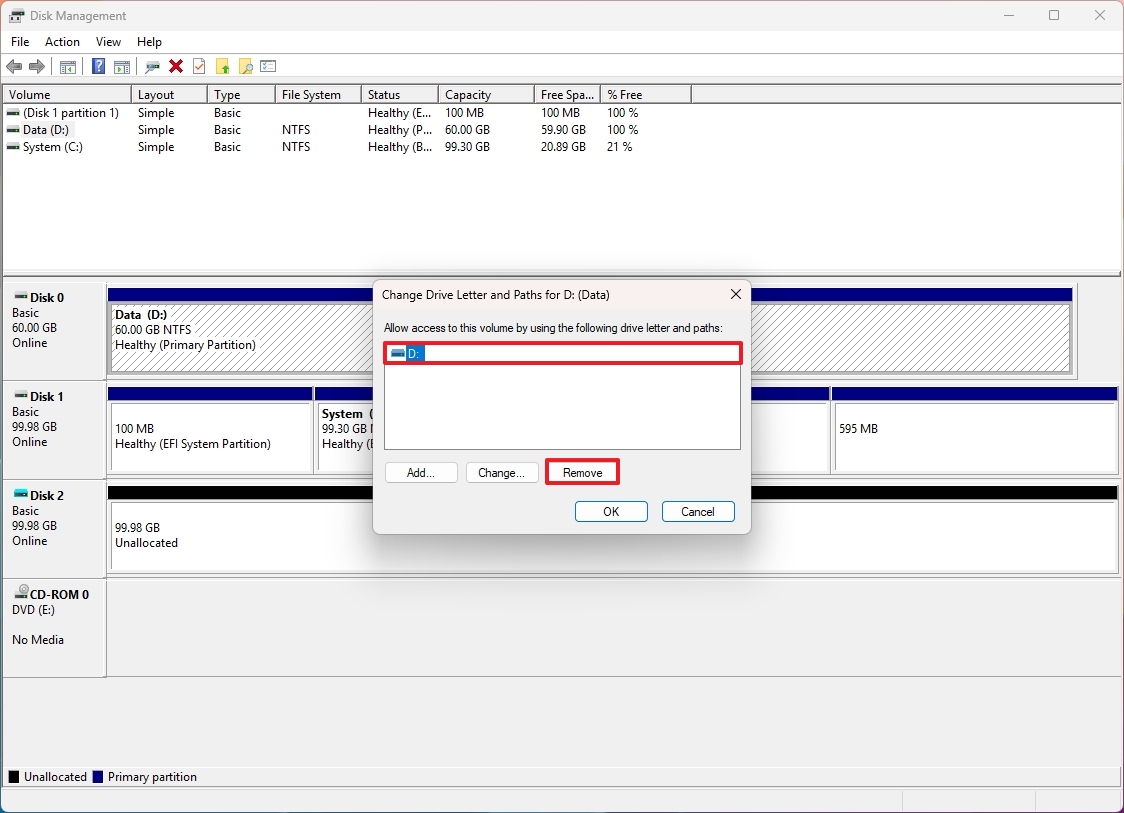
- Click the Yes button.
- Right-click the volume and select the "Change Drive Letter and Paths" option.
- Click the Add button.
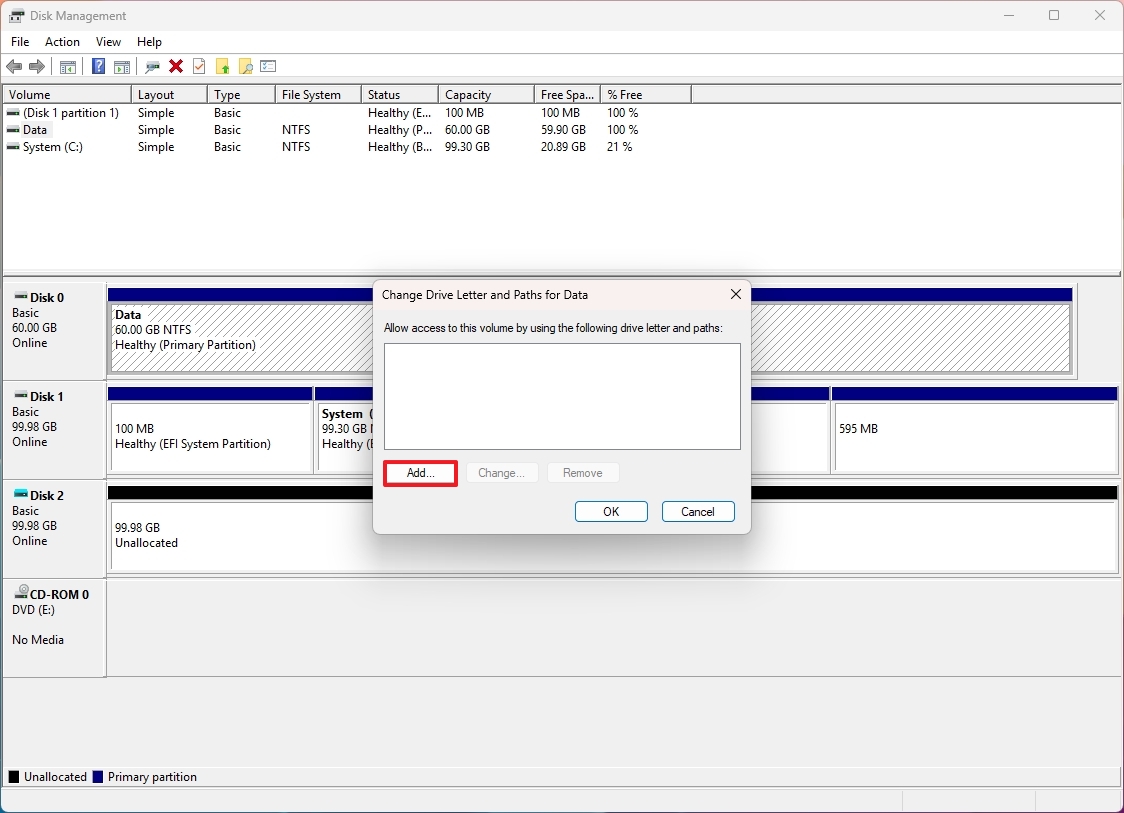
- Select the "Mount in the following empty NTFS folder" option.
- Click the Browse button.
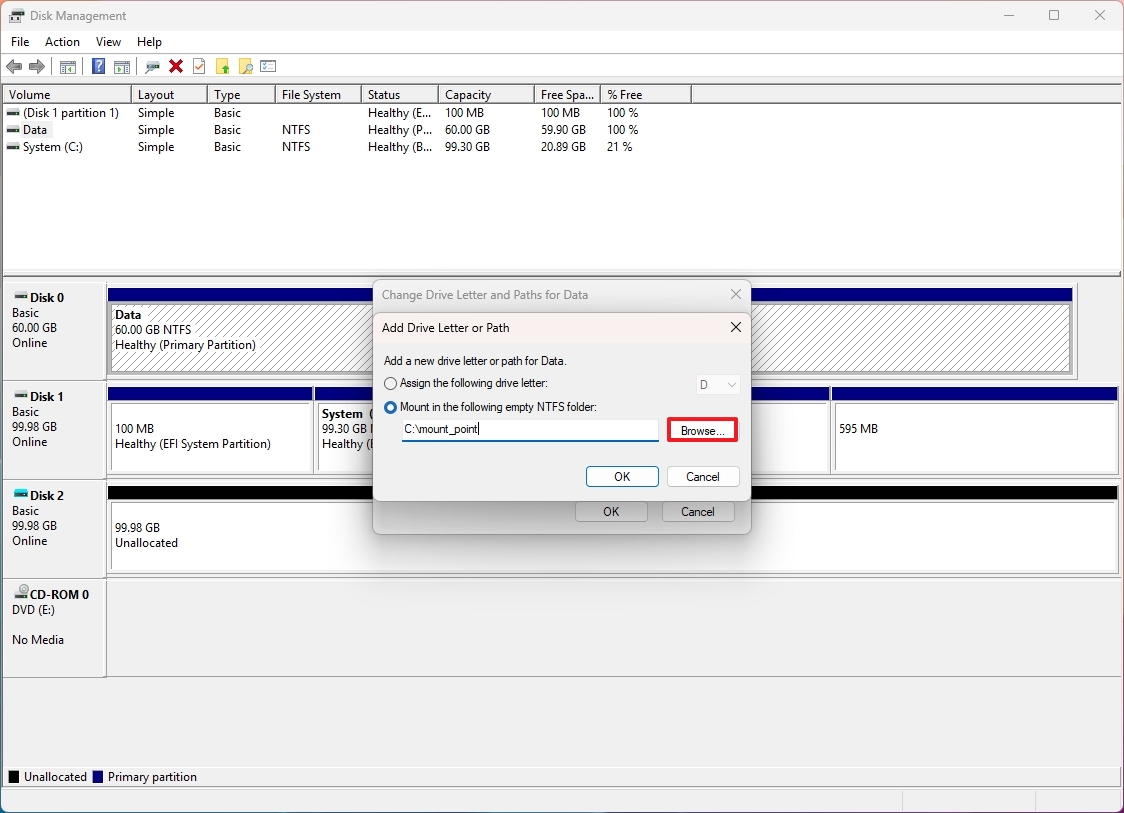
- Open the location to mount the volume.
- (Optional) Click the New folder button and confirm a name for the folder — for example, mount_point.
- Click the Select folder button.
- Click the OK button.
Once you complete the steps, the volume will be accessible from a different drive as a folder.
Check drive properties
To check the hard drive properties with Disk Management, use these steps:
- Open Start.
- Search for Create and format hard disk partitions and click the top result to open the Disk Management app.
- Right-click the drive and select the Properties option.
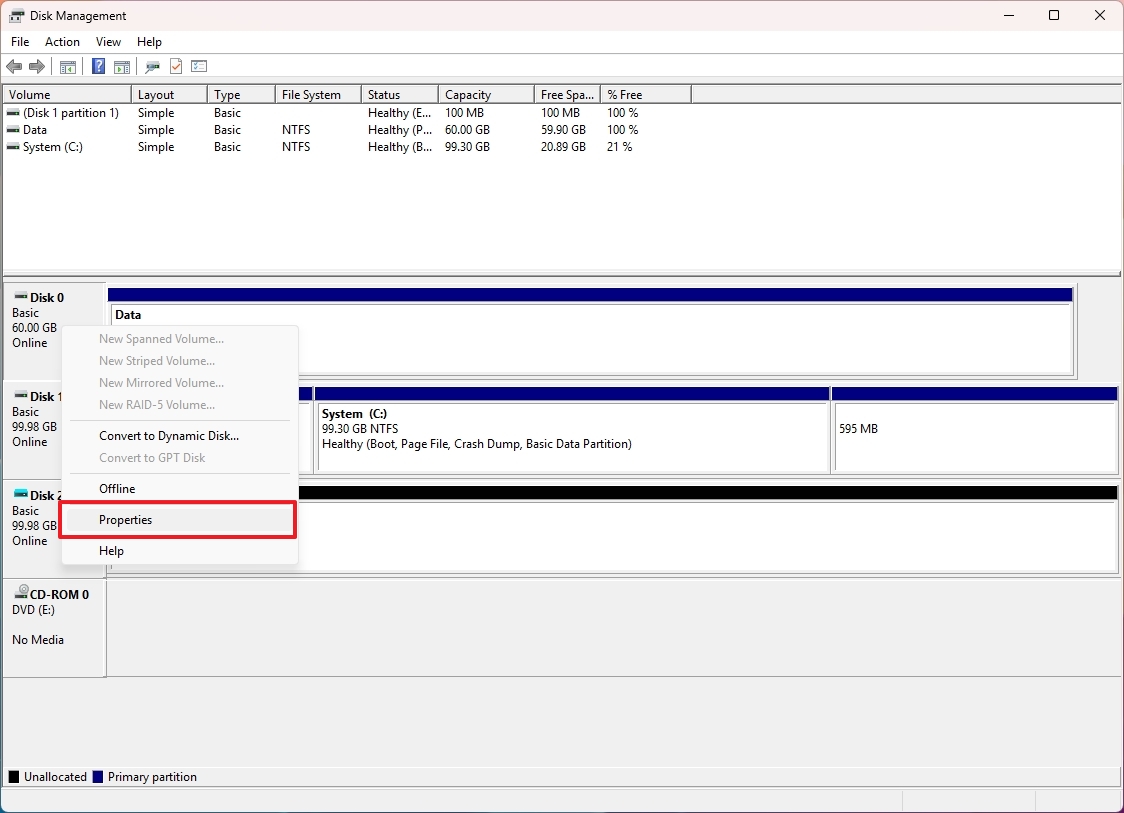
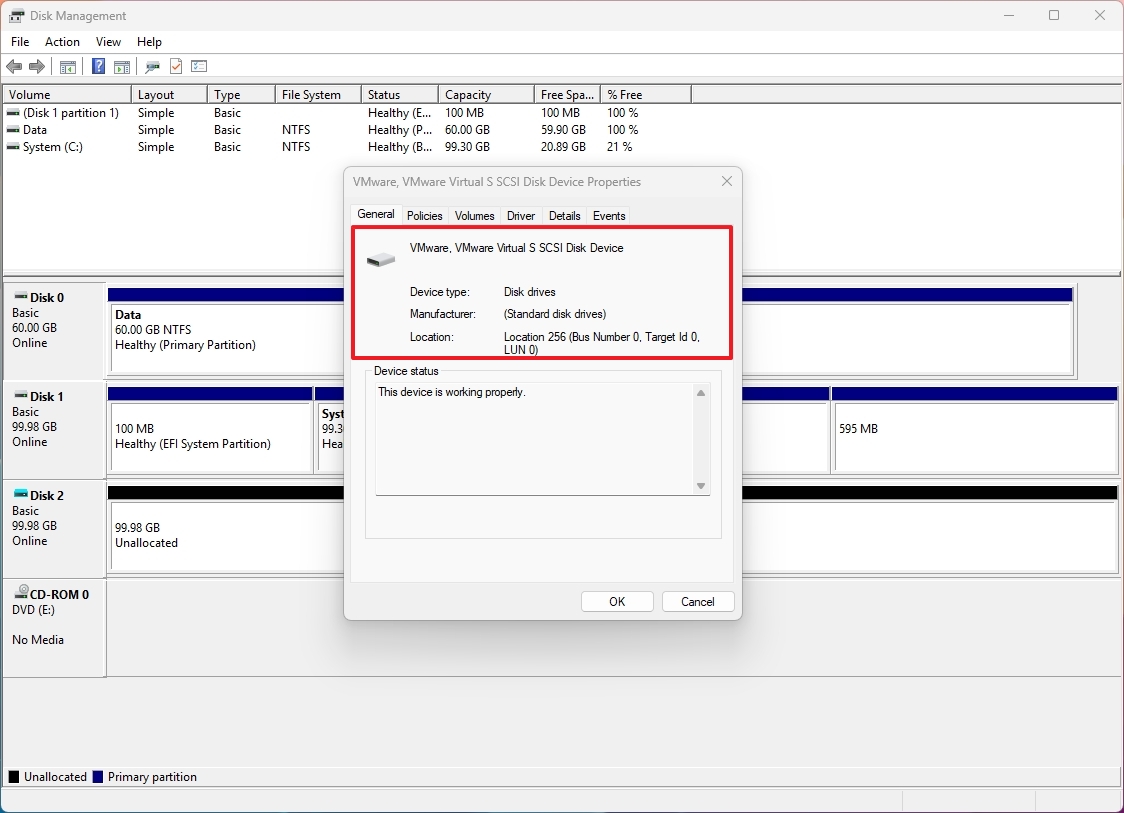
- Click the General tab.
- Confirm details like device type, manufacturer, and location.
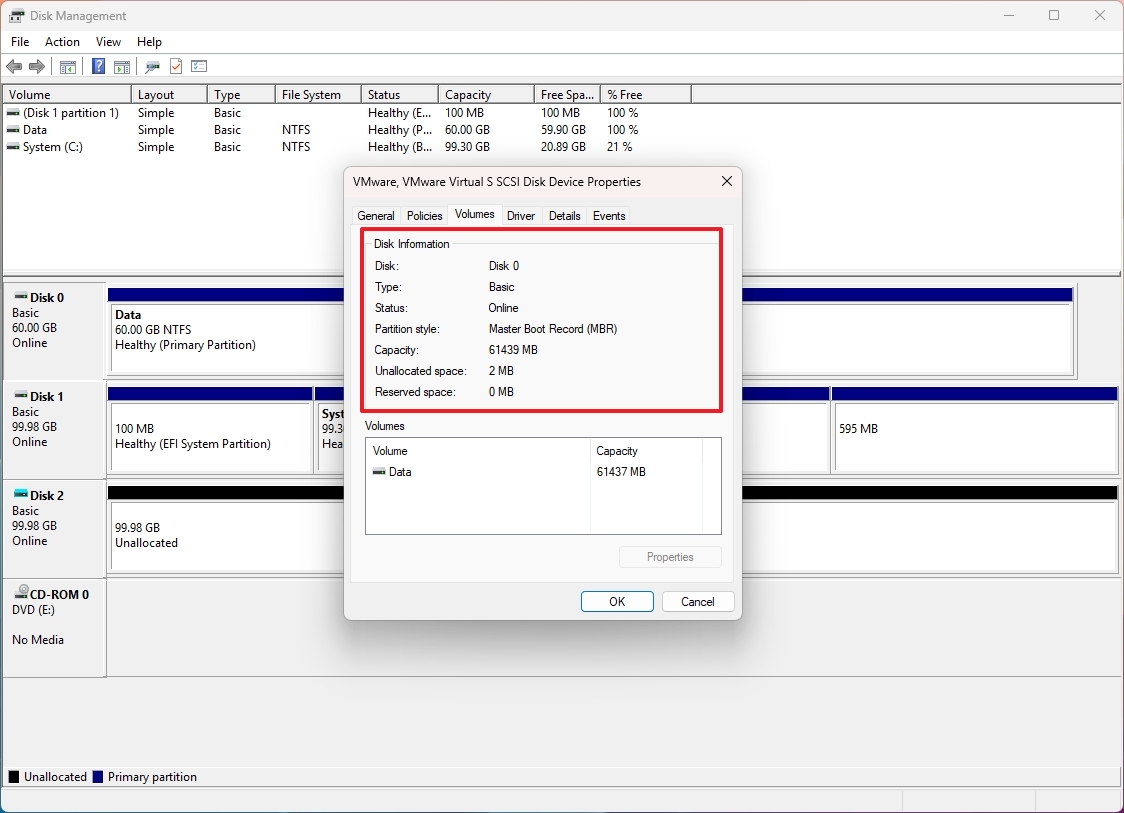
- Click the Volumes tab.
- Confirm disk number, type, status, partition style, capacity, and more.
- Click the Driver tab.
- Confirm the device driver information.
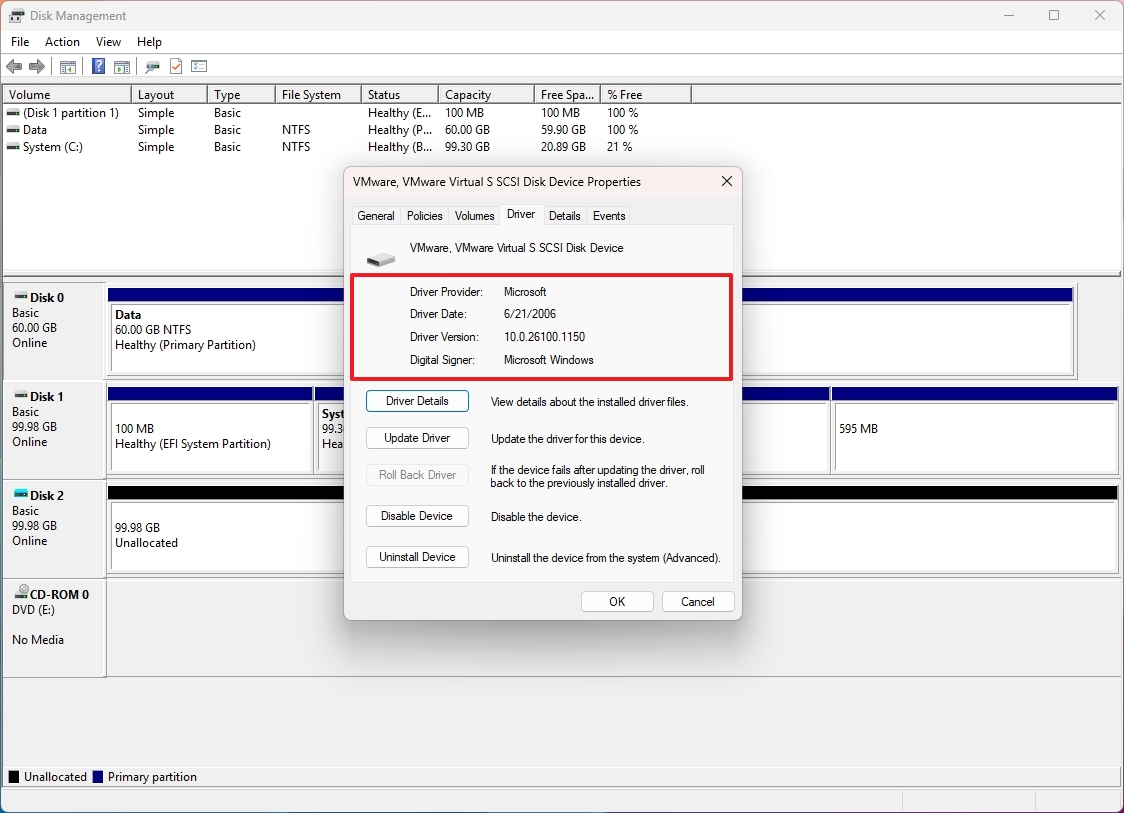
- Click the OK button.
After you complete the steps, you will better understand the properties of the physical drive.
Check volume properties
To check the volume properties, use these steps:
- Open Start.
- Search for Create and format hard disk partitions and click the top result to open the Disk Management app.
- Right-click the volume and select the Properties option.
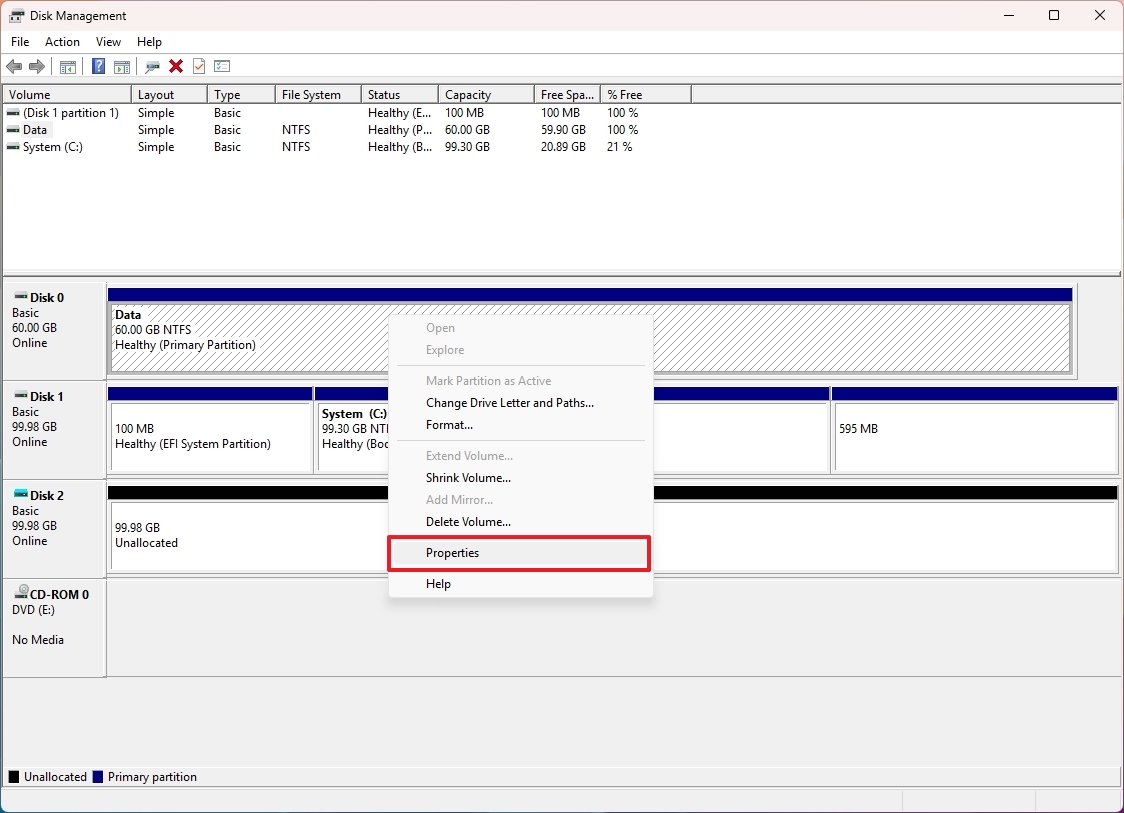
- Click the General tab.
- Confirm details like storage usage, file system, and type.
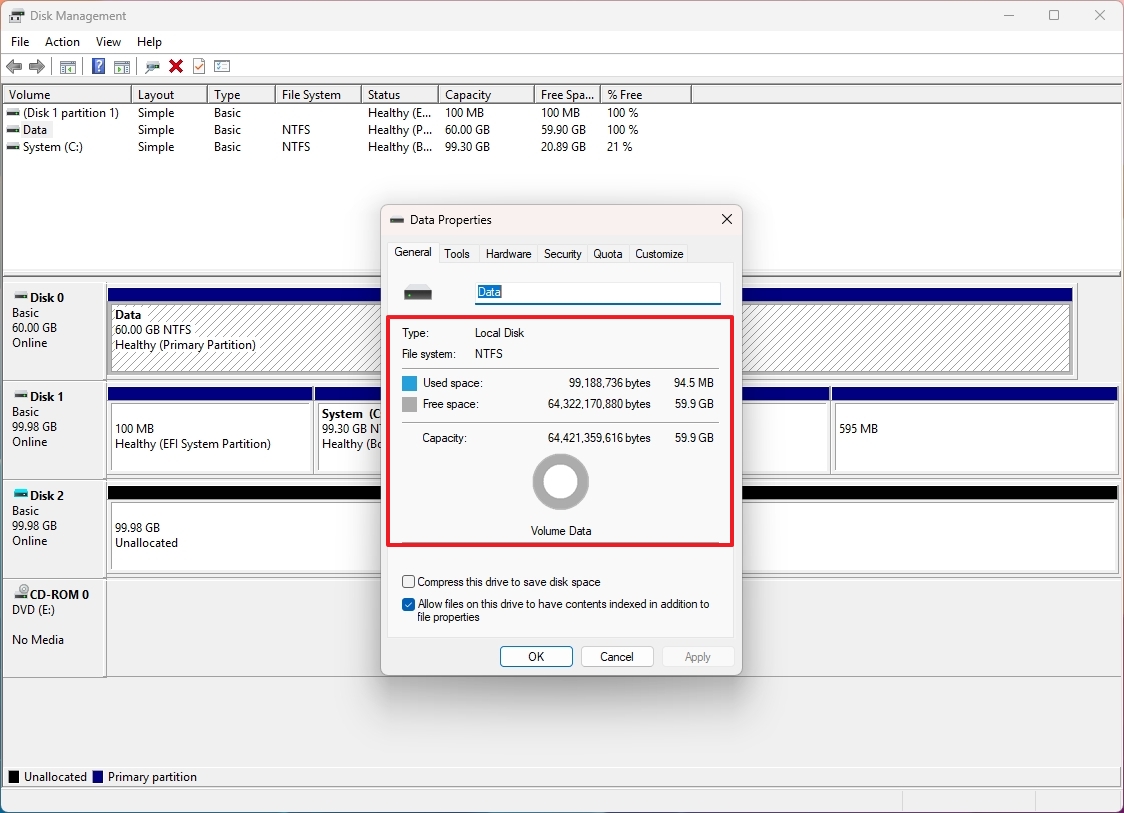
- Click the OK button.
Once you complete the steps, you will have detailed information about the volume.
Covert partition style to GPT or MBR
The conversion will delete the data on the drive. As a result, it's recommended that any data be backed up before proceeding. You can always restore the data after the process.
To convert a secondary drive from MBR to GPT on Windows 11, use these steps:
- Open Start.
- Search for Create and format hard disk partitions and click the top result to open the Disk Management app.
- Right-click the volume and select the Delete Volume option.
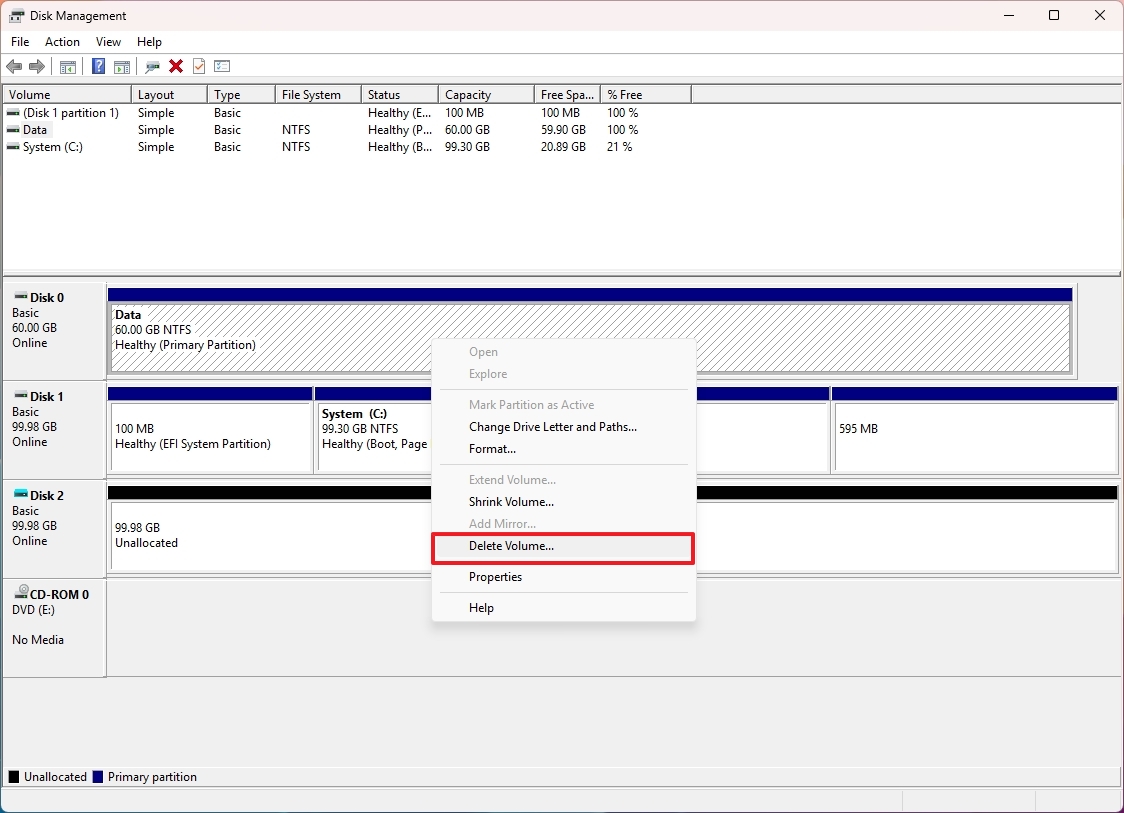
- Click the Yes button to confirm.
- Right-click the drive and select the "Convert to GPT Disk" option to convert it to GPT.
- Right-click the drive and select the "Convert to MBR Disk" option to convert it to MBR.
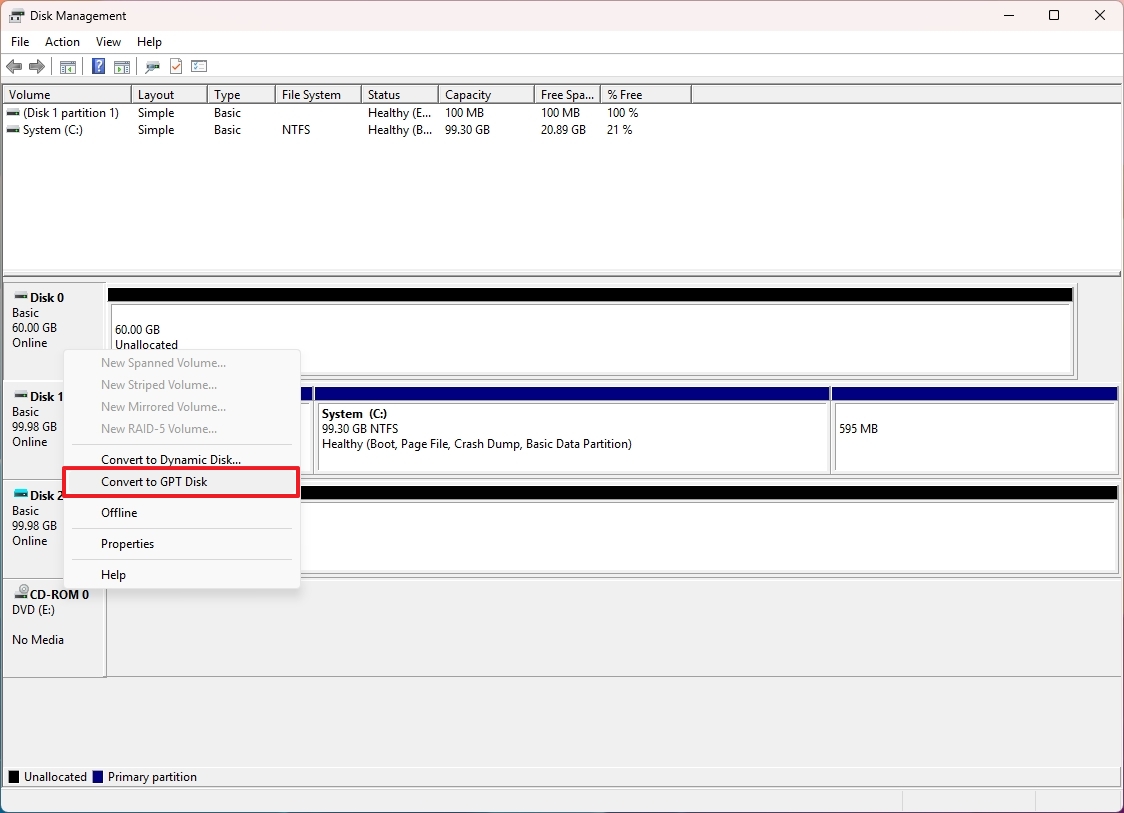
Once you complete the steps, the partition type will convert to GPT. You can also use the same instructions to convert the drive to MBR.
Bring drive online or take offline
To bring a drive online or take offline with Disk Management, use these steps:
- Open Start.
- Search for Create and format hard disk partitions and click the top result to open the Disk Management app.
- Right-click the drive and select the Offline option to take the drive offline.
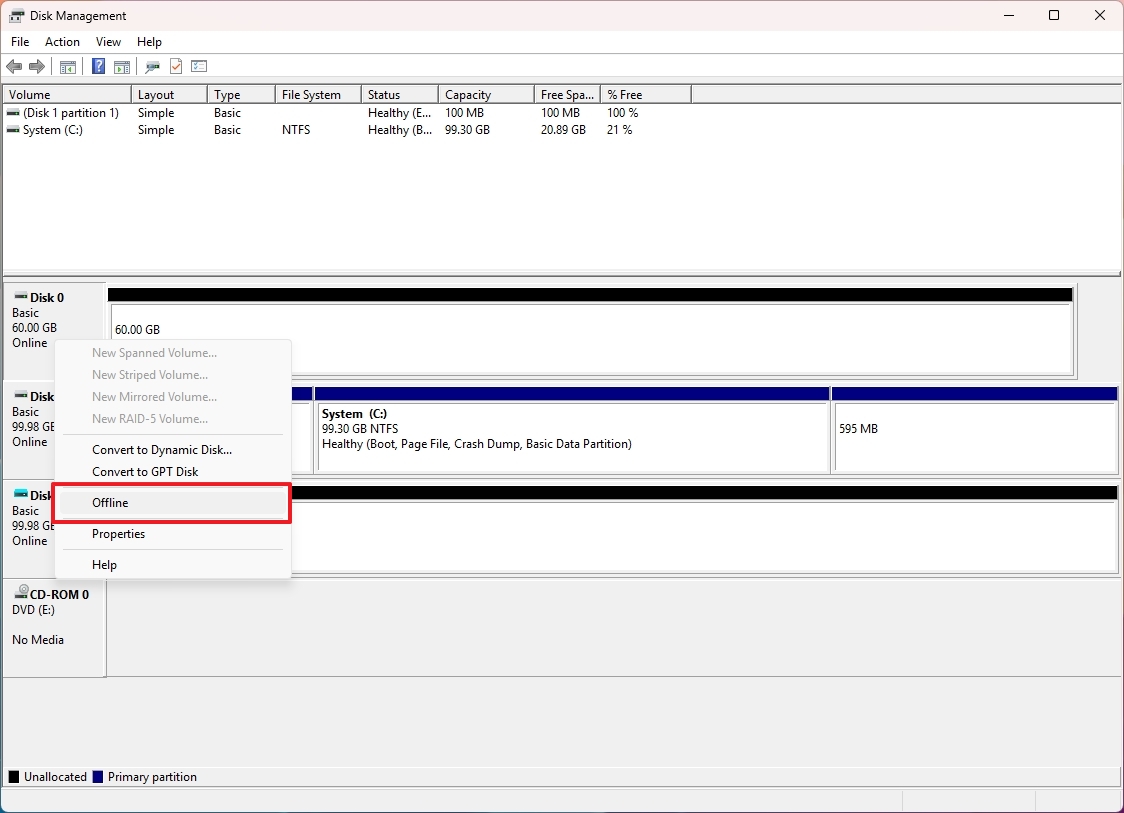
- Right-click the drive and select the Online option to bring the drive online.
After you complete the steps, the hard drive will go offline or come back up online, depending on the action.
Delete volume
If you want to delete the data and volume on a hard drive, use these steps:
- Open Start.
- Search for Create and format hard disk partitions and click the top result to open the Disk Management app.
- Right-click the volume and select the Delete Volume option.

- Click the Yes button.
Once you complete the steps, the files and folders will be deleted, and the volume will be erased from the storage drive.
Although it's possible to format, review details, and change various settings from within File Explorer, the "Disks & Volumes" settings and the Disk Management console offer the most options for managing storage drives on Windows 11.
More resources
For more helpful articles, coverage, and answers to common questions about Windows 10 and Windows 11, visit the following resources:
Mauro Huculak has been a Windows How-To Expert contributor for WindowsCentral.com for nearly a decade and has over 15 years of experience writing comprehensive guides. He also has an IT background and has achieved different professional certifications from Microsoft, Cisco, VMware, and CompTIA. He has been recognized as a Microsoft MVP for many years.

