Windows 11’s Start Menu is more flexible than you think — here’s how to take control of its settings
Pin, unpin, resize, reorganize — the Start Menu is yours to command.
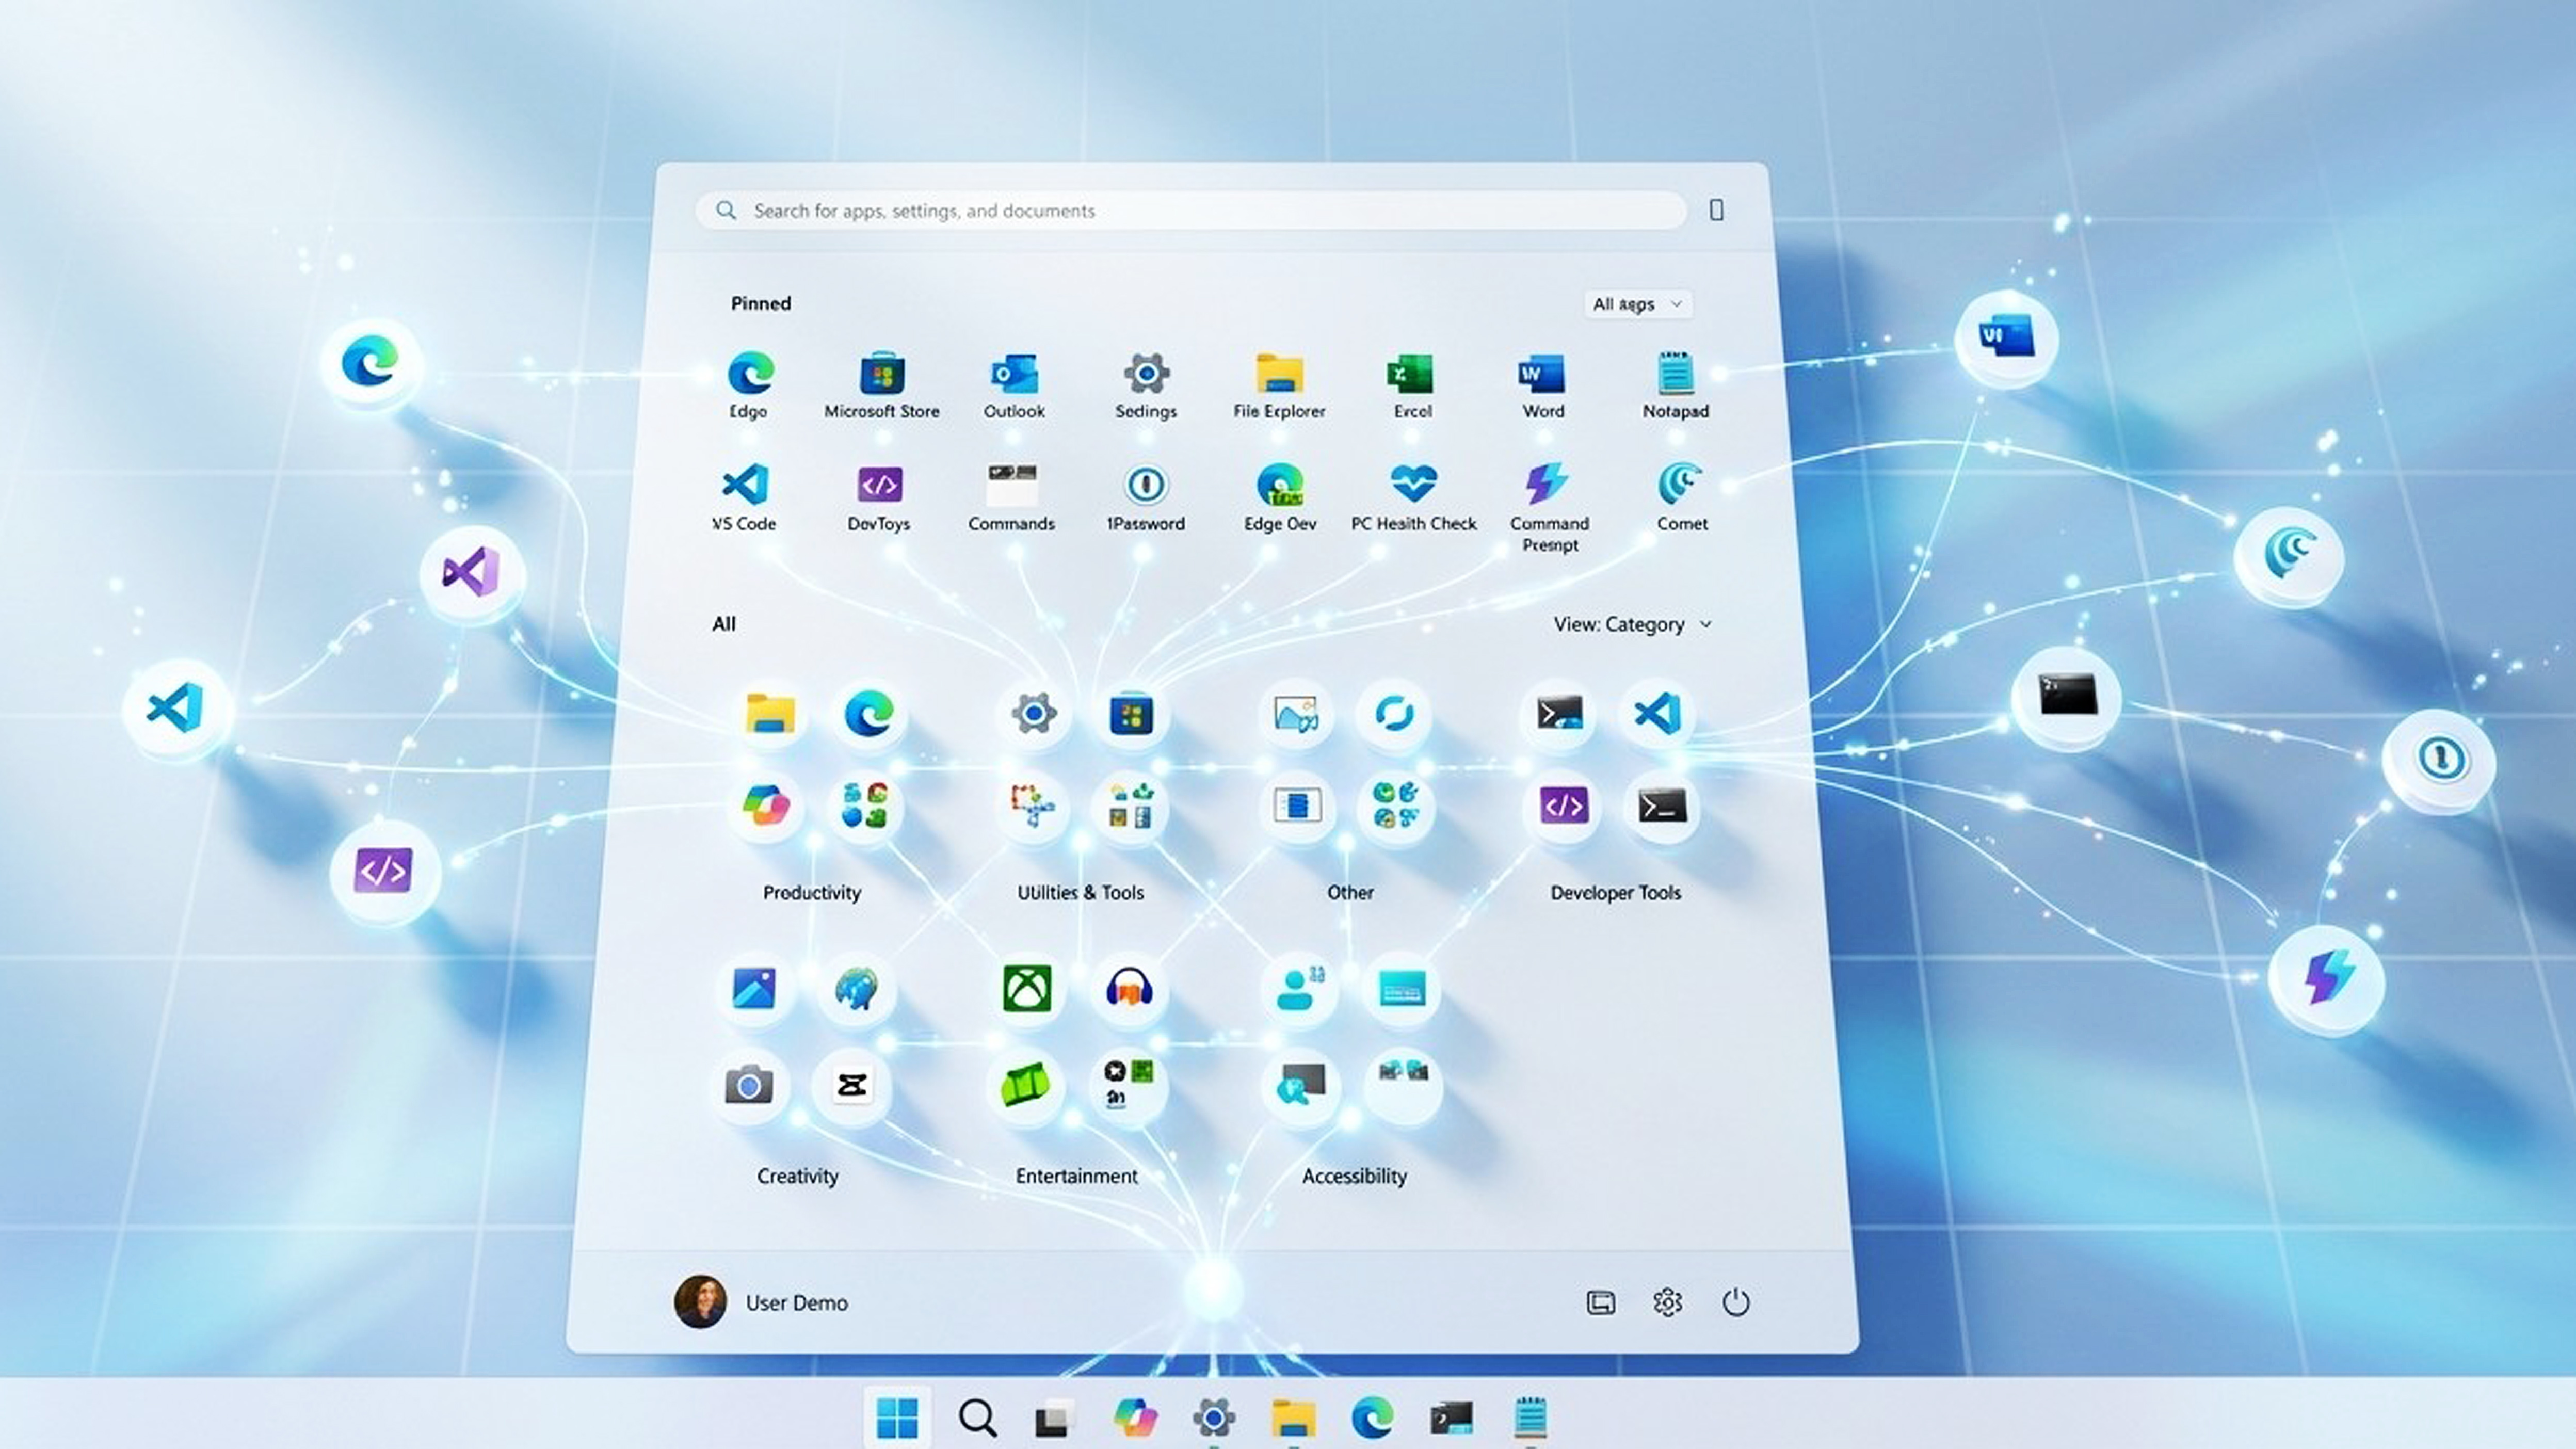
Windows 11 continues to evolve its Start menu experience. The original design introduced a cleaner layout without Live Tiles, a simplified app grid, and a more streamlined set of personalization controls.
In the latest version of the operating system, Microsoft has introduced a refreshed Start menu layout that changes how apps and recommendations appear by making the interface larger and merging the "Pinned" section with the "All" menu, giving users even more flexibility.
Since the company is still rolling out the design, both versions of the menu remain in use. The Settings app still provides extensive options to tailor the experience to your preferences, including managing the "All" view, adjusting or reducing the "Recommended" section, customizing quick-access folders next to the Power menu, choosing accent and background styles, and switching the menu alignment to the left for a more classic feel.
In this how-to guide, I'll show you how to customize Start menu settings so it works the way you like, regardless of the design on your computer.
These instructions has been updated to ensure accuracy and reflect changes to the process in the operating system.
How to customize the Start menu on Windows 11 (new)
Similar to the (now) legacy version of the menu, the new version's settings are also available from the "Start" page.
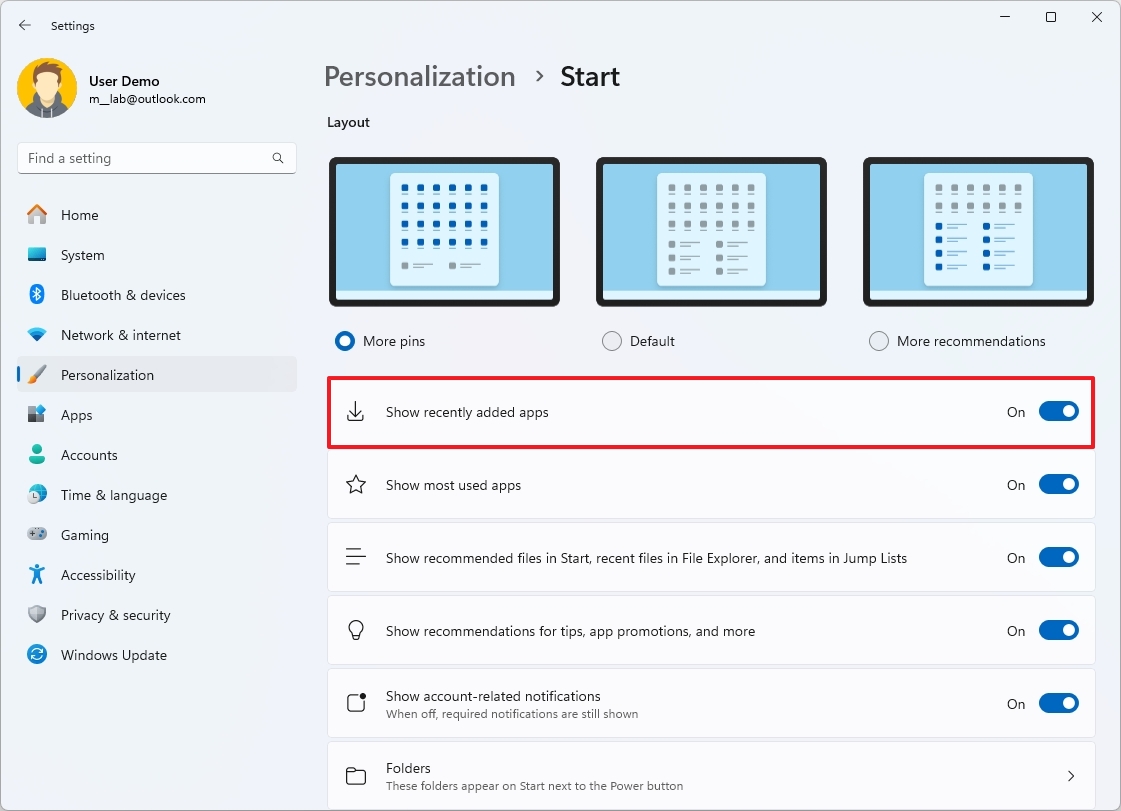
Show or hide recently added apps
To control recently added apps from appearing in the "Recommended" section, use these steps:
- Open Settings.
- Click on Personalization.
- Click the Start page on the right side.
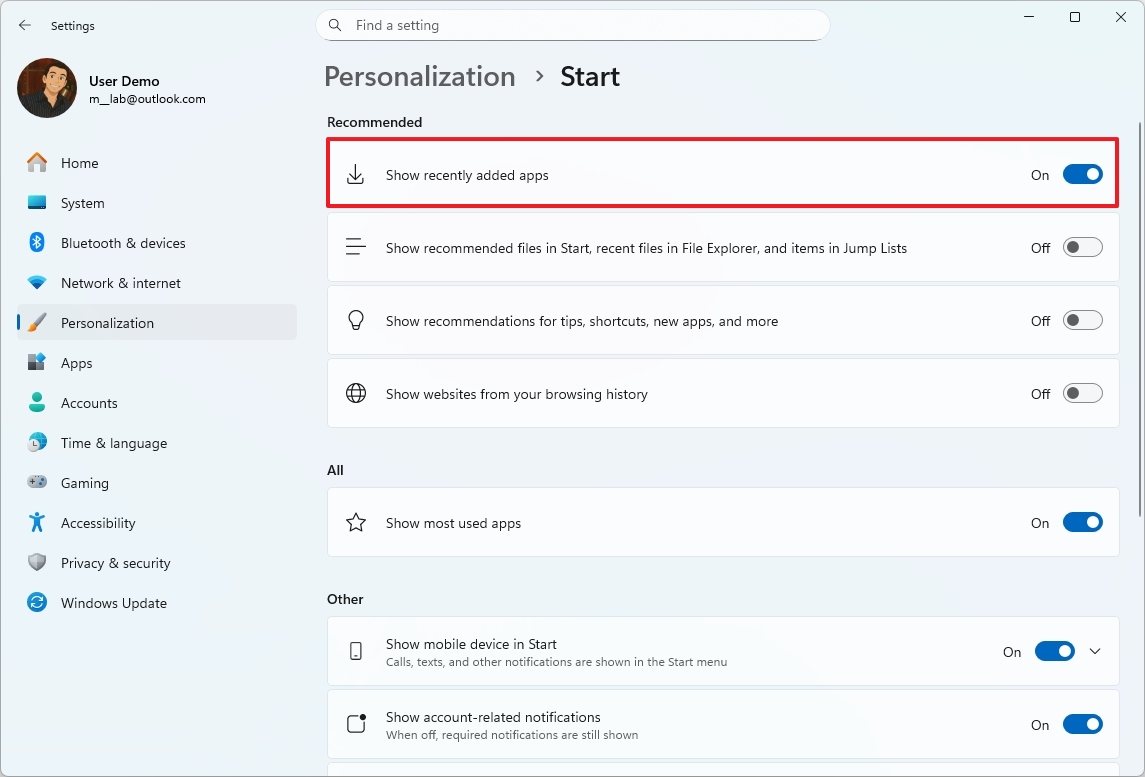
- Turn on or off the "Show recently added apps" toggle switch.
Once you complete the steps, recently installed apps will appear grouped in the "Recommended" list, depending on your settings.
All the latest news, reviews, and guides for Windows and Xbox diehards.
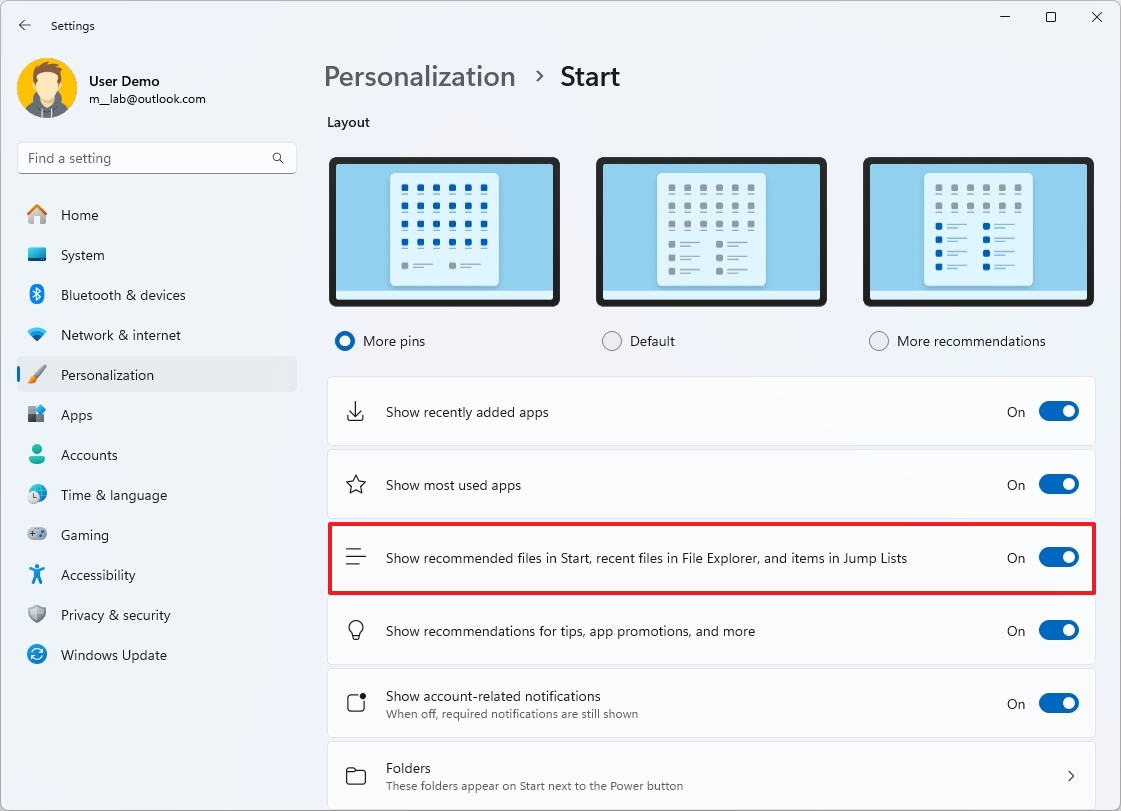
Show or hide opened items
To show or hide recent files, use these steps:
- Open Settings.
- Click on Personalization.
- Click the Start page on the right side.
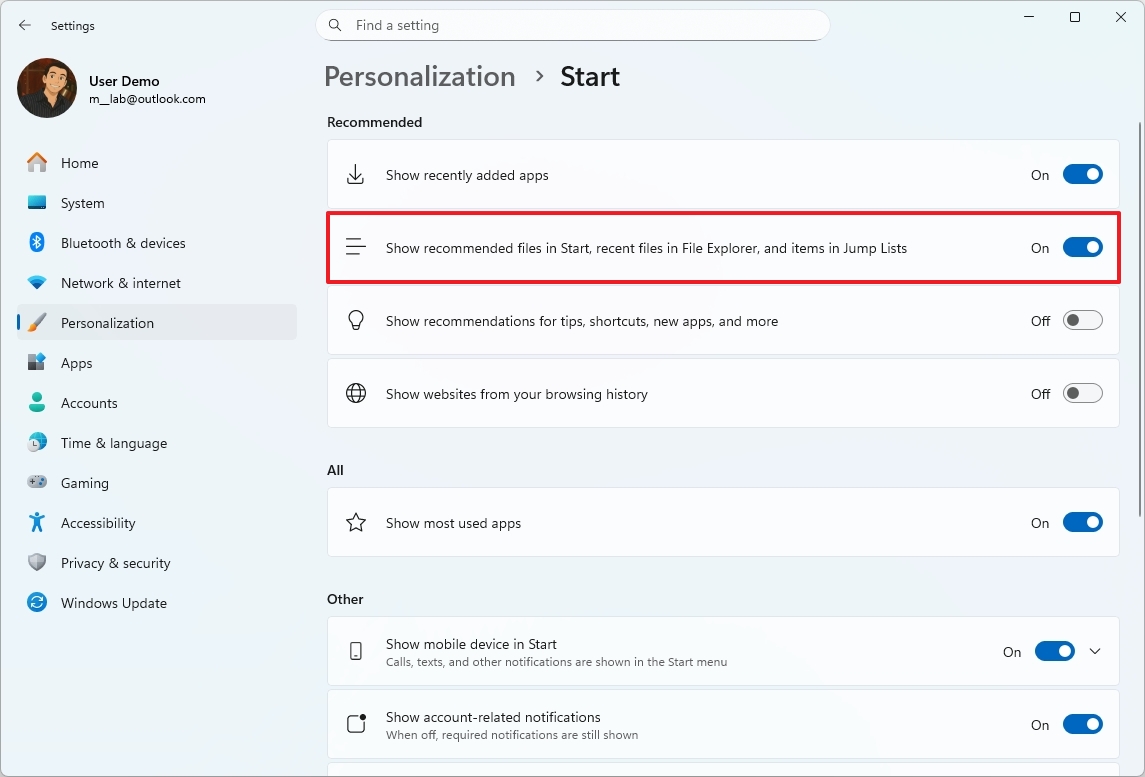
- Turn on or off the "Show recommended files in Start, recent files in File Explorer, and items in Jump Lists" toggle switch.
Once you complete the steps, if you turn on the option, recently opened items will appear in the Start menu, and when you right-click an app to view the Jump List in the Taskbar and Quick Access page in File Explorer.
Show or hide recently visited websites
To control your web history appearing in the "Recommended" section, use these steps:
- Open Settings.
- Click on Personalization.
- Click the Start page on the right side.
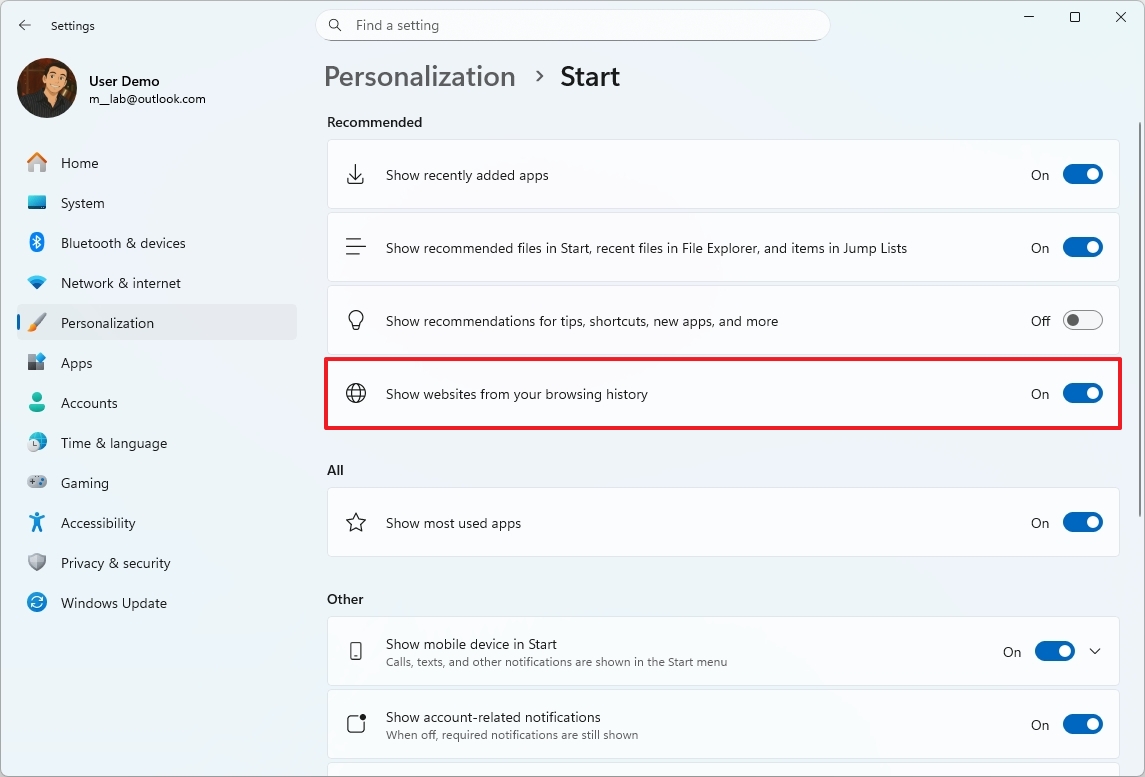
- Turn on or off the "Show websites from your browsing history" toggle switch.
After you complete the steps, your web history when using Microsoft Edge will appear in the section, according to your configuration.
Show or hide newly installed apps and other items
To decide where newly installed apps, tips, and shortcuts appear in the "Recommended" section, use these steps:
- Open Settings.
- Click on Personalization.
- Click the Start page on the right side.
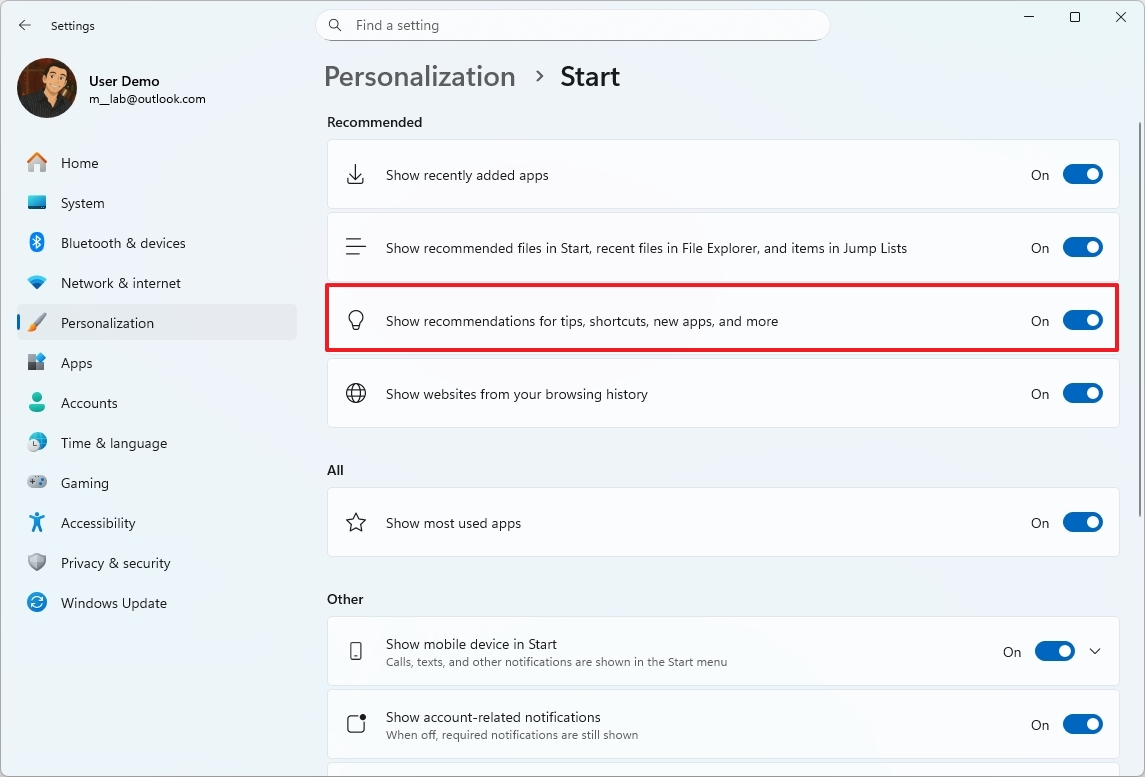
- Turn on or off the "Show recommendations for tips, shortcuts, new apps, and more" toggle switch.
Once you complete the steps, the new configuration will apply to the Start menu.
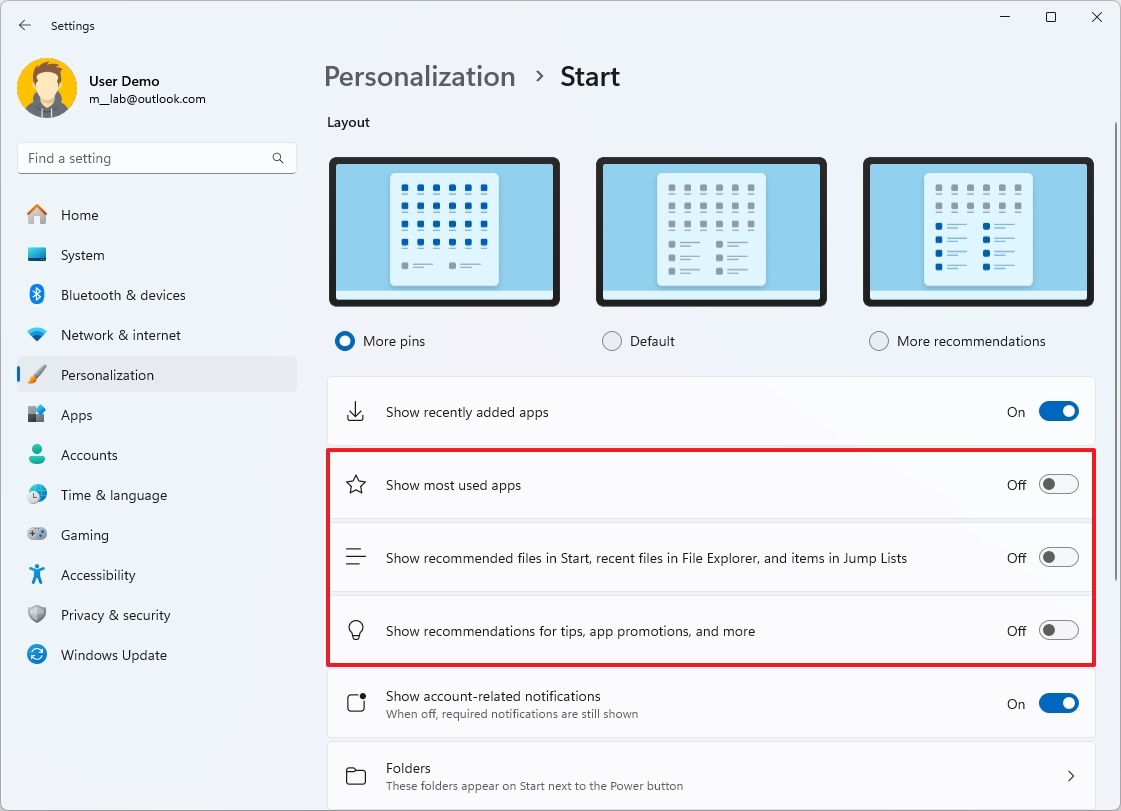
Show or hide the Recommended section
To remove all the items from the Recommended section of the Start menu, use these steps:
- Open Settings.
- Click on Personalization.
- Click the Start page on the right side.
- (Option 1) Turn off all the settings from the "Recommended" settings to disable the feature.
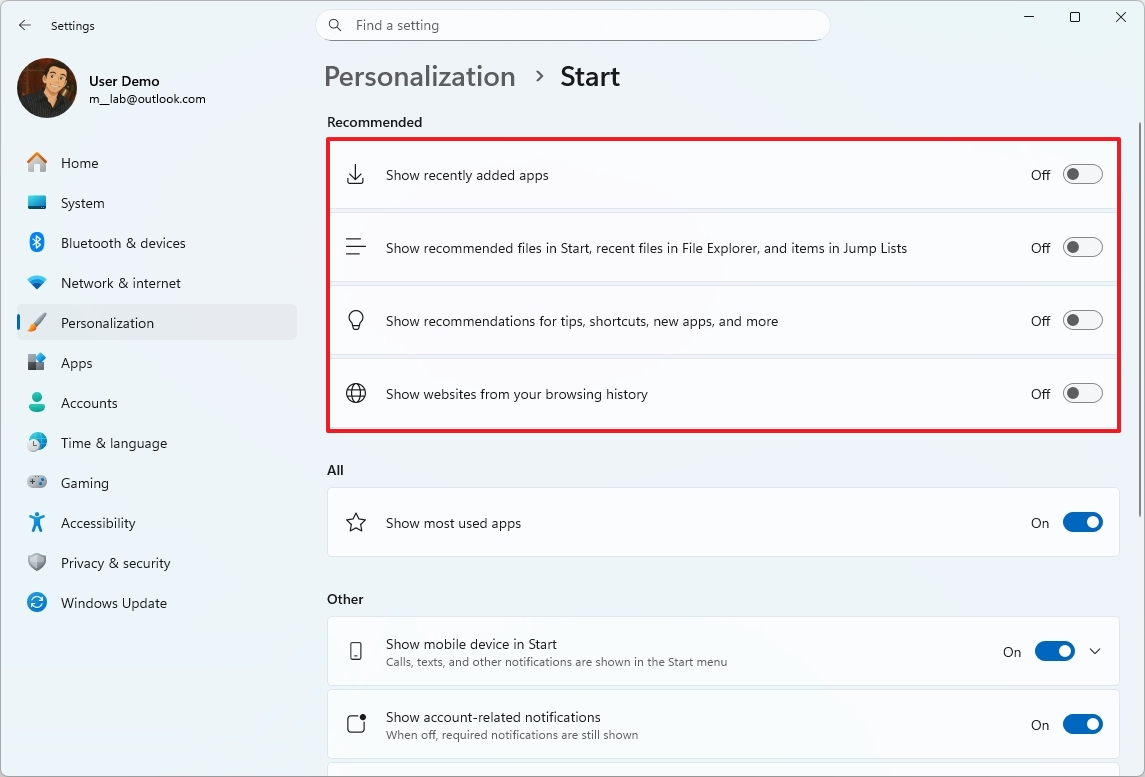
- (Option 2) Turn on at least one option in the "Recommended" settings to enable the feature.
Once you complete the steps, if you turned off all the settings, then you will no longer see the "Recommended" section in the Start menu.
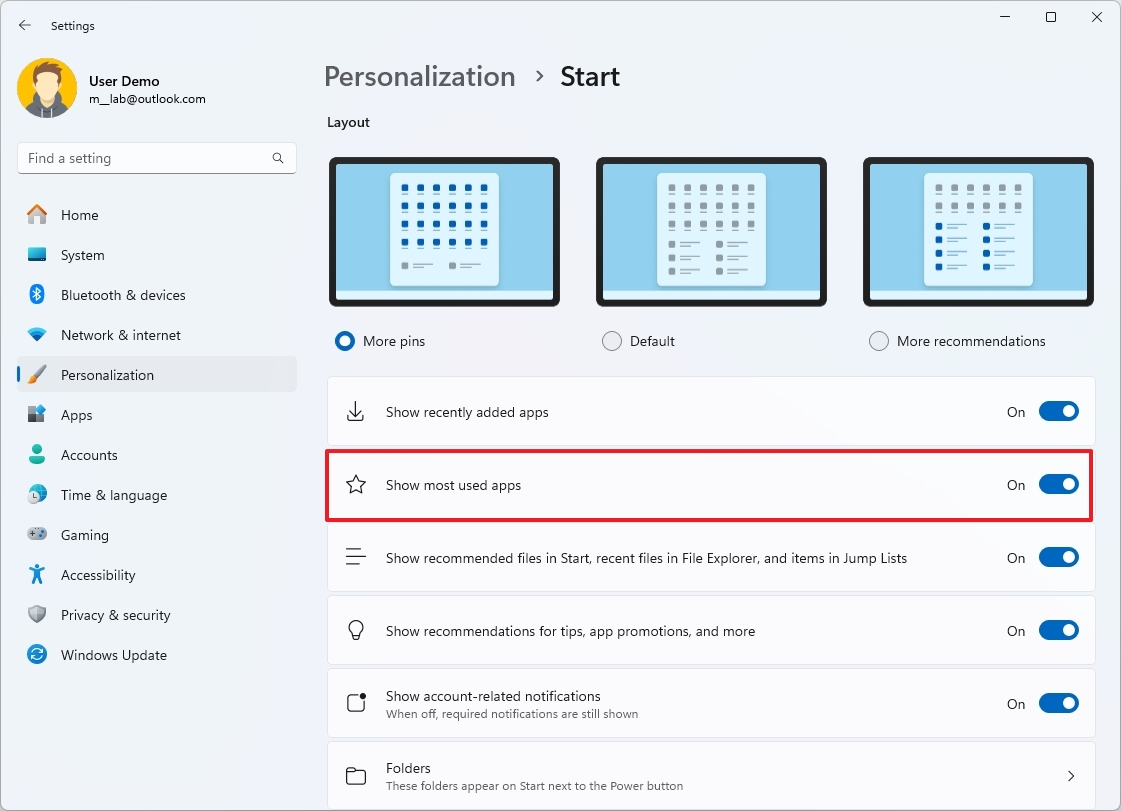
Show or hide most used apps
To control the visibility of the most used apps in the "Recommended" section in the new Start menu, use these steps:
- Open Settings.
- Click on Personalization.
- Click the Start page on the right side.
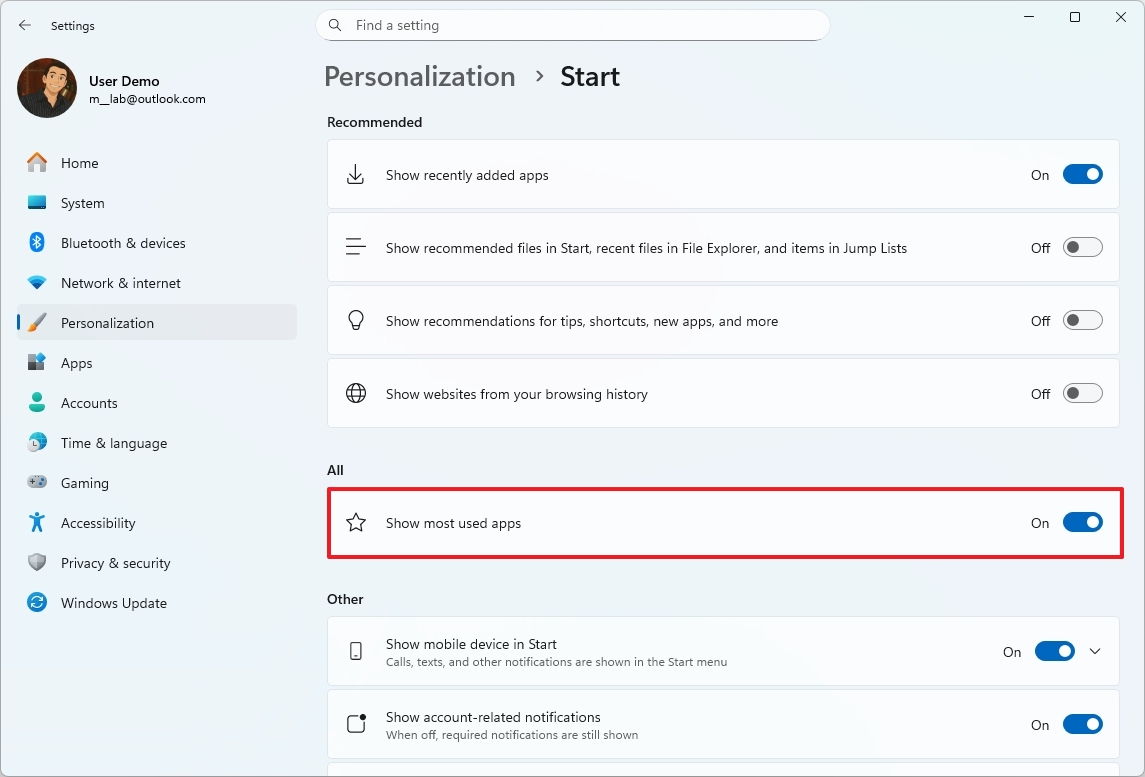
- Turn on or off the "Show most used apps" toggle switch.
After you complete the steps, frequently used apps will appear grouped in the "Recommended" list, depending on your settings.
Show or hide the mobile sidebar
To enable or disable the sidebar that appears next to the Start menu when you have an Android or iPhone connected to Windows 11, use these steps:
- Open Settings.
- Click on Personalization.
- Click the Start page on the right side.
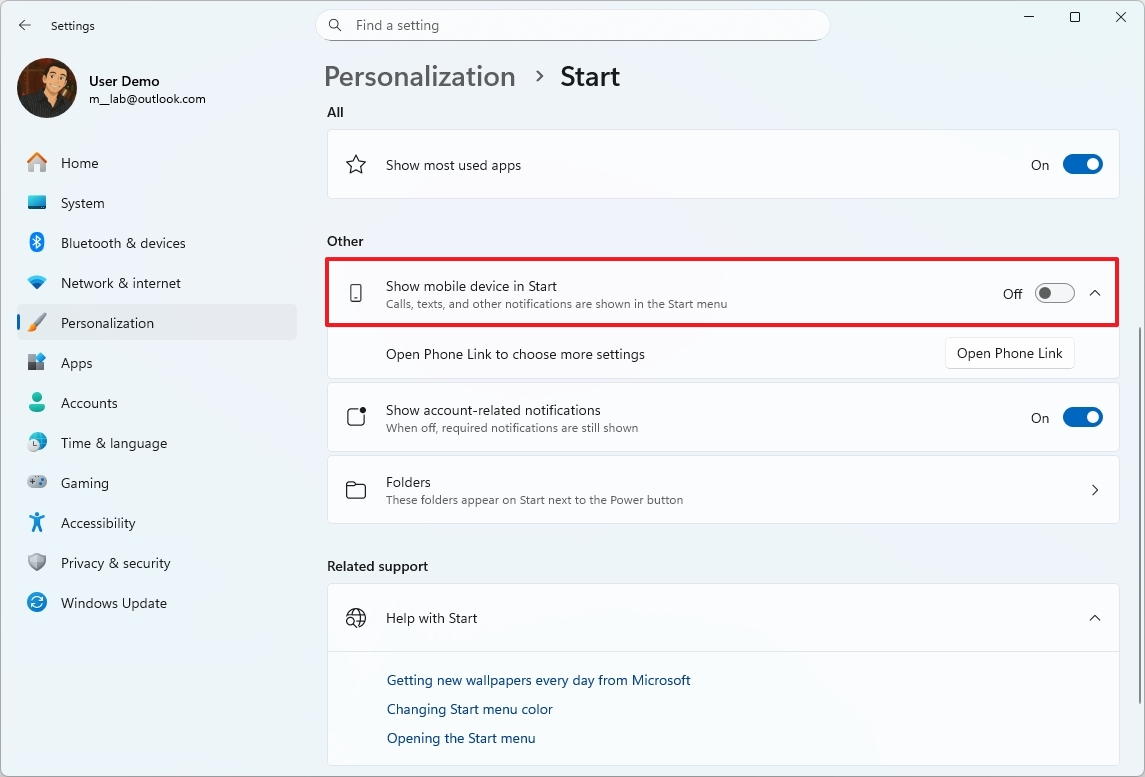
- Turn on or off the "Show mobile device in Start" toggle switch.
Alternatively, you should be able to toggle the sidebar on or off using the button at the top-right of the Start menu.
Show or hide account notifications
To decide where the system should display account-related notifications in the account manager menu in the Start menu, use these steps:
- Open Settings.
- Click on Personalization.
- Click the Start page on the right side.
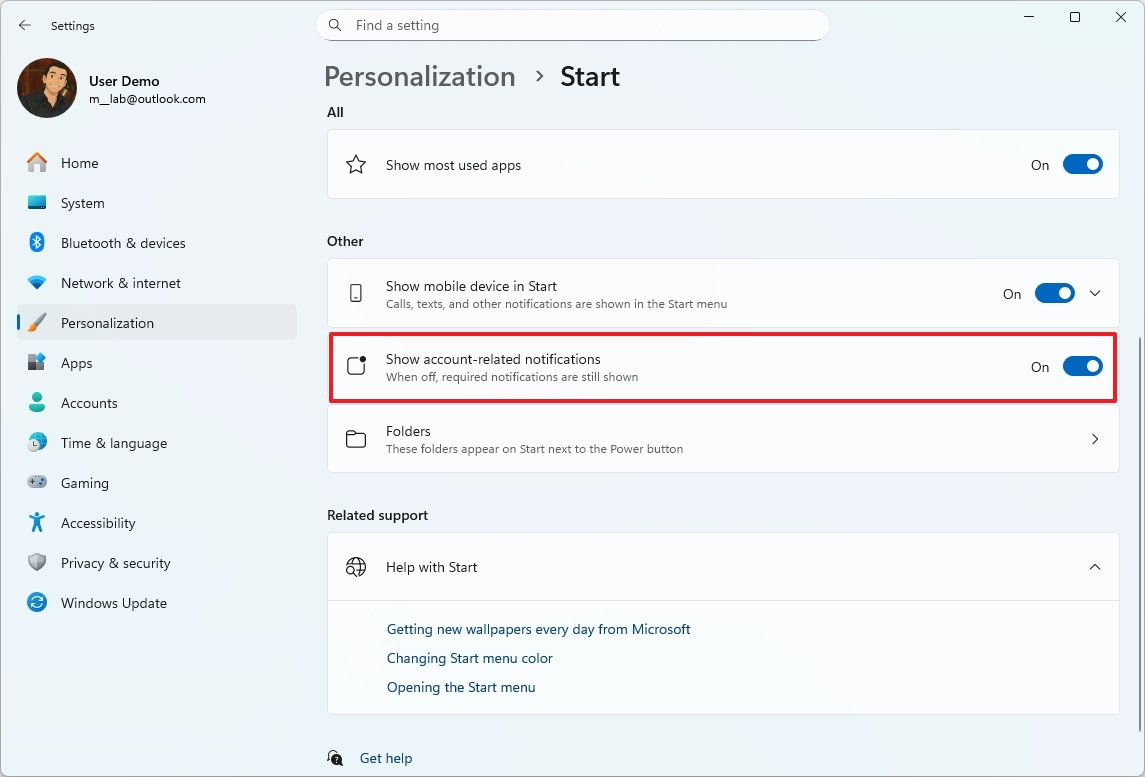
- Turn on or off the "Show account-related notifications" toggle switch.
After you complete the steps, notifications for your account will appear in the menu, depending on your configuration.
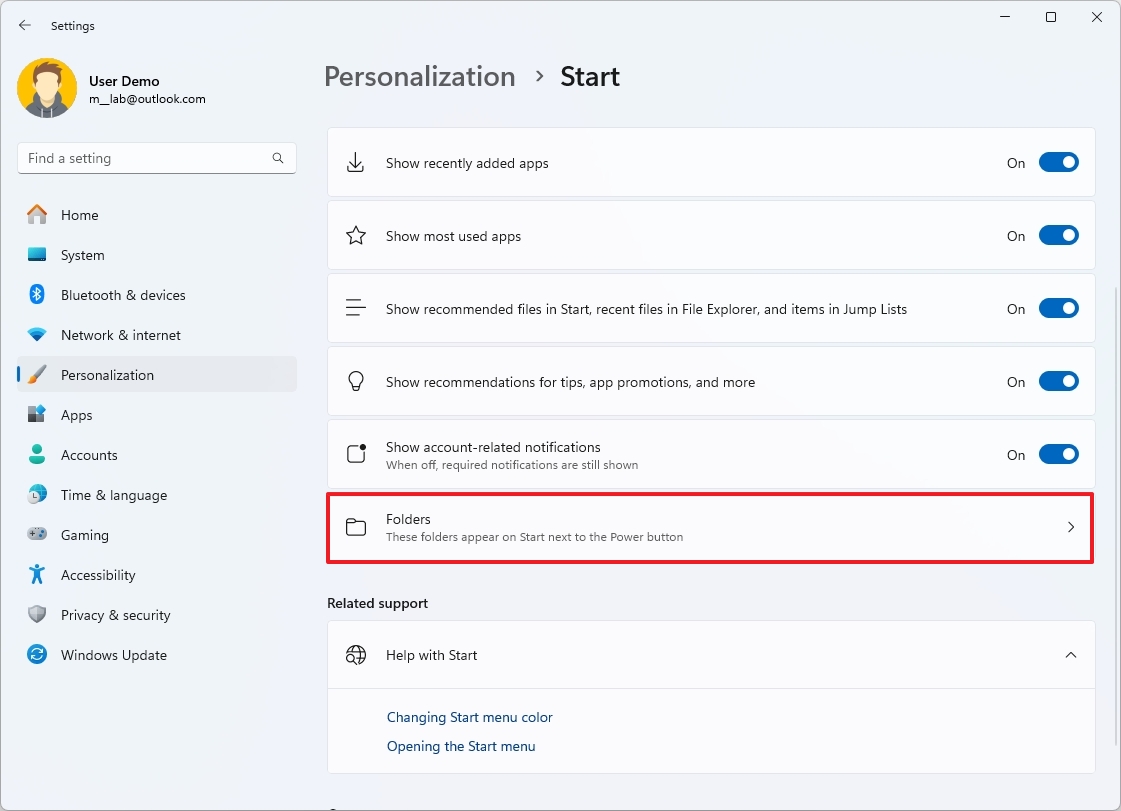
Show folders next to the Power menu
To add or remove items next to the Power menu, use these steps:
- Open Settings.
- Click on Personalization.
- Click the Start page on the right side.
- Click the Folders settings.
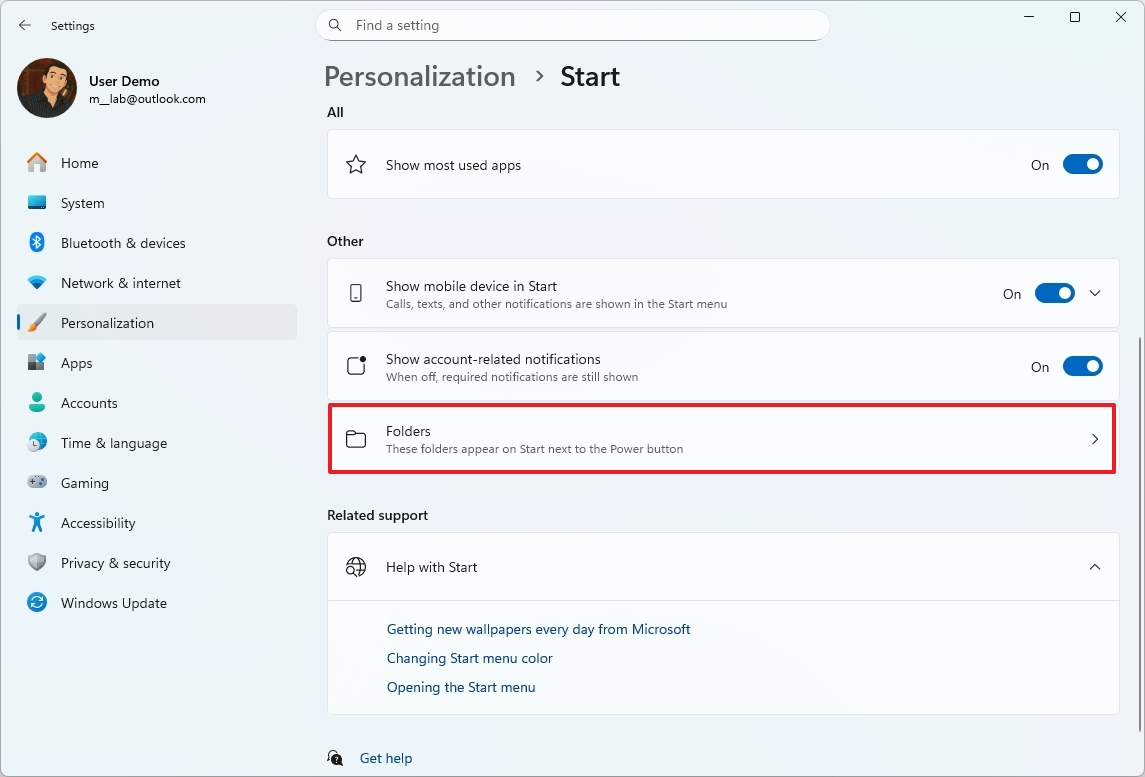
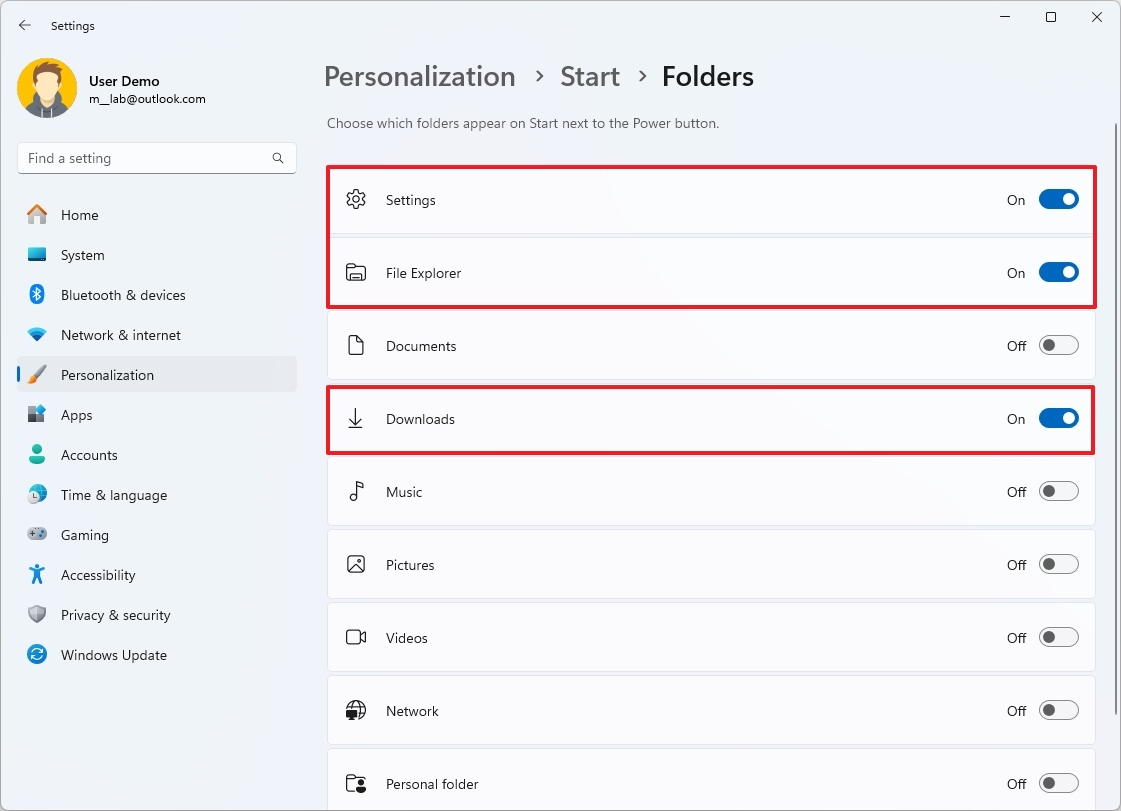
- Turn on or off the toggle switch to show or hide items next to the Power button:
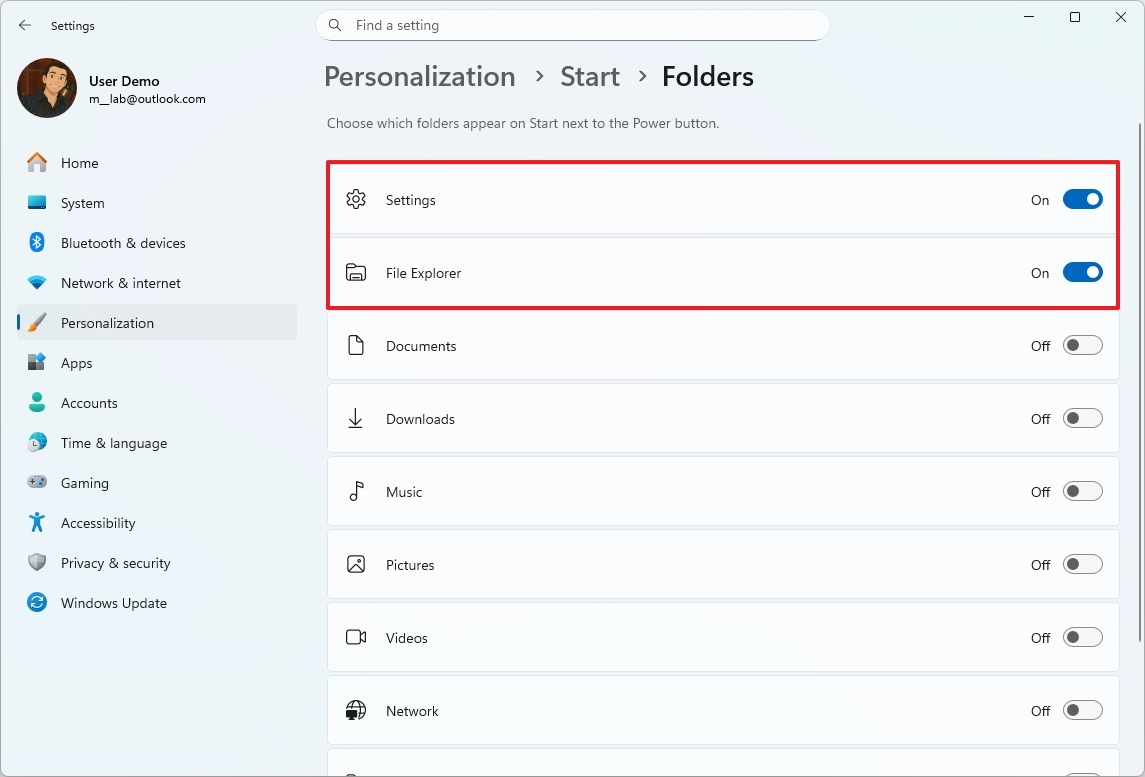
- Settings.
- File Explorer.
- Documents.
- Downloads.
- Music.
- Pictures.
- Videos.
- Network.
- Personal folder.
After you complete the steps, only the shortcuts you turned on will appear next to the Power menu in the Start menu.
Change Start menu color
To change the new Start menu color scheme, use these steps:
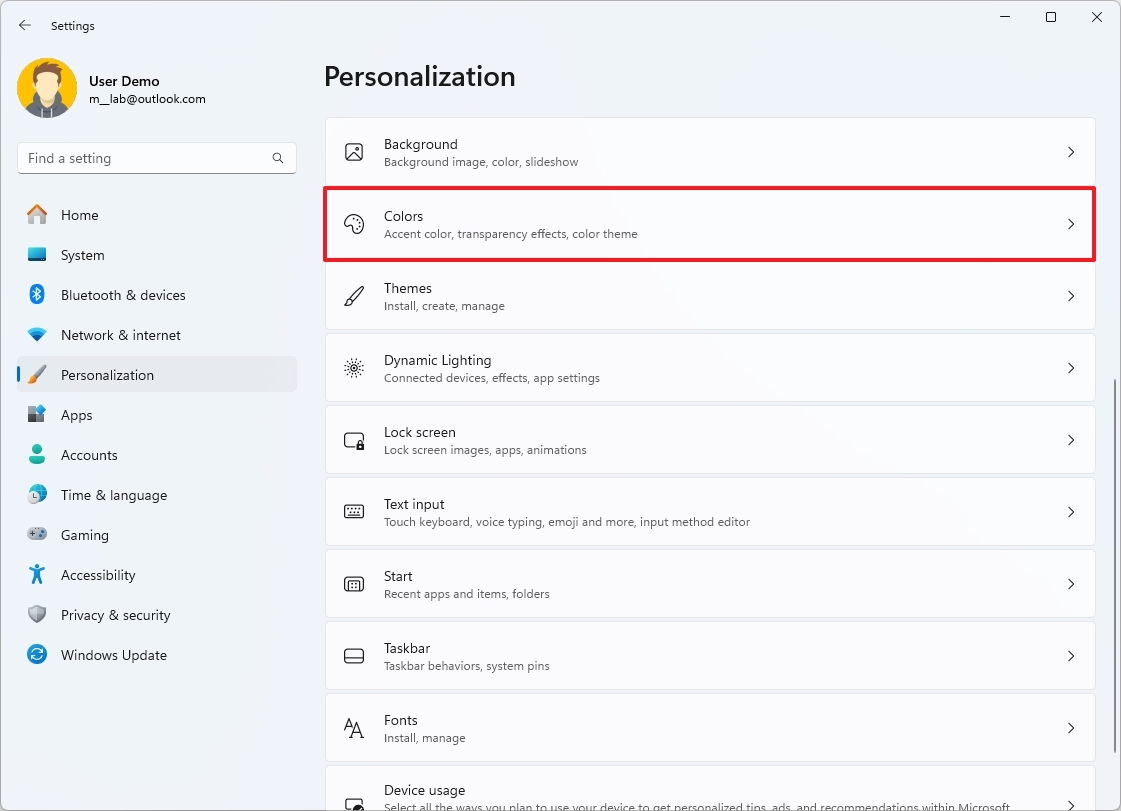
- Open Settings.
- Click on Personalization.
- Click the Colors page on the right side.
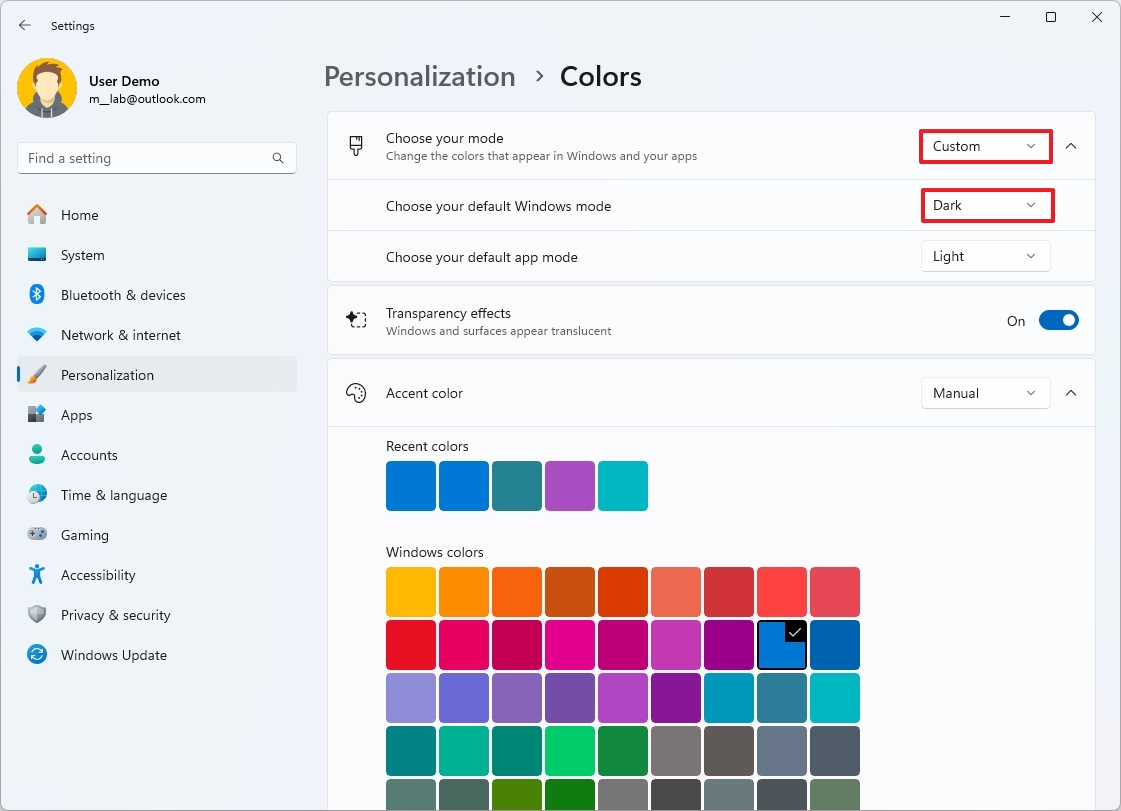
- Select the Custom option for the "Choose your mode" setting.
- Select the Dark option for the "Choose your default Windows mode" setting.
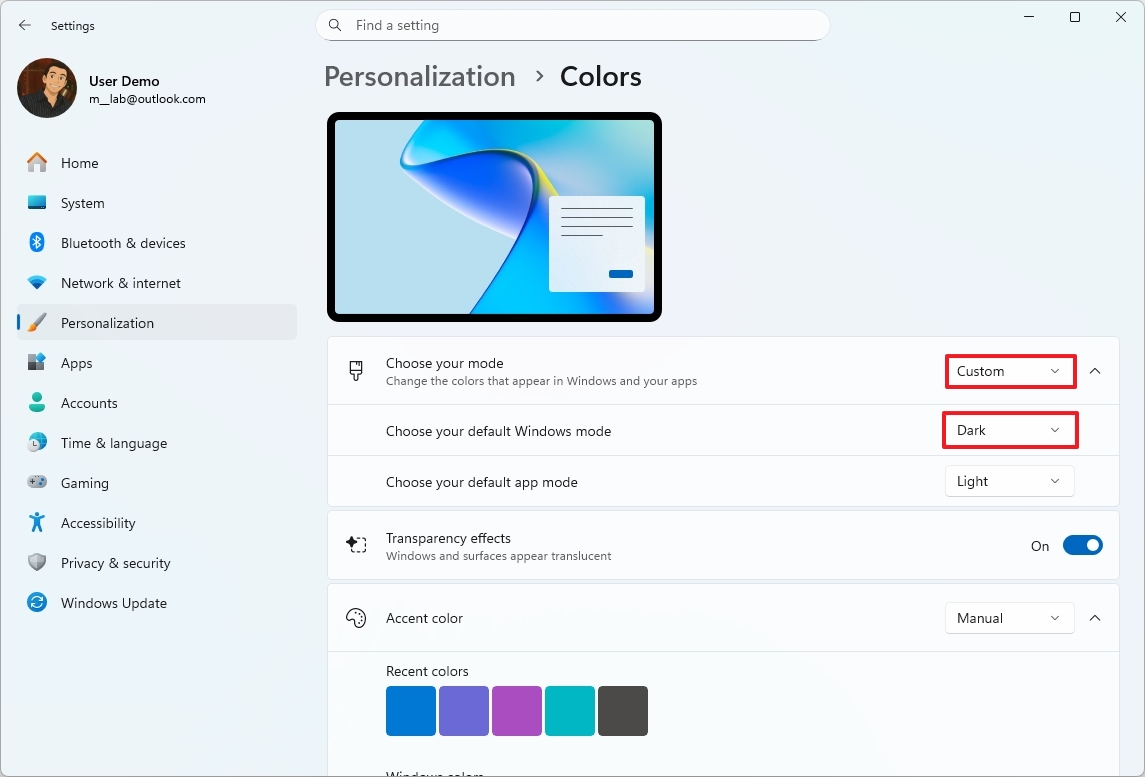
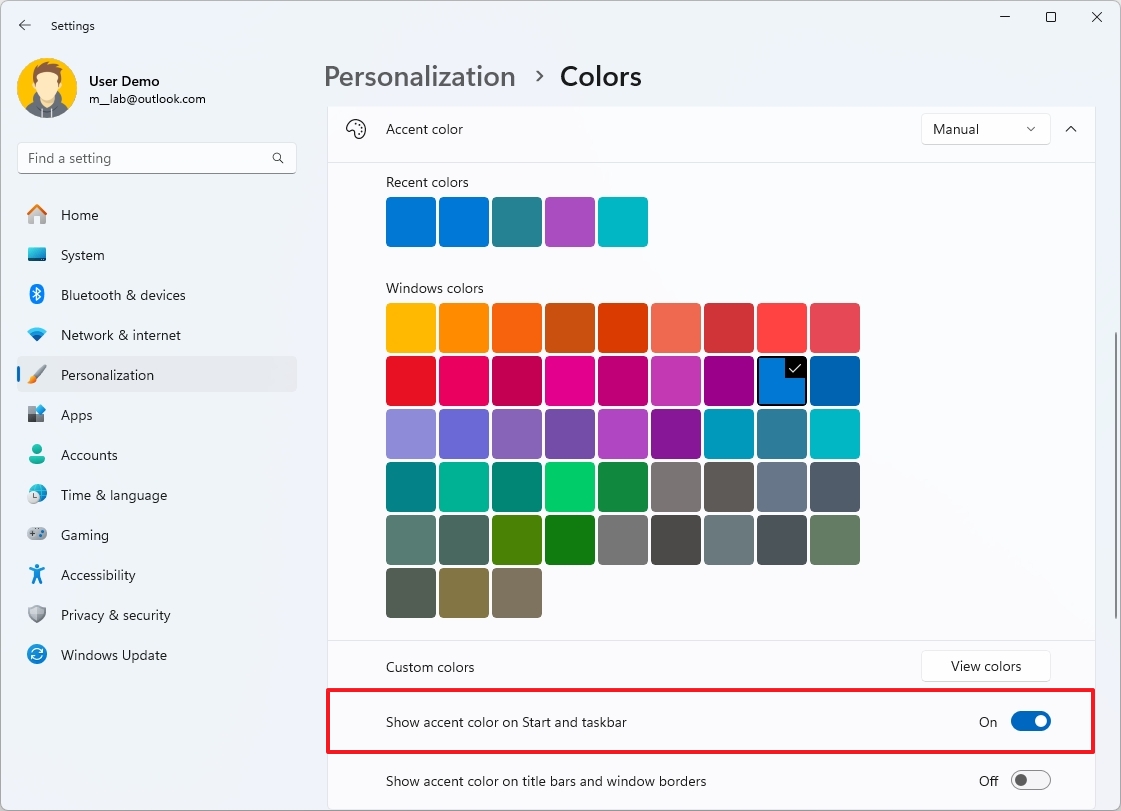
- Turn on the "Select accent color on Start and taskbar" toggle switch.
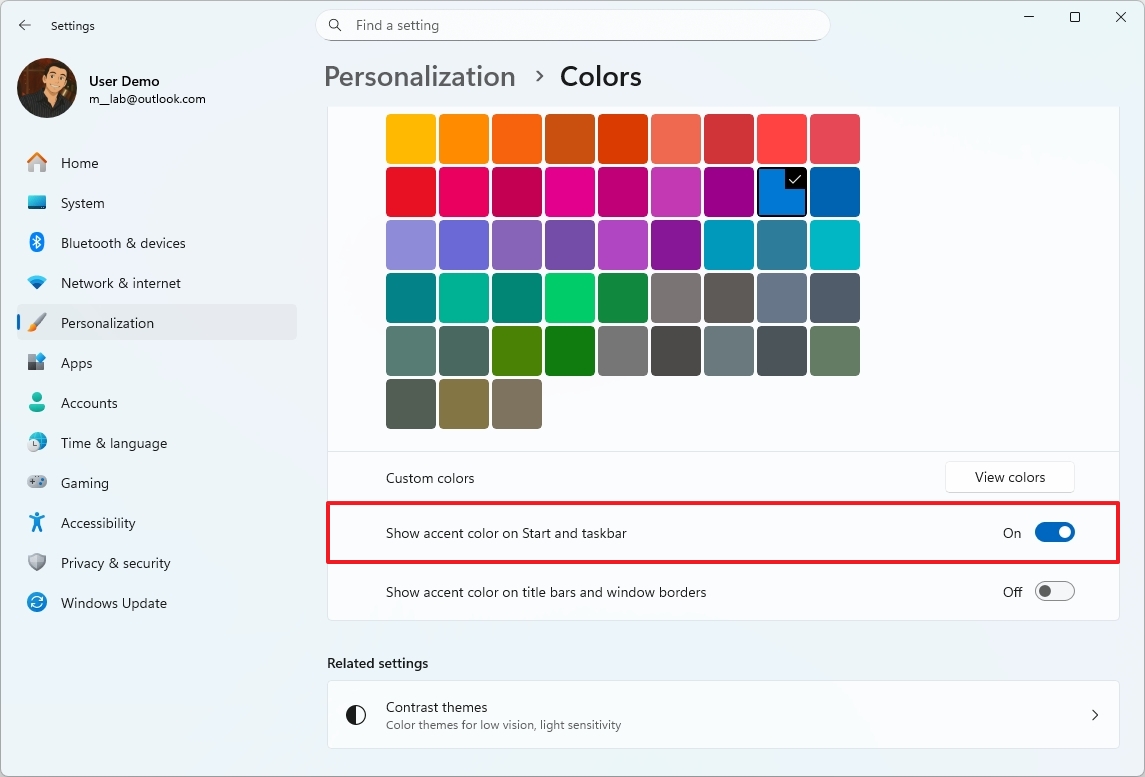
- Select the Start menu color under the "Accent color" section.
After you complete the steps, the new Start menu will reflect the color scheme you've chosen.
Align the Start menu to the left side
To align the Start menu to the left of the screen, use these steps:
- Open Settings.
- Click on Personalization.
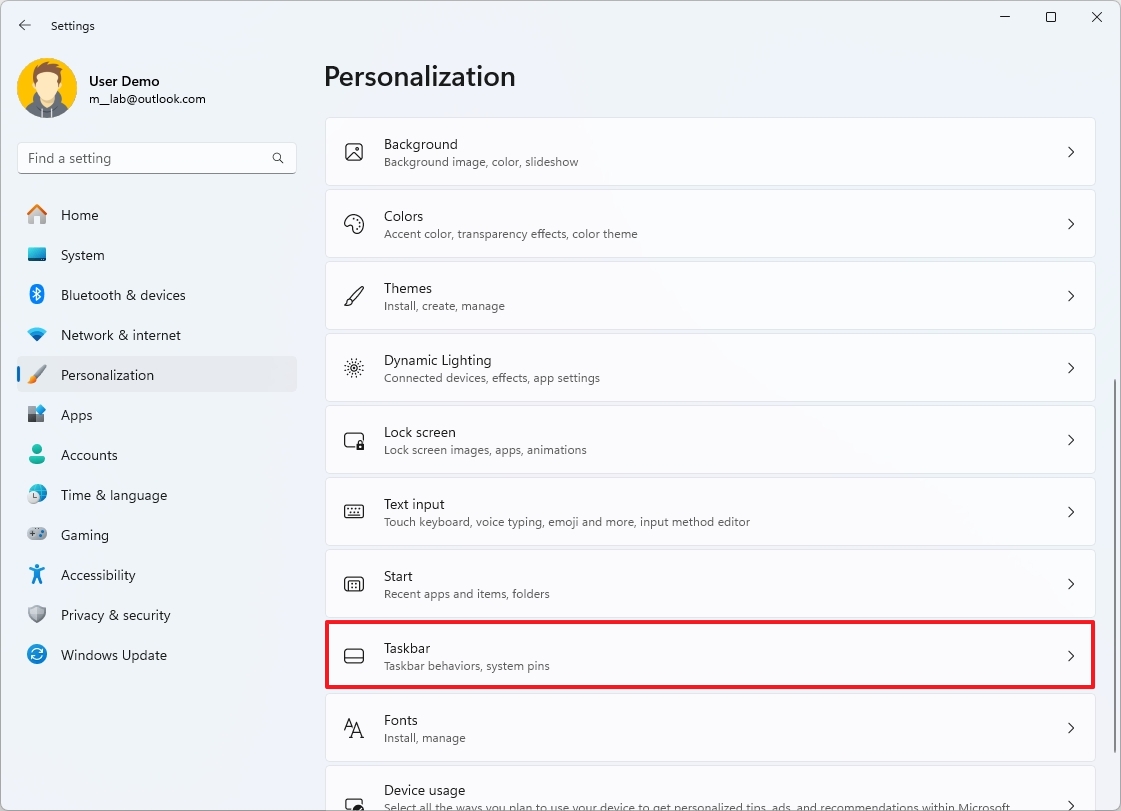
- Click the Taskbar page on the right side.
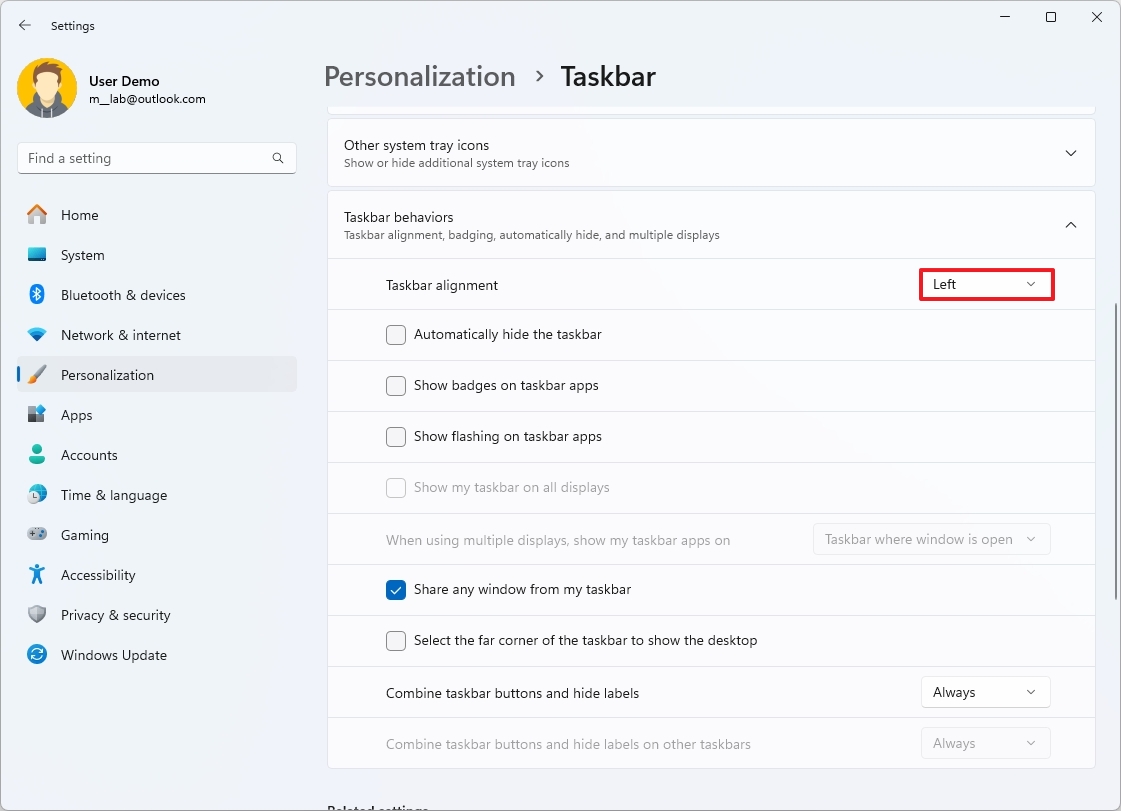
- Click the Taskbar behaviors settings.
- Select the Left option for the "Taskbar alignment" setting.
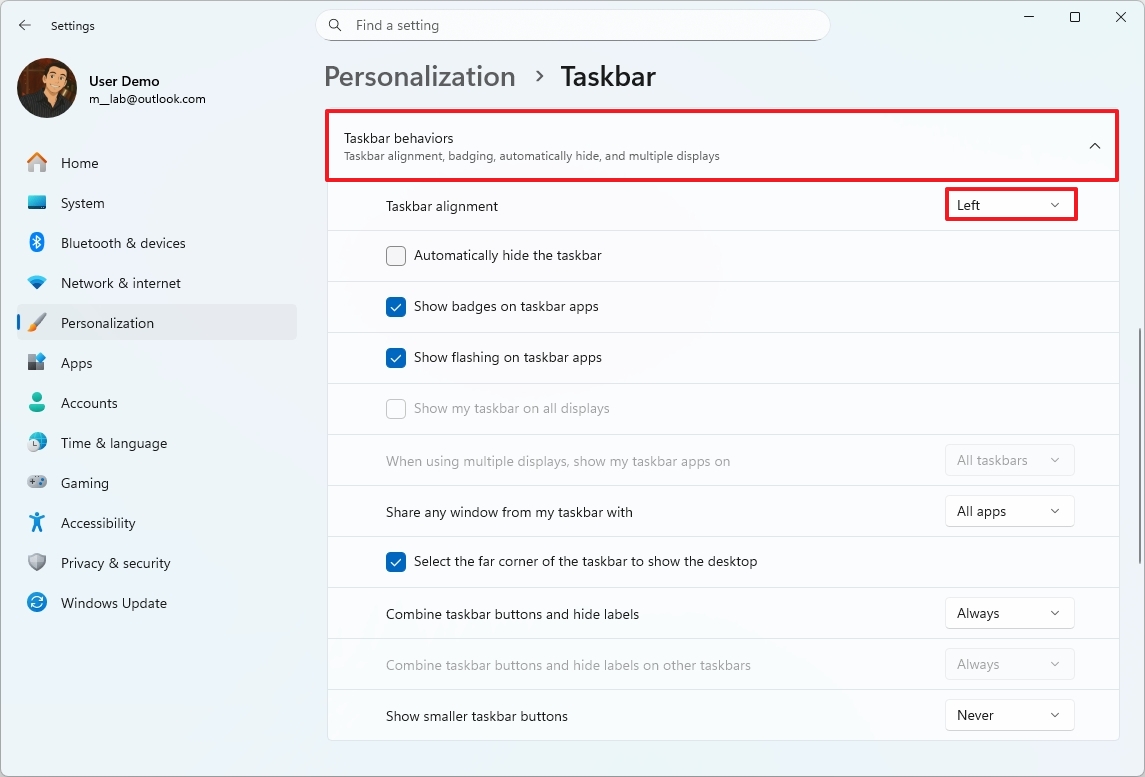
Once you complete the steps, the redesigned menu will open from the left side as in previous versions of the operating system.
How to customize the Start menu on Windows 11 (old)
On Windows 11, the customization settings for the Start menu are available through the "Start" page, while some related settings can be found on the "Colors and Taskbar pages.
Show or hide recently added apps
To control recently added apps in the "All apps" list, use these steps:
- Open Settings.
- Click on Personalization.
- Click the Start page on the right side.
- Turn on or off the "Show recently added apps" toggle switch.
Once you complete the steps, those apps you installed recently will appear grouped in the "All apps" list, depending on your configuration.
Show or hide most used apps
To manage the visibility of the most used apps in the "All apps" list, use these steps:
- Open Settings.
- Click on Personalization.
- Click the Start page on the right side.
- Turn on or off the "Show most used apps" toggle switch.
After you complete the steps, frequent apps will appear grouped in the "All apps" list, depending on your configuration.
Show or hide recently opened items
To show or hide recently used files and documents, use these steps:
- Open Settings.
- Click on Personalization.
- Click the Start page on the right side.
- Turn on or off the "Show recently opened items in Start, Jump Lists, and File Explorer" toggle switch.
Once you complete the steps, if you turn on the option, recently opened items will appear in the Recommended section of the Start menu when right-clicking an app to open the Jump List in the Taskbar and Quick Access page of File Explorer.
Show or hide Recommended section
To remove all the items from the Recommended section of the Start menu, use these steps:
- Open Settings.
- Click on Personalization.
- Click the Start page on the right side.
- Turn on or off these options to manage the contents from the Recommended section.
- Show most used apps
- Show recently opened items in Start, Jump Lists, and File Explorer
- Show recommendations for tips, app promotions, and more
After you complete the steps, the Start menu Recommended section will no longer show apps or files.
Show folders next to the Power menu
To add or remove items next to the Power menu, use these steps:
- Open Settings.
- Click on Personalization.
- Click the Start page on the right side.
- Click the Folders settings.
- Turn on or off the toggle switch to show or hide items next to the Power button:
- Settings.
- File Explorer.
- Documents.
- Downloads.
- Music.
- Pictures.
- Videos.
- Network.
- Personal folder.
Once you complete the steps, only the items you turned on will appear next to the Power menu in the Start menu.
Change Start menu color
To change the Start menu color scheme, use these steps:
- Open Settings.
- Click on Personalization.
- Click the Colors page on the right side.
- Select the Custom option for the "Choose your mode" setting.
- Select the Dark option for the "Choose your default Windows mode" setting.
- Turn on the "Select accent color on Start and taskbar" toggle switch.
- Select the Start menu color under the "Accent color" section.
After you complete the steps, the Start menu will reflect the color scheme you selected on the settings page.
Show or hide mobile sidear in the Start menu
Microsoft is working on a new sidebar next to the Start menu to show Android and iPhone details, including phone information and messages after linking the device using the Phone Link and Link to Windows apps.
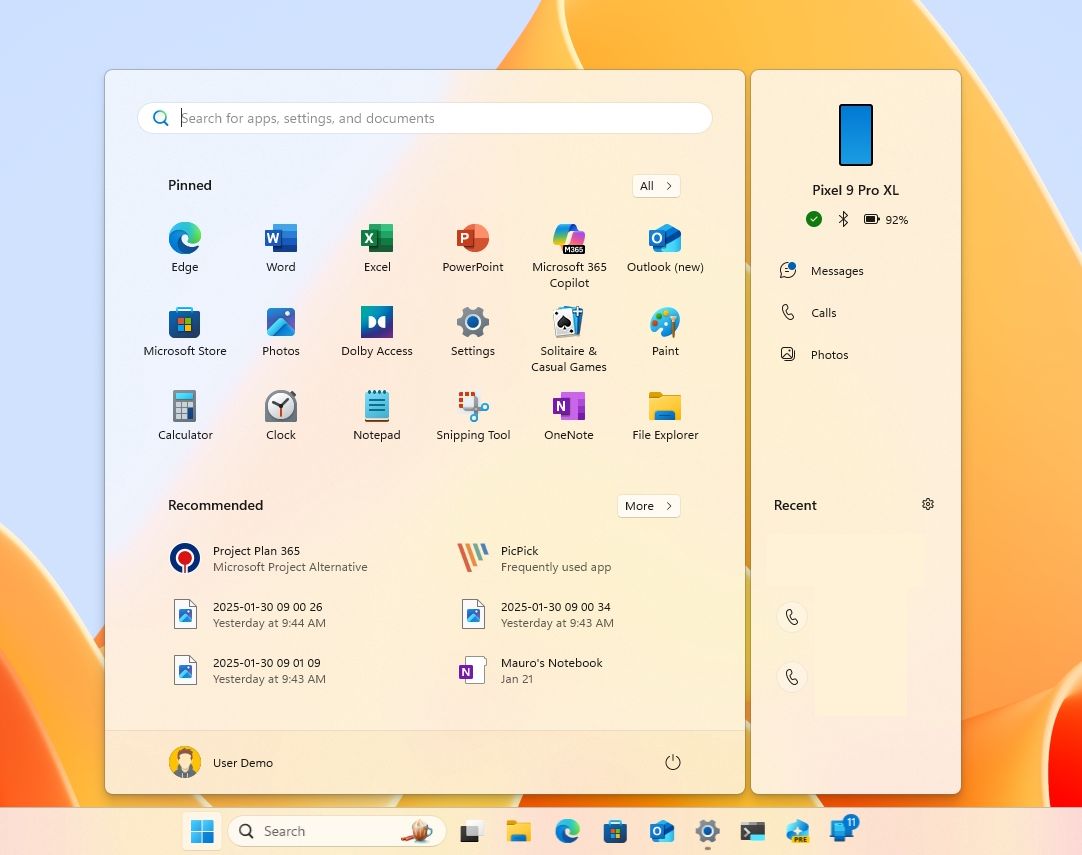
If, when the feature leaves the Windows Insider Program and rolls out to everyone, you don't want to use it, you will have to disable it with these steps:
- Open Settings.
- Click on Personalization.
- Click the Start page on the right side.
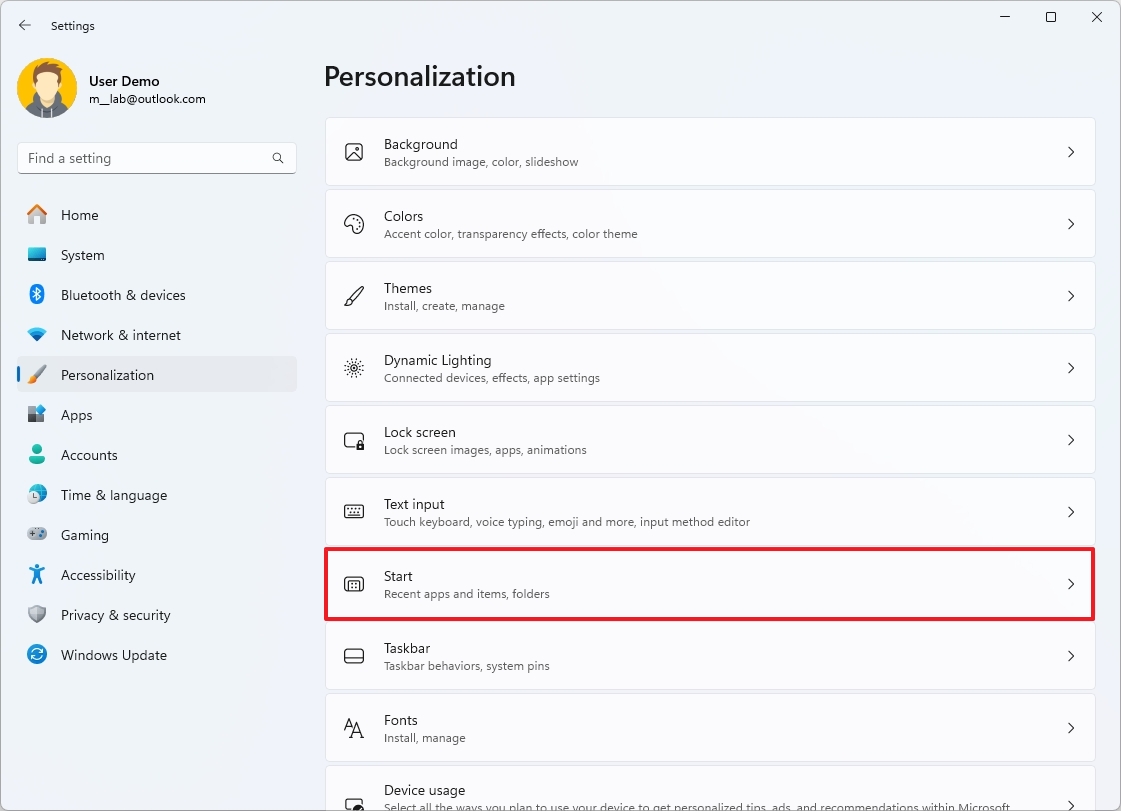
- Turn off the "Show mobile device in Start" toggle switch.
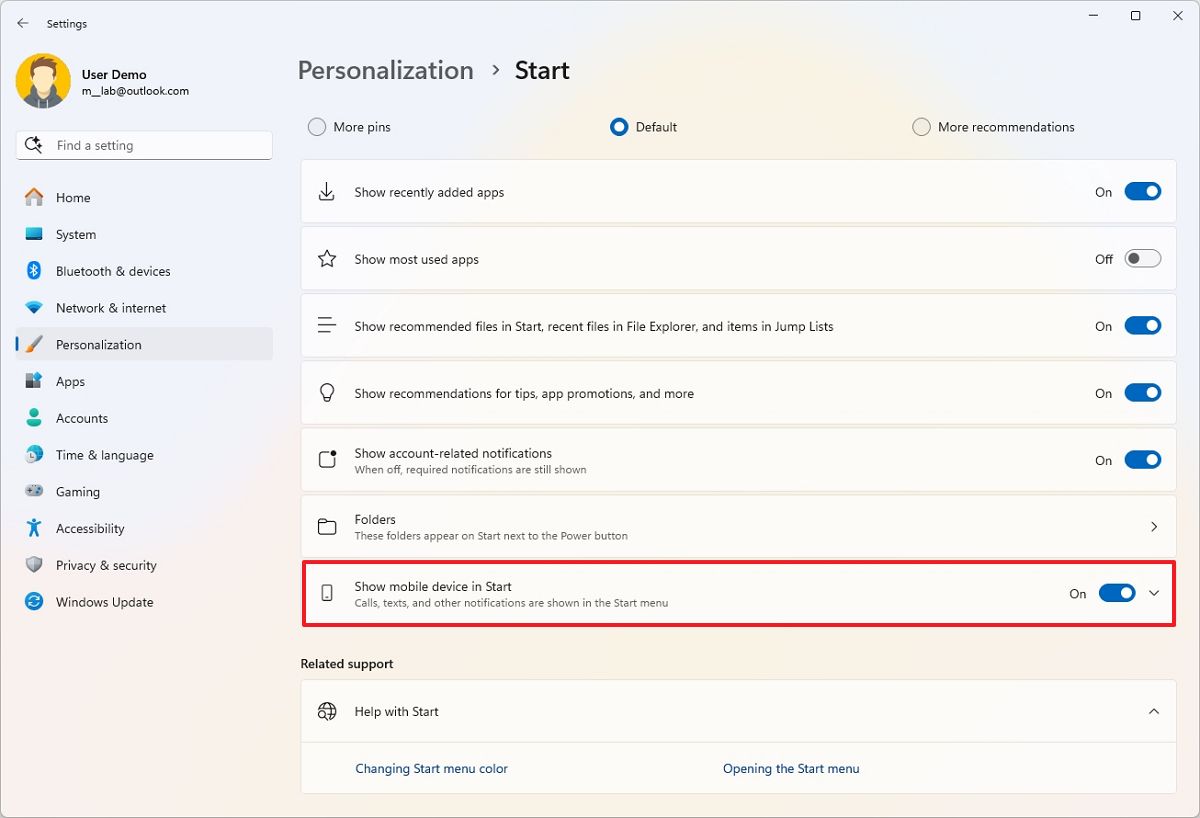
Once you complete the steps, the Start menu will no longer show the mobile sidebar.
Align the Start menu to the left side
To align the Start menu to the left of the screen, use these steps:
- Open Settings.
- Click on Personalization.
- Click the Taskbar page on the right side.
- Click the Taskbar behaviors settings.
- Select the Left option for the "Taskbar alignment" setting.
Once you complete the steps, you will be able to open the Start menu from the left side of the screen, like on Windows 10.
More resources
For more helpful articles, coverage, and answers to common questions about Windows 10 and Windows 11, visit the following resources:
- Windows 11 on Windows Central — All you need to know
- Windows 10 on Windows Central — All you need to know

Follow Windows Central on Google News to keep our latest news, insights, and features at the top of your feeds!

Mauro Huculak has been a Windows How-To Expert contributor for WindowsCentral.com for nearly a decade and has over 22 years of combined experience in IT and technical writing. He holds various professional certifications from Microsoft, Cisco, VMware, and CompTIA and has been recognized as a Microsoft MVP for many years.
You must confirm your public display name before commenting
Please logout and then login again, you will then be prompted to enter your display name.
