How to manage sound settings on Windows 11
Best tips to customize the settings for output devices on Windows 11.
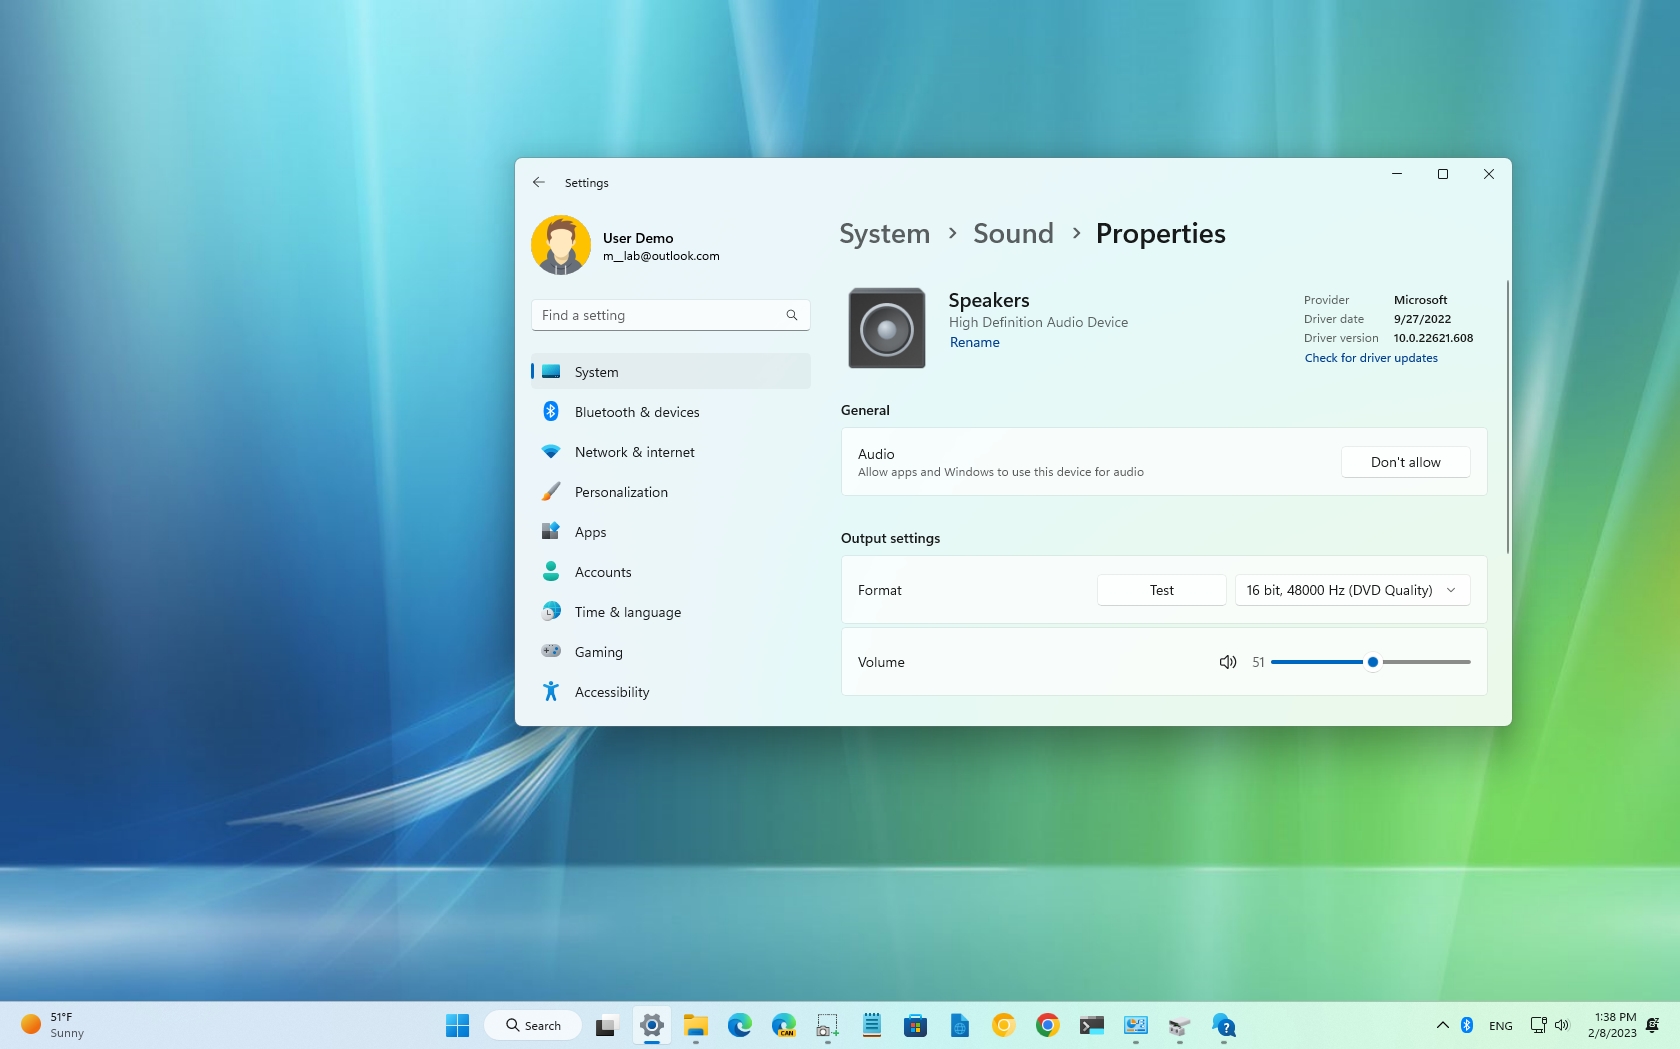
Even though audio devices are virtually plug-and-play on Windows 11, sometimes, you may still need to manage the settings to ensure that sounds play correctly or as intended, depending on the content.
For example, if you have multiple output devices (such as stereo speakers and gaming headsets), you can connect both to the system and configure the system to make one of them the default. Spatial sound offers a more immersive audio experience that makes it feel like the sound is playing around you and not directly from the speakers. You can enable mono audio to convert stereo sound into a single channel. You can configure special sound features to improve the audio quality. In addition, you can customize various other settings and fix the most common problems quickly.
This how-to guide will walk you through the steps to manage the sound settings on Windows 11.
How to change default audio output on Windows 11
On Windows 11, you can choose a different set of speakers, headphones, or headsets for the entire system or per application.
Choose default output for system
To change where the computer should play sound on Windows 11, use these steps:
- Open Settings.
- Click on System.
- Click the Sound page on the right side.
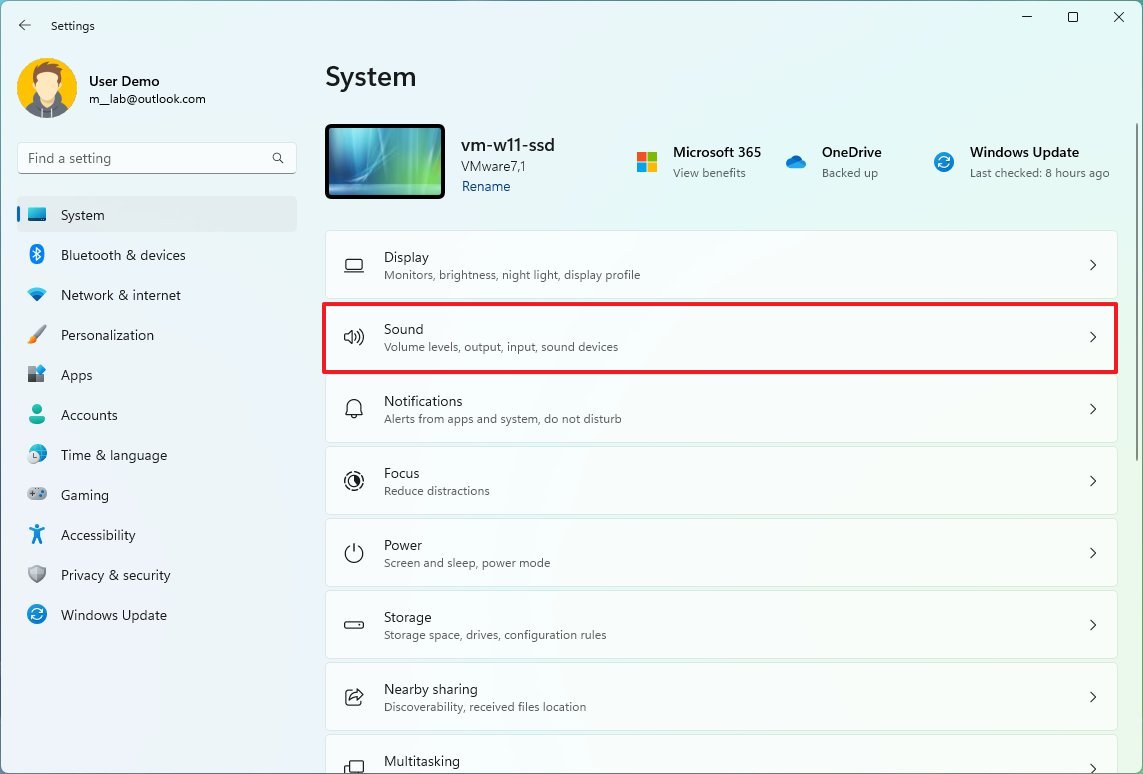
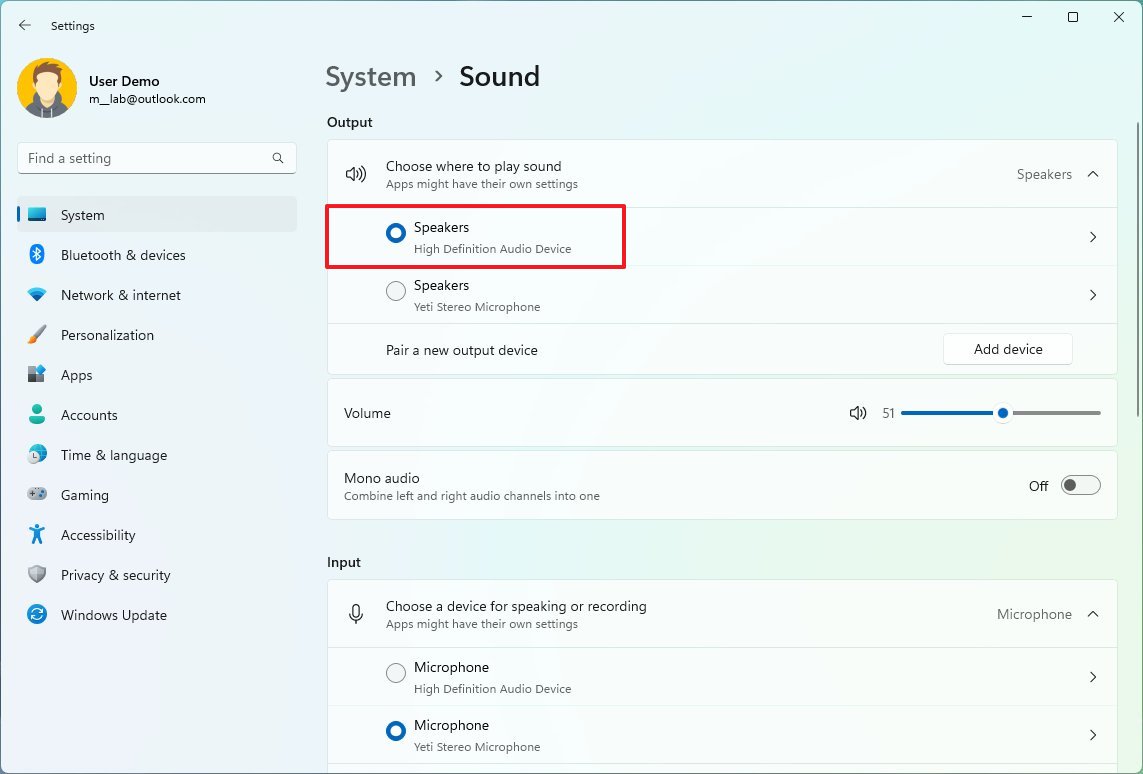
- Under the "Output" section, click the "Choose where to play sound" setting.
- Select the speakers, headphones, or headsets you want to use.
Alternatively, you can also change the default output device by opening the "Quick Settings" flyout (Windows key + A keyboard shortcut), clicking the "Manage audio devices" button next to the volume slider, and selecting the device.
Get the Windows Central Newsletter
All the latest news, reviews, and guides for Windows and Xbox diehards.
Choose default output per application
To set the default output device for a specific application, use these steps:
- Open Settings.
- Click on System.
- Click the Sound page on the right side.

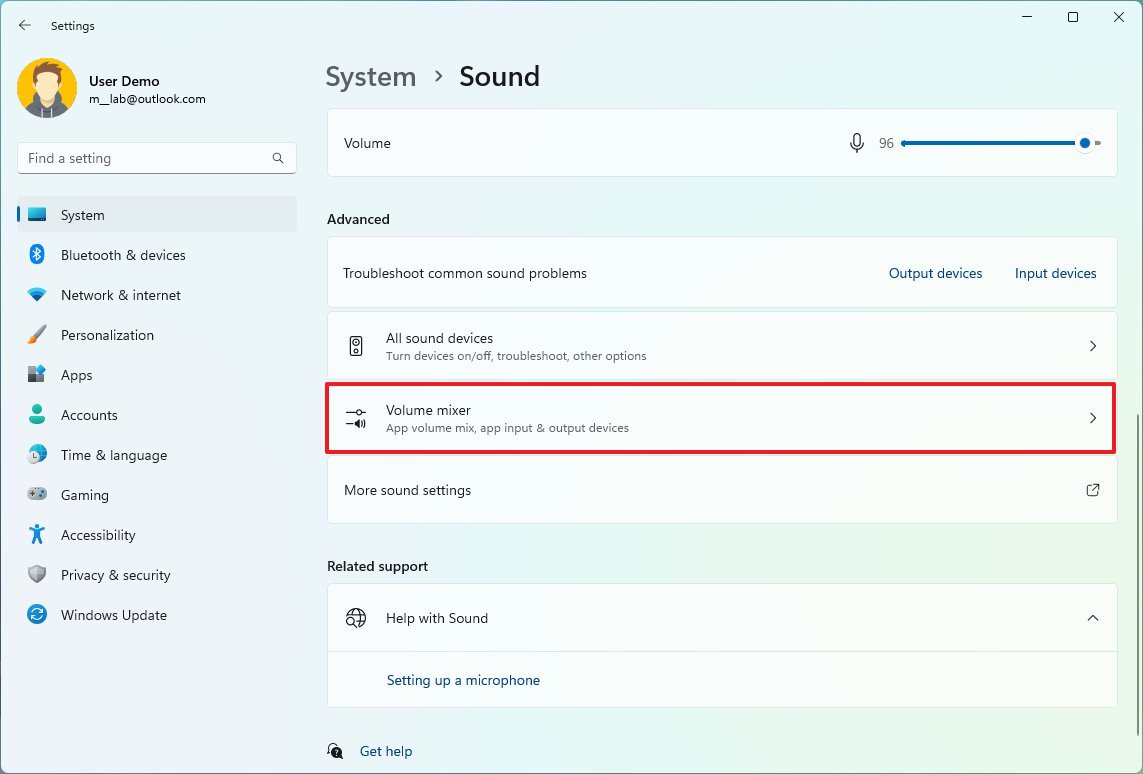
- Under the "Advanced" section, click the Volume mixer setting.
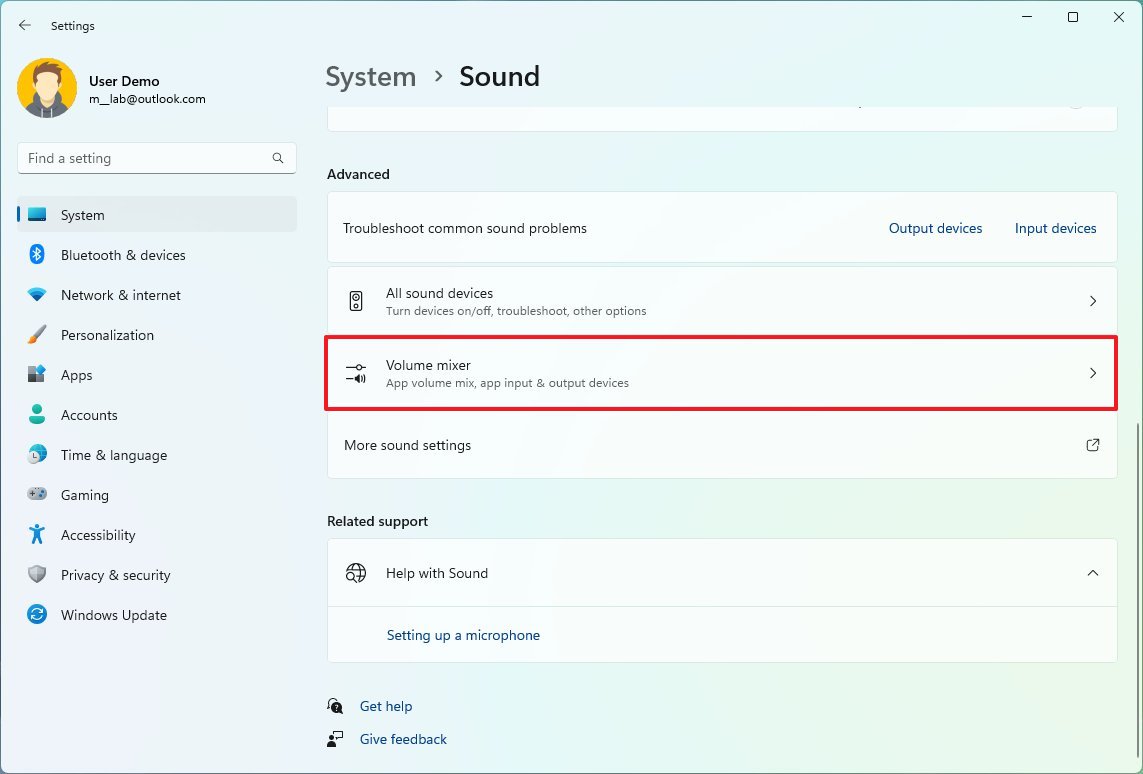
- Under the "Apps" section, select the app.
- Use the Output device setting to select a different output device.
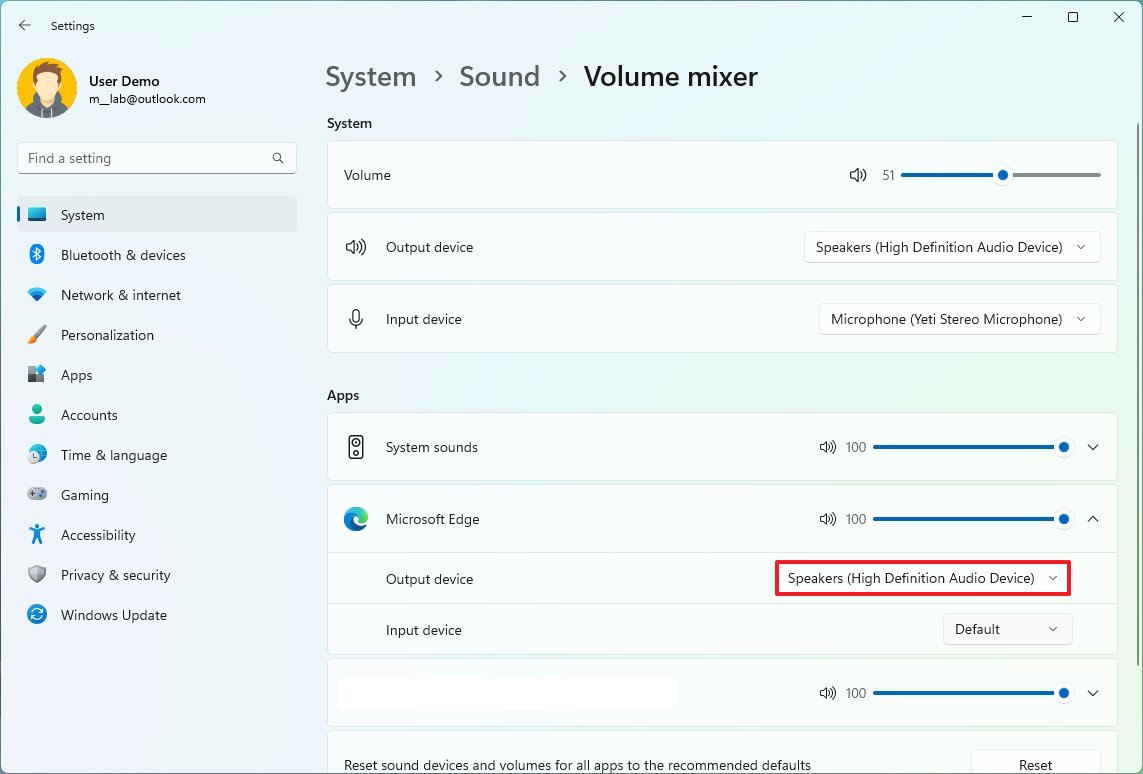
Once you complete the steps, Windows 11 will output sounds in the device you selected.
How to enable spatial sound on Windows 11
To enable or disable spatial sound, use these steps:
- Open Settings.
- Click on System.
- Click the Sound page on the right side.

- Under the "Output" section, click the Speakers setting.
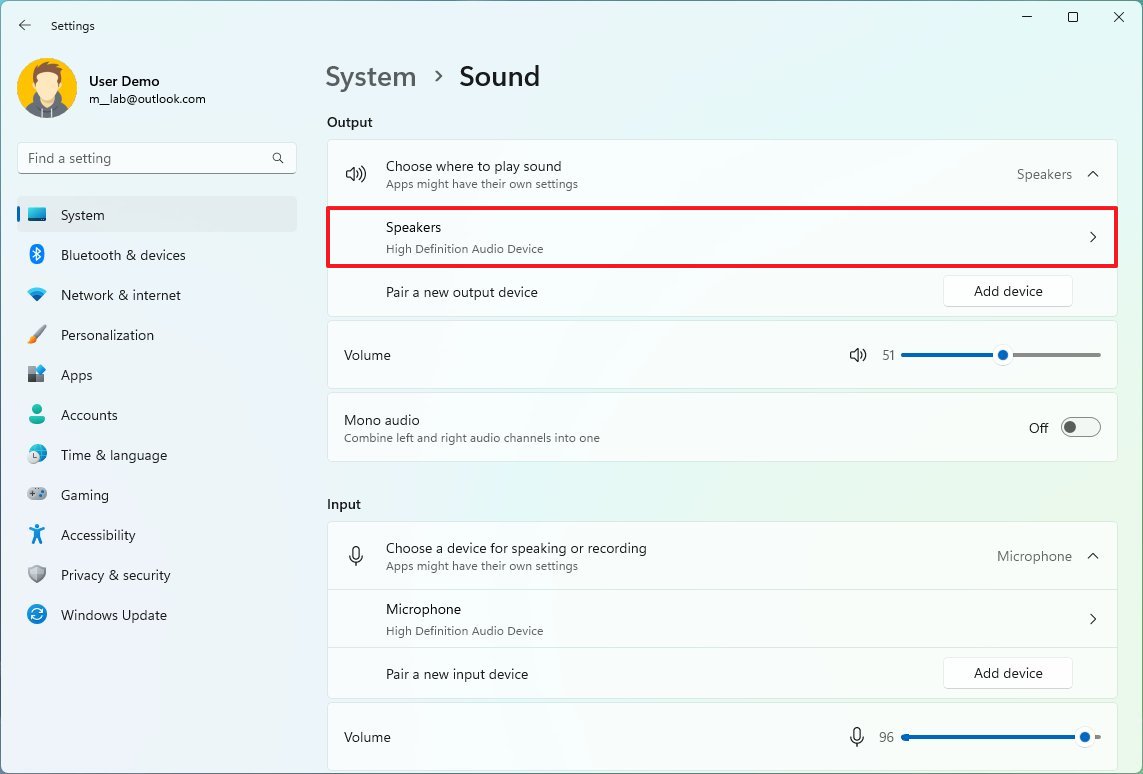
- Select the "Windows Sonic for Headphones" option in the "Spatial audio" setting.
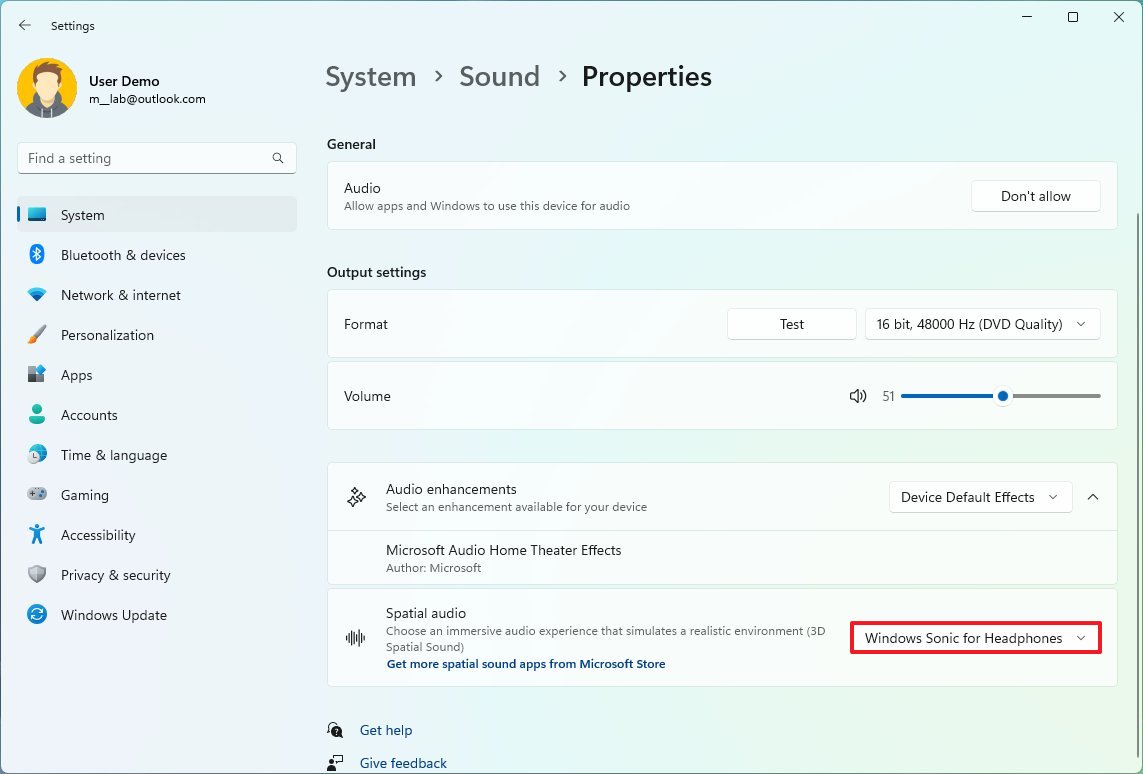
- (Optional) Select the Off option for the "Type" setting.
After you complete the steps, you will hear a more immersive sound experience from your computer.
How to enable enhanced audio on Windows 11
Windows 11 provides additional features to improve the sound quality with more bass, virtual surround, room correction, and loudness equalizer.
Enable enhanced audio features
To enable and configure enhanced audio on Windows 11, use these steps:
- Open Settings.
- Click on System.
- Click the Sound page on the right side.

- Under the "Output" section, click the Speakers setting.

- Under the "Output settings" section, select the audio profile to use in the "Audio enhancements" setting.
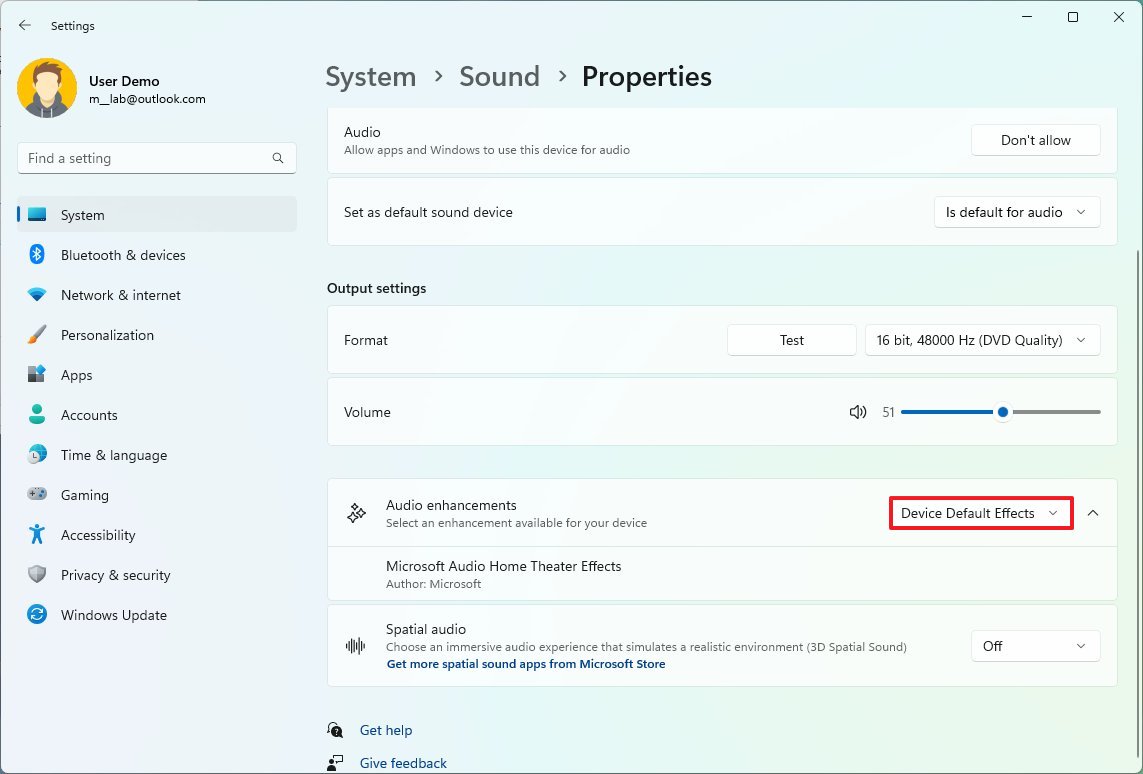
- Click the Back button to open the "Sound" page again.
- Click the "More sound settings" option.
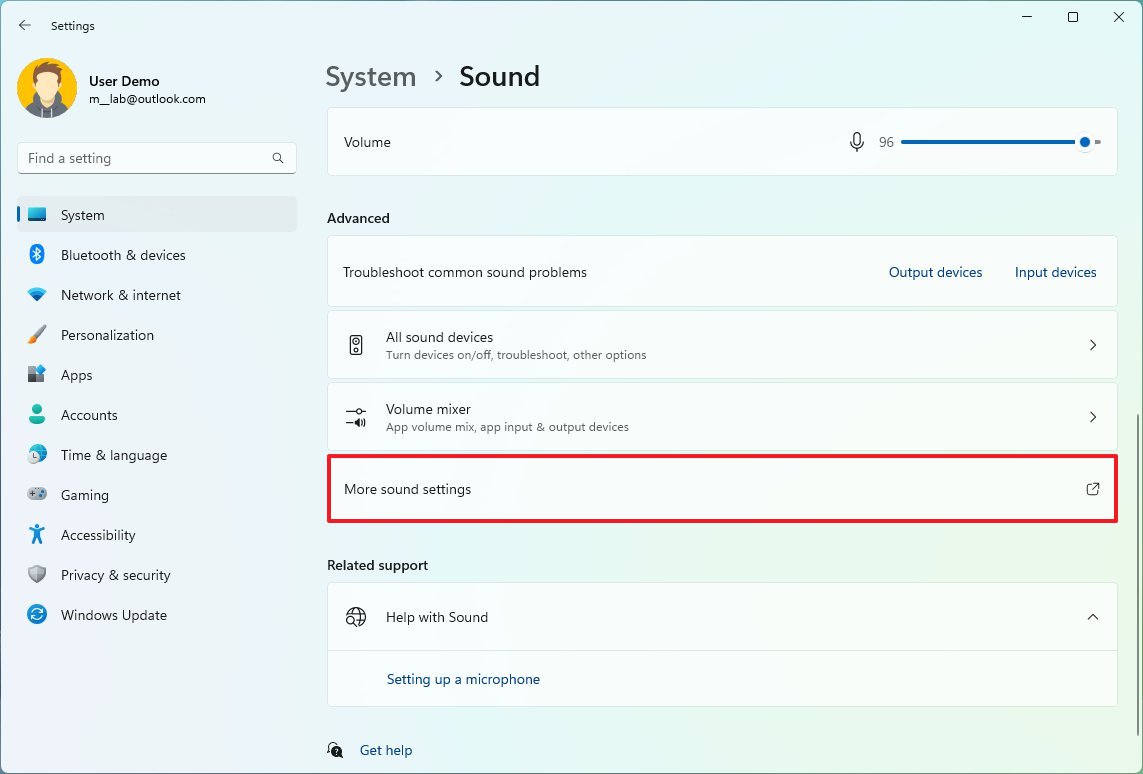
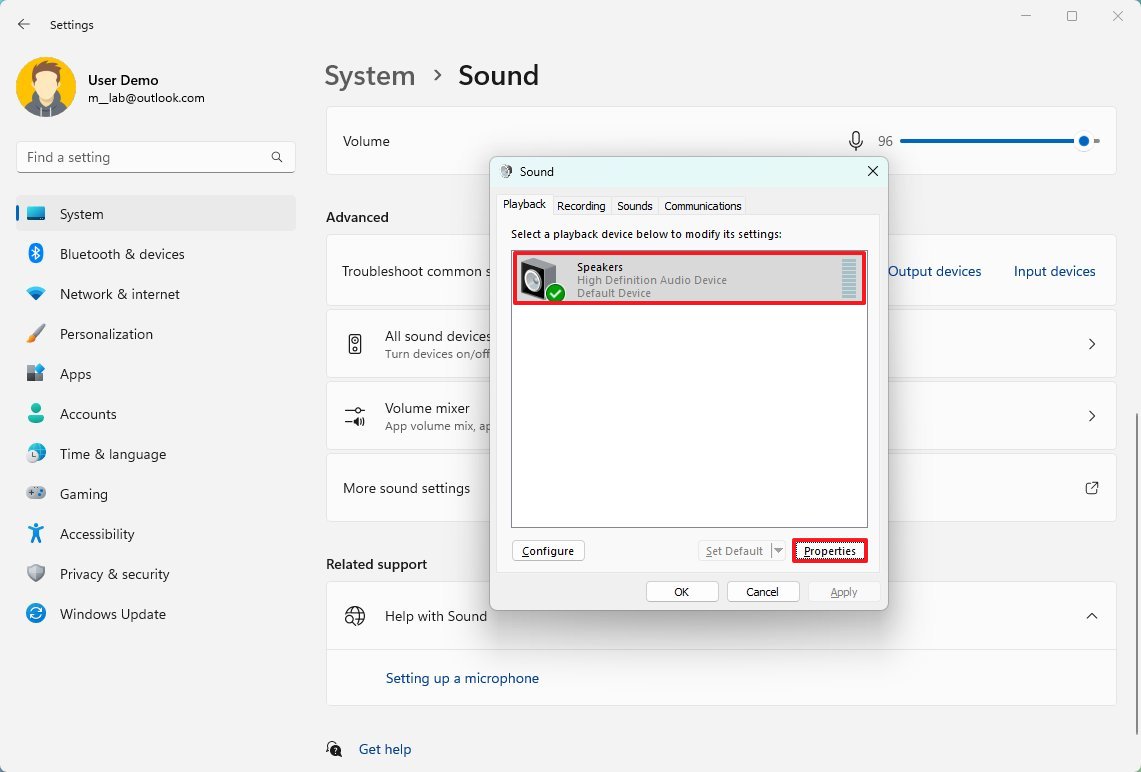
- Select the device from list in the "Playback" tab and click the Properties button.
- Click the Enhancements tab.
- Clear the "Disable all enhancements" option (if applicable).
- Check the sound enhancement feature for Windows 11:
- Bass Boost — Boosts the lowest frequencies that the device can output.
- Virtual Surround — Encodes audio for transfer as stereo output to receivers with a Matrix decoder.
- Room Correction — Compensates for room and speaker characteristics. When selecting this option, you'll need to complete the correction wizard.
- Loudness Equalization — Uses an understanding of human hearing to reduce perceived volume differences.
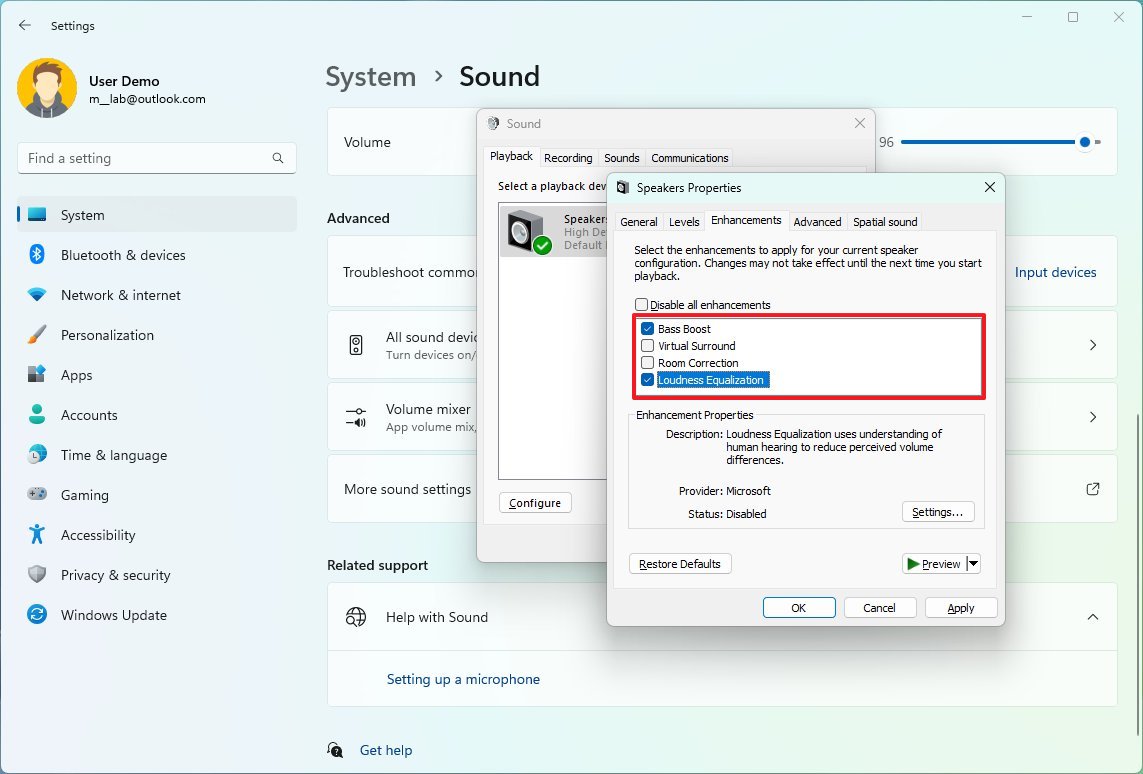
- Quick note: If you select "Bass Boost" when clicking the Settings button, you can adjust the frequency and boost levels. If you choose "Loudness Equalization," you can change the release time by clicking the Settings button.
- Click the Apply button.
- Click the OK button.
Once you complete the steps, the audio enhancements will improve the audio quality.
These features don't apply to everyone. If they are causing problems, it is best to turn them off with the steps below.
Disable enhanced audio features
To disable enhanced audio settings on Windows 11, use these steps:
- Click the Apply button.
- Click the OK button.

- Under the "Output" section, click the Speakers setting.

- Under the "Output settings" section, turn off the Audio enhancements toggle switch.
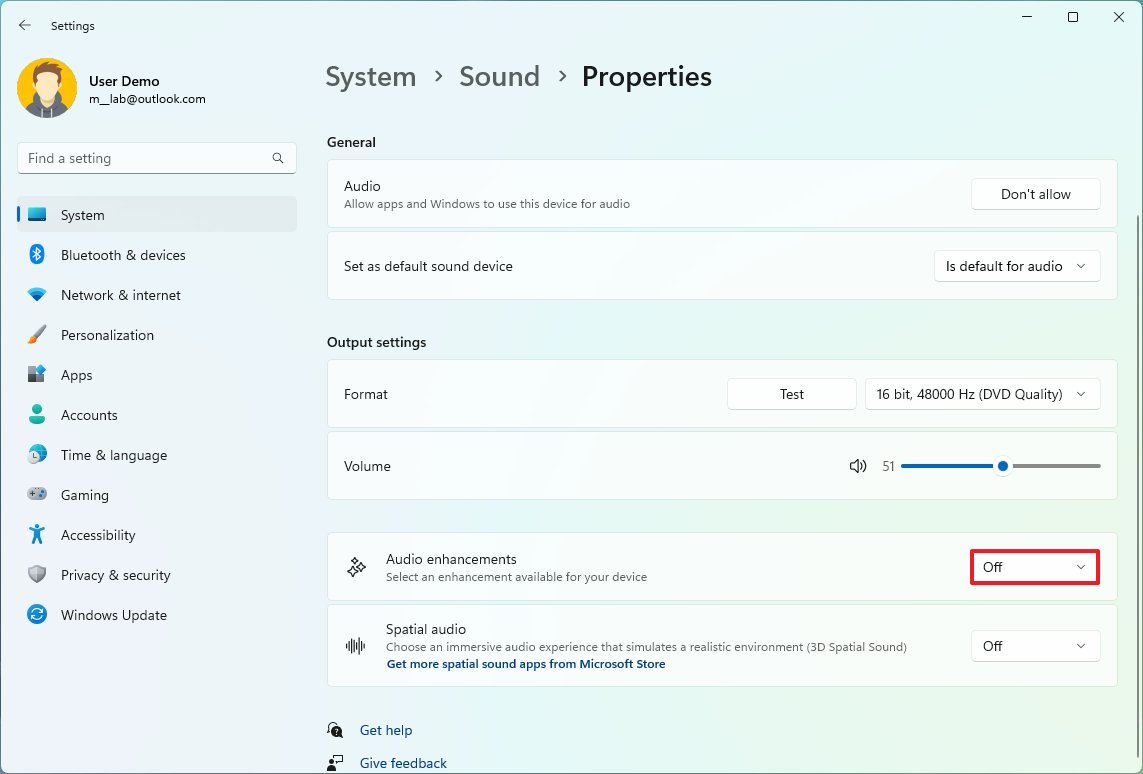
After you complete the steps, all the audio enhancements will turn off immediately.
How to disable audio output on Windows 11
You can enable or disable the system's and apps' access to an output device at any time without disabling the driver.
Disable output device
To disable an output device on Windows 11, use these steps:
- Open Settings.
- Click on System.
- Click the Sound page on the right side.

- Under the "Output" section, click the Speakers setting.

- Under the "General" section, click the Don't allow button for the "Audio" setting.
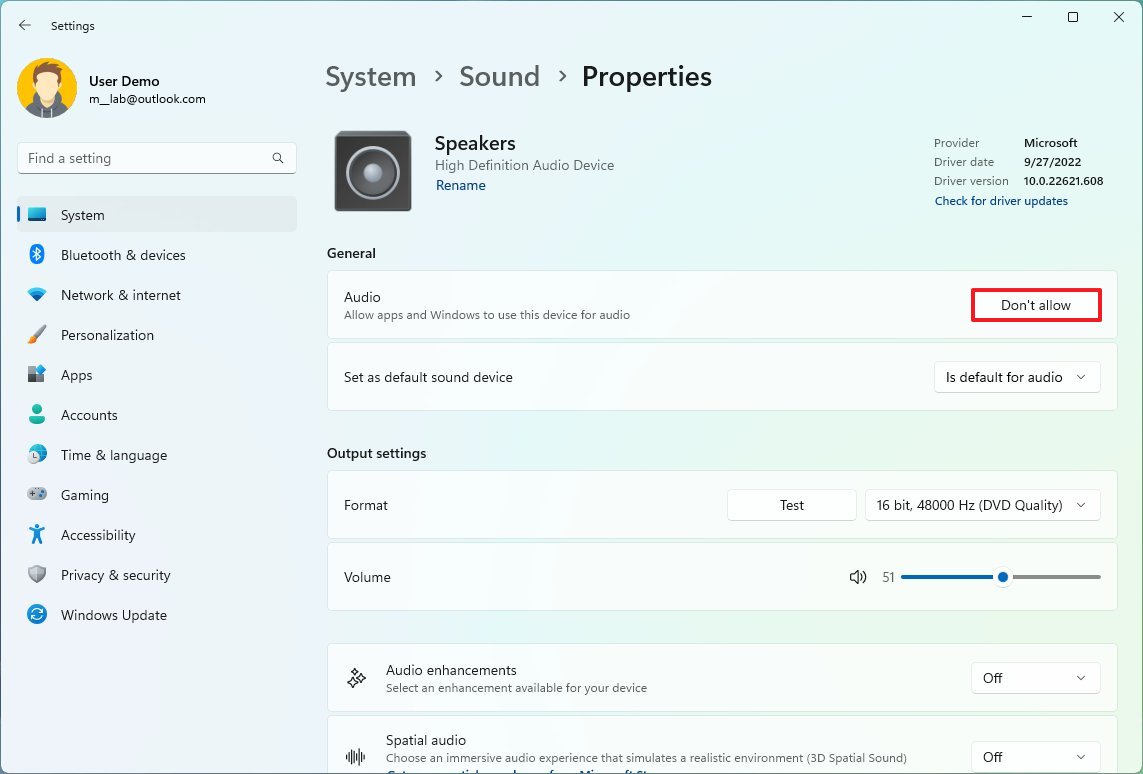
- Click the Don't allow button again.
Once you complete the steps, Windows 11 will no longer play sounds on that specific set of speakers, headsets, or headphones.
Enable output device
To enable an output device on Windows 11, use these steps:
- Open Settings.
- Click on System.
- Click the Sound page on the right side.

- Under the "Output" section, click the Speakers setting.

- Under the "General" section, click the Allow button for the "Audio" setting.
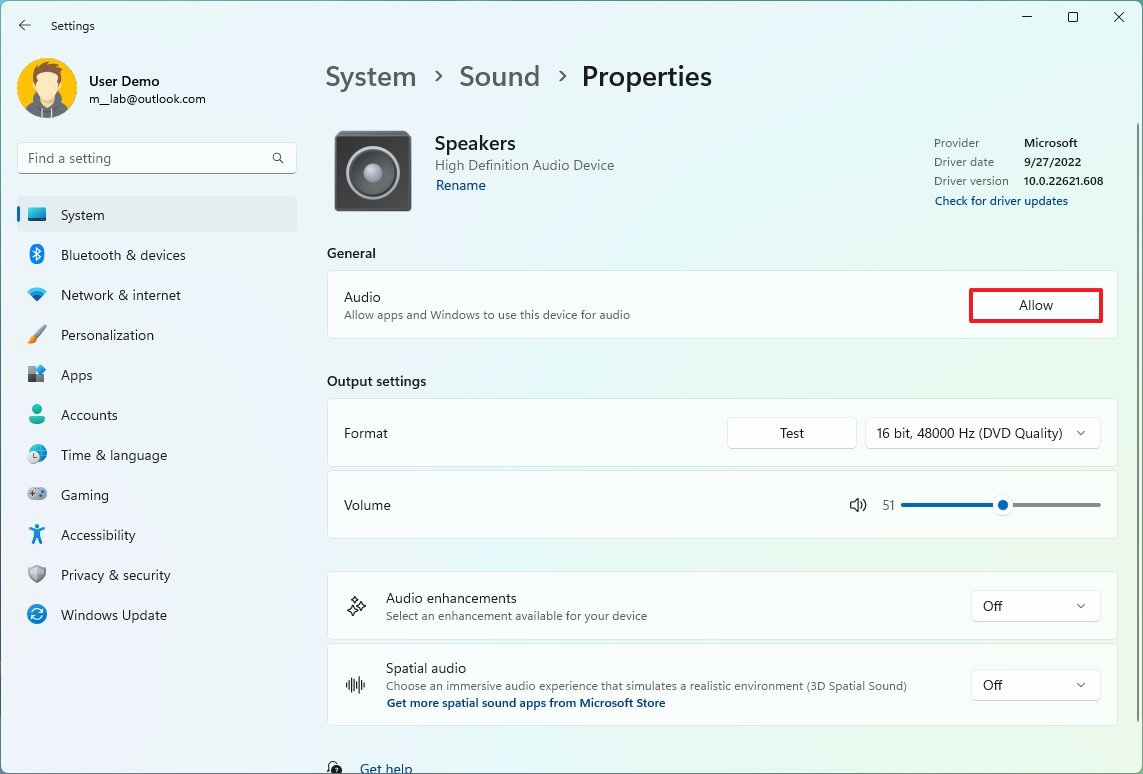
After you complete the steps, the output device will again be available on the computer.
How to check audio driver version on Windows 11
To check the audio driver version, use these steps:
- Open Settings.
- Click on System.
- Click the Sound page on the right side.

- Confirm the output device driver in the top-right corner.
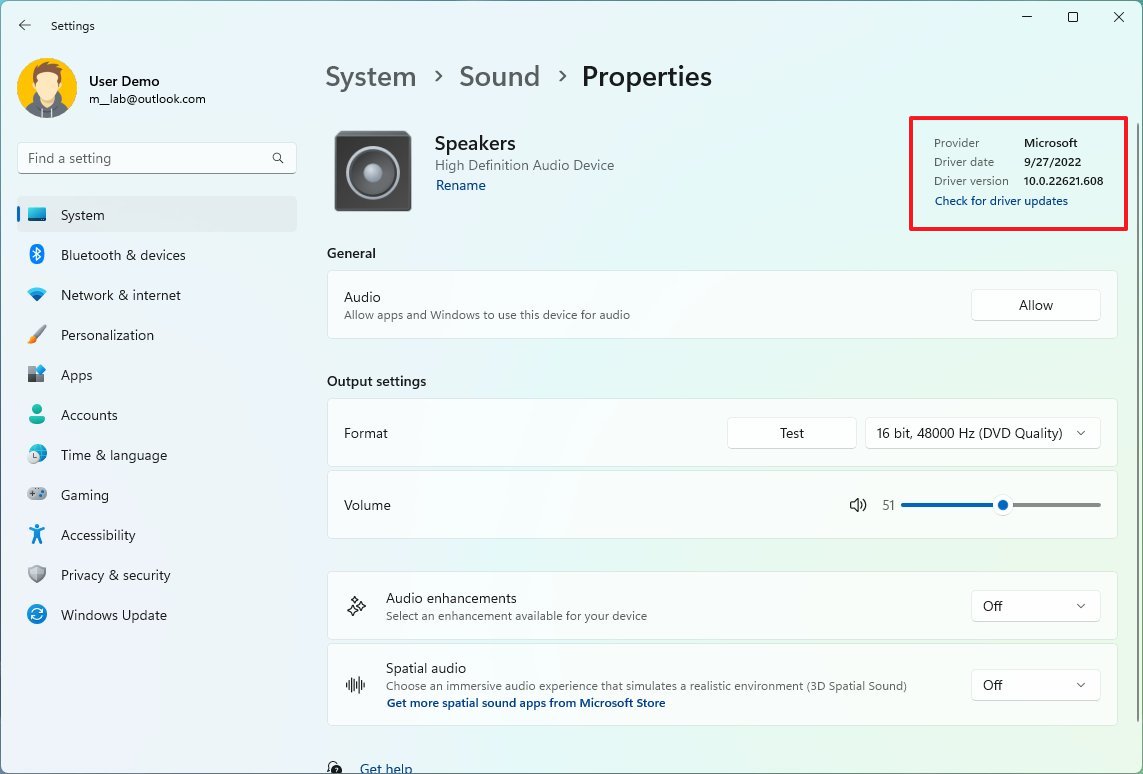
In addition to the version number, the page also shows the driver's date and provider information.
How to enable mono audio on Windows 11
To enable or disable mono audio on Windows 11, use these steps:
- Open Settings.
- Click on System.
- Click the Sound page on the right side.

- Turn on the Mono audio toggle switch to enable the feature.
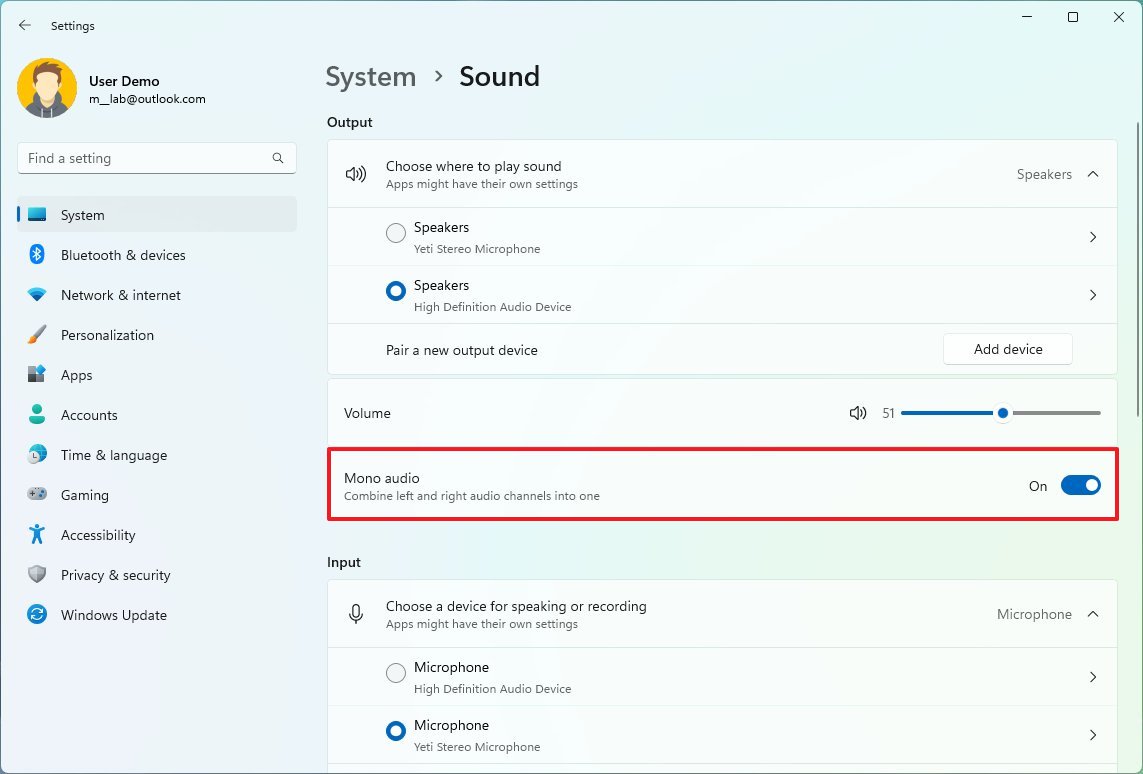
- (Optional) Turn off the Mono audio toggle switch to disable the feature.
Once you complete the steps, the stereo sound will be converted into a single channel, letting you hear everything on Windows 11.
How to pair audio output device on Windows 11
To pair a new set of speakers, headphones, or headsets to Windows 11, make the peripheral discoverable, and use these steps:
- Open Settings.
- Click on System.
- Click the Sound page on the right side.

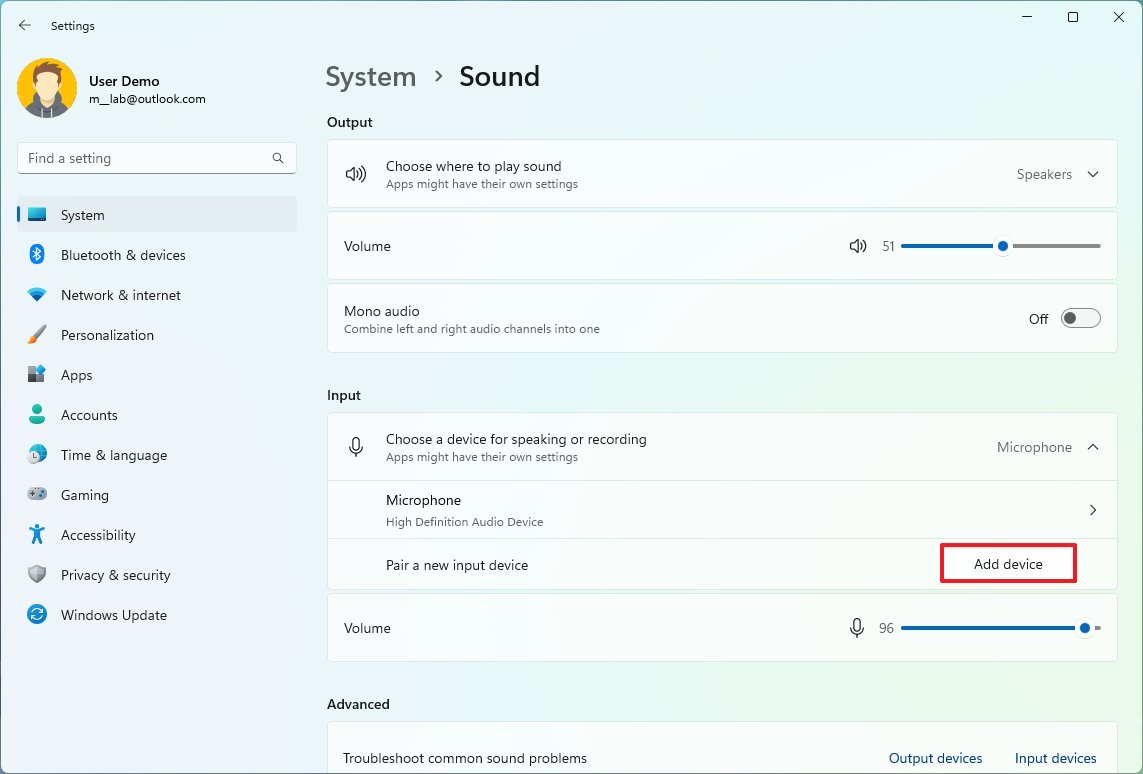
- Under the "Output" section, click the Add device button for the "Pair a new output device" setting.
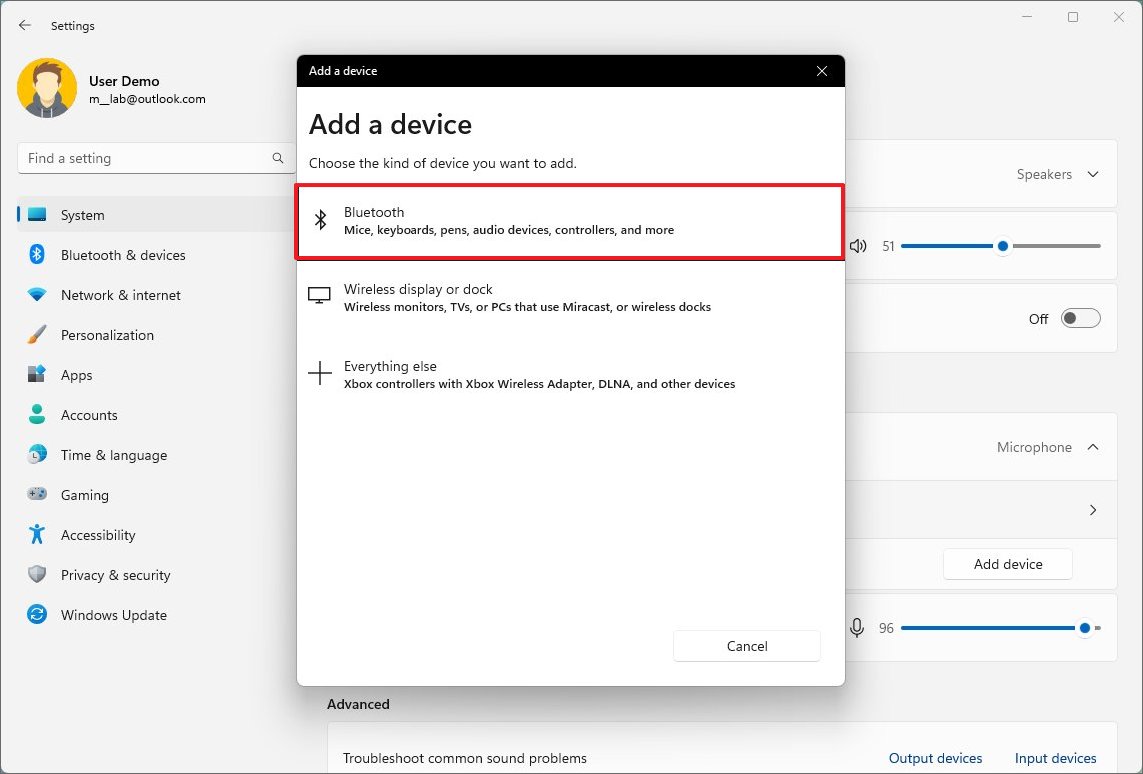
- Click the Bluetooth option.
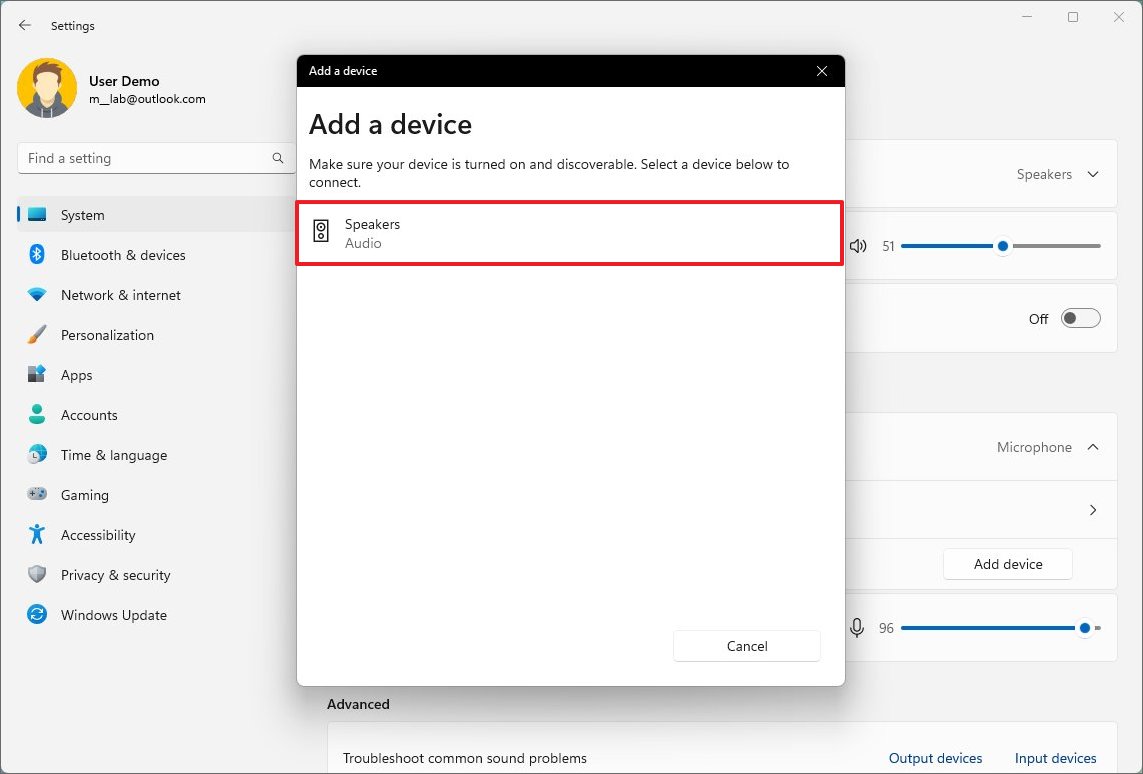
- Select the wireless speakers.
- Continue with the on-screen directions (if applicable).
After you complete the steps, the wireless output device will connect to Windows 11.
How to control system volume on Windows 11
To control the system sounds and apps on Windows 11, use these steps:
- Open Settings.
- Click on System.
- Click the Sound page on the right side.

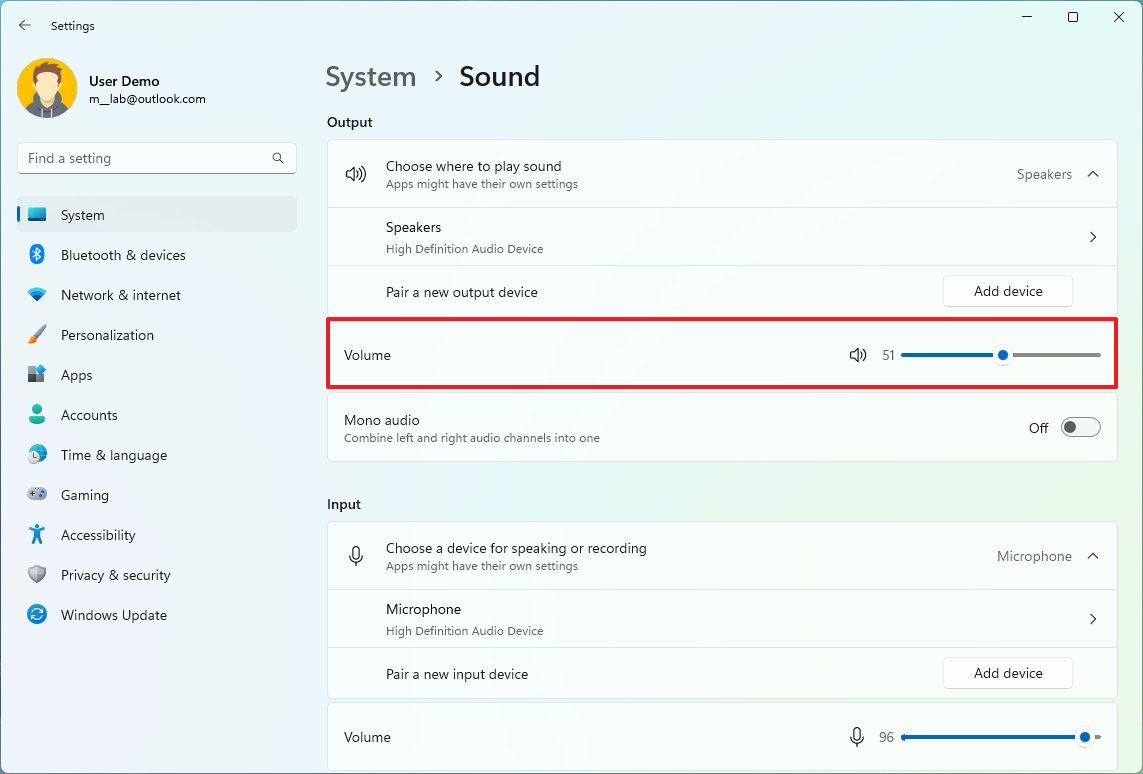
- Under the "Output" section, use the volume slider to control the system volume.
- Under the "Advanced" section, click the Volume mixer setting.
- Under the "Apps" section, use the System sounds slider to control the volume for the system sounds.
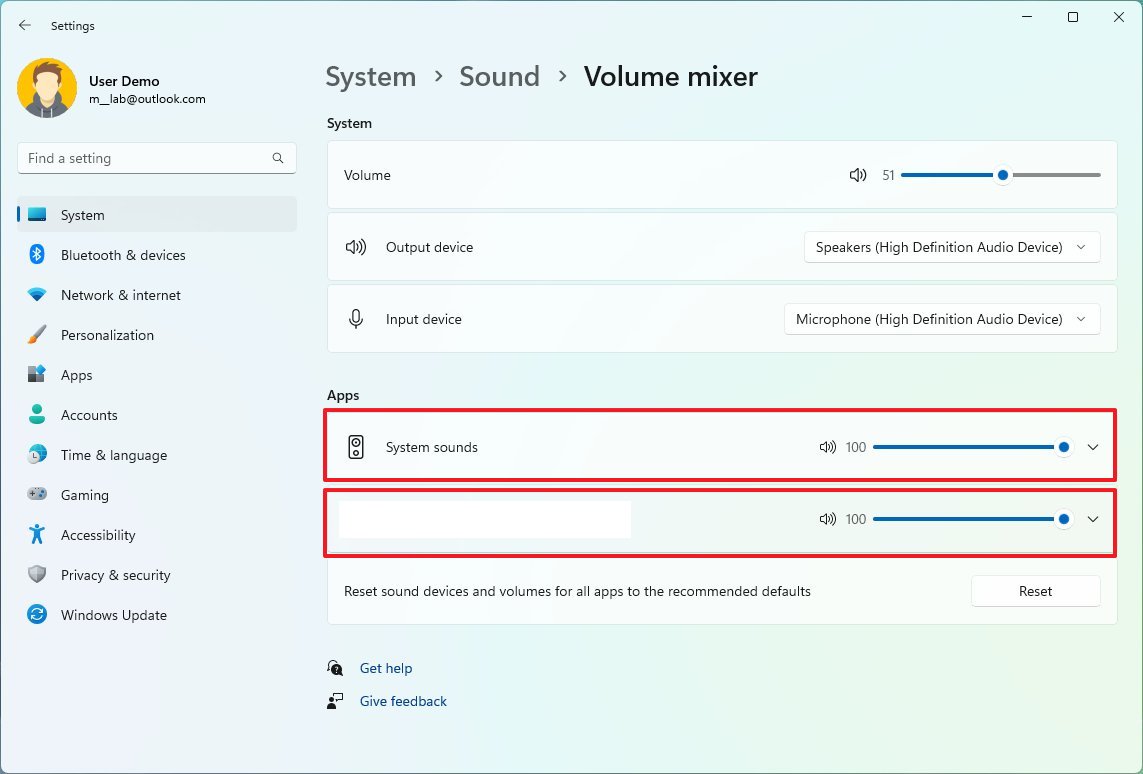
- Use the slider to increase or decrease the volume for a specific app.
- Quick tip: If you have multiple sets of output or input devices, you can click the app to select which speakers or microphone the app should use.
You can also increase or lower the volume by using the dedicated audio buttons or shortcuts in the keyboard, opening the Quick Settings flyout (Windows key + A keyboard shortcut), and using the volume slider. Or you can click the speaker icon to mute the system.
How to rename audio output device on Windows 11
To rename an output device on Windows 11, use these steps:
- Open Settings.
- Click on System.
- Click the Sound page on the right side.

- Under the "Output" section, click the Speakers setting.
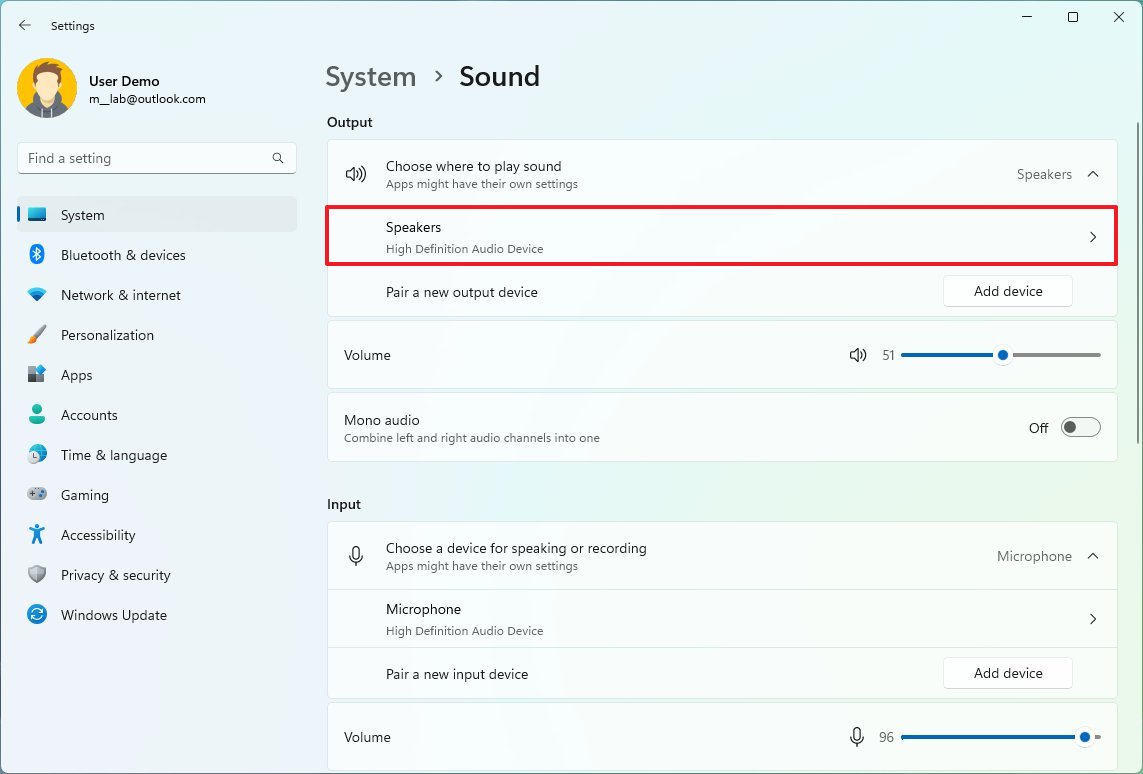
- Click the Rename button in the top-left corner.
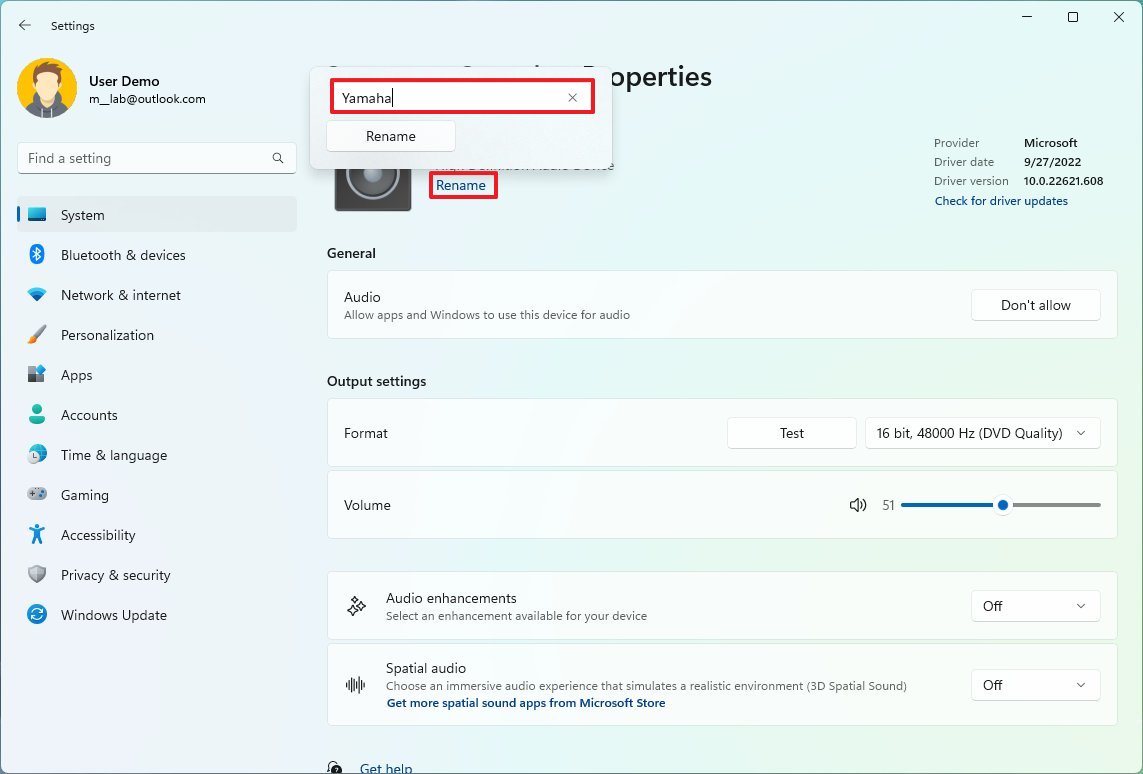
- Confirm the new name for the speakers.
- Click the Rename button.
Once you complete the steps, the new name will appear on the device (top-left side of the page).
How to test speakers or headphones on Windows 11
To test speakers, headphones, or headsets on Windows 11, use these steps:
- Open Settings.
- Click on System.
- Click the Sound page on the right side.

- Under the "Output" section, click the Test button in the "Format" setting.
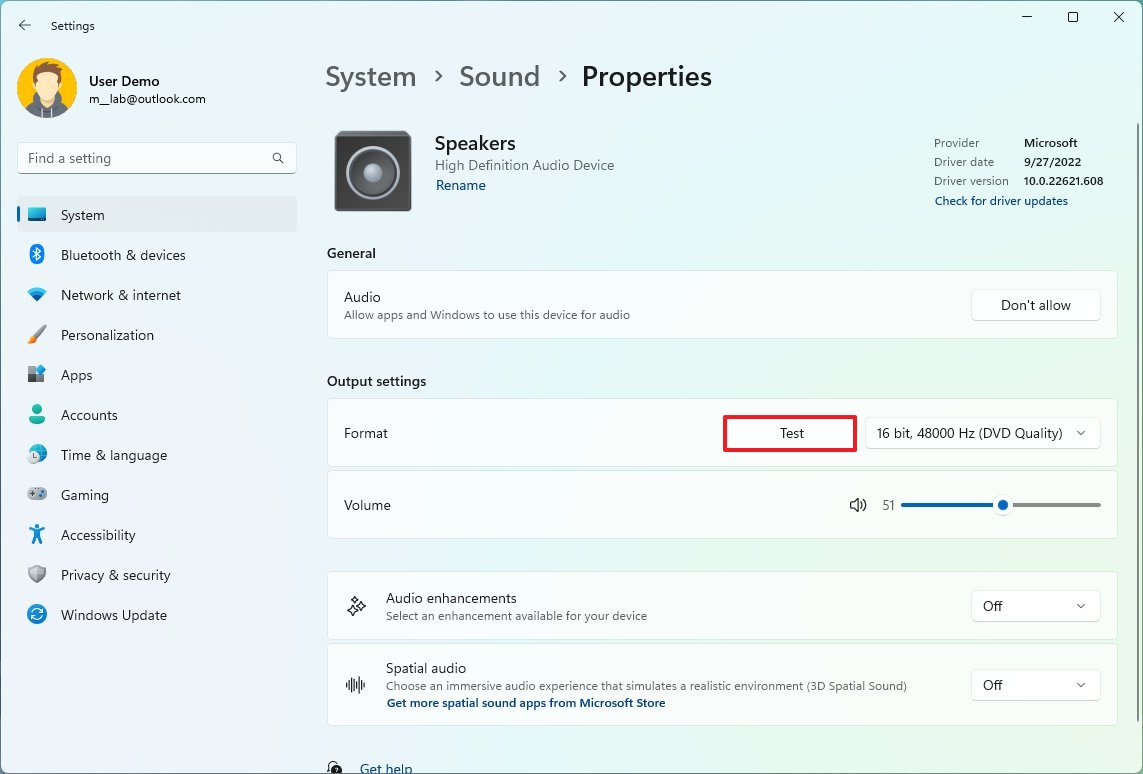
After you complete the steps, you'll know whether the output device is working or whether troubleshooting is needed.
How to manage sound balance on Windows 11
To adjust the left and right sound balance on Windows 11, use these steps:
- Open Settings.
- Click on System.
- Click the Sound page on the right side.

- Under the "Advanced" section, click the "More sound settings" option.

- Select the device from list in the "Playback" tab and click the Properties button.

- Click the Levels tab.
- Click the Balance button.
- Change the left and right volume settings (as needed).
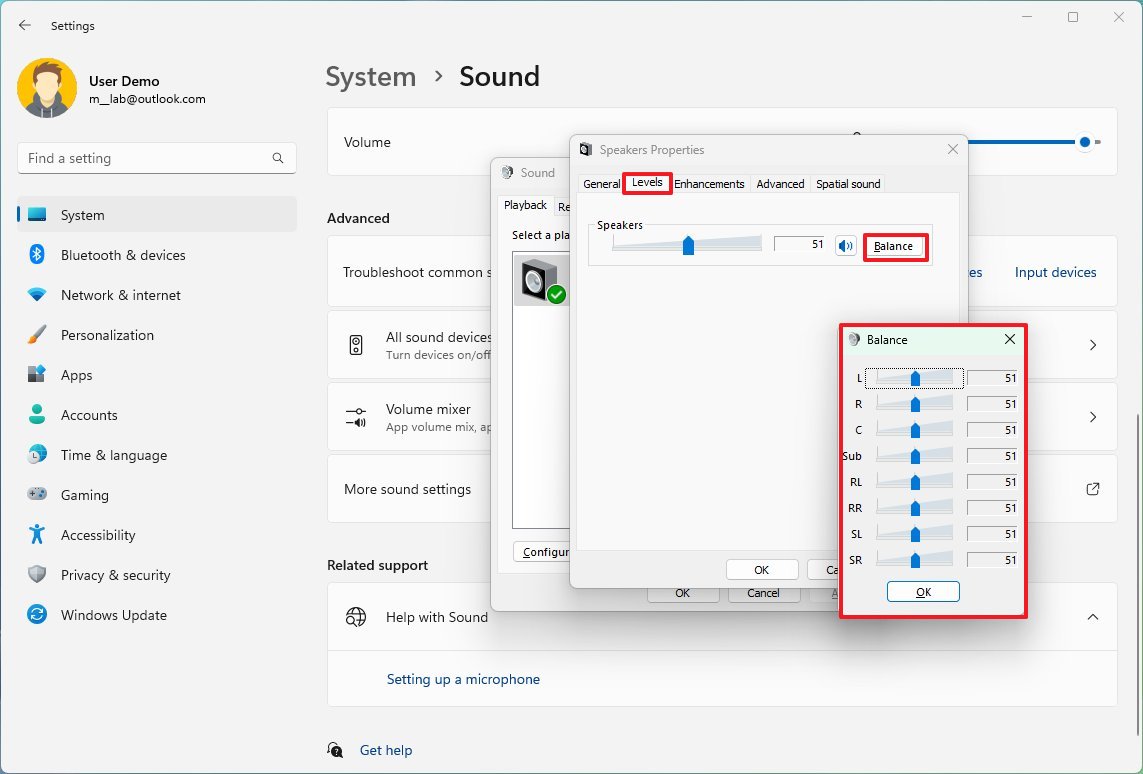
- Click the OK button.
- Click the Apply button.
- Click the OK button.
Once you complete the steps, the audio should play more balanced in the output device.
How to fix sound problems on Windows 11
To fix the most common sound problems on a laptop or desktop, use these steps:
- Open Settings.
- Click on System.
- Click the Sound page on the right side.

- Under the "Advanced" section, click the Output devices option for the "Troubleshoot common sound problems" setting.
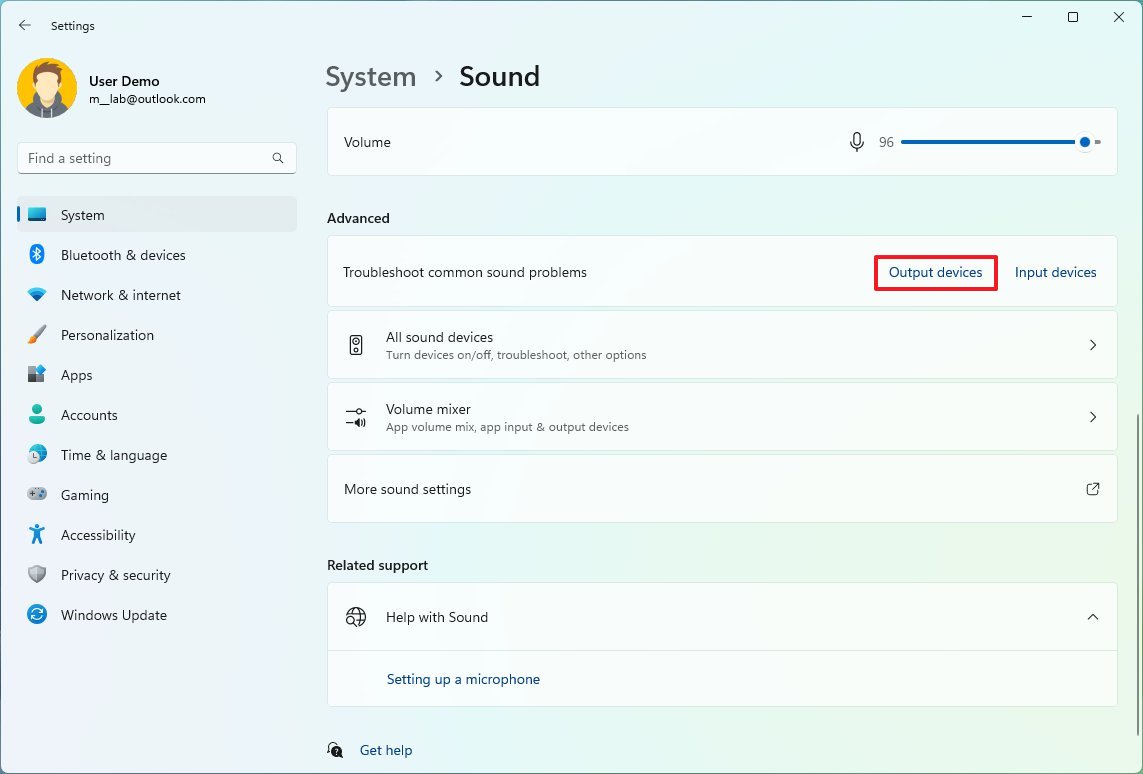
- Click the Yes button in the "Get Help" app to launch the troubleshooter.
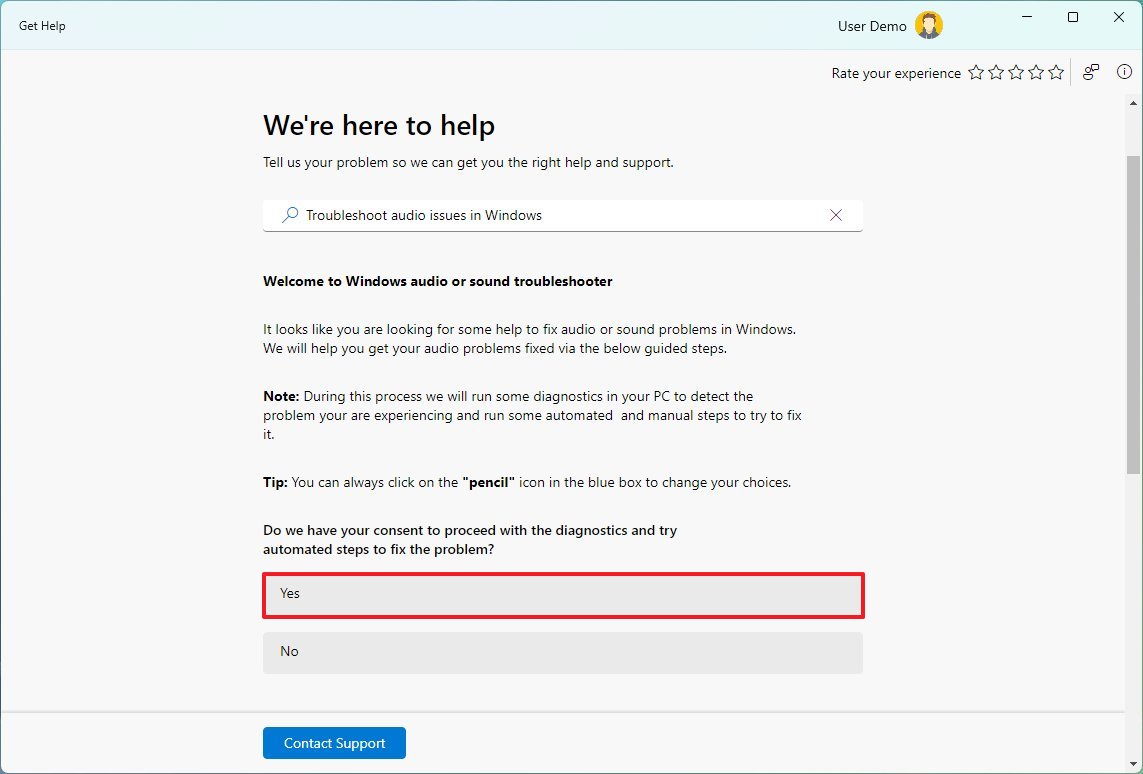
- Continue with the on-screen directions (if applicable).
Alternatively, you can also run the sound troubleshooter directly from the Troubleshoot settings page.
More resources
For more helpful articles, coverage, and answers to common questions about Windows 10 and Windows 11, visit the following resources:
Mauro Huculak has been a Windows How-To Expert contributor for WindowsCentral.com for nearly a decade and has over 15 years of experience writing comprehensive guides. He also has an IT background and has achieved different professional certifications from Microsoft, Cisco, VMware, and CompTIA. He has been recognized as a Microsoft MVP for many years.


