How to manage Cortana settings on the Windows 10 Fall Creators Update
The Windows 10 Fall Creators Update brings Cortana's options to the Settings app, and in this guide, we'll show you the steps to manage them.
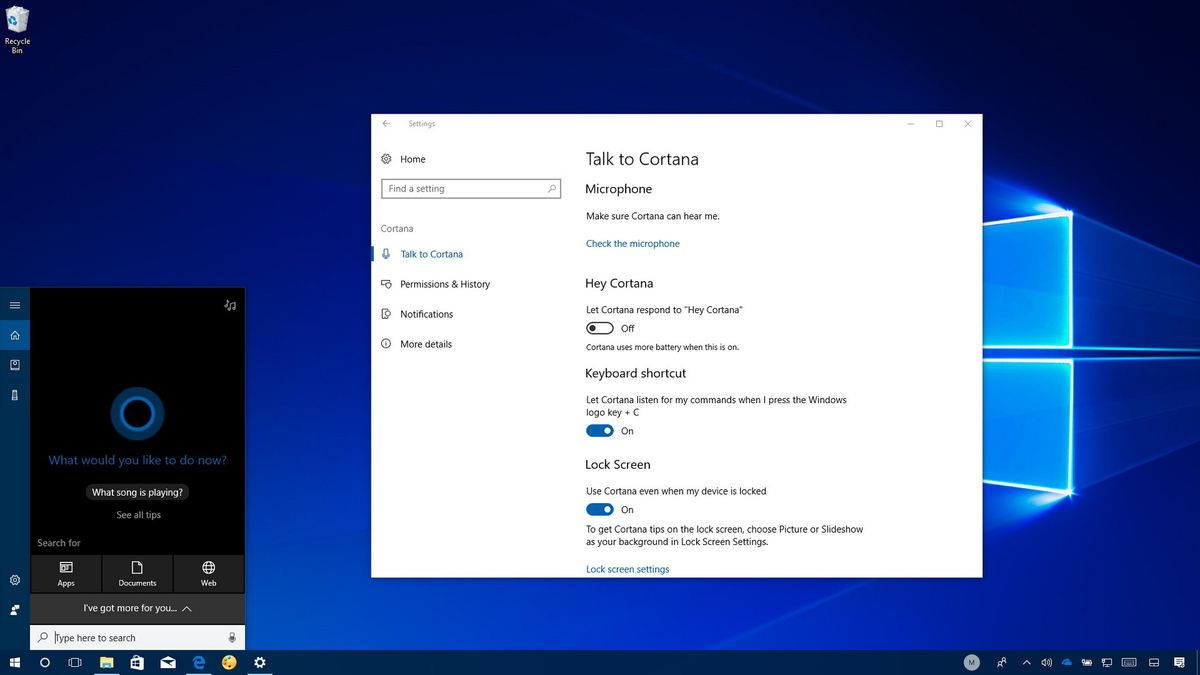
Cortana is one of the biggest features of Windows 10, which has been designed to perform a wide range of tasks to help you get things done. The only caveat is that it's been rather confusing to know where to find its settings, as many users have been looking into the Settings app to customize its options. But only to realize that the assistant has its own settings page inside the app, which it's not a very obvious place.
However, the Windows 10 Fall Creators Update is changing that, and it's finally relocating the Cortana customization options to the Settings app to make them more discoverable.
Cortana in the Settings app
After installing the new update, opening the Settings app, you'll notice a new Cortana section that is divided into four pages.

The Talk to Cortana page includes all the basic options, such as "Hey Cortana," the ability to enable the assistant about the Lock screen, and change language settings.
The Permissions & History page allows you to set the search filter levels, omit cloud content on searches, control history settings, and you even get the option to decide whether Cortana can access your location and other information to improve the experience.
Then there is the Notifications page, which includes the options to control sync notifications, and finally, you'll find the More details page that really doesn't include any configurable settings — just privacy details.
In this Windows 10 guide, we'll walk you through the new settings changes to manage and personalize your Cortana experience.
Get the Windows Central Newsletter
All the latest news, reviews, and guides for Windows and Xbox diehards.
- How to enable microphone access on Cortana
- How to enable 'Hey Cortana' hands-free feature
- How to enable Cortana listening mode keyboard shortcut
- How to enable Cortana above the Lock screen
- How to change the default language on Cortana
- How to change search filters on Cortana
- How to show cloud content on search results on Cortana
- How to clear device history data on Cortana
- How to clear search history data on Cortana
- How to clear personal information on Cortana
- How to manage permissions on Cortana
- How to manage cloud services on Cortana
- How to control notifications on Cortana
- How to manage additional Cortana settings
How to enable microphone access on Cortana
If Cortana is having trouble hearing you, or you're just setting up the assistant for the first time on your PC, use the following steps to troubleshoot microphone issues:
- Open Settings.
- Click on Cortana.
- Click on Talk to Cortana.
- Under "Microphone," click the Check the microphone link.

- Click the Cortana can't hear me option to set up your microphone, or click I can't hear Cortana option to troubleshoot any microphone problems.

- Follow the on-screen directions to complete the process.
How to enable 'Hey Cortana' hands-free feature
Although you can use Cortana with your keyboard and mouse, and touch, you can also use the assistant hands-free with voice commands.
If you want to use voice commands hands-free, use the following steps:
- Open Settings.
- Click on Cortana.
- Click on Talk to Cortana.
- Under "Hey Cortana," turn on the Let Cortana respond to "Hey Cortana" toggle switch.
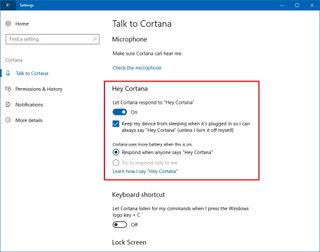
After enabling the feature, you'll notice two additional options, including Keep my device from sleeping when it's plugged in so I can always say "Hey Cortana." And an option that allows you to select whether you want Cortana to respond to anyone that says "Hey Cortana," or to train the assistant to answer only to you.
Starting with the Windows 10 Fall Creators Update is also possible to shutdown, restart, lock, and sign out of your device using these voice commands:
- Hey Cortana — restart PC.
- Hey Cortana — turn off PC.
- Hey Cortana — sign out.
- Hey Cortana — lock PC.
Just remember that using the commands to shutdown, restart, sign out will require a Yes voice command confirmation to complete the process.
Additionally, it should be noted that this feature will impact your device battery life, which is one of the reasons it's disabled by default.
How to enable Cortana listening mode keyboard shortcut
While you can simply enable the hands-free feature to interact with Cortana, you can also open the digital assistant in listening mode manually using a keyboard shortcut. However, you need to enable this feature using the following steps:
- Open Settings.
- Click on Cortana.
- Click on Talk to Cortana.
- Under "Keyboard shortcut," turn on the Let Cortana listen for my commands when I press Windows logo key + C toggle switch.

How to enable Cortana above the Lock screen
You can also use the digital assistant even if your computer is locked to ask for weather, play music, create reminders, and more without having to access your computer.
Cortana above the Lock screen should be turned on by default, but you can check or disable the feature using the following steps:
- Open Settings.
- Click on Cortana.
- Click on Talk to Cortana.
- Under "Keyboard shortcut," turn on the Use Cortana even when my device is locked toggle switch.

The tasks that Cortana can perform above the Lock screen are limited for security reasons, but you can always check the Let Cortana access my calendar, email, messages, and Power BI data when my device is locked option if you want the assistant to have more access above the Lock screen.
How to change the default language on Cortana
In the Cortana settings, you also get an option to select a specific region language. For example, if your device primary language is English (United States), but you're from Canada, you can configure Cortana to use English (Canada) to better understand you.
Typically, most users won't have to deal with this option, but if it's something you want to customize, you can use the following steps:
- Open Settings.
- Click on Cortana.
- Click on Talk to Cortana.
- Under "Cortana Language," use the drop-down menu to select the correct language.
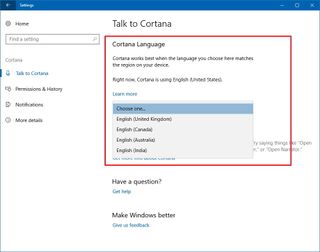
It's worth saying that Cortana will always work best when the language selected matches the region configured on your device.
How to change search filters on Cortana
One of the best features of Cortana is the ability to offer instant search results without having to open the web browser. However, sometimes results may show content that is not suitable for the younger audience, which is the reason Cortana also offers search filters.
If the default search option is not optimal, you can change this option using the following steps:
- Open Settings.
- Click on Cortana.
- Click on Permissions & History.
- Under "SafeSearch," select the search filter that is more appropriate for you, including Strict, Moderate, or Off.

How to show cloud content on search results on Cortana
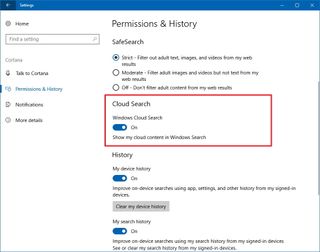
Starting with Windows 10 Fall Creators Update, you can prevent Cortana from showing cloud content in search results using the following steps:
- Open Settings.
- Click on Cortana.
- Click on Permissions & History.
- Under "Cloud Search," turn on the Windows Cloud Search toggle switch to include cloud content, such as from OneDrive in search results.
How to clear device history data on Cortana
Cortana by default collects searches you do on apps, settings, and other history from devices that you sign-in with your Microsoft account. If you want to stop the assistant from accessing this data, you can easily disable the feature and even clear the history on your device.
To turn off and clear your device history, use the following steps:
- Open Settings.
- Click on Cortana.
- Click on Permissions & History.
- Under "History," click the Clear my device history button.
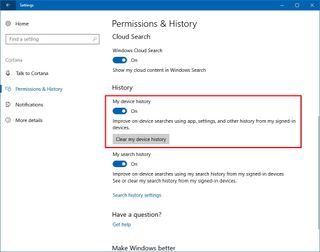
In the same section, you can also turn off the My device history toggle switch to prevent Cortana to keep collecting on-device searches on apps, settings, and other history from other devices you sign in with a Microsoft account.
How to clear search history data on Cortana
In order to improve the experience when searching on your device, Cortana collects search history from devices you sign-in with your Microsoft account, but you can always disable the feature and clear your search history data.
To disable and remove the search history on your account, use the following steps:
- Open Settings.
- Click on Cortana.
- Click on Permissions & History.
- Under "History," turn off the My search history toggle switch to stop Cortana from collecting your search history.

If you want to clear your search history and customize the settings, click the Search history settings link. Then in your Bing account, you can stop recent search from appearing in Search History, you can see your recent history, and you can access the settings to manage your history in your Microsoft account.
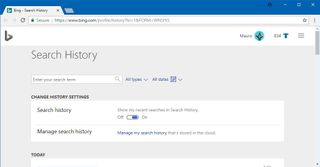
When you click the Manage my search history link, you can clear your browsing history, as well as search history, location activity, and edit your Cortana data and the data on Microsoft Health.

How to clear personal information on Cortana
Cortana depends on information about you in the cloud, such as from messages, apps, and other sources to improve the experience, but it's possible to delete everything the assistant has learned about you to start over or leave the service.
If you want to erase the data Cortana stores in the cloud about you, use the following steps:
- Open Settings.
- Click on Cortana.
- Click on Permissions & History.
- Click the Change what Cortana knows about me in the cloud link to open the Cortana experience in the Taskbar.

- Scroll down, and click the Clear button.

How to manage permissions on Cortana
Microsoft's digital assistant can access certain information, such as location, contacts, emails, calendar, and browsing history to perform a wide array of tasks, such as find directions, track packages, and personalized suggestions. However, you can customize the experience to manage what Cortana can see and use.
To change permissions on your device, use the following steps:
- Open Settings.
- Click on Cortana.
- Click on Permissions & History.
- Click the Manage the information Cortana can access from this device link.

- Turn on or off the toggle switch for the feature want Cortana to see and use, including:
- Location — Current location and location history allows Cortana to remind you of places, find directions, and alter you of nearby places.
- Contacts, email, calendar & communication history — Accessing this data, Cortana can suggest reminders, track packages and flights, and more.
- Browsing history — Allows the assistant to provide personalized suggestions and pick up where you left on Microsoft Edge websites.

How to manage cloud services on Cortana
Cortana can assist you with tasks from many different cloud services (e.g., Skype, Uber, Xbox Live, LinkedIn, Office 365), but you need to connect those services manually.
To add or remove cloud services on Cortana on your device, use the following steps:
- Open Settings.
- Click on Cortana.
- Click on Permissions & History.
- Click the Manage the information Cortana can access from other devices link to open the Cortana experience in the Taskbar.
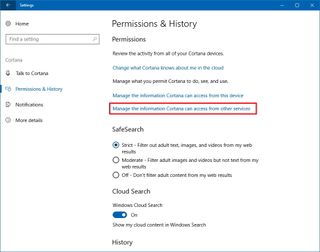
- Click the Add a service button.
- Select a service from the list.
- Click the Connect button.
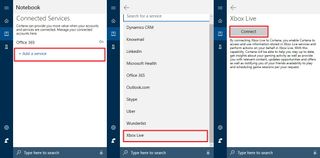
- Type your service credential and follow the on-screen directions to connect the service.
If you want to remove a service, select the service from the list, and click the Disconnect button.
How to control notifications on Cortana
If you have the Cortana app installed on your iPhone or Android phone, you can allow the assistant to let you know when the battery is getting low, missed a call, text, or there is a new app notification.
To manage cross-device notifications with Cortana, use the following steps:
- Open Settings.
- Click on Cortana.
- Click on Notifications.
- Turn on or off the Send notifications between devices toggle switch.
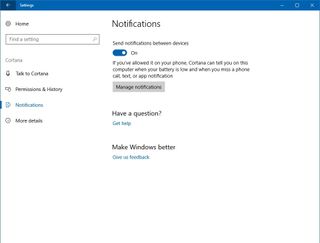
If you need more granular control, click the Manage notifications button to open the Cortana experience in the Taskbar.

There you can select a device to manage notifications. On a mobile device, you can allow Cortana to alert you on battery, call, incoming messages, and specify apps notifications.
How to manage additional Cortana settings
Although Windows 10 now better organize the Cortana settings inside the Settings app, some options to customize the experience are scattered around.
How to change Cortana presence on the Taskbar
You can always open Cortana by clicking the search box next to Start button. However, if you want to optimize the space in the taskbar on your PC, or you simply don't want the search box to be visible, you have some options available through the Taskbar settings.
- Right-click the Taskbar to open the context menu.
- Select Cortana.
- Choose one of the three options:
- Hidden — Removes Cortana from the taskbar, but you can always open the Start menu and start typing to bring up the app.
- Show icon only — Removes the search box, but you'll still can click the Cortana button to start a search.
- Show search box — Places the search box in the taskbar for quick access to Cortana (default).

How to improve Cortana voice recognition
Cortana's default voice recognition settings may suit most people, but if the language configured on your device isn't your native language, the assistant may find it a bit difficult to understand you.
To improve voice recognition using Cortana you can use the following steps:
- Open Settings.
- Click Time & language.
- Click Speech.
- Check the Recognize non-native accents for this language option.

Once you've completed the steps mentioned above Cortana will be able to understand more accurately when using voice commands.
Wrapping things up
While we're focusing this guide to customize Cortana using the Settings app, to make this guide more complete, we also include some instructions that been around in previous releases, but they're part of Cortana settings.
More Windows 10 resources
For more helpful articles, coverage, and answers to common questions about Windows 10, visit the following resources:
- Windows 10 on Windows Central – All you need to know
- Windows 10 help, tips, and tricks
- Windows 10 forums on Windows Central
Mauro Huculak has been a Windows How-To Expert contributor for WindowsCentral.com for nearly a decade and has over 15 years of experience writing comprehensive guides. He also has an IT background and has achieved different professional certifications from Microsoft, Cisco, VMware, and CompTIA. He has been recognized as a Microsoft MVP for many years.
