How To: Install, Uninstall, and Transfer Files on Windows Mobile
Join us in reading Hobbes' epic How-To install guide, the definitive one for how to get the stuff you want on your Windows Mobile device. It's geared to the new user, but even an old-hat like myself has learned a thing or two from this monster guide. If you're like me, you have a friend or family member who's always hitting you up for help with their Windows Mobile smartphone. My new advice to them: read this article. -- Ed.
Window Mobile (WM) phones can certainly make a huge impact on your productivity on a personal level as well in your professional career. It can offer hours of entertainment with games, movies and music while making sure you never miss a beat from the office while away from your desk. When someone buys their first WM phone, they can usually be placed into two different camps. Those who have only owned a regular cell phone and this is their first smartphone... and those who have owned smartphones in the past, but never a WM phone (i.e. they have only owned Palm OS, Symbian, Blackberry, etc.). In either case, as with anything else in this world, there is a learning curve in order to reach that level of comfort and understanding with their new phone, though this learning curve is probably smaller than some might think at first.
This is going to be the first part in a series aimed at addressing the most common questions, beginner misunderstandings, avoidable unneeded frustrations, etc... that many brand new WM users face. Or for some long time or casual WM users, it may simply answer questions you might have been too embarrassed to ask about!
Part one focuses on how to copy files to your WM phone as well as how to install and unistall software applications on your phone. This guide is written with the beginner in mind, so it does go into a little more detail than you would normally find.
How To: Manually Transfer Files From the PC to the Phone
There are times you will want to transfer files to your new Windows Mobile phone. They may be Word or Excel docs for work, your collection of MP3s, a program you want to install, or pictures of your 3 year old that you are itching to show anyone who will look. There are a few different ways you can transfer files from your PC to your WM phone. Sometimes you will have to make a judgment call as to which way will be the best for the file(s) that you want to transfer, depending on it's size, how many there are, and the location in relation to your phone. In other words, is the file big or small, do you have 2 or 163 files, is it on the PC sitting next to the phone or is the file 2,000 miles away on you boss' laptop. These tutorials assume you have a basic knowledge of Windows XP or Vista on your PC.
Transfer with ActiveSync
If you only need to transfer a few small files and you can connect the phone to the PC that has the files, then you can use ActiveSync to transfer the file. Please be aware that if you are using Windows XP vs Windows Vista, the steps below are very similar with only minor differences. The big difference is basically in the name of the Utility that you use depending the OS on your PC. In Windows XP you will use ActiveSync, which you may need to install on the PC (you can download the latest version here). In Windows Vista it already comes with its version of ActiveSync called Windows Mobile Device Center. Here is how you would do it with both WinXP and Vista:
- Connect your phone to your PC
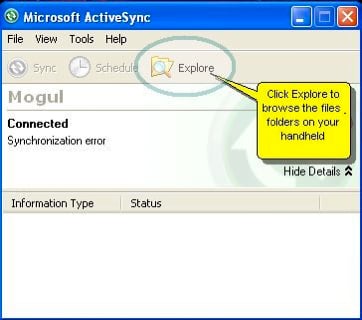
- In XP: After ActiveSync shows it is connected, click on the "Explore" button on ActiveSync on your PC
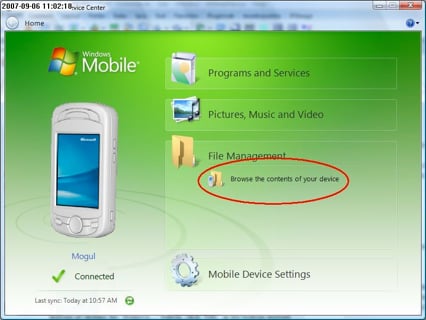
In Vista: After Windows Mobile Device Center on your PC shows it is connected to your phone, hover your mouse over File Management and then click on the "Browse The Content Of Your Device"
- In the ActiveSync Explorer or the Windows Mobile Device Center Explorer window you just opened on your PC, browse to the folder on your phone you want to copy the file to.
In WinXP: The window will usually open in your phone's My Documents folder in WinXP ActiveSync. In order to browse anywhere else, you will have go up one level by double clicking on "My Windows Mobile Based Device" and then browse to any folder on your phone or select Memory Card and browse to any folder there.
In Vista: Vista's Windows Mobile Device Center it will open up to the root directory so you will have to start by clicking on the phone for the internal memory or the SD card to explorer's it's folders. - Now in Windows Explorer on your PC find the file that you want to copy to your phone.
- To copy the file to your phone, simply drag the file from Windows Explorer to the the window of the ActiveSync Explorer or Windows Mobile Device Center Explorer window.
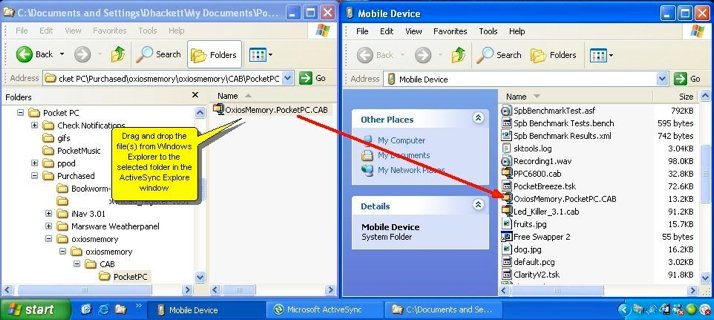
- A progress bar will show the status of the file transfer. Please note that if you are using Windows XP, you will not be able to browse either the ActiveSync Explorer window or Windows Explorer until the transfer is completed, but if you are using Windows Vista you will be able to continue to browse while the files are being copied.
You really only want to use this option if the file(s) you want to transfer are small. You also do not want to do this if you are going to transfer a lot of files.
Transfer with a Card Reader
One of the easiest ways (and the way I personally do it most of the time) is to simply remove the memory card from your phone and plug it into a USB card reader connected to your PC. Then you simply use Windows Explorer to drag and drop any file(s) you want copy from your PC to any folder on your phone's memory card.
Get the Windows Central Newsletter
All the latest news, reviews, and guides for Windows and Xbox diehards.
There are times that this will really be your only option, too. For example, when you want to transfer a VERY large file (i.e. the map file for the whole USA for your GPS navigation program) or a large group of files (i.e. 682 MP3 files) then you want to use a memory card reader for two reasons: First is that copying large files or a large group of files via ActiveSync may literally take **hours** longer. I am not kidding. When I first tried using Active Sync to copy about a GIG of MP3s to my phone, 6 hours later it was still trying to finish them. It only took a matter of minutes with my card reader. Secondly, if ActiveSync does not recognize the file format, it may try to convert to a format it likes better, but then makes it not usable for the intended program (I had this happen to me when I tried use ActiveSync in WinXP to transfer my map files for my GPS navigation program).
Transfer with Email
Now if there is a program that is on a PC that is not next to the computer that you want to install on your phone, then you can email the CAB file to your handheld so you can install the program. Please note that for this to work, you will need to have a CAB file to send, and not the EXE installation file (see the next section for details on this). On the PC, send an email to an email account that you have already set up on your handheld. (Look for a future How To article on WMexperts or browse the forums if you need help with this). Then make sure you attach the CAB file to your email. And send.
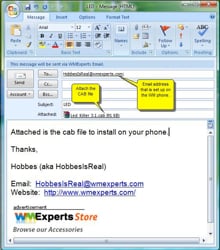
Now on the phone:.
- Open your email application and find the email that was sent to you with the CAB attachment..
- Depending your your settings you will probably need to tap once on the file to download the attachment.
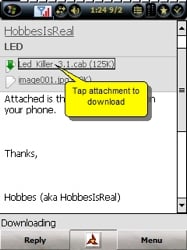
- After that is done, tap and hold on the attached file and click on "Save As "
- In the Save As window, I personally recommend that you save it to your My Documents folder in your main memory. It defaults to My Documents, so then just leave it as no folder. If you do not have room in your main memory, then you can select your memory card and a folder there.
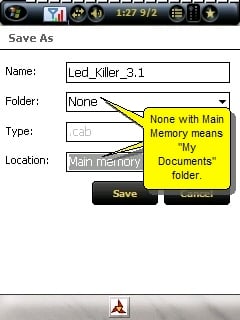
- Tap "Save" and you are done.
This process will work with nearly any type of file, i.e. you need the latest spreadsheet on your phone and you are on the road.
Advanced Options
There are also several advanced options that are best left to those with a fair amount of experience with WM, and knowledge in networking.These solutions are beyond the scope of this guide, but if you already know what I am talking about or you have a savvy IT person at your company that you can share these solutions with, then it is simply worth mentioning additional advanced possible solutions.
- Use an application to remote control the PC with the file on it, such as z2 R2PC, and transfer files to your handheld while connected.
- If you have access to an FTP server, then you could upload your documents to that and use an FTP application on your handheld to download it.
- You can also set up a VPN connection with the computer that you need access to.
How To Install Programs on a Windows Mobile Smartphone
Installing and uninstalling programs on a Windows Mobile phone can seem like a vast mystery resulting in frustration, especially to new users. But with a little knowledge and understanding of how to do it, it becomes a very simple and easy task that will shortly become second nature. The following assumes you are using WinXP or Vista, with basic knowledge of using Windows on a desktop.
There are 3 ways to install a program on your phone:
- From your PC via ActiveSync with a file
- Copying a file to your phone and launching it directly from the phone
- Going to a file directly on the internet and installing it directly from the phone.
There are also two types of files that can be used to install a program on your phone and it is important to understand the difference between the two. Files ending in .EXE and files ending with .CAB. Generally speaking, a file that ends in .exe, for example Install.exe, will need to be launched from your PC and installed through ActiveSync. Files ending in .cab, for example Install.cab, will need to be first copied to your phone, emailed to your phone, or accessed via a direct link on the internet, and then installed from the phone itself. Here is how you would do each of these in detail:
From your PC via Active Sync with an EXE File:
If the file name ends with .exe (i.e. Install.exe) then it is an executable file, and this will have to be launched on your desktop/laptop computer after you connect your phone to your PC and will need to be installed on your phone via ActiveSync. Basically connect your phone to your PC and then double click on the .exe file from your PC and then just follow any directions as prompted. Here are the detailed steps for doing this:
- Connect your phone to your PC
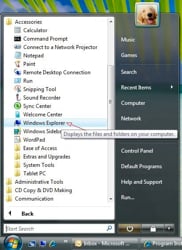
- Find the installation file on your PC using Windows Explorer (usually Start / All Programs / Accessories / Windows Explorer ) and double click on the installation .exe file
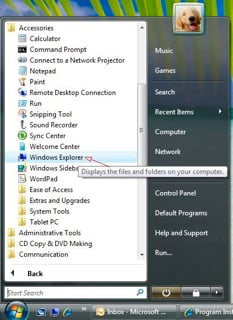
- There will usually be an "I Agree With the Terms & Conditions" page. Click "I Accept" or something similar.
- If there is a PC desktop companion utility for your Windows Mobile program, there may be a screen asking to confirm the location that you want to install this on your PC.To accept the default location, simply click "Next".
- Then the Add/Remove Programs utility with ActiveSync will open up and scan your PC and handheld for already installed programs. Depending on how many programs you have installed on your handheld, and how big and fast your memory card is, this can easily take several minutes.. so please be patient.
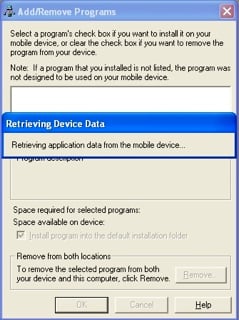
- Then you may see a progression bar titled "Installing Application" as the program is copied to your handheld and installed on your PC (if there is a desktop companion utility).
- After all necessary files have been copied to your handheld for you, you will then get the prompt stating "Please check your mobile device to see if additional steps are necessary to complete this installation". Then click "OK".
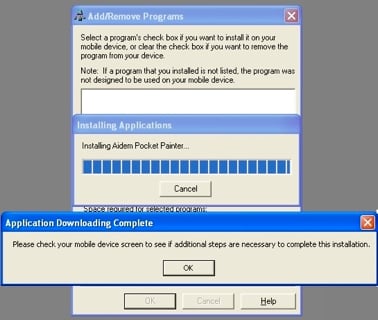
- Now you pick up your phone and you have a choice to make... whether to install the program on your device (aka in the phone's internal memory) or on your memory card. If you need some help with this decision please read my recommended guidelines for this choice below. Select where you want the program installed and then click the "Install" soft button at the bottom.
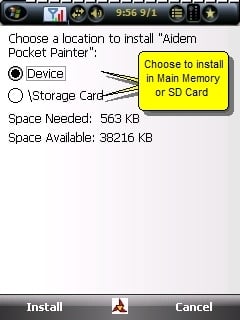
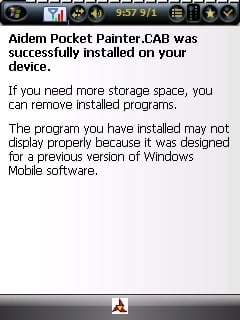
- That's it. You will now see the following message saying you have successfully installed the program.
From your phone with a CAB File:
If the file name ends with .cab (i.e. Install.cab) then this file will have to be copied to your phone and then launched directly from the phone to install the program. This can either be copied to your phone, as per the directions above, via email, or through a direct internet link to a cab file. Once the file is copied to your phone, follow these steps:
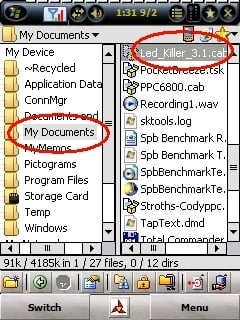
- On your WM phone, use either File Explorer or Resco File Explorer (Resco File Explorer is highlighted in part two of this series as highly recommend software) to browse to your "My Documents" folder (or whatever other specific folder you may have saved your file in) and tap on the CAB file you just saved to your phone.
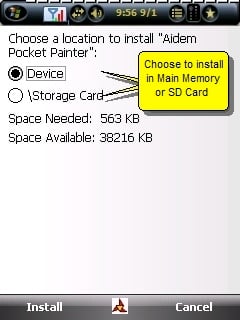
- Now you have a choice to make ...whether to install the program on your device (aka in the phone's internal memory) or on your memory card. If you need some help with this decision please read my recommended guidelines for this choice below. Select where you want the program installed and then tap OK (or the checkmark) in the top corner.
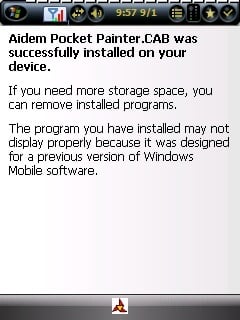
- That's it. You will now see the following message saying you have successfully installed the program.
From a link on the internet with a CAB File
Ed. Note: If you use the WMExperts Software Store, there's an option on most software to "install directly to your device." This sends you an SMS message with a link to the file. Just click it and then follow HobbesIsReal's steps below. Alternatively, if you visit the software store directly from your phone, there are links to download trials directly there.
Often times you can find a link to a cab file on the internet. When this happens you can use Pocket Internet Explorer (PIE) on your phone to browse to that specific link. Download the cab file to your phone. And then just tap the cab file and it will install. Below is specifically how to do that. In order to share how to install a program from a CAB link on the internet, let's install a Freeware version of Sudoku called SudoPocket ver 1.4:
- Open up your Pocket Internet Explorer (PIE)
- Type in the following address in the address field at the top of the browser: http://ferrao.org/pocketpc/sudopocket_1_4.cab (please note there are Underscores "_" in each blank space in this internet address)
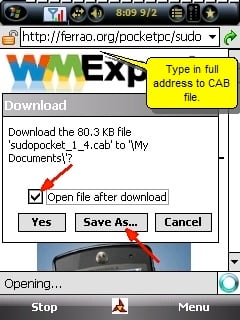
- When the pop up window comes up click on "Save As..." and make sure that "Open file after download" has a checkmark.
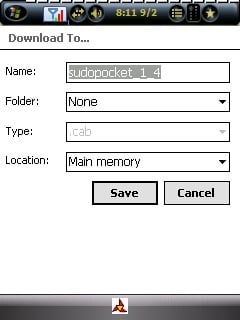
- After it downloads you will have a window asking where to save the cab file on your phone.In the Save As window, I personally recommend that you save it to your My Documents folder in your main memory. It defaults to My Documents, so then just leave it as no folder. If you do not have room in your main memory, then you can select your memory card and a folder there..
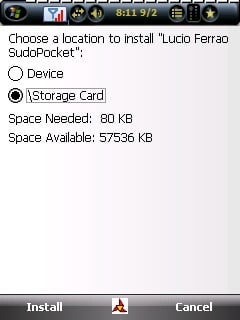
- Now you have a choice to make... whether to install the program on your device (aka in the phone's internal memory) or on your memory card. If you need some help with this decision, please read my recommended guidelines for this choice below. Select where you want the program installed and then click the "Install" soft button on the bottom.
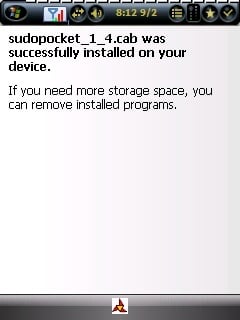
- That's it. You will now see the following message saying you have successfully installed the program.
Helpful Tips
Different Versions of Windows Mobile
It is important to know what Operating System (OS) you have on your phone. For example if you have Windows Mobile Standard (non touch screen) this is different from Windows Mobile Professional (touch screen). Software for one will NOT work on the other. With Windows Mobile, often times a program written for an older version of the OS may still work on your newer version of the OS, but not always (i.e. most programs written for WM5 will probably work on WM6, but not always). This is why it is smart to try it before you buy it if it offers a trial period.
Where to Install Software
Since on a WM phone you usually have a choice of installing any program either in the phone's internal memory or on the SD card, I am often asked how do you decide which one to choose for each application installed. For the most part, officially you can install programs on either the internal memory or on an SD card... but in practice, you will want to choose where you will install them. Programs running from internal memory will run faster, but there is only so much internal memory available. The SD card has the advantage of a huge amount of space, but programs will take longer to load. Here are the guidelines that I use to decide where to install a program:
- If it is a program or utility that is going to be used on the Today screen, a system utility (i.e. memory management, file explorer, email client, internet browser, etc.), or a program that I know I will use on a daily or regular basis, I will install it in internal memory.
- If it is something like a game, needs a huge amount of space, something that I know I will not use on regular basis, etc... I will install it on my SD card.
- There are also programs that you can install where the program in internal memory and then save the data it uses on an SD card, ex. a GPS program goes in internal memory and the maps on the SD card or an email client in internal memory while setting it to save all emails and attachments on my SD card. With this stuff, it's usually fine to install the program to main memory.
- If it is something that has a high amount of personal information, i.e. something like Splash ID, I will install it in internal memory because I can lose my SD card fairly easy, but it is harder to lose just my internal memory.
Exception to the .exe Rule
Please note that one of the glaring exceptions to this rule with EXE files needing to be installed from your PC only. There are a few programs that end in ".exe" that are meant to be run directly on your smartphone. A common example is a .exe created by a backup program such as Sprite Backup, where they create a self launching backup file so you can use it after a hard reset. So even though it is a file ending in .exe you can start it directly from the phone to restore all of your settings.
How To Uninstall Programs on a Windows Mobile Smartphone
There are two common ways to uninstall a program:
- Using ActiveSync from your PC
- Uninstalling the app directly on the phone.
- (a third way is to manually do it which requires advanced experience with WM which is beyond the scope of this guide)
This is pretty much a simple and automated process. The first question you would want to ask yourself is, do you want to uninstall it via ActiveSync on your PC or directly from your phone. Both are fine to use. If you have a PC desktop application that goes with the phone app, then you would want to use ActiveSync on your PC if possible. Here is how you would do it either way:
Uninstalling an app from a PC with ActiveSync:
This is very straight forward with a few simple steps:
- Connect your phone to your PC.
- After ActiveSync is showing the phone is connected...
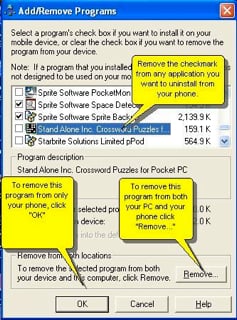
In WinXP: In ActiveSync, click on "Tools" and then on "Add / Remove Programs"
In Vista: In the Windows Mobile Device Center, hover over "Programs & Services", click "More", click "Add / Remove Programs"
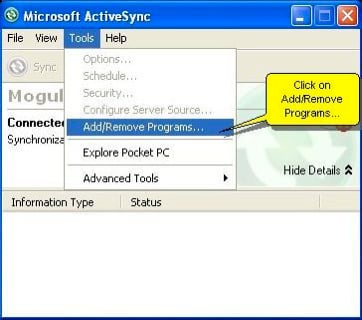
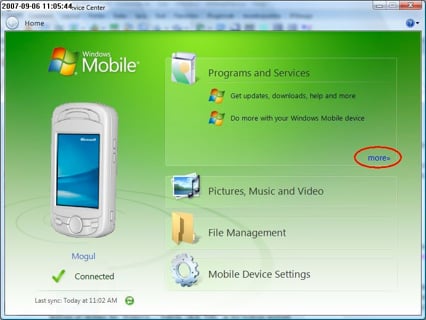
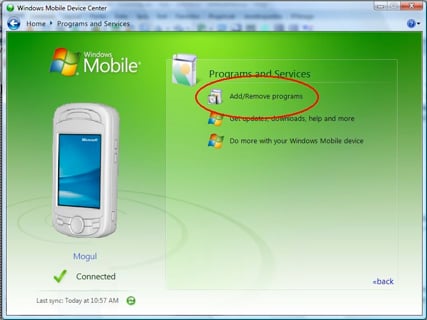
- You will have to wait while it retrieves all the application information from your phone. Depending on how many applications you have installed on your phone and the size and speed of your memory card, this can take several minutes. Please be patient.
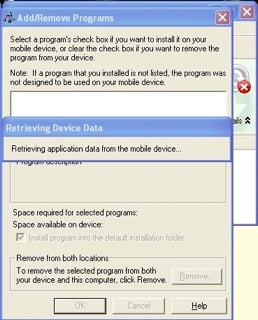
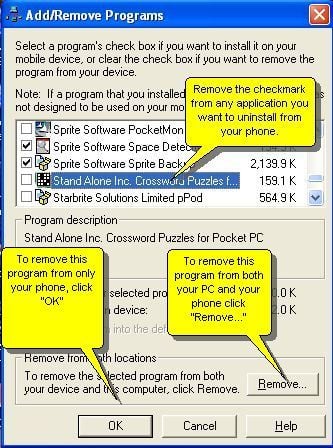
- When the list of all the applications for your phone comes up, scroll down until you see the application you want to uninstall and remove the checkmark. Most of the time, you can uninstall multiple applications at the same time. Then you want want to click on the "Remove..." button at the bottom. This will remove the program from both your PC and the phone. If you want to remove the application from your phone only, then instead of clicking the "Remove..." button, click "OK" at the bottom instead.
- Now on your phone you may have to confirm that you want to uninstall that application
- You are done.
Uninstalling an app from your phone
If you want to uninstall a program directly from your phone, you can. The next time you sync, it will update the Add / Remove Programs list in ActiveSync on your PC. Here is all you have to do:
- On your phone go to Menu / Settings / System / Remove Programs
- In the Remove Programs window scroll down and select the program(s) you want to uninstall. Please note that the applications are not alphabetically listed... they are listed by the order in which they were installed, with the first one at the bottom and last one at the top. Then click the "Remove" button.
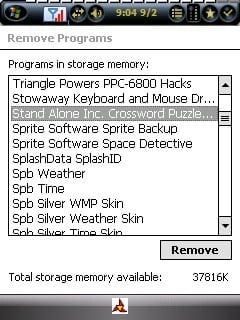
- There will be a confirmation window that pops up making sure you want to remove this program. Click "Ok".
- That is it, you are done.
More to Come!
In the next part of this multi-part Windows Mobile Guide, I will focus on what are the must have software apps that I recommend everyone should have, software apps I would suggest getting, and where to get them all... even where to get tons of free software for your new Windows Mobile phone! So keep an eye out for Part II coming very soon...
Home to the most invested and passionate Microsoft fans, Windows Central is the next generation destination for news, reviews, advice and buying recommendations on the Windows, PC and Xbox ecosystems, following all products, apps, software, AI advancements, and accessories. We've been around for more than decade, and we take our jobs seriously. Windows Central writers and editors value accuracy and editorial independence in everything we do, never receiving compensation for coverage and never pulling punches.

