How to get started with the Mail app on Windows 10
The Mail app for Windows 10 includes all the essential features to manage one or multiple email accounts, and in this guide, we'll show you how to get started.
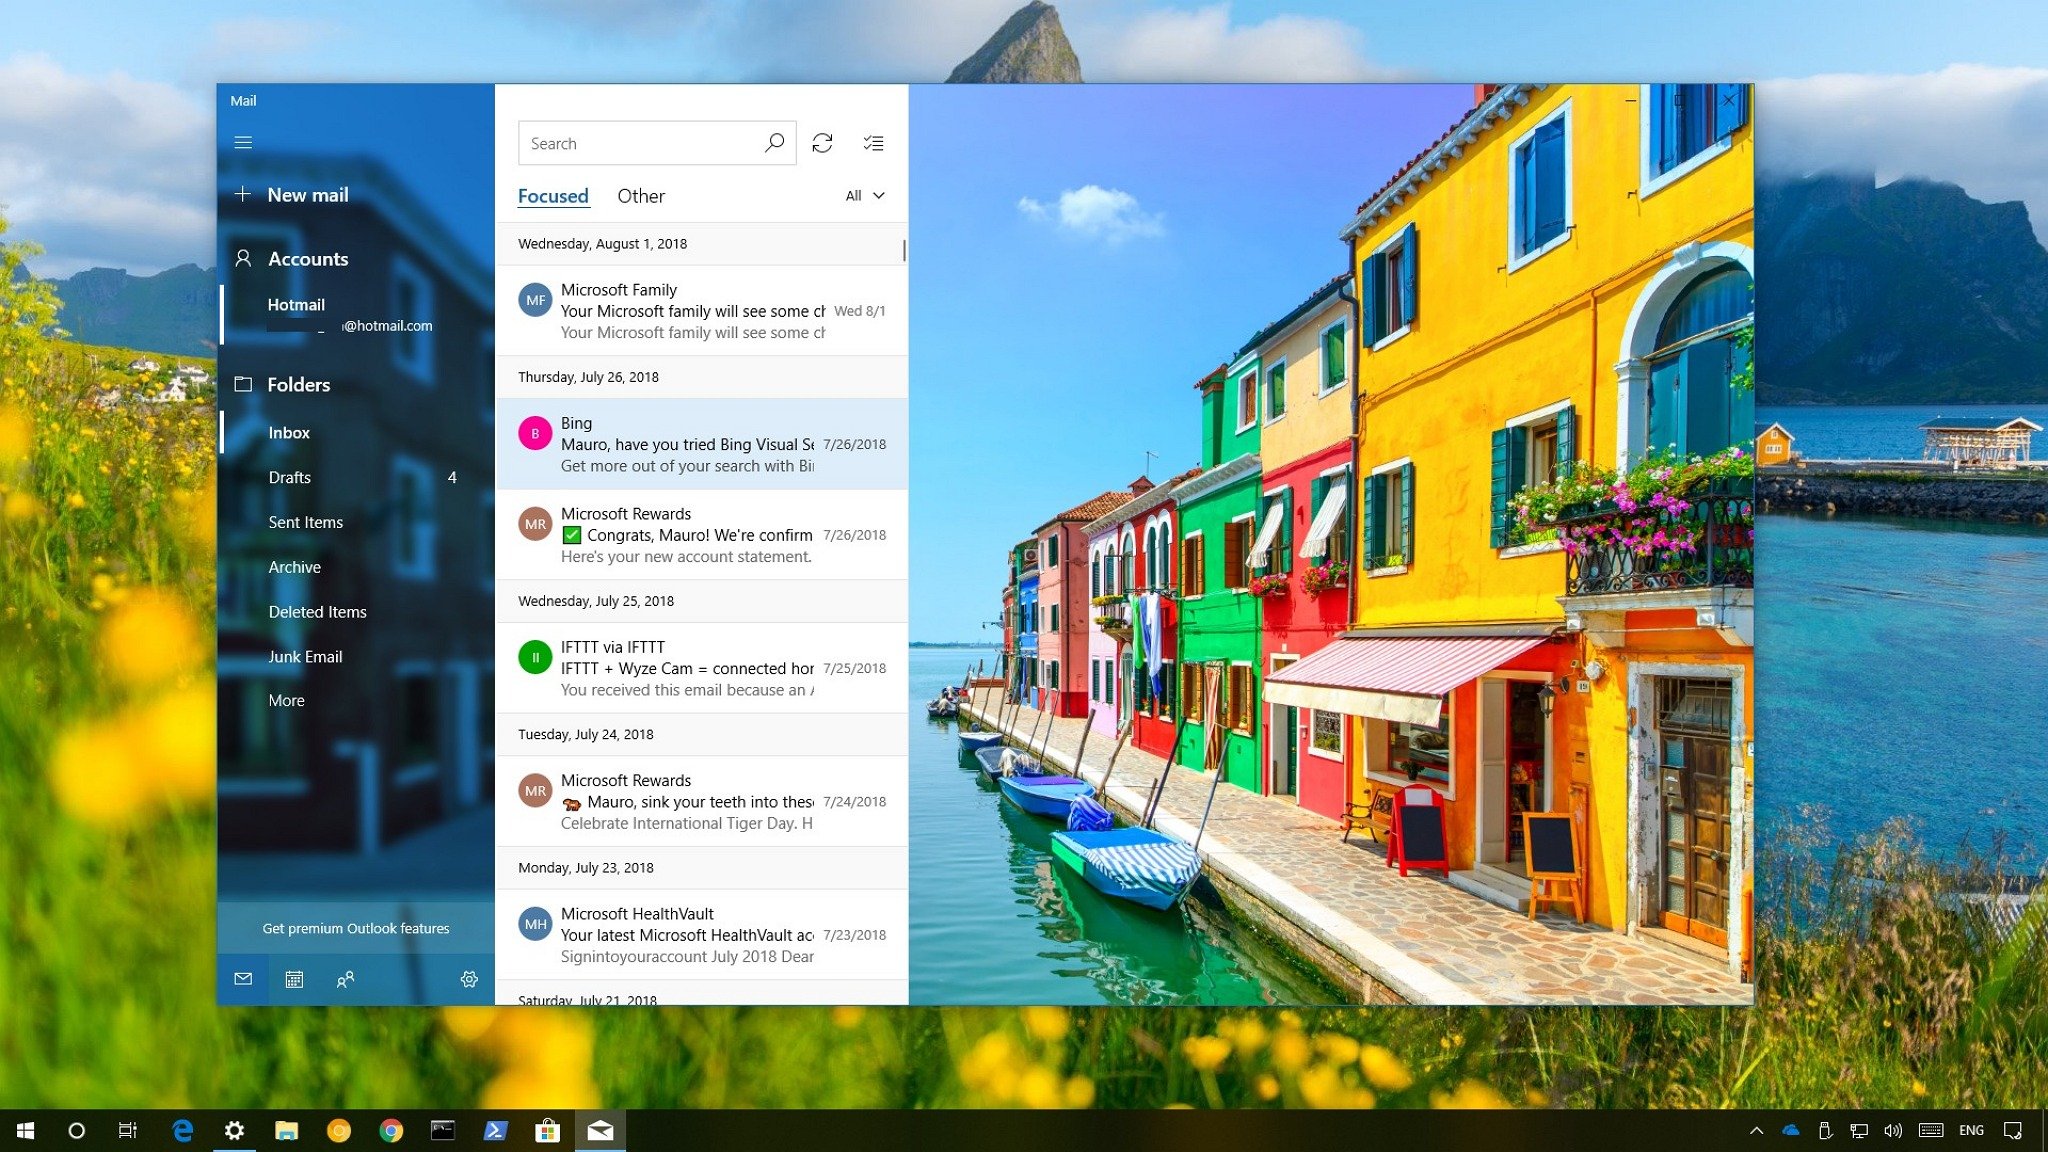
Windows 10 comes with the Mail app, which is your new default client to connect and manage all your email accounts from a single experience without having to load different websites to check your emails.
Although the feature set isn't as large as the one found in the desktop version of Outlook, the Mail app for Windows 10 includes all the basic features that most users will need to manage the flow of emails in the day-to-day basis. And it supports all the popular services, such as Outlook, Exchange, Yahoo, Gmail, iCloud, and other services using custom POP and IMAP configuration.
In this Windows 10 guide, we'll walk you through the steps to get started with the built-in Mail experience.
How to start using the Mail app on Windows 10
The Mail app is one of the most complete and easy to use free client to manage one or multiple email accounts, and here are the steps to get started:
- Adding new email account
- Adding multiple email accounts
- Changing email account settings
- Checking and replying emails
- Composing your first email
- Customizing the Mail app experience
- Removing email accounts
- Reseting the Mail app
Adding new email account
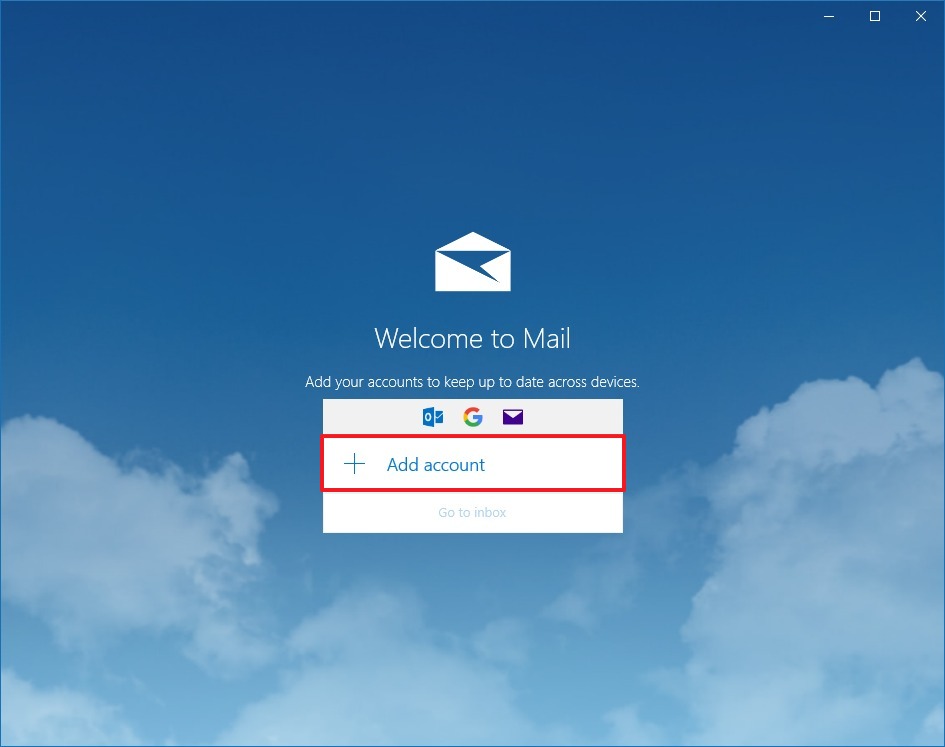
To get started with the app, you must first connect at least one email service using these steps:
- Open Start.
- Search for Mail, and click the top result to open the experience.
- Click the Add account button.
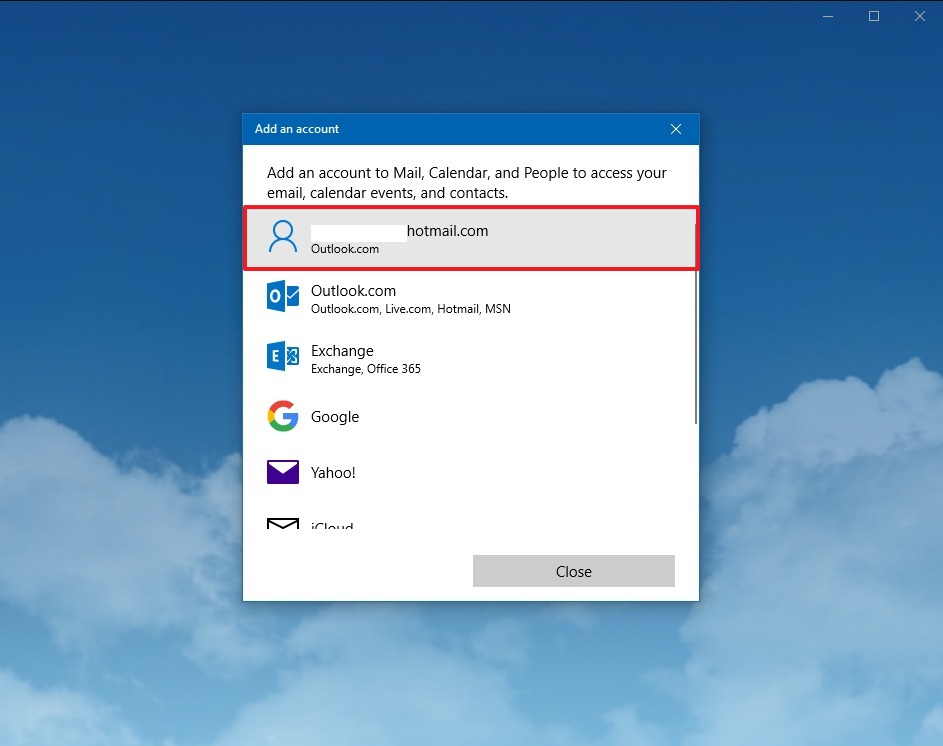
- Select a service and continue with the on-screen directions. Or select your email account from the list if applicable.
- Click the Done button.
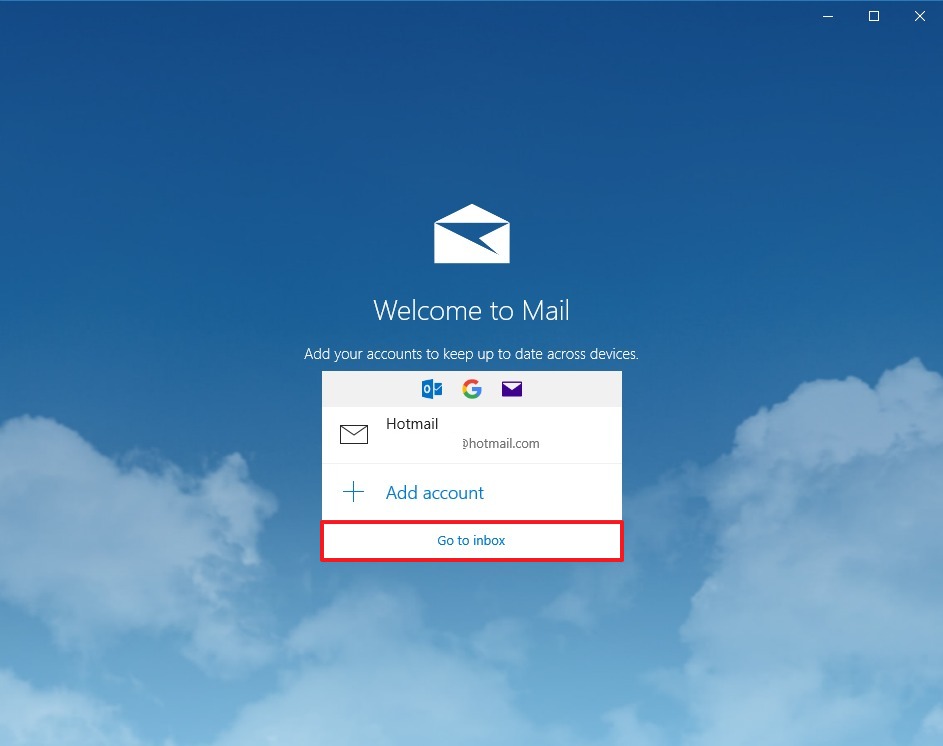
- Repeat steps No. 3, 4, and 5 to configure additional accounts during the initial setup. Otherwise, click the Go to inbox button.
Once you've completed the steps, you can start using the Mail app to manage your emails.
In the case that you need to set up an account from any of the supported services, usually, you only need to enter your address and password, as the app will figure out the required server settings automatically.
All the latest news, reviews, and guides for Windows and Xbox diehards.
Adding multiple email accounts
If you want to add multiple email accounts after the initial setup, use these steps:
- Open the Mail app.
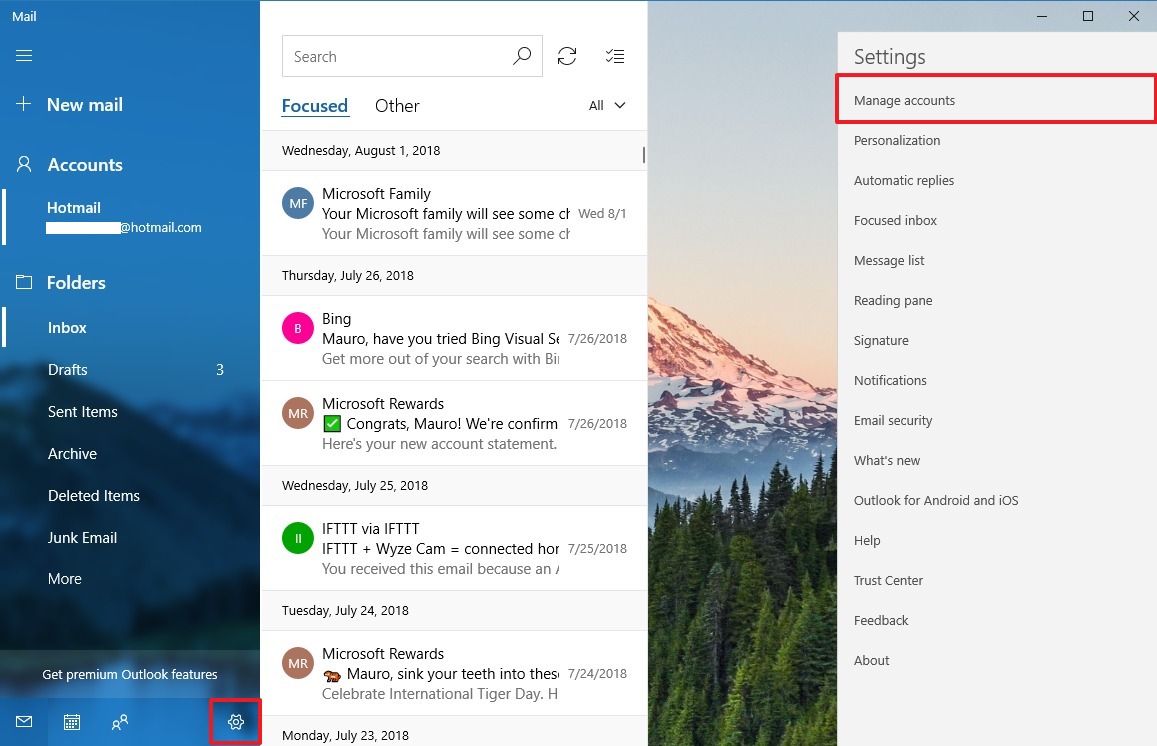
- Click the Settings (gear) button at the bottom of the left pane.
- Click the Manage accounts option in the right pane.
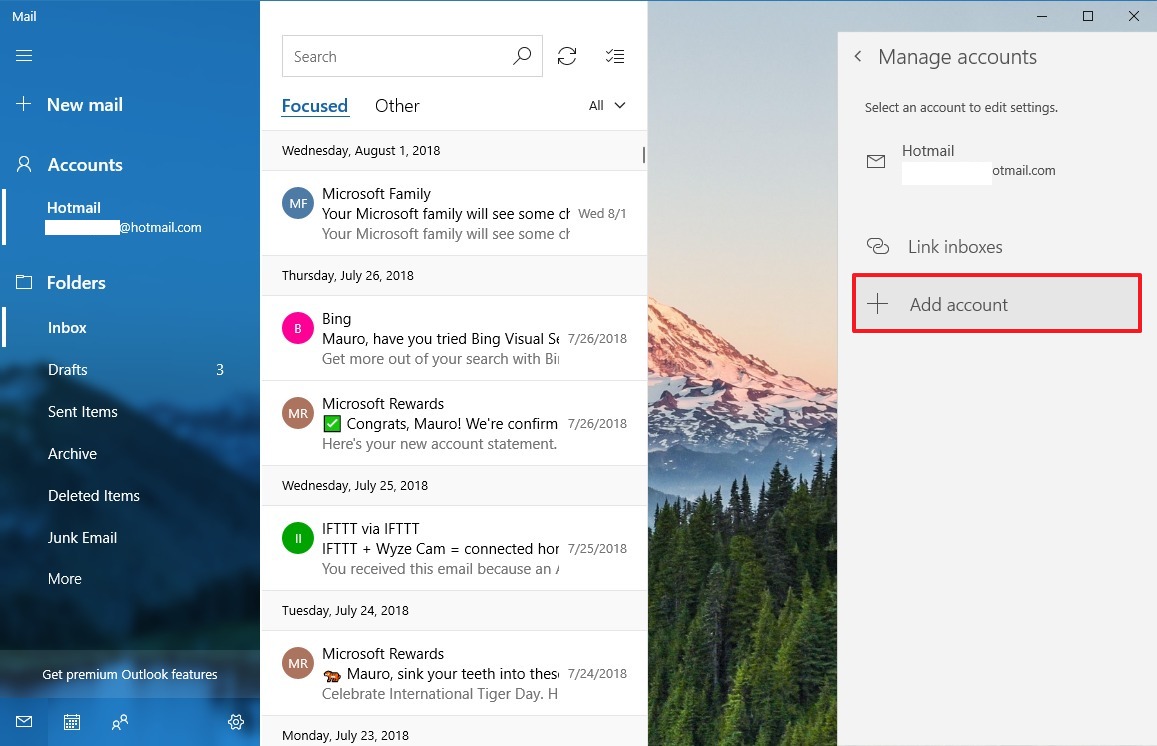
- Click the Add account button.
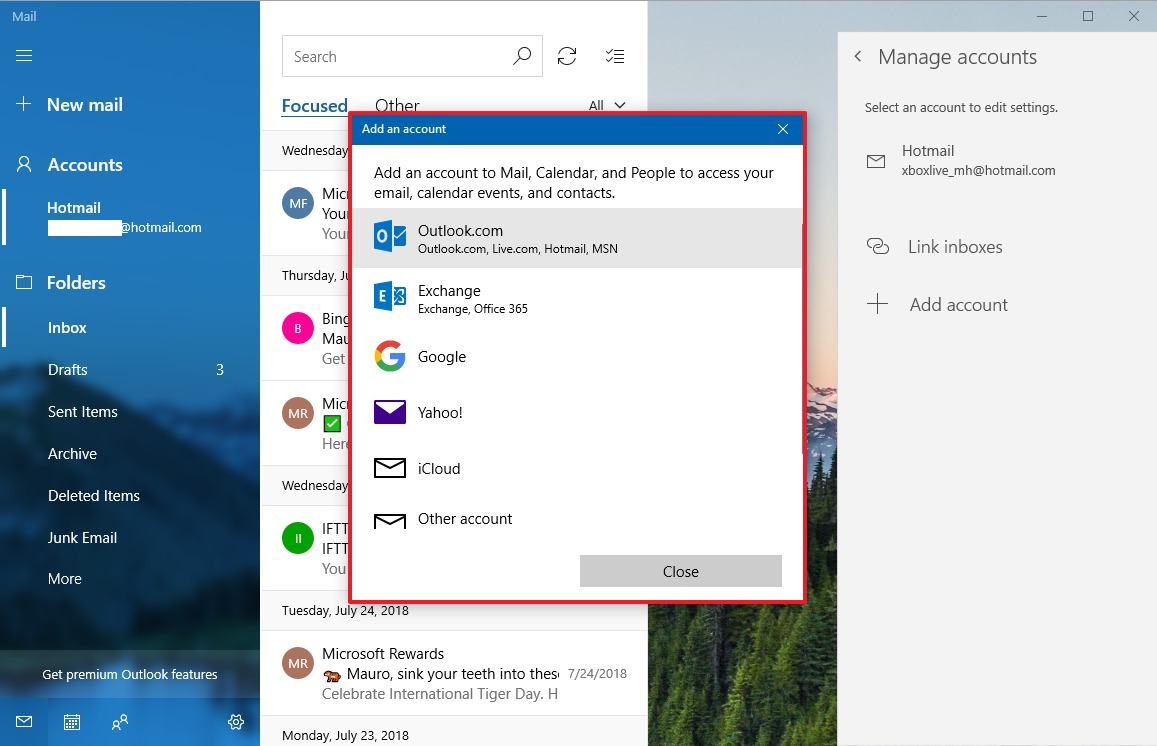
- Select the email service you want to add.
- Continue with the on-screen directions to add the account.
After completing the steps, you can repeat the instructions to configure additional accounts you want to manage with the application.
Changing email account settings
Depending on the email service that you're using, you can adjust some different account settings with these steps:
- Open the Mail app.
- Click the Settings (gear) button at the bottom of the left pane.
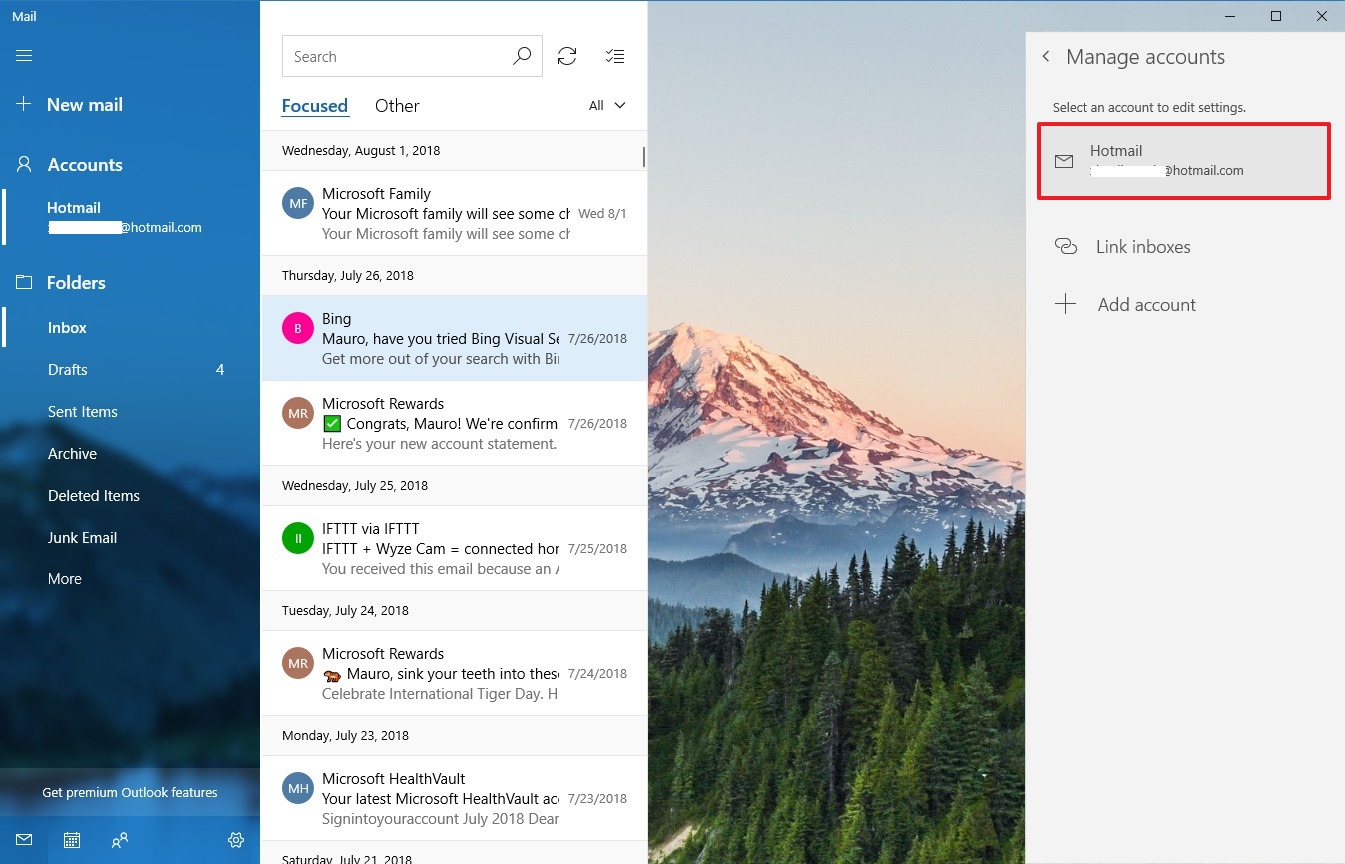
- Click the Manage accounts in the right pane.
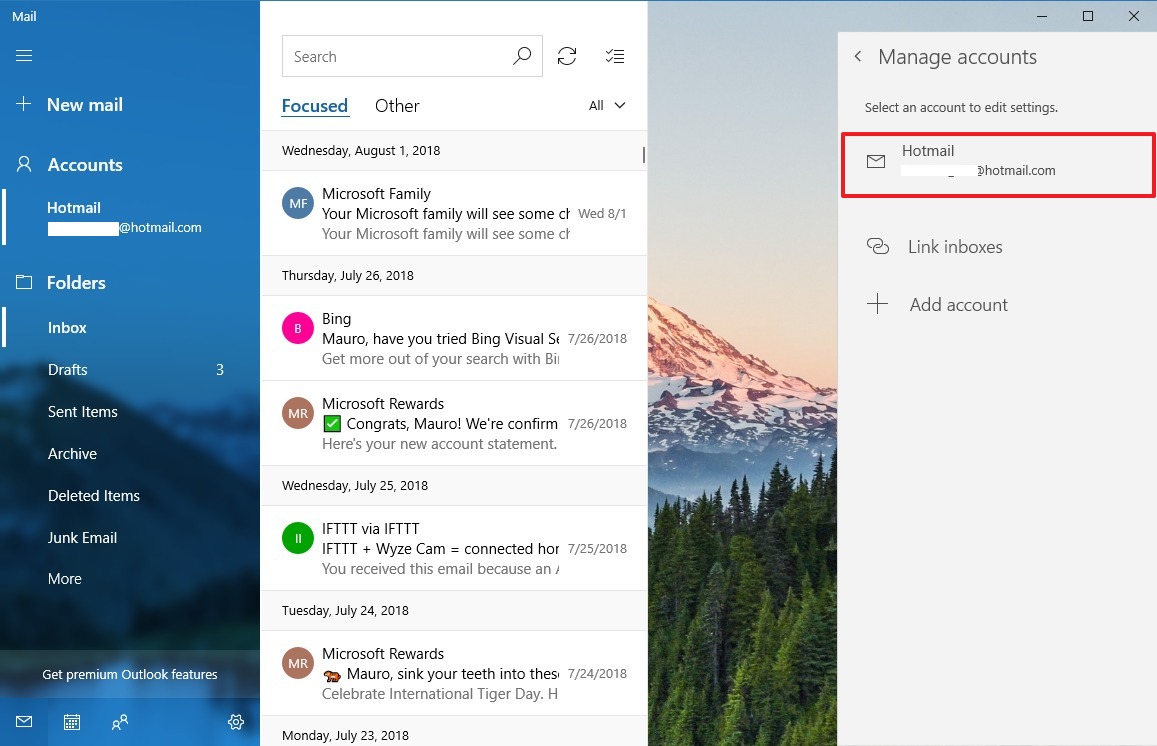
- Select the account you want to change settings.
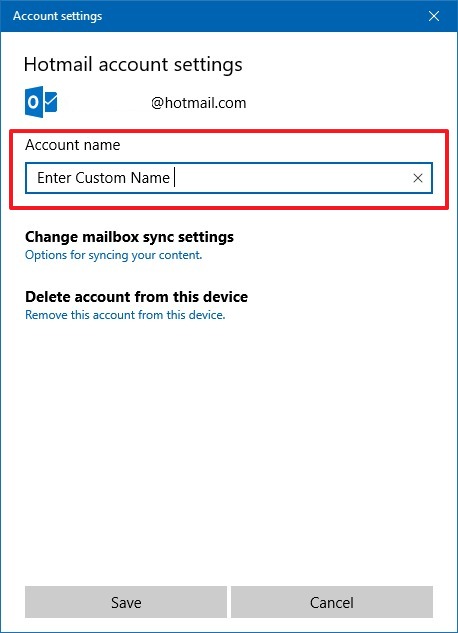
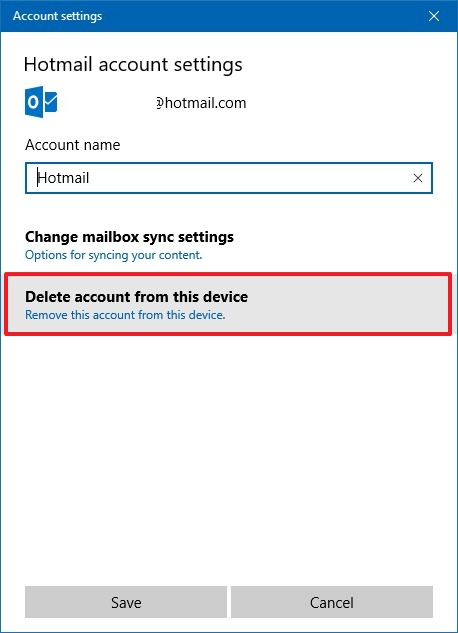
In the "Account settings" page, you can change the account name using a more descriptive name in the left pane of the app.
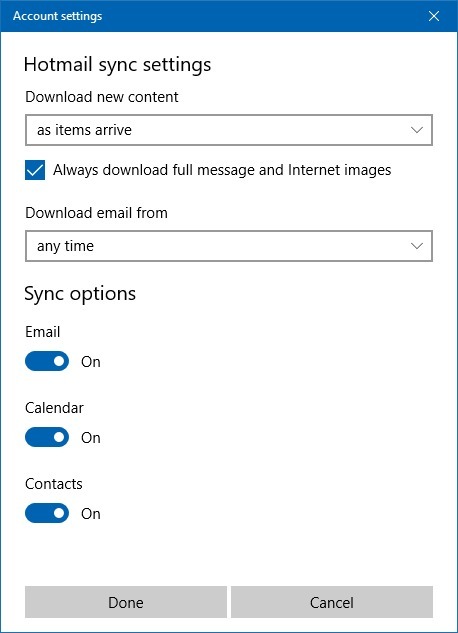
Clicking the Change mailbox sync settings option will open another page where you can control various settings.
Using the Download new content drop-down menu, you can specify when the app should retrieve new emails from your account.
If you're using a metered connection, you can even clear the Always download full message and Internet images to save data or to prevent downloading malicious content.
Using the Download email from drop-down menu, it's possible to specify the number of emails that you want to see in your desktop inbox.
In addition, under Sync options, you can decide if the app should only sync emails or calendar and contacts, which you can then access using the Calendar and People apps respectively.
Checking and replying emails
Checking and replying to emails is no different from the experience you get on the web or from other clients.
To view and respond to emails, use the following steps:
- Open the Mail app.
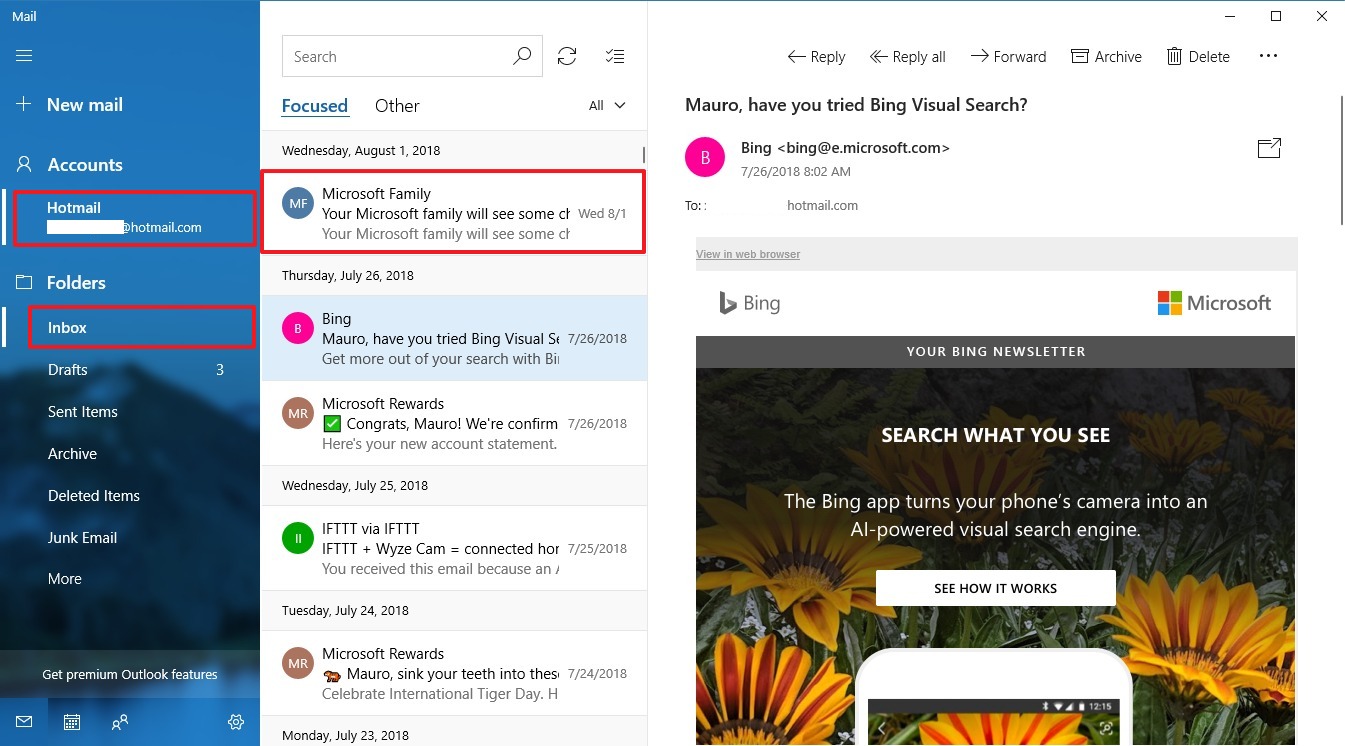
- Select the account to send a new email from the left pane.
- Under "Folders," select the list of emails.
- In the message list, select the email you want to read, which will open in the reading pane on the right.Quick Tip: If you need more space to view or compose emails, you can always collapse the left pane using the hamburger menu button in the top left corner.
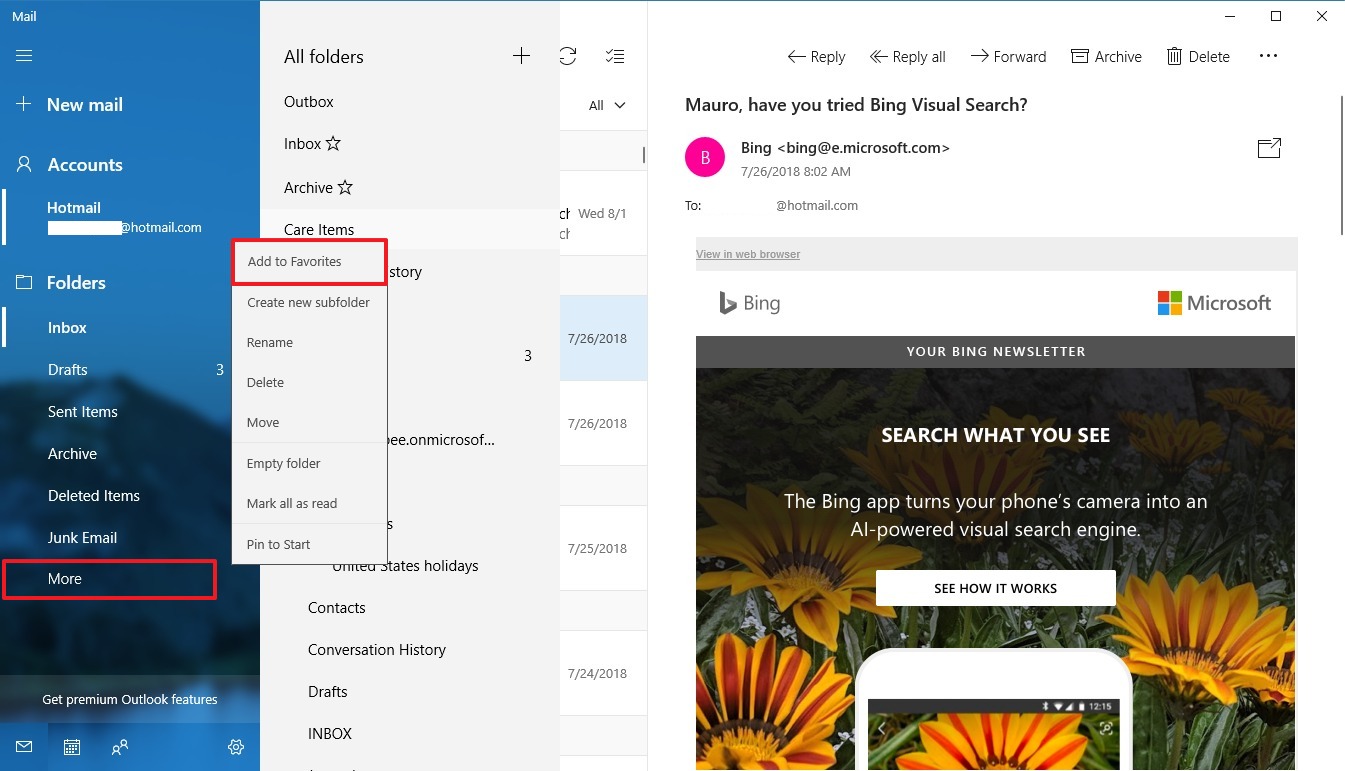
If the folder that you need to access isn't in the list, click the More option, and either select the folder you want to see, or right-click the folder you want and select the Add to Favorites option, so it'll always appear under "Folders."
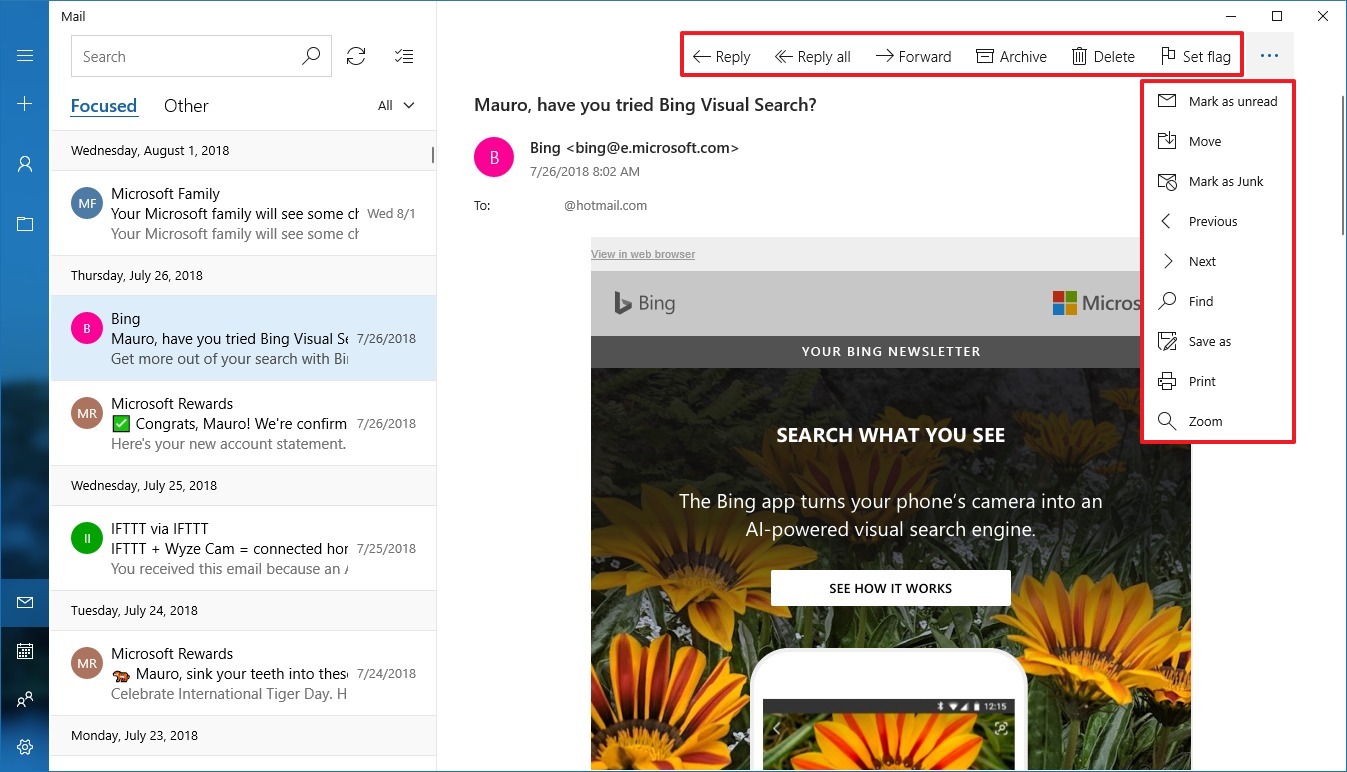
Once in the email, you can use the reading pane toolbar to reply, forward the message to another person, archive, delete, or set a flag.
When clicking the menu (three-dotted) button in the far left, you can access additional options to move the email to a different folder, mark as spam, print, and more.
If you don't see the email you want, above the message list pane, you can use the search box to find it. Also, it's possible to use the drop-down menu on the left to sort the list in a number of ways to find or manage your emails.
Composing your first email
Crafting and sending a message is a simple process, just follow these steps:
- Open the Mail app.
- Select the account you want to use to send a new email from the left pane.
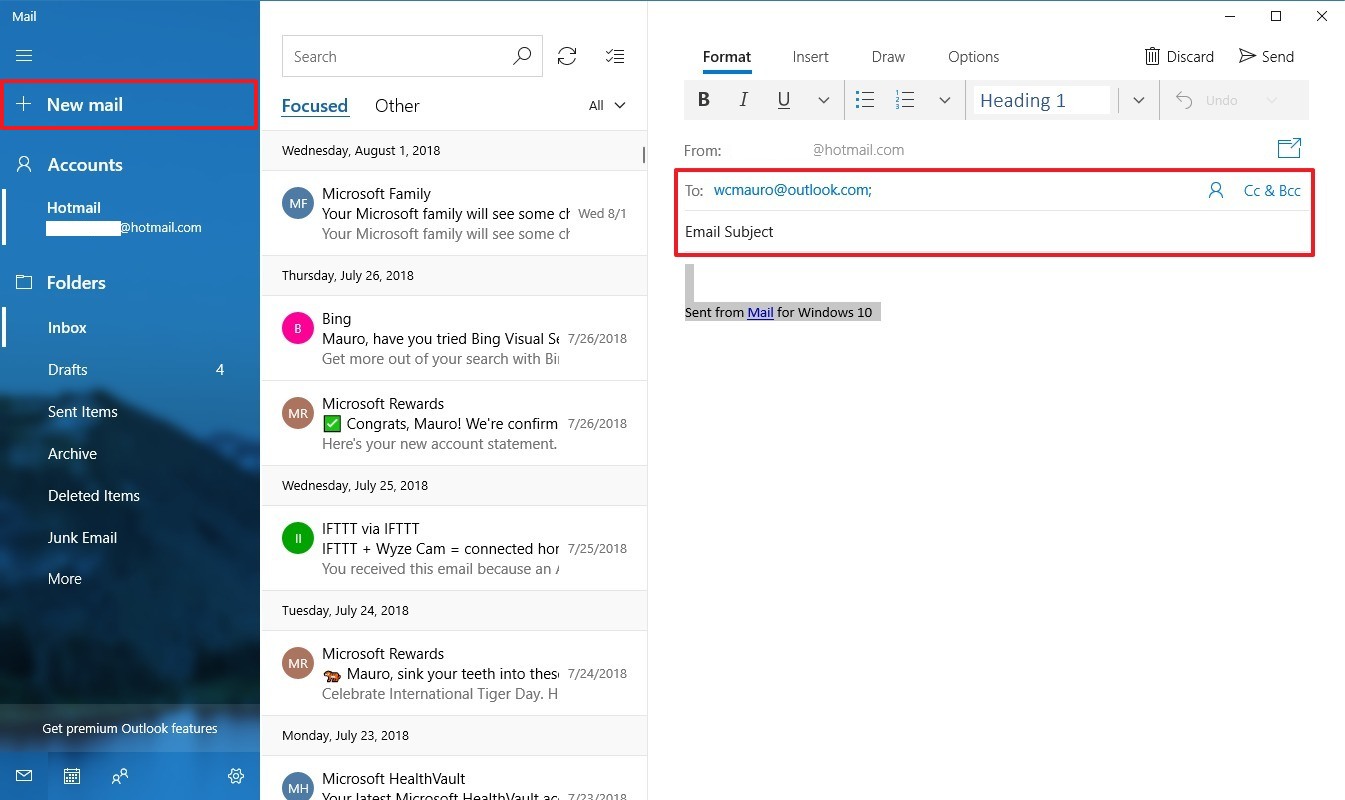
- Click the New mail button from the left pane.
- In the "To" field enter the email address of the recipient.Quick Tip: You can send the same email to multiple people by separating each address using a semicolon (;).
- In the "Subject" field, enter a title for the email.
- Click the message body to start writing your email.
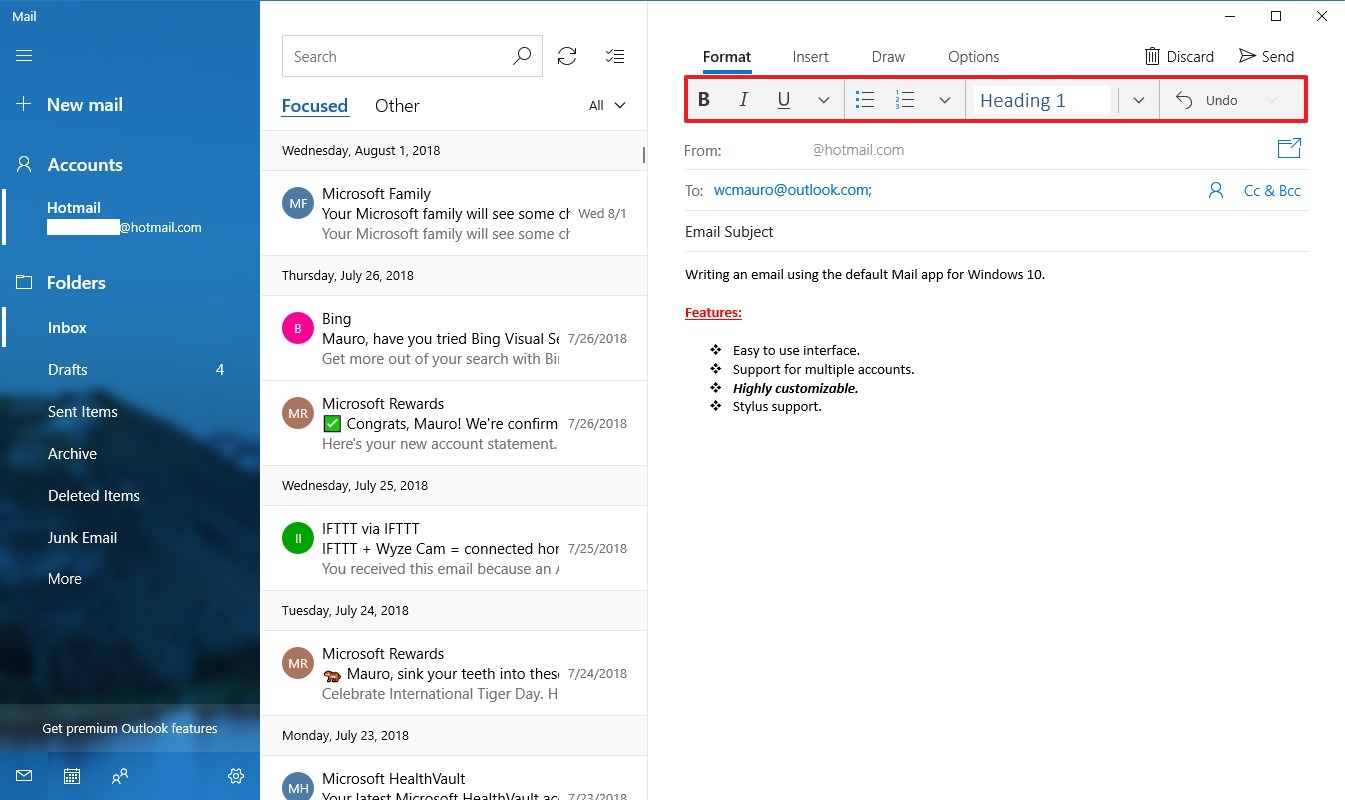
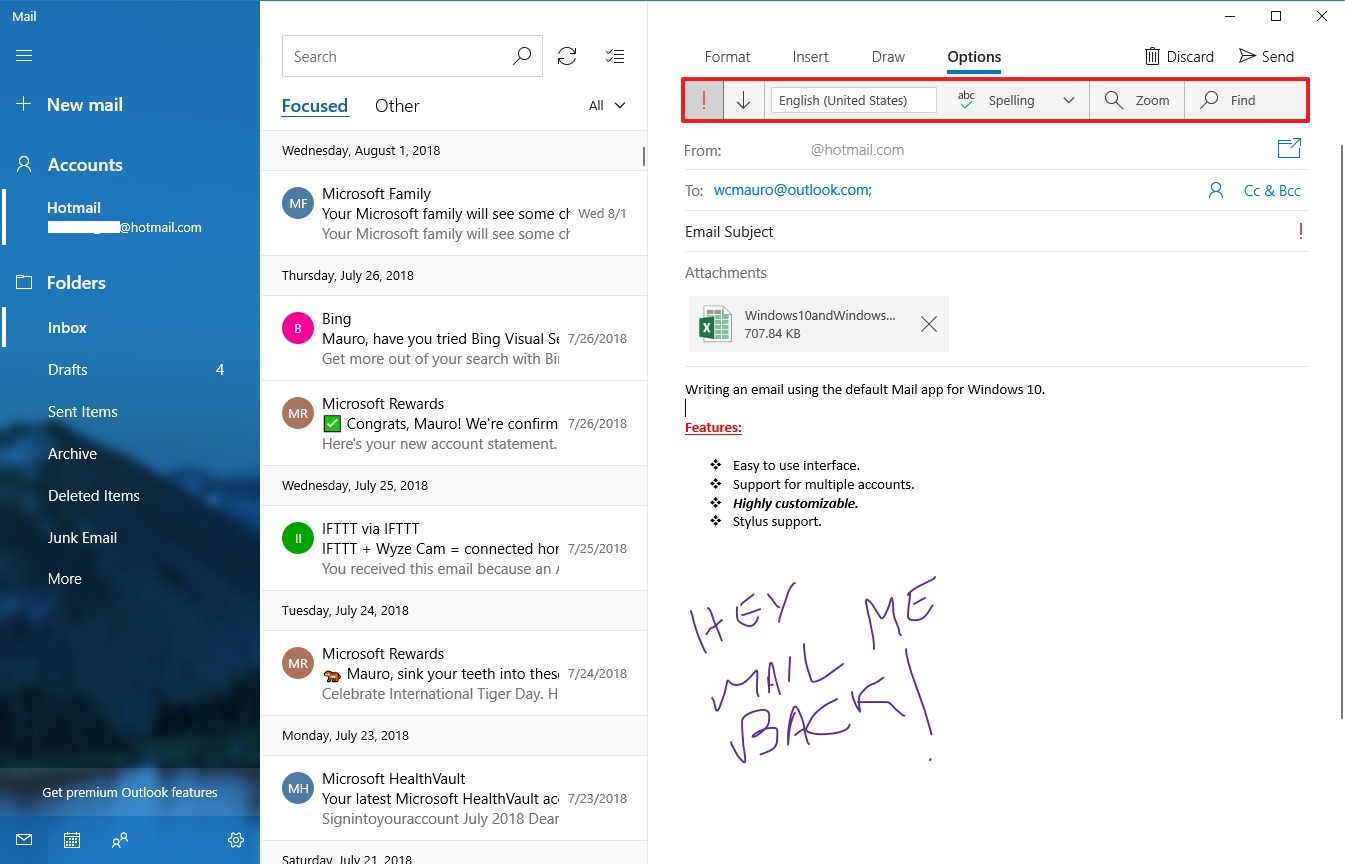
While writing your message, you'll notice that the Format tab is now available with tools to format text, lists, heading, and options to undo and redo content.
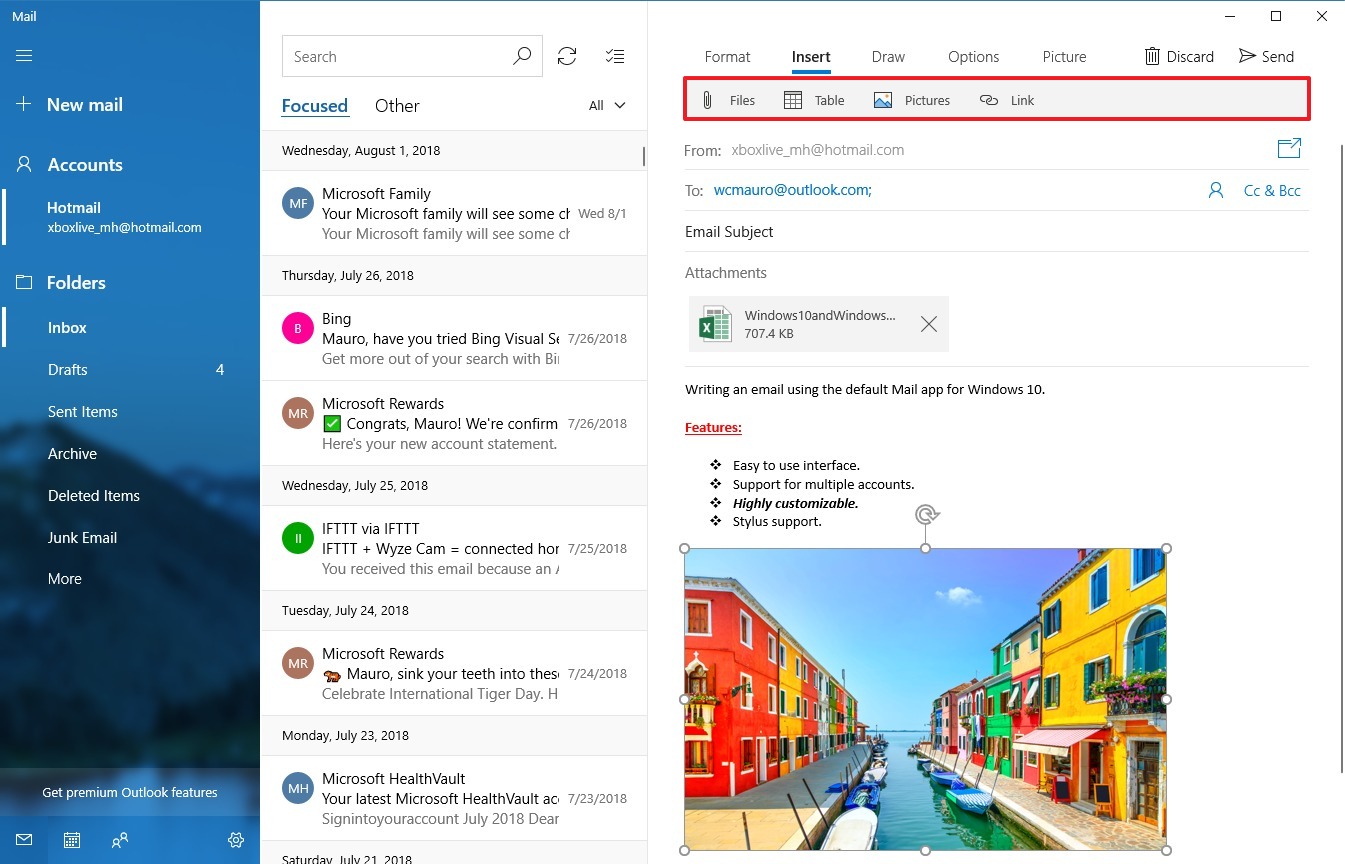
If you want to send a file, you can use the Insert tab, and click the Files button. Also, using this tab, you can also send pictures, links, and even create tables.
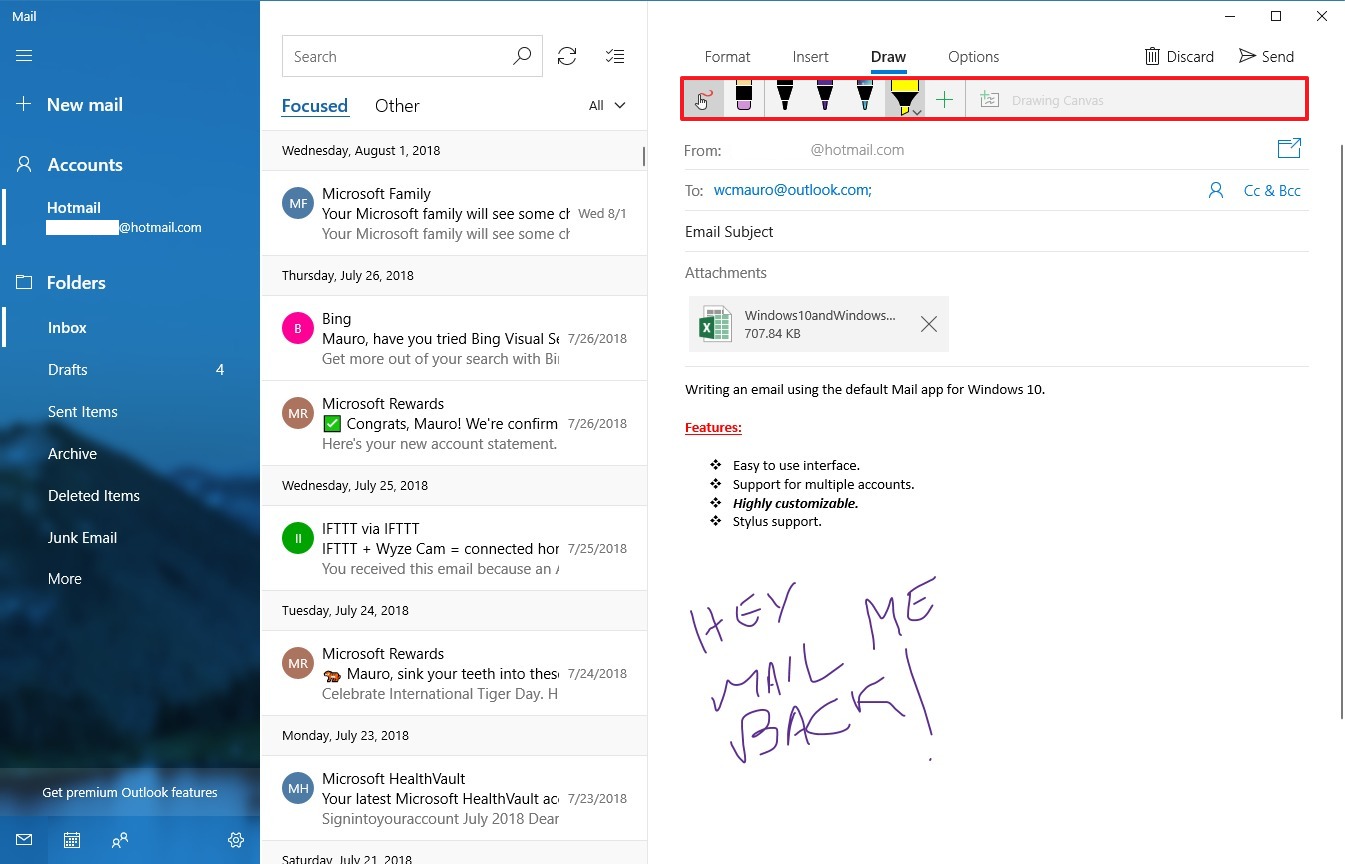
The Draw tab includes the tools to allow you to write emails using natural handwriting. To get started, click the Drawing Canvas button, select the Pen or Highlighter that you want to use and start writing away.
In the Options tab, you'll find the options to set a flag to indicate that message contains high or low priority content, check for spelling mistakes before sending the email, and options to zoom and find content within the body.
Once you've completed writing the message, you can click the Send button in the top-right corner or click the Discard button to delete the message.
Customizing the Mail app experience
Although the Mail app has been designed to provide a basic experience to manage email accounts, it's possible to control various aspects of the app, some of which include settings to customize the look and feel, notifications, signature, and much more.
Personalizing background image, color, and mode
To set the background image, color accent, and switch between the dark and light mode, use these steps:
- Open the Mail app.
- Click the Settings (gear) button at the bottom of the left pane.
- Select the Personalization option.
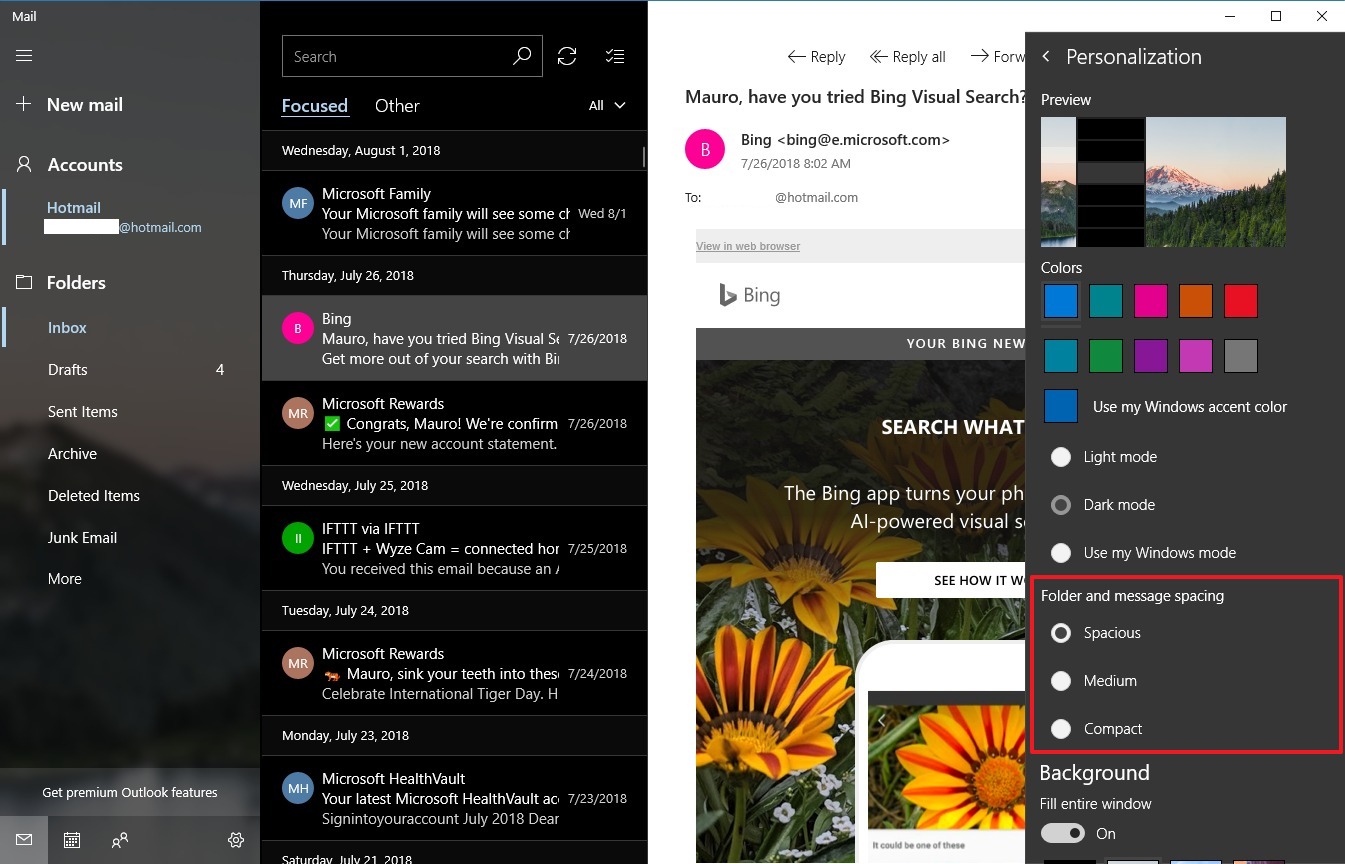
In this page, you can change the color accent for the experience, switch between light and dark mode, or you can allow the app to match the system mode currently in use.
Using the "Folder and message spacing" settings, you can adjust the display density to fit even more content in the screen.
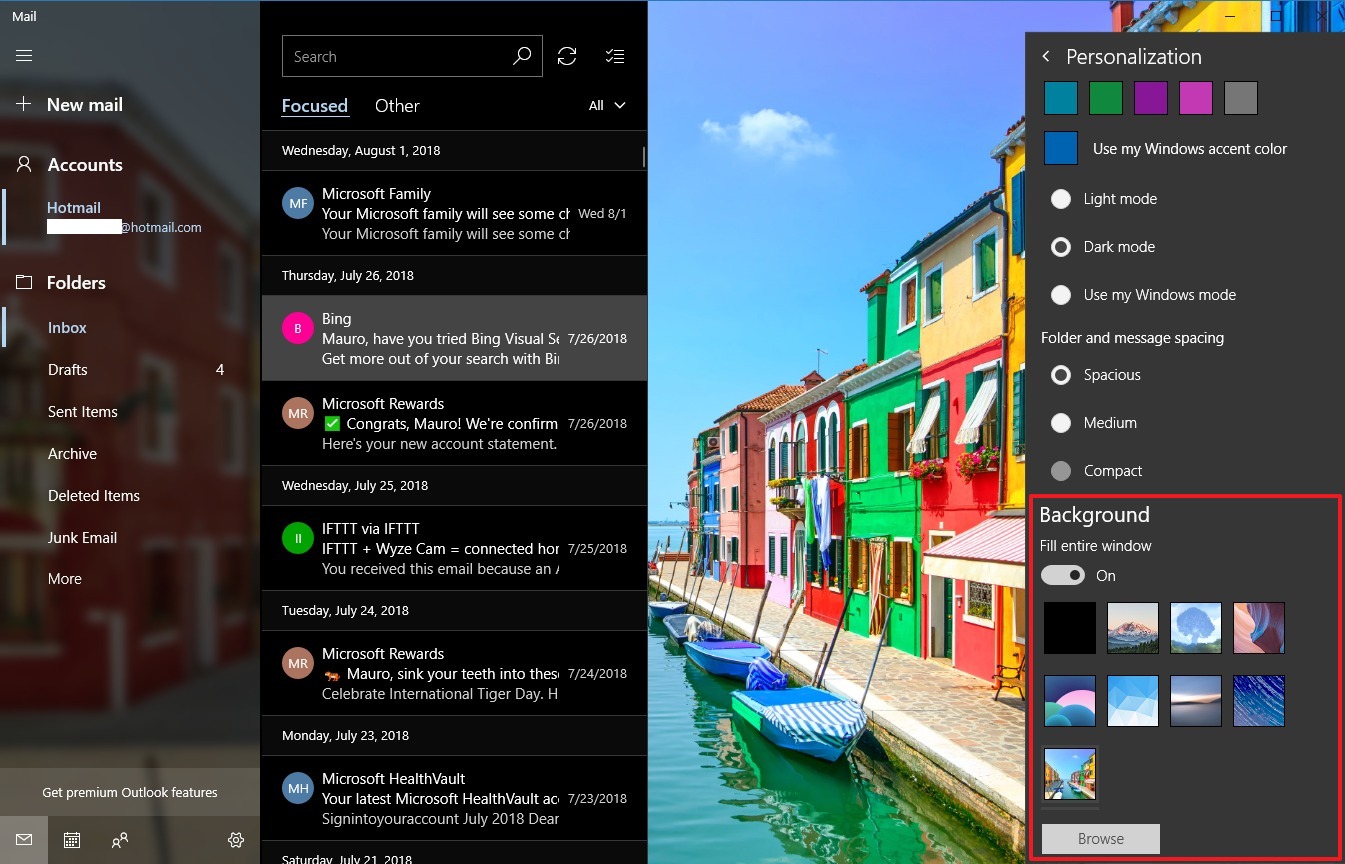
Additionally, under Background, you can set the wallpaper that will appear in the background when no email is selected. Using these settings, you can set the image to fill the entire experience, disable the feature, or select your custom image.
Configuring automatic replies
"Automatic replies" is a useful feature that allows you to communicate a specific message automatically to make sure anyone who sends you an email will get a response.
In the Mail app, "automatic replies" is only available for Outlook.com accounts, and you can set it up using these steps:
- Open the Mail app.
- Click the Settings (gear) button at the bottom of the left pane.
- Click the Automatic replies option.
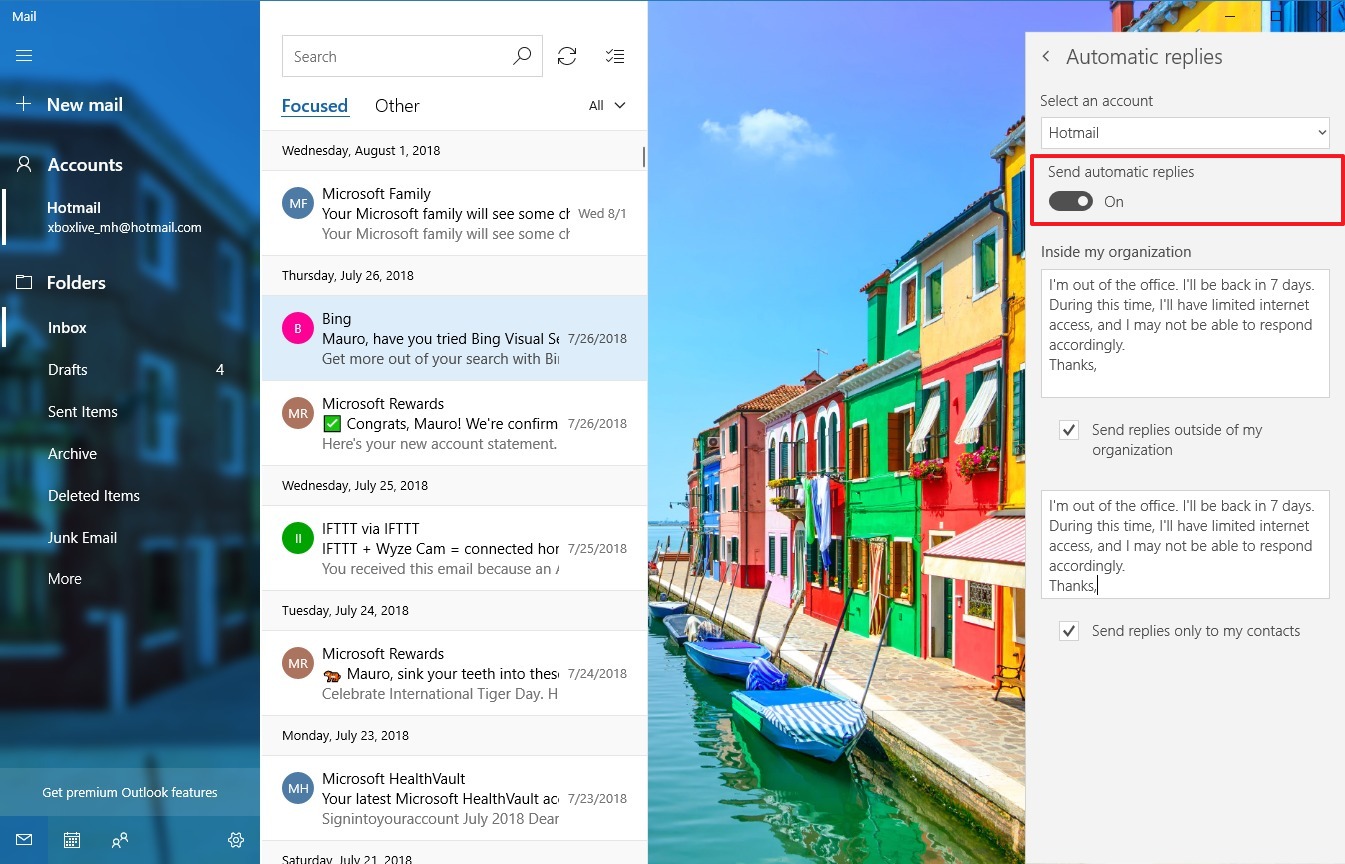
- Use the drop-down menu to select the Outlook email address you want to configure.
- Turn on the Send Automatic Replies toggle switch.
- Under "Inside my organization," create a custom message that senders will receive during your time away.
- Check the Send replies outside of my organization option, if you want to send an out-of-office reply to every email you receive that wasn't originated within your organization.
- If you must limit responses to a specific group of people, check the Send replies only to my contacts option.
- In the second box, create a custom message that your contacts will receive during your time away.
Once you've completed the steps, your account will send automatic replies based on your configuration.
Configuring focused inbox
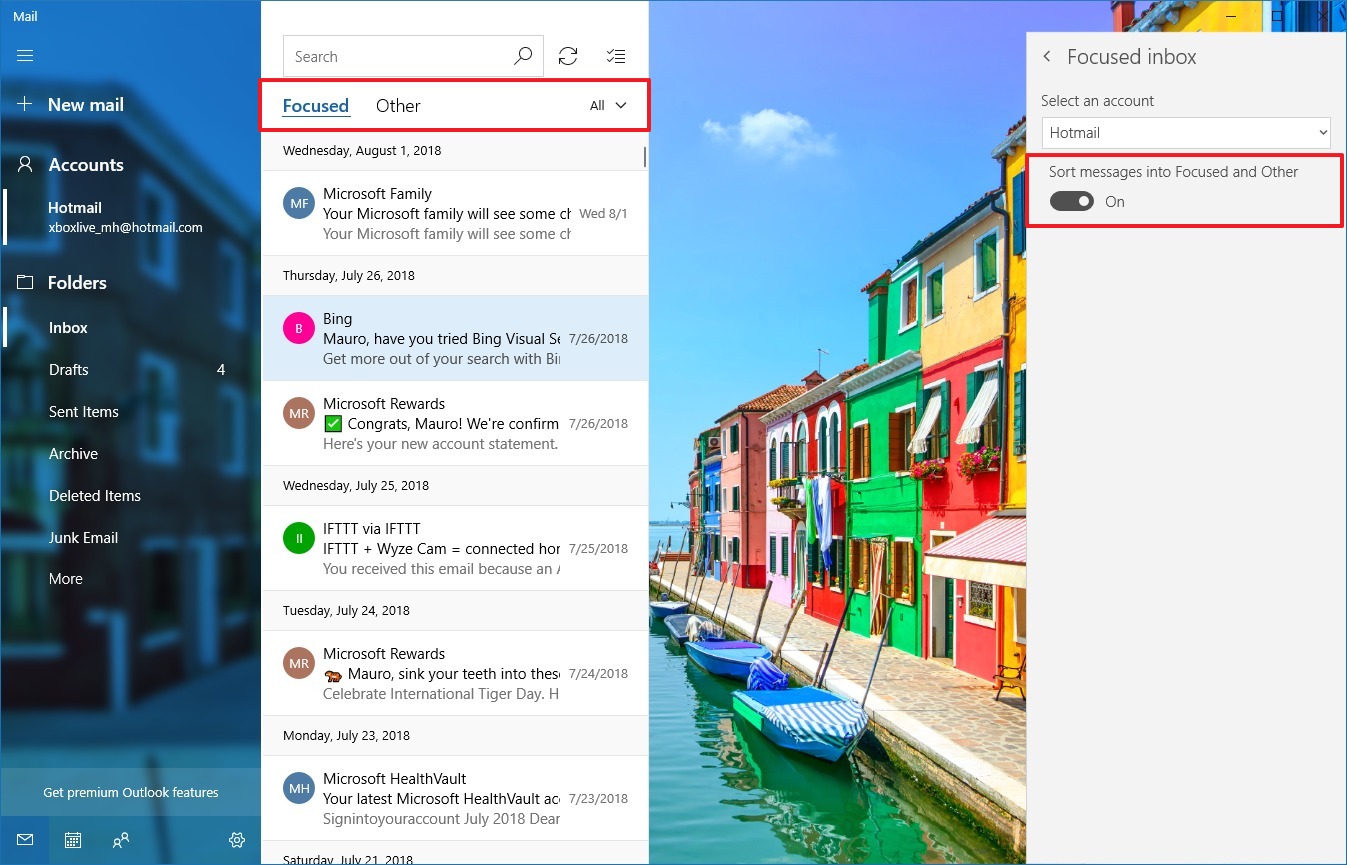
Focused inbox is a feature specific to Outlook accounts, and if enabled, the message list will organize your emails automatically into two tabs, Focused and Other.
To enable or disable Focused inbox, follow these steps:
- Open the Mail app.
- Click the Settings (gear) button at the bottom of the left pane.
- Click the Focused inbox option.
- Use the drop-down menu to select the Outlook email address you want to configure.
- Turn on or off the Sort messages into Focused and Other toggle switch.
After completing the steps, depending on your settings, your most important emails will appear in the "Focused" tab, while the rest will be organized in the "Other" tab.
Personalizing the messaging list pane
To change the settings the for message list pane, use these steps:
- Open the Mail app.
- Click the Settings (gear) button at the bottom of the left pane.
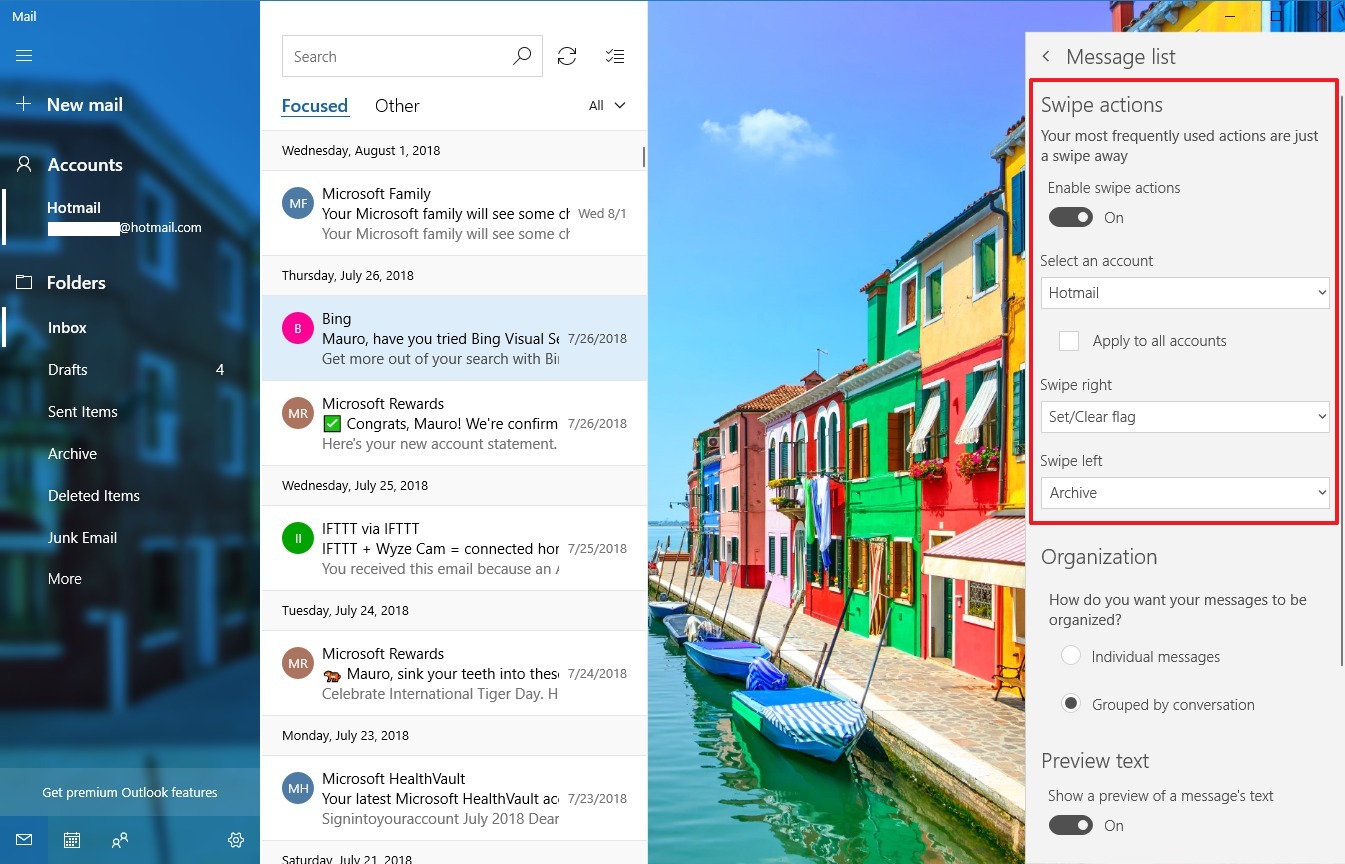
- Select the Message list option.
Under the "Swipe actions" section, you can enable or disable swipe the gestures and decide the action when swiping a message to the right or left.
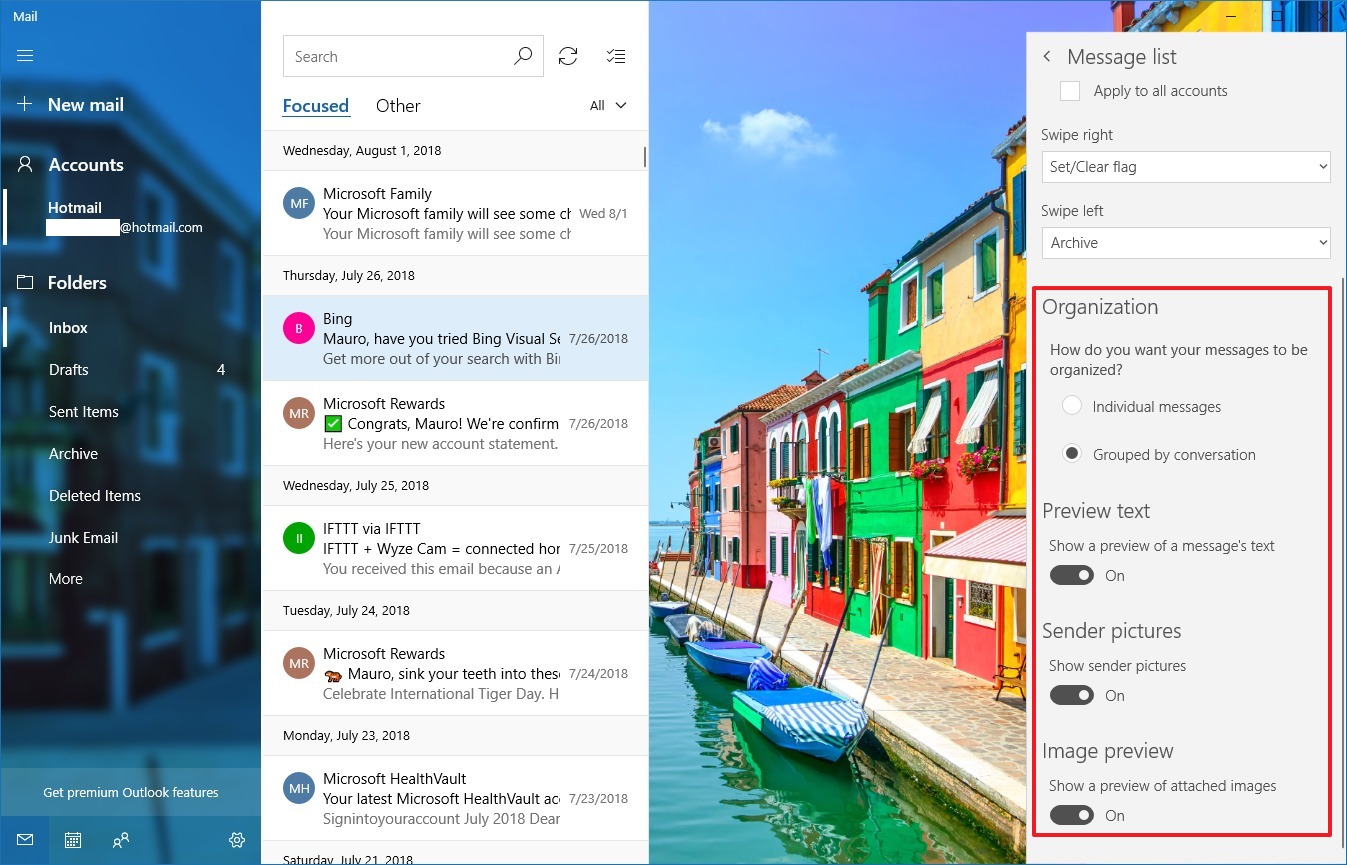
Also, at the bottom of the page, it's possible to personalize several other features, including:
- Organization: Allows you to group emails by conversation, or you can organize each message in chronological order as they arrive.
- Preview text: Shows a short preview of the content message.
- Sender pictures: Displays a profile image of the sender. If the image isn't available, a standard icon will appear.
- Image preview: Shows a small preview of the image included in the message.
Personalizing the reading pane
To change the settings for the reading pane, use these steps:
- Open the Mail app.
- Click the Settings (gear) button at the bottom of the left pane.
- Select the Reading pane option.
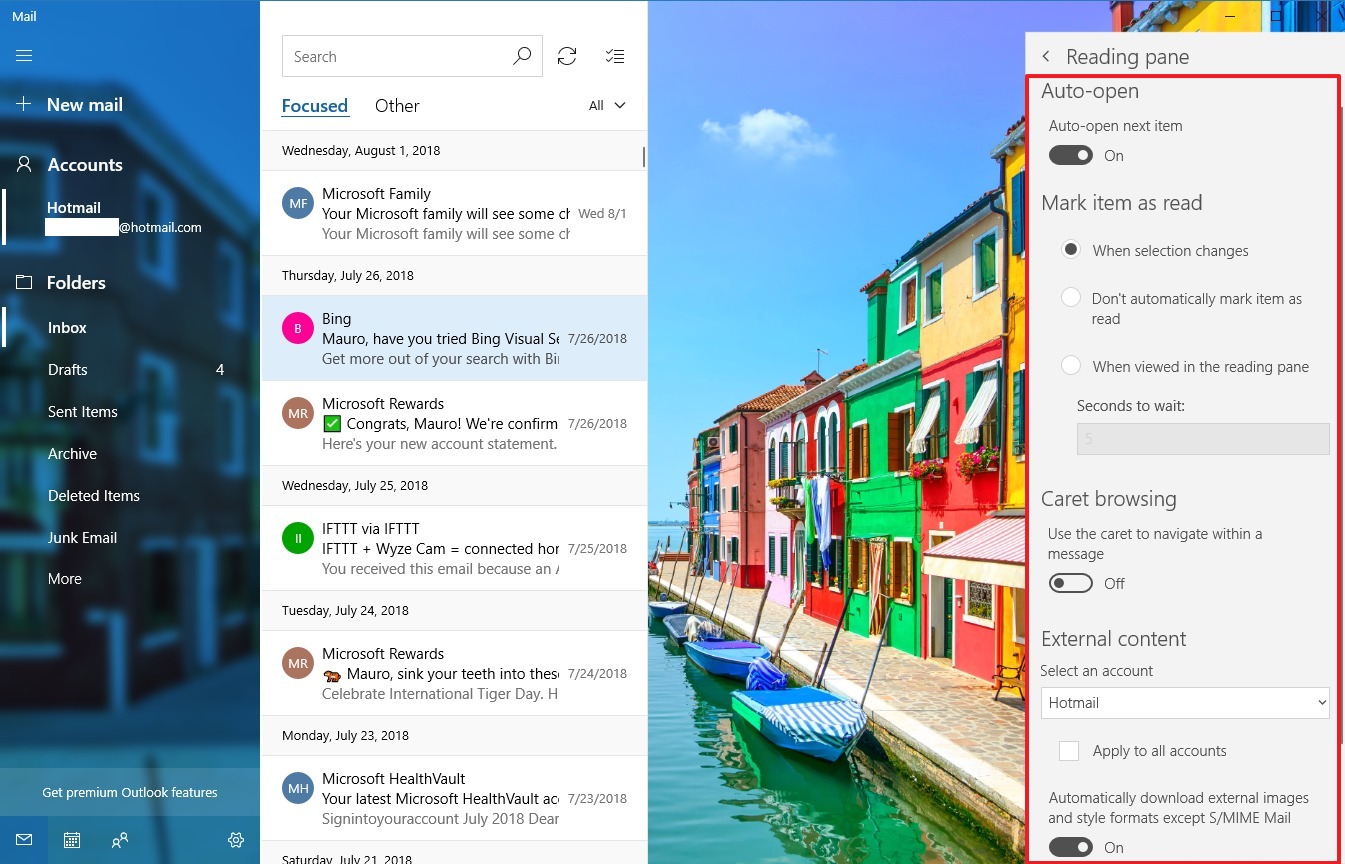
In this page, you can customize many features, including:
- Auto-open: If enabled, when you delete a message, the next email in the message list will open automatically.
- Mark item as read: Allows you to decide when a message will get marked as read after it's open.
- Caret browsing: When enabled, you can navigate emails using the text cursor.
- External content: If disabled, external elements, such as images and style will be blocked in the message. Typically, this option will affect email newsletters and promotional offers crafted using web technologies.
Personalizing email signature
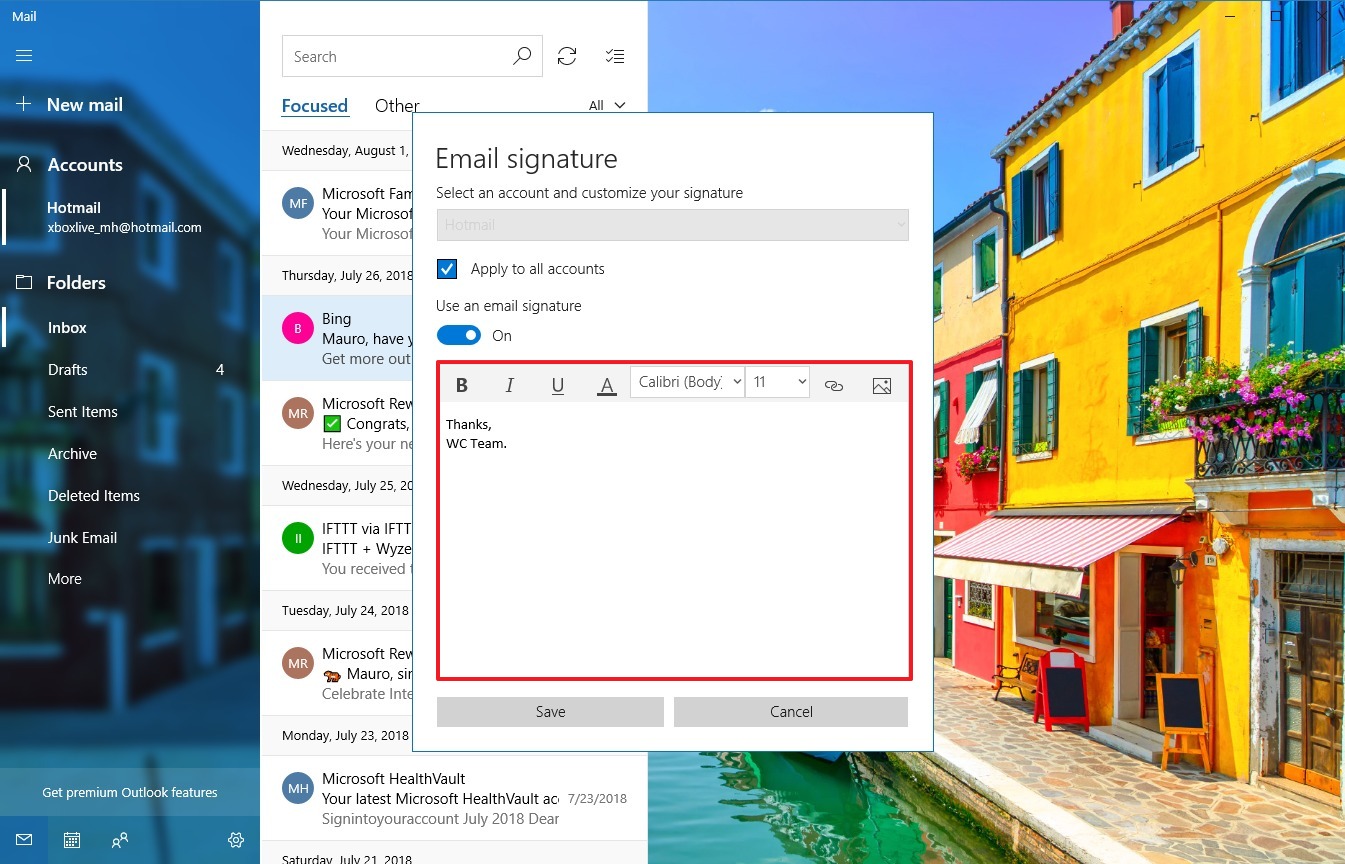
If you end up every email with the same signature, instead of writing it over and over, the Mail app offers an option to create a custom signature that you can attach to every email automatically.
To create a custom signature, use these steps:
- Open the Mail app.
- Click the Settings (gear) button at the bottom of the left pane.
- Select the Signature option.
- Select the account to apply the signature or check the Apply to all accounts option.
- Turn on the Use an email signature toggle switch.
- Compose the signature that you want to use.
- Click the Save button.
Once you've completed the steps, your new custom signature will be included with every new message you send.
Personalizing email notifications
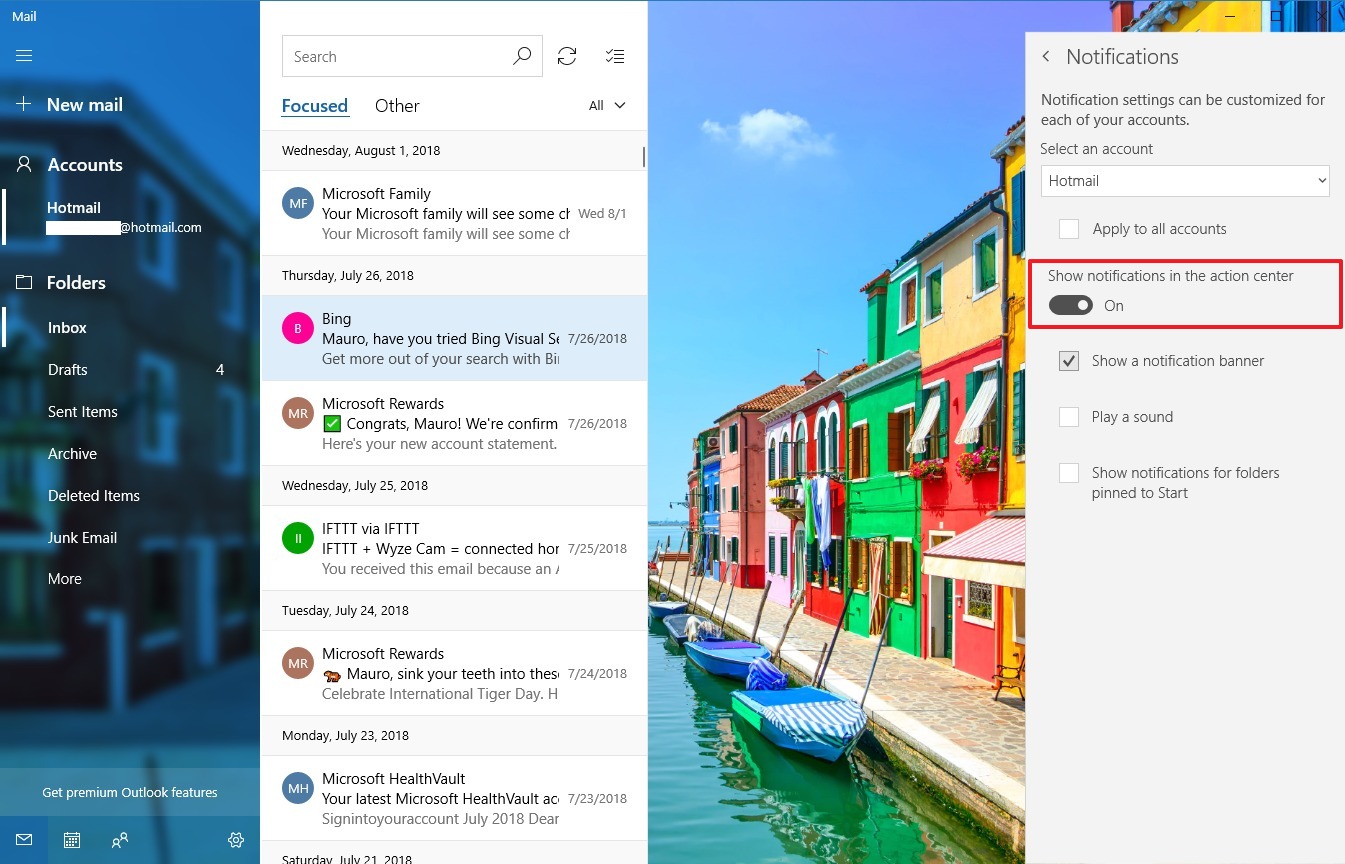
The Mail app integrates with the Action Center to show notifications, and you can use these steps to customize the experience:
- Open the Mail app.
- Click the Settings (gear) button at the bottom of the left pane.
- Select the Notifications option.
- Select the account to adjust notifications or check the Apply to all accounts option.
- Turn on the Show notifications in the action center toggle switch.
- Select the notifications settings that you want to use, including:
- Show a notification banner.
- Play a sound.
- Show notification for folders pinned to Start.
Removing email accounts
If you no longer need to manage emails for a particular service, you can remove the account using these steps:
- Open the Mail app.
- Click the Settings (gear) button at the bottom of the left pane.
- Click the Manage accounts in the right pane.
- Select the account you want to remove.
- In the "Account settings," click the Delete account from this device option.
- Click the Delete button.
After completing the steps, you'll no longer be able to check the account your removed using the Mail app.
Reseting the Mail app
If you're having trouble getting the app to sync your emails or other problems, you can quickly fix most common issues by resetting the app.
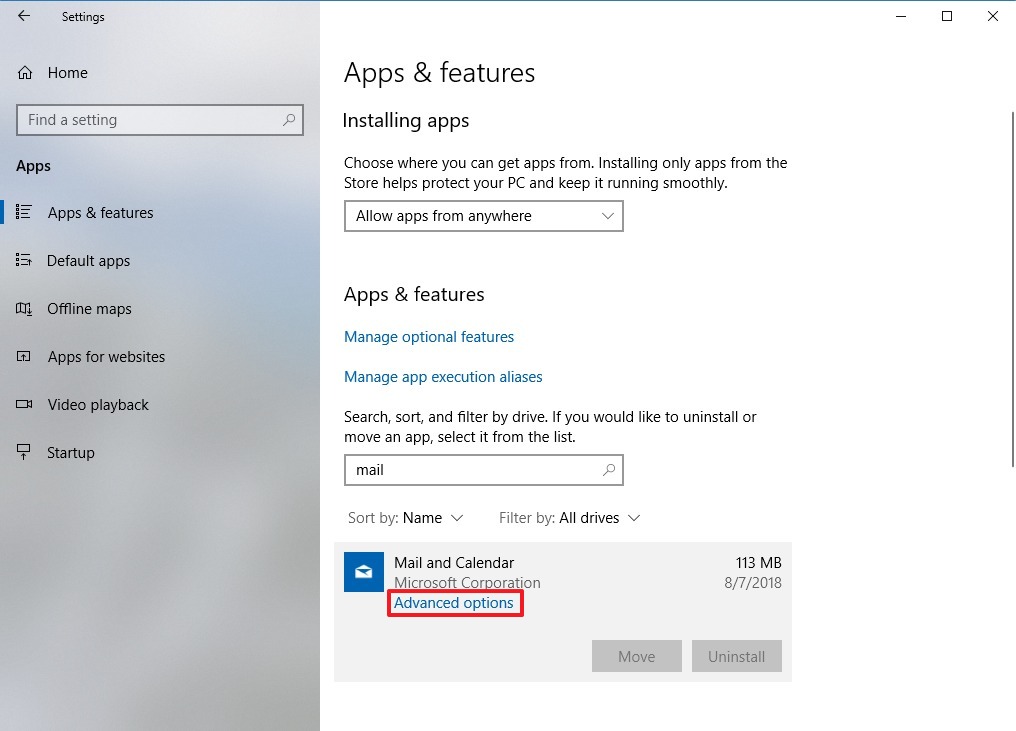
- Open Settings.
- Click on Apps.
- Click on Apps & features.
- Under "Apps & features," select the Mail and Calendar app.
- Click the Advanced options link.
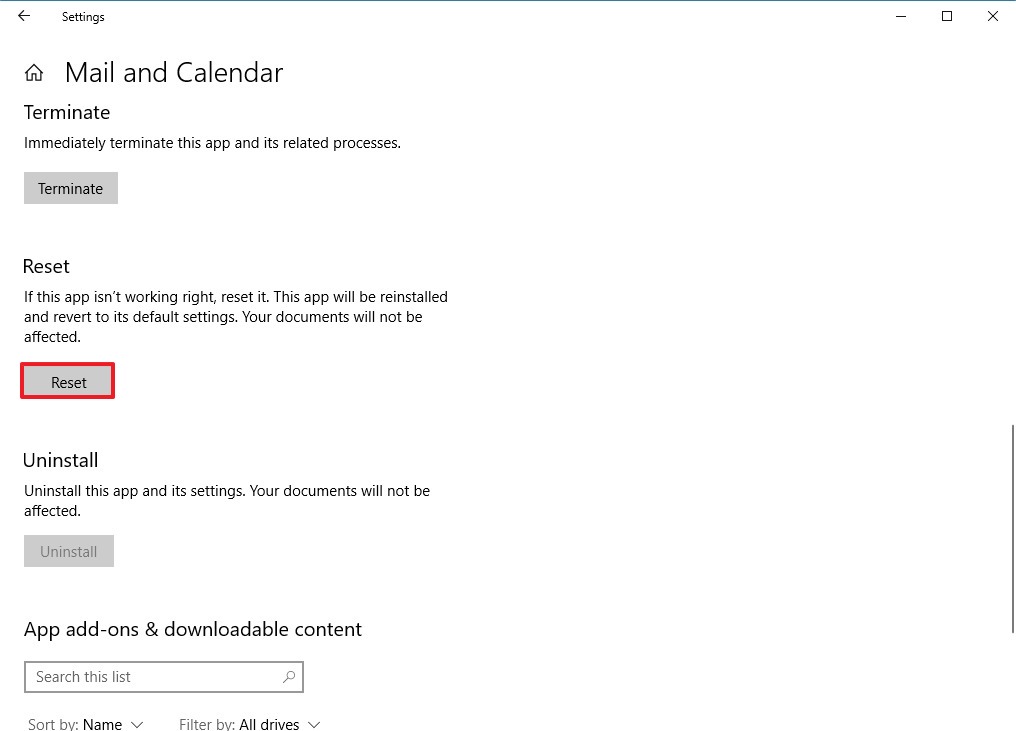
- Click the Reset button.
- Click the Reset button again to confirm.
Once you've completed the steps, the app will reset to its factory settings, which is a process that usually fixes most problems. After the app installs again, you'll need to set it up from scratch using the steps we outlined above.
Wrapping things up
While there are many email clients that you can use, the built-in Mail app on Windows 10 provides all the essential features that most regular users will need to manage one or multiple email accounts from virtually any service provider.
What email client do you use on Windows 10? Tell us in the comments.
More Windows 10 resources
For more helpful articles, coverage, and answers to common questions about Windows 10, visit the following resources:
- Windows 10 on Windows Central – All you need to know
- Windows 10 help, tips, and tricks
- Windows 10 forums on Windows Central

Mauro Huculak has been a Windows How-To Expert contributor for WindowsCentral.com for nearly a decade and has over 22 years of combined experience in IT and technical writing. He holds various professional certifications from Microsoft, Cisco, VMware, and CompTIA and has been recognized as a Microsoft MVP for many years.
