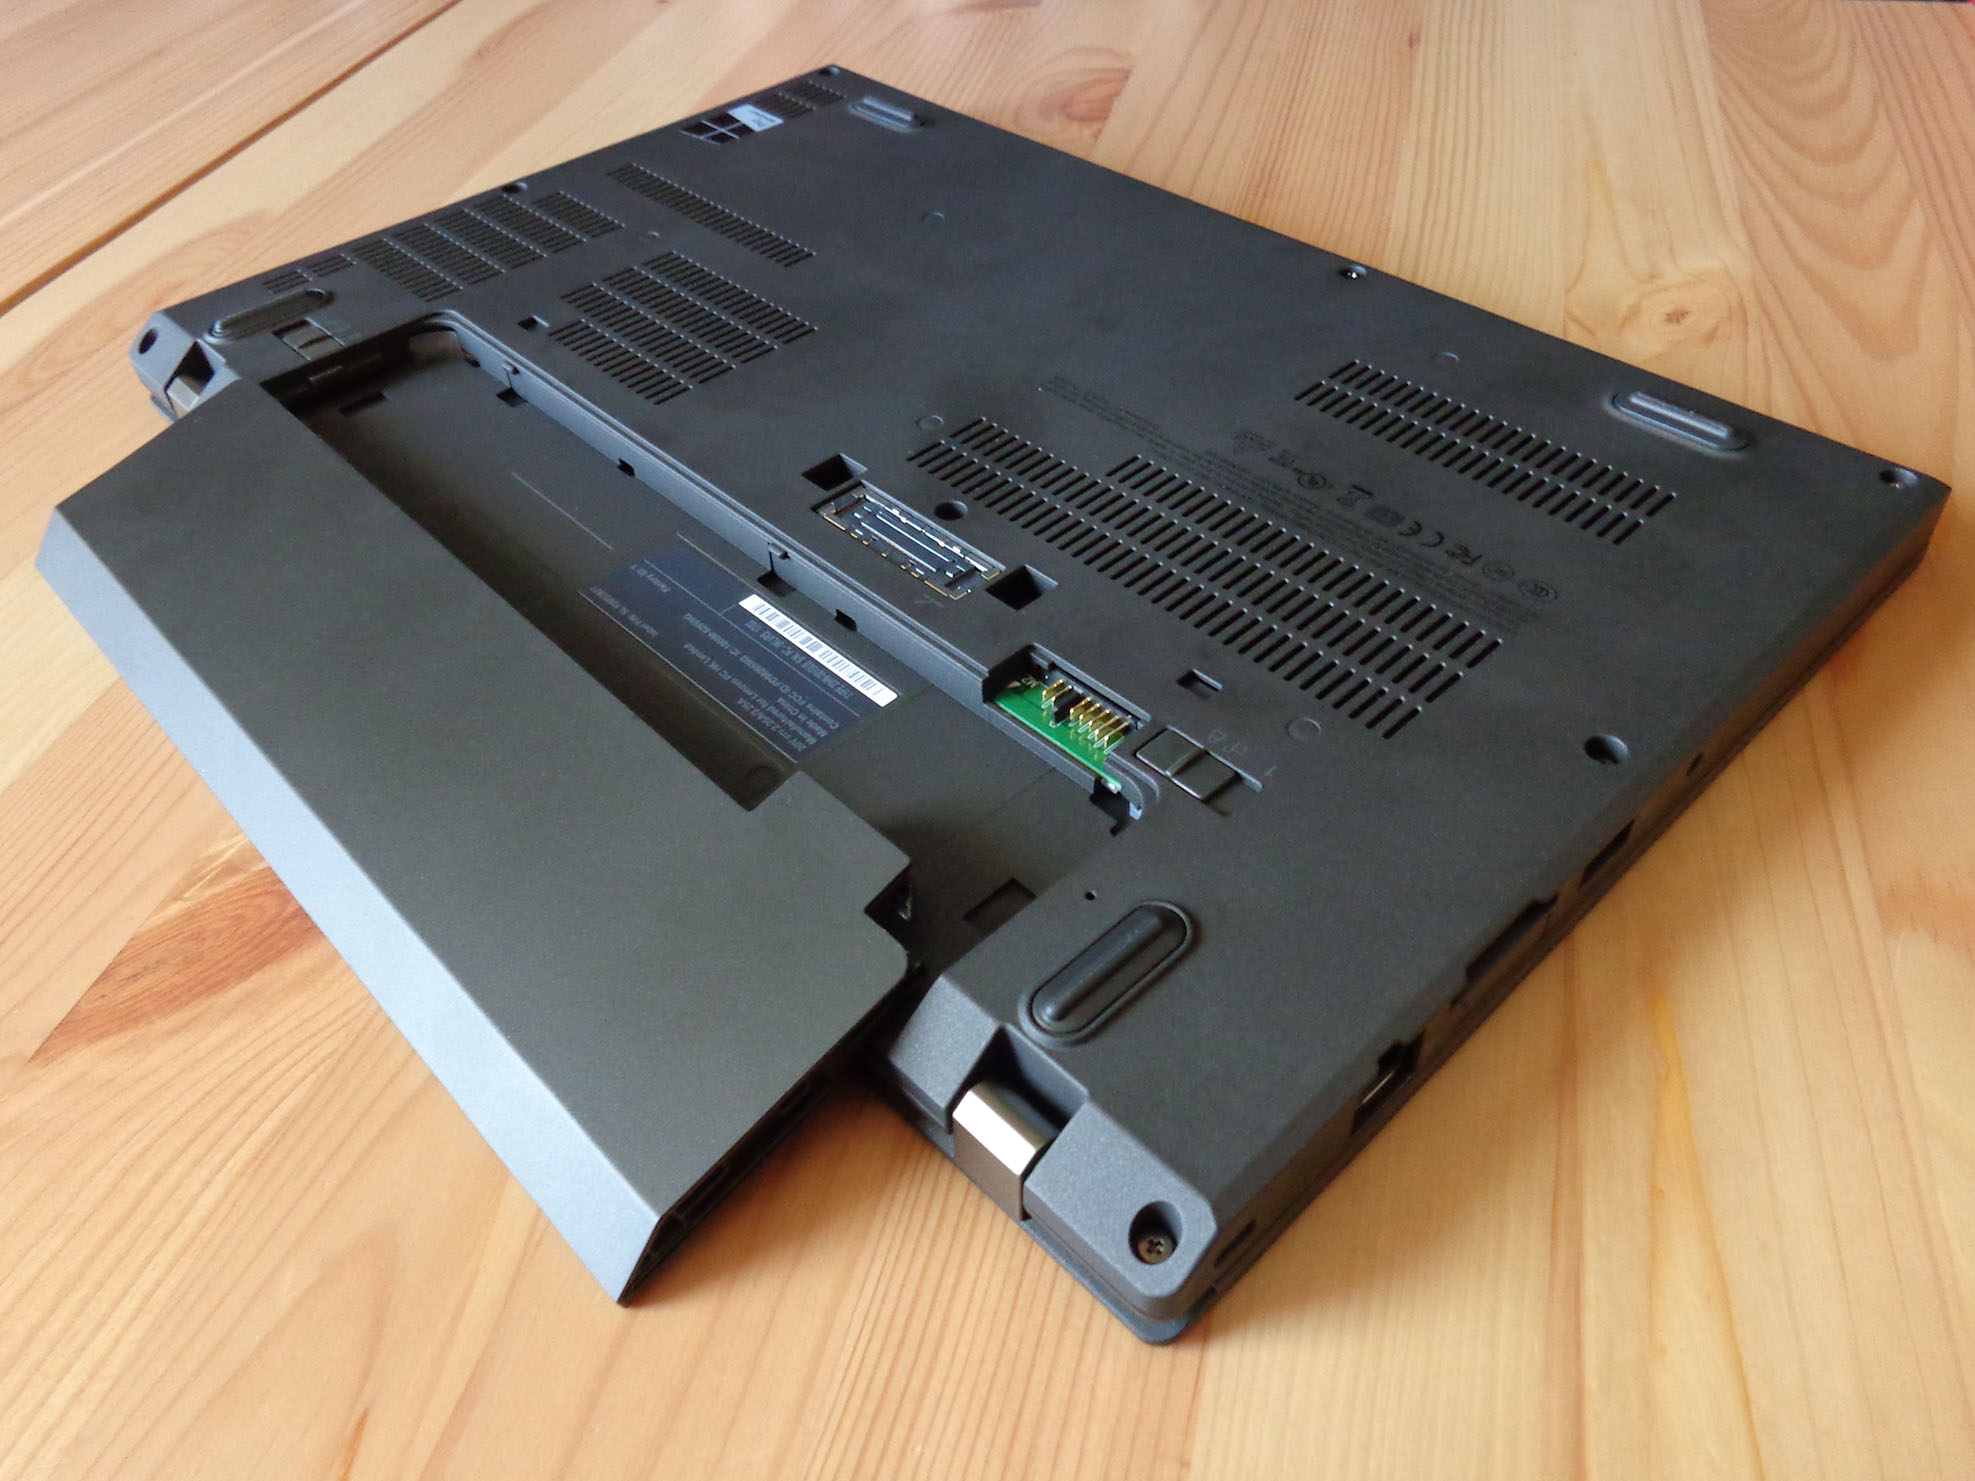
Other than the usual, quick methods of getting a bit more battery life from your PC — turning down the volume, lowering the brightness of your display, and unplugging any peripherals — there are a few tricks you can implement that will get you some extra time before you have to look for an outlet.
- Enable and configure battery saver mode
- Set your display to turn off when not in use
- Optimize your battery for video playback
- Change or create your own power plan
- Underclock your processor
- Set which apps are allowed to run on battery power
- Disable wireless communication
Enable and configure battery saver mode
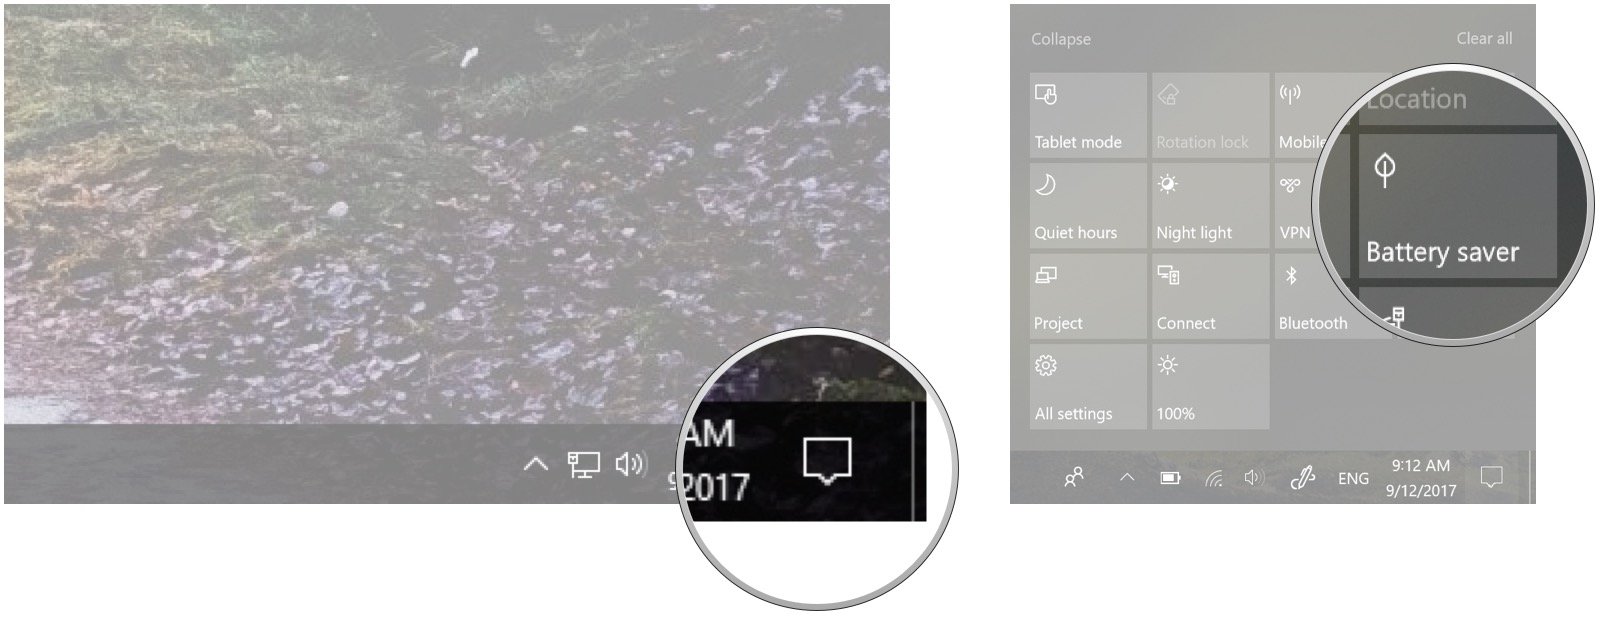
Windows 10 has a built-in battery saver tool that can help you get a few more minutes out of your battery. You can enable the battery saver through the Windows 10 Action Center:
- Click the Action Center button in the bottom-right corner of the screen.
- Click Battery saver.
- Repeat these steps to disable battery saver.
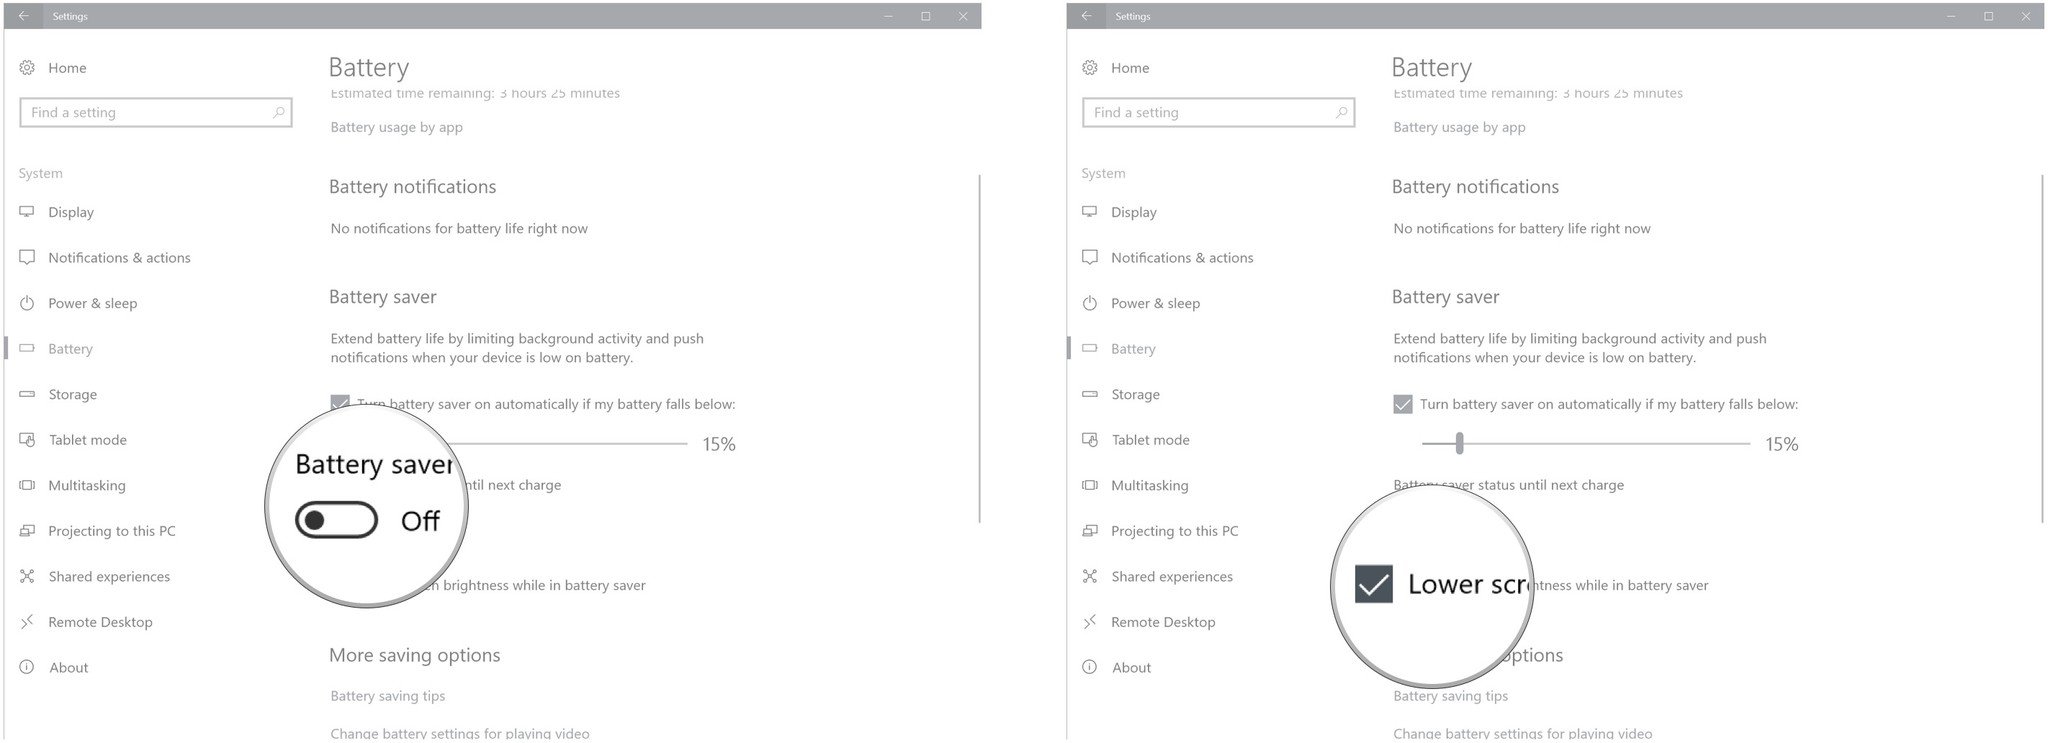
The battery saver tool can be configured to your liking. Here's how:
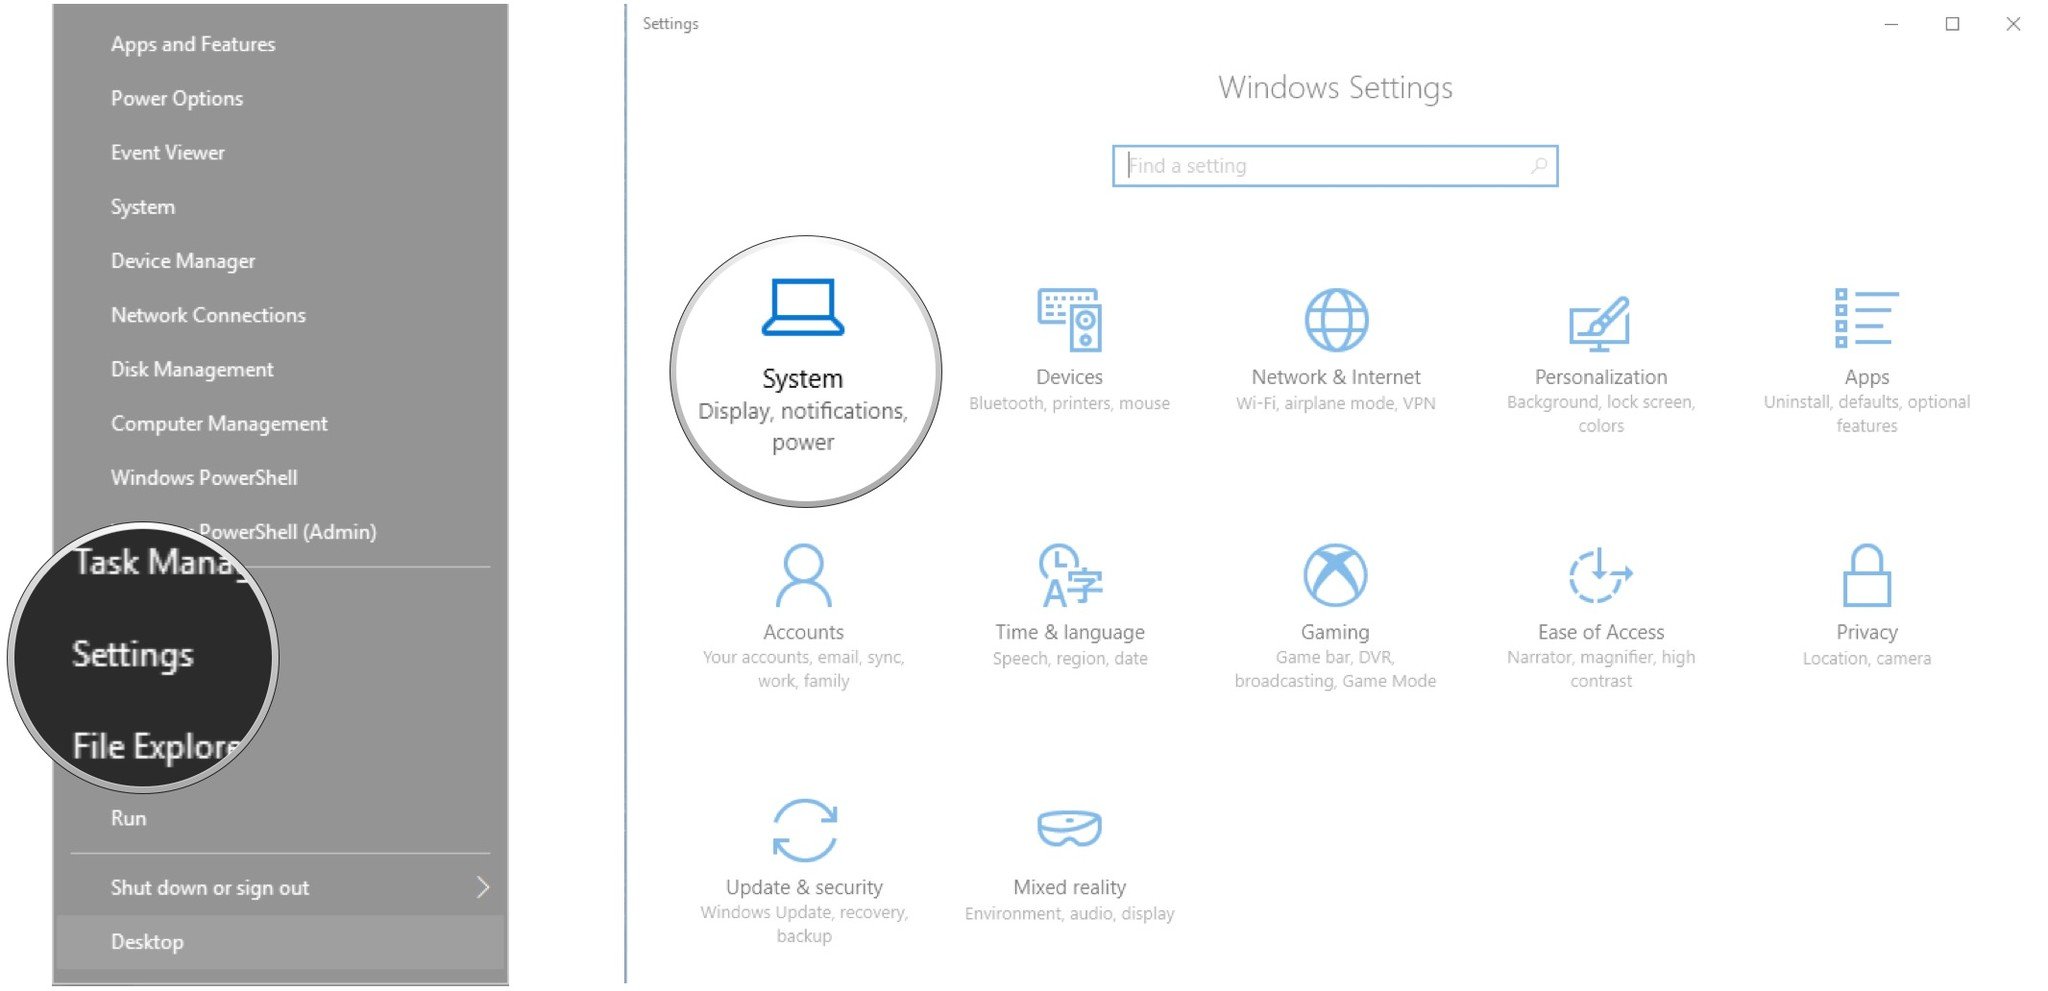
- Right-click the Start button.
- Click Settings.
- Click System.
- Click Battery.
- Click and drag the slider in the Battery saver section to adjust how soon battery saver turns on.
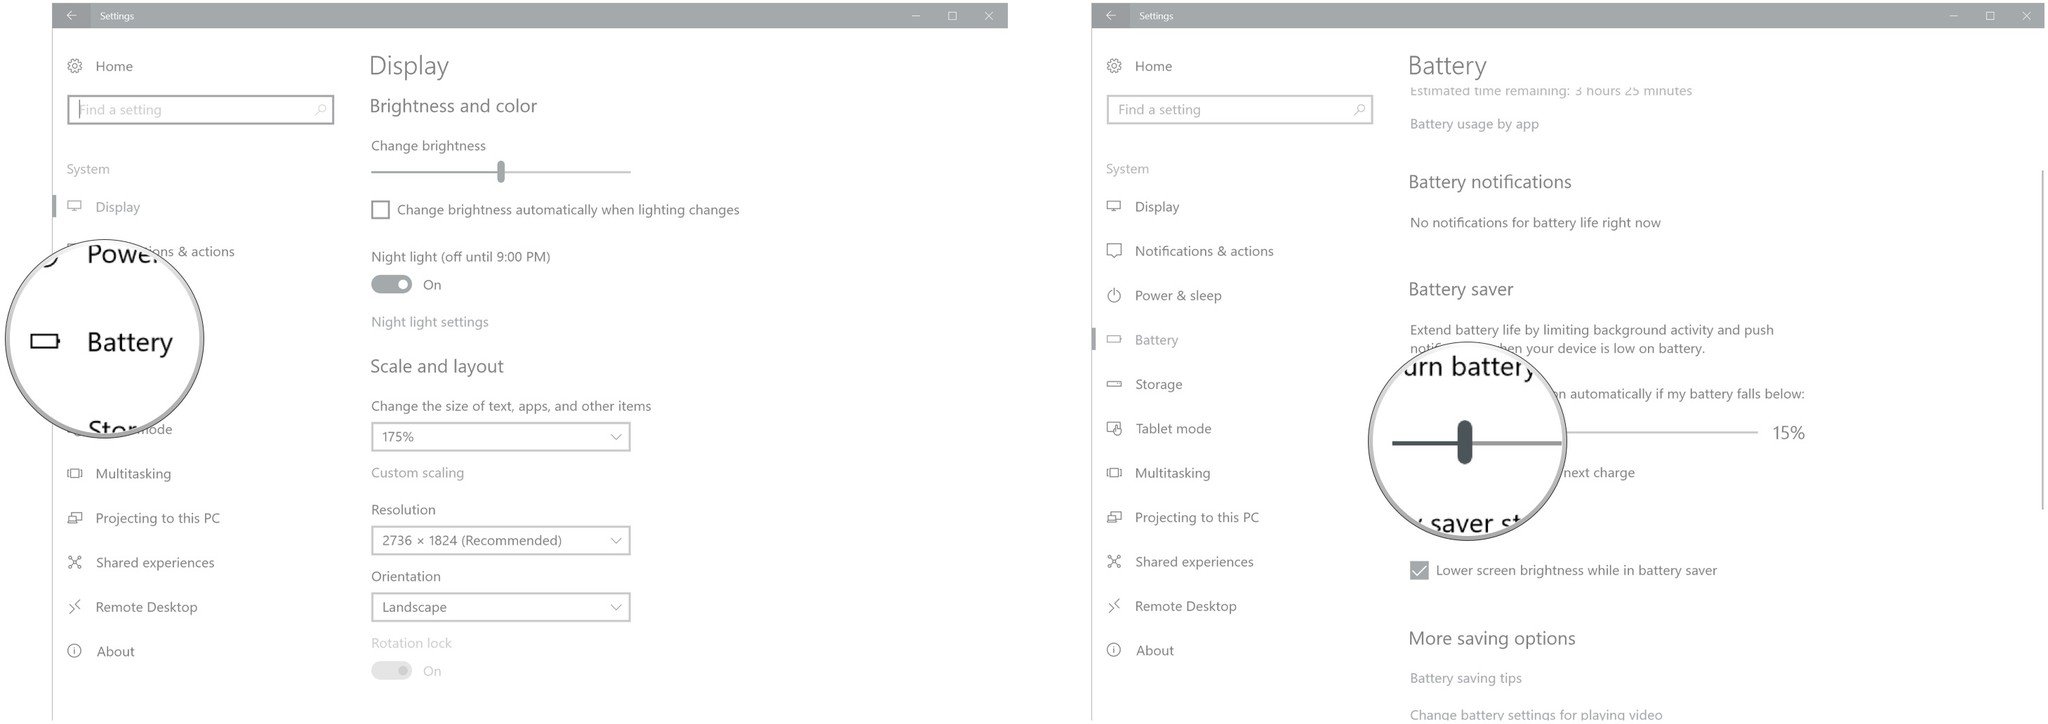
- Click the switch beneath Battery saver status until next charge to turn battery saver on until you plug in your laptop.
- Click the checkbox next to Lower screen brightness while in battery saver to toggle the screen brightness when battery saver is enabled.
Set your display to turn off when not in use
Windows 10 can be configured to turn off your display when the PC is not in use for a set amount of time. You can also set it to cut network connections when asleep and on battery power. This will keep your battery going in the long run. Here's how to make those changes:
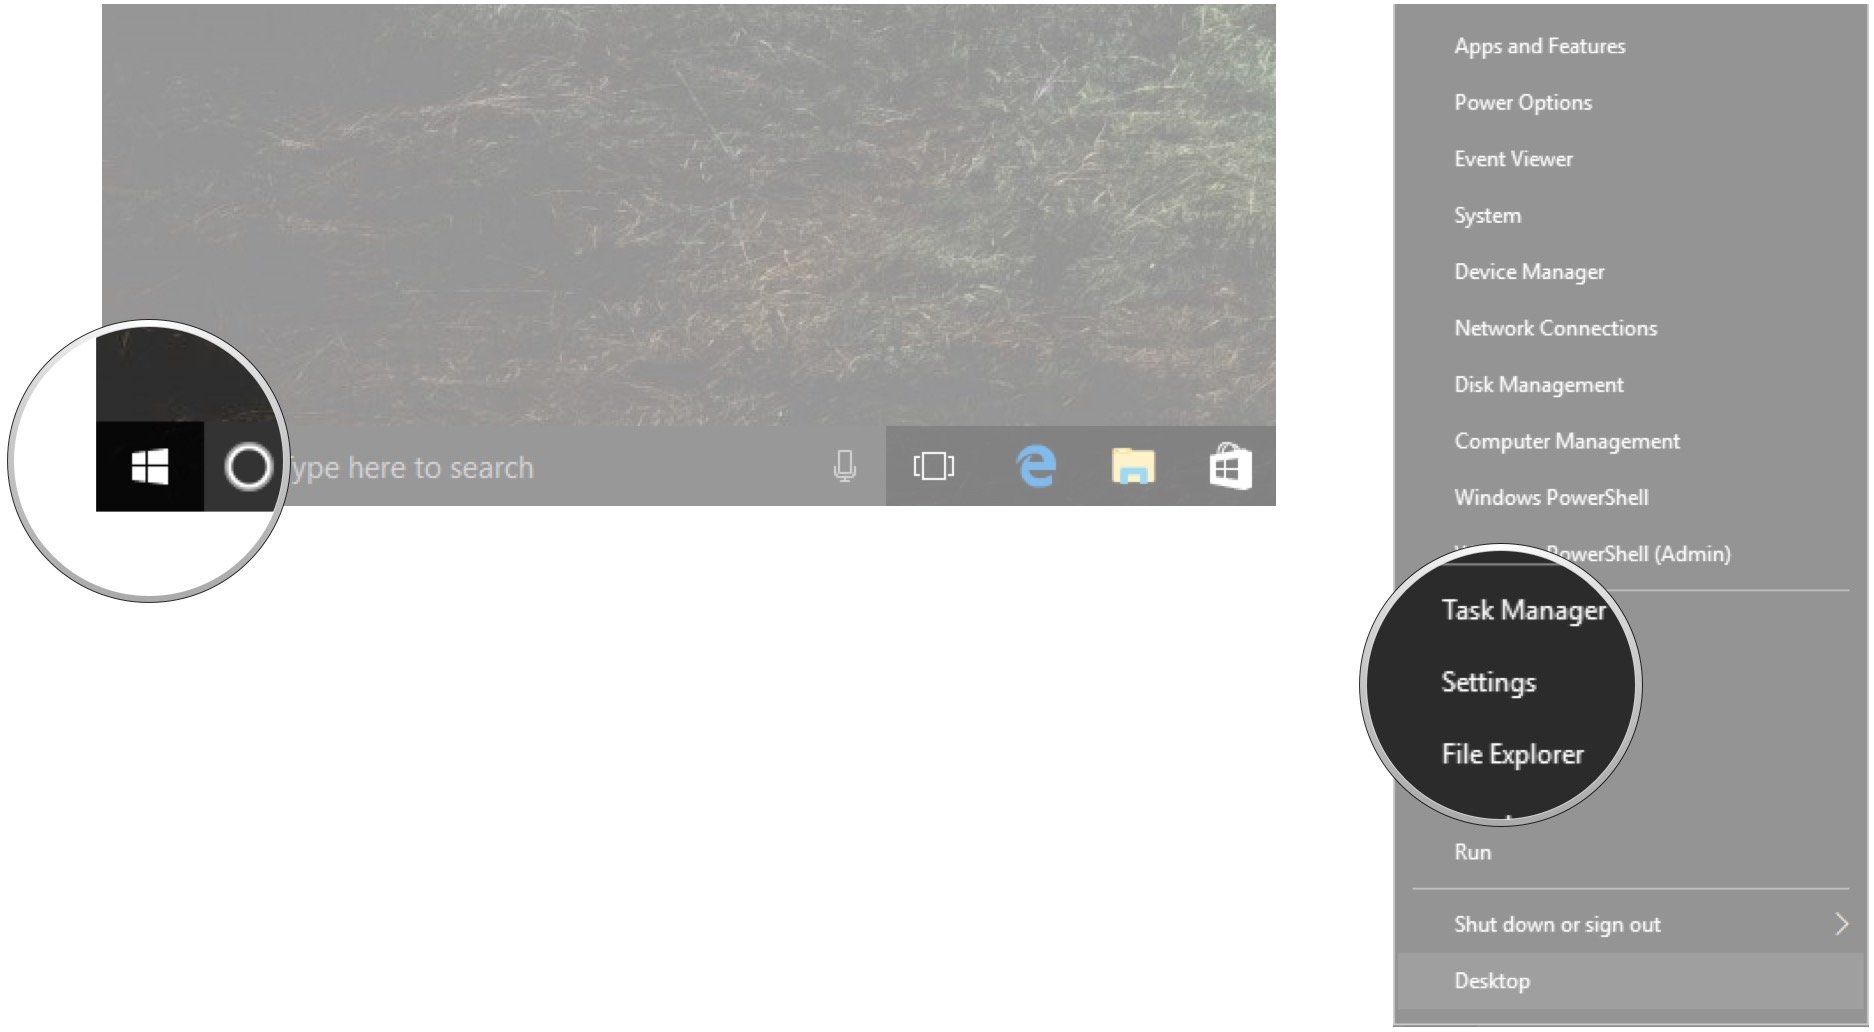
- Right-click the Start button.
- Click Settings.
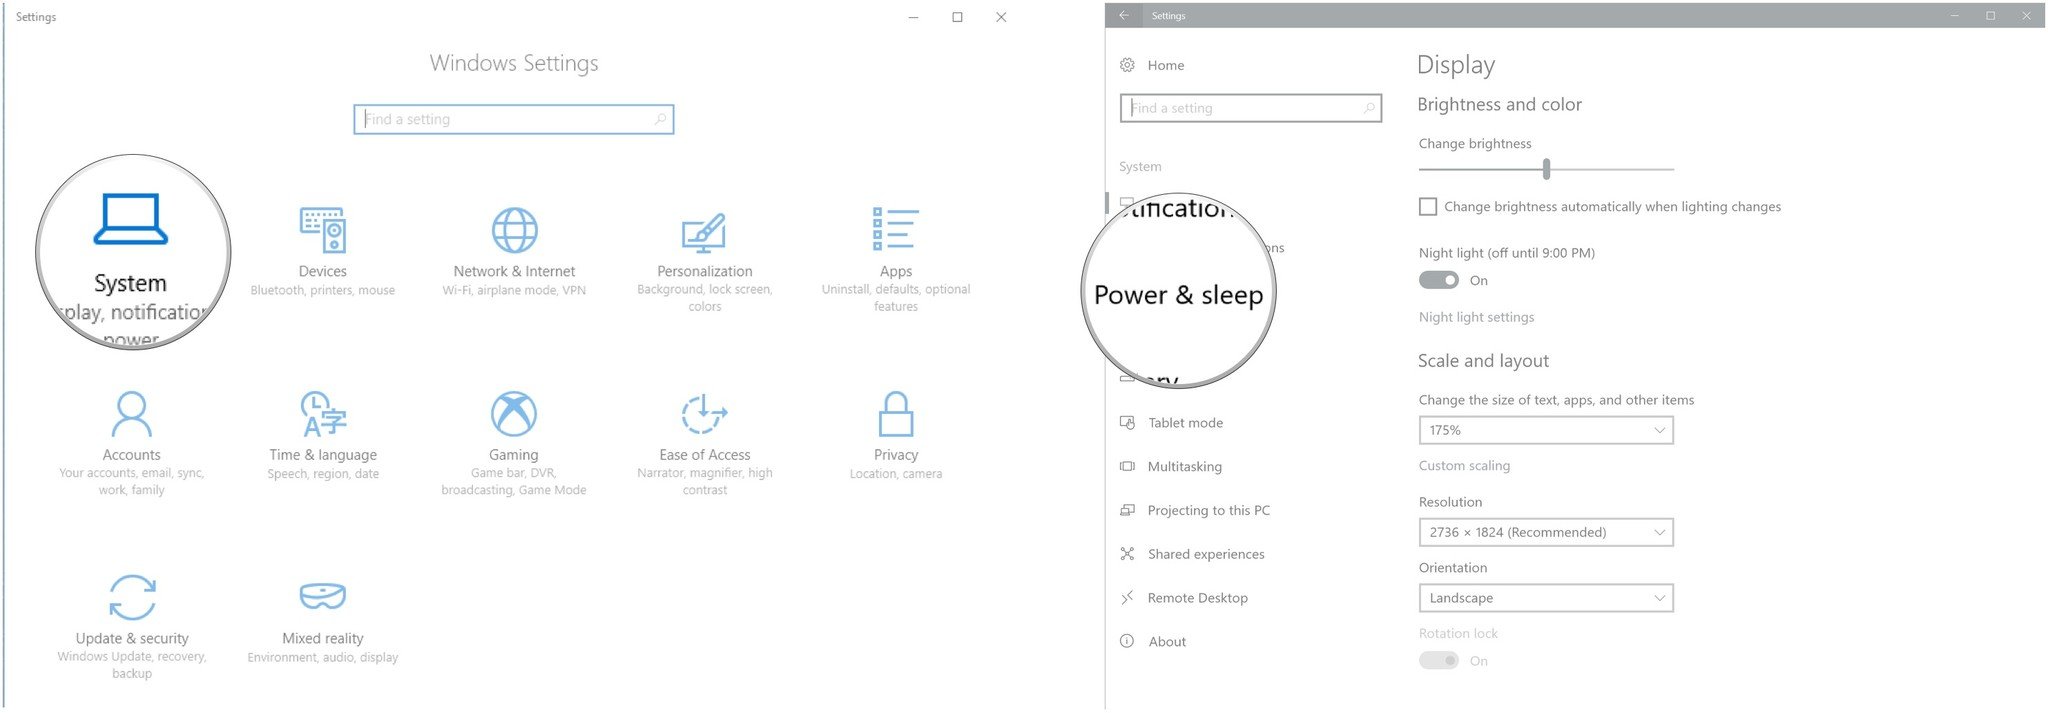
- Click System.
- Click Power & sleep.
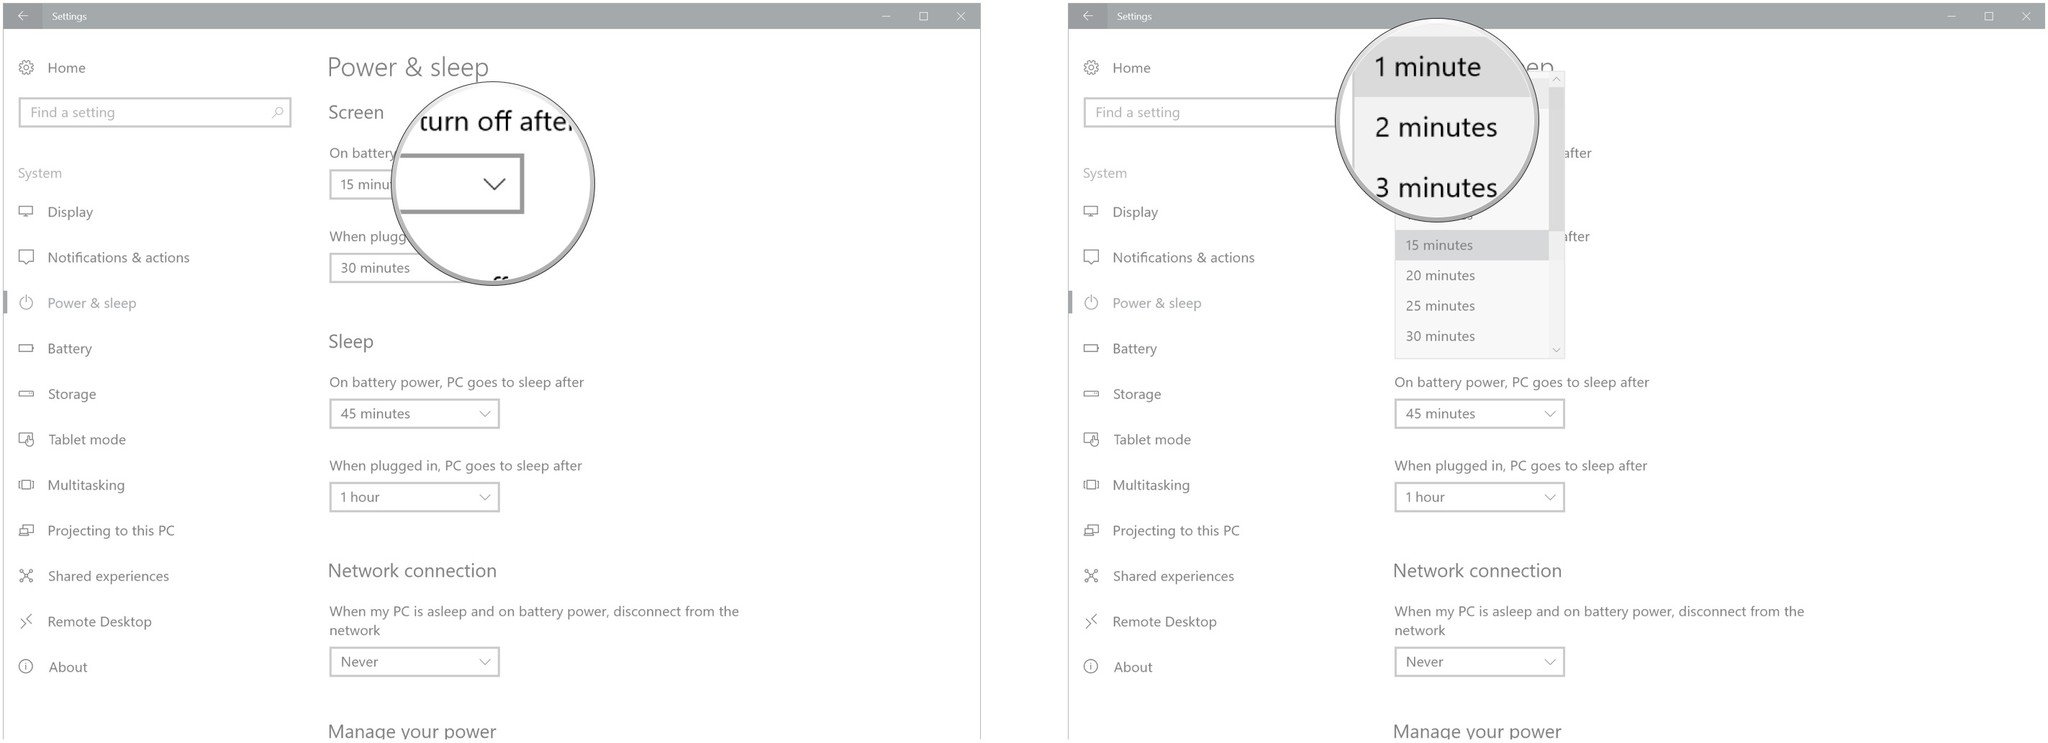
- Click the first dropdown menu in the Screen section.
- Click a time option. (In this case, we choose 2 minutes.)
- Click the first dropdown menu in the Sleep section.
- Click a time option. (In this case, we choose 5 minutes.)
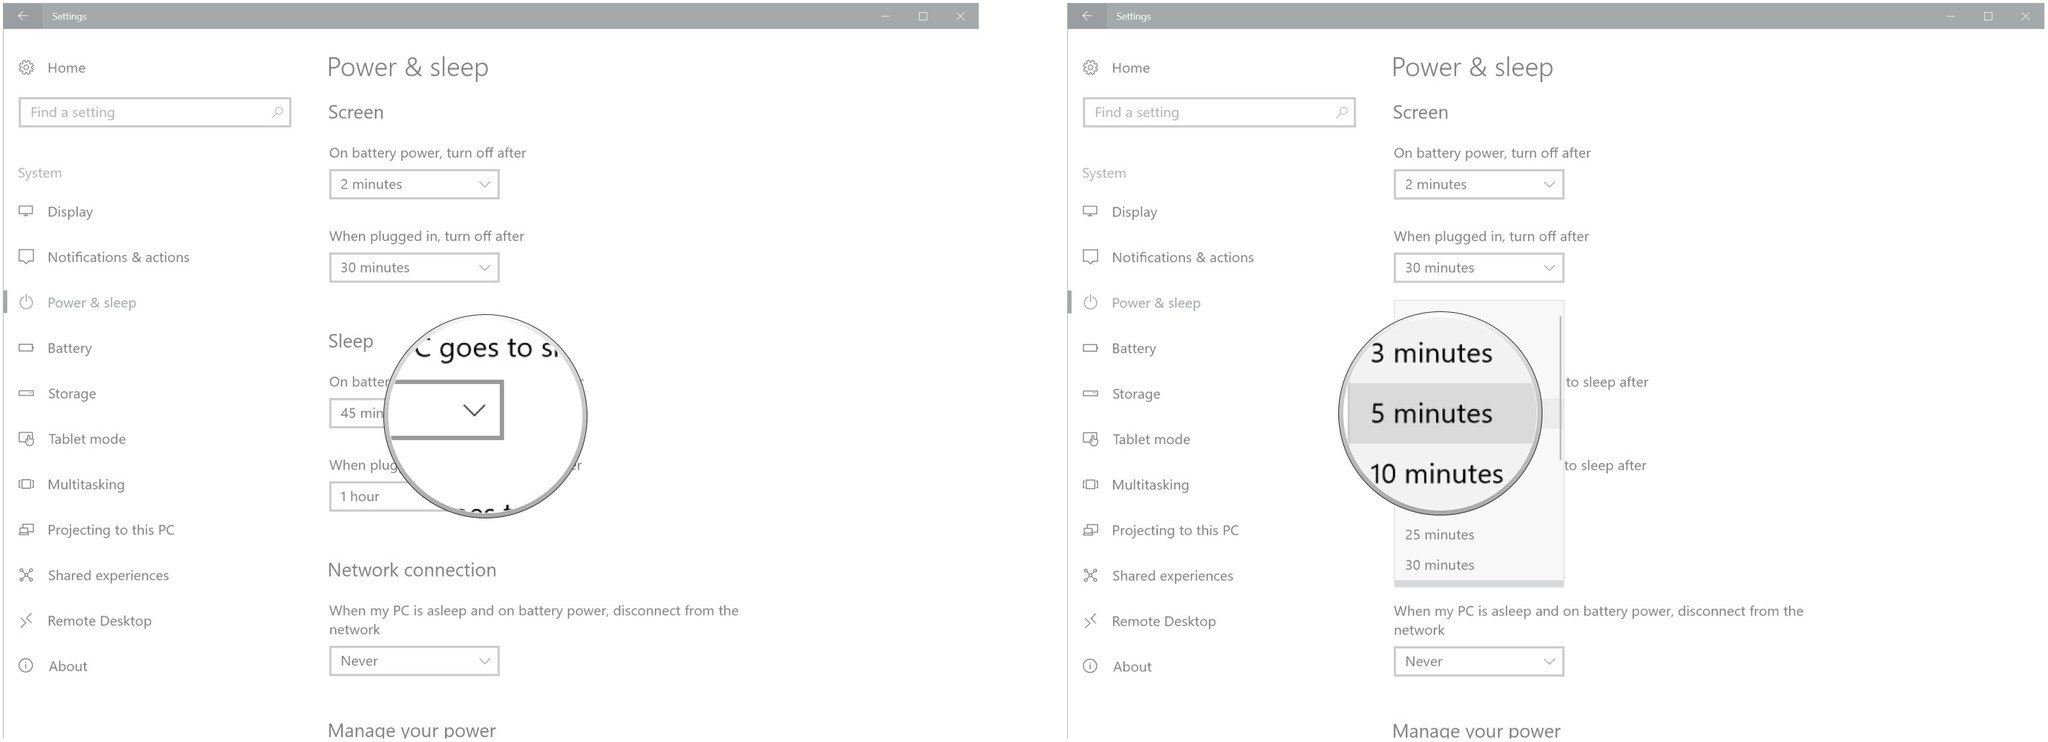
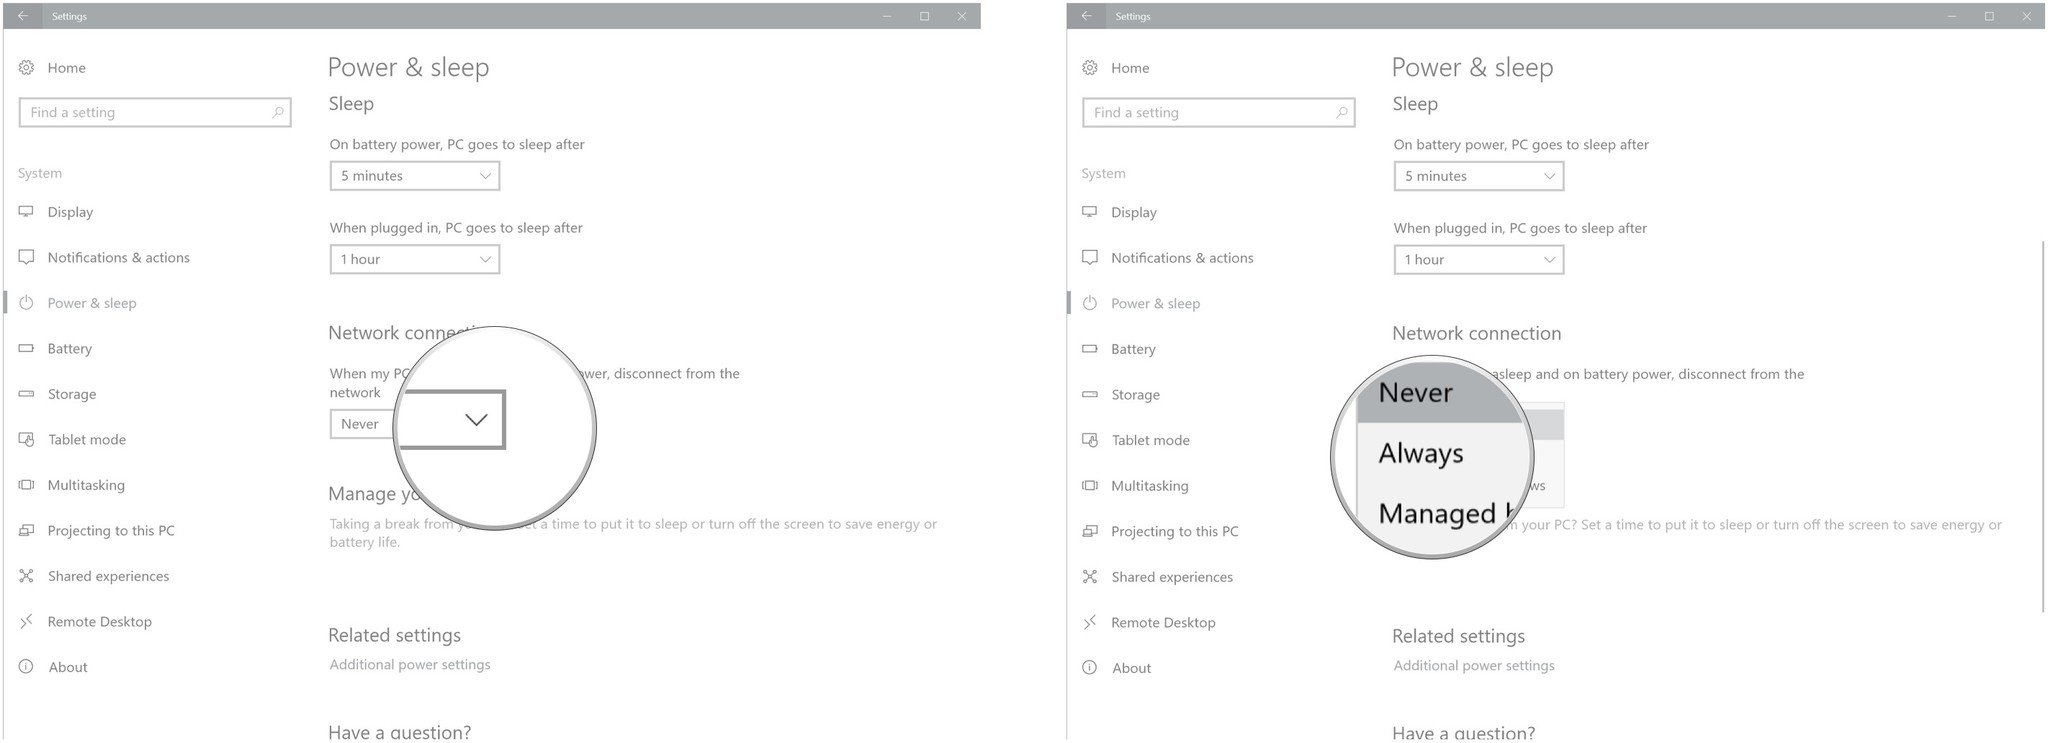
- Click the dropdown menu in the Network connection section.
- Click Always.
Optimize your battery for video playback
If you're trying desperately to see how your movie ends and you see the battery draining away quickly, you can change some settings that will optimize battery life for watching videos. Here's how:
- Right-click the Start button.
- Click Settings.
- Click Apps.
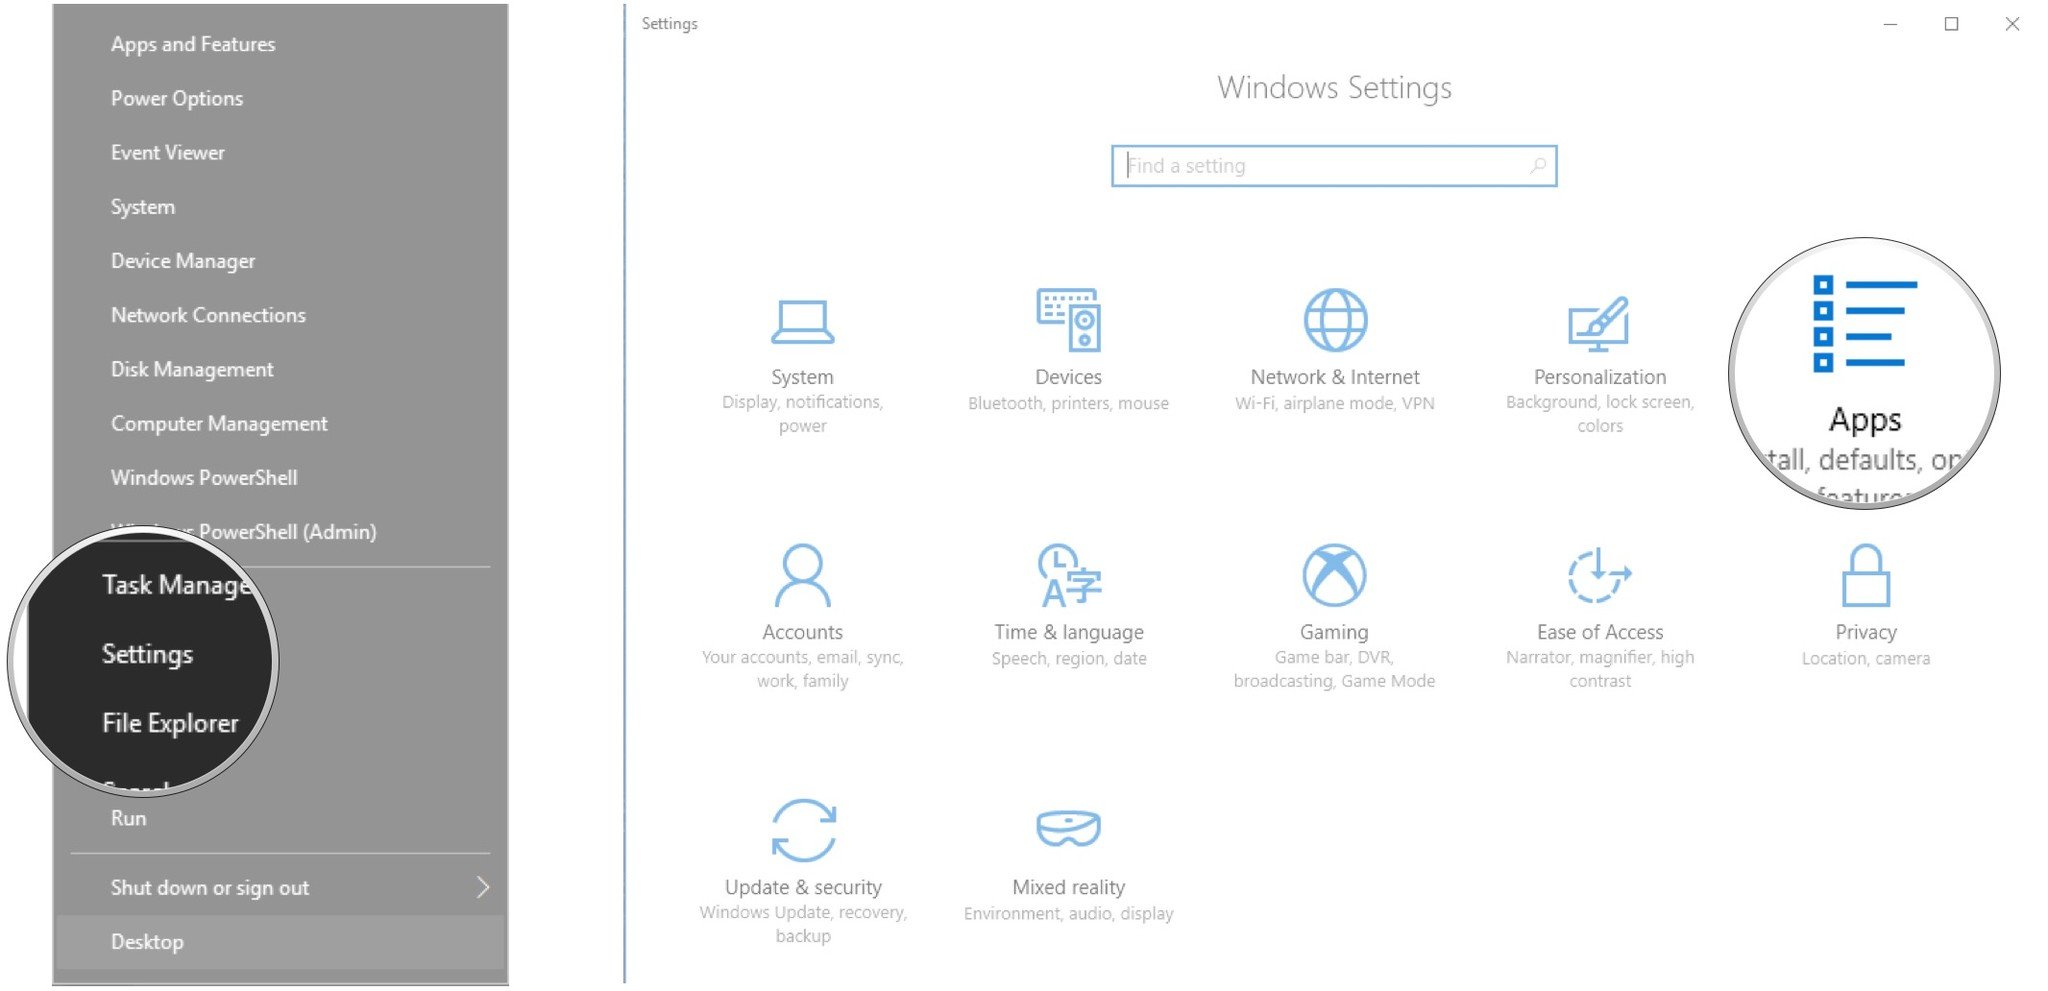
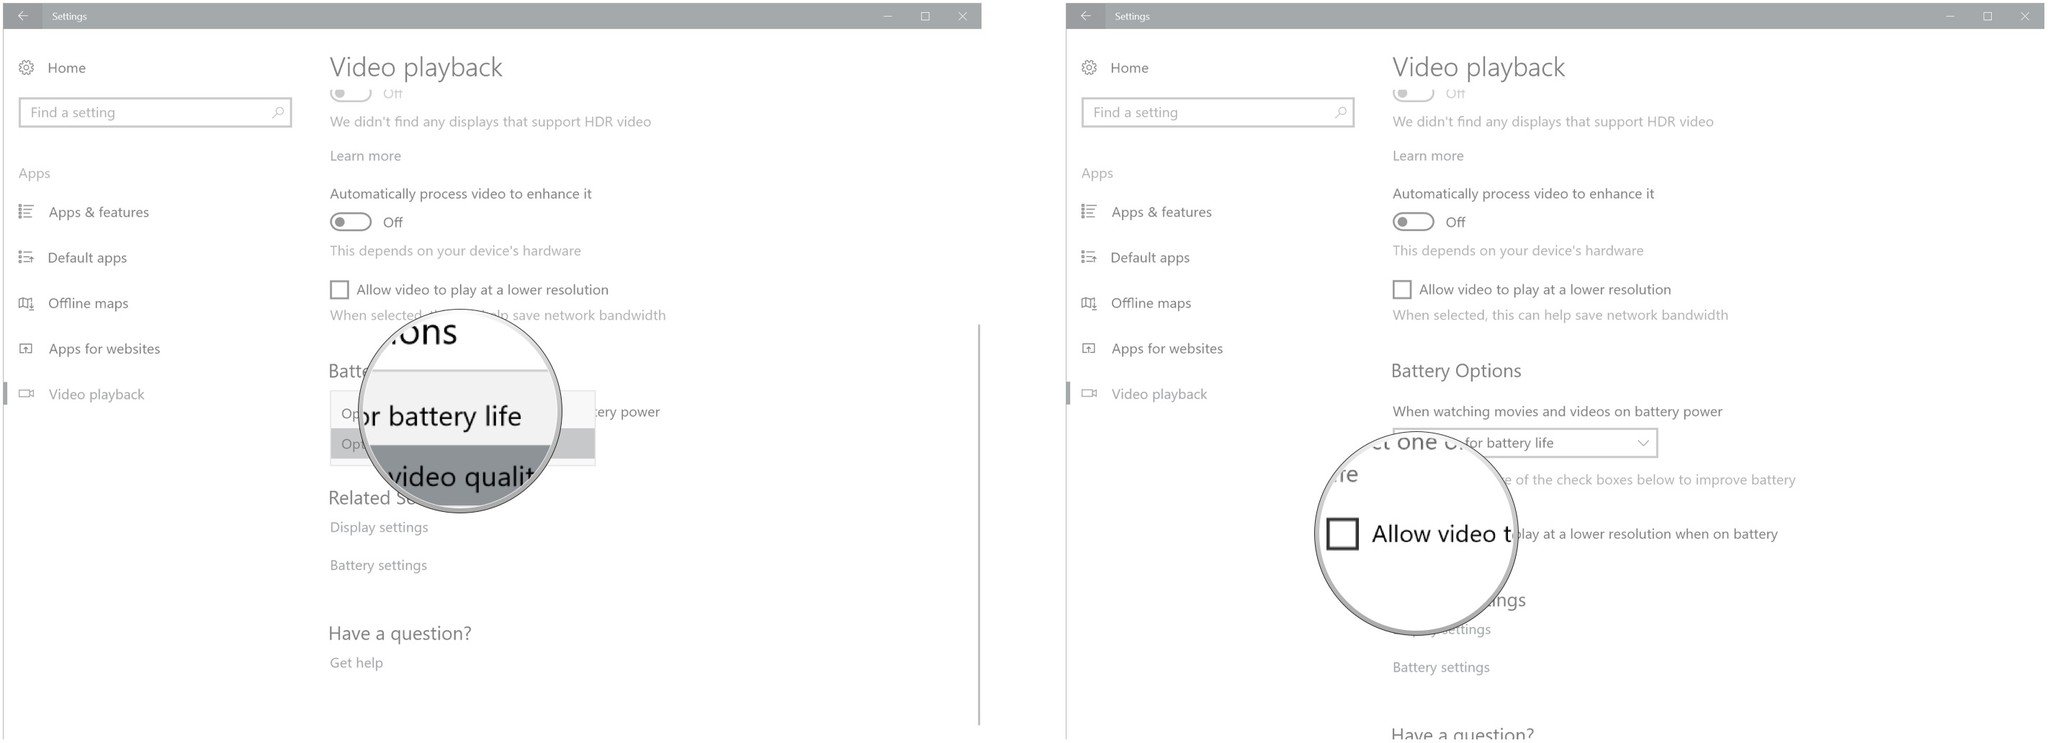
- Click Video playback.
- Click the dropdown menu in the Battery Options section.
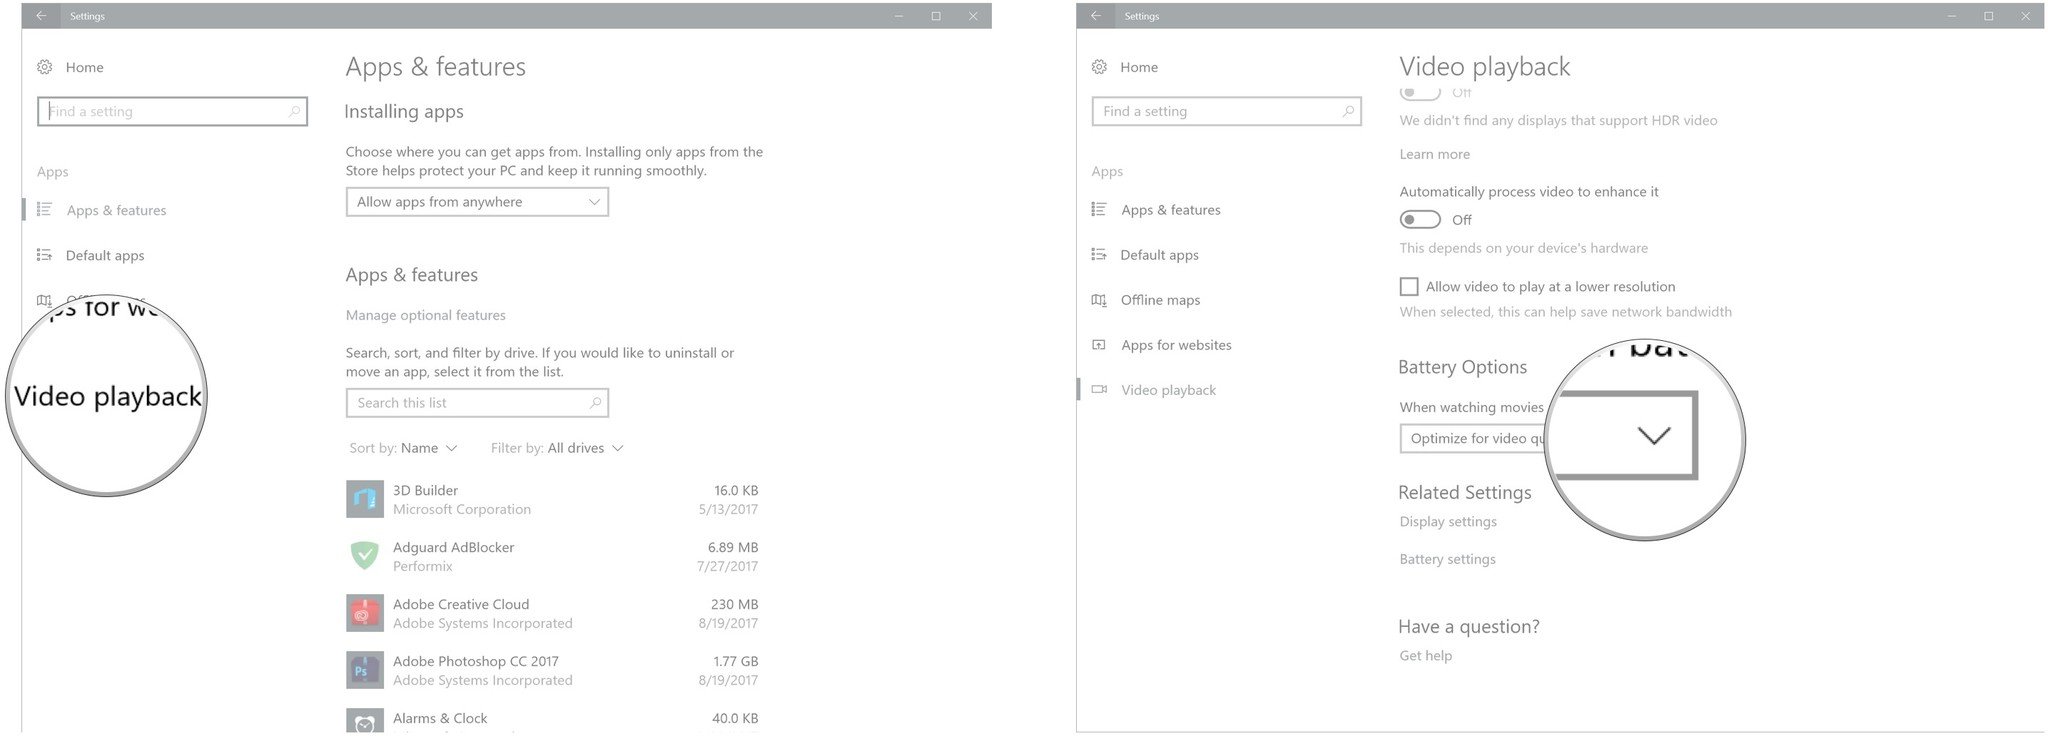
- Click Optimize for battery life.
- Click the checkbox next to Allow video to play at a lower resolution when on battery.
Change or create your own power plan
Windows 10 has several default power plans to choose from, including one that saves battery. If that isn't enough, you can create your own:
- Right-click the Start button.
- Click Settings.

- Click System.
- Click Power & sleep.
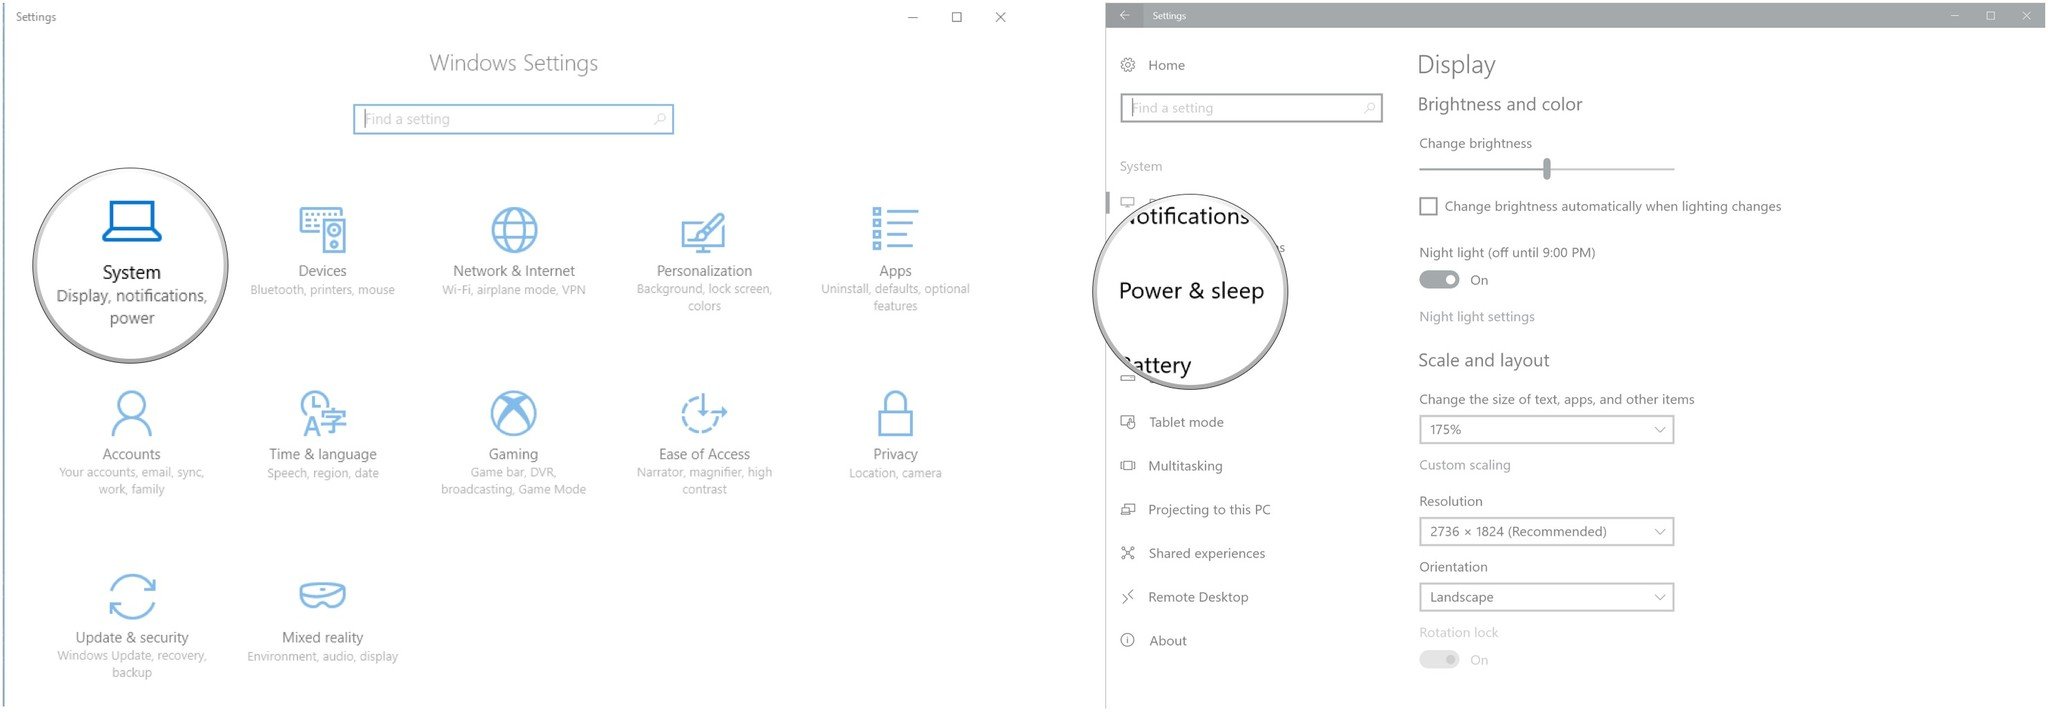
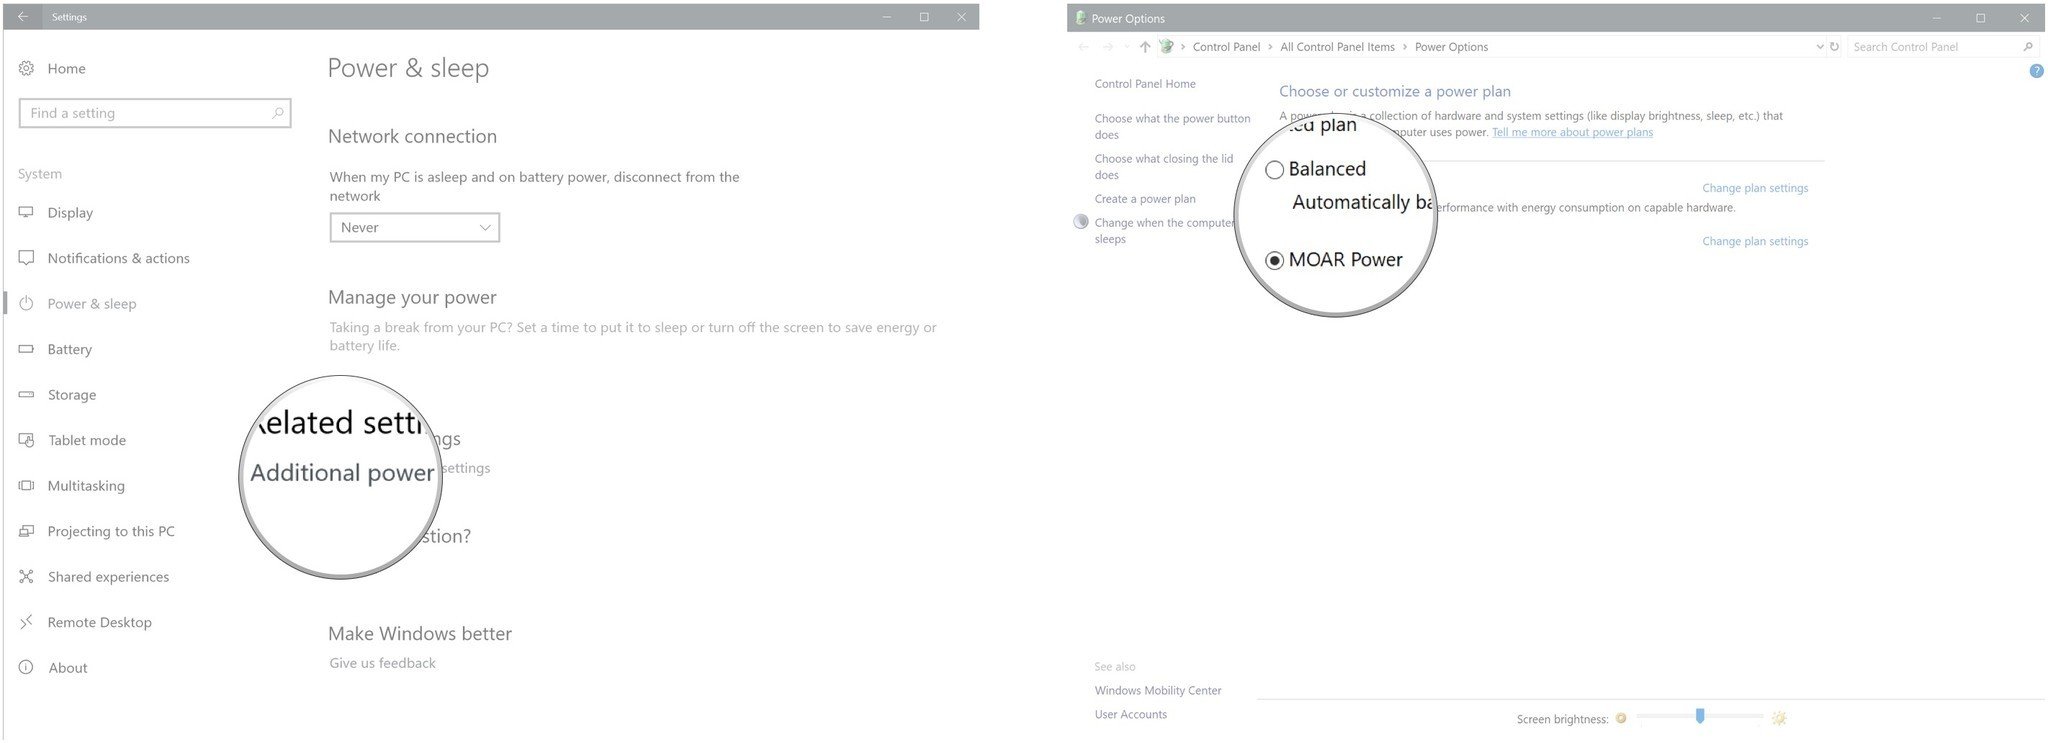
- Click Additional power settings in the Related settings section.
- Click a power plan.
If the default power plans don't cut it, you can create your own:
Get the Windows Central Newsletter
All the latest news, reviews, and guides for Windows and Xbox diehards.
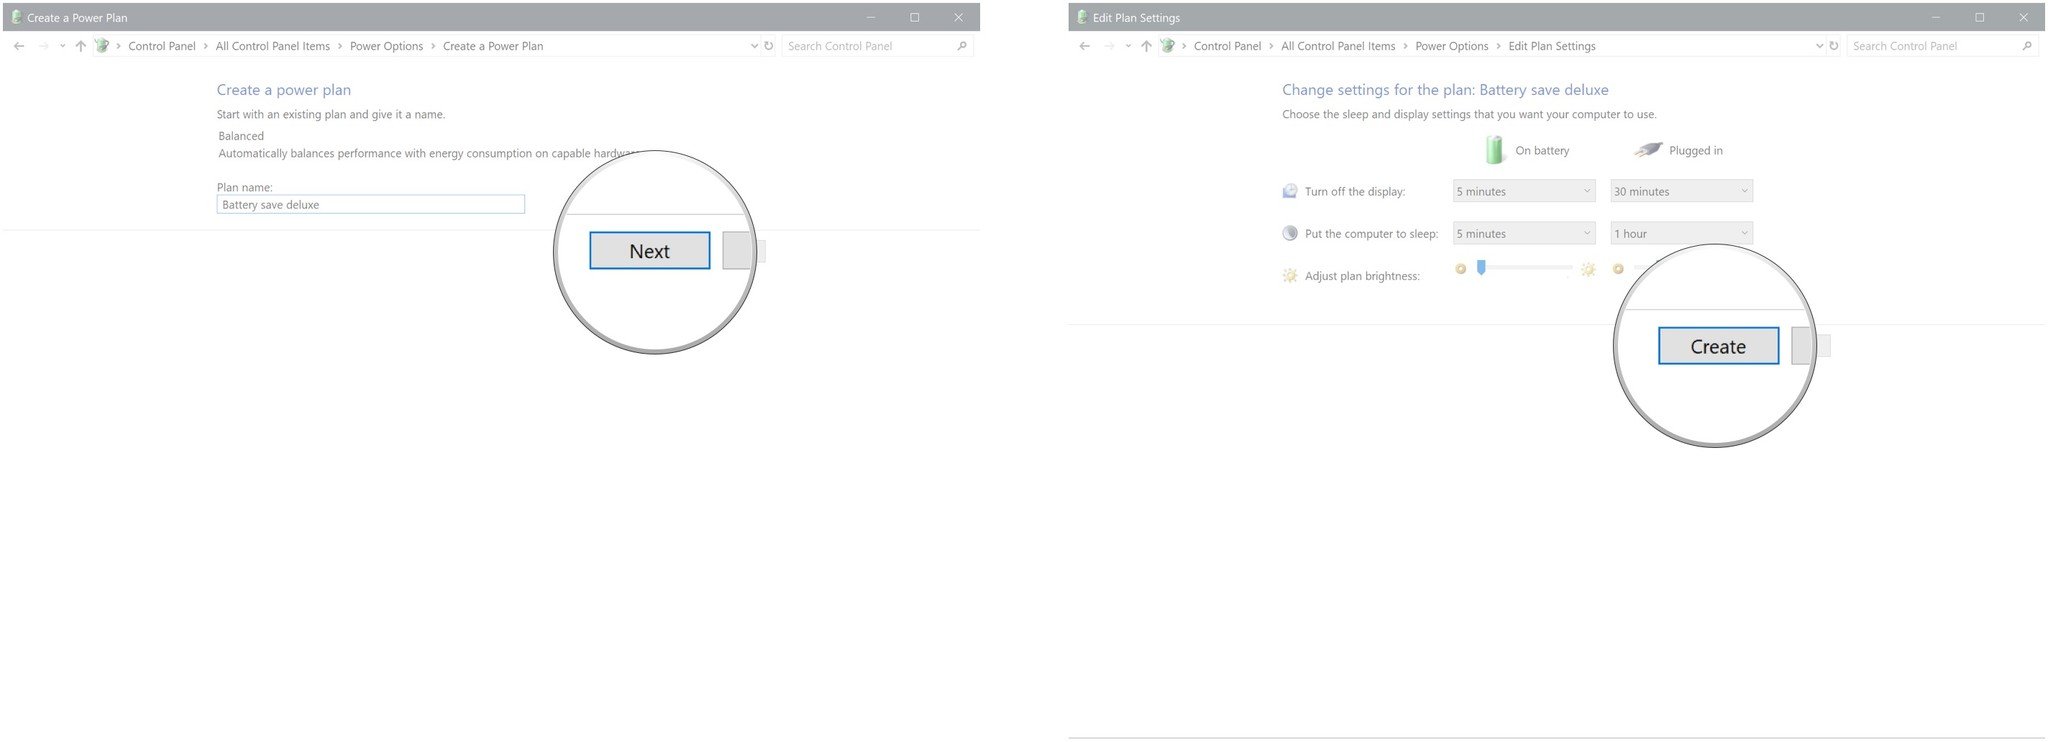
- Click Create a power plan.
- Type a name for the power plan.
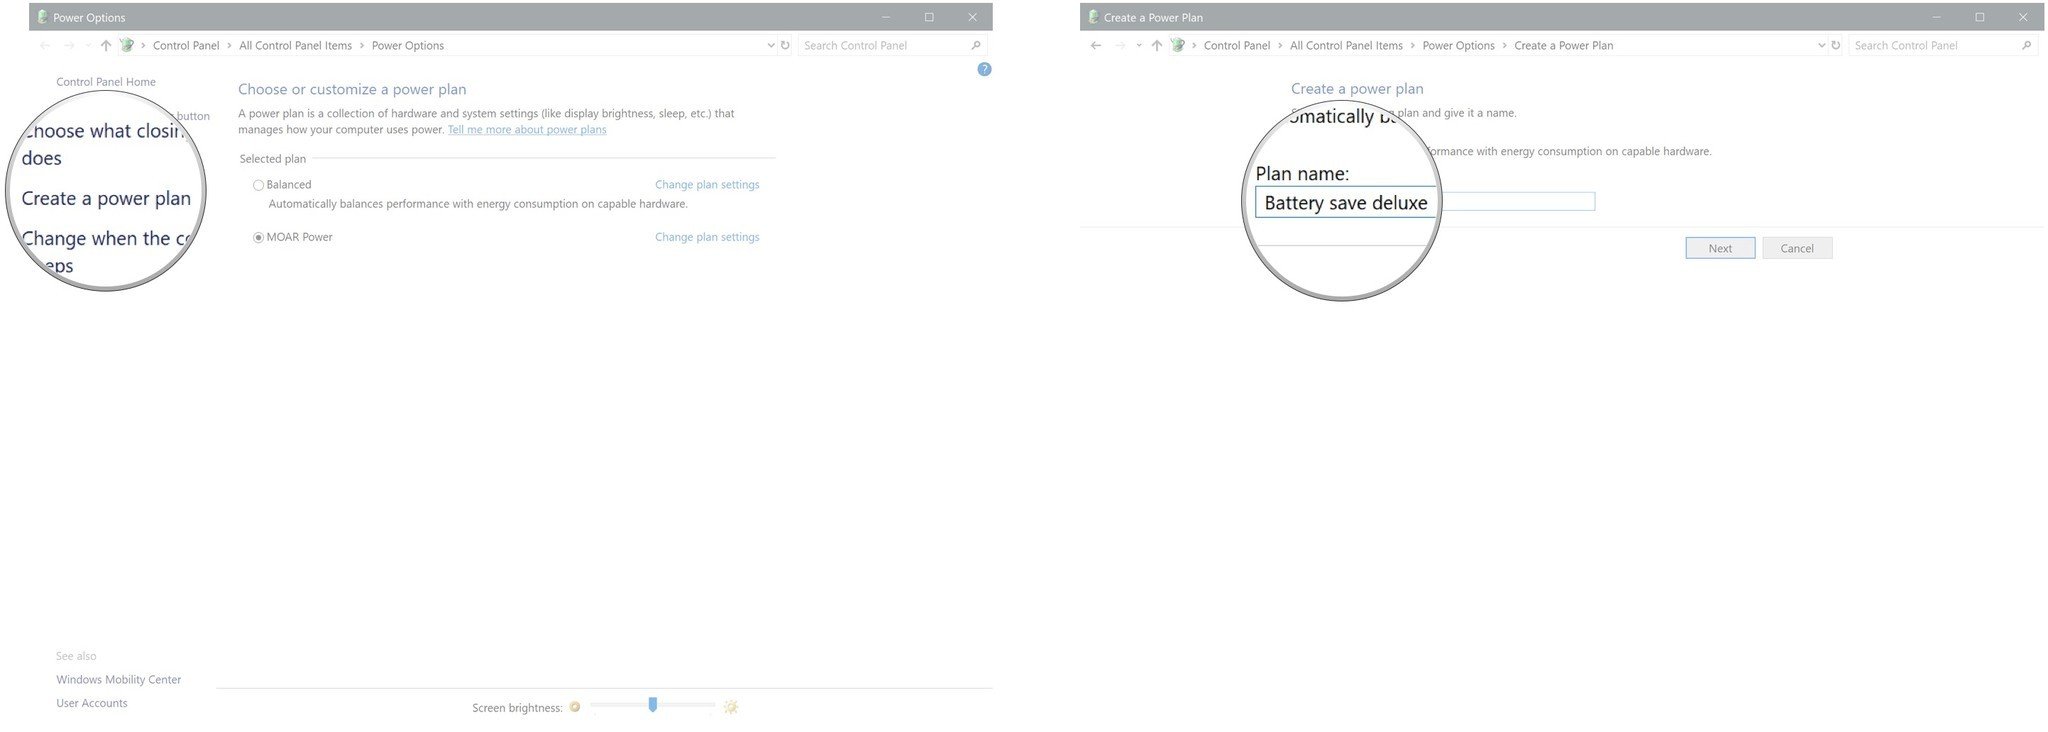
- Click Next. (You will now be able to tweak settings to your preference.)
- Click Create.
Underclock your processor
Underclocking your processor (CPU) is an effective way of saving a significant amount of power, as long as you don't mind performance also taking a hit. Depending on your system, you can either lower the Thermal Design Point (TDP) through the Intel Thermal Framework settings, or simply underclock the CPU through Processor Power Management. Let's start with the former method.
The TDP of your CPU is essentially a measurement of the maximum temperature your CPU can reach when running everyday apps. This can be applied to any power plan, but we will adjust the plan we created in the previous section:
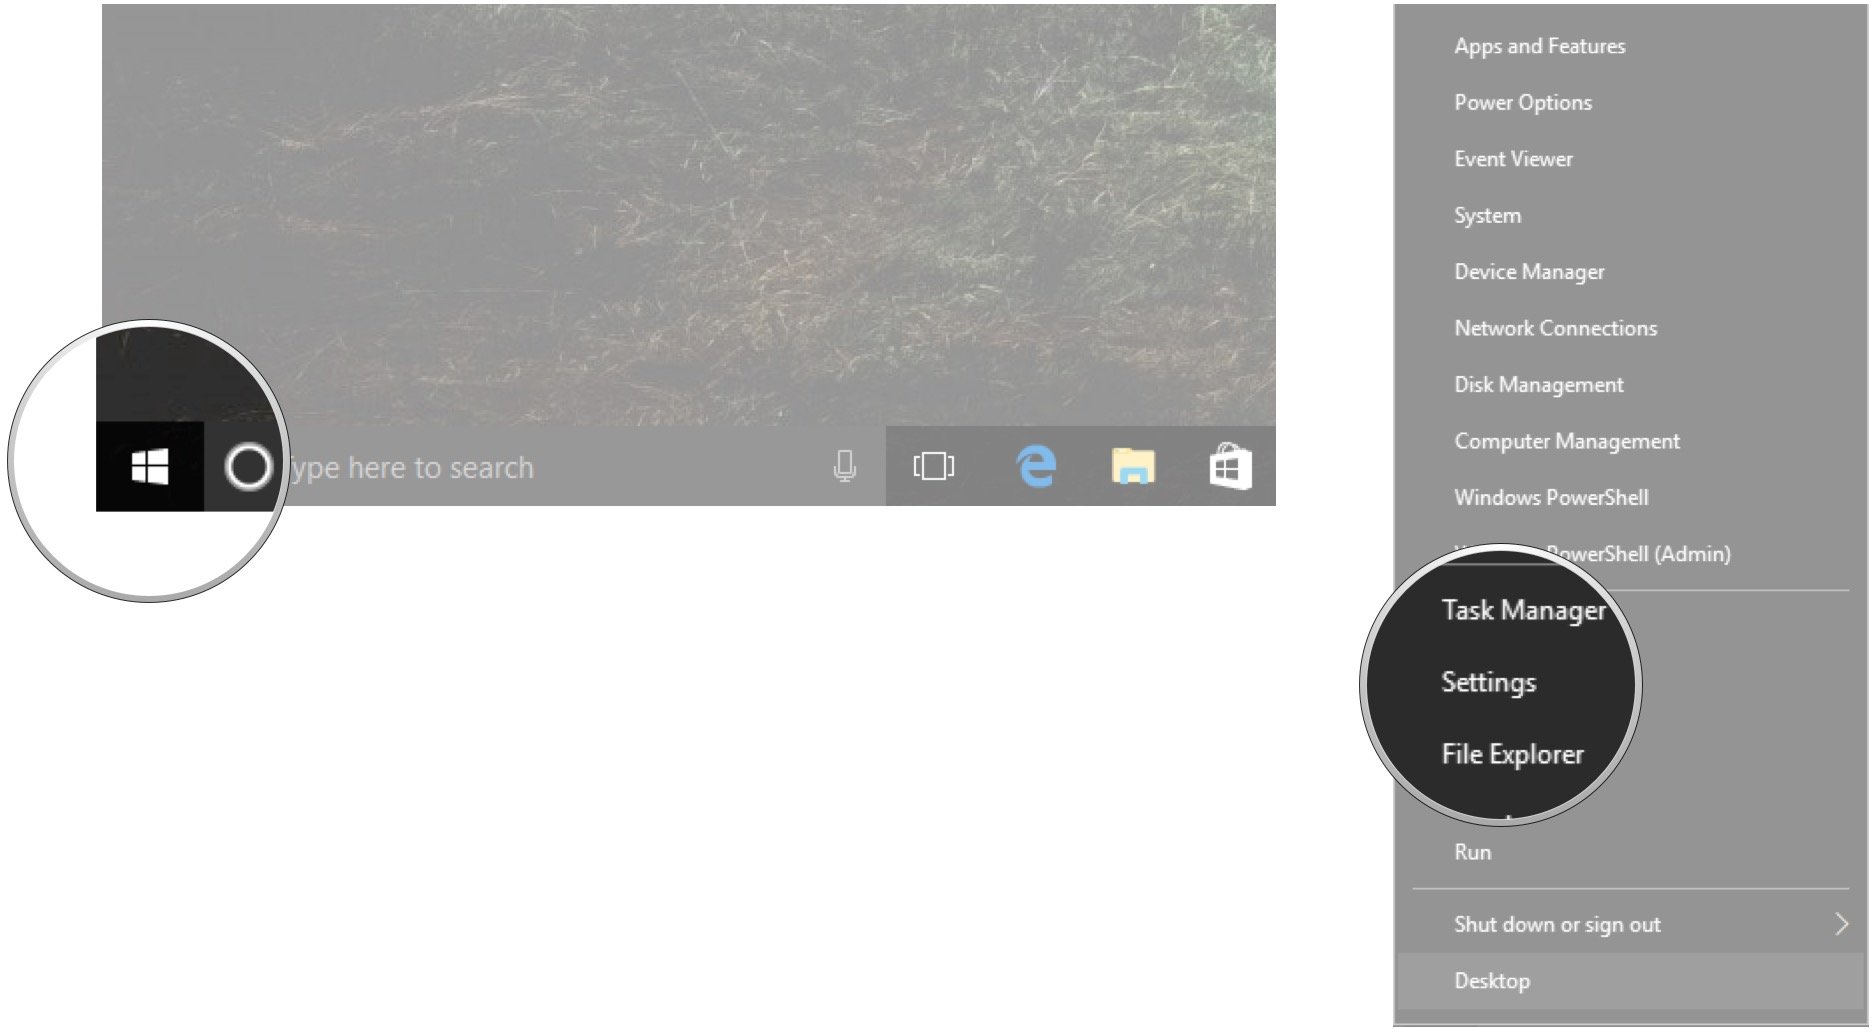
- Right-click the Start button.
- Click Settings.
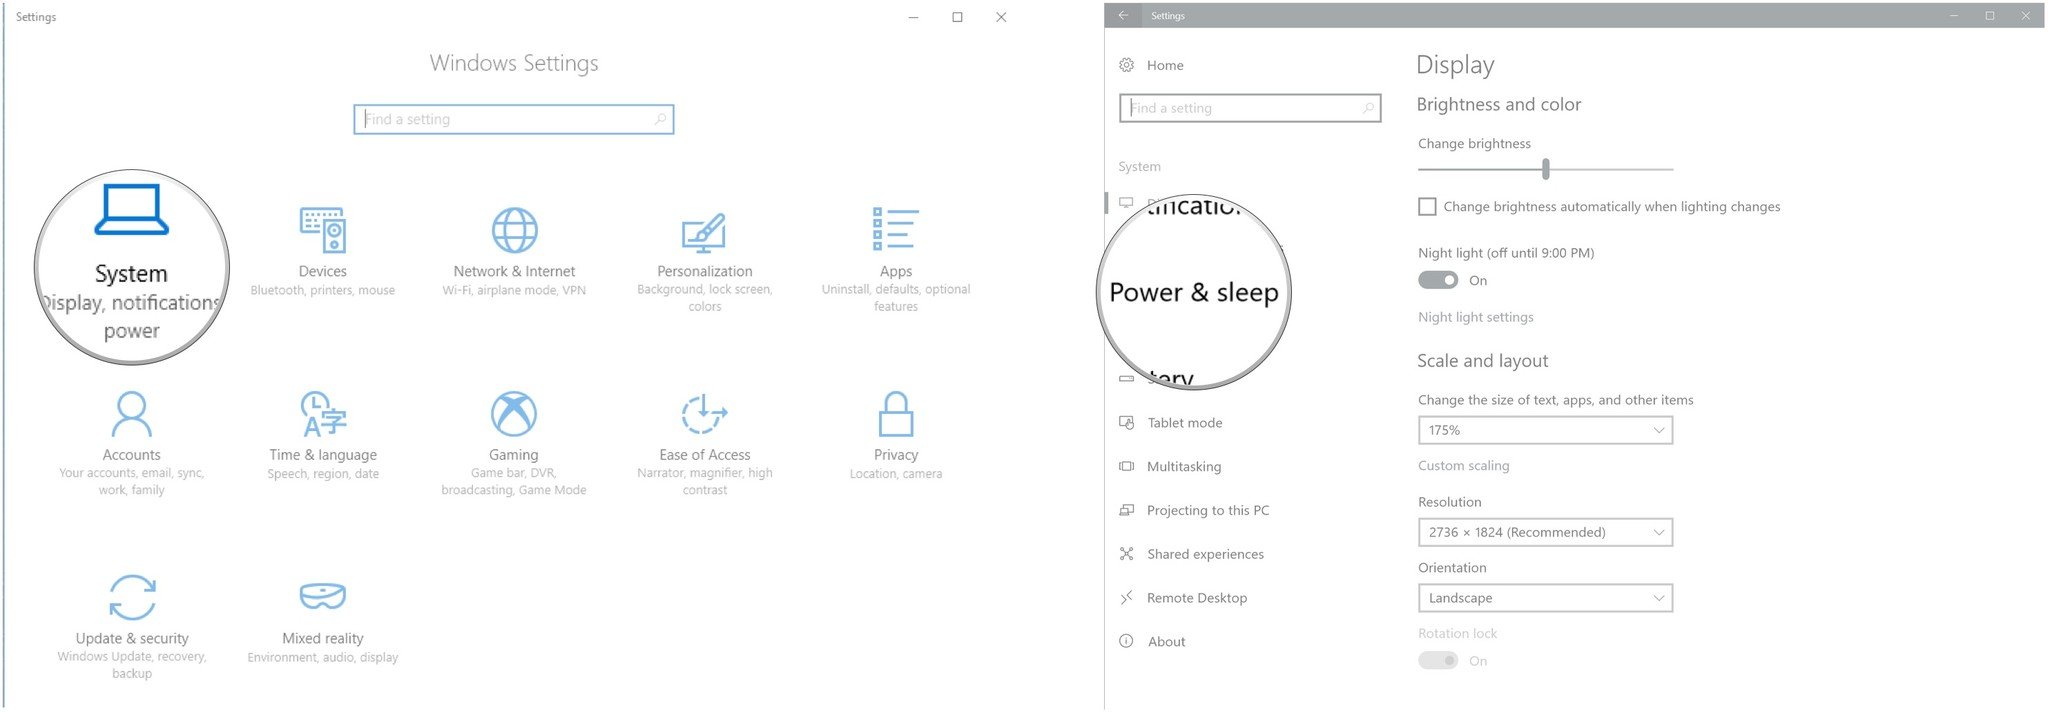
- Click System.
- Click Power & sleep.
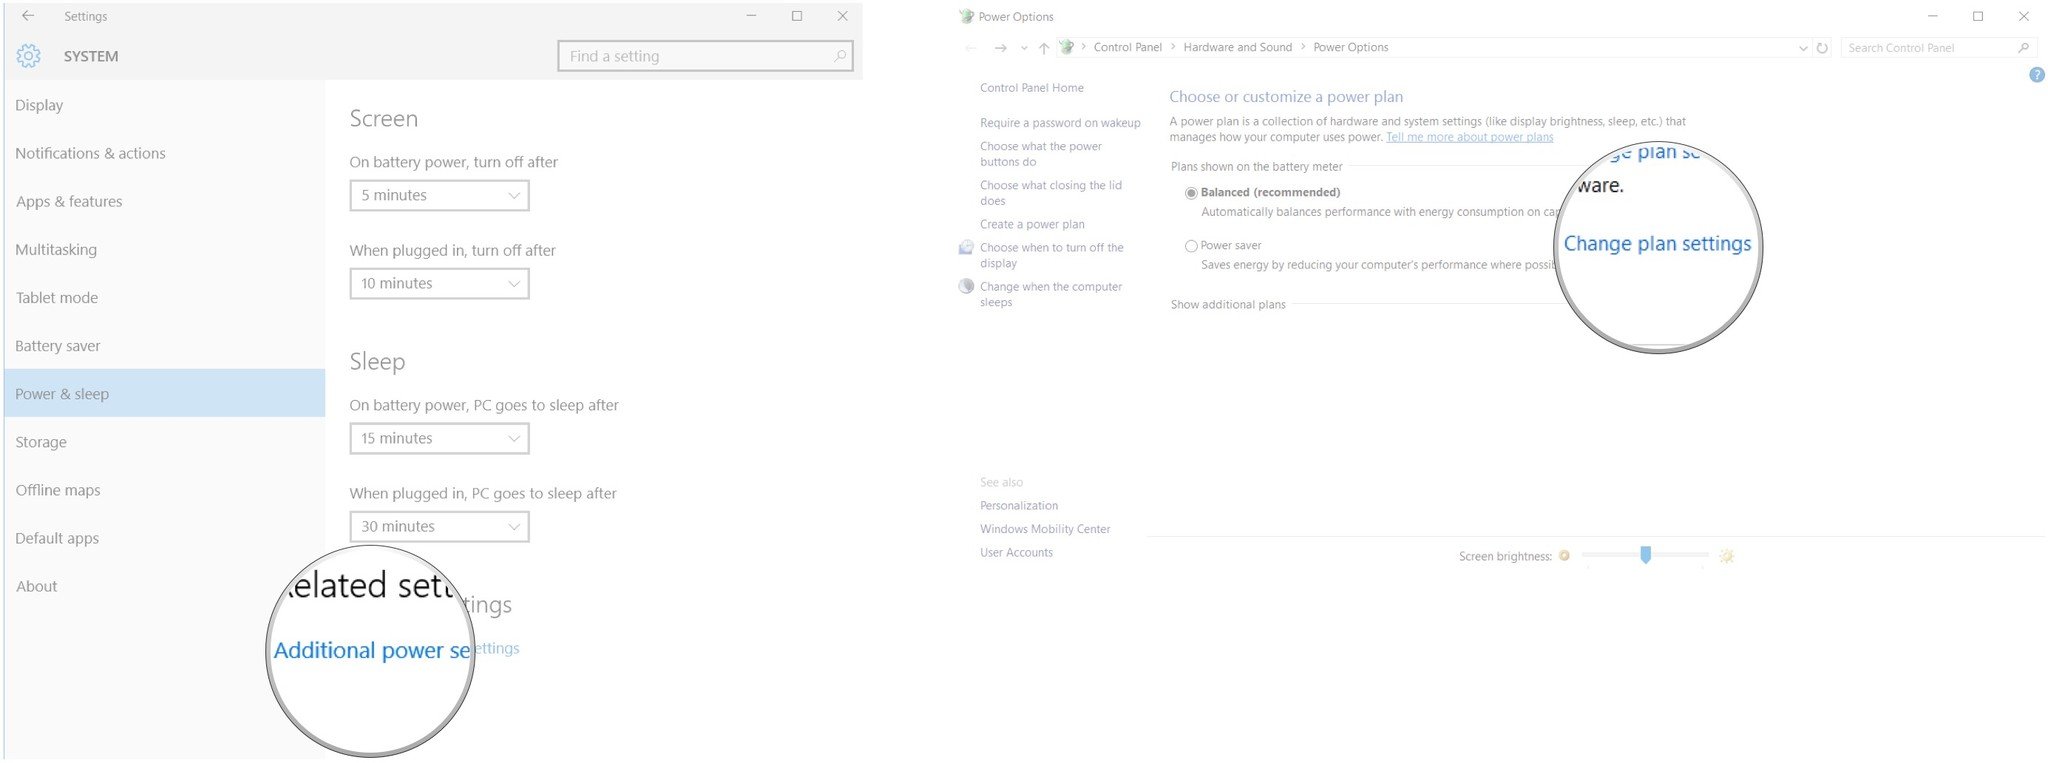
- Click Additional power settings in the Related settings section.
- Click Change plan settings.
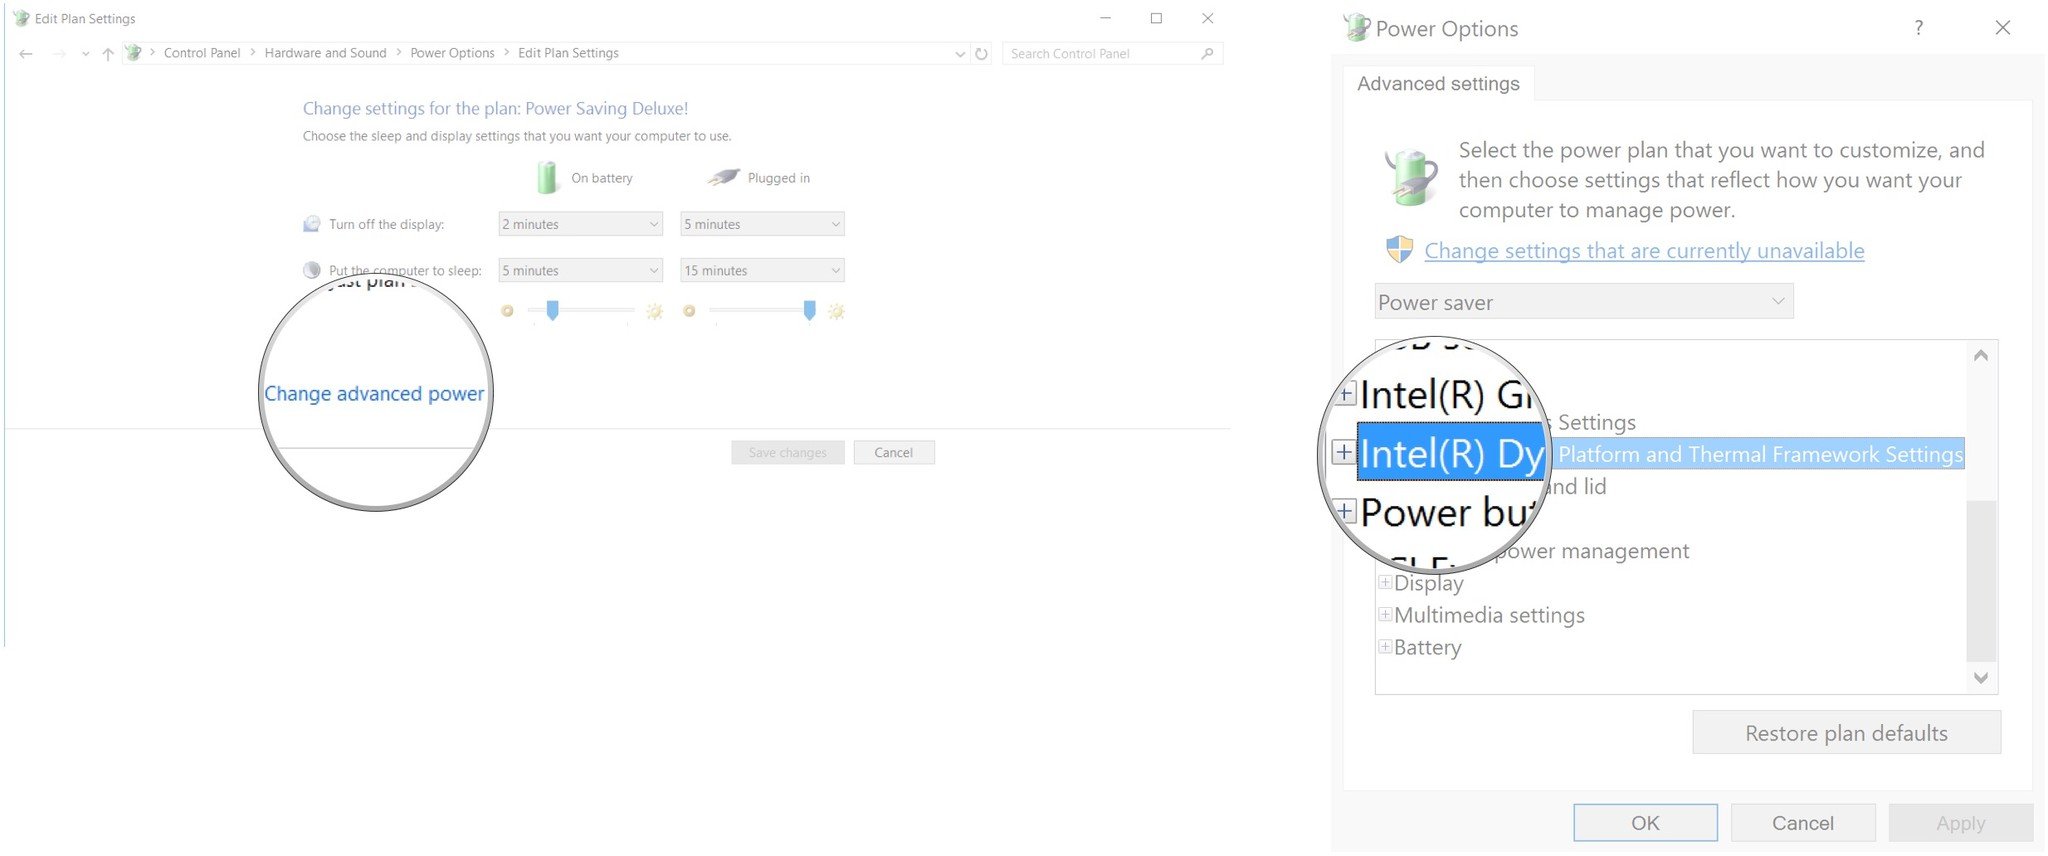
- Click Change advanced power settings.
- Click the expand button (it looks like a +) beside Intel(R) Dynamic Platform and Thermal Framework Settings.
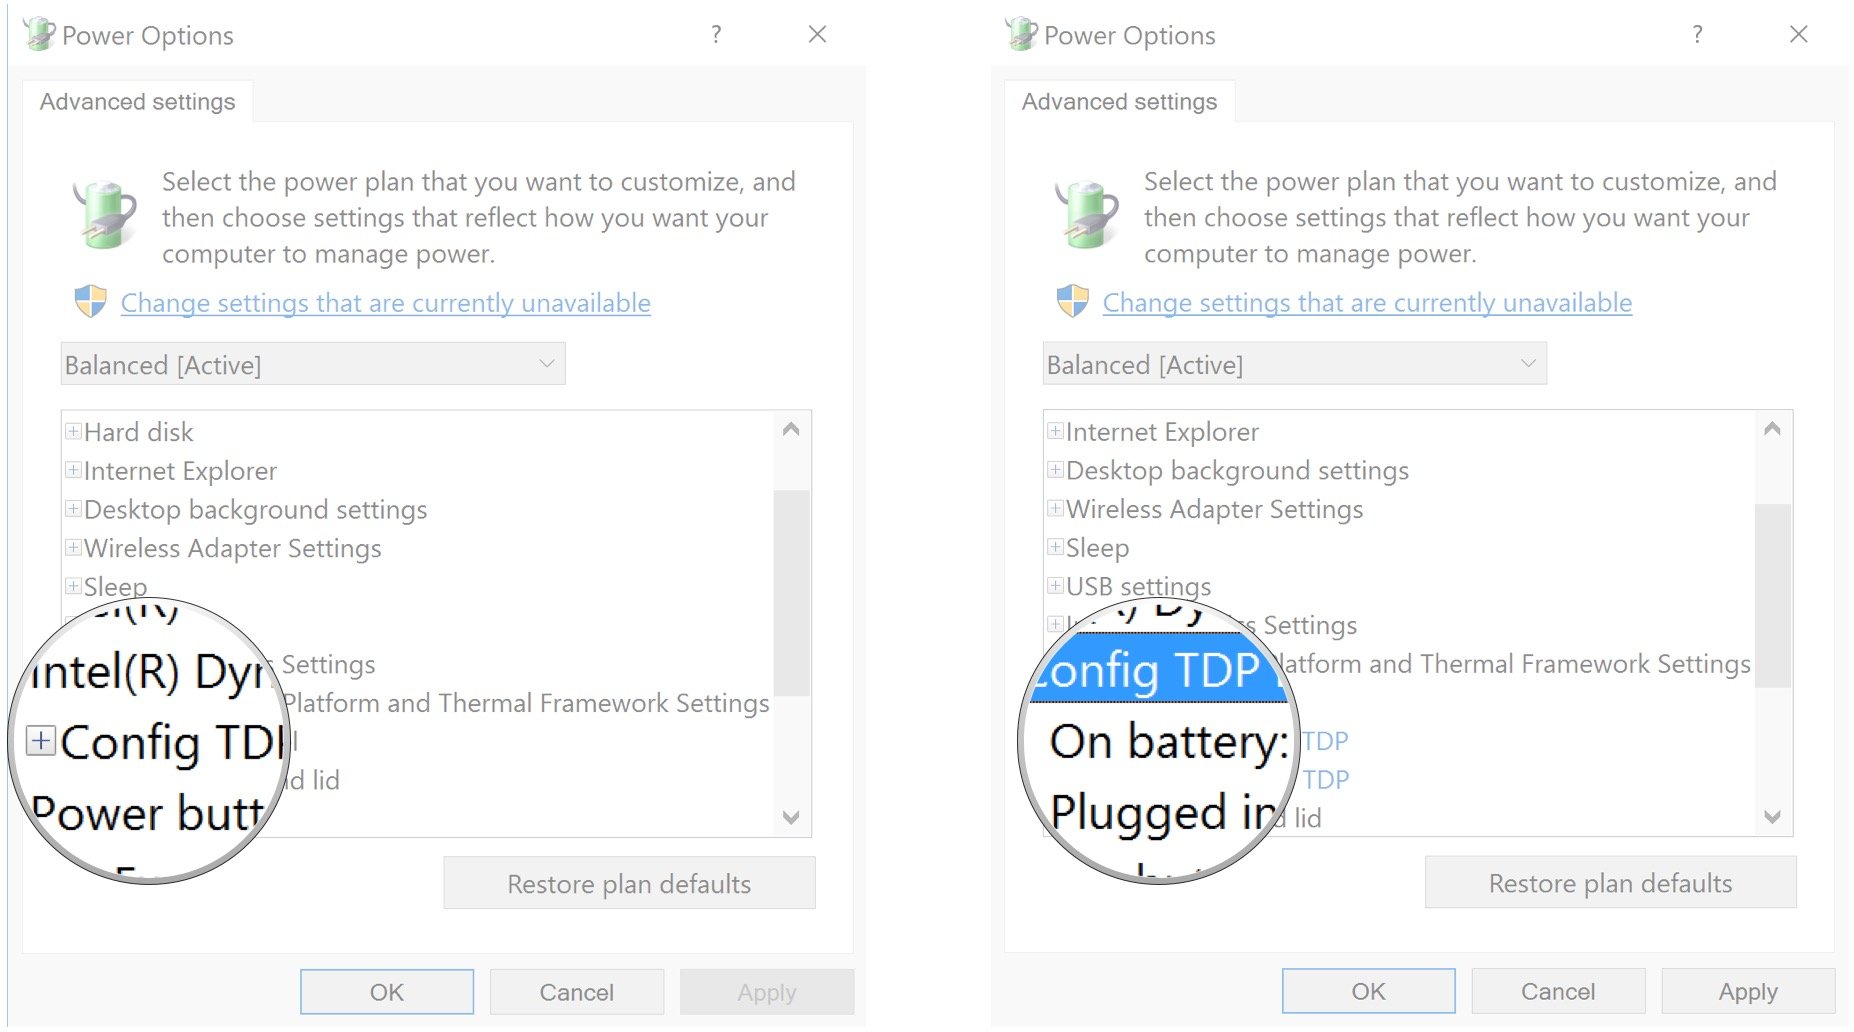
- Click the expand button (it looks like a +) beside Config TDP Level.
- Click On Battery.
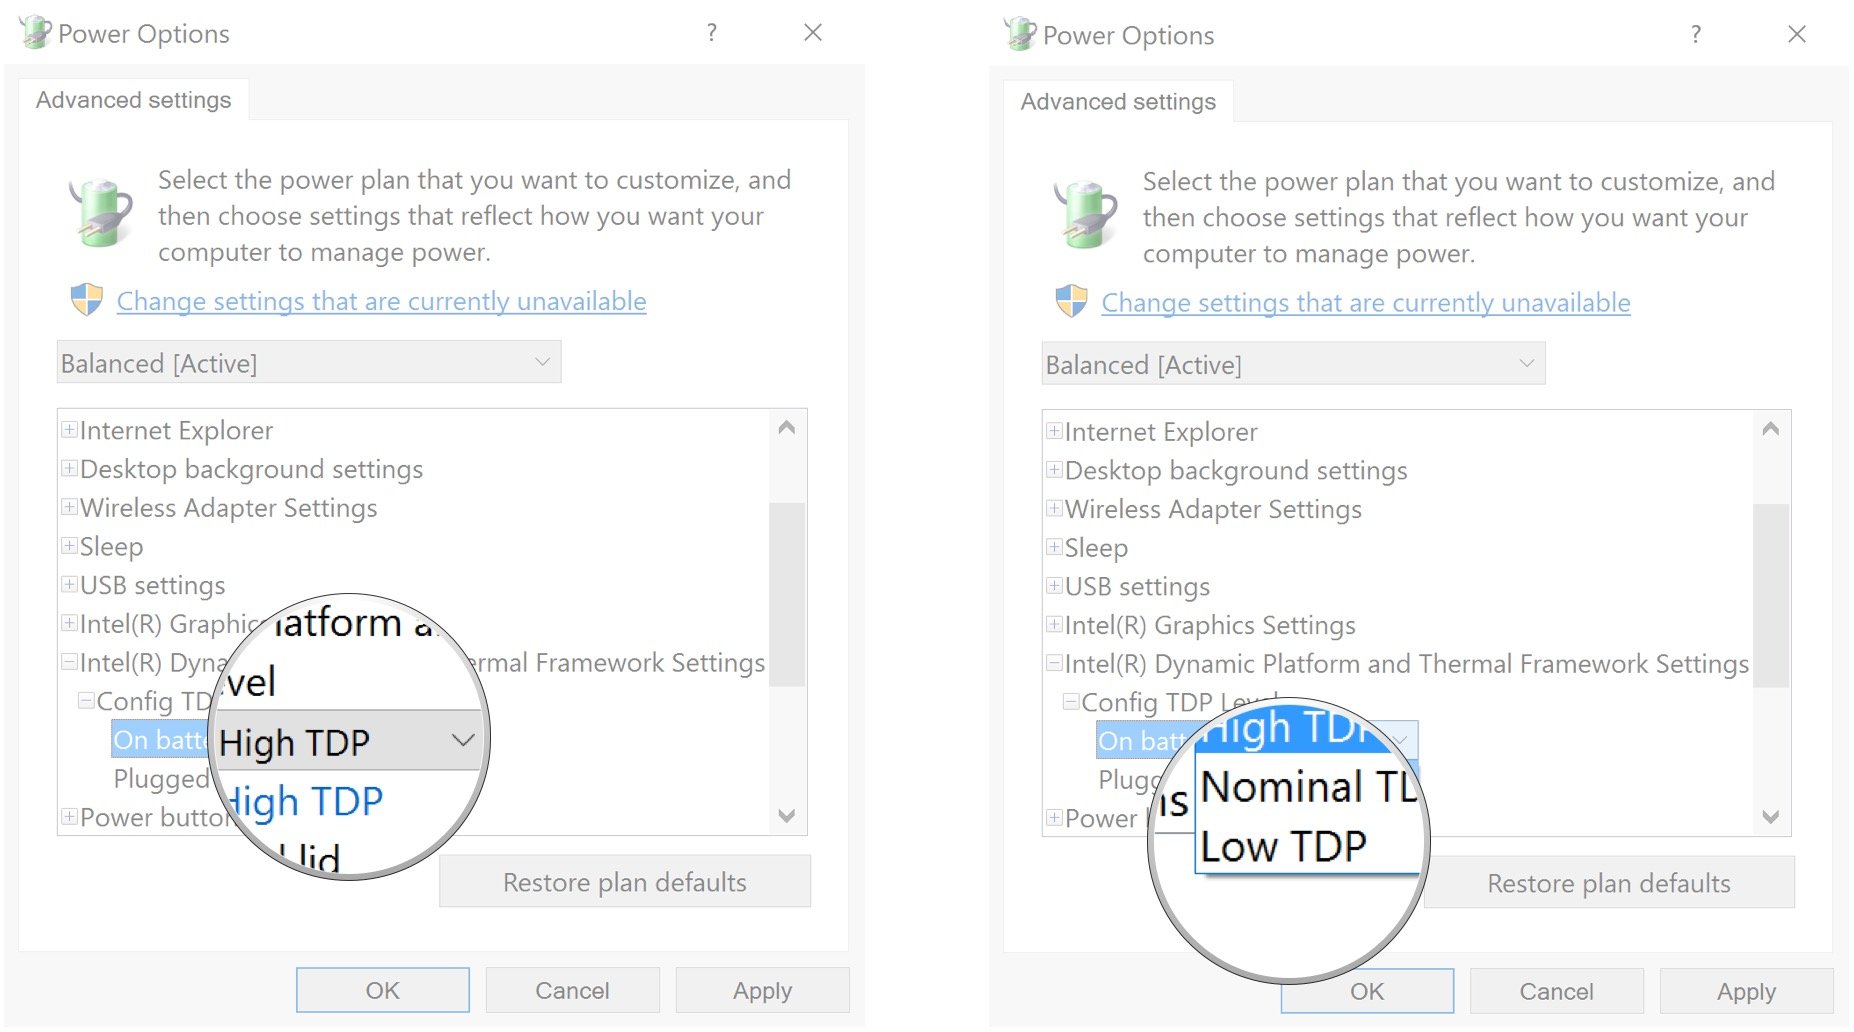
- Click the dropdown arrow next to High TDP.
- Click Low TDP.
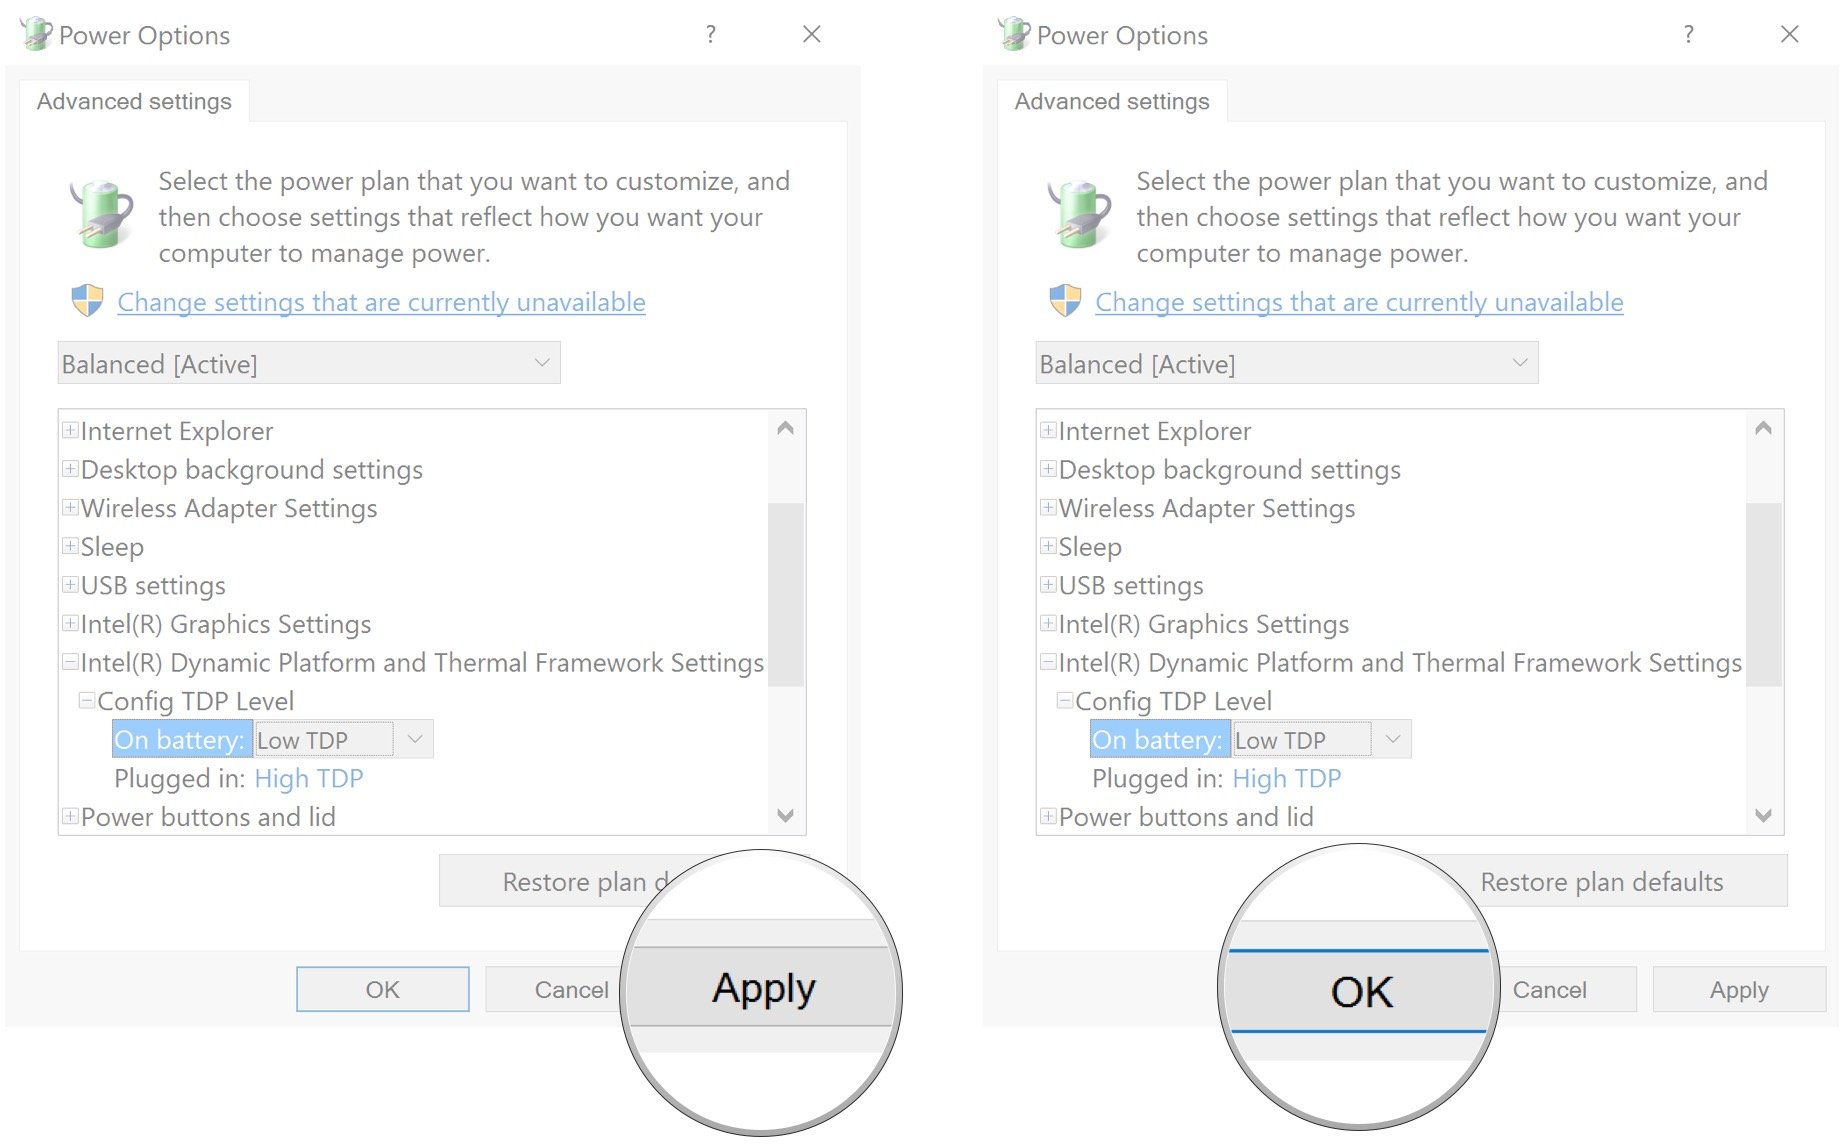
- Click Apply.
- Click OK.
If you don't see the Intel Dynamic Platform option in your laptop's power options, you can still underclock the CPU. Here's how:
- Right-click the Start button.
- Click Settings.

- Click System.
- Click Power & sleep.

- Click Additional power settings in the Related settings section.
- Click Change plan settings next to the power plan.
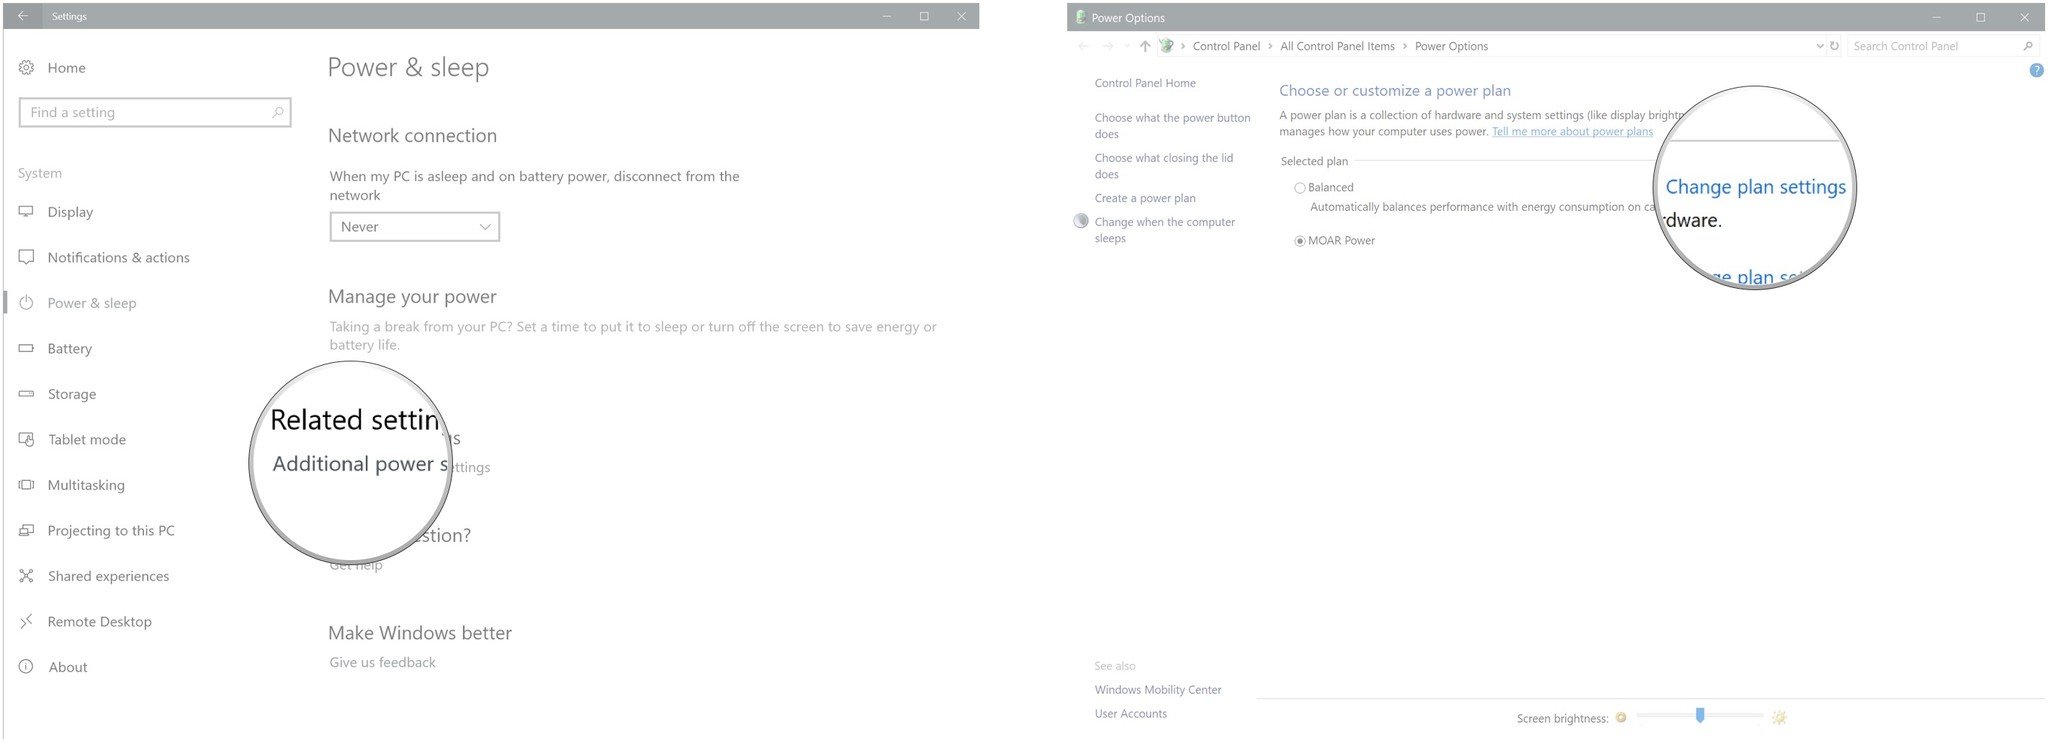
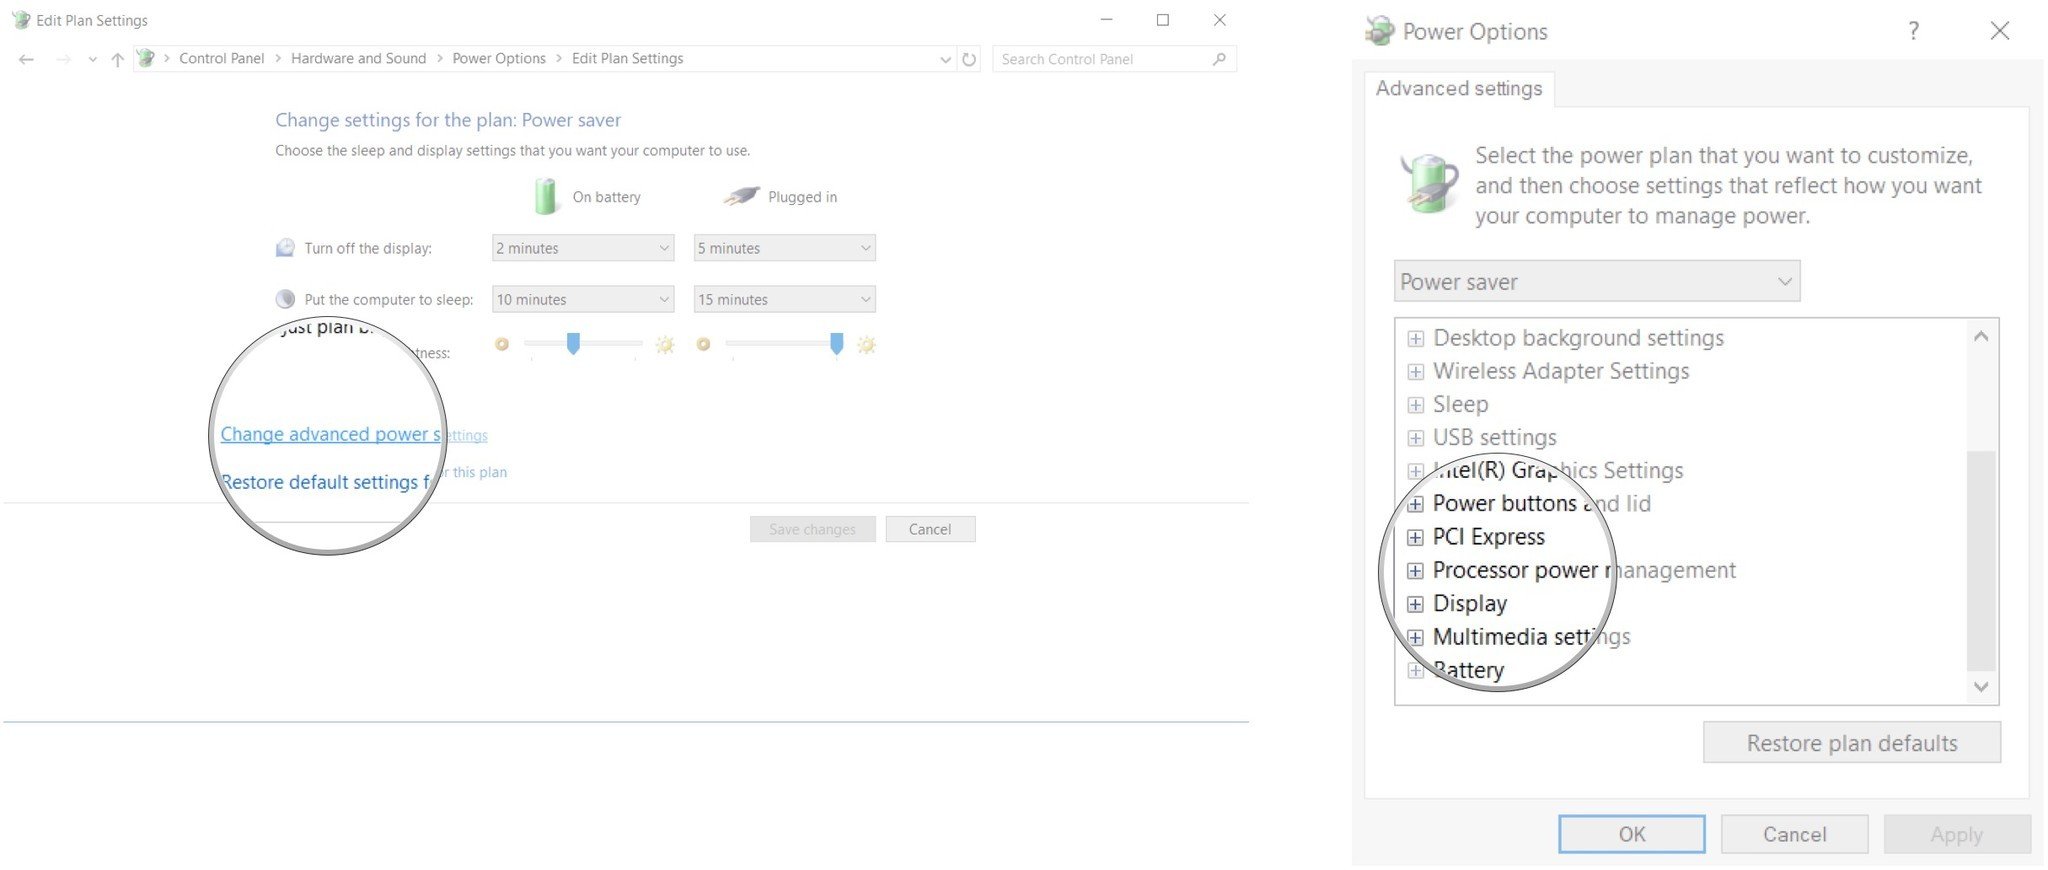
- Click Change advanced power settings.
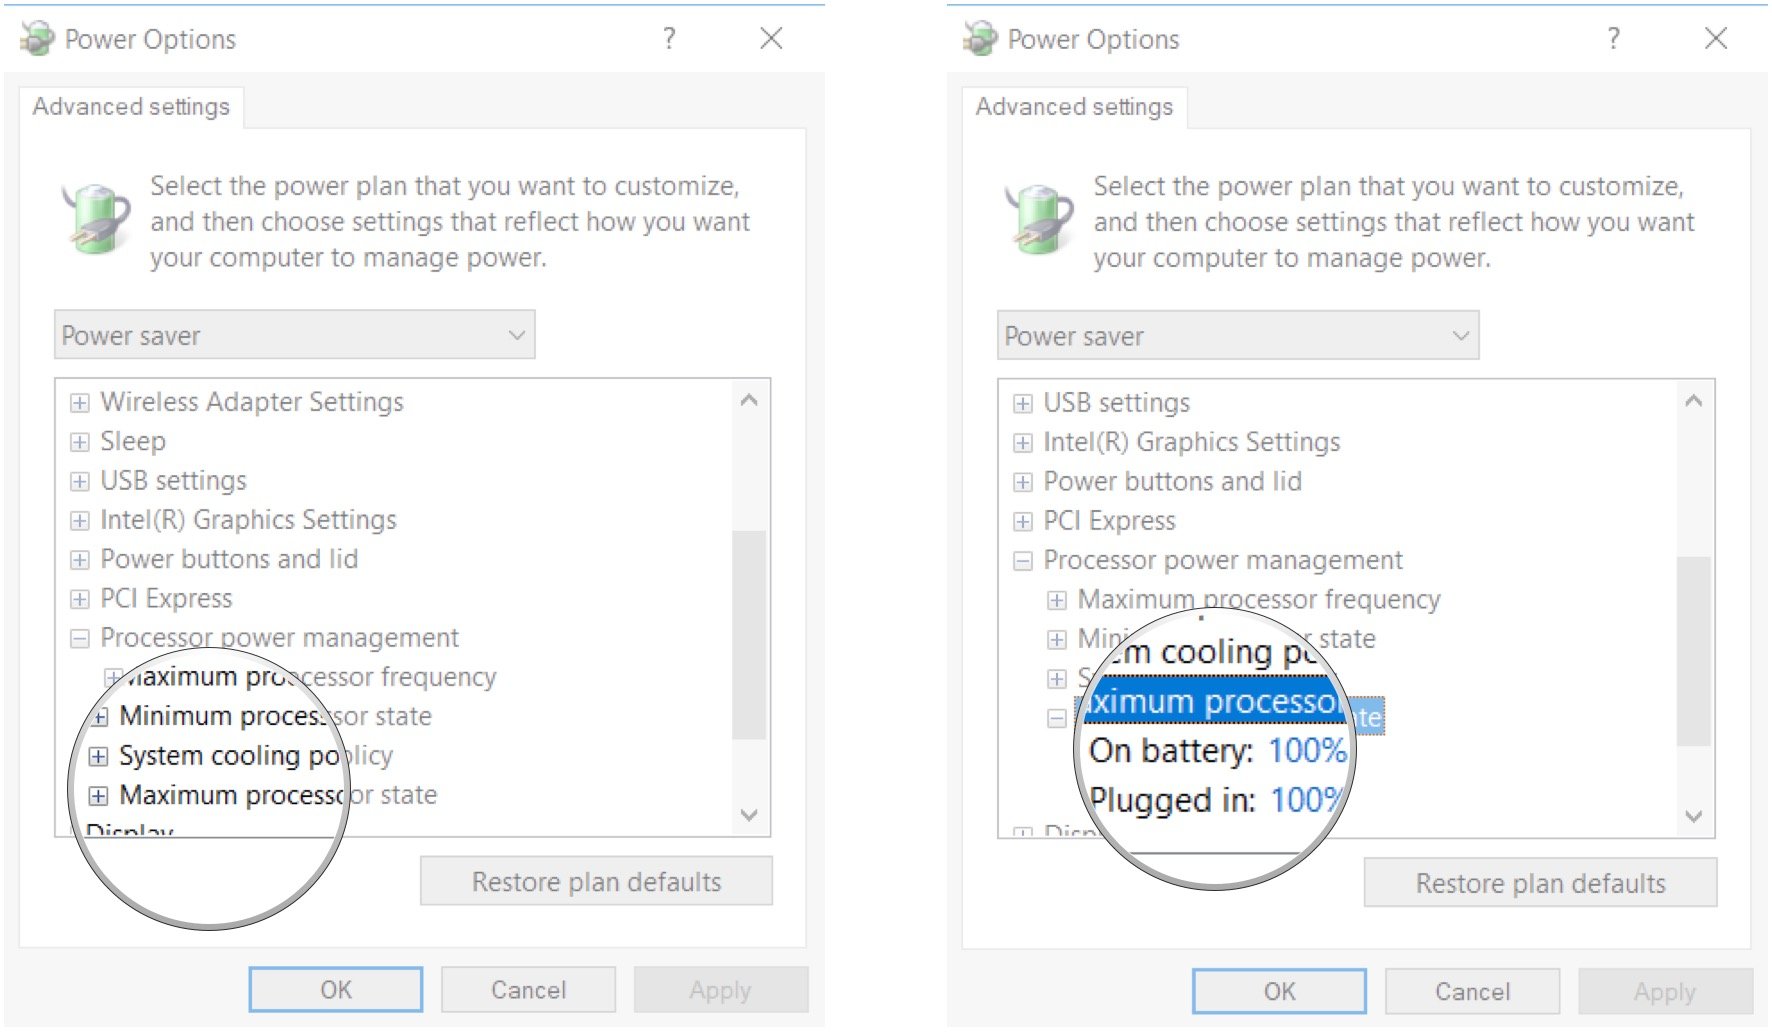
- Click the expand button (it looks like a +) next to Processor power management.
- Click the expand button (it looks like a +) next to Maximum processor state.
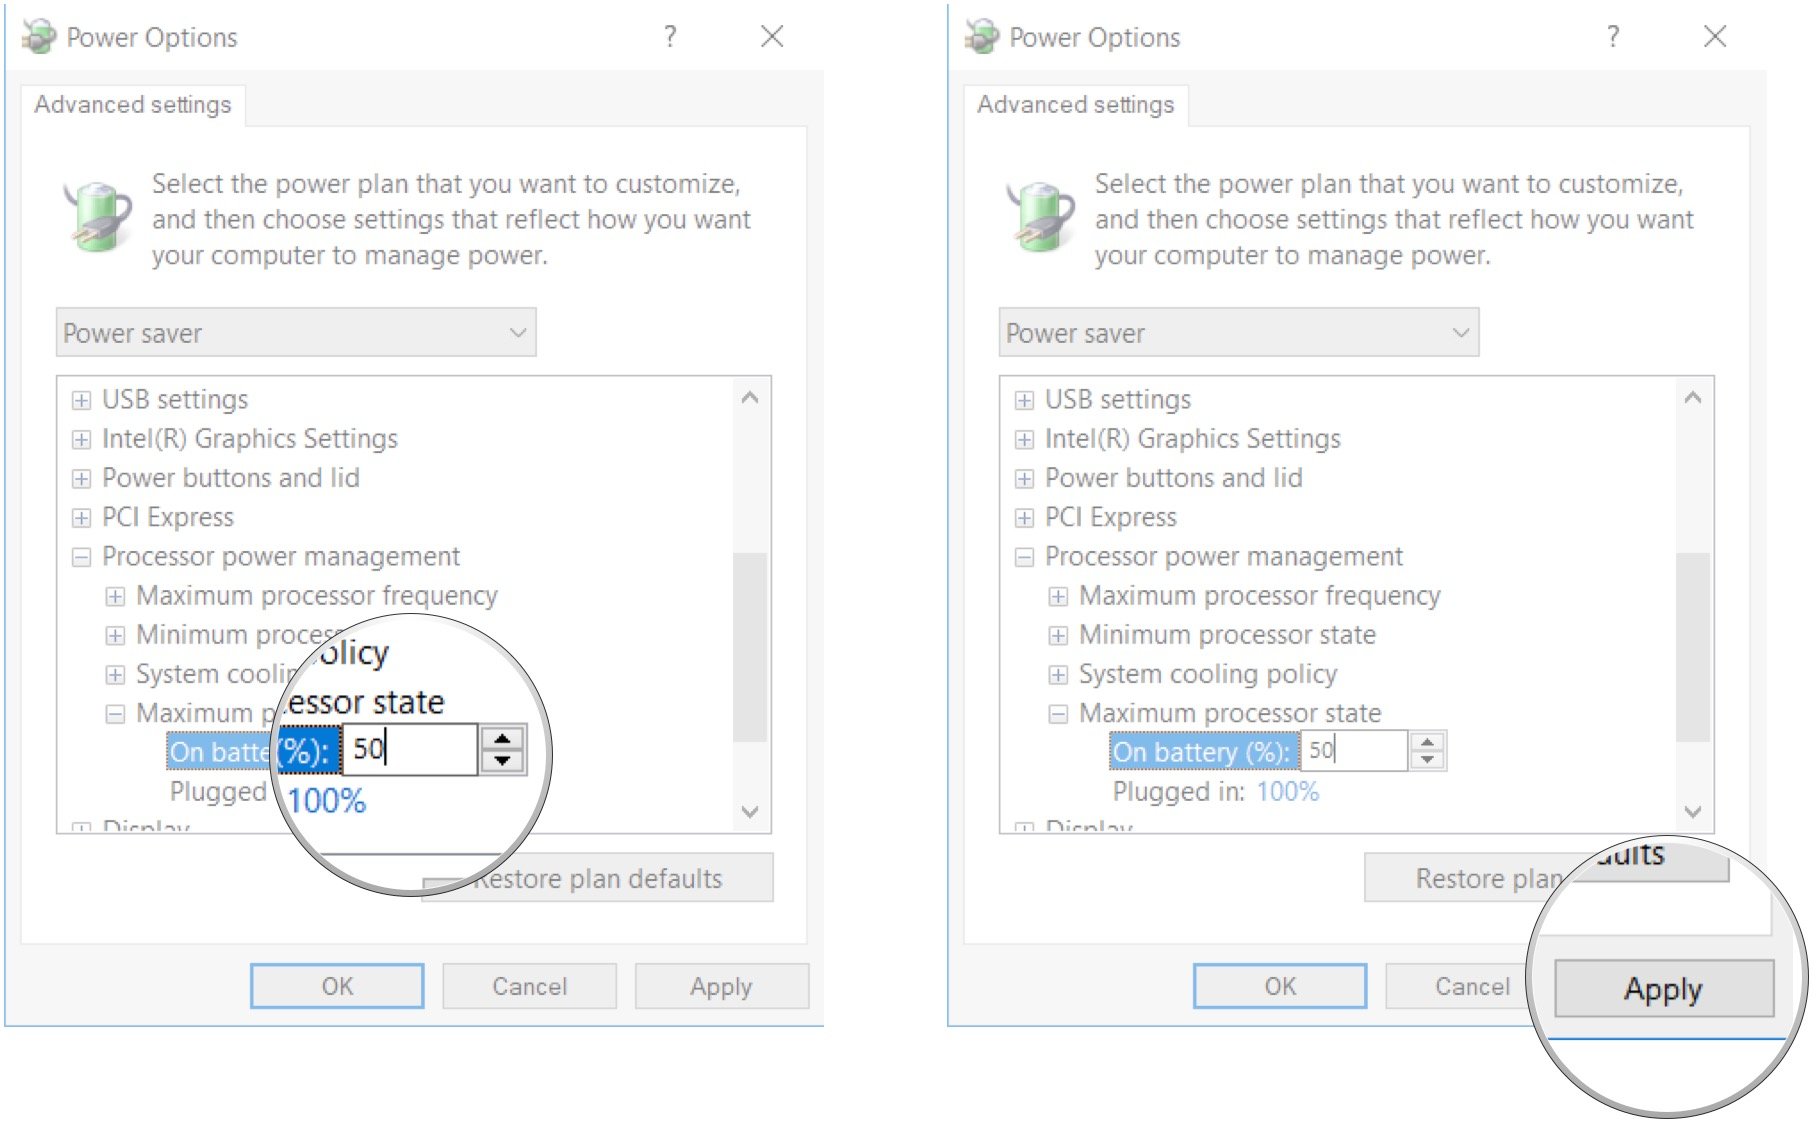
- Click On battery.
- Adjust the percentage to a level you'd like. (In our case, we changed it to 50 percent.)
- Click Apply.
Choose which apps can run on battery power
If there are apps that you seldom use when on battery power, you can prohibit them from running in the background when your PC isn't plugged in. Just follow these steps:
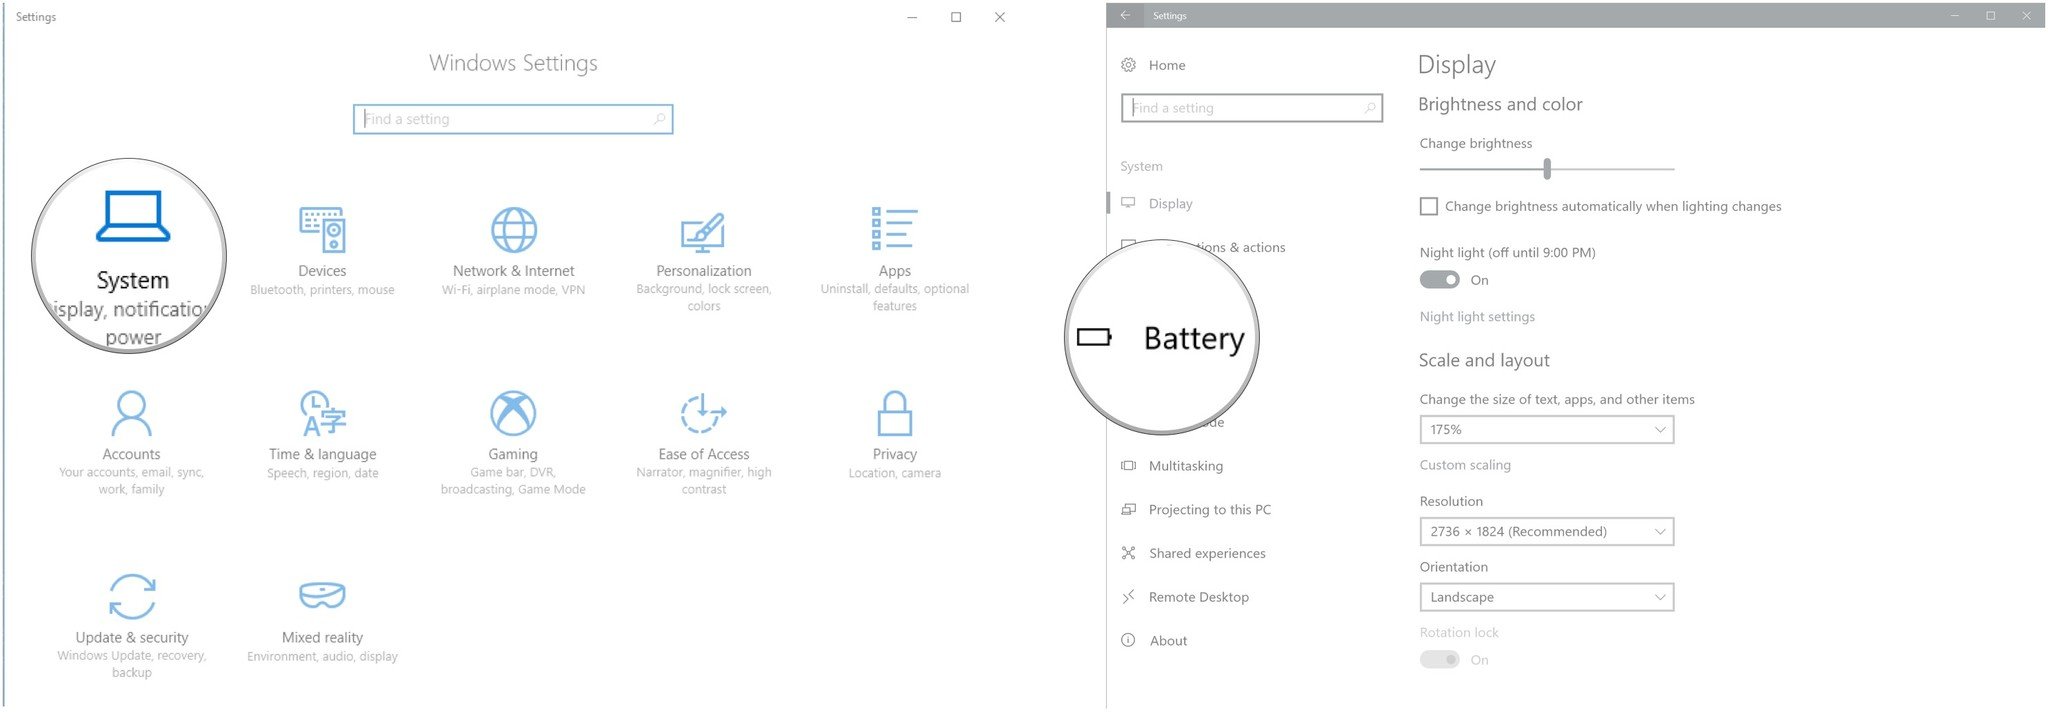
- Right-click the Start button.
- Click Settings.

- Click System.
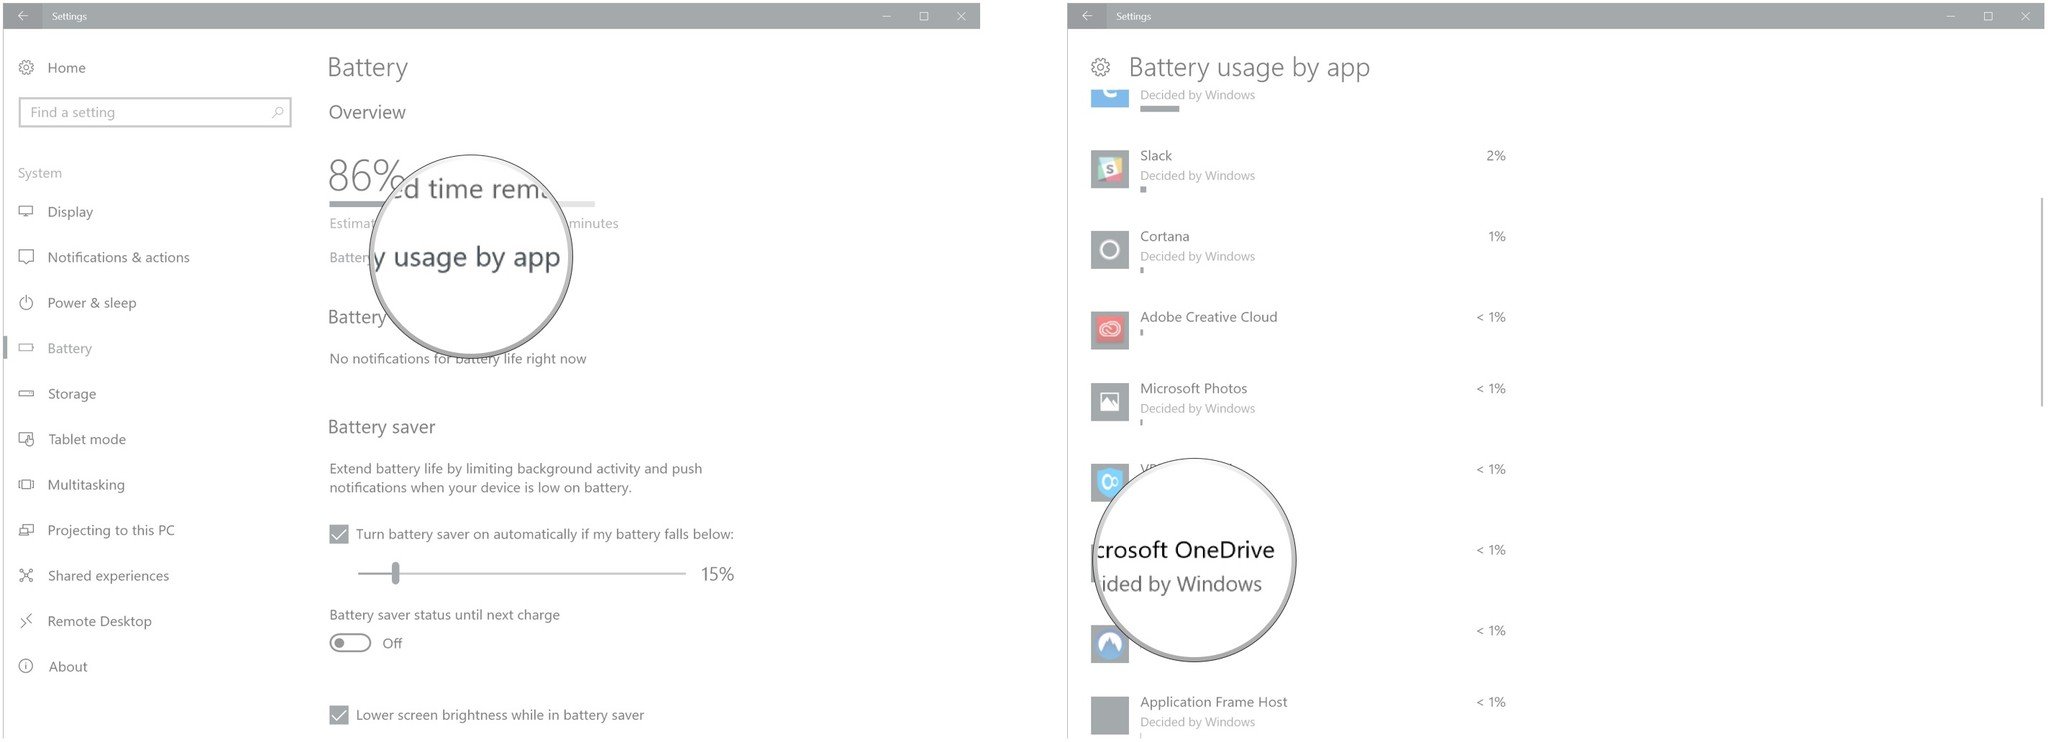
- Click Battery.
- Click Battery usage by app.
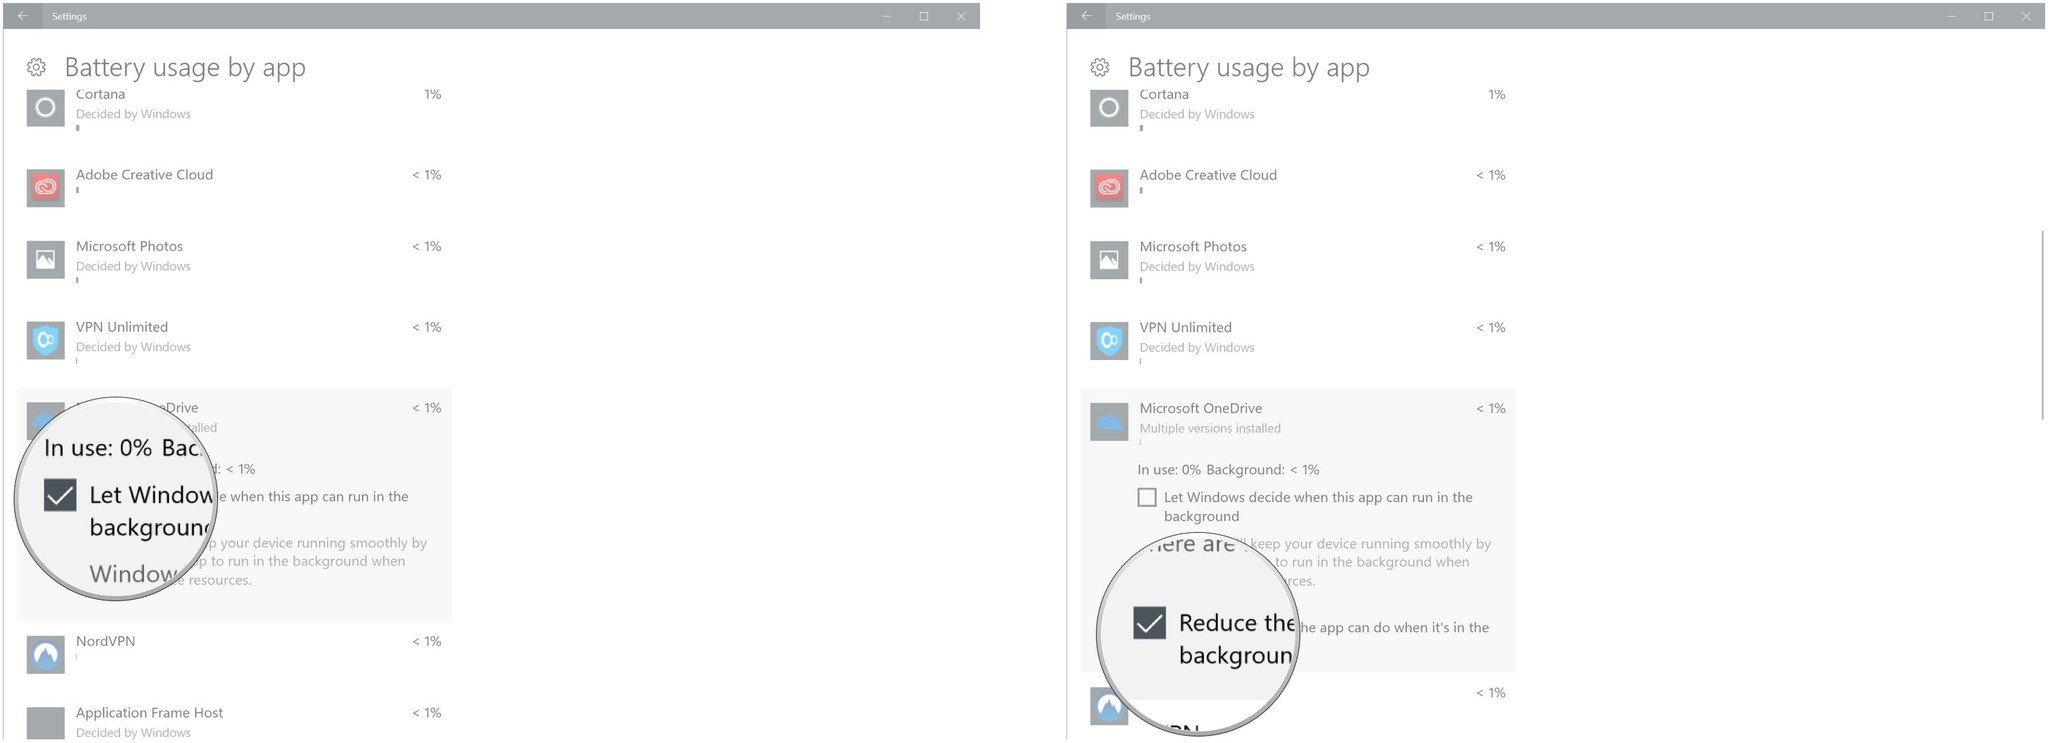
- Click an app.
- Click the checkbox next to Let Windows decide… so that it's unchecked.
- Ensure the checkbox next to Reduce the work the app… is checked.
Disable wireless communication
This tip is for when don't need Bluetooth or Wi-Fi and want to eke a few extra minutes from your battery, whether to jot down a few more words or finish up a suspenseful movie that you've downloaded onto your hard drive.
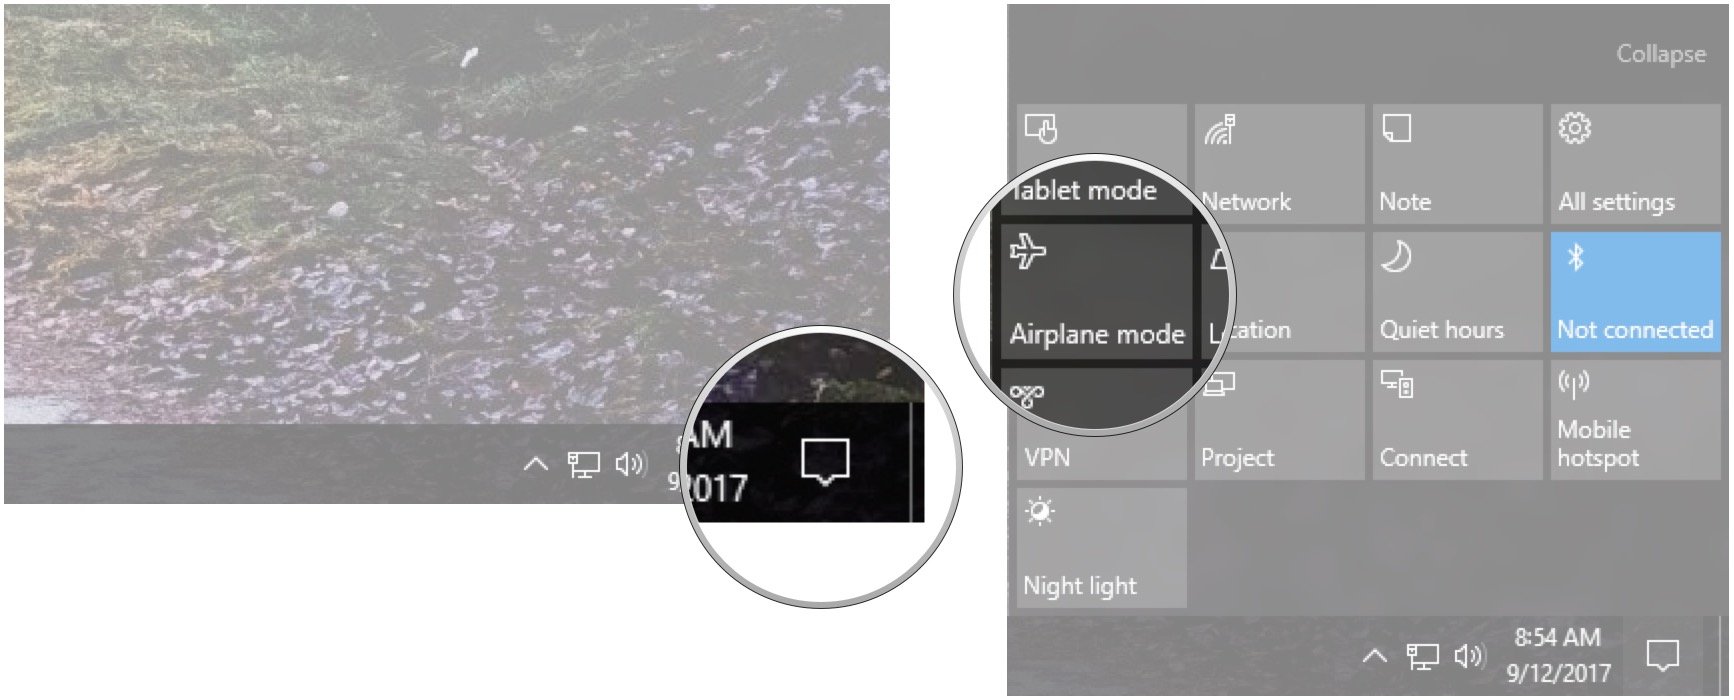
The easiest way to disable all wireless communication is to enable airplane mode. This is done either through the Action Center or through the regular Windows 10 settings:
- Click the Action Center button in the bottom-right corner of the screen.
- Click Airplane mode. Repeat these steps to disable airplane mode.
To achieve the same result through normal Windows 10 settings, follow these steps. From the following menu, you can also individually disable Wi-Fi and Bluetooth:
- Right-click the Start button.
- Click Settings.
- Click Network & Internet.
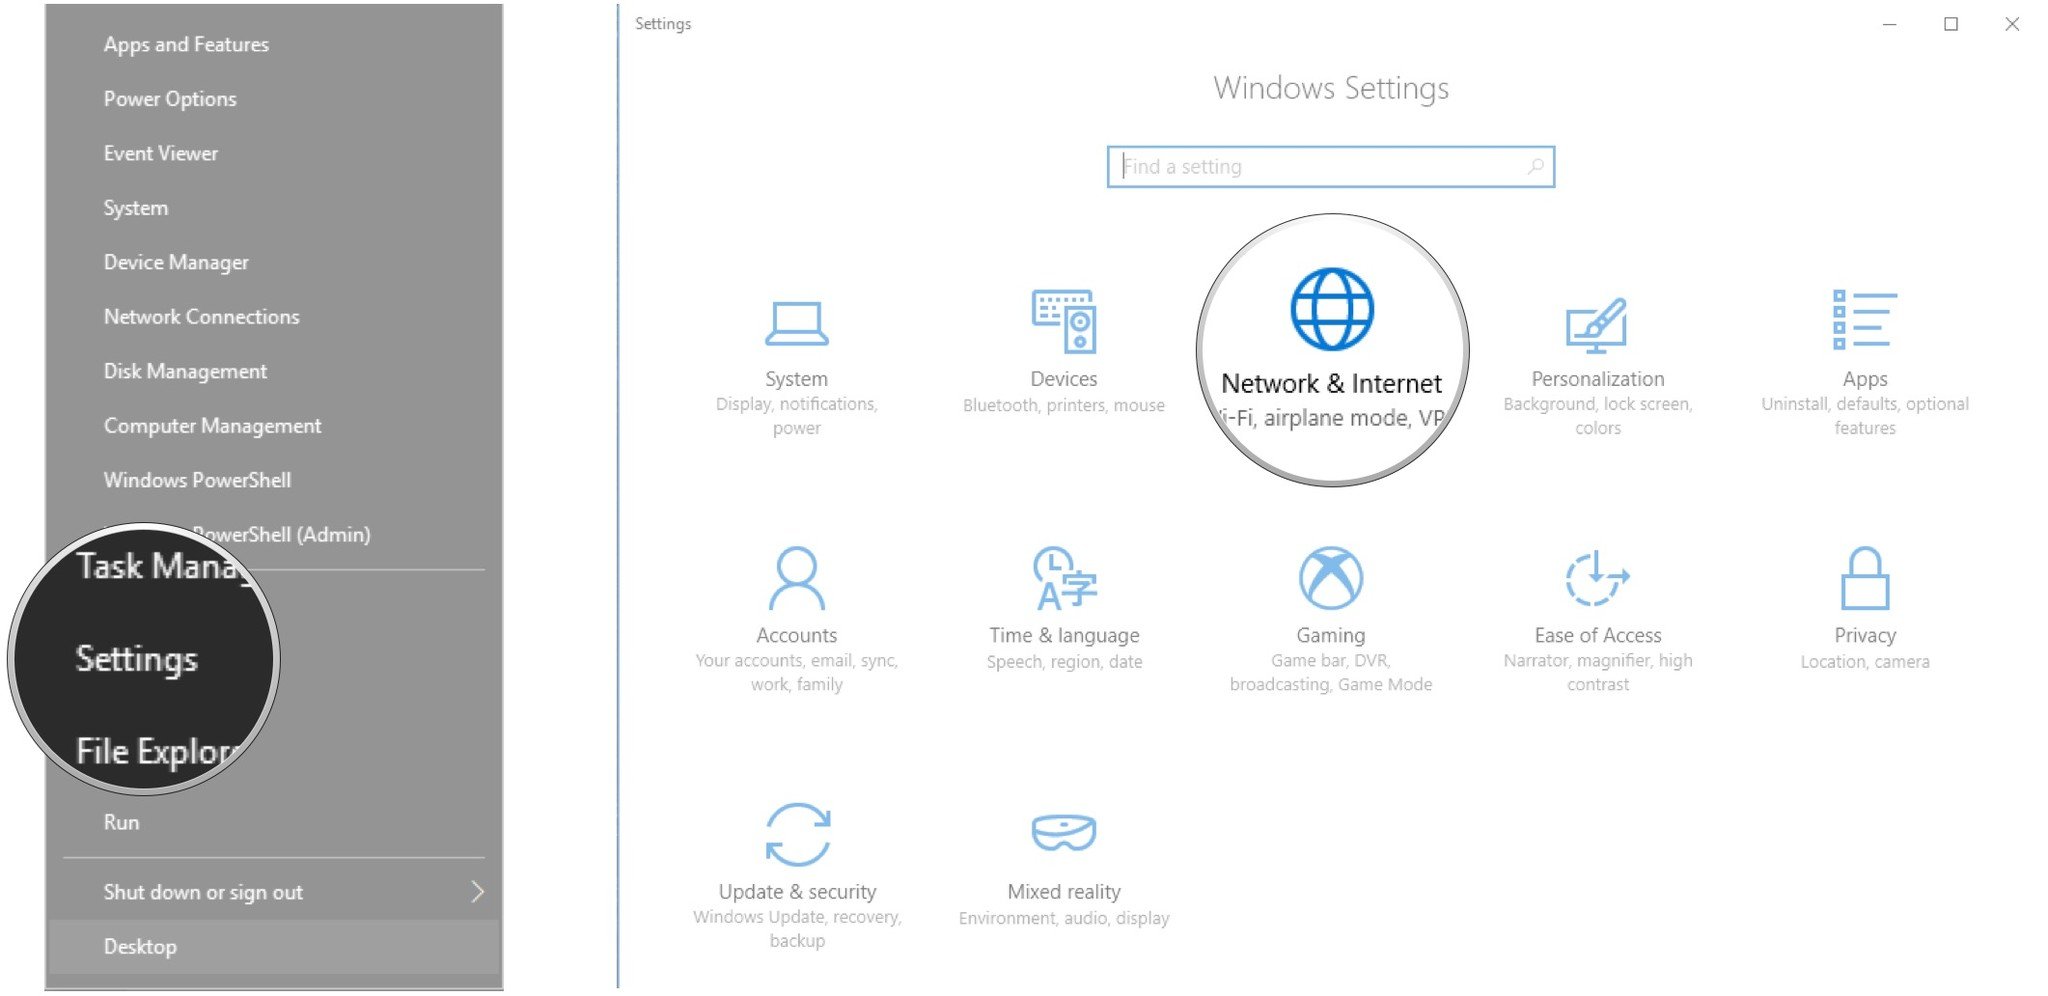
- Click Airplane mode.
- Click the switch below Airplane mode. Repeat the steps to disable airplane mode.

Do you have Windows battery tips to share?
Did we miss an obvious battery-saving tip? Be sure to let us know in the comments. Your fellow readers will appreciate the help! Also, be sure to check out our picks for the laptops with the absolute best battery life. Need a battery backup? We also put together a list of the best options.

Cale Hunt brings to Windows Central more than eight years of experience writing about laptops, PCs, accessories, games, and beyond. If it runs Windows or in some way complements the hardware, there’s a good chance he knows about it, has written about it, or is already busy testing it.
