12 best tips to free up hard drive space on Windows 11
Here are the best ways to free up hard drive space for more important files and improve performance on Windows 11.
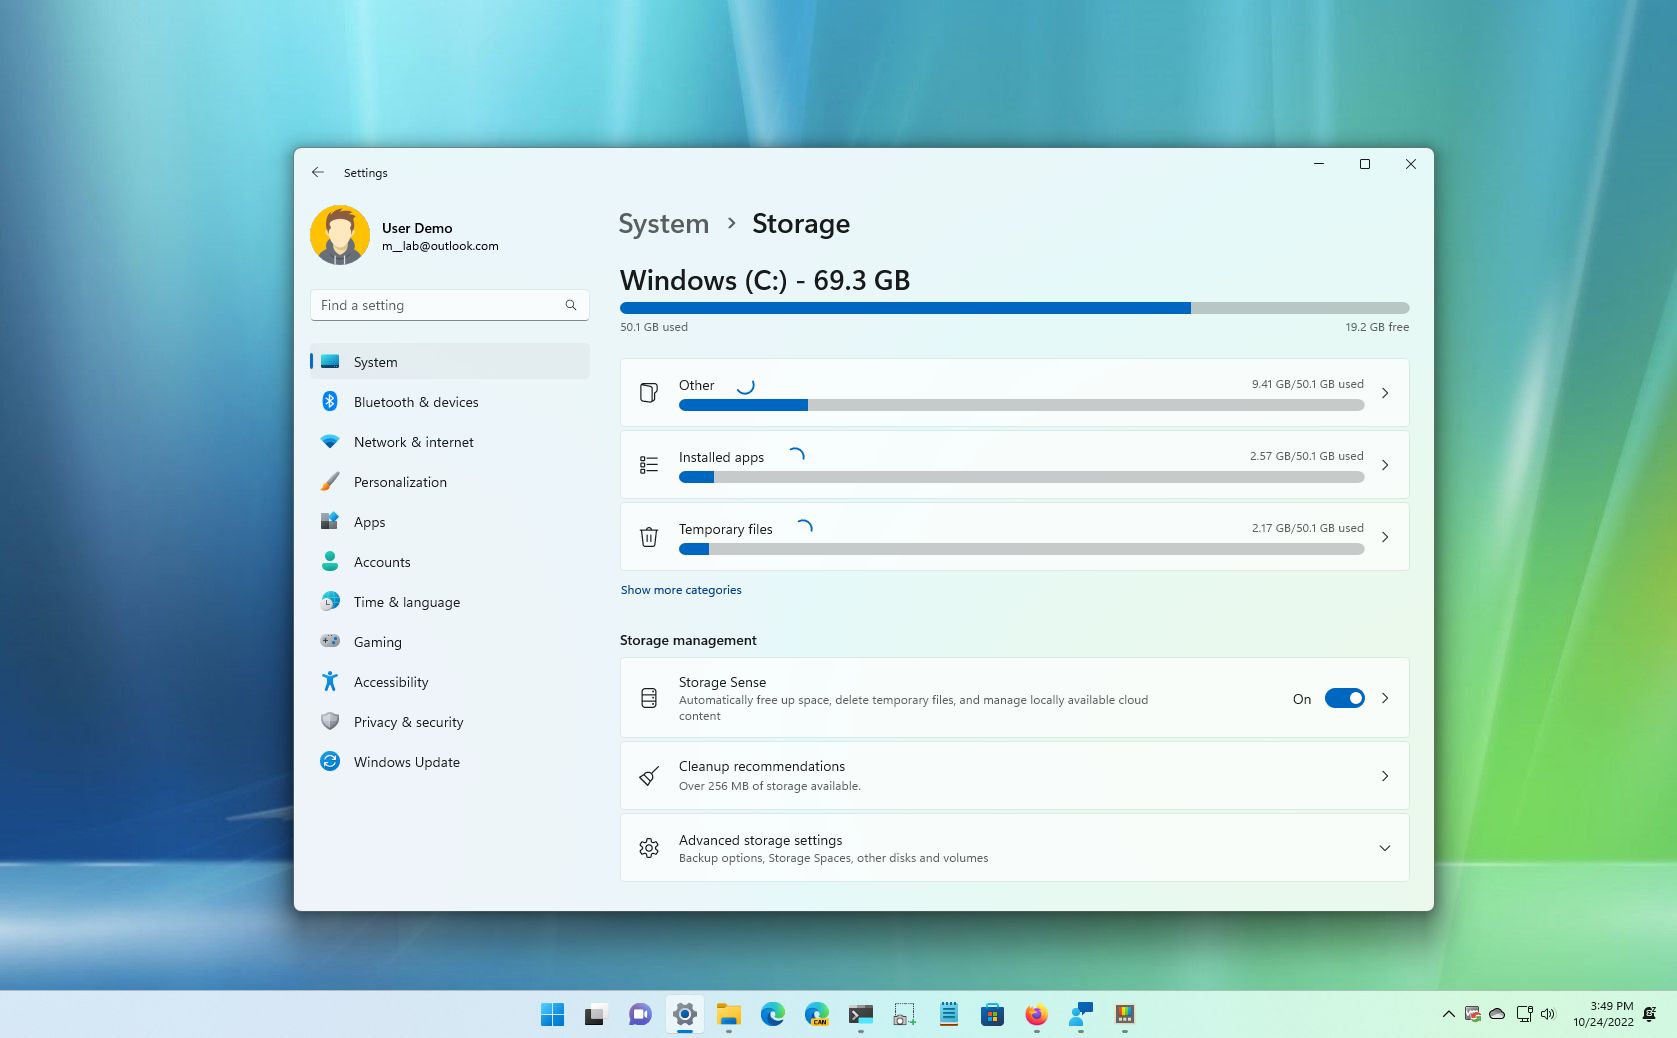
On Windows 11, when your computer is running low on storage, you have several ways to free up space for more important files and improve performance.
For example, you can quickly use Storage Sense to remove temporary files. OneDrive files on-demand to delete files already synced to the cloud. NTFS compression to shrink files to fit more content in the same physical space, and Compact OS to reduce the footprint of Windows 11 and apps. You can also uninstall apps and games you rarely use, move files to a different drive, and more.
This guide will walk you through the most effective methods to free up space on your computer.
Free up space with Cleanup recommendations
On Windows 11, "Cleanup recommendations" is a new feature that automatically tells you the contents you might be able to remove to reclaim space on your laptop or desktop computer, including specific large and unused files, rarely used apps and games, and files already synced to OneDrive.
To free up space with Cleanup recommendations on Windows 11, use these steps:
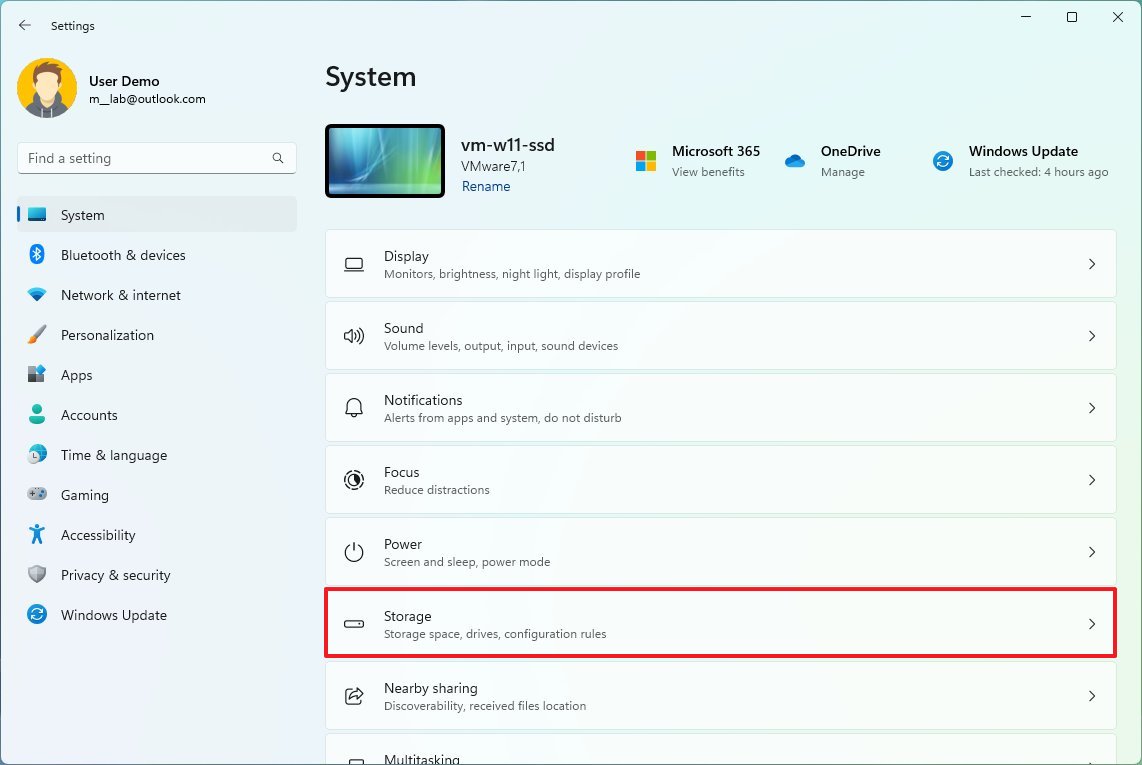
- Open Settings.
- Click on System.
- Click the Storage page on the right side.
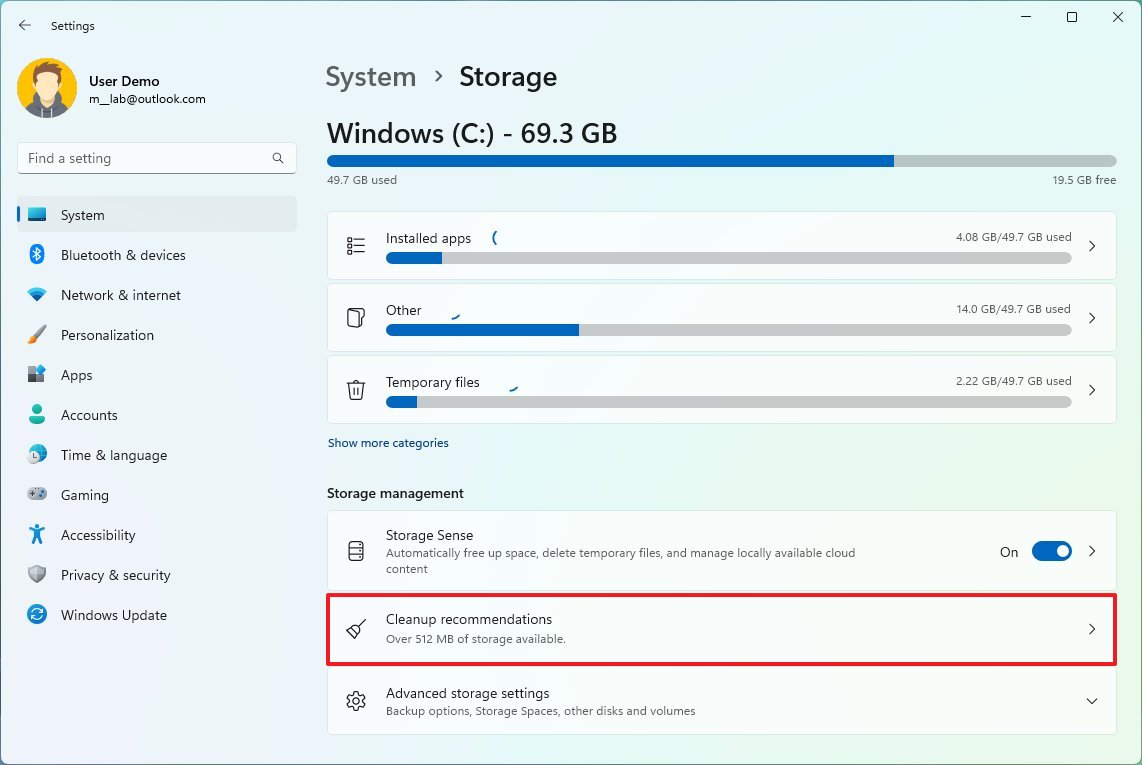
- Under the "Storage management" section, select the "Cleanup recommendations" setting.
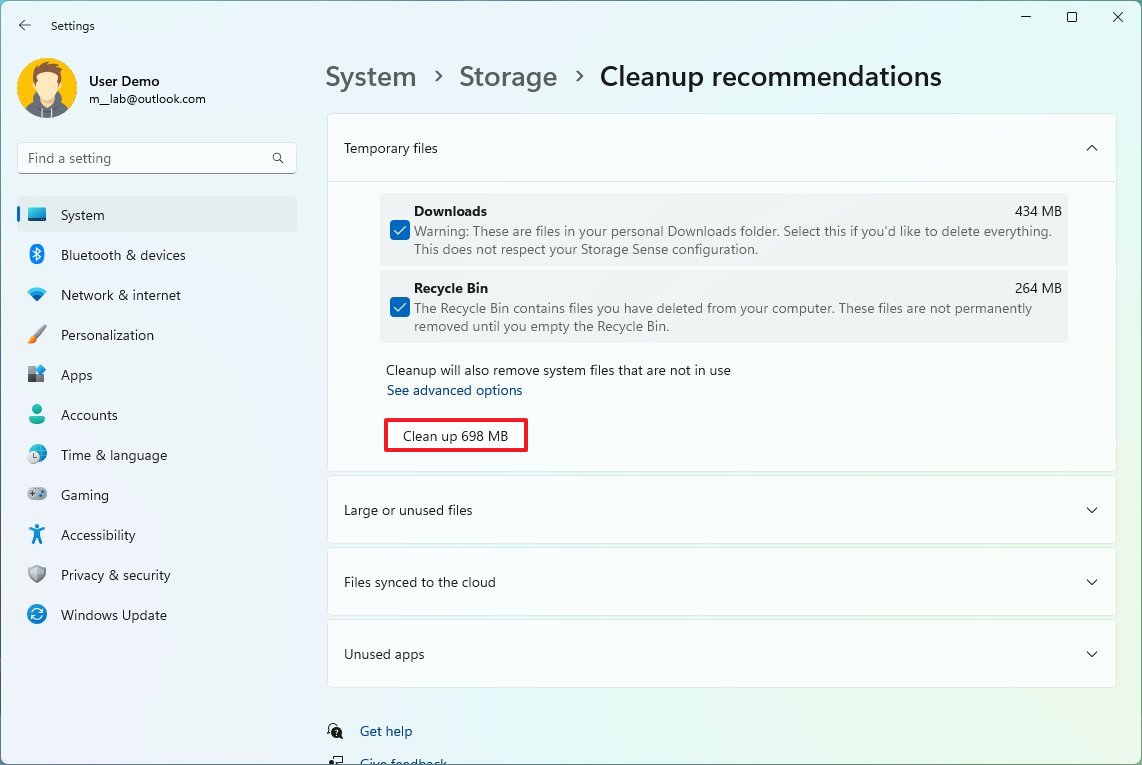
- Click on Temporary files.
- Select the files to delete to free up space.
- Click the Clean up button.
- Click on "Large or unused files."
- Select the large and unused files to delete.
- Click the Clean up button.
- Click on "Files synced to the cloud."
- Select the synced files that you can delete locally
- Quick note: If you delete synced files, they will still be available on your OneDrive account.
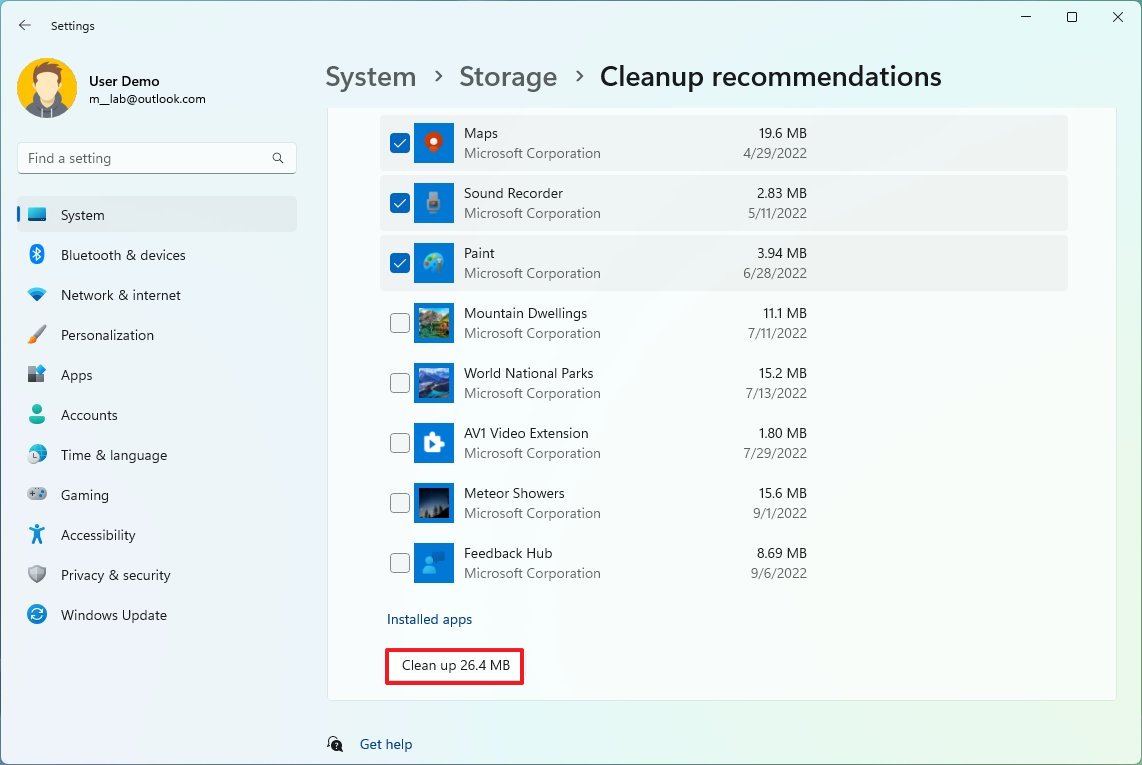
- Click on Unused apps.
- Check the recommended apps that you can delete to free up space on Windows 11.
- Click the Clean up button.
Once you complete the steps, the content will be deleted from the system freeing up space for more important files.
Free up space with Storage Sense
Storage Sense is a feature that provides the tools to quickly delete many junk files, such as previous installation files, temporary files from apps, and more, from the device to reclaim storage space.
All the latest news, reviews, and guides for Windows and Xbox diehards.
To enable, configure, and use Storage Sense on Windows 11, use these steps:
- Open Settings.
- Click on System.
- Click the Storage page on the right side.
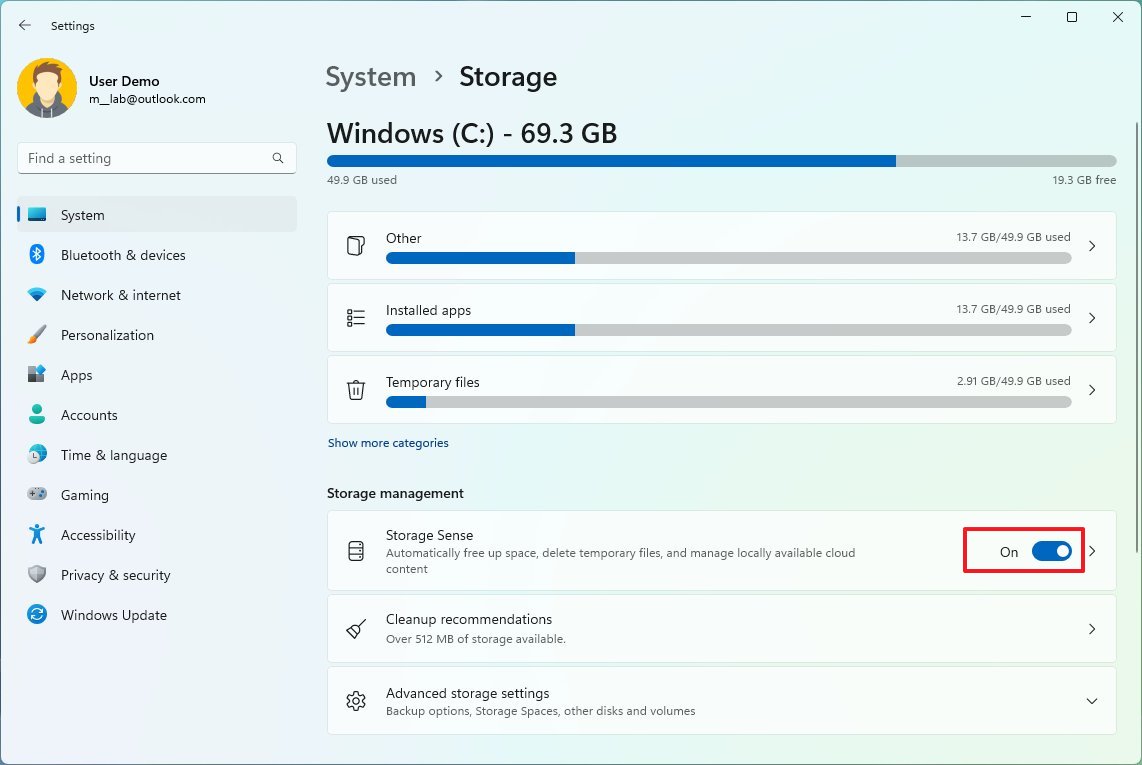
- Under the "Storage management" section, turn on the Storage Sense toggle switch.
- Quick note: When you enable Storage Sense, the feature will clear up files automatically based on your configuration. However, Storage Sense will enable Storage Sense if the feature remains disabled and the system needs space to perform specific tasks like installing a new feature update.
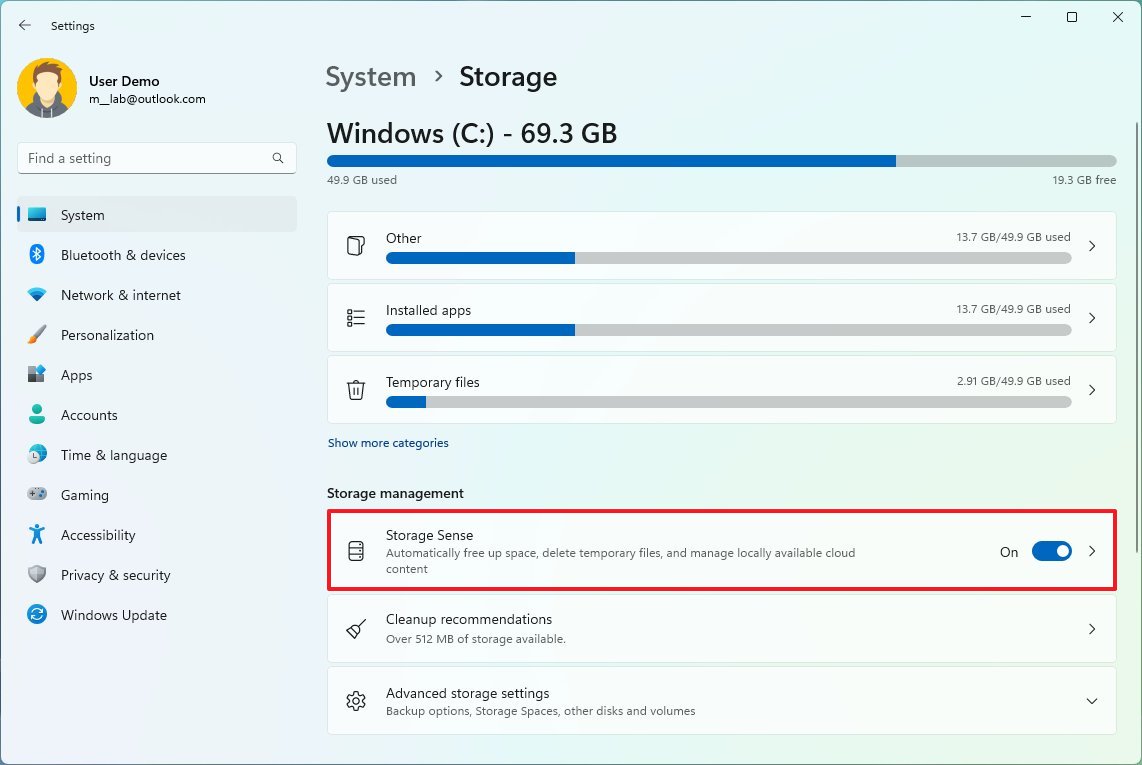
- Select the Storage Sense setting.
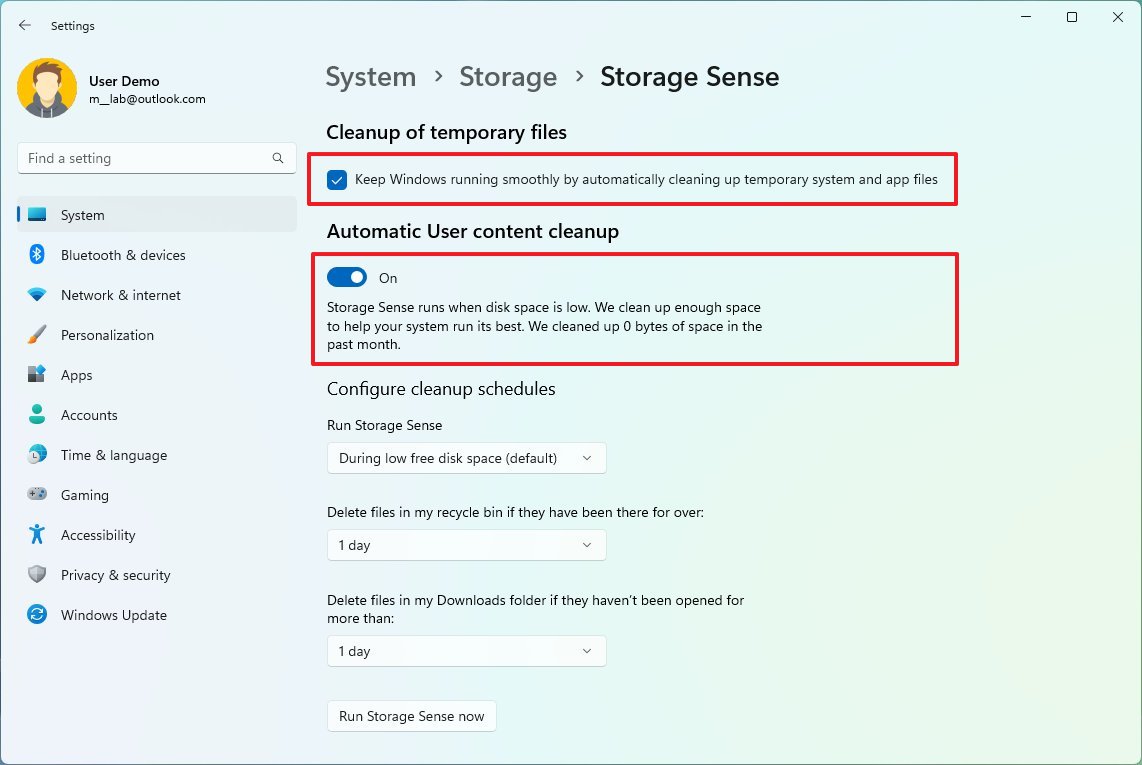
- Under the "Cleanup of temporary files" section, check the "Keep Windows running smoothly by automatically cleaning up temporary system and app files" option to allow the system to delete junk files as needed.
- Turn on the "Automatic User content cleanup" toggle switch.
- Under the "Configure cleanup schedules" section, use the "Run Storage Sense" drop-down menu and select the best cleanup option for you:
- Every day.
- Every week.
- Every month.
- During low free disk space (recommended).
- Use the Recycle Bin drop-down menu to specify how to clear already deleted files.
- Use the Downloads drop-down menu to specify how to clean up files you downloaded from the internet into the Downloads folder.
- Quick tip: To delete the most files, use the 1-day option for the settings. The Downloads folder may contain important files, which means that it is recommended to backup those files manually before running Storage Sense.
- Under the "Locally available cloud content" section, use the drop-down menu to specify how long OneDrive content synced to the device becomes online-only.
- (Optional) Click the "Run Storage Sense now" button.
- Check the "Delete previous versions of Windows" option (if applicable).
After you complete the steps, if you click the run now button, Storage Sense will clear the files immediately. Otherwise, the system will clean up the files as space is needed.
Free up space deleting temporary files
As part of the storage tools available on Windows 11, you can also delete temporary files manually using the Storage settings.
To delete temporary files manually, use these steps:
- Open Settings.
- Click on System.
- Click the Storage page on the right side.
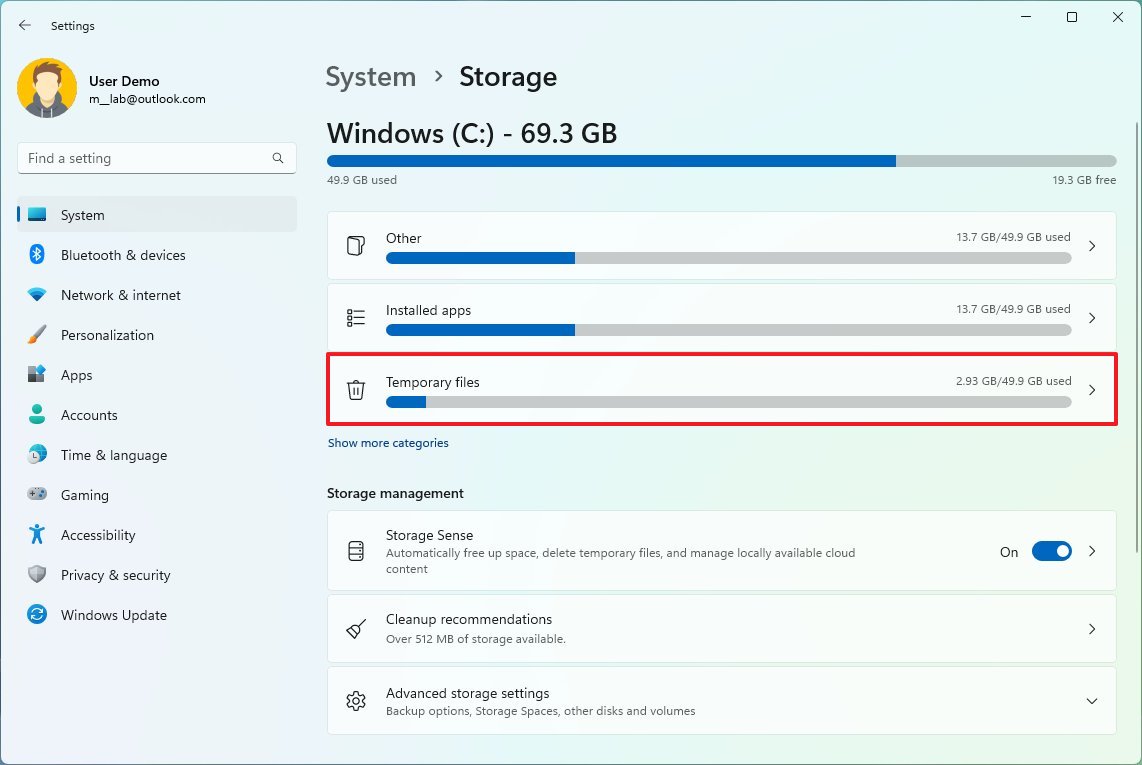
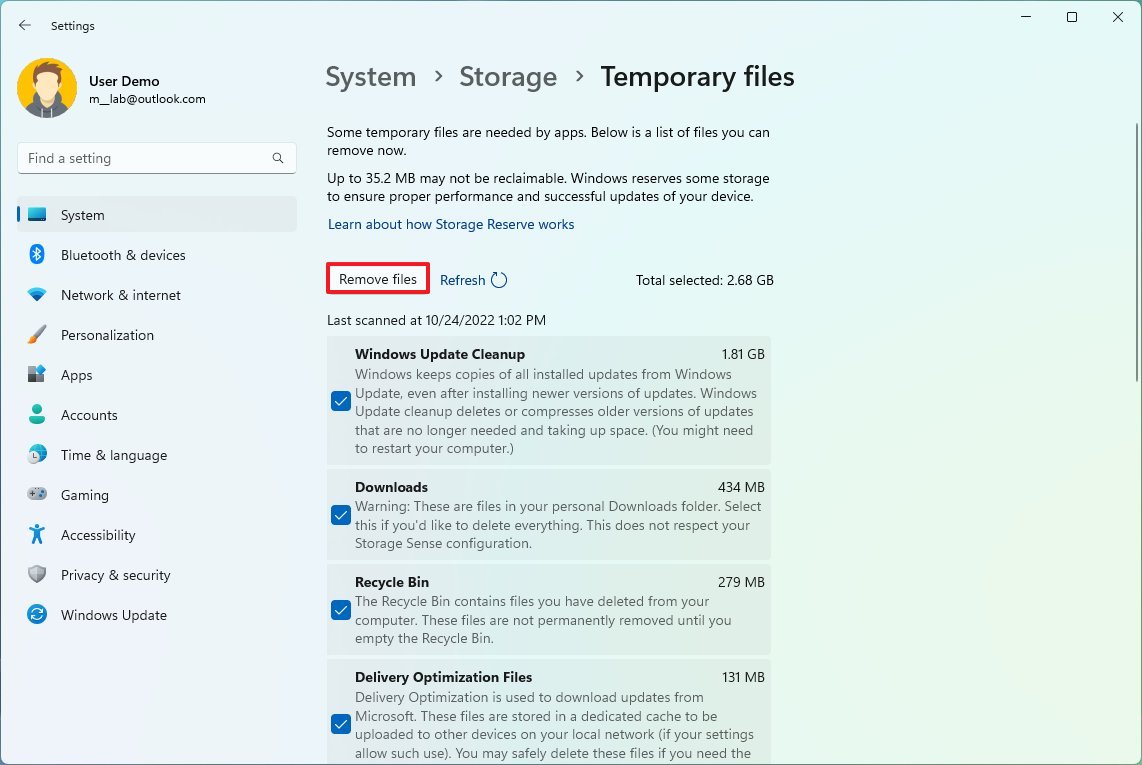
- Click the Temporary files setting.
- Select the junk files to delete from Windows 11.
- Quick note: The available items may differ in your installation. If you want to select the "Downloads" item, consider that this option will erase everything in the "Downloads" folder.
- Downloads.
- Windows Update Cleanup.
- Recycle Bin.
- Delivery Optimization Files.
- Thumbnails.
- Microsoft Defender Antivirus.
- Temporary Internet Files.
- Temporary files.
- Windows error reports and feedback diagnostics.
- DirectX Shader Cache.
- Previous Windows installation(s).
- Temporary Windows installation files.
- Click the Remove files button.
Once you complete the steps, the files will delete permanently, freeing up space on the computer.
Free up space with Disk Cleanup
If you prefer the legacy experience, Windows 11 still includes the Disk Cleanup tool to delete temporary files and recovery points.
Delete temporary files
To clear up space on the hard drive with Disk Cleanup, use these steps:
- Open Start.
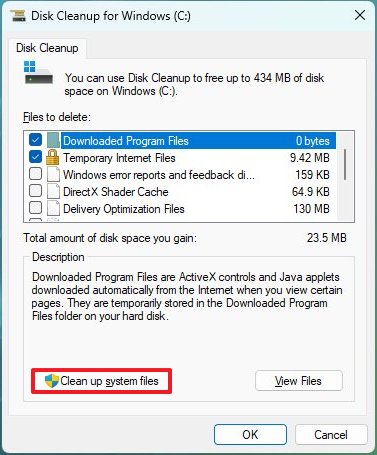
- Search for Disk Cleanup and click the top result to open the app.
- Use the "Drives" drop-down menu and select the (C:) drive (if applicable).
- Click the OK button.
- Click the "Cleanup system files" button.
- Use the "Drives" drop-down menu and select the (C:) drive.
- Click the OK button.
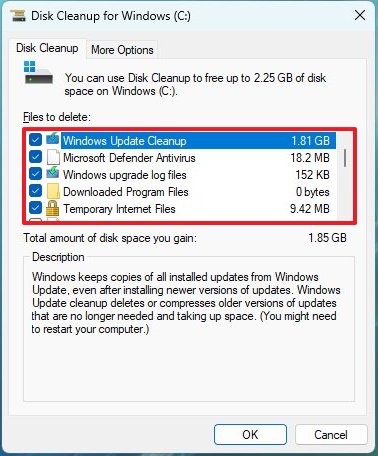
- Check all the contents you want to clear:
- Windows Update Cleanup.
- Microsoft Defender Antivirus.
- Downloaded Program Files.
- Temporary Internet Files.
- Windows error reports and feedback diagnostics.
- DirectX Shader Cache.
- Delivery Optimization Files.
- Device driver packages.
- Language Resource Files.
- Previous Windows installation(s).
- Recycle Bin.
- Temporary files.
- Thumbnails.
- Click the OK button.
- Click the Delete Files button.
After you complete the steps, those unnecessary files you selected will be removed from the device.
Delete System Restore and Shadow Copies
You can also delete older files to reclaim additional space using System Restore and the Shadow Copies feature.
To delete old system restore points on Windows 11, use these steps:
- Open Start.
- Search for Disk Cleanup and click the top result to open the app.
- Use the "Drives" drop-down menu and select the (C:) drive (if applicable).
- Click the OK button.
- Click the "Cleanup system files" button.
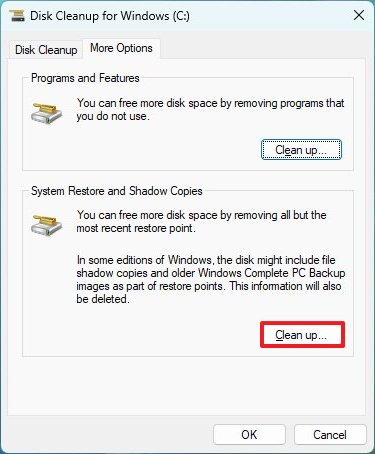
- Click the More Options tab.
- Under the "System Restore and Shadow Copies" section, click the Clean up button.
- Click the Delete button.
Once you complete the steps, you will reclaim some additional space to store more important files.
Free up space with OneDrive file on-demand
If you need to free up space quickly, you can use the OneDrive files on-demand feature to make files available online manually.
Enable OneDrive files on-demand
To enable files on-demand on Windows 11, use these steps:
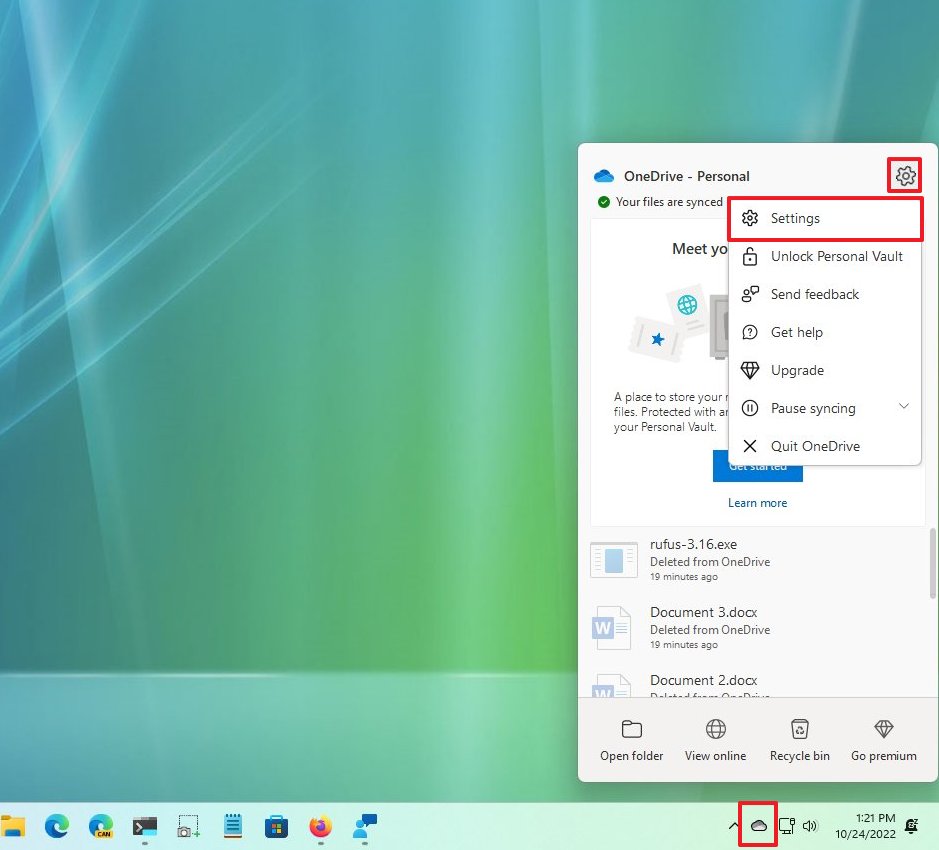
- Click the OneDrive icon in the bottom-right corner of the taskbar.
- Click the Help & Settings option.
- Click the Settings option.
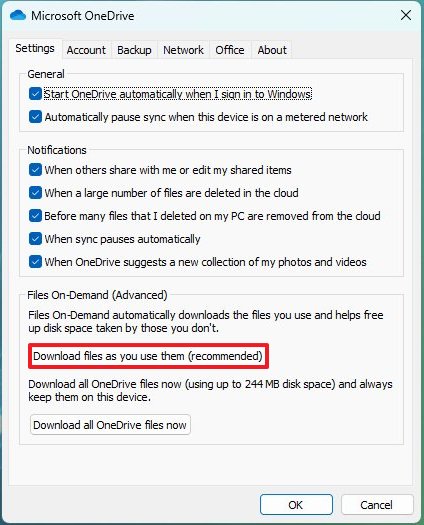
- Click the Settings tab.
- Under the "File On-Demand" section, check the "Download files as you use them" option.
- Click the Continue button.
- Click the OK button.
Once you complete the steps, you can move files to the OneDrive folder and make them available only online to free up space.
Convert local files available online-only
To make files online only with OneDrive, use these steps:
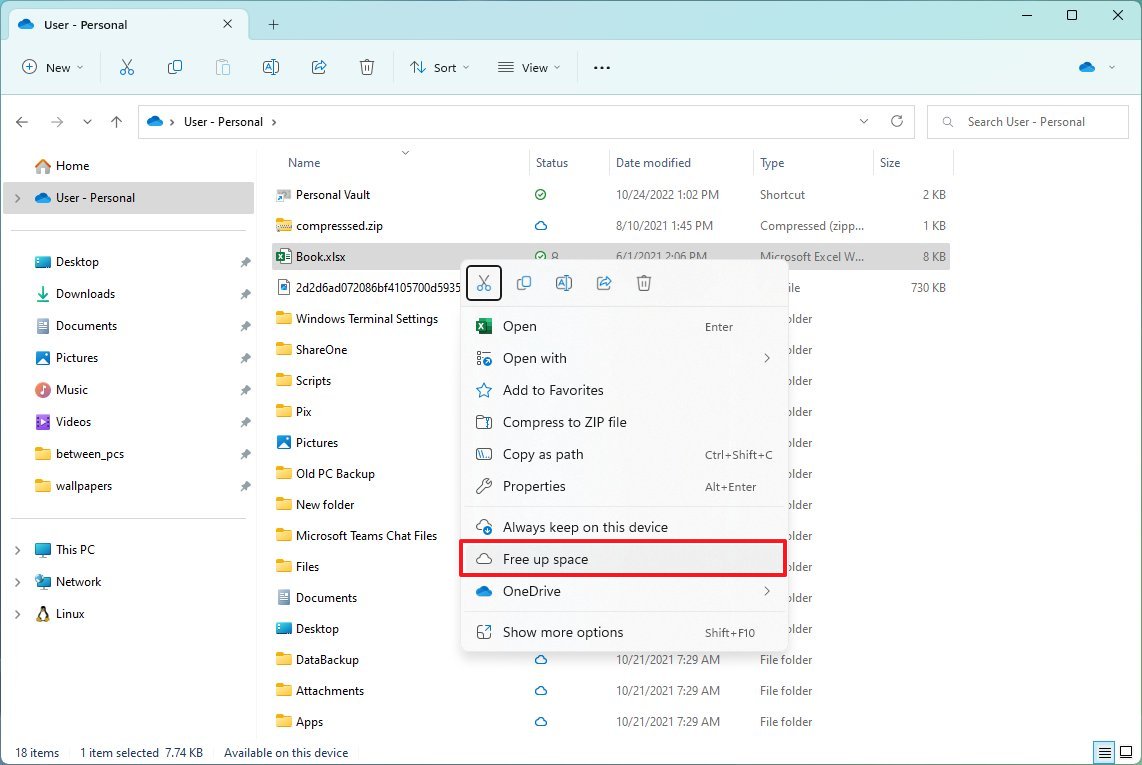
- Open File Explorer.
- Select the OneDrive folder from the left pane.
- Select the files and folders taking up space.
- Right-click the selection and choose the "Free up space" option.
If you need to free up additional space, move other files to the OneDrive folder and repeat the above steps to make them available on-demand.
After you complete the steps, you will be able to access all of your content using File Explorer, but you will only be able to open them with an internet connection.
The free version of OneDrive only allows you to store up to 5GB of data, but you can upgrade to a Microsoft 365 subscription to lift the limit to 1TB. In addition to the 1TB of storage, the subscription also gives you access to all the Office apps and services like Microsoft Teams and Family Safety.
Microsoft 365 gives you full access to all the apps and perks, such as 1TB OneDrive storage and Skype minutes. You can also install Word, Excel, PowerPoint, Outlook, and other apps on up to five devices, and depending on the subscription, you can share the account with up to six people.
Free up space removing unused apps and games
On Windows 11, you can reclaim a lot of storage by uninstalling apps you rarely use. Games can also use a lot of space, so keeping the list low or removing them will make space for more important files. Also, reducing space usage will help improve overall gaming performance.
To uninstall apps and games on Windows 11, use these steps:
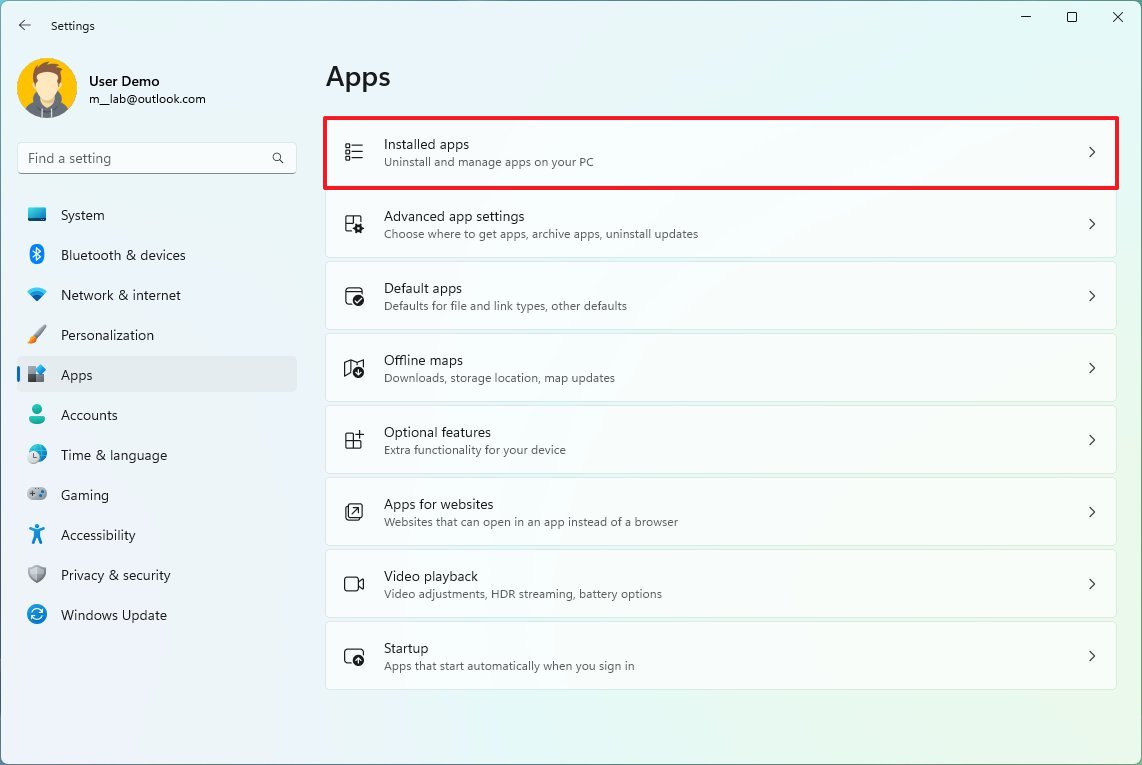
- Open Settings.
- Click on Apps.
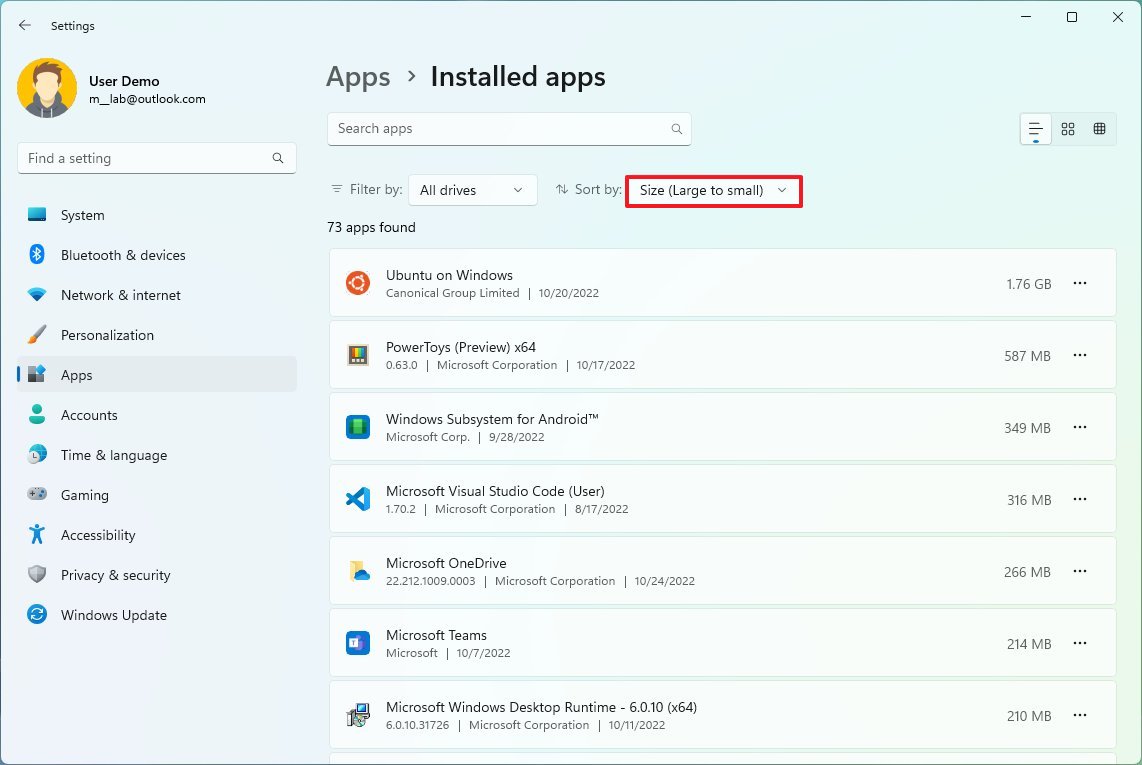
- Click the Installed apps page on the right side.
- Quick note: In version 21H2, the name of the page is Apps & features.
- Use the "Sort by" filter and select the "Size (Large to small)" view to find the apps and games using the most space quickly.
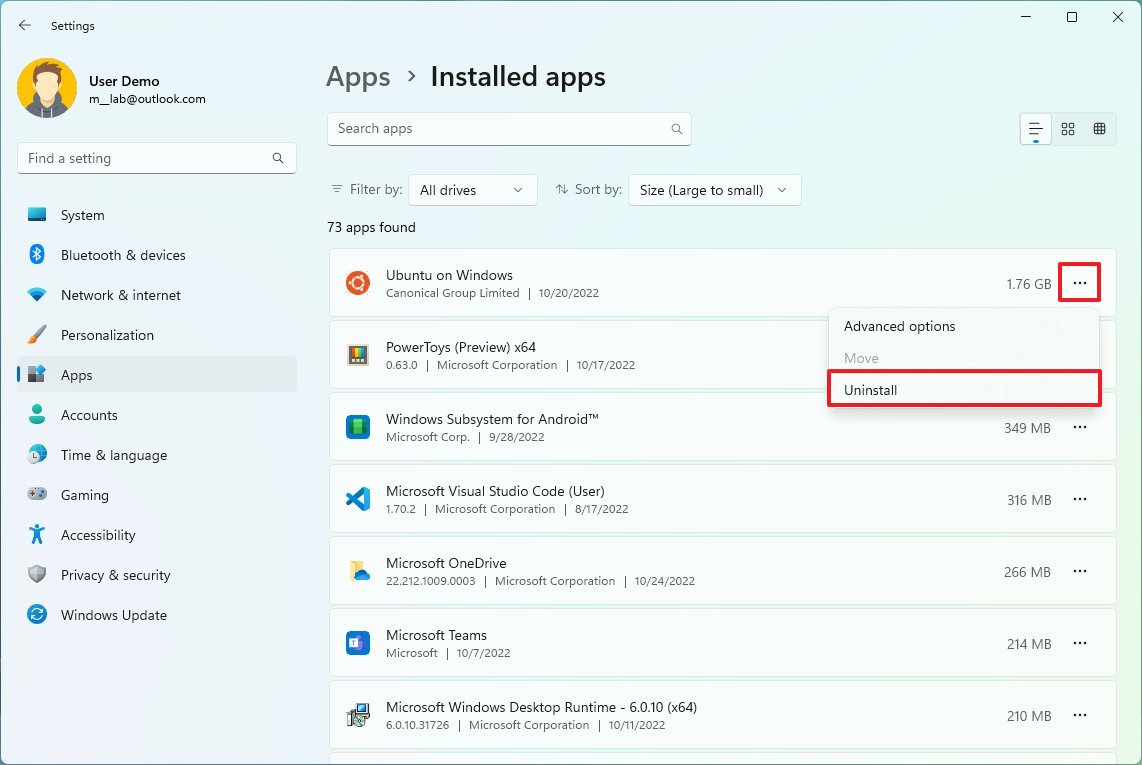
- Select the item to remove.
- Click the Uninstall button.
- Click the Uninstall button again.
- Continue with the on-screen directions (if applicable).
Once you complete the steps, repeat the same instructions to uninstall other apps and games.
If you use the Windows Subsystem for Linux (WSL), you may also have one or multiple distros installed on the device. You can always uninstall them to free up space on Windows 11.
Delete unused languages
If every byte counts, secondary languages can use some space, and removing them can free up additional storage.
To uninstall languages on Windows 11, use these steps:
- Open Settings.
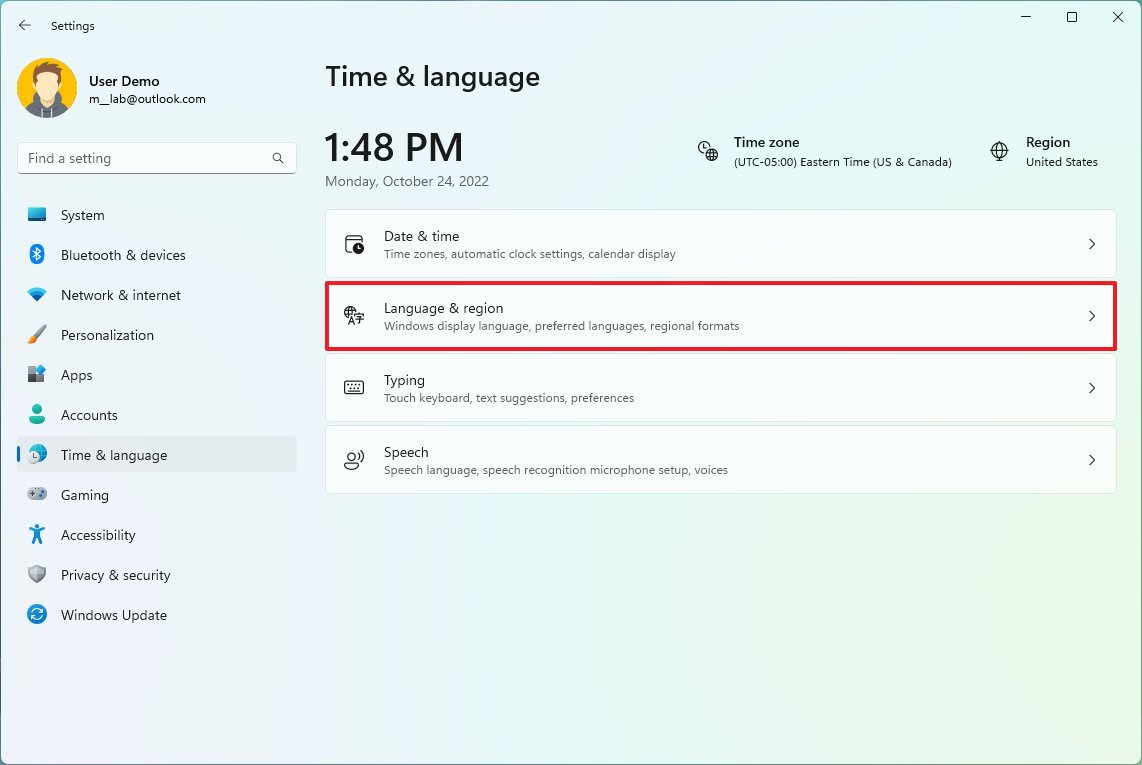
- Click on Time & Language.
- Click the Language & region page on the right side.
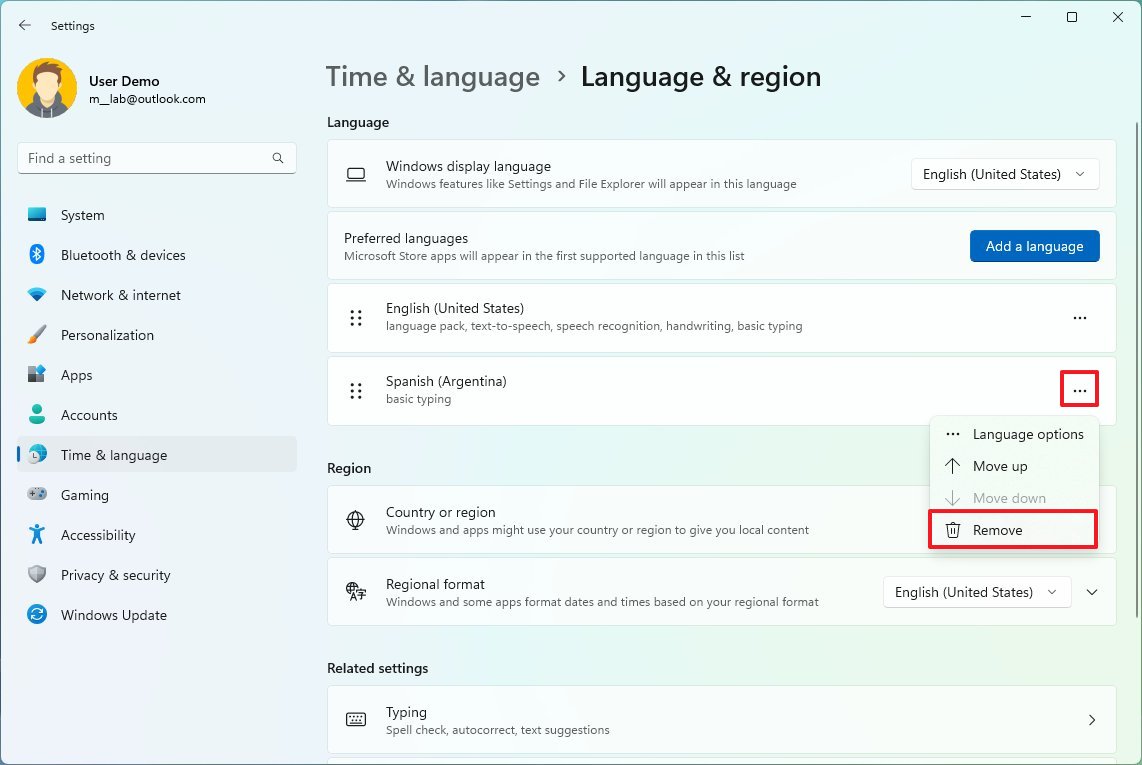
- Select the language no longer needed.
- Click the menu (three-dotted) button and click the Remove button.
After you complete the steps, you may need to repeat the instructions to delete additional languages.
Delete maps
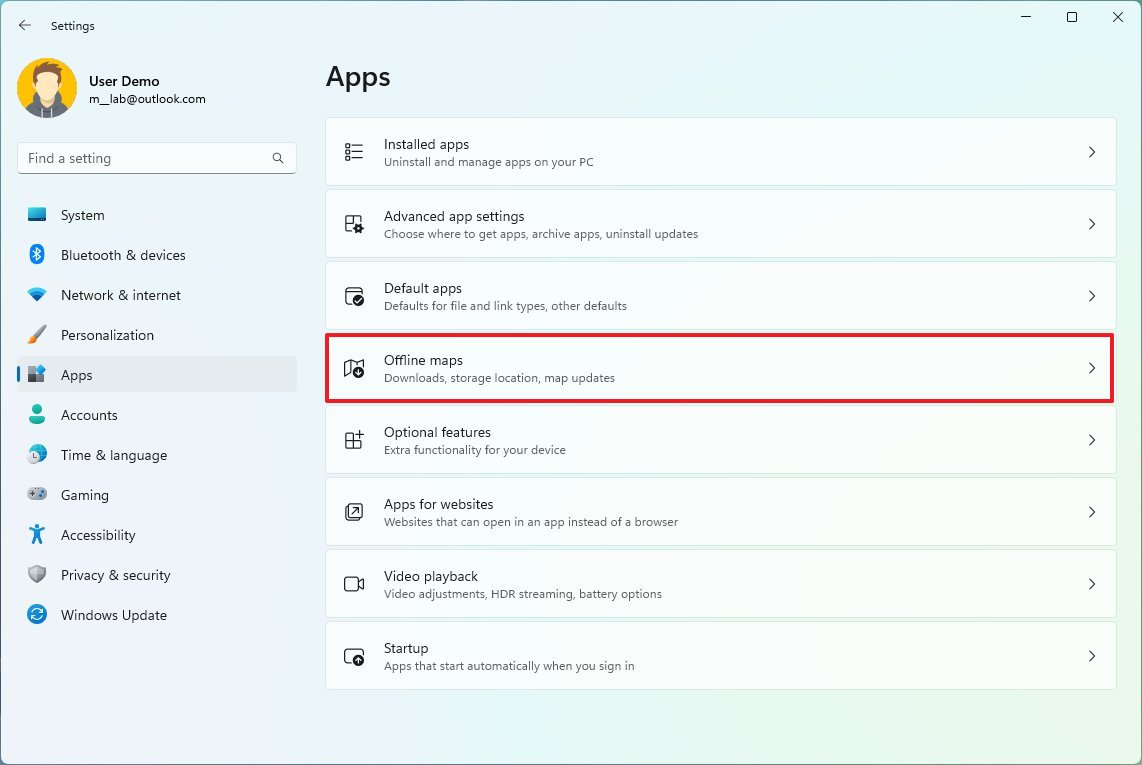
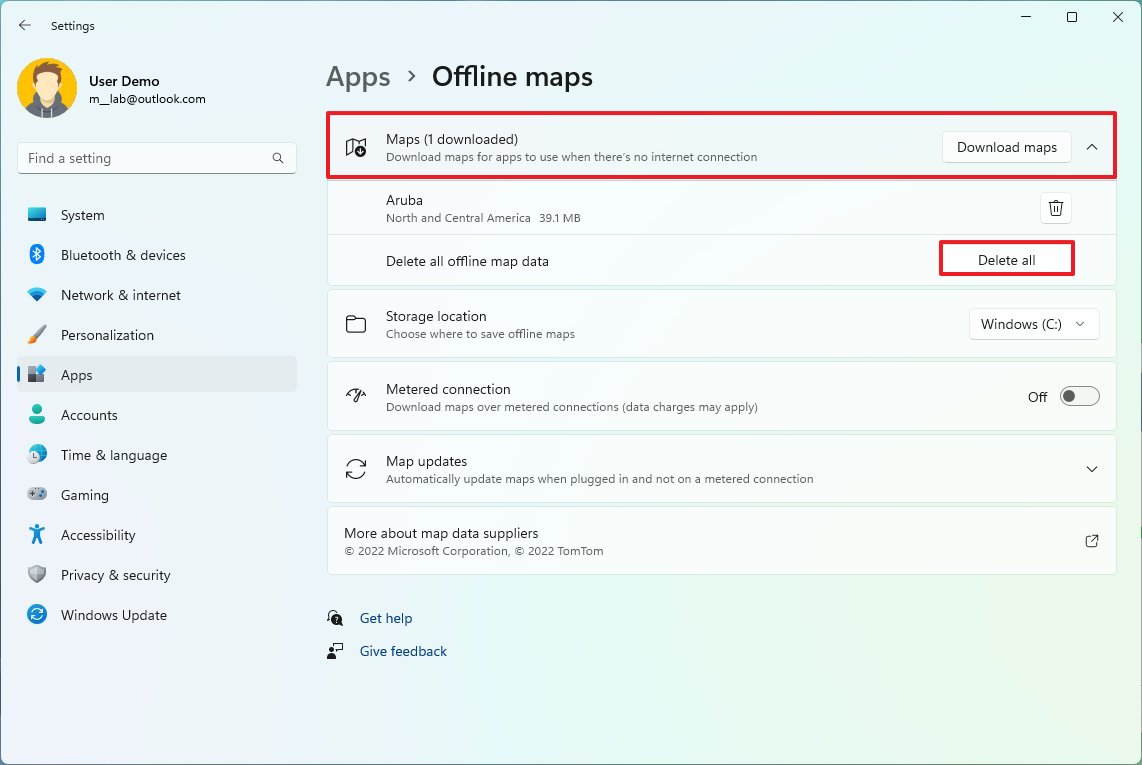
You can also remove the offline maps to clear up some additional space.
To remove locally stored maps on Windows 11, use these steps:
- Open Settings.
- Click on Apps.
- Click the Offline maps page on the right side.
- Click the Maps setting.
- Click the Delete all button.
- Click the Delete all button again.
Once you complete the steps, the offline maps will be removed to make more space available on the computer.
Uninstall optional features
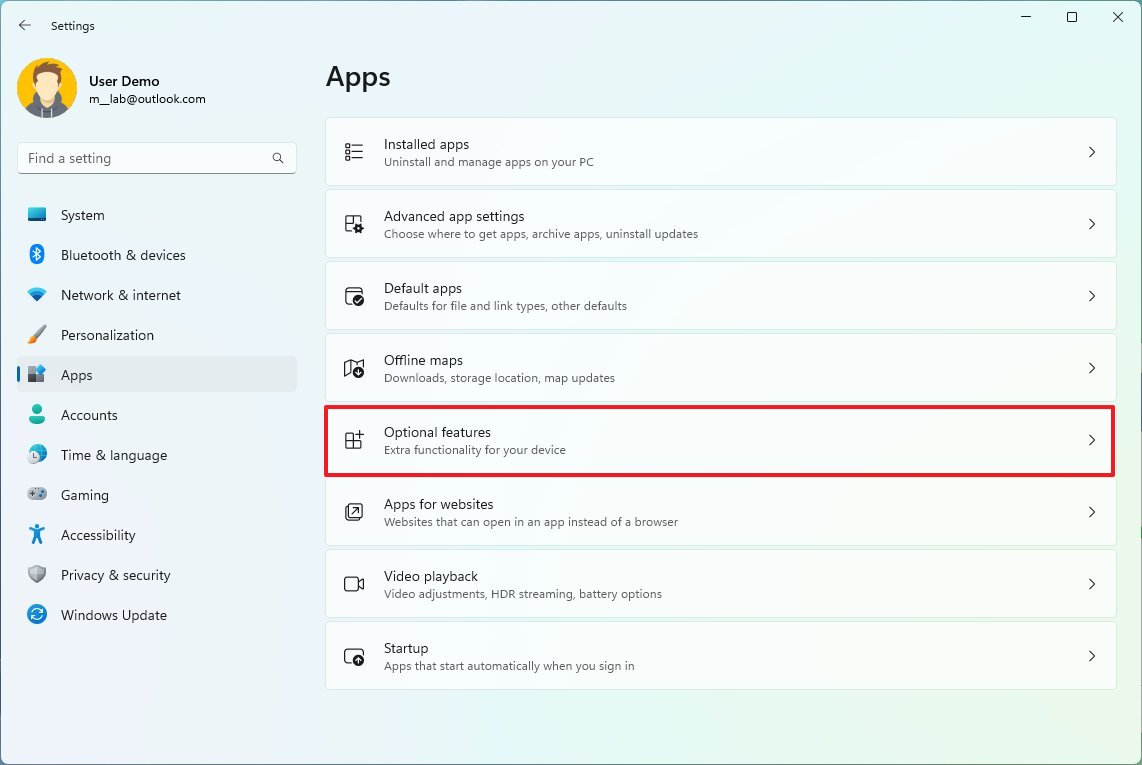
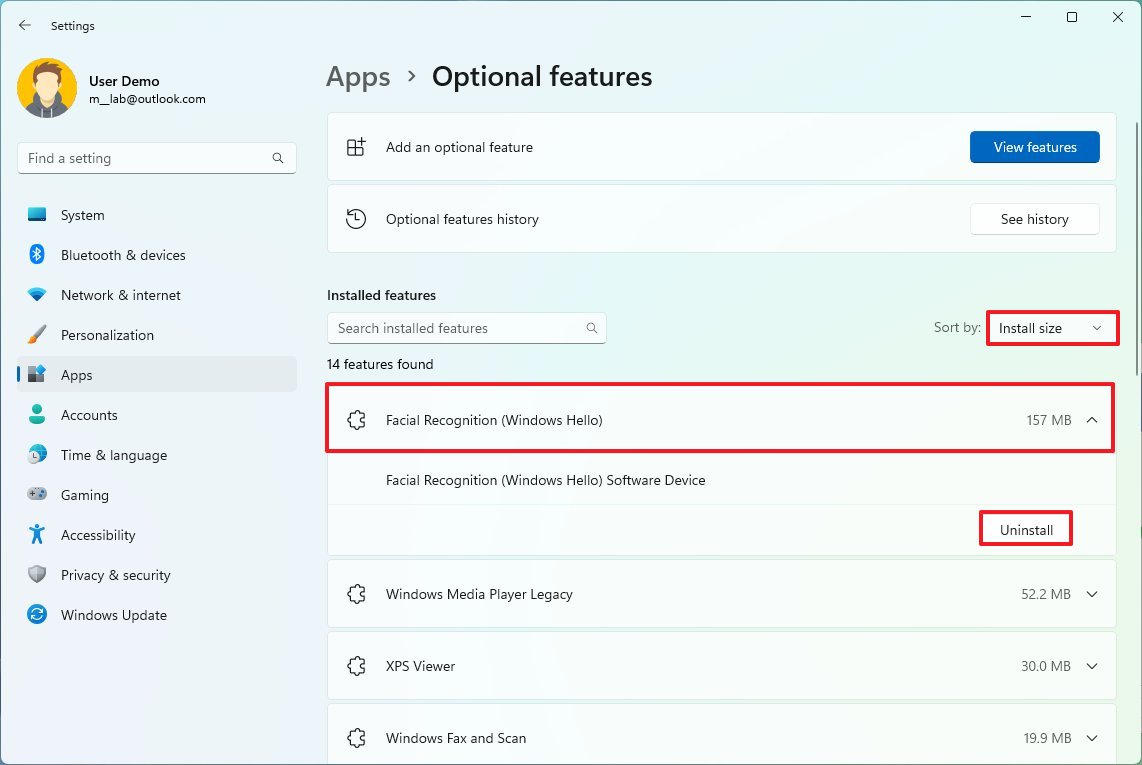
Windows 11 has many optional features (for example, Windows Media Player, Windows Hello Face, Math Recognizer, Windows Fax and Scan, Step Recorder, WordPad, Windows PowerShell ISE, and others) you can remove to regain a little bit more space.
To remove Windows 11 optional features, use these steps:
- Open Settings.
- Click on Apps.
- Click the Optional features page on the right side.
- Click the "Sort by" menu and select the Install Size option to find the feature using the most space.
- Select the feature to remove.
- Click the Uninstall button.
- Restart the computer (as necessary).
After you complete the steps, you may need to repeat the instructions to remove additional features.
Free up space moving files to external storage
If you have tried everything and still don't have enough space, you should connect an external storage device to transfer the files to free up space on the main drive. If the external storage remains attached to the computer, you can even configure Windows 11 to save files directly onto the secondary storage.
Move files to external storage
To offload files to a different location, connect an external drive with enough space and use these steps:
- Open File Explorer.
- Browse to the folder with the content taking the most space on the drive.
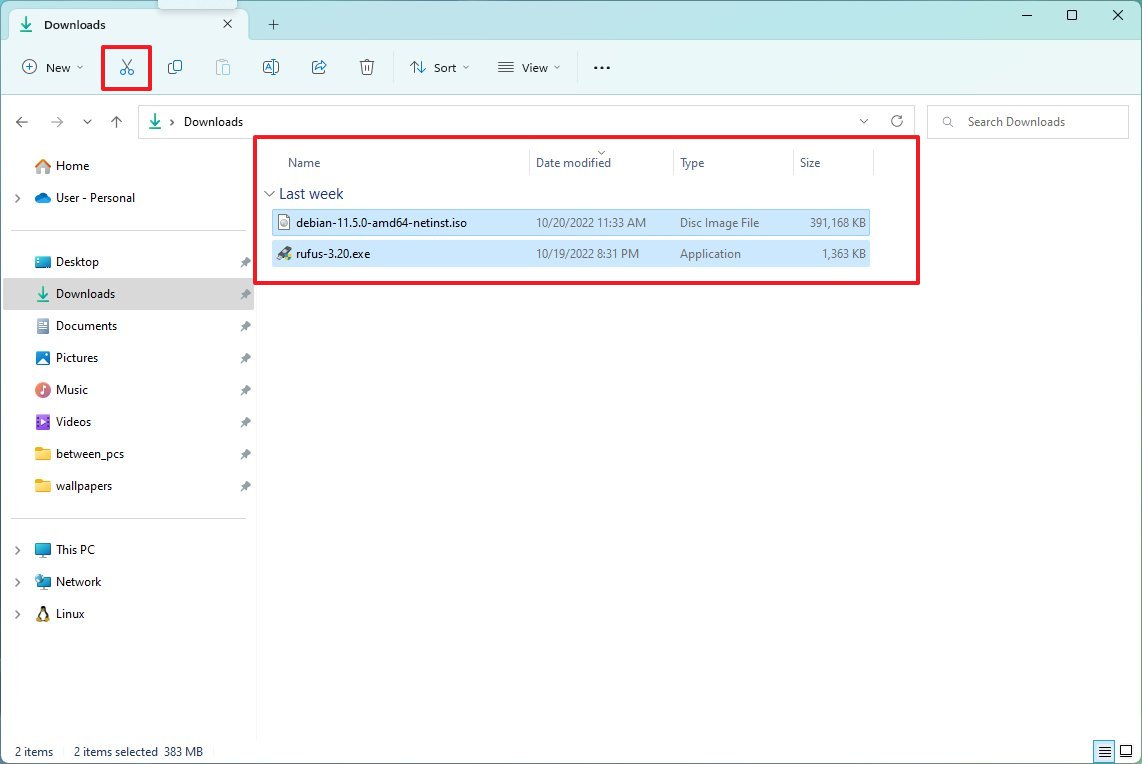
- Select the items.
- Click the Cut button from the command bar.
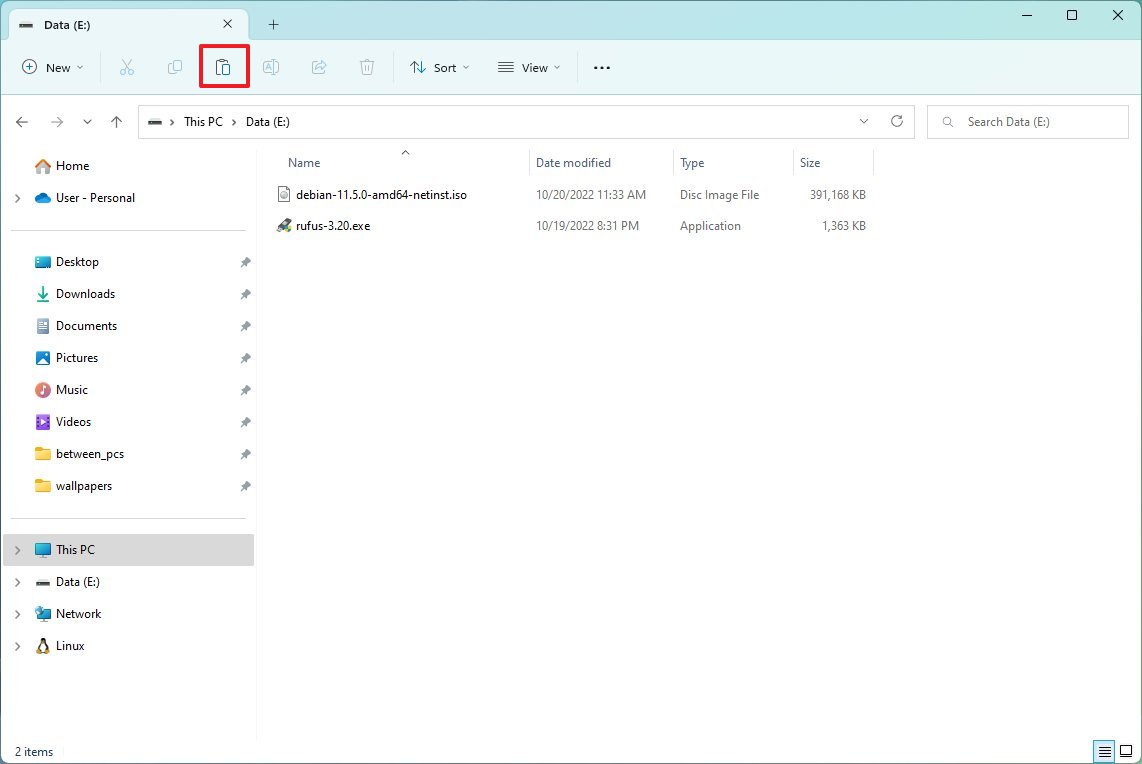
- Browse to the destination drive.
- Quick tip: If you want to keep files organized, create a new folder with a descriptive name and paste the files inside. Also, if you have a lot of data, transferring the files in chunks, not everything at once is recommended.
- Click the Paste button.
Once you complete the steps, repeat the instructions to move additional files and folders to a new location to reduce the storage usage in the location running out of space.
Configure another storage as new default location
To configure Windows 11 to save files and install new apps on an external drive automatically, use these steps:
- Open Settings.
- Click on System.
- Click the Storage page on the right side.
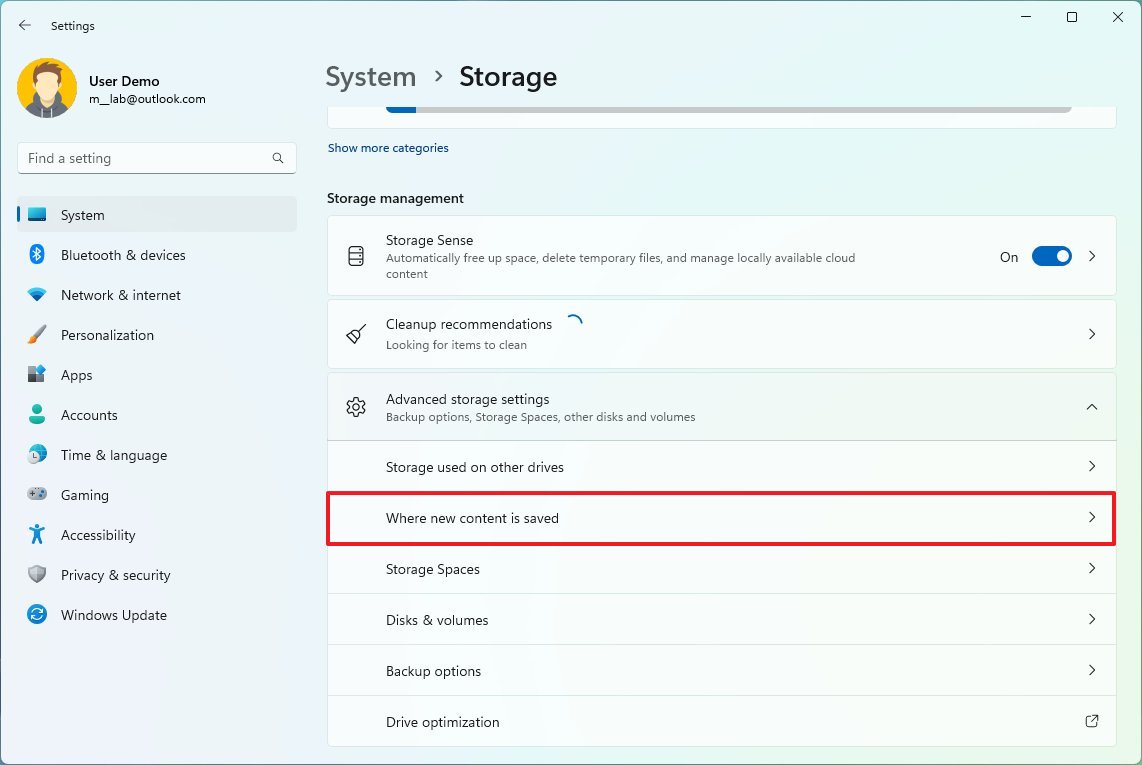
- Under the "Storage management" section, click on Advanced storage settings.
- Click the Where new content is saved setting.
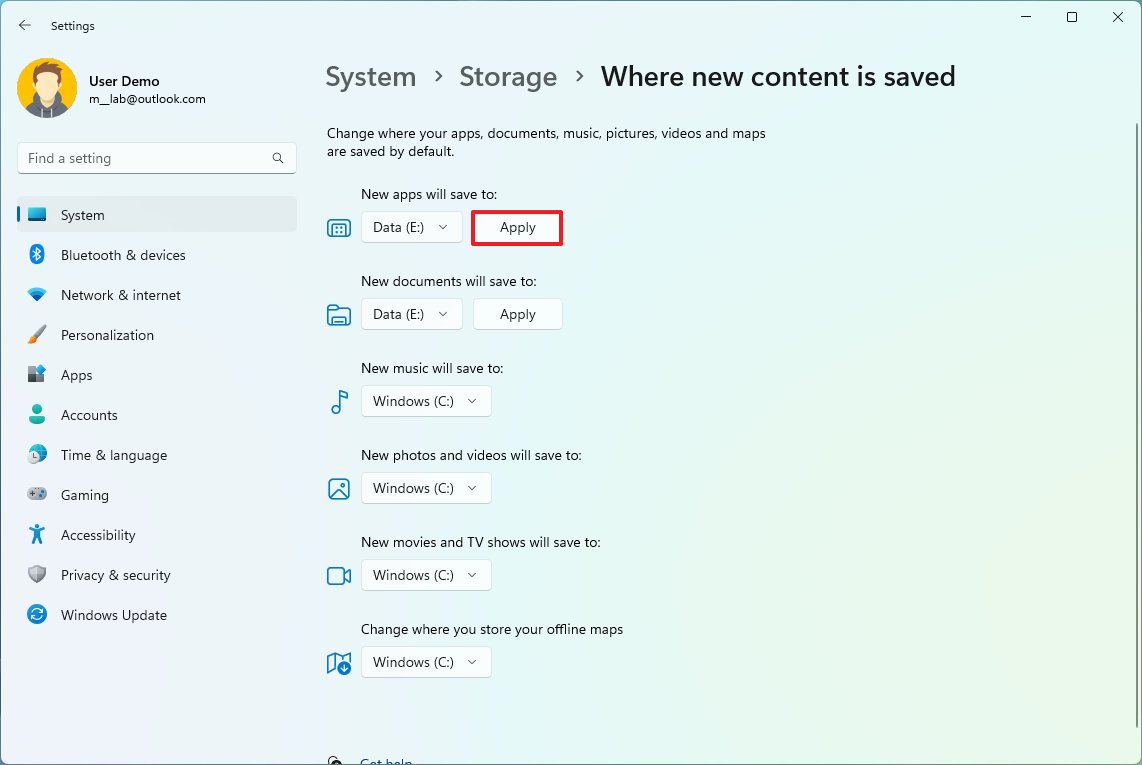
- Use the drop-down menus and select the new location to save files automatically for each content type.
- Click the Apply button.
- (Optional) Use the "New apps will be saved to" drop-down menu to select the drive to install future apps by default.
- Click the Apply button.
After you complete the steps, files and apps from the Microsoft Store will be saved and installed in the new location.
Move apps and games to external storage
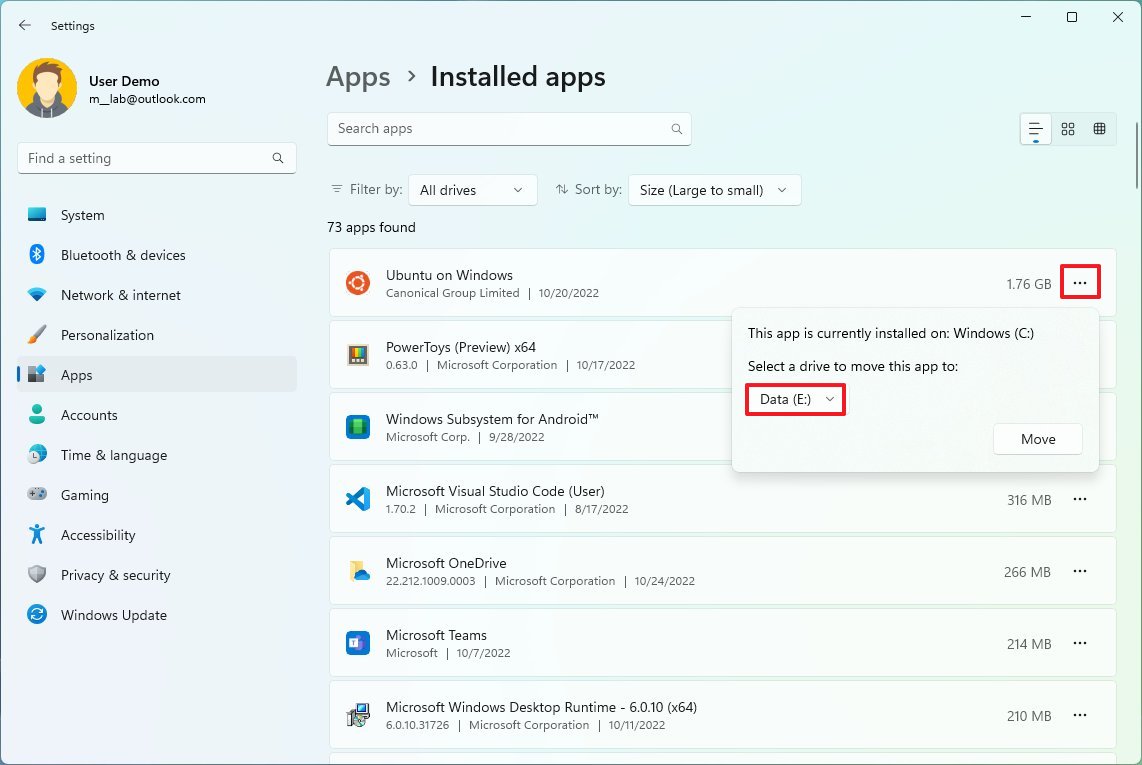
Like previous versions, Windows 11 also includes the option to move apps from the Microsoft Store and games to an external drive without reinstalling anything. You could use this feature to move apps and games to another drive to free up space on the primary storage.
To move existing games and apps to another driver on Windows 11, use these steps:
- Open Settings.
- Click on Apps.
- Click the Installed apps page on the right side.
- Use the "Sort by" filter and select the "Size (Large to small)" view to see the apps and games taking up the most space quickly.
- Click the menu (three-dotted) button on the right side of the item and select the Move option.
- Select the new storage location.
- Click the Move button.
- Quick note: If the option is not available, the feature is not available for that particular app.
- Select the drive to move the app or game.
- Click the Move button again.
The external drive must always be connected to the device when using this feature. Otherwise, you won't be able to launch the apps or play those games in the new storage.
After you complete the steps, repeat the above instructions to move additional apps or games to the new location.
Free up space with NTFS compression
Windows 11 also comes with a built-in lightweight feature part of the NT File System (NTFS) to compress data maintaining their normal access without the need to zip your files. This feature can compress files, folders, or the entire drive.
Using data compression can negatively impact system performance because it has to compress and decompress data on demand. You should use this option only if you do not have another option and are dealing with capable hardware.
Set up folder compression
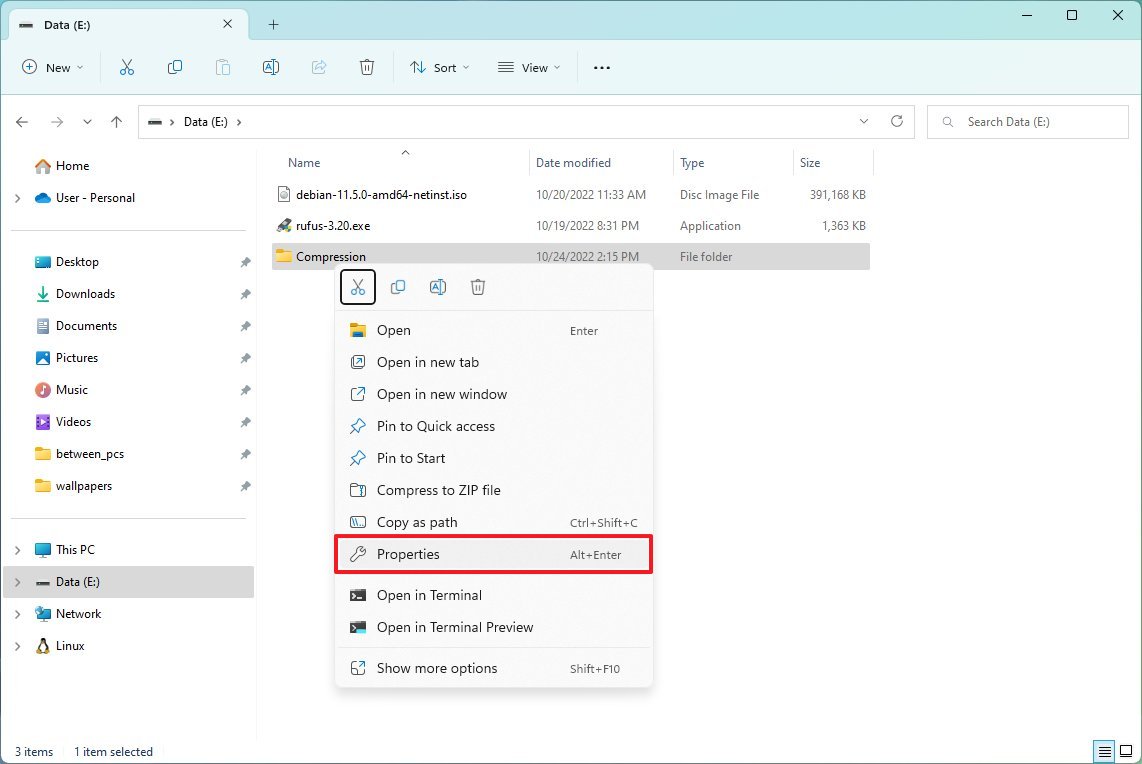
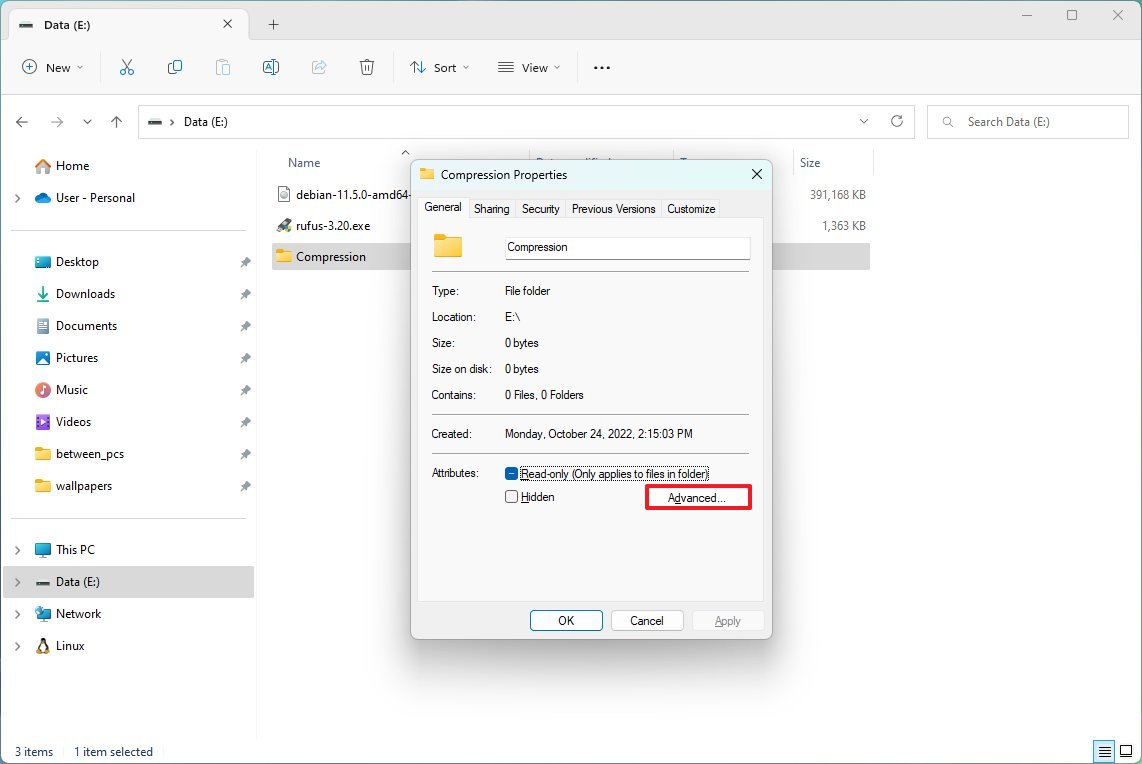
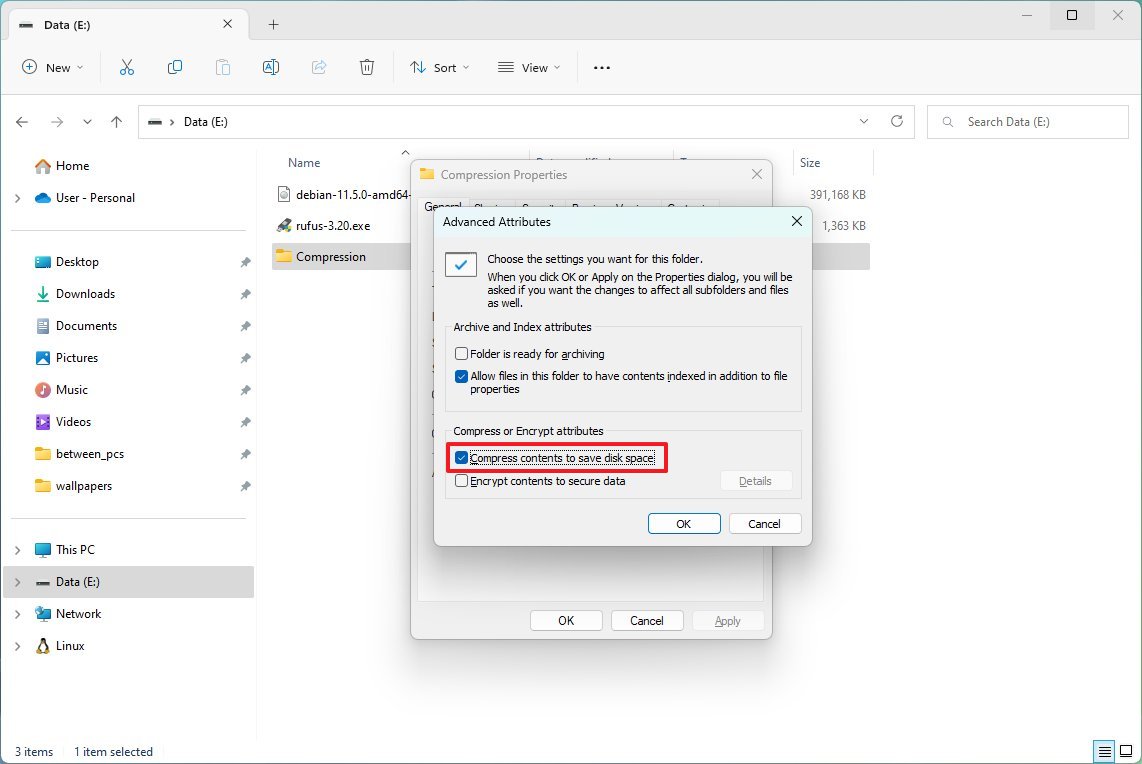
To enable NTFS compression for a folder, use these steps:
- Open File Explorer.
- Browse to the folder to compress.
- Right-click the folder and select the Properties option.
- Click the Advanced button.
- Under the "Compress or Encrypt attributes" section, check the "Compress contents to save disk space" option.
- Click the OK button.
- Click the Apply button.
- Select the "Apply changes to this folder, subfolders, and files" option.
- Quick note: If the folder already contains a lot of files, the initial compression can take some time.
- Click the OK button.
- Click the OK button again.
After you complete the steps, the compression feature will enable in the folder, reducing the size of existing and future files. Also, you can use the same instructions to compress files individually.
You can revert the changes using the same instructions, but in step 5, make sure to clear the "Compress contents to save disk space" option.
Set up storage compression
To enable NTFS compression on a drive, use these steps:
- Open File Explorer.
- Click on This PC from the left pane.
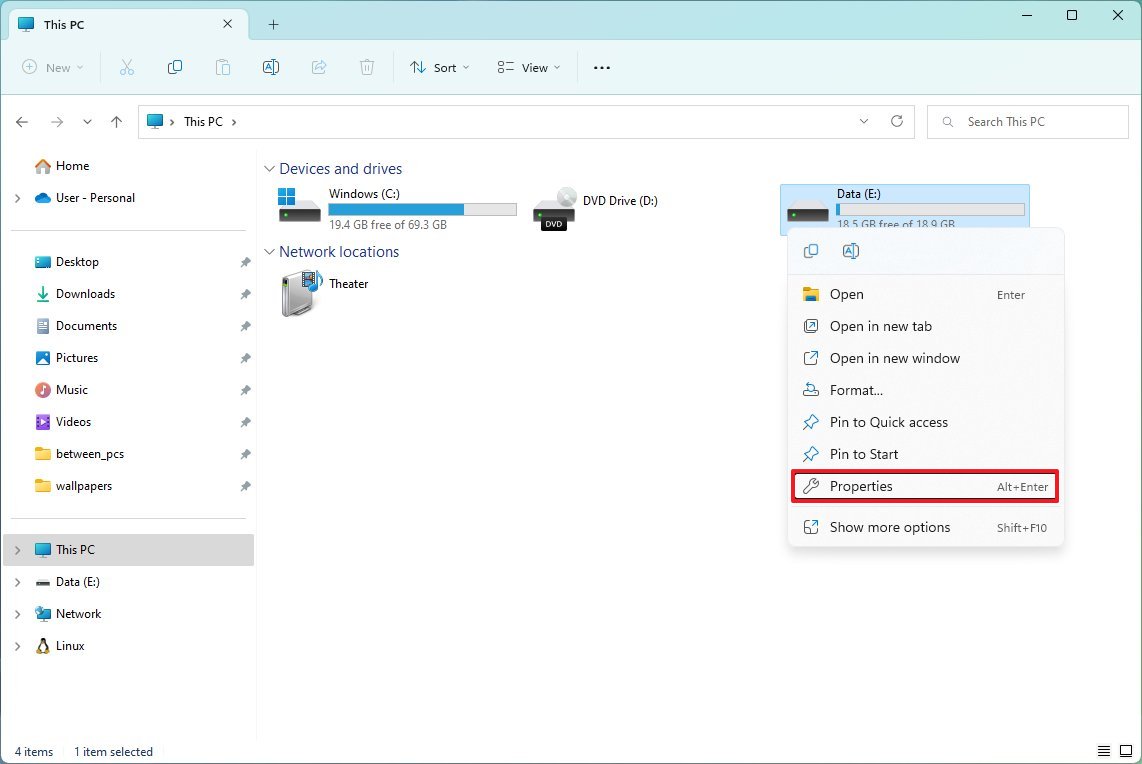
- Under the "Devices and drives" section, right-click the drive you want to compress and select the Properties option.
- Check the "Compress this drive to save disk space" option.
- Quick tip: Using compression on the Windows installation drive can negatively affect performance. It's only recommended to use this feature on a secondary drive or partition.
- Click the Apply button.
- Select the "Apply changes to drive (drive letter), subfolders, and files" option.
- Click the OK button.
- Click the OK button again.
Once you complete the steps, the compression process will begin, but if the drive already has content, the process could take some time.
If you don't need the feature anymore, you can revert the changes with the same instructions, but in step 4, clear the "Compress this drive to save disk space" option.
Free up space disabling Hibernation
On Windows, Hibernation has been around for a long time, and it's a feature designed to save the data in memory onto the system drive before shutting down to preserve the current session the next time you turn on the computer.
Although it is a useful feature, it requires several gigabytes to save the memory contents into the hiberfil.sys file. Disabling Hibernation can help free up storage quickly if you run out of space.
To disable Hibernation to free up space on Windows 11, use these steps:
- Open Start.
- Search for Command Prompt, right-click the top result, and select the Run as administrator option.
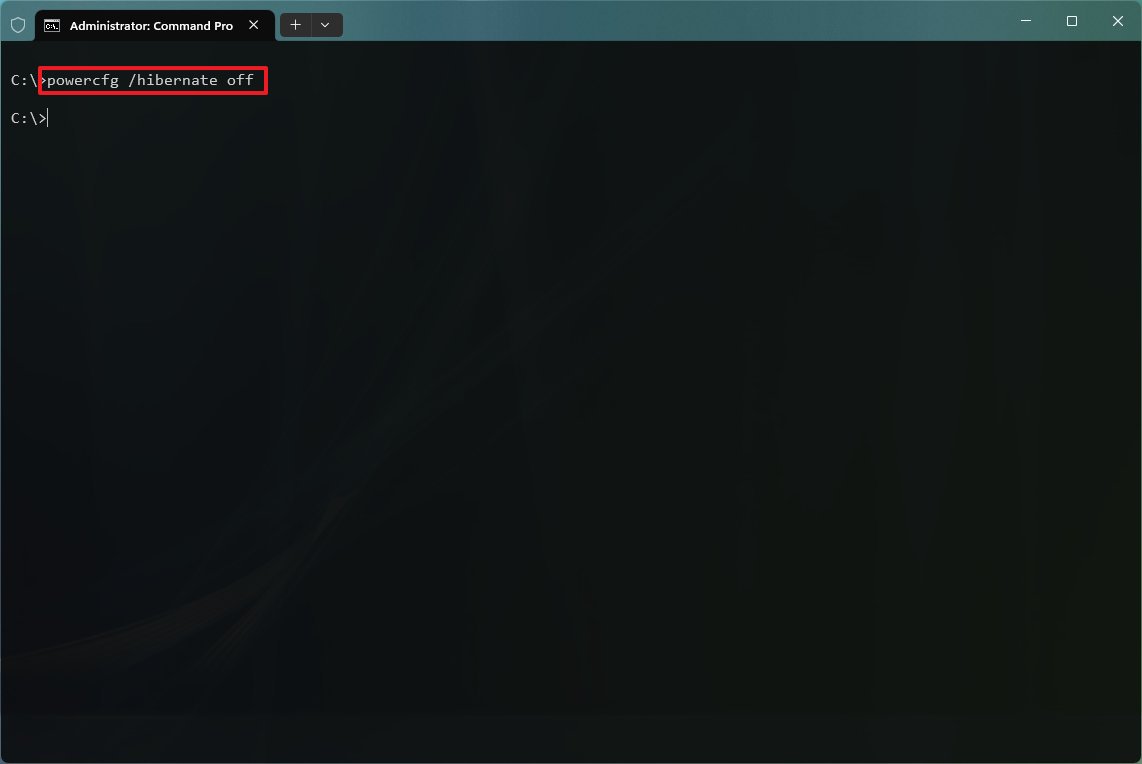
- Type the following command to disable Hibernation and press Enter: powercfg /hibernate off
Once you complete the steps, Hibernation will turn off, and during the process, the system will remove the hiberfil.sys file freeing up several gigabytes of space.
In the future, you can always re-enable the feature on Windows 11 with the same instructions, but on step No. 3, make sure to use the powercfg /hibernate on command.
Free up space with Compact OS
Compact OS is a command-line tool that you can use to reduce the installation footprint of Windows 11 and apps. The tool was designed for devices with limited storage, but you can use it to reclaim some space when you need the storage immediately.
Warning: This is a friendly reminder that modifying system files is risky and can cause irreversible damage to your installation if you do not do it correctly. Before proceeding, making a temporary full backup of your PC is recommended.
To shrink the size of the Windows 11 installation, use these steps:
- Open Start.
- Search for Command Prompt, right-click the top result, and select the Run as administrator option.
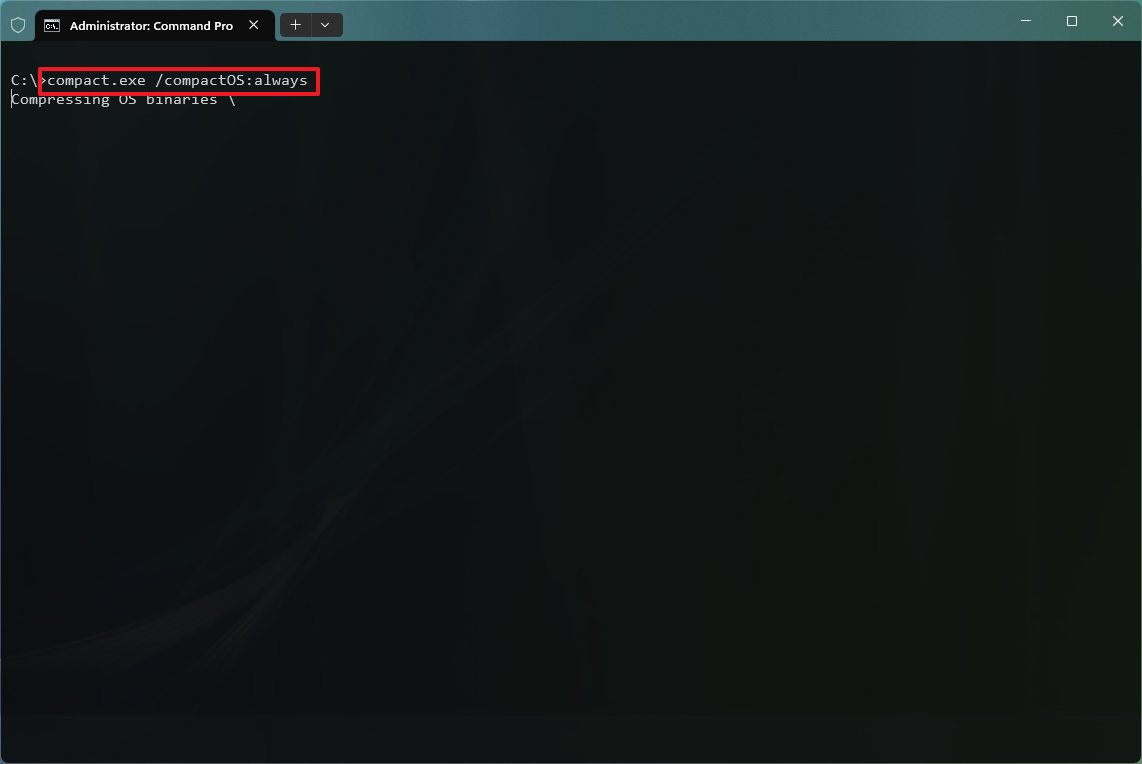
- Type the following command to compress the installation of Windows 11 and apps and press Enter: compact.exe /compactOS:always
After completing the steps, the process will reclaim around 2GB of storage without affecting performance.
You can always revert the changes using the same instructions, but in step 3, use the compact.exe /compactOS:never command.
Free up space rebuilding Windows Search index
On Windows 11, the database that holds the index for Windows Search can grow large if there's an issue or the device has a lot of files. If this is the case, resetting the database and changing how the feature operates can help to reduce space usage significantly.
To rebuild the Windows 11 search database, use these steps:
- Open Settings.
- Click on Privacy & security.
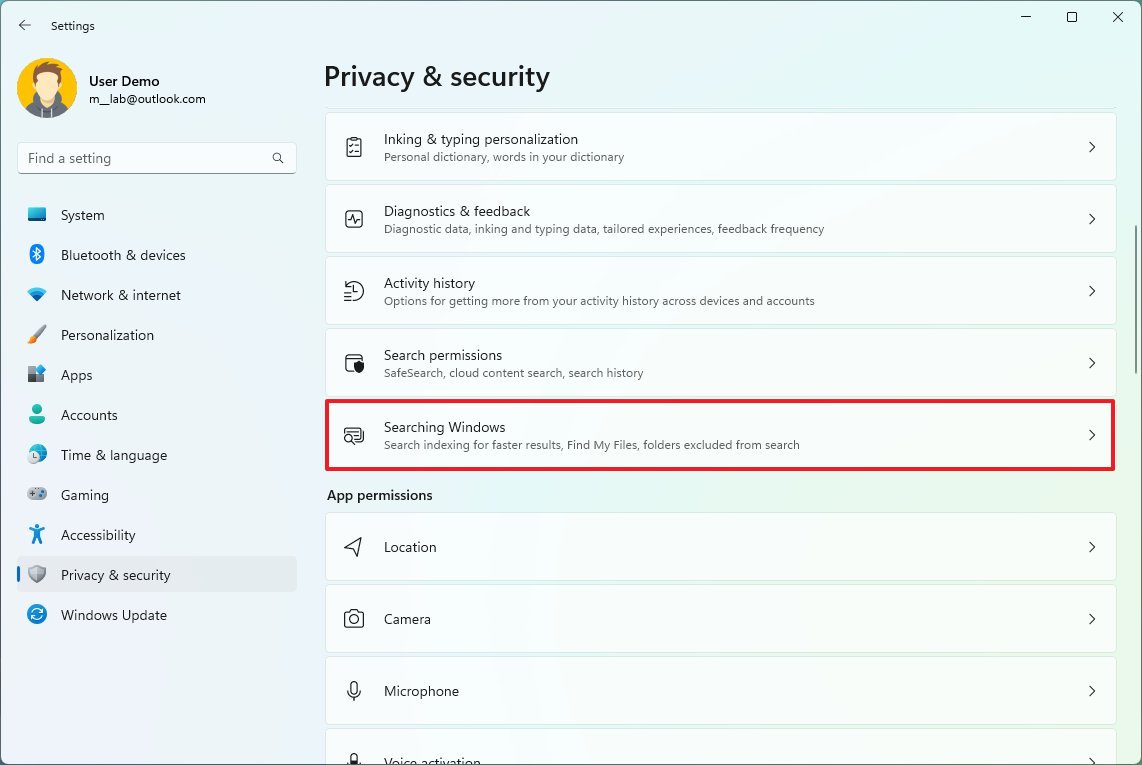
- Click the Searching Windows page on the right side.
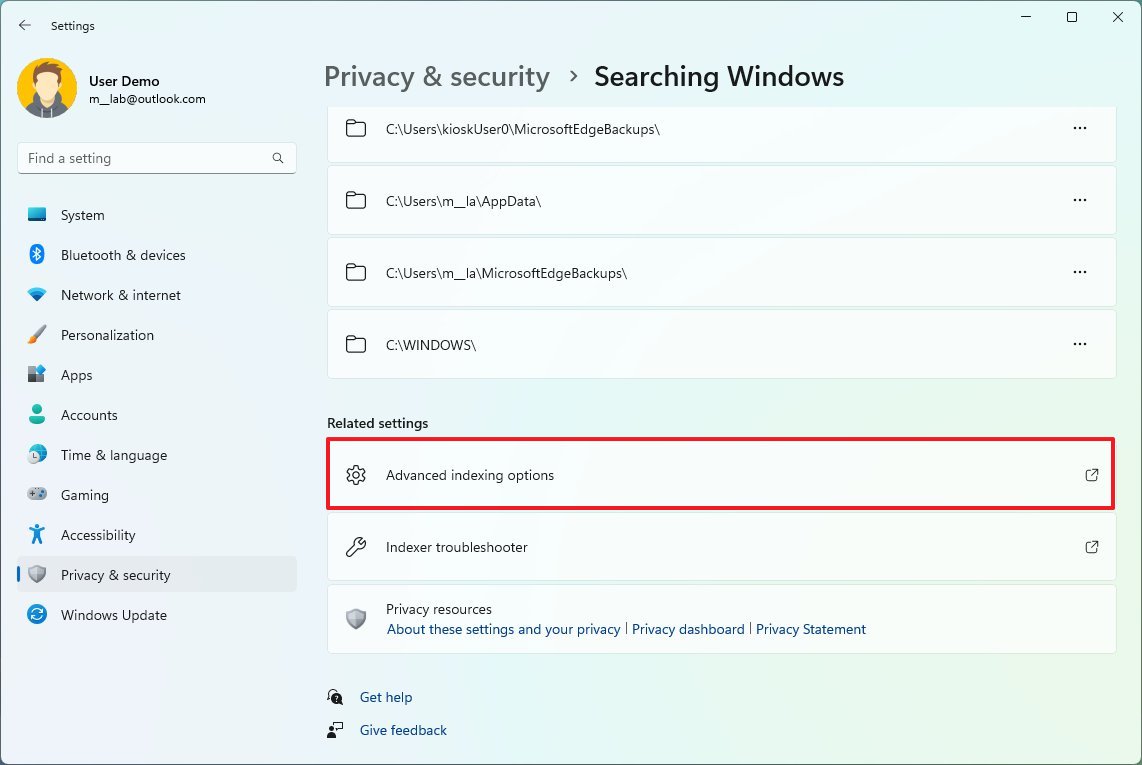
- Under the "Related settings" section, click on "Advanced indexing options."
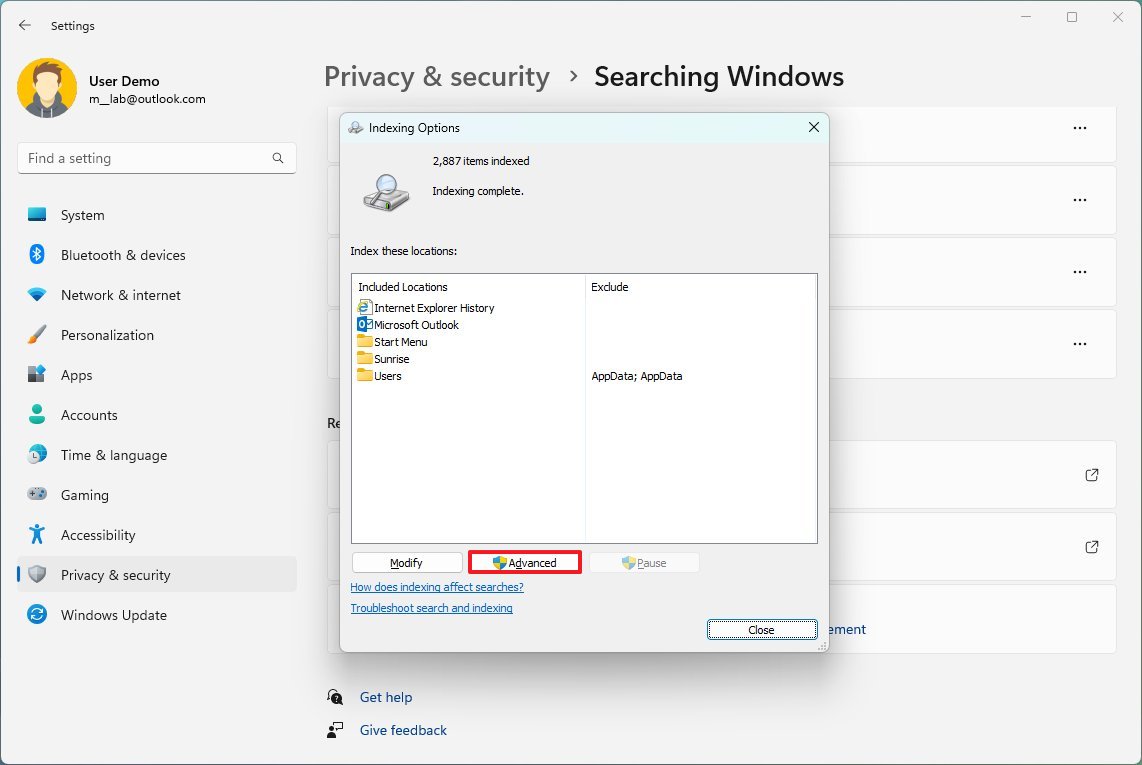
- Click the Advanced button.
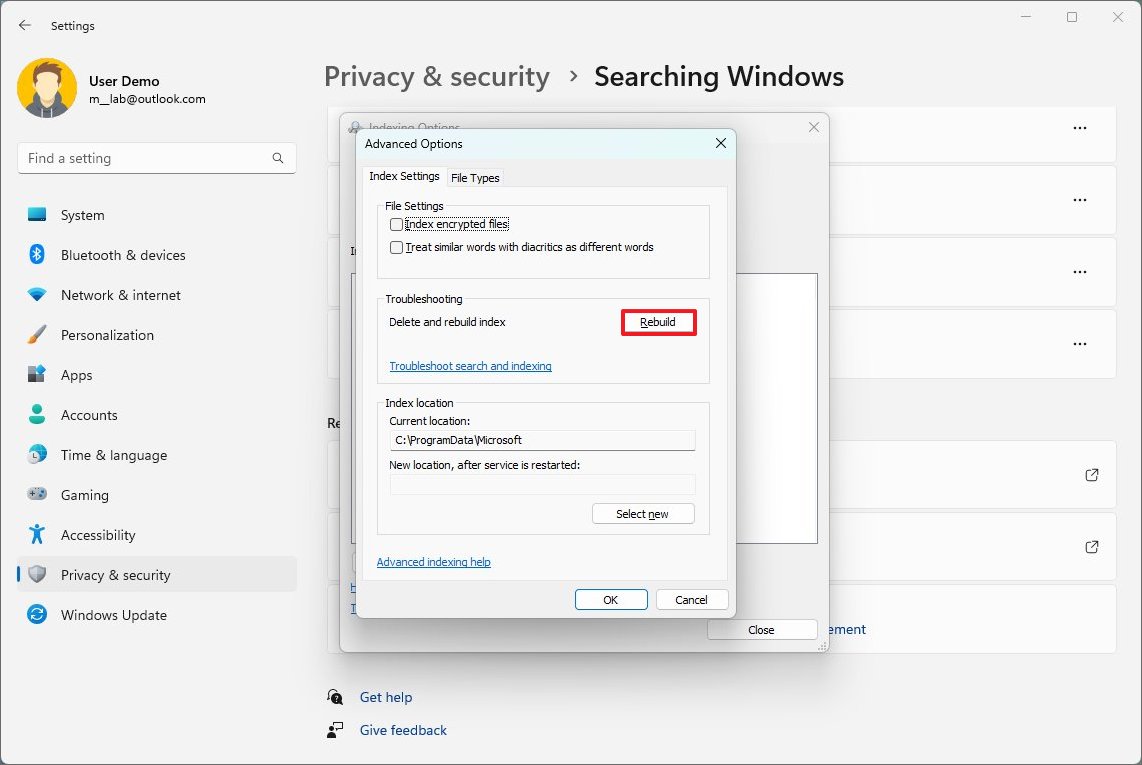
- Click the Index Settings tab.
- Under the "Troubleshooting" section, click the Rebuild button.
- Click the OK button.
Once you complete the steps, the system will clear and rebuild the Windows Search feature's index database.
The only caveat is that during the database rebuild, searches might be incomplete until files are indexed one more time.
Change Windows Search settings
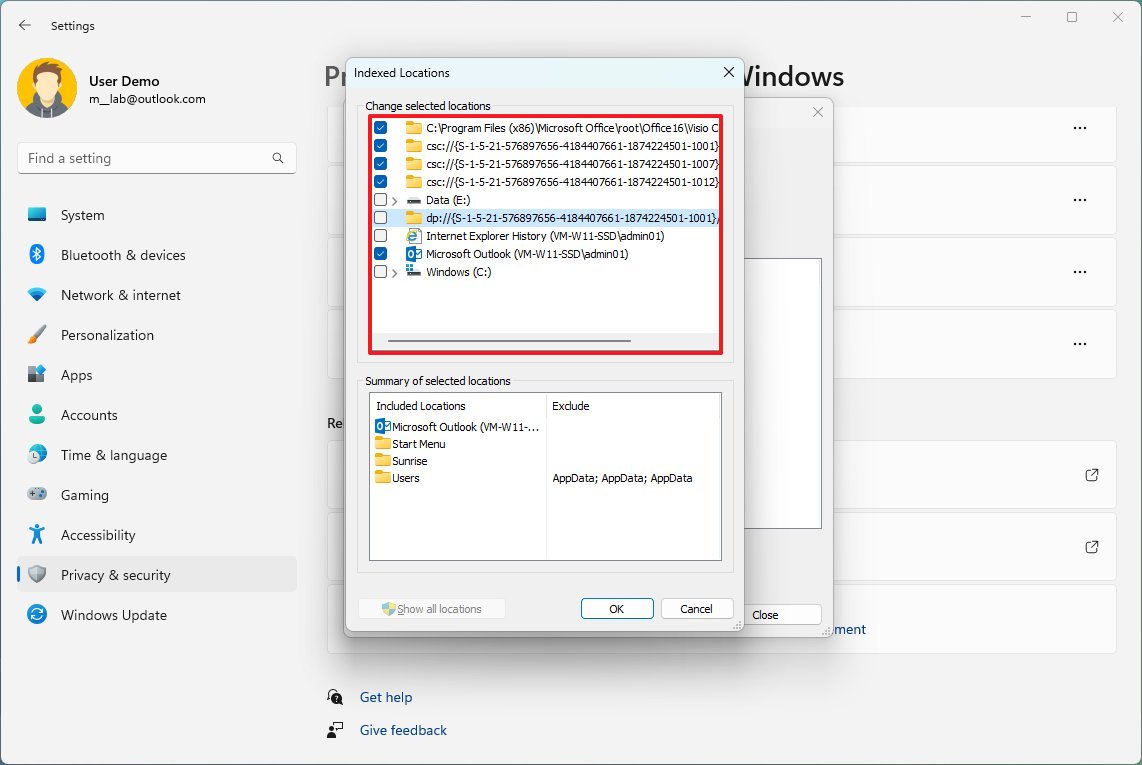
You can prevent the database from growing large by specifying only specific locations.
To modify the indexable locations, use these steps:
- Open Settings.
- Click on Privacy & security.
- Click the Searching Windows page on the right side.
- Under the "Related settings" section, click on "Advanced indexing options."
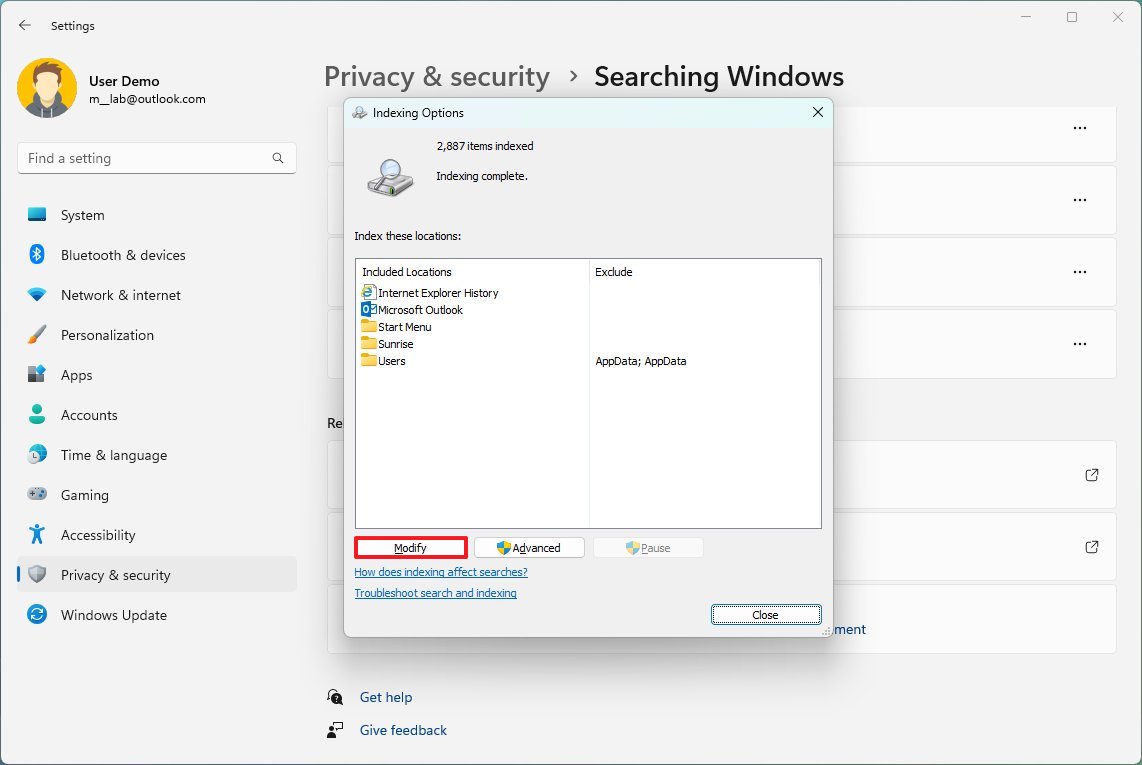
- Click the Modify button.
- Click the Show all locations button.
- Clear the options for apps you want to exclude in the index.
- Expand the C drive and clear the folder you do not wish to appear in search to reduce the footprint of the database.
- Click the OK button.
- Click the Close button.
After you complete the steps, Windows Search will update the database, excluding the locations you specified and reducing the database's overall size.
Free up space deleting users and data on shared devices
If you share a computer with other people, you may be able to delete the accounts that are no longer needed to free up additional space.
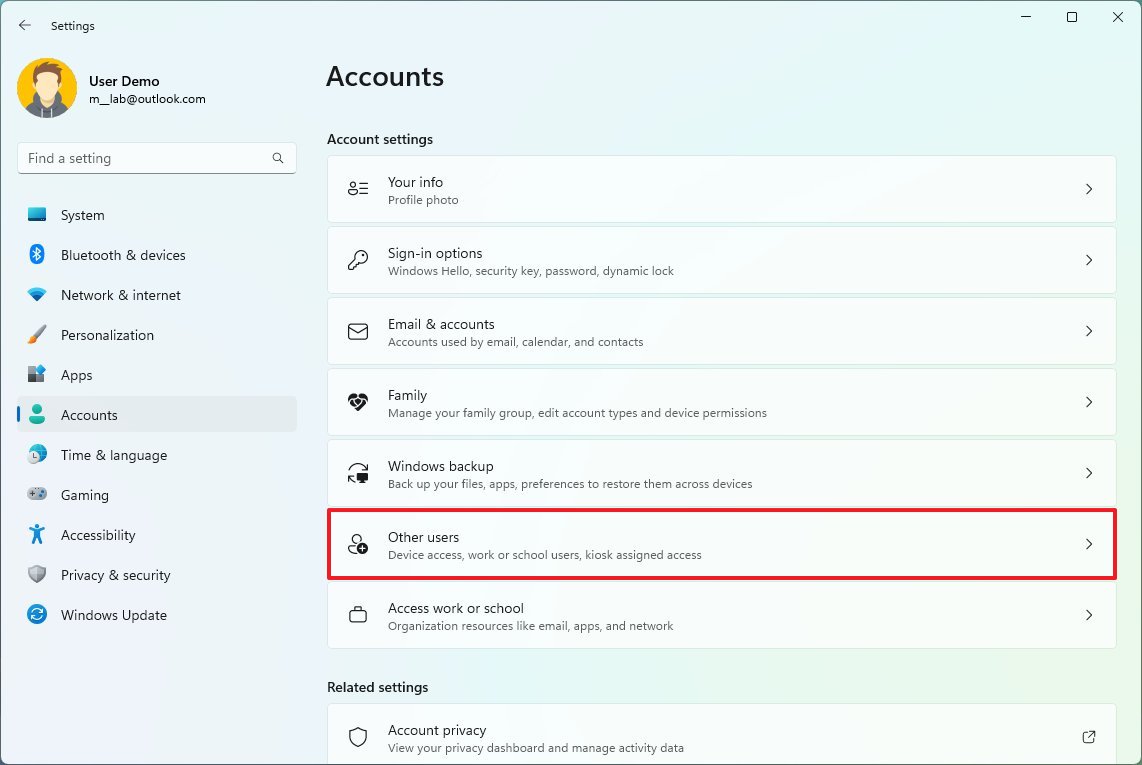
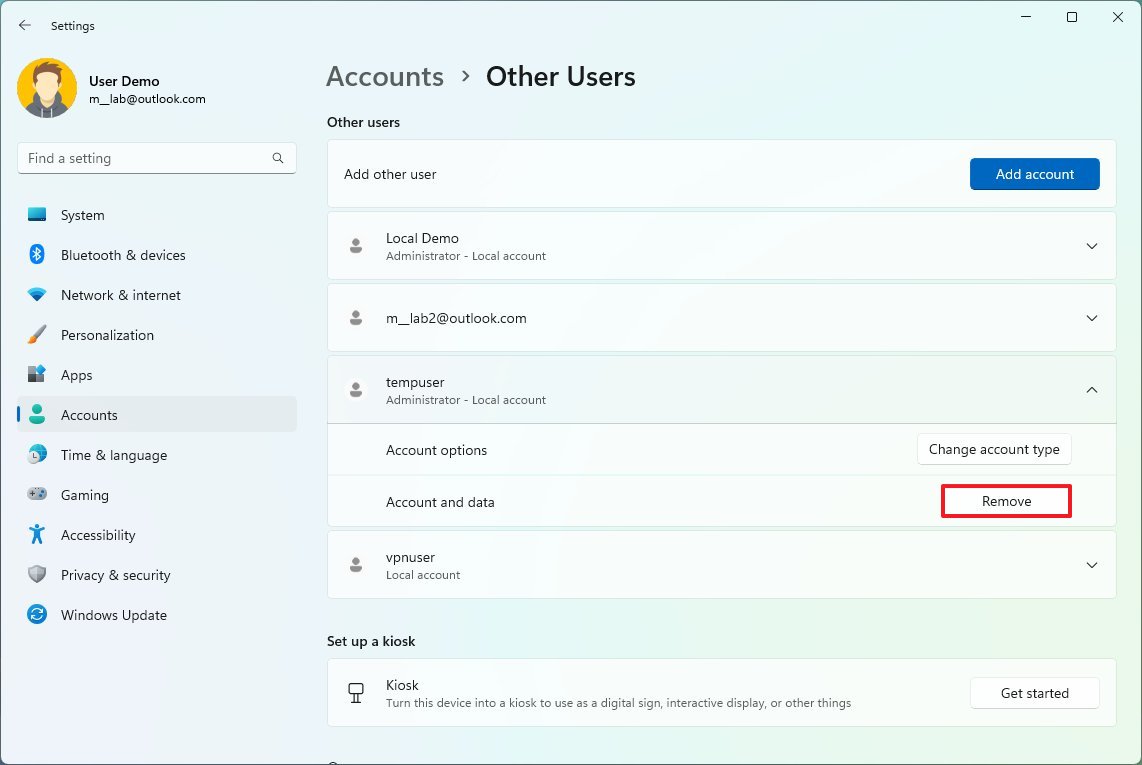
To delete user accounts and data on Windows 11, use these steps:
- Open Settings.
- Click on Accounts.
- Click the Other users page on the right side.
- Quick note: In version 21H2, the name of the page is Family & other users.
- Select the account to remove.
- Click the Remove button.
- Click the "Delete account and data" button.
Once you complete the steps, Windows 11 will delete the account and data for the user you selected, freeing up more space for other files. You may need to repeat the instructions to delete any other accounts.
Free up space removing viruses on Windows 11
Viruses and other type of malware can sometimes also cause high storage usage. In the case that the computer is likely to be infected and running low on storage, you can run the Microsoft Defender Antivirus to remove the virus, improve performance, and reclaim space.
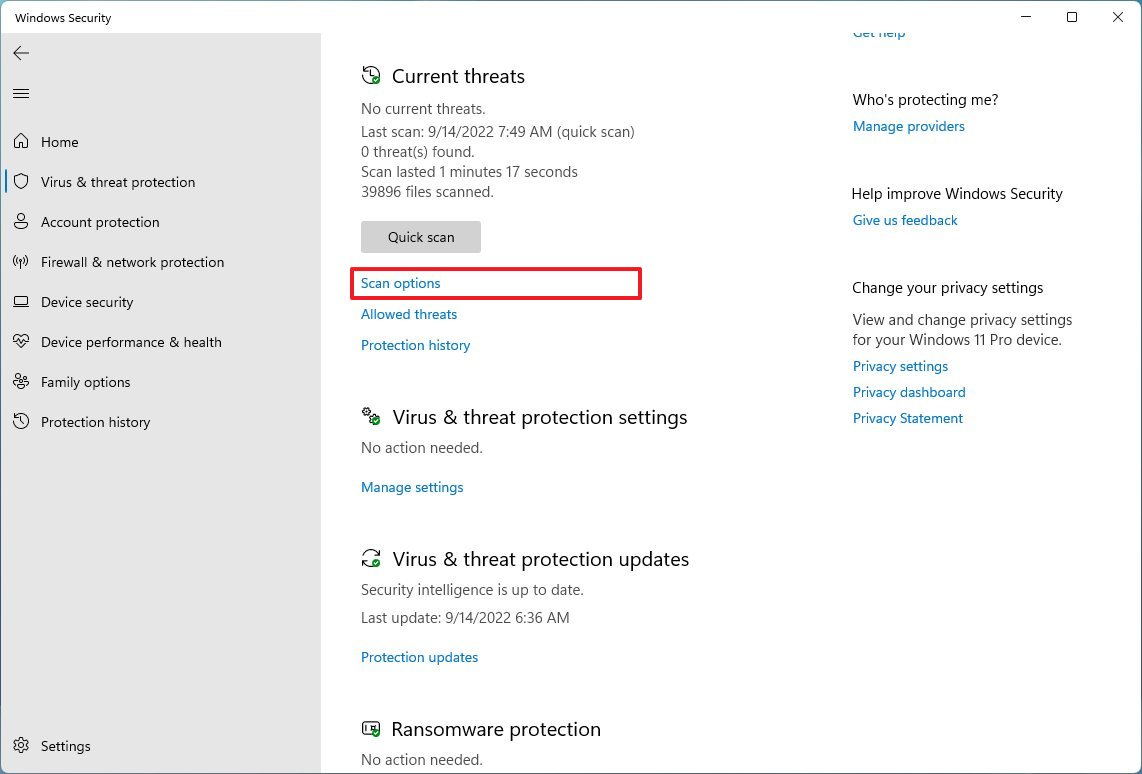
To perform a full virus on Windows 11, use these steps:
- Open Start.
- Search for Windows Security and click the top result to open the app.
- Click on Virus & threat protection.
- Under the "Current threats" section, click on Scan options.
- Select the Full scan option.
- Click the Scan now button.
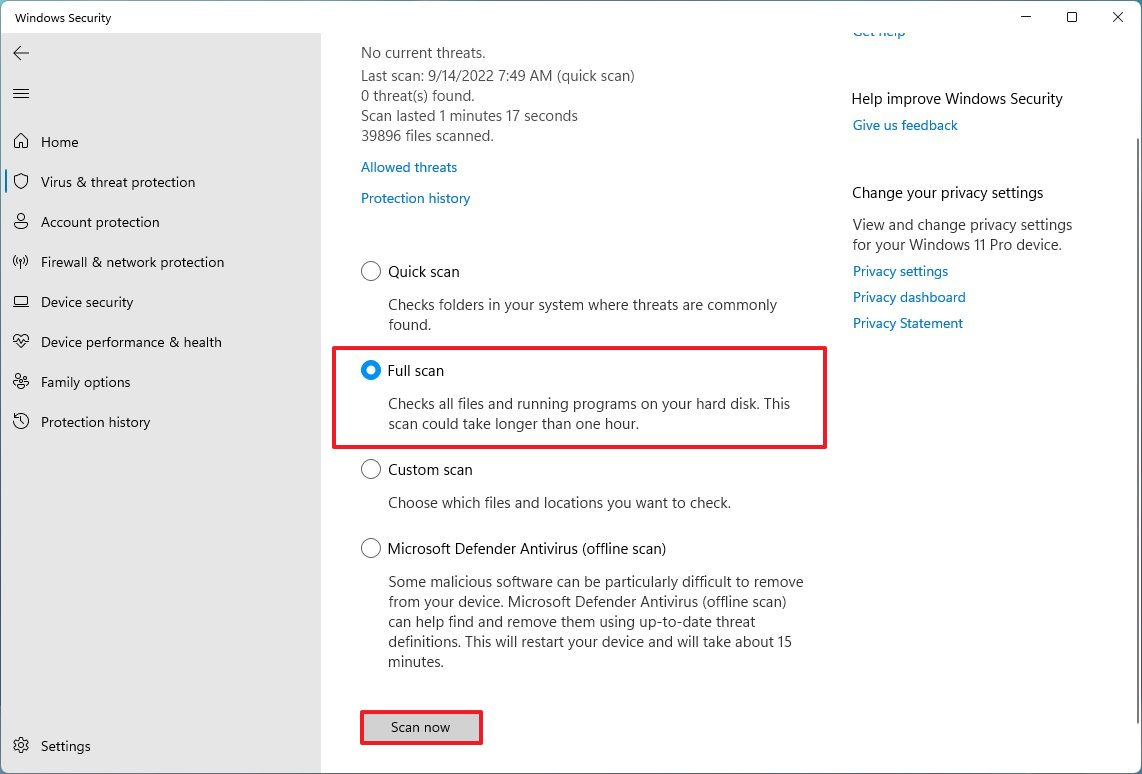
After you complete the steps, the antivirus will detect and remove the virus, freeing up space on Windows 11. (For more assistance, here's everything you need to know to get started with Microsoft Defender Antivirus.)
More resources
For more helpful articles, coverage, and answers to common questions about Windows 10 and Windows 11, visit the following resources:

Mauro Huculak has been a Windows How-To Expert contributor for WindowsCentral.com for nearly a decade and has over 22 years of combined experience in IT and technical writing. He holds various professional certifications from Microsoft, Cisco, VMware, and CompTIA and has been recognized as a Microsoft MVP for many years.
