How to fix second monitor not detected on Windows 10 and 11
Windows 10 or 11 isn't detecting the external monitor? Try these troubleshooting steps to fix it.
On Windows 10 and Windows 11, connecting a second display allows you to expand the available desktop to work with multiple apps and play games on your laptop or desktop computer.
Although setting up an external monitor is usually straightforward, sometimes Windows 10 and 11 may not be able to detect older displays or second monitors due to drivers or hardware-related issues. However, if your device has a problem, you can use several troubleshooting steps (including checking the connection and installing the correct drivers) to fix the issue quickly.
In this how-to guide, I will explain several ways to troubleshoot and fix issues that are blocking the system from automatically detecting the second monitor. This set of instructions is focused on Windows 10, but you can also refer to them if you're dealing with the same issues on Windows 11. I have also added a section with more specific steps for the newer version of the operating system.
How to fix external monitor connection issues from hardware troubleshooting
When your desktop or laptop does not detect the second external display, it could be a software problem, but it might also be an issue with the physical connection or the monitor itself.
If the monitor does not show up in the settings, use these steps before messing around with the configuration settings on Windows:
- Confirm the display is connected to a power source.
- Check whether the monitor is powered on.
- Turn the computer off and on to refresh the connection.
- Open the monitor's built-in controls and choose the correct input port.
- Check the signal cable connection between the display and the graphics card.
- Disconnect the signal cable from both ends, wait one minute, and firmly reconnect it.
- Change the signal cable to confirm the problem isn't the cable.
- Check the manufacturer for requirement details to ensure you have the correct cable since DisplayPort and HDMI come in different versions.
- Change ports if the monitor and graphics card feature multiple ports.
- Connect the monitor to another computer to confirm whether the problem is with the external display.
- Connect another known working monitor to determine the issue is not the graphics card.
- Disconnect all peripherals (such as printers, cameras, and USB devices) to confirm none of the other devices are conflicting with the display.
- If you have a Surface device connected to a dock station, disconnect it and try to connect the monitor directly to the computer to confirm the problem is not the dock.
- Update the external monitor firmware to help fix bugs and compatibility issues (uncommon).
If the basic troubleshooting steps outlined above do not fix the problem with the second monitor, it could be a software-related issue, which you may be able to fix with the steps below.
1. ExpressVPN: The best VPN available right now
This is our top pick for anyone looking to get started with a VPN. It offers a great mix of speed, reliability, outstanding customer service, and affordability. There is a 30-day money-back guarantee, so give it a shot today.
In the event that the problem is the monitor or you are in the market for a new one, check our best 4K monitor roundup that you should consider getting.
Get the Windows Central Newsletter
All the latest news, reviews, and guides for Windows and Xbox diehards.
How to fix external monitor connection issues from Settings
After determining that there isn't a physical problem with the connection, monitor, or computer, you can use the Settings app to force the system to detect the second monitor.
Force second display detection
To detect a second monitor manually on Windows 10, use these steps:
- Open Settings.
- Click on System.
- Click on Display.
- Under the "Multiple displays" section, click the Detect button to connect to the external monitor.
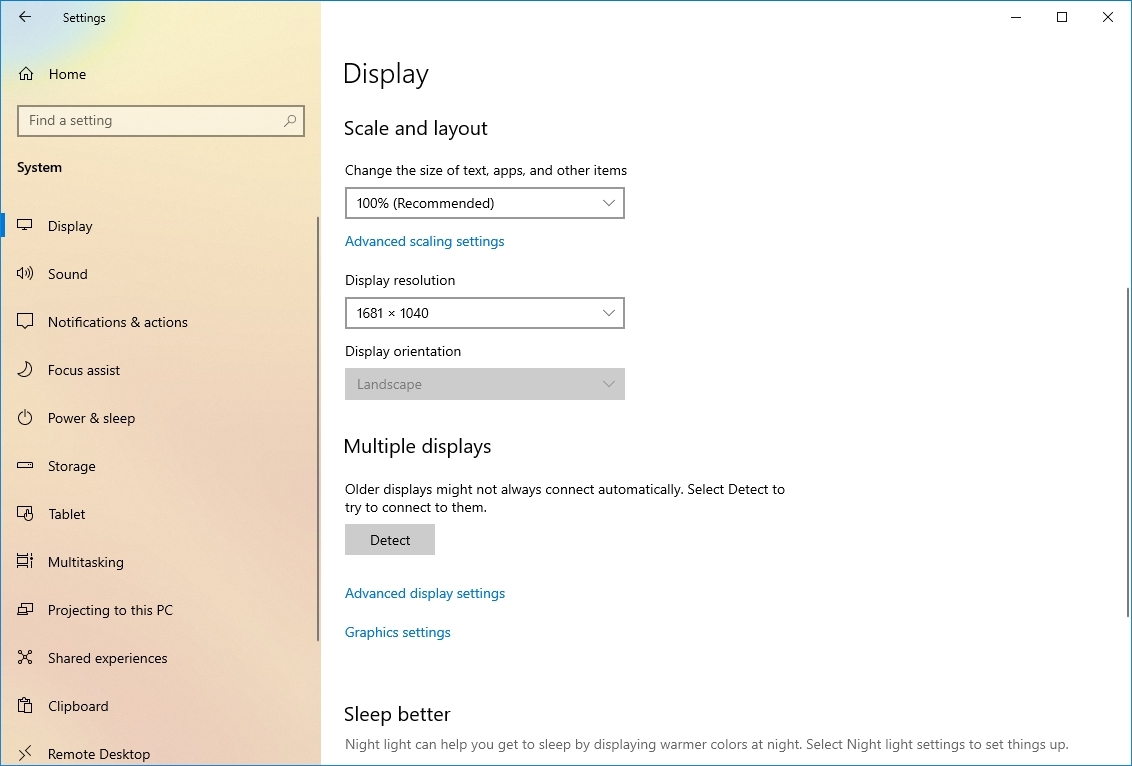
- (Optional) Under the "Rearrange your displays" section, click the Detect button in the bottom-right corner (if applicable).
- Quick note: If you have only one monitor, the option won't be present since it's only available when connecting multiple displays.
Once you complete the steps, Windows 10 should detect the external monitor connected to the computer.
Connect wireless external display
To connect a wireless display on Windows 10 as a secondary screen on your computer, use these steps:
- Open Settings.
- Click on Devices.
- Click on Bluetooth & other devices.
- Turn on the Bluetooth toggle switch (if applicable).
- Click the "Add Bluetooth or other device" button.
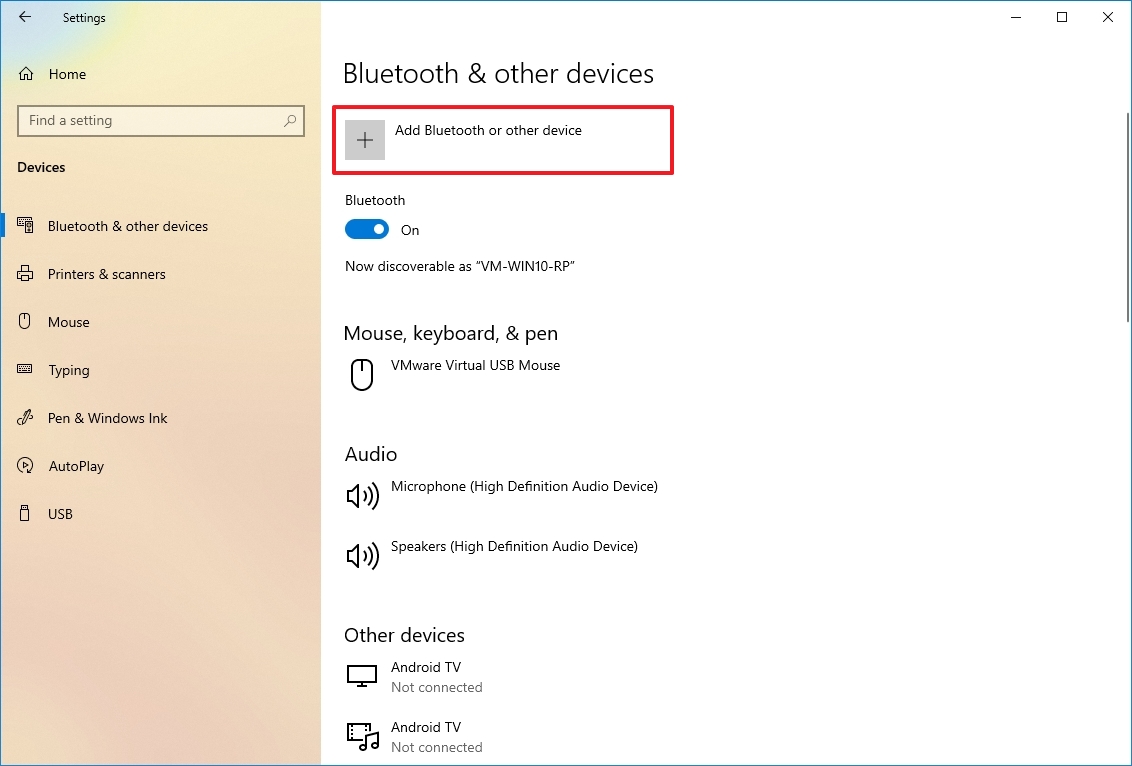
- Select the "Wireless display or dock" option.
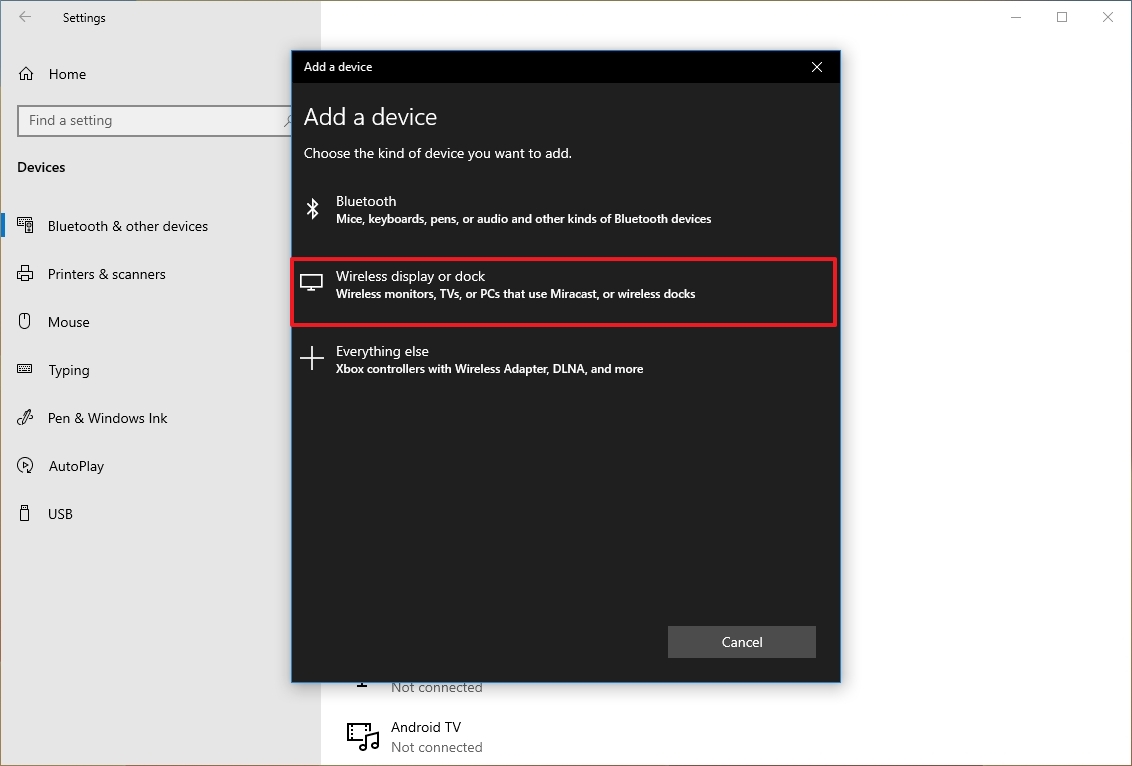
- Confirm the wireless display is on and discoverable (refer to device documentation).
- Select the display (wireless monitor, TV, or PC with Miracast support) from the list.
- Continue with the on-screen directions (if applicable).
After you complete the steps, the wireless display will be detected as a new external display.
How to fix external monitor connection issues from latest graphics drivers
A buggy, outdated, or corrupted graphics driver can cause problems that may prevent Windows 10 from detecting a second monitor automatically. The easiest method to fix this issue is updating, reinstalling, or downgrading the driver.
Update graphics driver
To update the graphics card driver through Windows Update, use these steps:
- Open Settings.
- Click on Update & Security.
- Click on Windows Update.
- Click the "View optional updates" option.
- Quick tip: If the option is not available, Windows Update does not have a newer driver available.
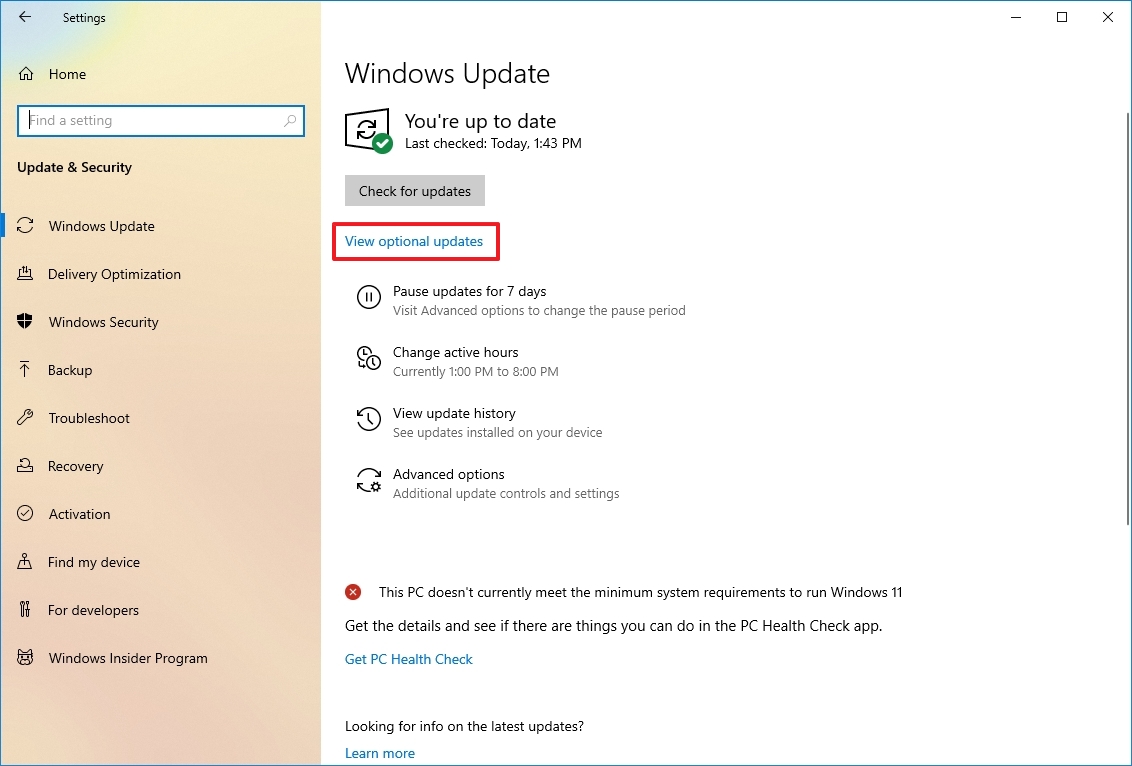
- Select the Driver updates setting.
- Check the graphics driver to update on Windows 10.
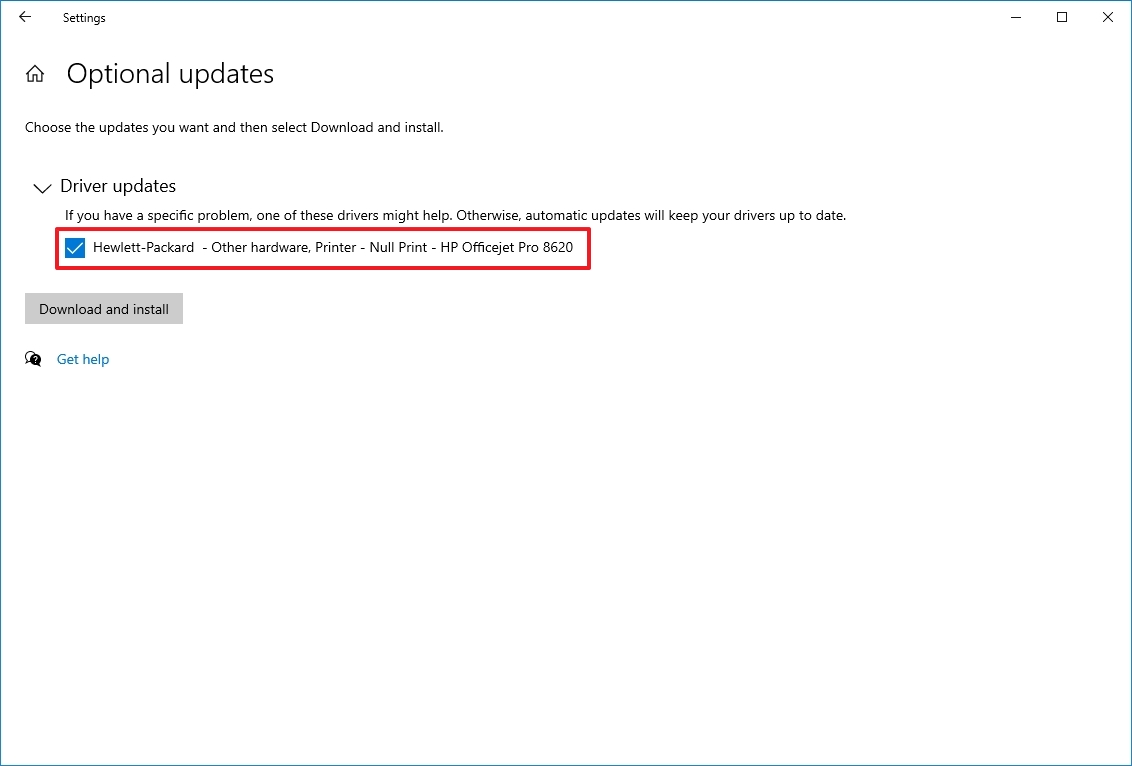
- Click the "Download and install" button.
Once you complete the steps, Windows Update will install the graphics driver, fixing the external monitor's detection problem.
If Windows Update does not have a newer driver version, check the manufacturer support website to download and install a more recent version (if available).
Reinstall graphics driver
To reinstall a corrupted video driver on Windows 10, use these steps:
- Open Start.
- Search for Device Manager and click the top result to open the app.
- Double-click to expand the Display adapters branch.
- Right-click the adapter and select the Uninstall device option.
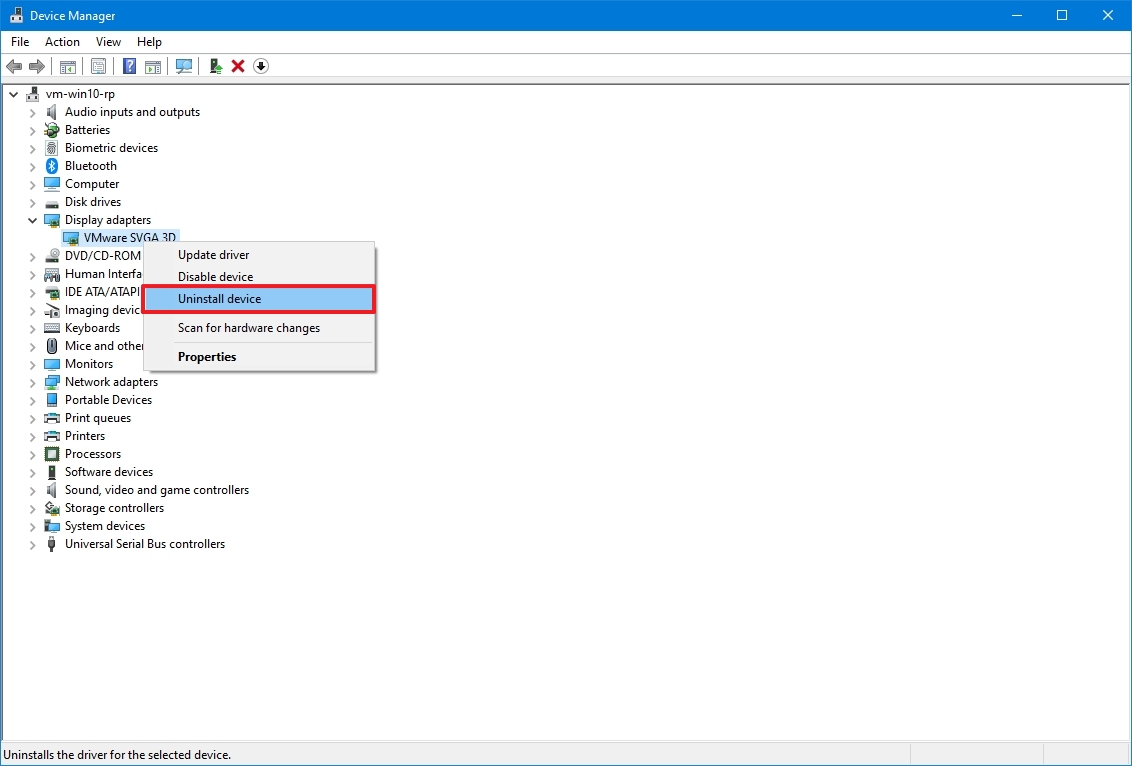
- Clear the "Delete the driver software from this device" option (if applicable).
- Click the Uninstall button.
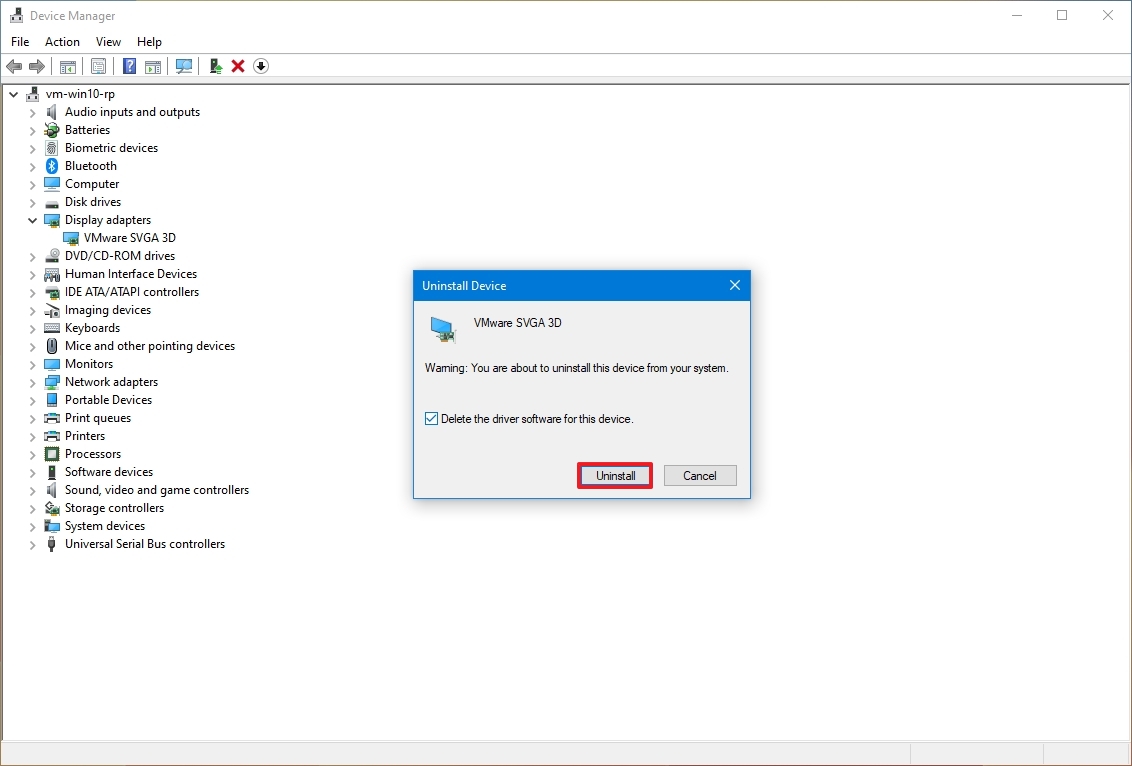
- Restart the computer.
- Open Device Manager again.
- Quick note: The system should detect the monitor again automatically. If it's not the case, you can scan for changes manually to reinstall the display.
- Right-click the computer name and select the "Scan for hardware changes" option.
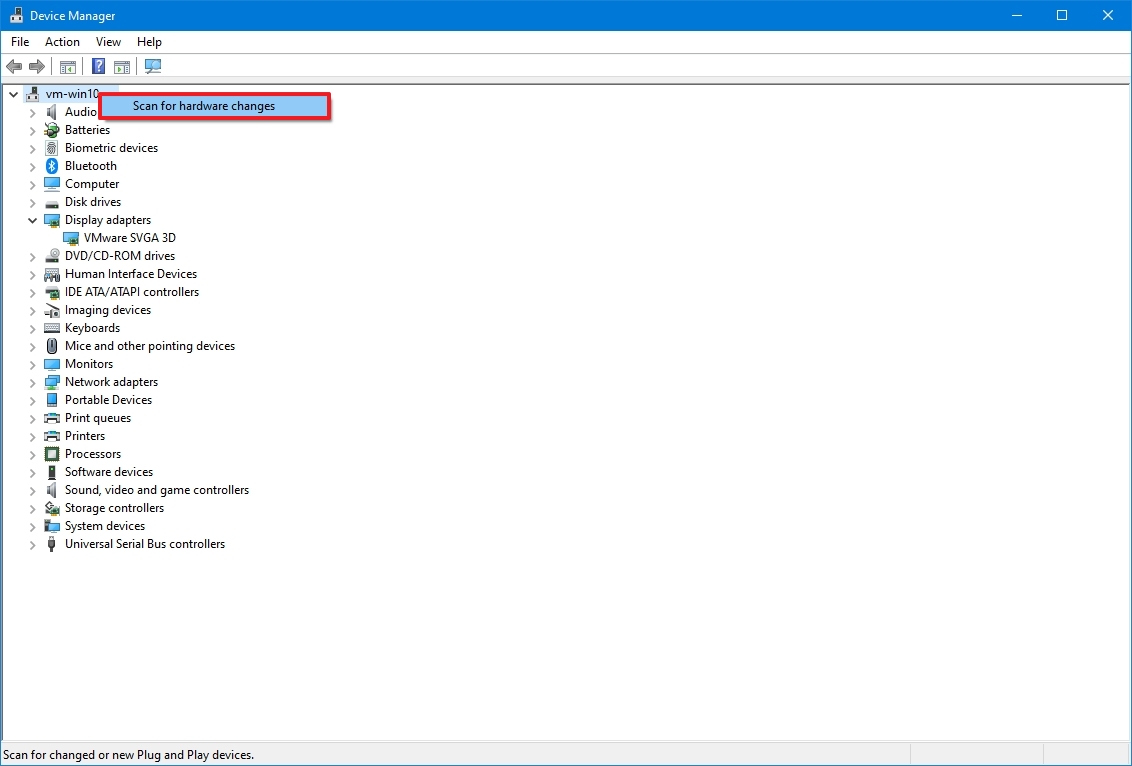
After you complete the steps, Windows 10 will reinstall the driver automatically. However, it's good to use the above steps to ensure the driver installs correctly.
Rollback graphics driver
If the computer was recently updated or the graphics driver was recently upgraded manually, and Windows 10 cannot detect the second monitor, rolling back to the previous driver version may resolve the issue.
To remove and reinstall an older version of a graphics driver on Windows 10, use these steps:
- Open Start.
- Search for Device Manager and click the top result to open the app.
- Double-click to expand the Display adapters branch.
- Right-click the graphics adapter and select the Properties option.
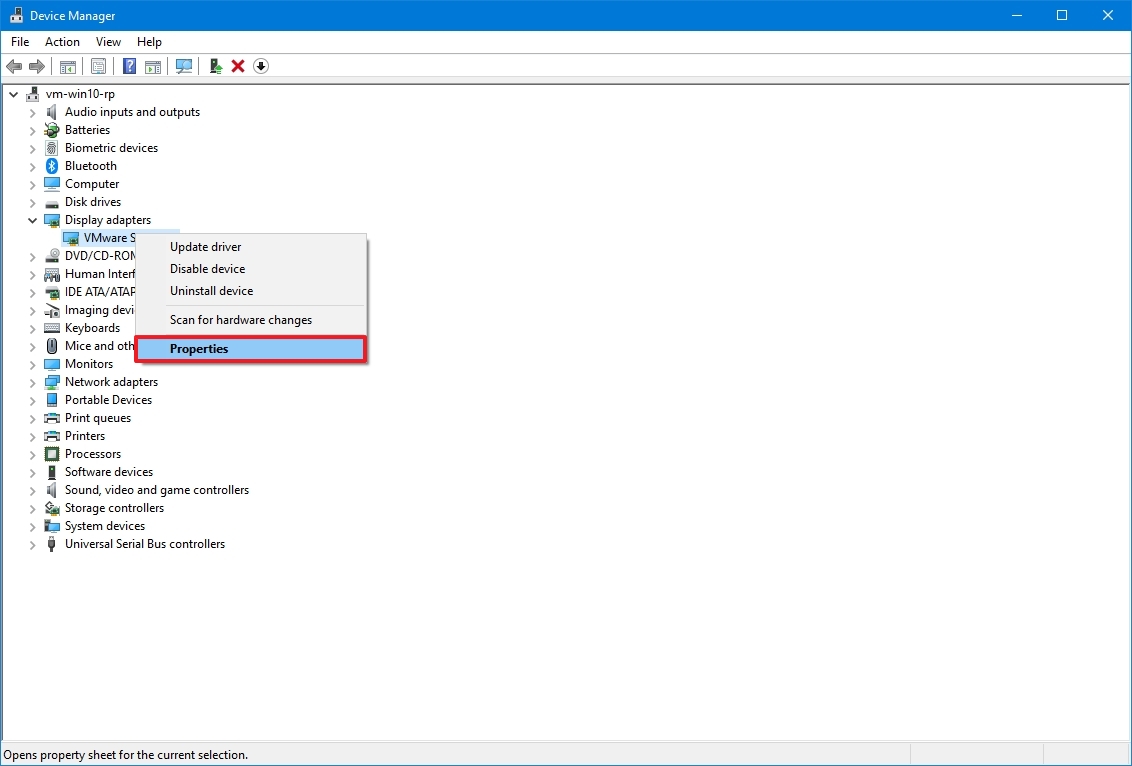
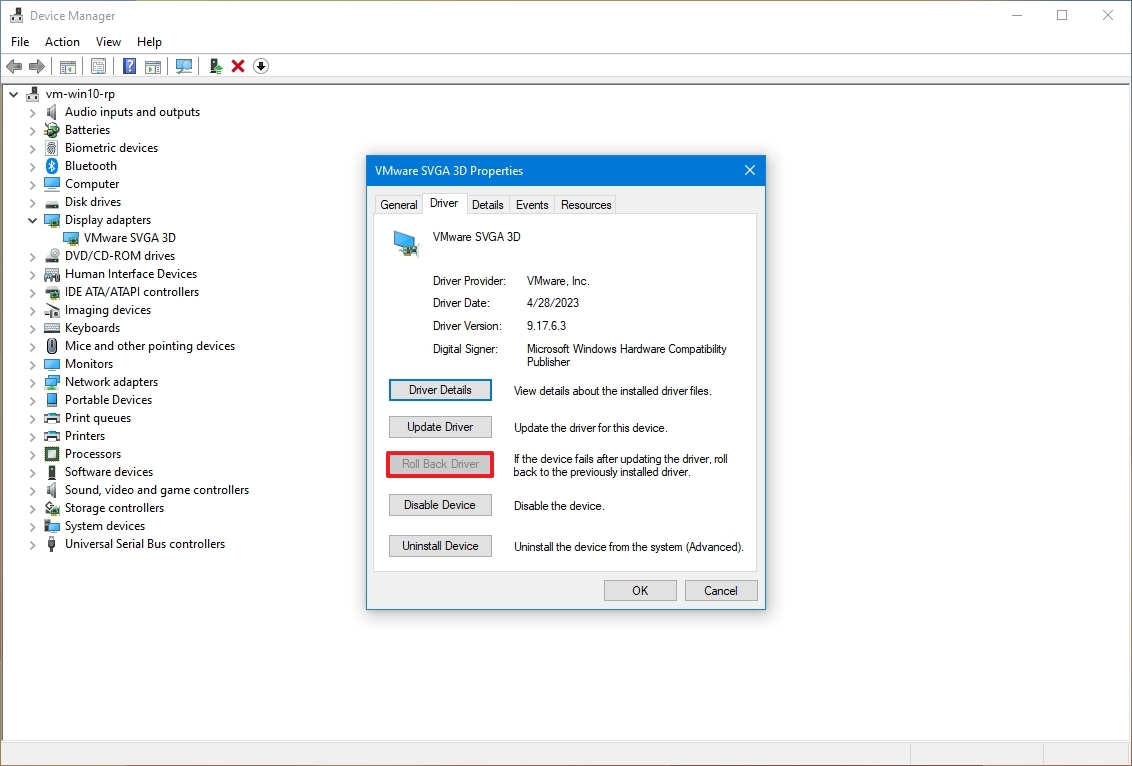
- Click the Driver tab.
- Click the Roll Back Driver button.
- Quick tip: You cannot use this rollback process if the option is unavailable. However, you might still be able to use an older version from the device manufacturer's support website (if available).
- Select an option to answer the question.
- Click the Yes button.
- Restart the device.
Once you complete the steps, Windows 10 should start rendering content on the external monitor.
Update graphics driver with manufacturer control panel
Windows 10 can automatically set up drivers for most graphics adapters, but the drivers available through Windows Update are not typically the most recent. If you have to install the latest driver, companies like NVIDIA, AMD, and Intel offer tools to quickly install the latest updates that may help to fix external display problems.
Check out these links to download the drivers, depending on your manufacturer:
If you want to use the manufacturer's control panel application, the installation is simple. You only need to download and double-click the installer using the above links, continue with the on-screen directions to complete the setup, and check for updates.
Alternatively, you can download the drivers directly from the manufacturer's support website using their recommended instructions. You can use the links below to find the drivers:
Check manufacturer and driver version
To check the graphics card vendor and driver version on Windows 10, use these steps:
- Open Start.
- Search for System Information and click the top result to open the app.
- Double-click to expand the Components branch on the left pane.
- Select the Display category.
- Confirm the Adapter Type and Driver Version information to determine the driver's card model and current version.
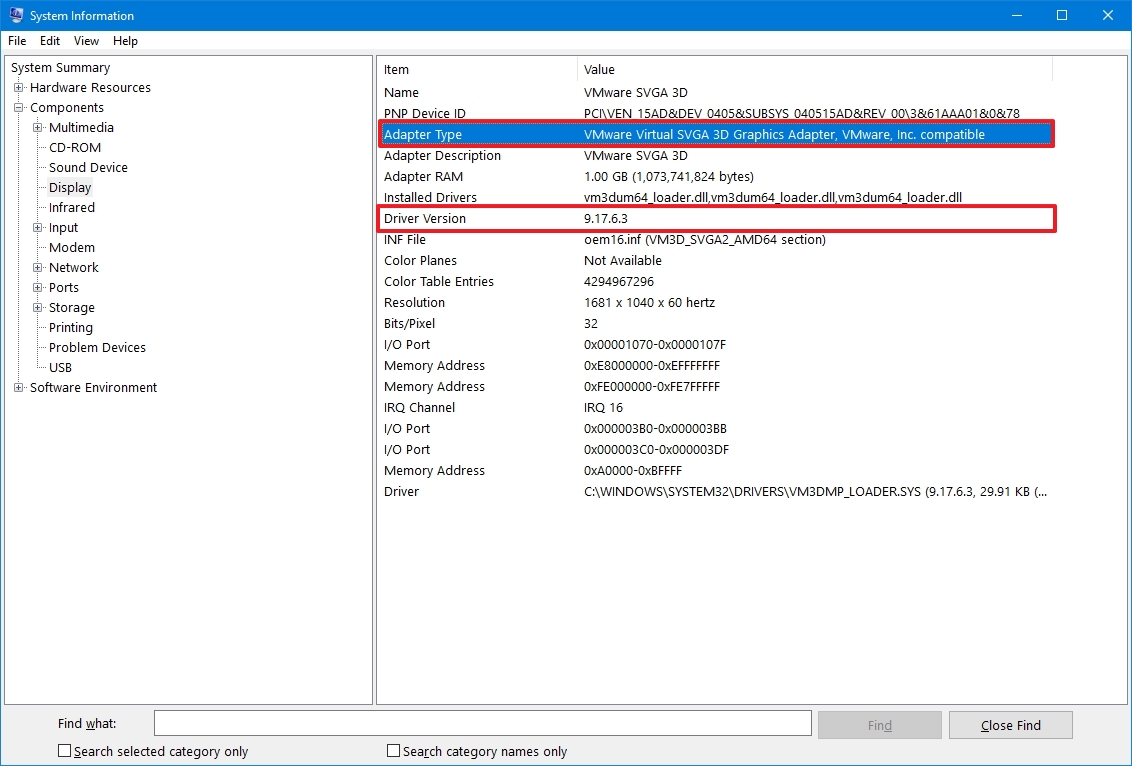
Once you complete the steps, use the above links to find, download, and install the correct driver.
Finally, manufacturers (such as Dell, HP, Razer, Acer, and Microsoft) usually change the original drivers to optimize their computers. As a result, if you have a branded computer (also known as an Original Equipment Manufacturer (OEM) computer), you should always consider using the graphics driver available through the device manufacturer before trying those available through the graphics card manufacturer to avoid problems.
How to fix external monitor connection issues on Windows 11
Although these instructions also apply to Windows 11, some of the steps are slightly different since the newer version includes an updated interface.
Force external monitor detection
To detect an external monitor manually on Windows 11, use these steps:
- Open Settings.
- Click on System.
- Click the Display page on the right side.
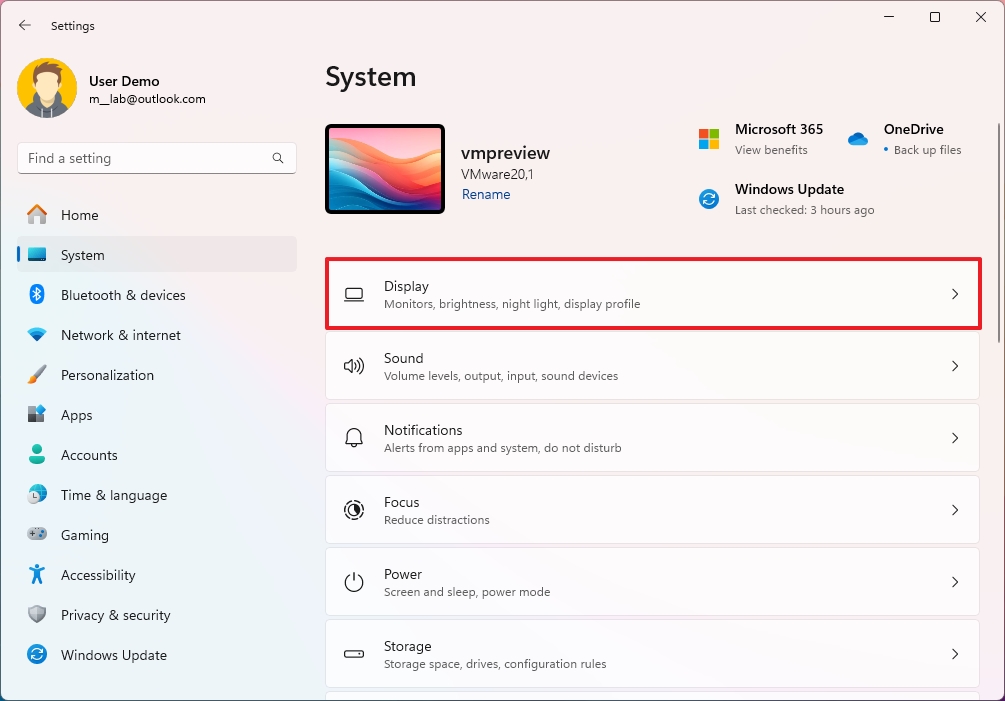
- Click the Multiple displays setting.
- Click the Detect button.
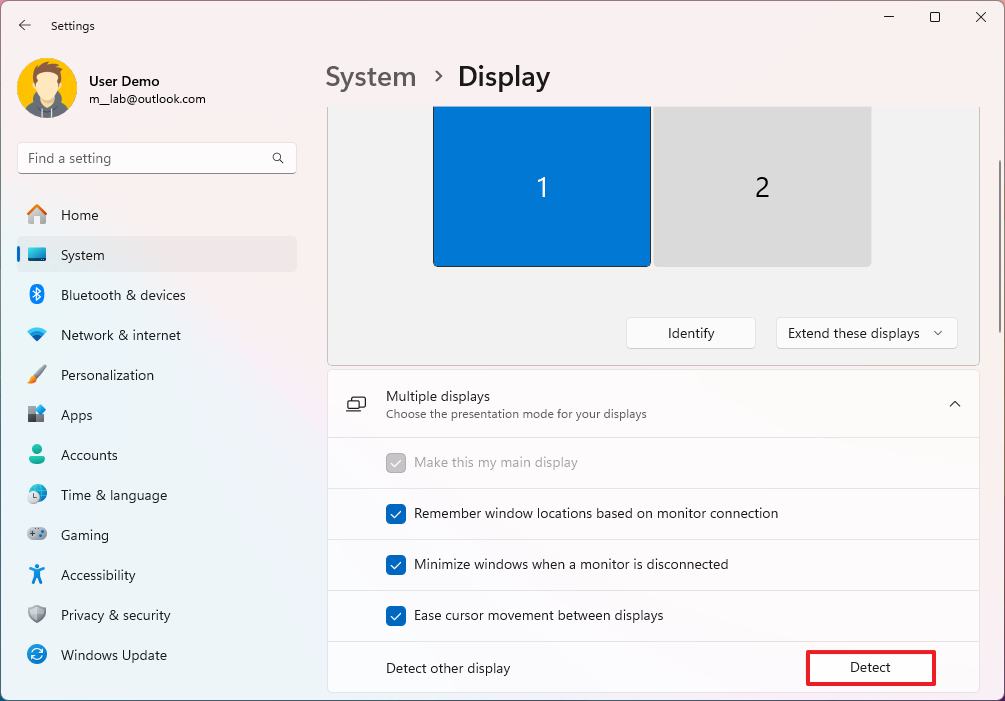
Once you complete the steps, the system should detect the external display.
Connect wireless external display
To connect a wireless display as a secondary screen, use these steps:
- Open Settings.
- Click on Bluetooth & devices.
- Turn on the Bluetooth toggle switch (if applicable).
- Click the Add device button.
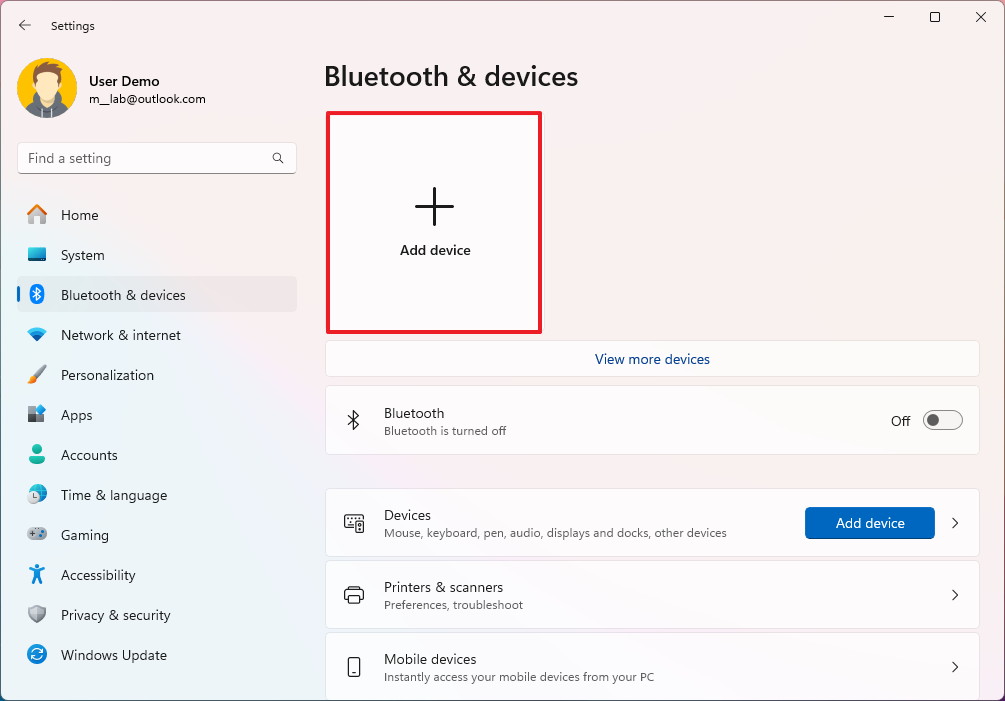
- Select the "Wireless display or dock" option.
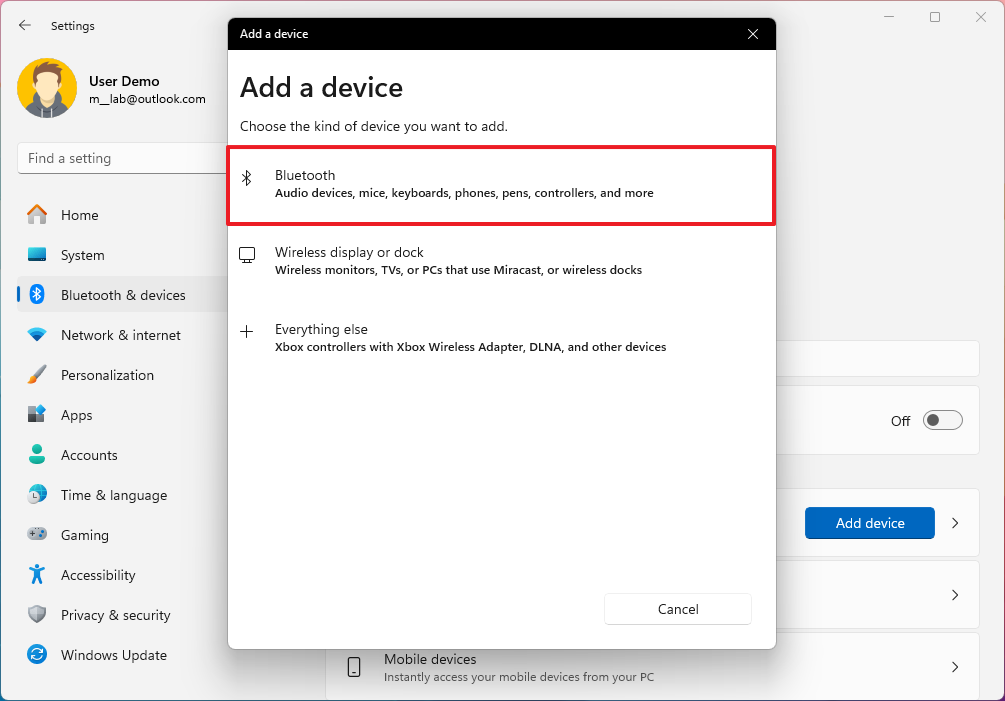
- Confirm the wireless display is turned on and discoverable (refer to device documentation).
- Select the display (wireless monitor, TV, or PC with Miracast support) from the list.
- Continue with the on-screen directions (if applicable).
After you complete the steps, the display will be detected as a new external display on the computer.
Update graphics driver
To update the graphics driver, use these steps:
- Open Settings.
- Click on Windows Update.
- Click the Advanced options page on the right side.
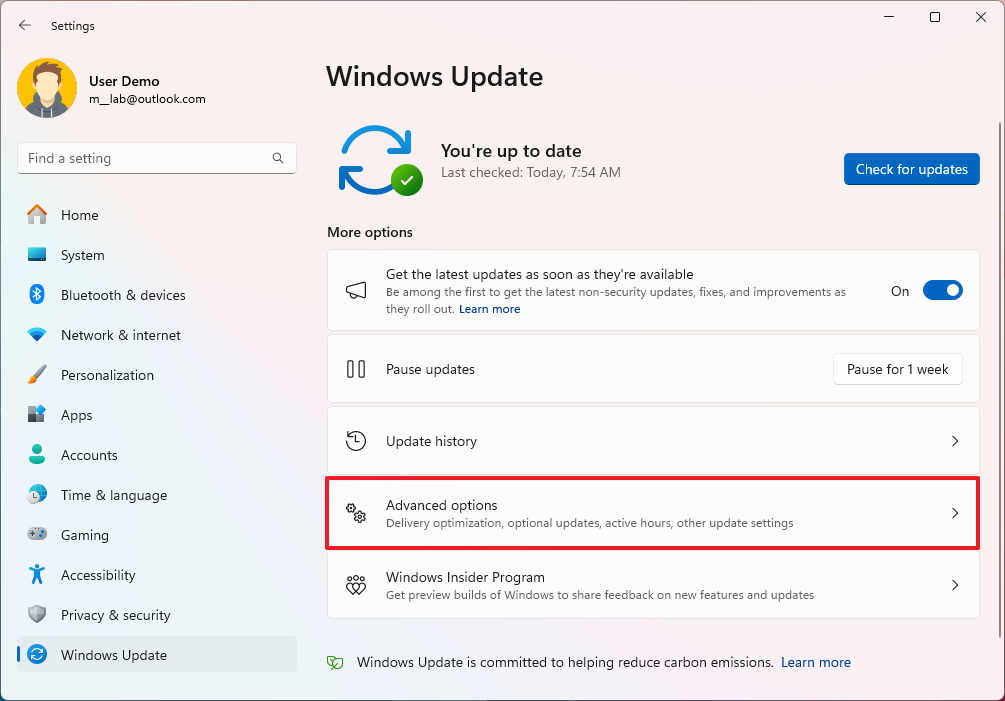
- Under the "Additional options" section, click the Optional updates option.
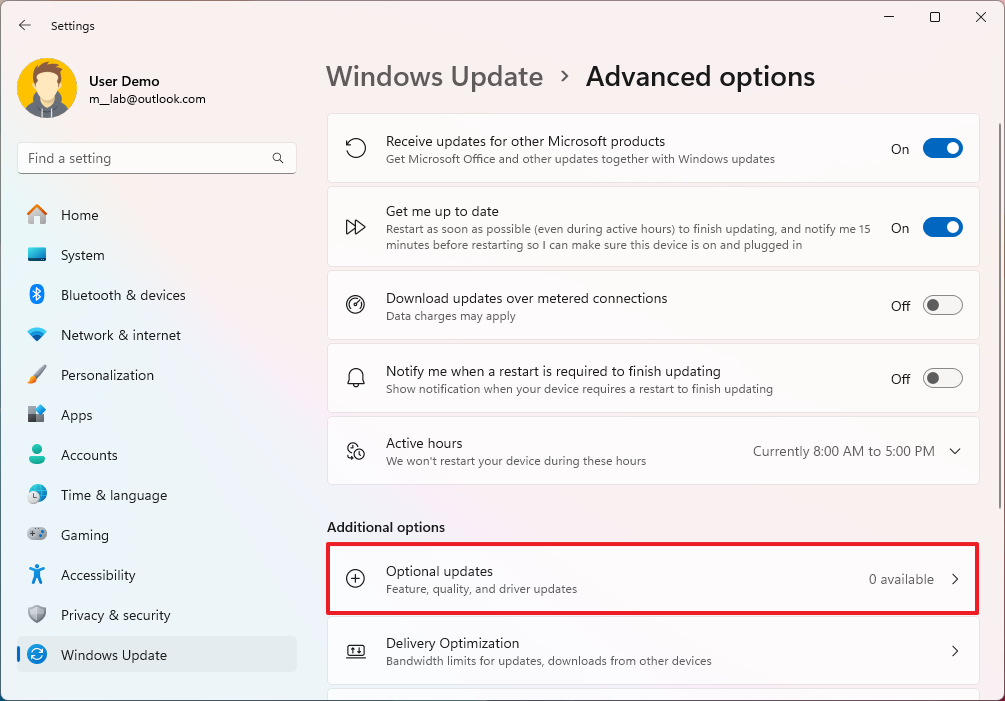
- Select the newer graphics driver to install on Windows 11.
- Click the "Download & install" button.
Once you complete the steps, the system will download and install the available update for the graphics driver, fixing the external monitor's detection problem.
More resources
For more helpful articles, coverage, and answers to common questions like how to rearrange multiple monitors on Windows 11 and 10, visit the following resources:
Mauro Huculak has been a Windows How-To Expert contributor for WindowsCentral.com for nearly a decade and has over 15 years of experience writing comprehensive guides. He also has an IT background and has achieved different professional certifications from Microsoft, Cisco, VMware, and CompTIA. He has been recognized as a Microsoft MVP for many years.


