
 Windows Central Insider


On Windows 10, the ability to check the computer serial number can come in handy in many scenarios. For instance, when you need to create an inventory of the devices connected to your home network or organization, or need to contact technical support to troubleshoot a problem, order a replacement part, or check the warranty information.
Usually, you can find the required information on the sticker affixed on the back or bottom of your laptop or desktop, or checking the Basic Input/Output System (BIOS) or Unified Extensible Firmware Interface (UEFI) on your motherboard. However, if the sticker isn't available or you don't want to go through extra steps to access firmware, you can also use PowerShell and Command Prompt to retrieve this information quickly on Windows 10.
In addition, using commands can be useful to automate the process using a script when you need to retrieve the serial information from multiple devices.

In this Windows 10 guide, we'll walk you through the steps to quickly find your device serial number using command lines.
- How to determine PC serial number using PowerShell
- How to determine PC serial number using Command Prompt
How to determine PC serial number using PowerShell
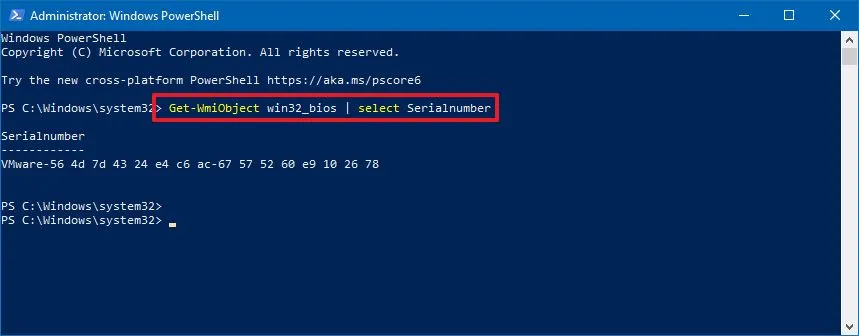
To retrieve the serial number of your computer with a PowerShell command, use these steps:
- Open Start.
- Search for PowerShell, right-click the top result, and select the Run as administrator option.
- Type the following command to find out the computer serial number and press Enter:
Get-WmiObject win32_bios | select Serialnumber
- Confirm the SerialNumber information.
- (Optional) Type the following command to determine device serial number and press Enter:
Get-CIMInstance win32_bios | format-list SerialNumber - Confirm the SerialNumber information.
- (Optional) Type the following command to export the serial information to a text file and press Enter:
Get-WmiObject win32_bios | select Serialnumber > PATH\TO\EXPORTIn the command, make sure to replace "PATH\TO\EXPORT" with the path to the text file you want to export the serial number information.For example, this command exports the output to the ComputerSerial.txt file in the C drive:Get-WmiObject win32_bios | select Serialnumber > C:\ComputerSerial.txt

Once you complete the steps, you'll know the serial number of your desktop or laptop computer.
If you are using the command to export the output, you'll find the file in folder location you specified. Also, since you exported it as a text format, you can open it with Notepad or any other text editor.
How to determine PC serial number using Command Prompt
To check the device serial number using a Command Prompt command, use these steps:
- Open Start.
- Search for PowerShell, right-click the top result, and select the Run as administrator option.
- Type the following command to find out the computer serial number and press Enter:
wmic bios get SerialNumber

- Confirm the computer serial number.
- (Optional) Type the following command to export the serial information to a text file and press Enter:
wmic bios get SerialNumber > PATH\TO\EXPORTIn the command, make sure to replace "PATH\TO\EXPORT" with the path to the text file you want to export the serial number information.For example, this command exports the output to the ComputerSerial.txt file in the C drive:wmic bios get SerialNumber > C:\ComputerSerial.txt

After you complete the steps, the command will return the serial number without needing to access the BIOS or going behind the device to look for the sticker.
Although these commands will work on any computer, custom-build devices don't have a serial number. This means that the command output may read "To Be Filled By O.E.M."
If you're looking to retrieve the device model number, you can use these instructions.

