How to enable write protection for USB devices on Windows 10
As an additional security layer, you can use this guide to enable write protection on Windows 10 to prevent users from copying data to a USB drive.
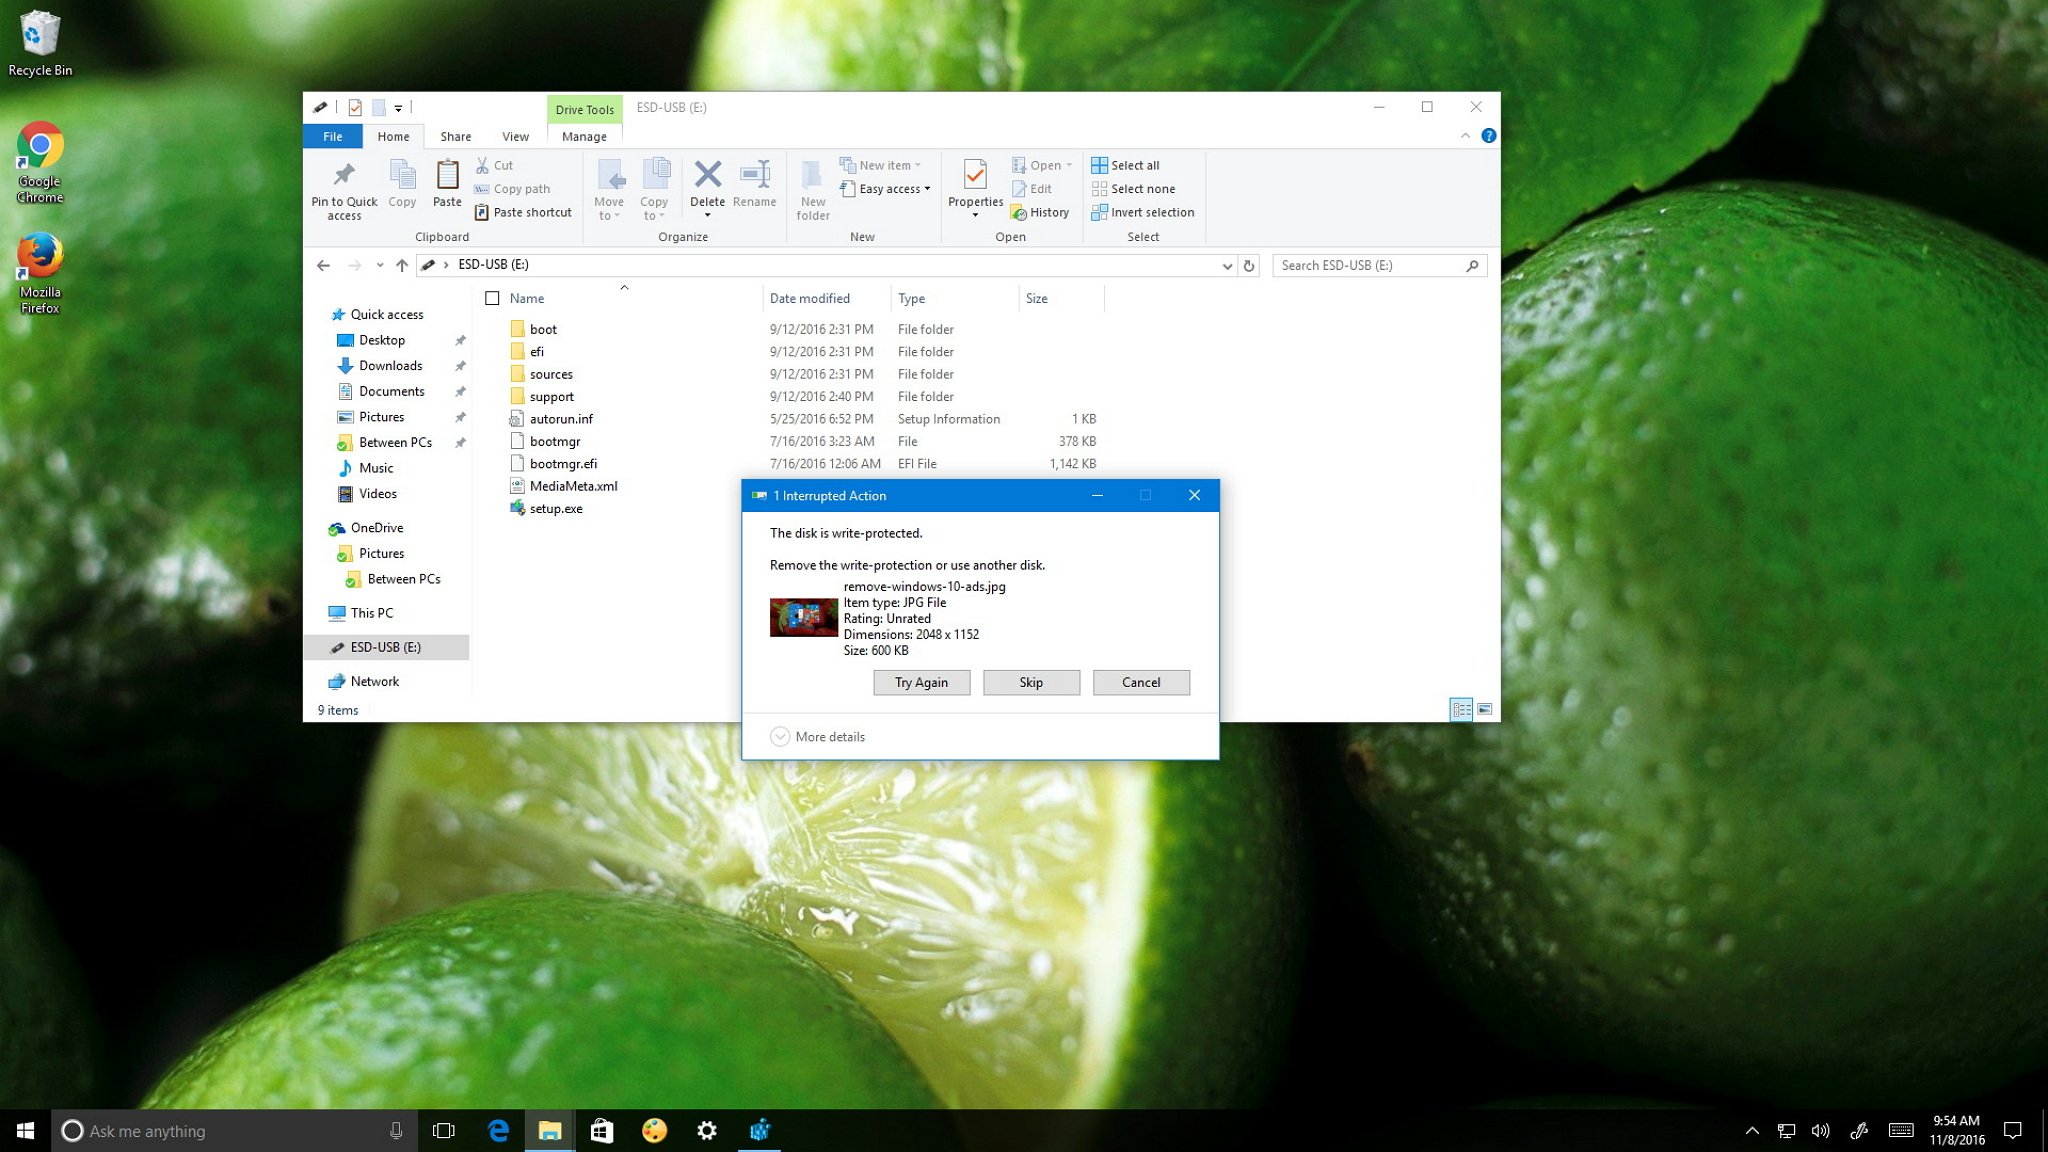
Windows 10 is the most secure version of Windows yet, but even though Microsoft has spent countless hours building new features to make computers more secure, someone can still just walk in, insert a USB drive, and walk away with sensitive data.
Of course, you can always protect your computer with a password, or set up a very strong PIN, but it's possible for someone with physical access to your machine get a hold to your sensitive data.
Fortunately, Windows 10 includes a write protection feature, which is hidden for some mysterious reason, and it allows you prevent any users from inserting a USB drive and downloading any data from your computer.
In this Windows 10 guide, we'll walk you through the steps to edit the Registry or the Group Policy editor to enable the write protection feature in the operating system to block users from saving data to a USB drive.
- How to enable USB write protection using the Registry
- How to enable USB write protection using the Group Policy
How to enable USB write protection using the Registry
Important: This is a friendly reminder to let you know that editing the registry is risky, and it can cause irreversible damage to your installation if you don't do it correctly. It's recommended to make a full backup of your PC before proceeding.
- Use the Windows key + R keyboard shortcut to open the Run command.
- Type regedit, and click OK to open the registry.
- Browse the following path:
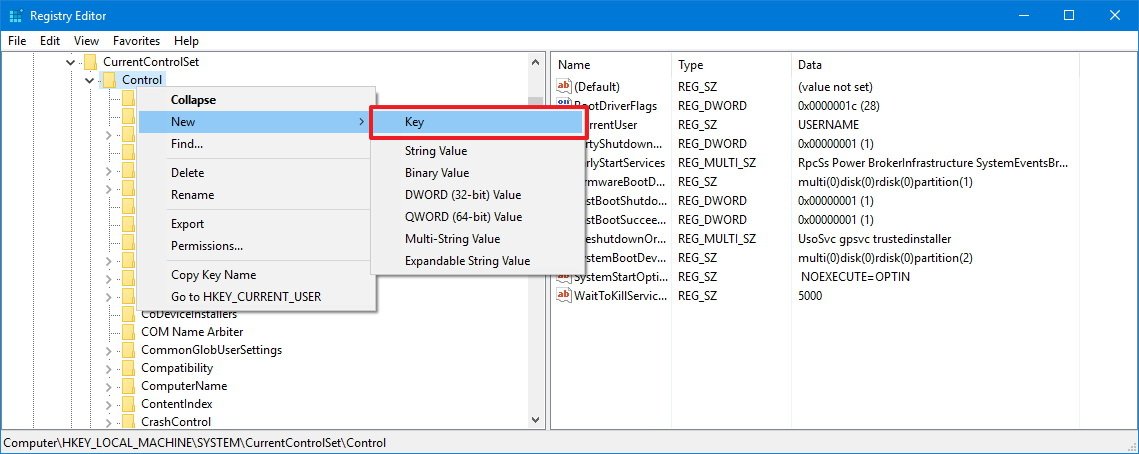
HKEY_LOCAL_MACHINE\SYSTEM\CurrentControlSet\Control - Right-click the Control (folder) key, select New, and click on Key.
- Name the new key StorageDevicePolicies and press Enter.
- Select the newly created key, and right-click on the right side, select New, and click on DWORD (32-bit) Value.
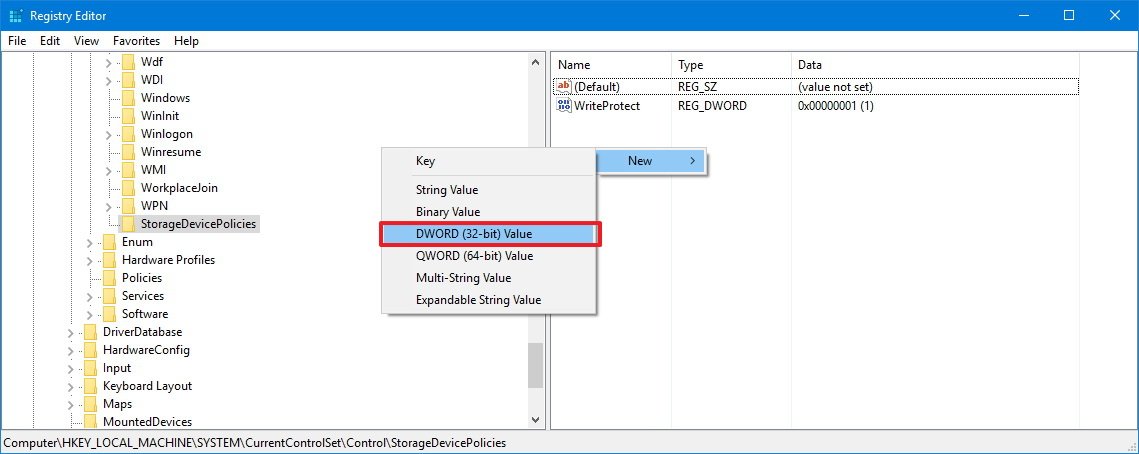
- Name the new DWORD WriteProtect and press Enter.
- Double-click the newly created DWORD and change its value from 0 to 1.
- Click OK.
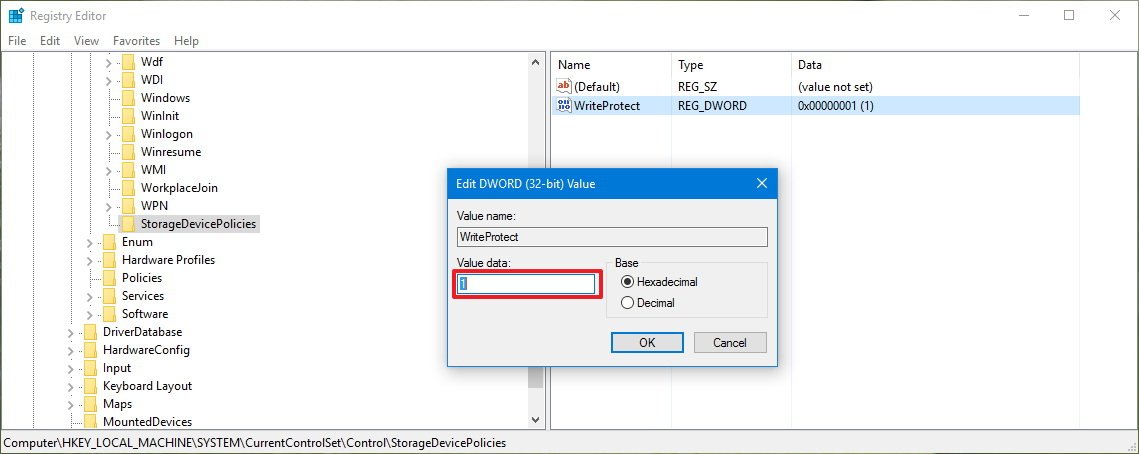
- Close the Registry to complete the task.
Once you completed the steps, anyone who connects a USB drive to your computer will be denied copy privileges, and they'll get a "This disk is write-protected" message. As a result, no one will be able to edit, delete, create, or rename files in the external storage.
At any time you can revert the changes by following the steps mentioned above, but on step 8, make sure to change the DWORD value from 1 to 0.
Get the Windows Central Newsletter
All the latest news, reviews, and guides for Windows and Xbox diehards.
How to enable USB write protection using the Group Policy
Alternatively, if you don't feel comfortable modifying the Registry, and you're running Windows 10 Pro, Enterprise, or Education, you can access the Group Policy editor to deny write permissions to removable storage devices.
To enable write protection using Group Policy, do the following:
- Use the Windows key + R keyboard shortcut to open the Run command.
- Type gpedit.msc and click OK to open the Local Group Policy Editor.
- Browse the following path:
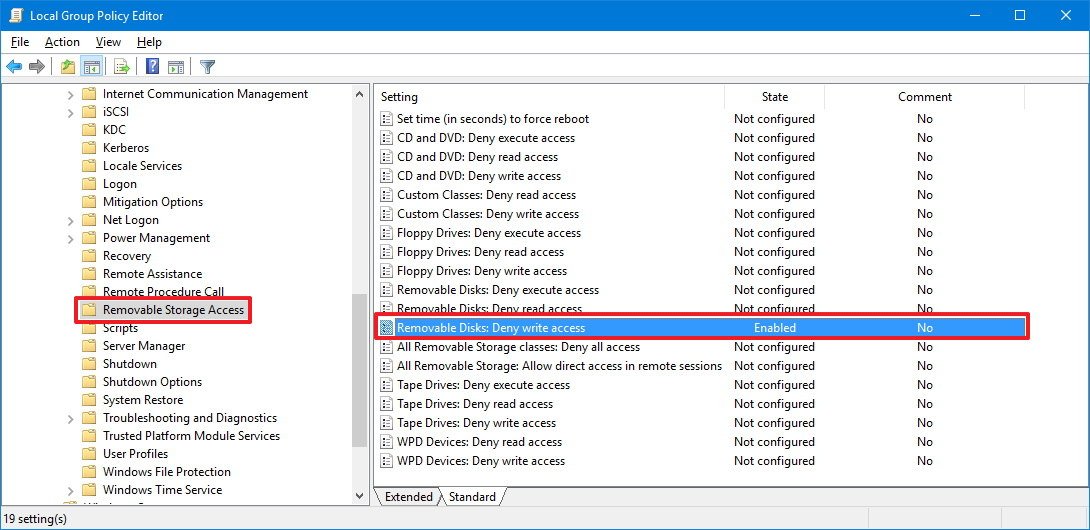
Computer Configuration > Administrative Templates > System > Removable Storage Access - On the right side, double-click the Removable Disks: Deny write access policy.
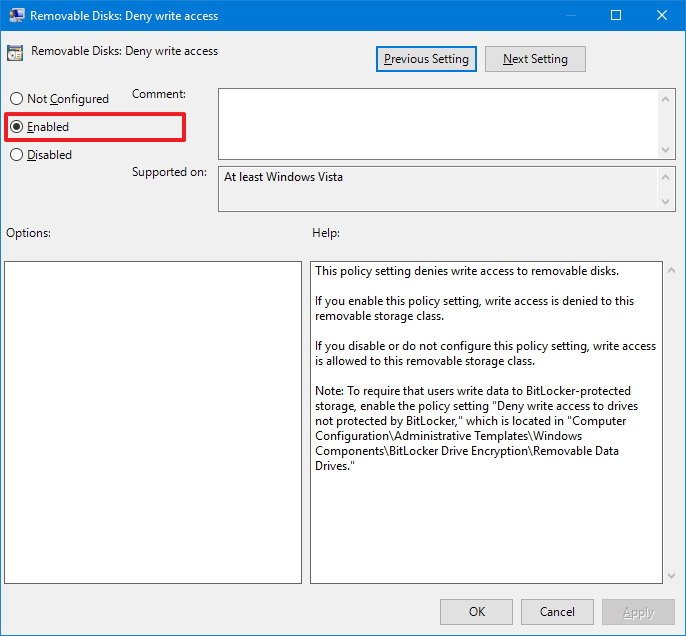
- On the top-left, select the Enabled option to activate the policy.
- Click Apply.
- Click OK.
- Close the Group Policy editor.
- Restart your computer to complete the task.
Once your computer reboots, anyone who connects a USB drive will be denied access to save, edit, or delete any content from the removable storage. However, unlike the enabling write protection using the Registry, users will get the "You'll need to provide administrator permission to copy to this folder" message, but even with administrator privileges no one will be able to export data to the USB drive.
It's worth pointing out that inside of Removable Storage Access, you'll also get a number of other storage policies. For example, "All Removable Storage classes: Deny all access," which doesn't enable write protection, but it will prevent anyone from accessing any removable storage, which achieves the same result.
If you need to revert the changes, just follow the same steps, but on step 5 make sure to select the Not Configured option.
Wrapping things up
While you can enable the write protection feature on your computer to protect your data from falling on to the wrong hands, there a number of other scenarios where something like this will be useful.
For example, this feature can add an extra layer of security when implementing a kiosk machine, or when you work with sensitive data on your business, just to name a few.
Although we're focusing this guide on Windows 10, it's worth pointing out that the same concept should work on previous versions of the operating system, including Windows 8.1 and Windows 7.
Do you think Windows 10 should include this option in the Settings app? Tell us in the comments below.
Thanks @Jessicator for the alternative tip!
More Windows 10 resources
For more help articles, coverage, and answers on Windows 10, you can visit the following resources:
- Windows 10 on Windows Central – All you need to know
- Windows 10 help, tips, and tricks
- Windows 10 forums on Windows Central
Mauro Huculak has been a Windows How-To Expert contributor for WindowsCentral.com for nearly a decade and has over 15 years of experience writing comprehensive guides. He also has an IT background and has achieved different professional certifications from Microsoft, Cisco, VMware, and CompTIA. He has been recognized as a Microsoft MVP for many years.

