How to import your media library into iTunes on Windows 10
Get the latest version of iTunes installed on your Windows machine with ease.
So you've got a fresh install of Windows 10 and you can't give up your familiarity with iTunes? No worries, as Windows 10 is open to everyone, even those who prefer Apple's (quite dominate) music service.
Here's the quick and easy way of getting the latest version of iTunes installed. We'll even help you make sure your music, photos, videos, and other media are identified by iTunes so you can start enjoying it right away. The process is very straightforward, and shouldn't take too long at all.
How to download and install iTunes for Windows 10
- Crack open your favorite web browser (maybe even give Edge a spin).
- Visit www.apple.com/itunes.
- Click the blue Download iTunes button in the top-right.
- Decide if you want to opt in to the newsletter and optionally provide location information.
- Double-check the system requirements to make sure your computer is up to snuff, but odds are very good that you can run iTunes just fine.
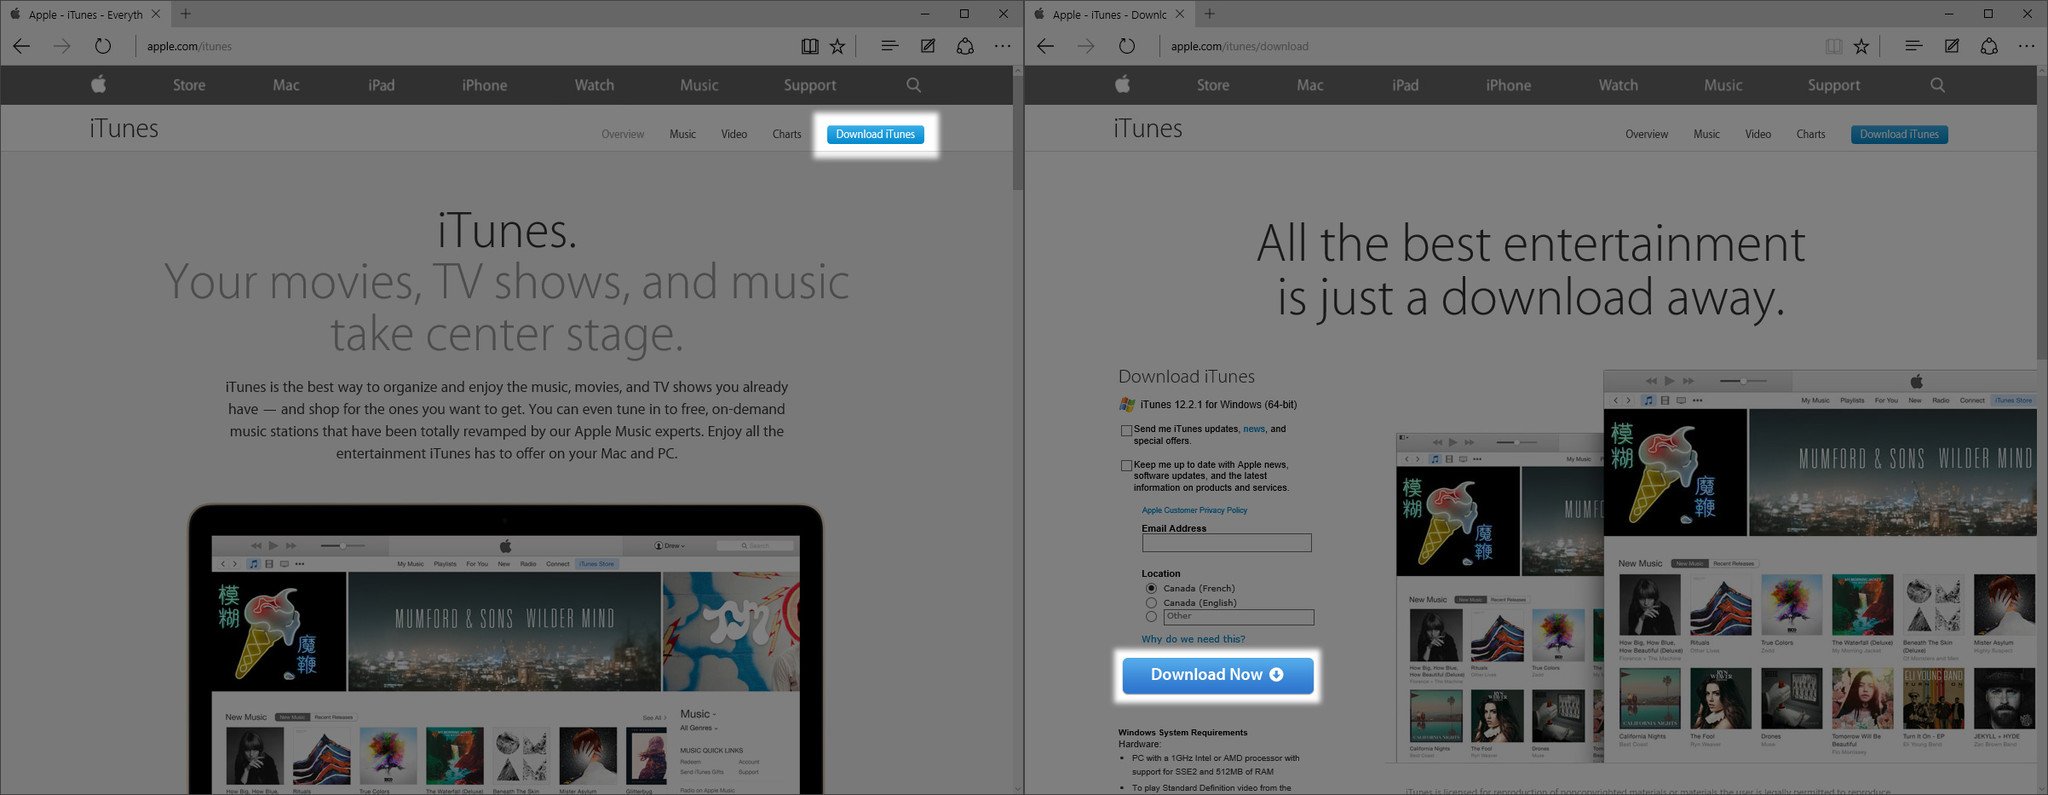
- Click the Download Now button.
- Click on the download, once it completes, to launch the installer.
- Choose your install directory, and let it complete the process.
How to create an Apple ID account and log in on Windows 10
You'll need an Apple ID to buy music, download apps, and make use of device syncing. If you haven't already made an Apple ID on your iPhone or iPad, it's possible to do so through iTunes on Windows quite easily.
- Click the profile silhouette near the top-right of the screen. It's just to the left of the search bar.
- A prompt to log in will show up. Click the Create Apple ID button below.
- Click Continue on the next screen, then Agree to the terms and conditions.
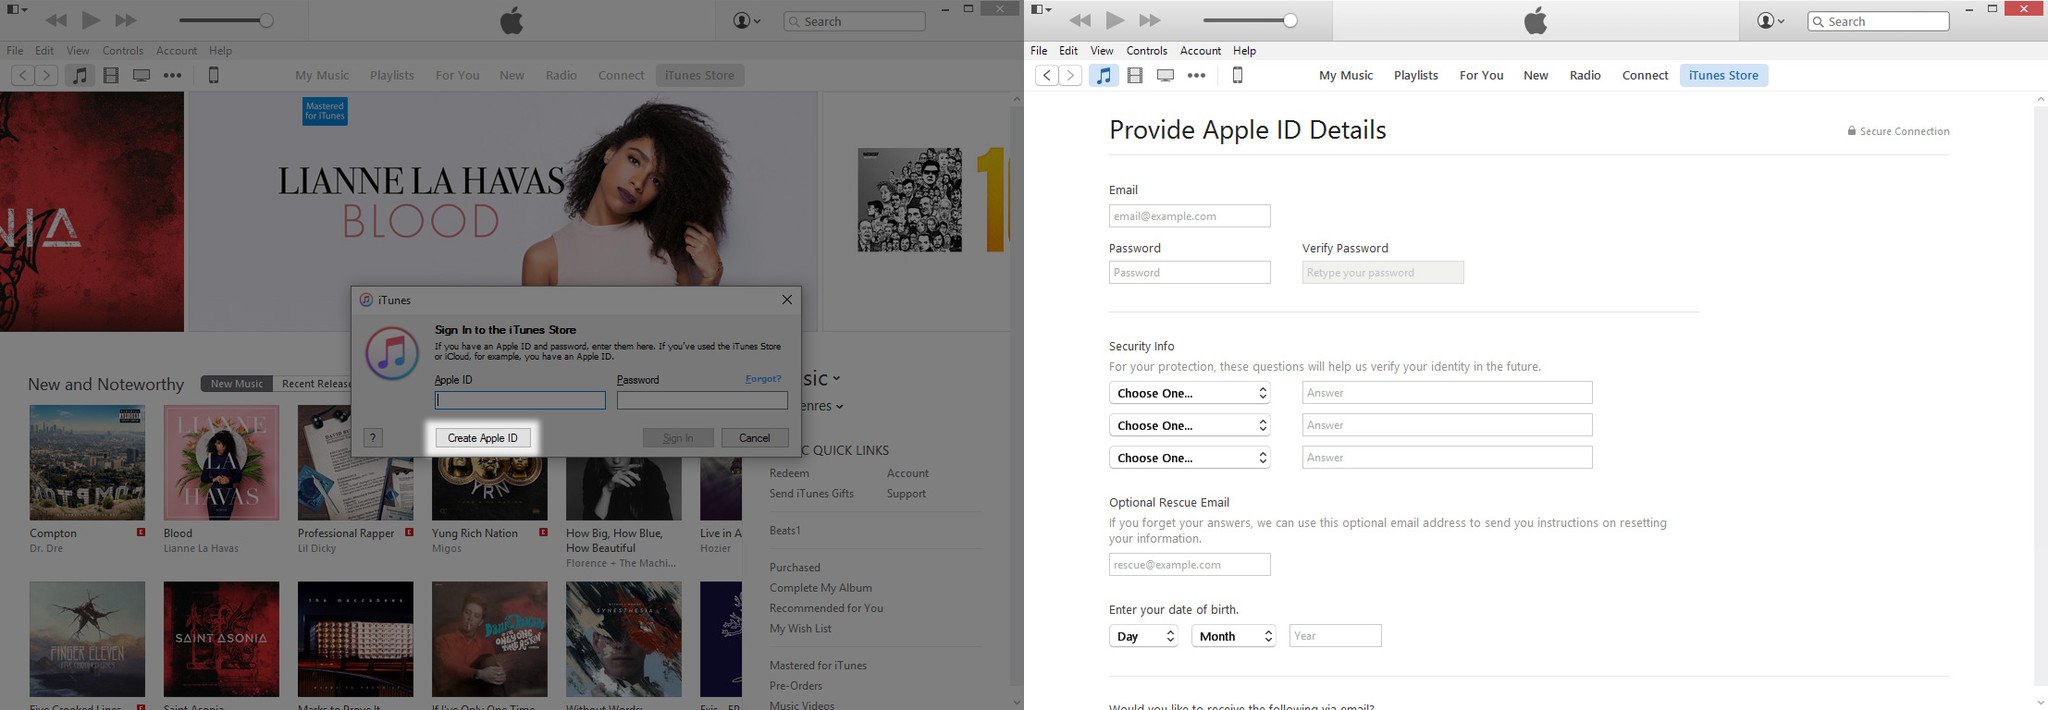
- Fill in required information, including e-mail address, security questions, and password. Optionally include a secondary e-mail address and opt in to newsletters. Click Continue when done.
- Fill in a billing address on the next screen, and optionally provide credit card payment information. Click Create Apple ID in the bottom-right.
- Check your e-mail for a verification message, and click the link provided to complete the process.
You'll need to add your payment information later if you want to download apps or music. Here's how to do it after your Apple ID has been verified.
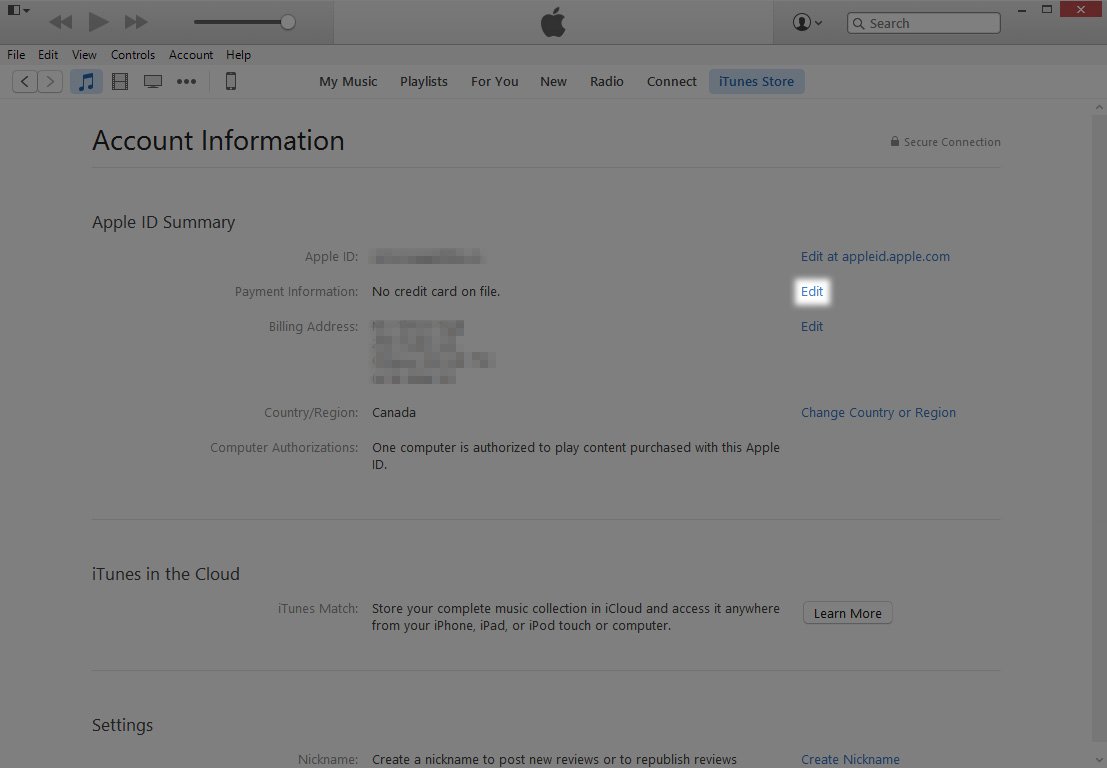
- Click the Apple ID silhouette in the top-right, log in, and click Account Info.
- Under the Apple ID Summary you'll find Payment Information. Click the Edit button to the right.
- On the following screen, select your payment method, input the required information, and click Done in the bottom-right.
How to import your media library into iTunes on Windows 10
iTunes should offer to Scan for Media the first time you launch it. Let it do its job and it'll collect together and organize all the music and compatible videos it can find on your system. If you prefer to do that some other time, or you add other media to your machine and want to bring it into iTunes later, you can do that too.
- Click File in the menu at the top of the iTunes window
- Click Add Folder to Library...
- Browse through your computer to where your music lives, and select it to make the addition.

Rinse and repeat for photos, videos, and any additional folders you want monitored.
How to buy from iTunes in Windows 10
Once you're logged in, you'll want to be able to buy music, TV shows, and movies in iTunes. Before getting started, you'll need to make sure your Apple ID has payment information included, as per above.
Get the Windows Central Newsletter
All the latest news, reviews, and guides for Windows and Xbox diehards.
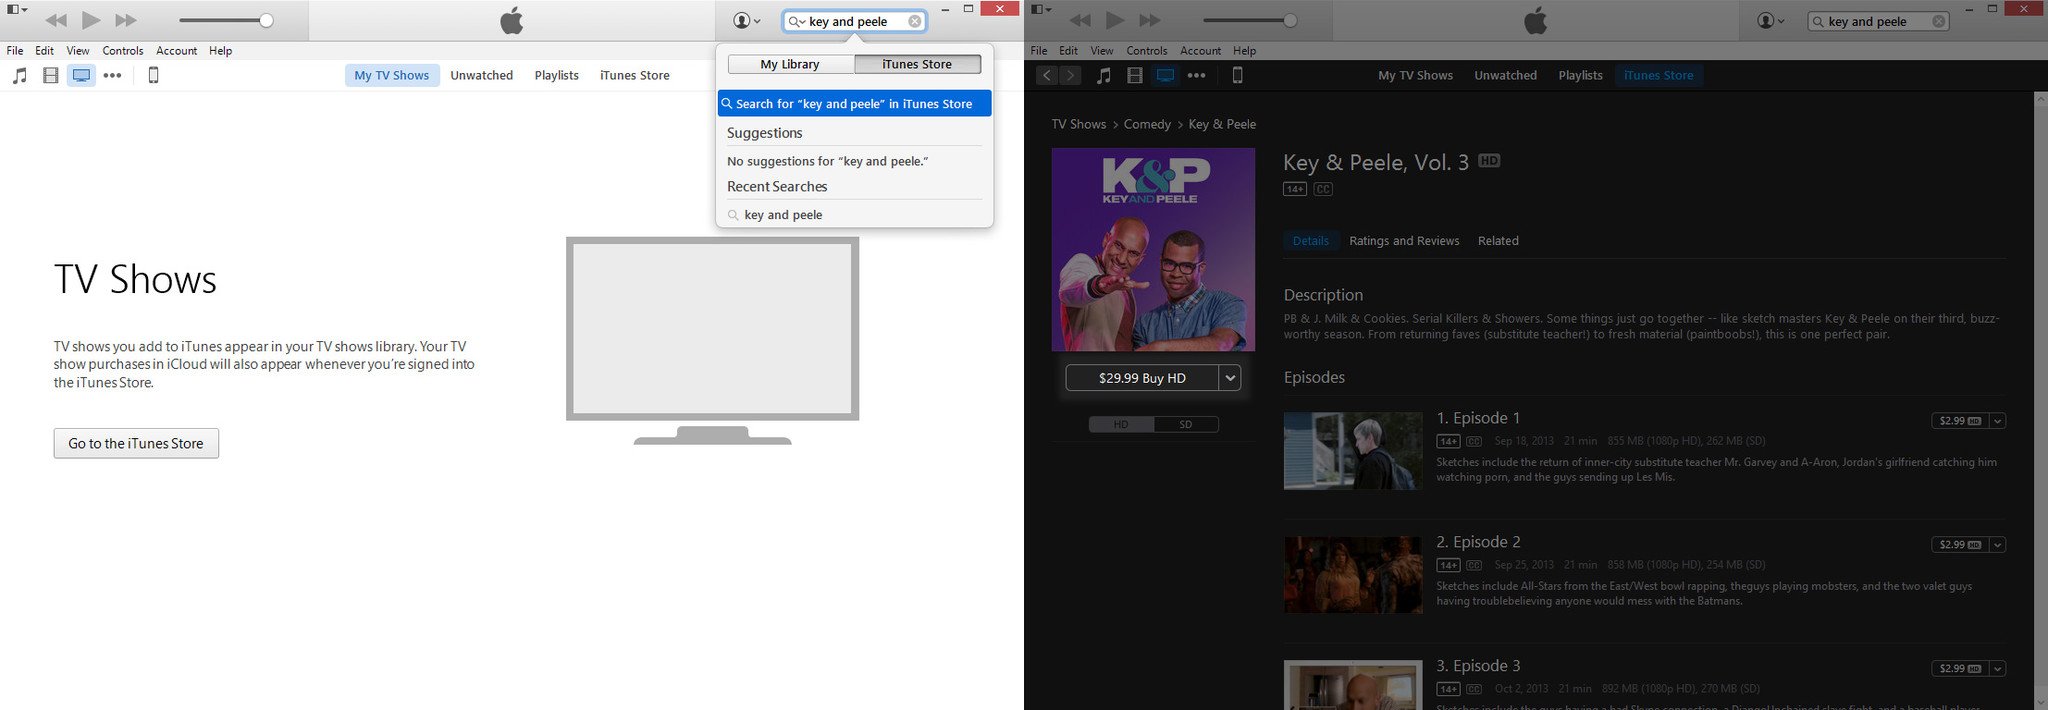
The easiest way to find something specific to download is by typing in the search bar in the top-right. If you're able to find your desired content through search, skip to step 5.
- Click the media icon in the top-left relating to the kind of media you're looking for, either music, movies, or TV shows. Additional options are available after clicking the three dots after these icons.
- Click the iTunes Store button in the center bar along the top. This will take you to the front page of the store for that type of content.
- Scroll down through the featured section to see popular content, or click All Genres on the right side pane to drill down into more specific types of content.
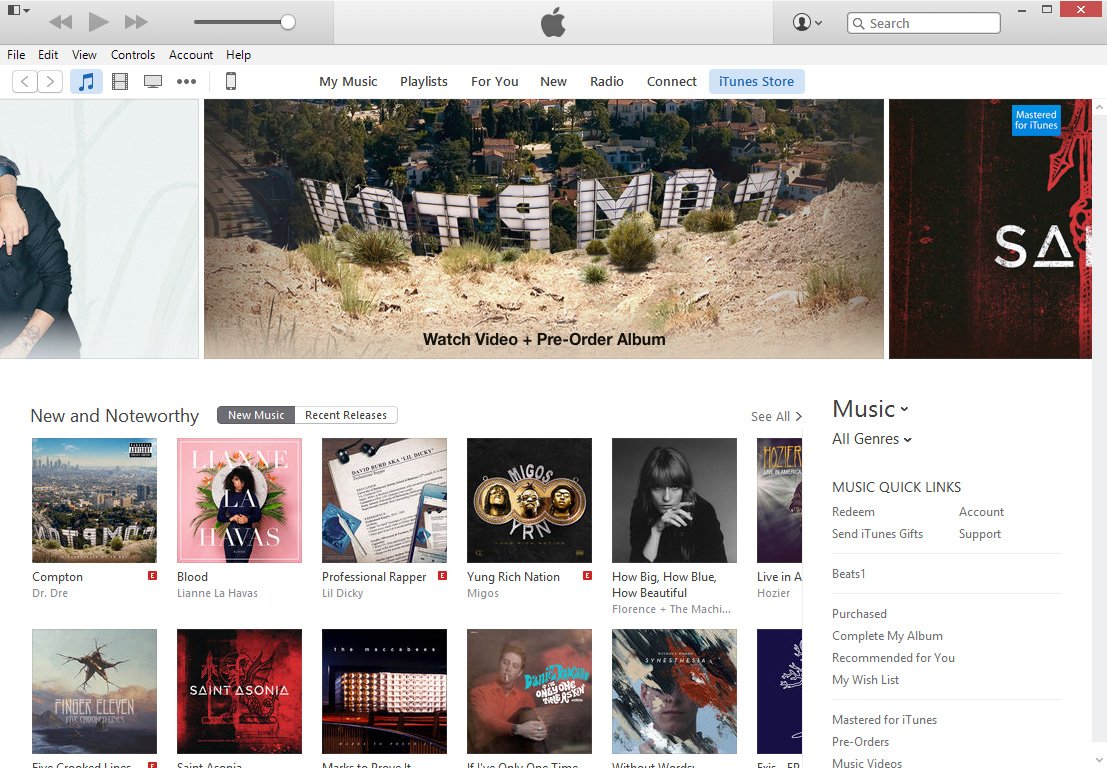
- Click the Buy button next to whatever you want to purchase. 6 Enter your Apple ID password to confirm.
Your credit card will then be charged and your download will begin. When finished, your content will be available under My Music, My Movies, and My TV Shows. Check out how to sync your iPhone or iPad with iTunes in Windows 10 to make sure your iOS devices enjoy the new content too.
How to subscribe to iTunes Match in Windows 10
iTunes Match backs up your entire music collection in the cloud for access anywhere. It will scan your library and provide access to Apple's cloud-stored tunes, and if there's no match between your track and theirs, Apple will upload your music for remote access on iPhone, iPad, or other computers. Here's how to get started with it.
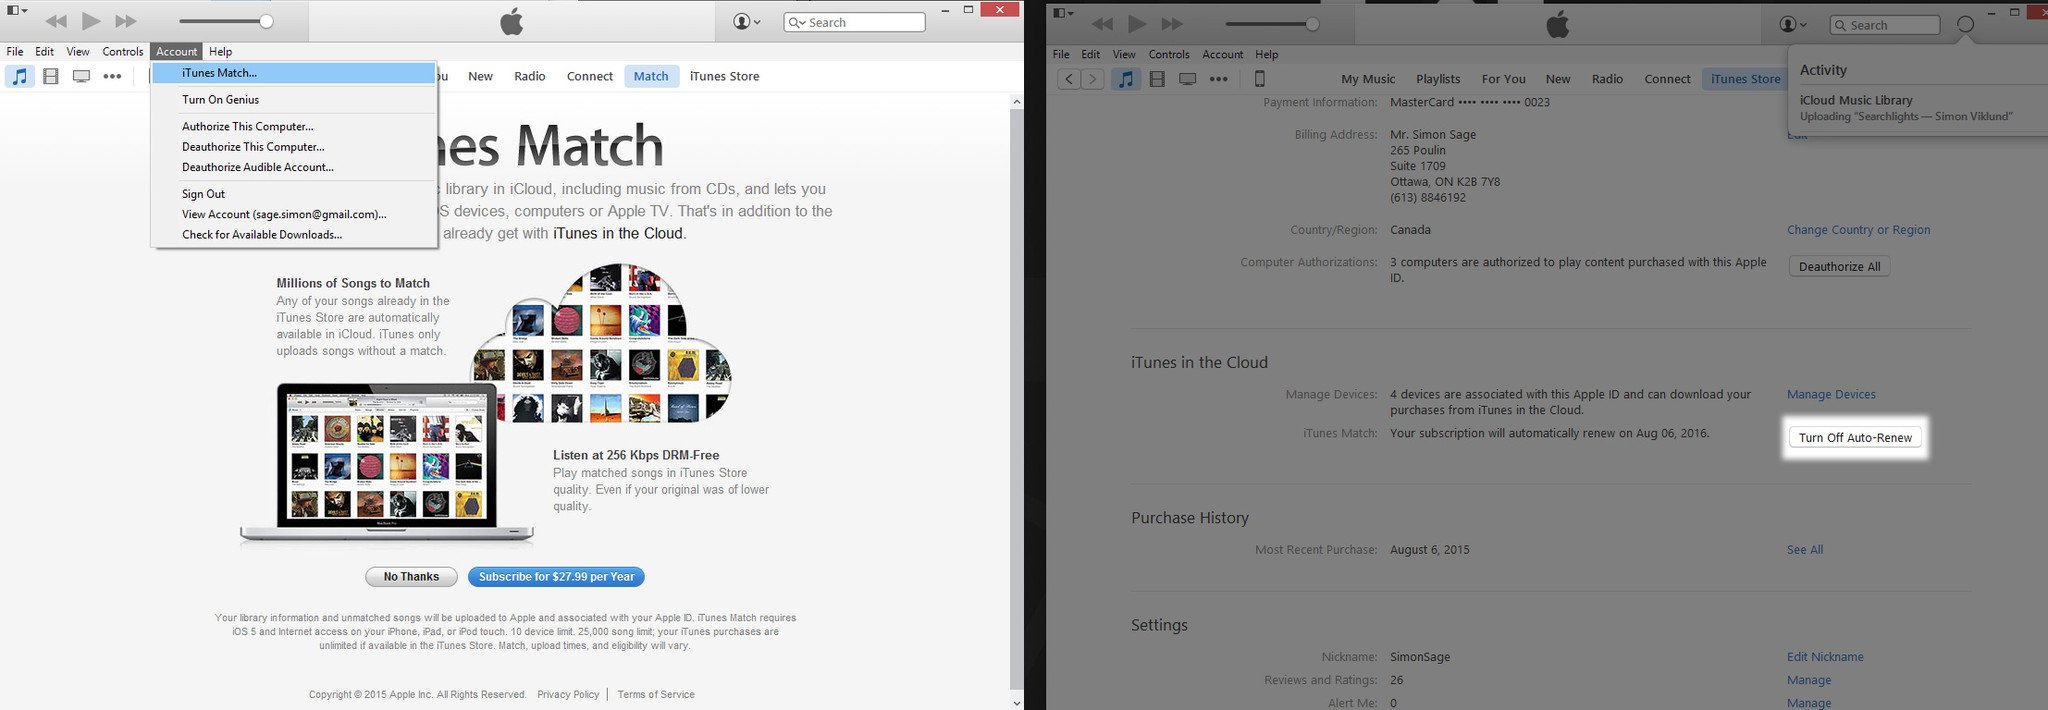
- In iTunes, click Account from the top menu, and click iTunes Match...
- Click the Subscribe button at the bottom of the following screen.
- Confirm your Apple ID account and password to activate your subscription.
iTunes will then start pairing up your music with music that's available in the iTunes Store, and upload anything that isn't.
You can disable automatic renewal, since you're billed on an annual basis, if you don't want to forget before the next payment kicks in.
- Click the Acccount silhouette icon in the top-right of iTunes, and click Account Info.
- Scroll down to iTunes in the Cloud, and next to iTunes Match, click Turn Off Auto-Renew.
Read up more on what iTunes Match can do for you at the link below. Ultimately, this is a great way to have access to all of your music and movies all the time, without having to worry about local storage.
How to subscribe to Apple Music in Windows 10
Apple Music more like a traditional subscription service rather than a cloud content locker. With it, you can enjoy all of the music from the expansive iTunes catalog on-demand, so long as you're willing to fork over a monthly subscription fee. Here's how you get started using it.
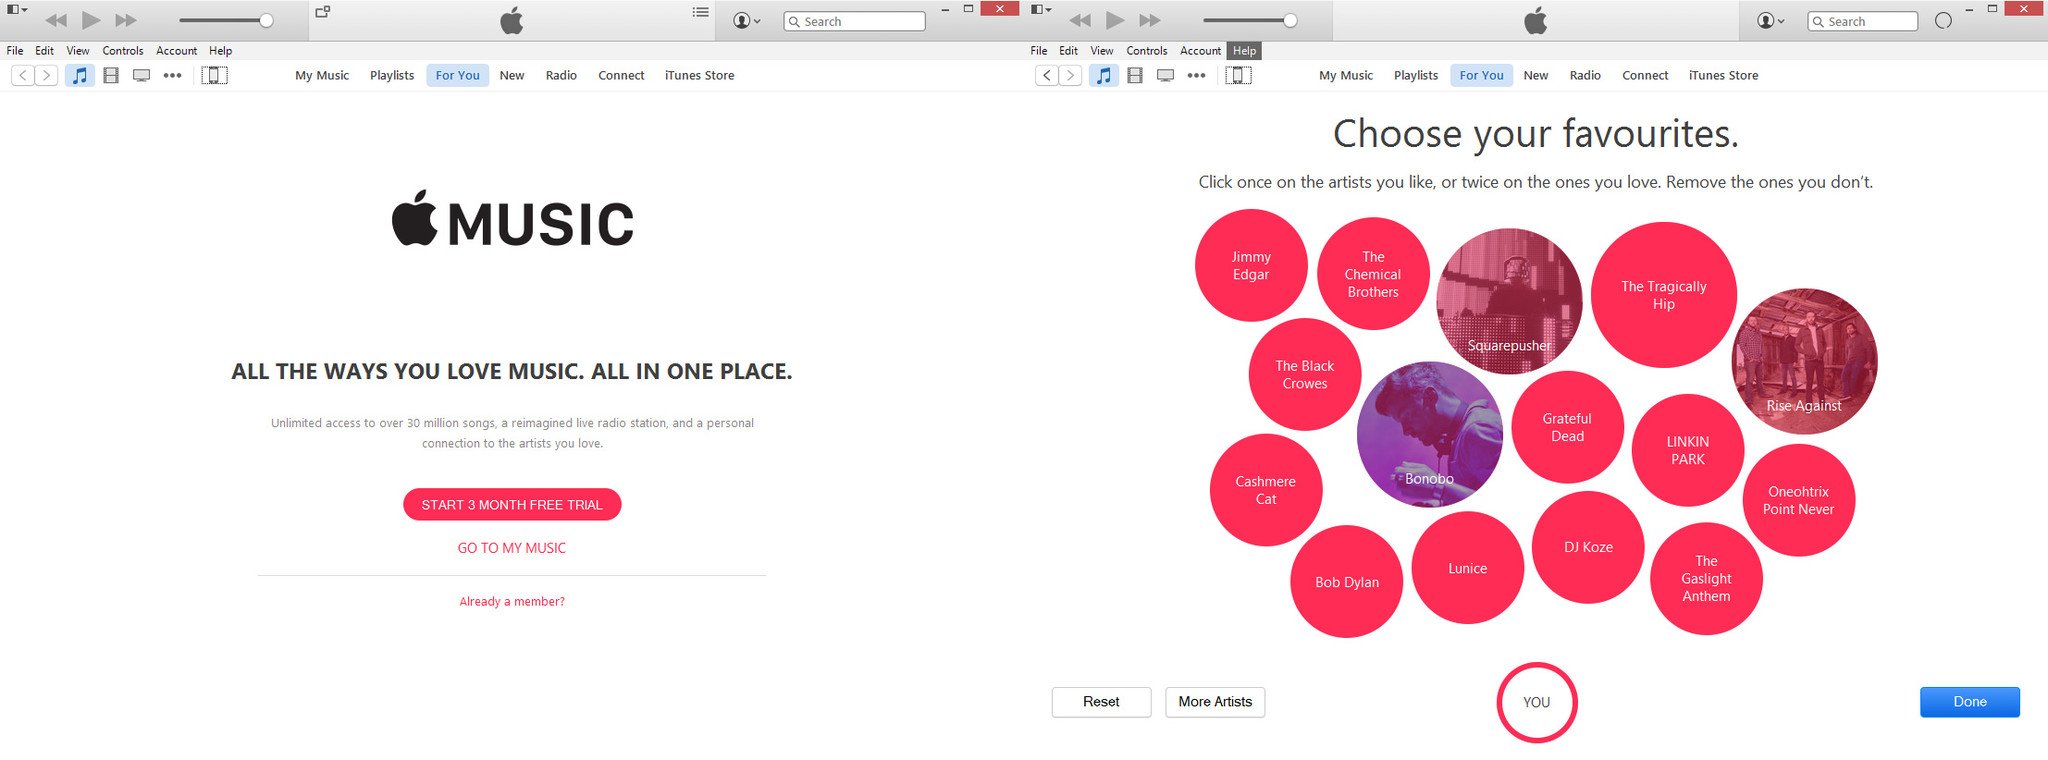
- Click the Music icon in the top-left of iTunes, and click For You in the middle of the same bar.
- Click Start 3 Month Free Trial.
- Click either Individual or Family, depending on how many people you want using the service.
- The following two screens will ask you to identify your music tastes by way of genre and artists. This will improve the quality of suggested music.
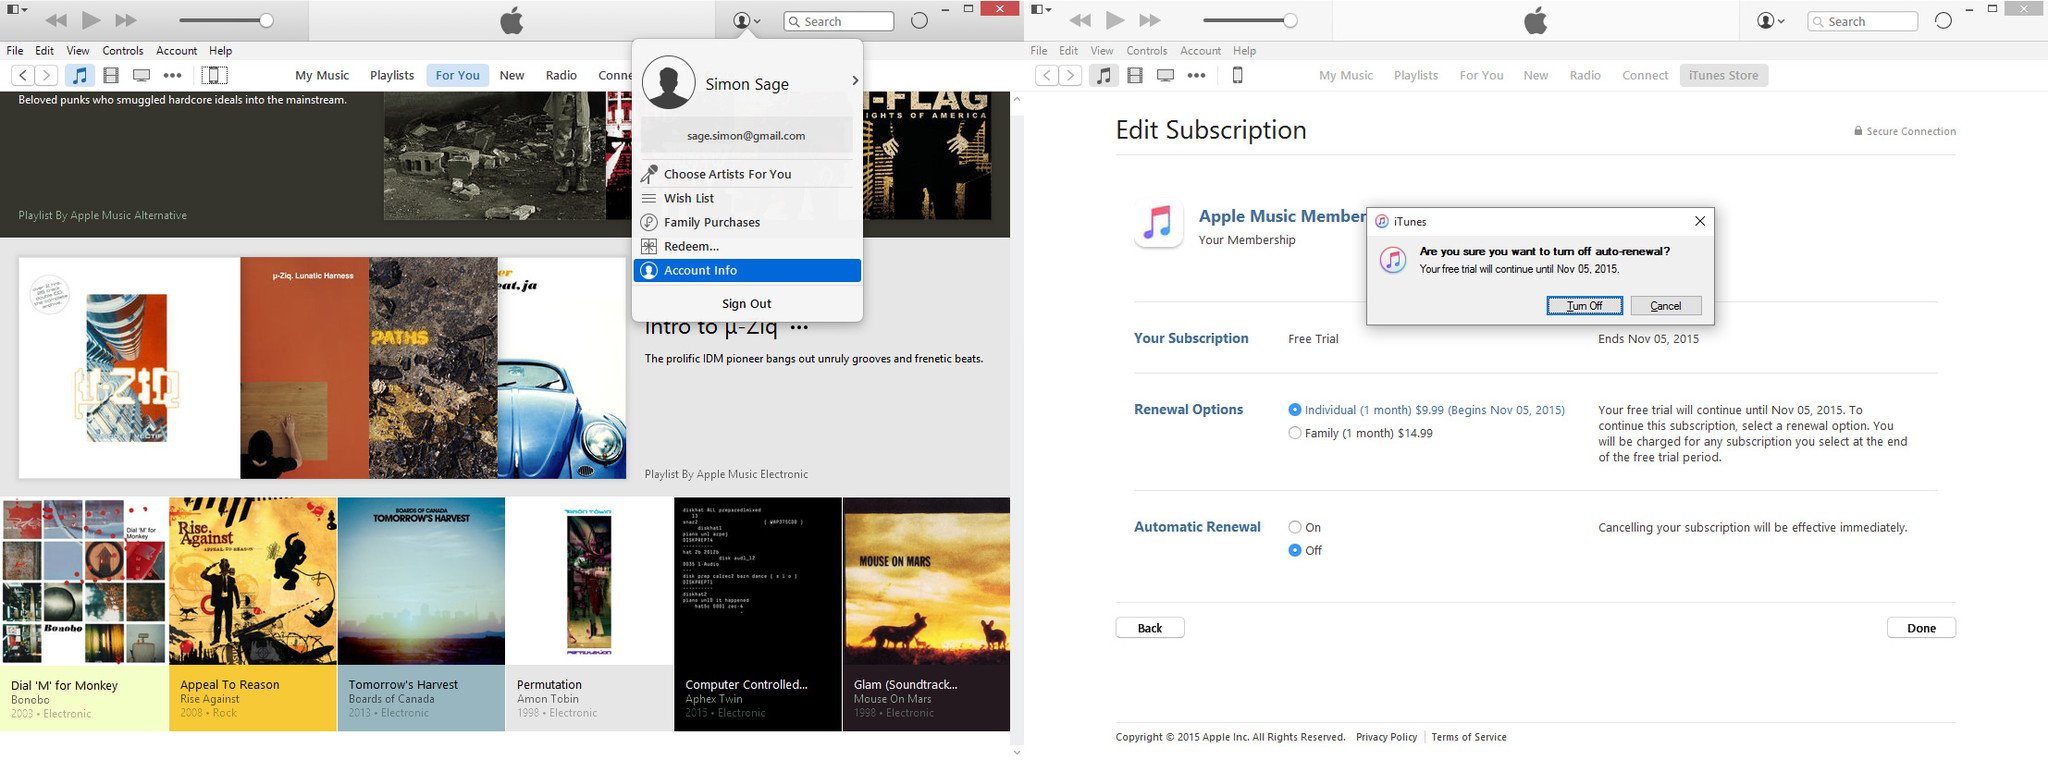
- You'll want to disable automatic renewal of Apple Music to ensure you won't be billed after the trial period ends. Click the Account silhouette icon in the top-right of iTunes, and click Account Info.
- Scroll down to Settings on the following screen, click Manage next to Subscriptions.
- Click Edit next to Apple Music Membership. On the next screen under Automatic Renewal, click Off. A pop-up window will require you to confirm turning off Automatic Renewal.
Now you can dive into a bottomless pool of music curated by experts. Visit the For You tab again and you can start diving into available music. There's a lot more to Apple Music, but now you should be set to use it on your Windows 10 machine.
That's it!
Hopefully that covers all of the basics of using iTunes on Windows 10. If you're having trouble anywhere along the road, leave a comment here, and we'll be sure to do our best to help out. Check out the links below for additional resources.
More Info!
If you are an Apple and Mac user make sure you check out our sister site iMore for all of their Windows 10 info. It is the best spot to ease your way into the Microsoft world if you mainly use OS X.
Windows 10 on iMore – All you need to know
Windows 10 on Mac: Help and discussion forum {.cta}
For more basic info on Windows 10, including some tips and our vast array of how-to articles, make sure you head to our main Windows 10 help page or jump into our forums!
- Windows 10 on Windows Central – All you need to know
- Windows 10 help, tips, and tricks
- Windows 10: Help and discussion forum at Windows Central

