How to disable Windows Ink Workspace on Windows 10
If Windows Ink Workspace isn't a feature you need, this guide will walk you through the steps to disable the experience on your Windows 10 PC.
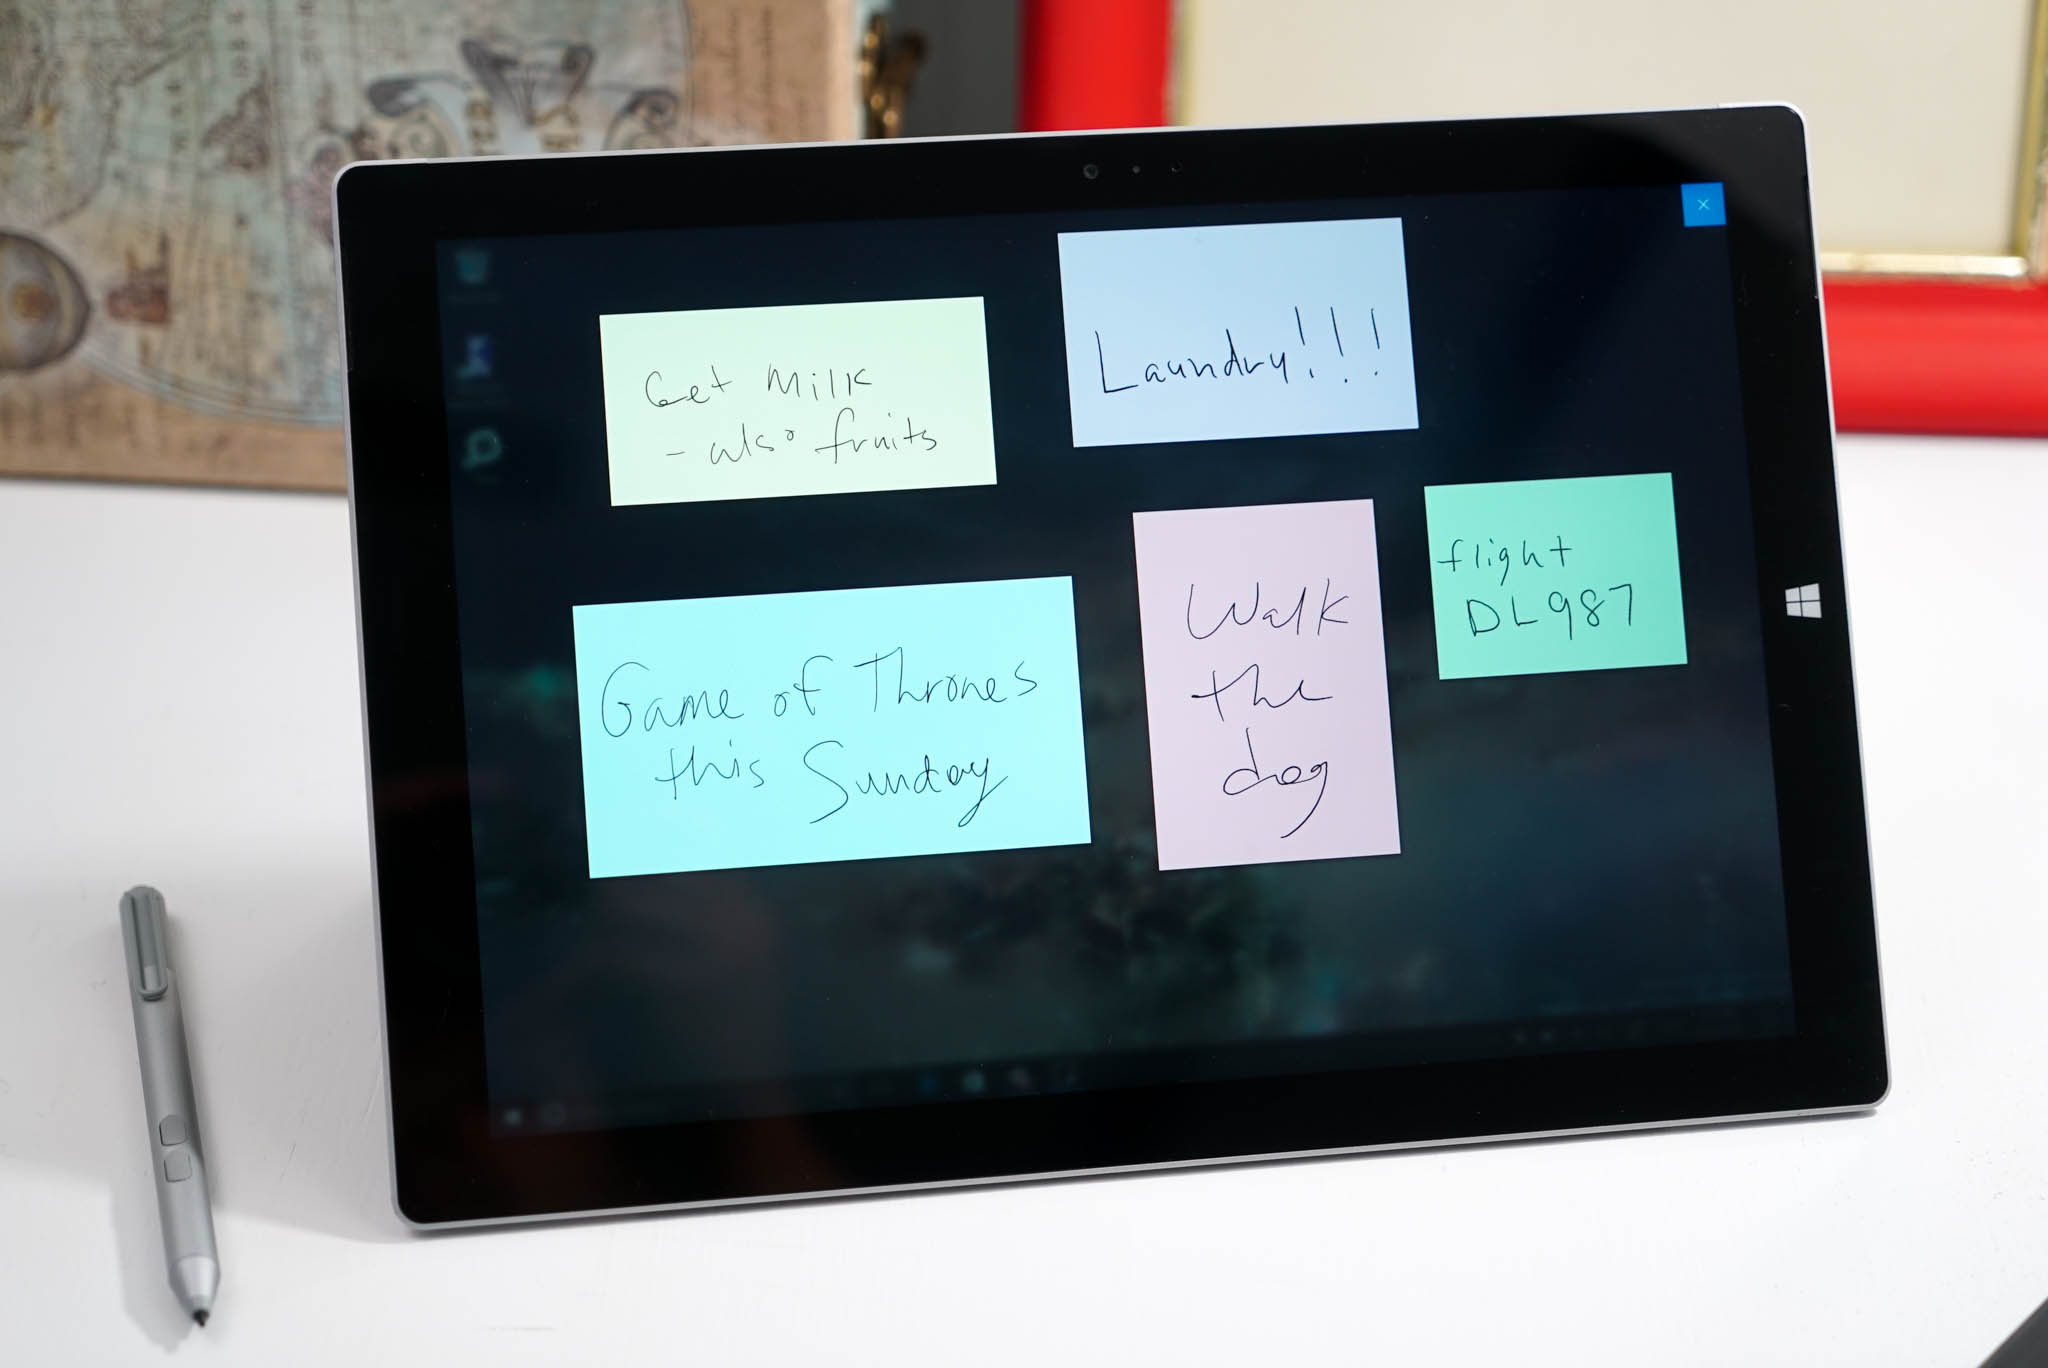
Windows Ink is a new pen experience that Microsoft is introducing with the Windows 10 Anniversary Update. At the core of Windows Ink, there is the same pen support that the operating system has included for years, but there are a number of new improvements.
It all starts with the Windows Ink Workspace that acts as the central hub to access the new Sticky Notes to create notes and reminders using Cortana, and you can also draw on a whiteboard or on a screenshot using Sketchpad or Screen sketch. In addition, Microsoft has promised to keep improving the experience to make it easier for developers to implement Windows Ink support on their apps.
If you own a Surface Book, Surface Pro 4, or similar device that includes support for an active pen, the Windows Ink experience will be enabled by default. However, as with any feature, the new improvements may not be for everyone, and this Windows 10 guide, we'll walk you through the steps to disable Windows Ink Workspace completely from your device.
How to disable Windows Ink Workspace using Group Policy
There are multiple ways to disable Windows Ink Workspace, but the quickest way to completely turn off the experience is by using the Local Group Policy Editor -- that's of course if you're using Windows 10 Pro, Enterprise, or Education.
- Use the Windows key + R keyboard shortcut to open the Run command.
- Type gpedit.msc and click OK.
- Select Computer Configuration.
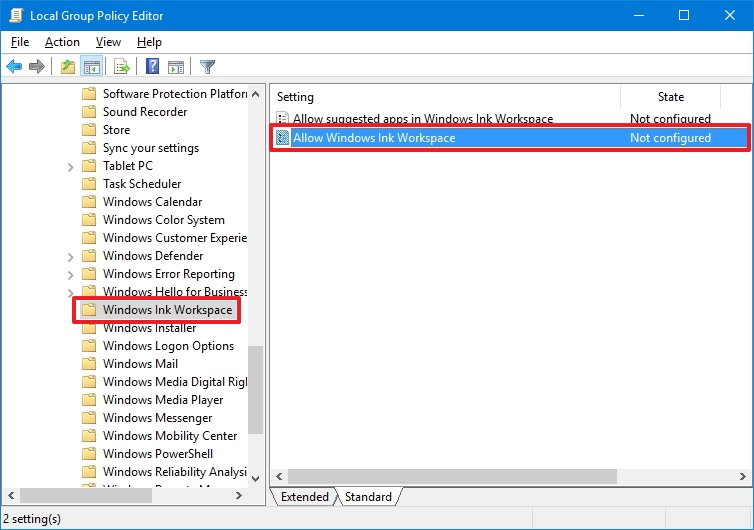
- Expand the following path: Administrative Templates\Windows Components\Windows Ink Workspace.Note: It's worth pointing out that if you see two "Windows Ink Workspace" entries, you must choose to configure the second one. Otherwise, the instructions will not work.
- On the right side, double-click the Allow Windows Ink Workspace setting.
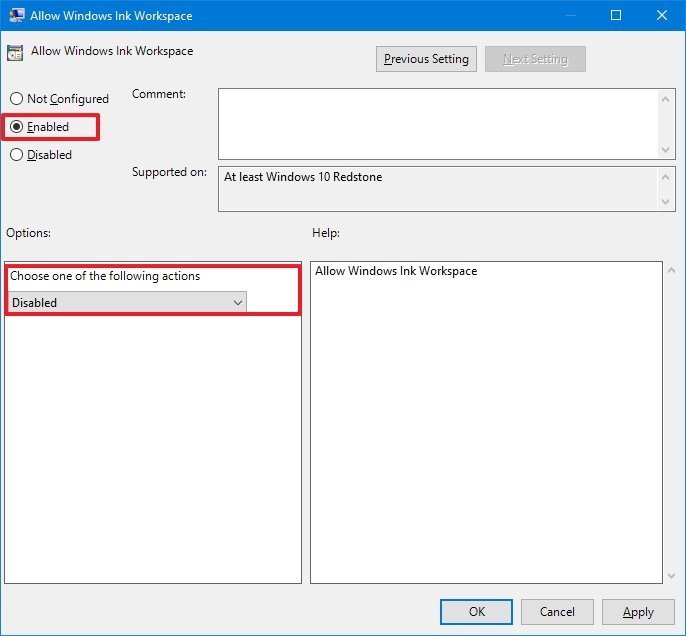
- Check the Enabled option.
- Under Options, select Disabled from the drop-down menu.
- Click Apply.
- Click OK.
- Restart your computer to see the new changes.
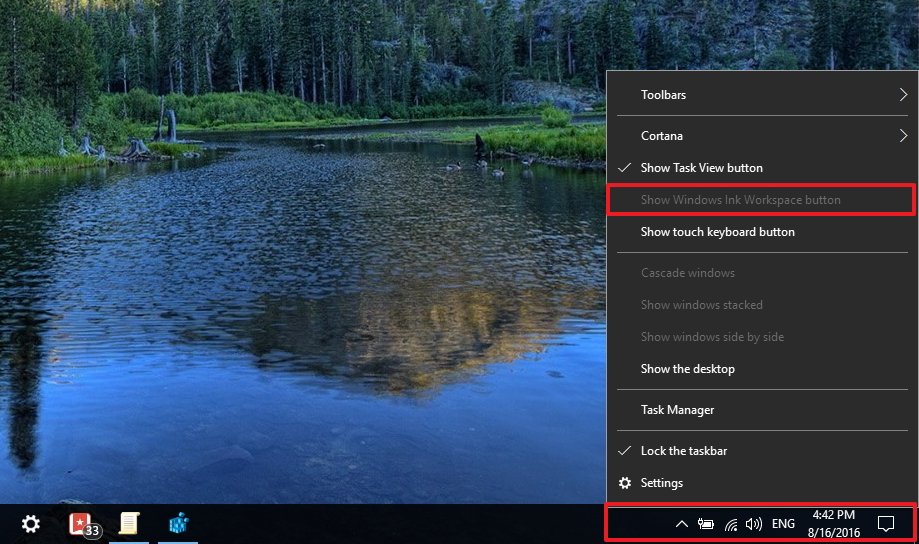
Once you restart your device, the Windows Ink Workspace icon will no longer be available in the taskbar. And you'll notice that the "Show Windows Ink Workspace button" option on the taskbar context menu will become unavailable.
To revert the changes follow the steps mentioned above, but this time on step 8 select the Not Configured option instead.
How to disable Windows Ink Workspace using the registry
The Local Group Policy Editor is not a feature available on Windows 10 Home, but you can achieve the same results using the registry (if you're up to the challenge).
All the latest news, reviews, and guides for Windows and Xbox diehards.
Important: Before you make any changes to the registry, make sure to understand that these changes may cause irreversible damage to your installation if they're not done properly. It's recommended that you do a full backup of your computer before proceeding. You've been warned!
- Use the Windows key + R keyboard shortcut to open the Run command.
- Type regedit, and click OK to open the Windows registry.
- Browse the following path:
HKEY_LOCAL_MACHINE\SOFTWARE\Policies\Microsoft\WindowsInkWorkspace - If you don't see the WindowsInkWorkspace key (folder), then do the following:
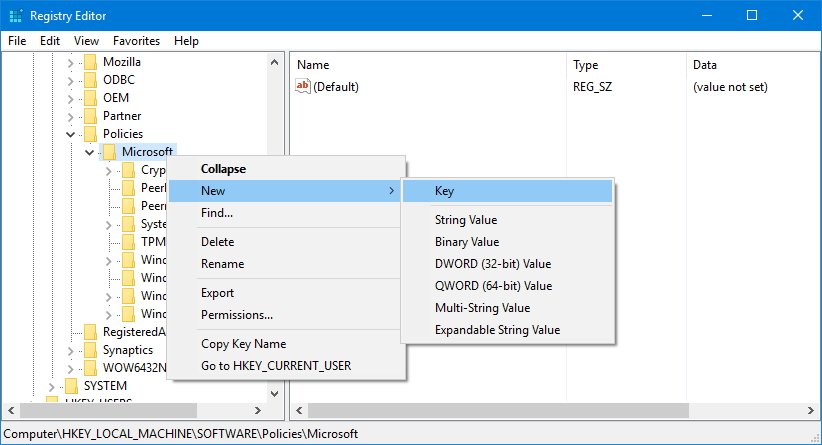
- Right-click the Microsoft key, select New, and click Key.
- Name the new key WindowsInkWorkspace.
- Click OK.
- Right-click on the right side, select New, and click DWORD (32-bit) Value.
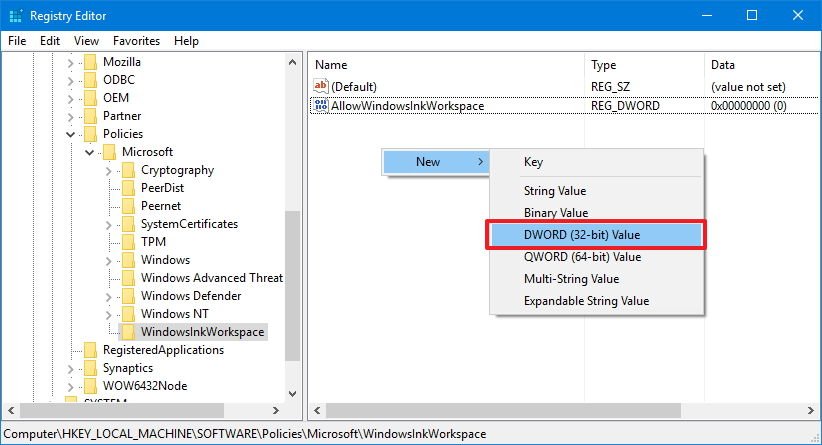
- Name the key AllowWindowsInkWorkspace.
- Click OK.
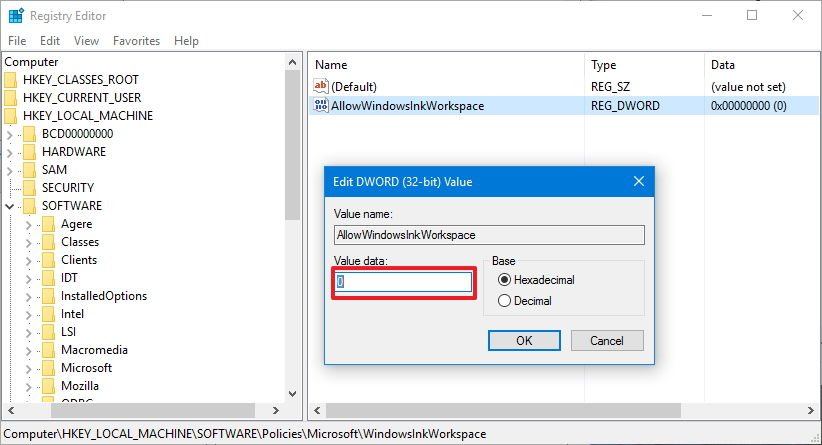
- Double-click the key and make sure its value is set to 0, which means disabled.
- Restart your computer to apply the changes.
Once you restart your device, identically as the process done with the Local Group Policy Editor, the Windows Ink Workspace icon will no longer be available in the taskbar. And you'll notice that the "Show Windows Ink Workspace button" option on the taskbar context menu will become unavailable.

To enable Windows Ink Workspace again, simply follow the steps mentioned above and on step 9 make sure to change the value from 0 to 1, and restart your computer.
Wrapping things up
It's important to note that after you've disabled Windows Ink Workspace, you won't be able to launch Sketchpad or Screen sketch, but you'll still be able to use Sticky Notes, as it's a regular Windows Store app.
In addition, disabling the experience doesn't remove the Pen & Windows Ink settings page from the Settings app. If you had the pen shortcuts configured to open Windows Ink Workspace, the pen button functions will fall back to open the OneNote app for all the options.
Do you use Windows Ink Workspace on the regular basis? Would you consider disabling the feature? Tell us in the comments below.
More Windows 10 resources
For more help articles, coverage, and answers on Windows 10, you can visit the following resources:
- Windows 10 on Windows Central – All you need to know
- Windows 10 Anniversary Update
- Windows 10 help, tips, and tricks
- Windows 10 forums on Windows Central

Mauro Huculak has been a Windows How-To Expert contributor for WindowsCentral.com for nearly a decade and has over 22 years of combined experience in IT and technical writing. He holds various professional certifications from Microsoft, Cisco, VMware, and CompTIA and has been recognized as a Microsoft MVP for many years.
