How to disable extension support on Microsoft Edge
When you want to prevent users from running extensions on Microsoft Edge, use this guide to disable the feature.

On Microsoft Edge, extensions are small applications you can plug into the browser to add new features or change and enhance existing functionality to improve the overall experience.
Windows 10 introduced support for extensions on Edge with the Anniversary Update, and you can now acquire them from the Windows Store. However, most extensions are designed by third-party developers, and if they're not coded correctly, they can affect your browsing experience and even impact battery life.
If extensions on Microsoft Ege is your least favorite feature, or if you're sharing your computer and you don't want other people adding new extensions, you can disable the feature on Microsoft Edge in at least two different ways.
In this Windows 10 guide, we'll walk you through the steps to disable extensions on the Microsoft Edge web browser.
How to disable extensions using Group Policy
The easiest way to disable extensions on Microsoft Edge is using the Local Group Policy Editor, as long as you're running Windows 10 Pro, Enterprise, or Education.
To prevent users from installing extensions on Edge using Group Policy, do the following:
- Use the Windows key + R keyboard shortcut to open the Run command.
- Type gpedit.msc and click OK to open the Local Group Policy Editor.
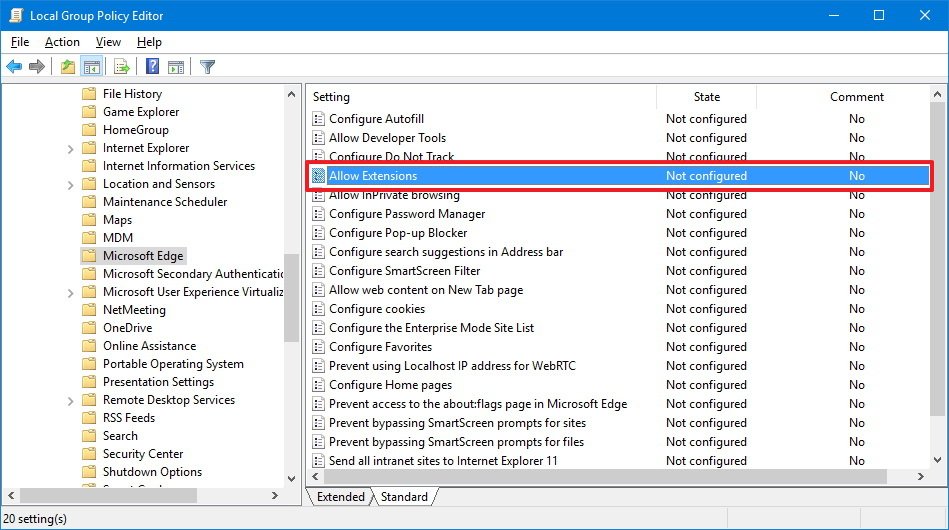
- Browse the following path:
Computer Configuration > Administrative Templates > Windows Components > Microsoft Edge - Double-click the Allow Extensions policy.

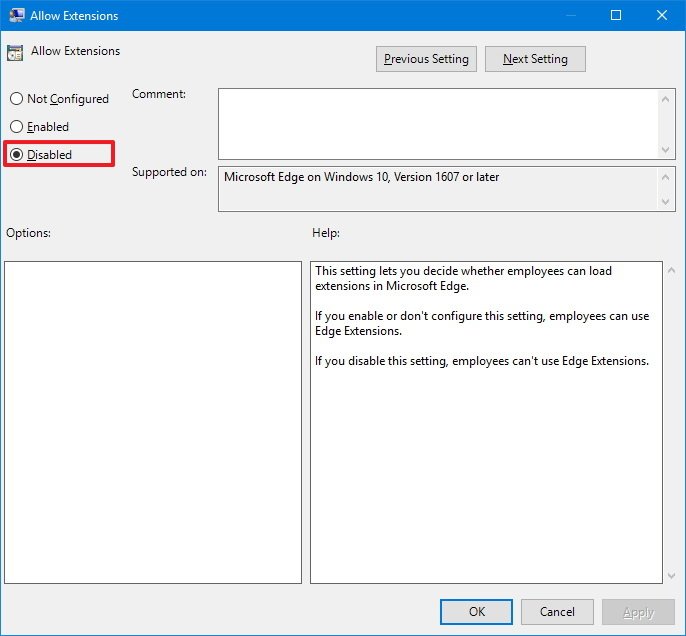
- Select the Disabled option to turn off the feature.

- Click Apply.
- Click OK.
Once you complete the steps, users will no longer be able to use or install extensions on Microsoft Edge. Furthermore, while using the browser, the Extensions item in the settings menu will also be disabled.
Get the Windows Central Newsletter
All the latest news, reviews, and guides for Windows and Xbox diehards.
If you want to revert the changes, simply follow the same steps mentioned above, but on step No. 5 select the Not Configured option.
How to disable extensions using Registry
If you're running Windows 10 Home, you won't have access to the Local Group Policy Editor, but you can still disable Microsoft Edge extensions by editing the Registry.
Warning: This is a friendly reminder to let you know that editing the registry is risky, and it can cause irreversible damage to your installation if you don't do it correctly. It's recommended to make a full backup of your PC before proceeding.
To disable extensions on Edge using Registry, do the following:
- Use the Windows key + R keyboard shortcut to open the Run command.
- Type regedit, and click OK to open the registry.
- Browse the following path:
HKEY_LOCAL_MACHINE\SOFTWARE\Policies\Microsoft - Right-click the Microsoft (folder) key, select New, and click on Key.

- Name the new key MicrosoftEdge and press Enter.
- Right-click the MicrosoftEdge (folder) key, select New, and click on Key.
- Name the new key Extensions and press Enter.
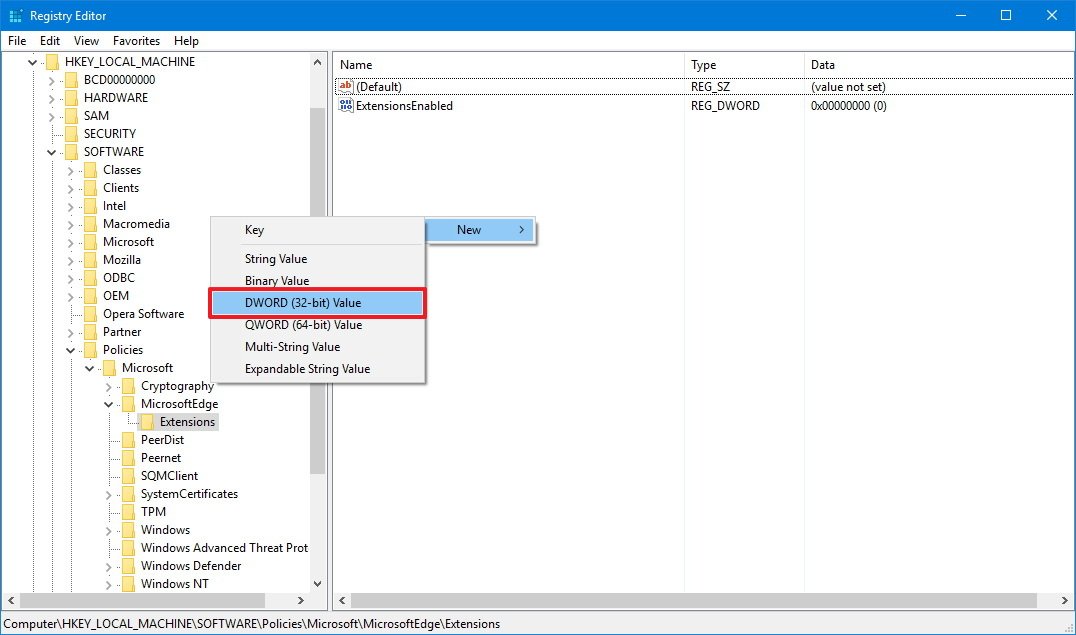
- Inside Extensions, right-click on the right side, select New, and click on DWORD (32-bit) Value.

- Name the new DWORD ExtensionsEnabled and press Enter.
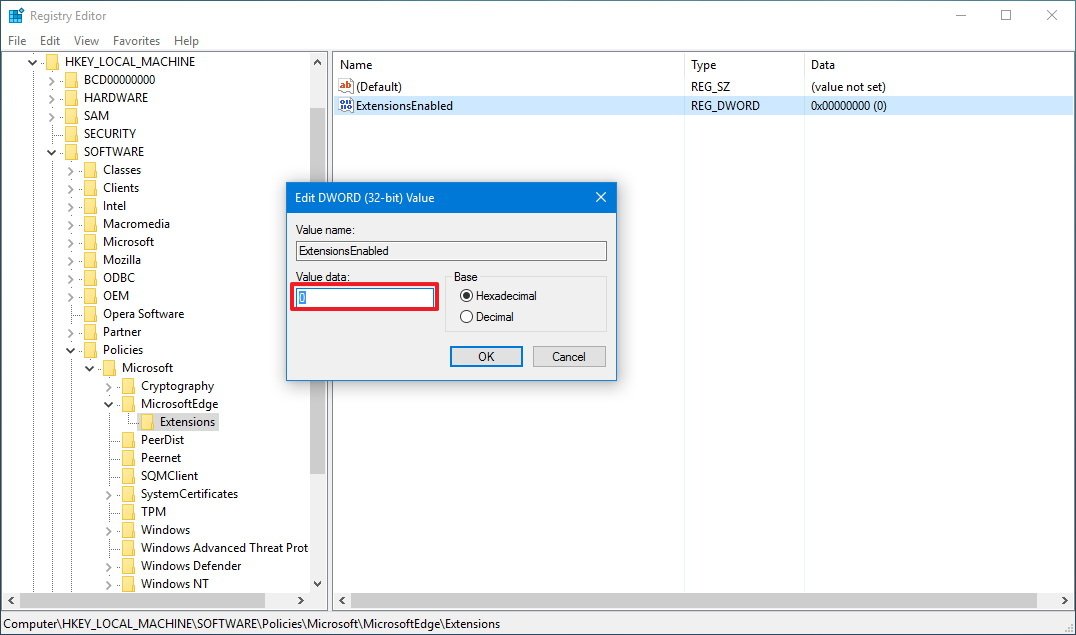
- Double-click the newly created DWORD and make sure the value is set to 0.

- Click OK.
After you have completed the steps, you won't be able to use or install extensions on Microsoft Edge, and the Extensions item in the settings menu will also be disabled in the web browser.
You can at any time revert the changes by following the same steps, but on step No. 10 change the DWORD ExtensionsEnabled value from 0 to 1.
More Windows 10 resources
For more help articles, coverage, and answers to common questions about Windows 10, visit the following resources:
- Windows 10 on Windows Central – All you need to know
- Windows 10 help, tips, and tricks
- Windows 10 forums on Windows Central
Mauro Huculak has been a Windows How-To Expert contributor for WindowsCentral.com for nearly a decade and has over 15 years of experience writing comprehensive guides. He also has an IT background and has achieved different professional certifications from Microsoft, Cisco, VMware, and CompTIA. He has been recognized as a Microsoft MVP for many years.

