How to install Windows 10 from USB with UEFI support
These tools help create a compatible USB flash drive and install Windows 10 on a UEFI-based PC.
All the latest news, reviews, and guides for Windows and Xbox diehards.
You are now subscribed
Your newsletter sign-up was successful
When preparing to install a fresh copy of Windows 10, you typically use a USB flash drive to launch the "Windows Setup" wizard to continue with the process. However, on a device that has a Unified Extensible Firmware Interface (UEFI) instead of the legacy Basic Input/Output System (BIOS), it is crucial to use the correct media for the firmware type to start and complete the installation successfully.
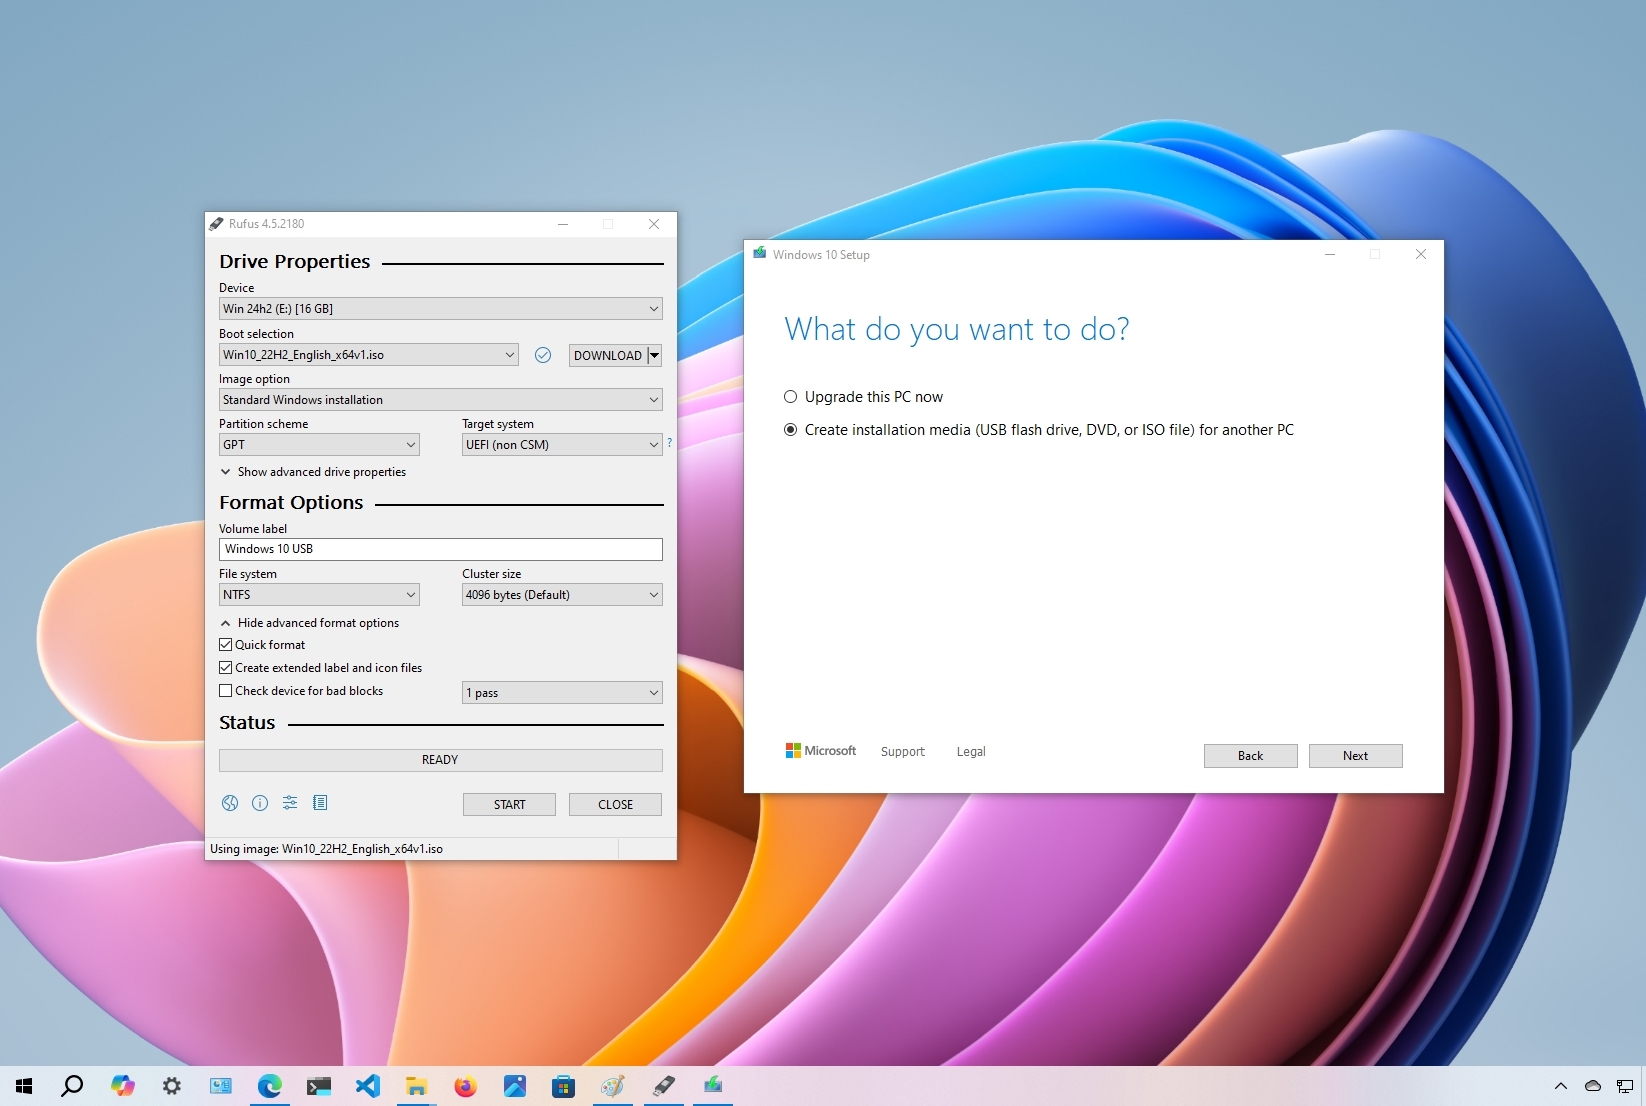
On Windows 10, you can use at least two tools to create a bootable USB flash drive. You can use the Microsoft Media Creation Tool to download the files onto a removable drive with support for both firmware types (UEFI and legacy BIOS). You can also use Rufus, a third-party tool that makes creating a flash drive installer easy with support for UEFI.
In this how-to guide, I will walk you through creating a Windows 10 USB flash drive with support for UEFI using the Microsoft Media Creation Tool and Rufus.
How to create Windows 10 UEFI boot media with Media Creation Tool
The Media Creation Tool is the best option for creating a bootable USB media for performing an in-place upgrade or clean installation of Windows 10.
To create a Windows 10 USB media, connect a flash drive of at least 8GB of space, and then use these steps:
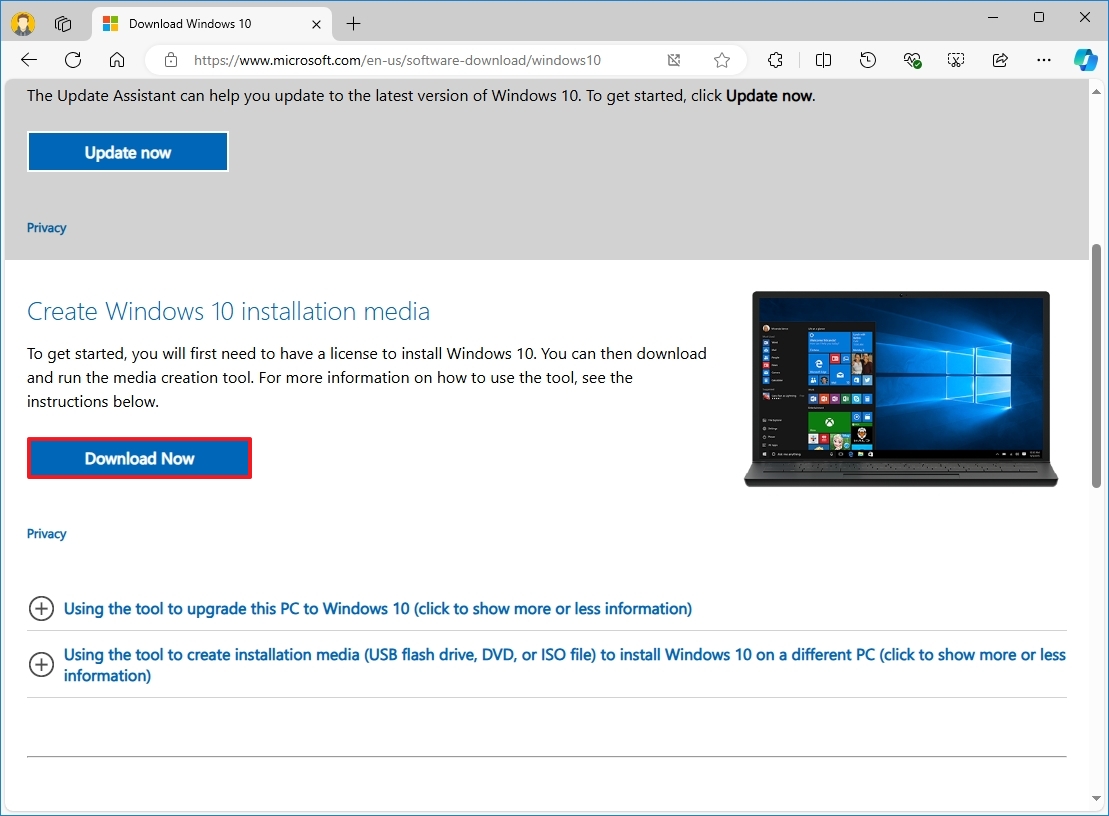
- Open the Windows 10 download page.
- Click the Download now button to save the file under the "Create Windows 10 installation media" section.
- Double-click the MediaCreationToolxxxx.exe file to launch the setup.
- Click the Accept button to agree to the licensing terms.
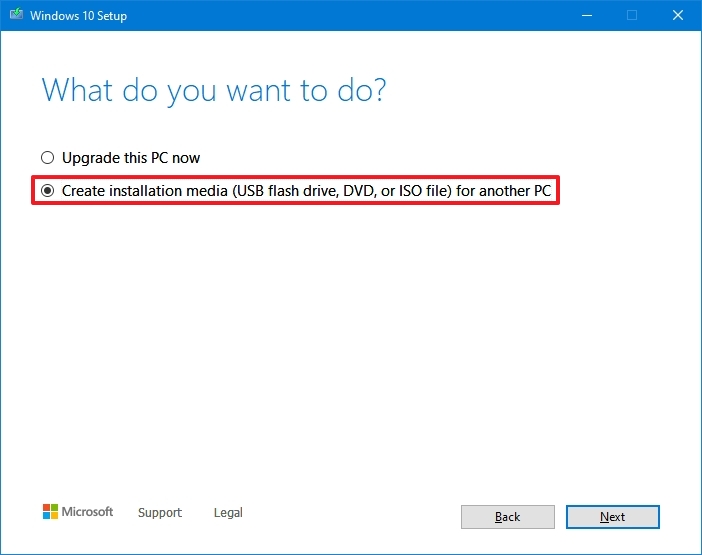
- Select the "Create installation media (USB flash drive, DVD, or ISO file) for another PC" option.
- Click the Next button.
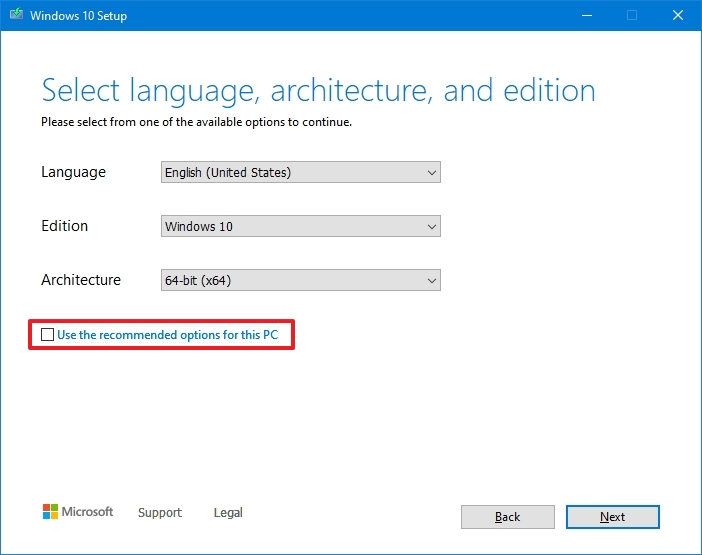
- (Optional) Clear the "Use the recommended options for this PC" option.
- Select the correct language, architecture, and edition of Windows 10 (if applicable).
- Quick tip: If you plan to install Windows on multiple computers running 32-bit and 64-bit architectures, use the "Architecture" drop-down menu and select the "Both" option to create a media that will work on both systems.
- Click the Next button.
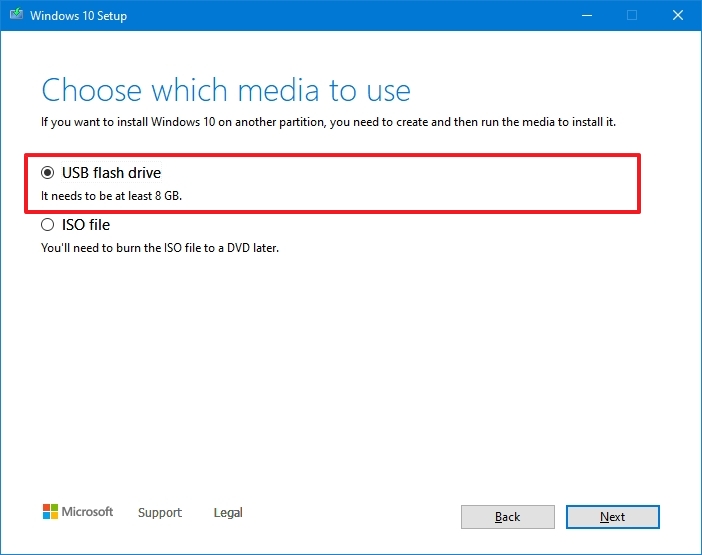
- Select the "USB flash drive" option.
- Click the Next button
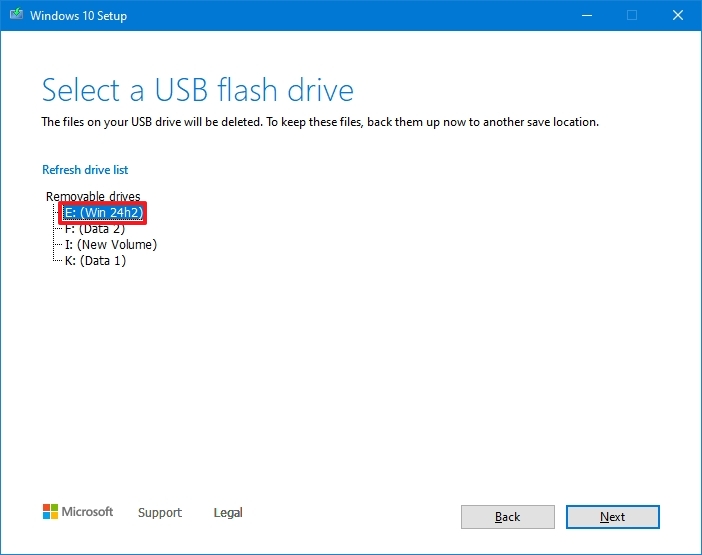
- Select the flash drive from the list. (If you do not see the device, click the "Refresh drive list" option.)
- Click the Next button.
- Click the Finish button.
Once you complete the steps, the Media Creation Tool will download the files and will create a bootable USB flash drive that you can use to install Windows 10 on computers with support for UEFI and BIOS.
How to create Windows 10 UEFI boot media with Rufus
If the Media Creation Tool does not work or you do not want to use it, you can try Rufus, a popular free third-party tool that allows you to create installation media with support for UEFI devices. The utility offers two ways to create the installation media, including using an existing ISO file or downloading the image from the Microsoft servers directly from the app.
All the latest news, reviews, and guides for Windows and Xbox diehards.
Create a flash drive with existing Windows 10 ISO
To create a USB media with an existing Windows 10 ISO file, connect a flash drive of at least 8GB of space and use these steps:
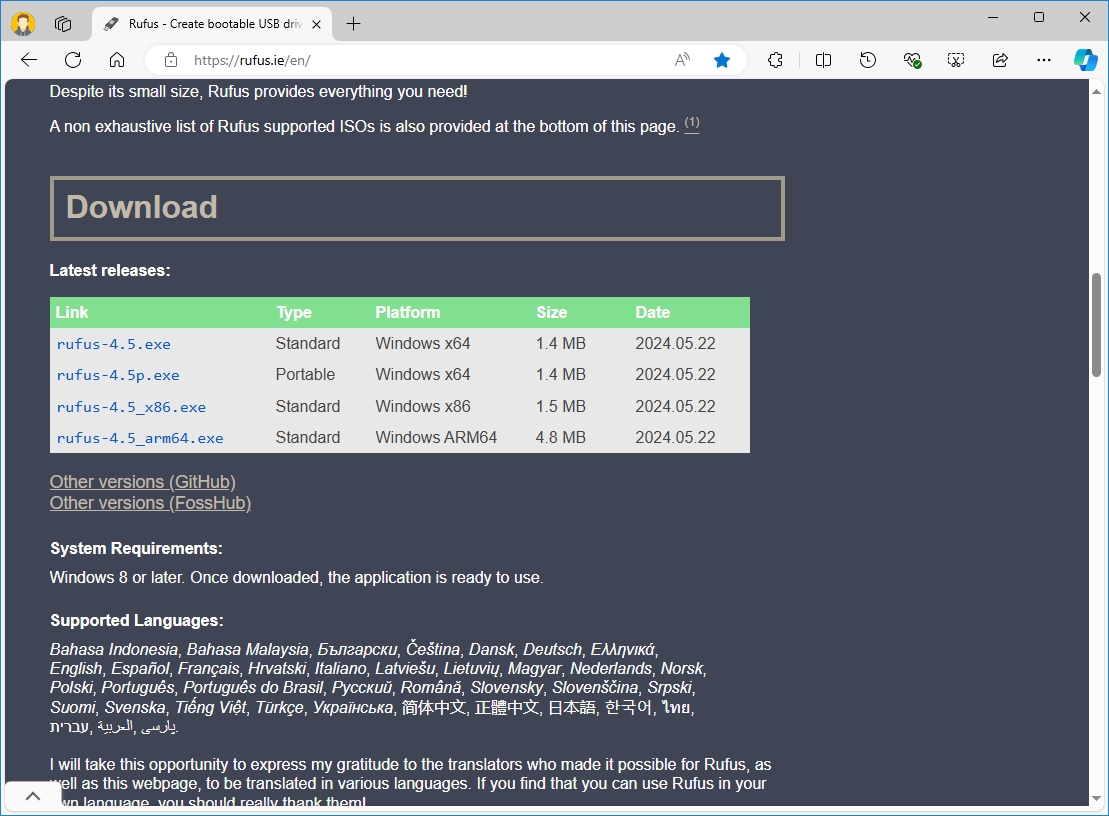
- Open Rufus download page.
- Click the latest release (first link) and save the file under the "Download" section.
- Double-click the Rufus-x.xx.exe file to launch the tool.
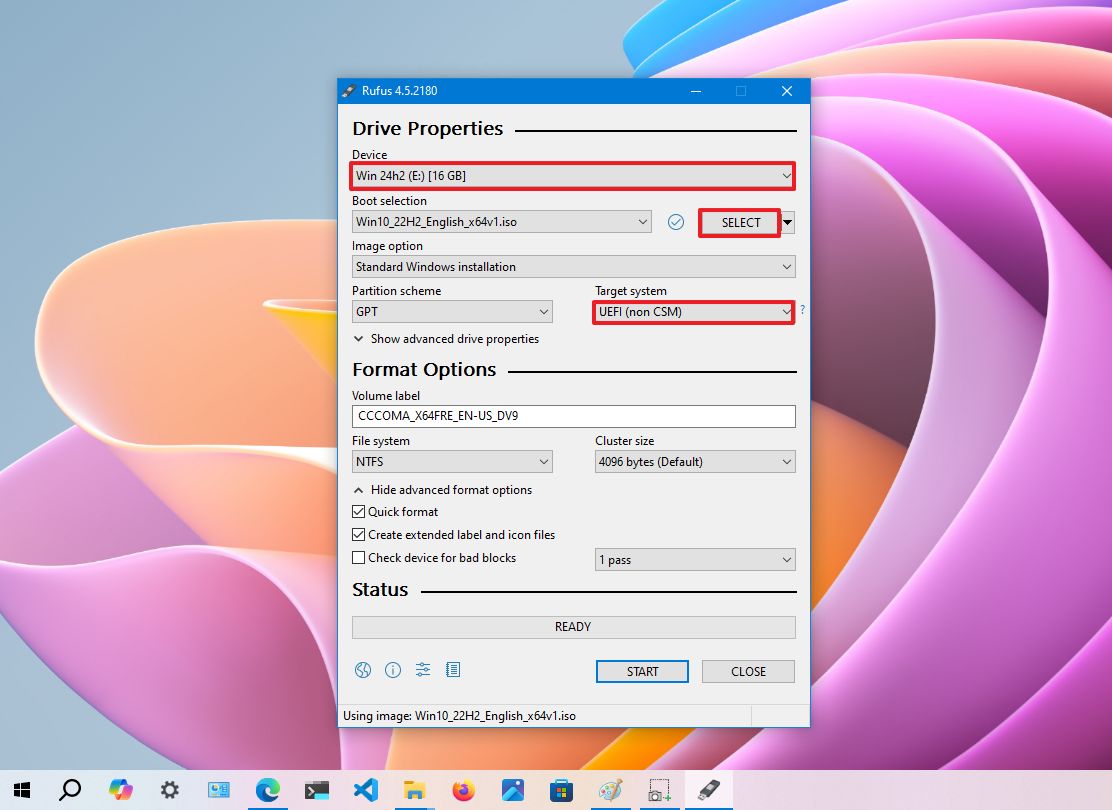
- Under the "Device" section, select the USB flash drive.
- Under the "Boot selection" section, click the Select button on the right.
- Select the Windows 10 ISO file from the folder location.
- Click the Open button.
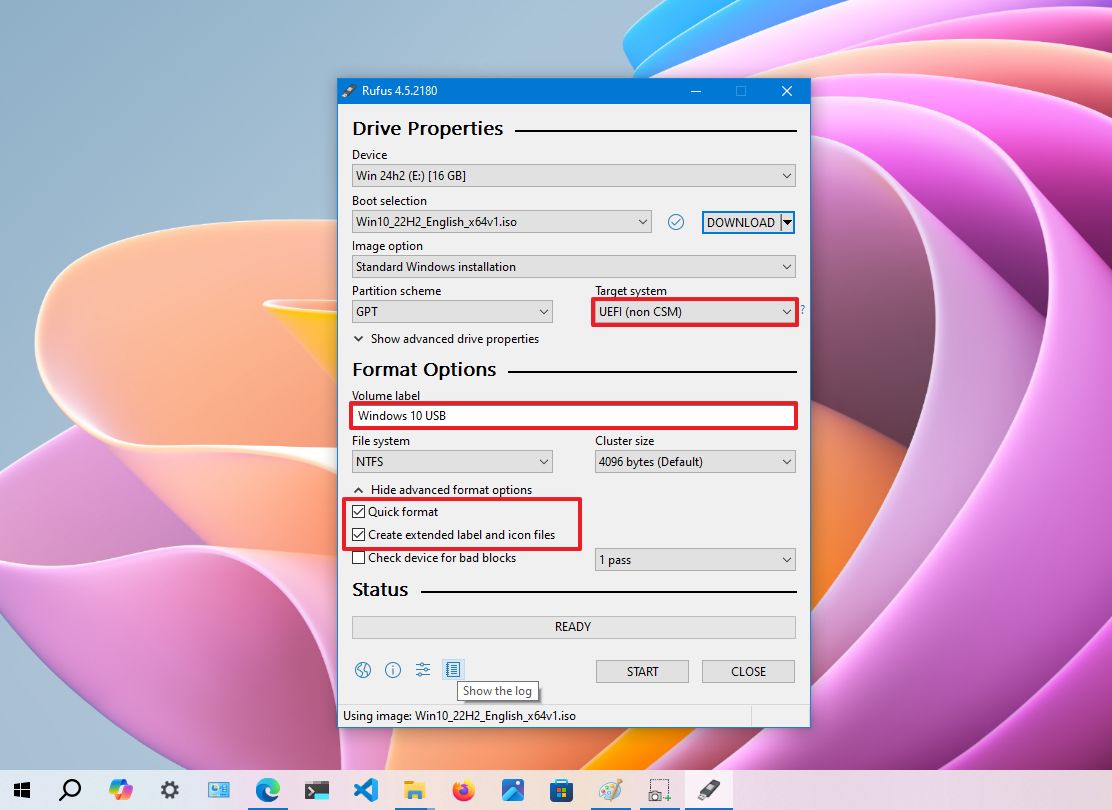
- Use the "Image option" drop-down menu and select the "Standard Windows installation" option.
- Use the "Partition scheme" drop-down menu and select the GPT option.
- Use the "Target system" drop-down menu and select the UEFI (non CSM) option.
- Continue with the default settings under the "Show Advanced drive properties" section (as necessary).
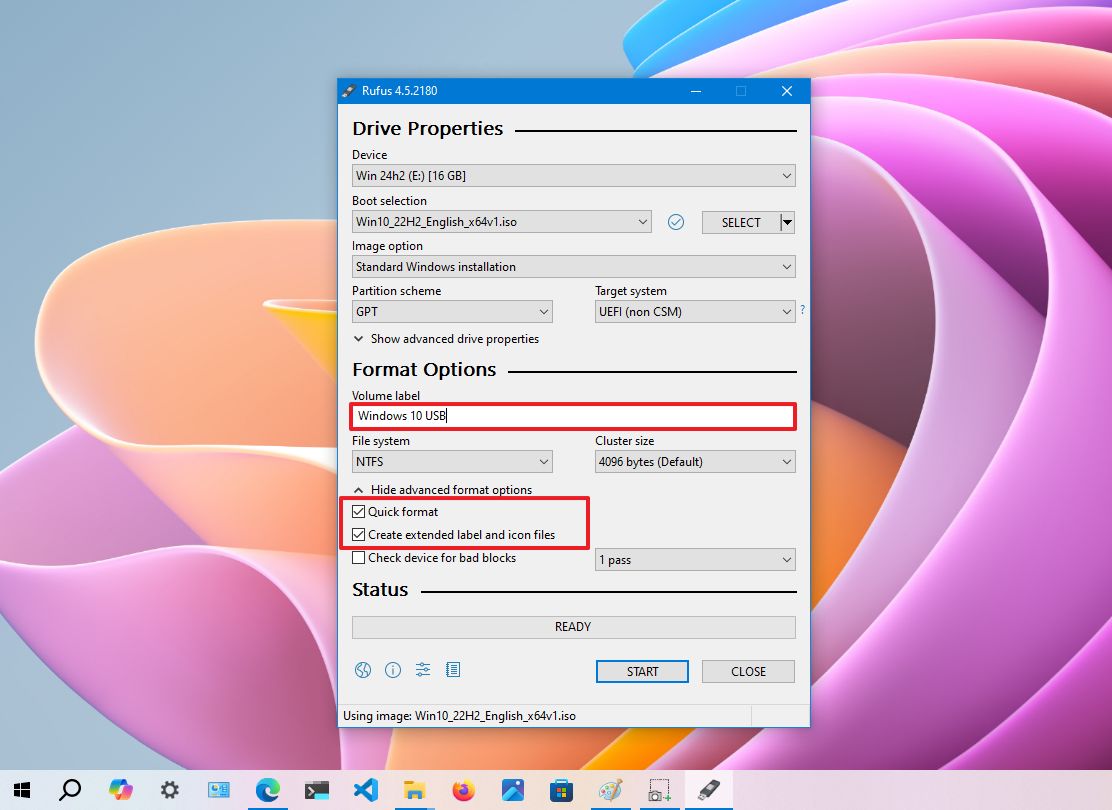
- Confirm a name for the drive (for example, "Windows 10 USB") under the "Volume label" setting.
- Do not change the default settings in the "File system" and "Cluster size" options.
- Click the "Show advanced format options" setting.
- Check the Quick format option.
- Check the "Create extended label and icon files" option.
- Click the Start button.
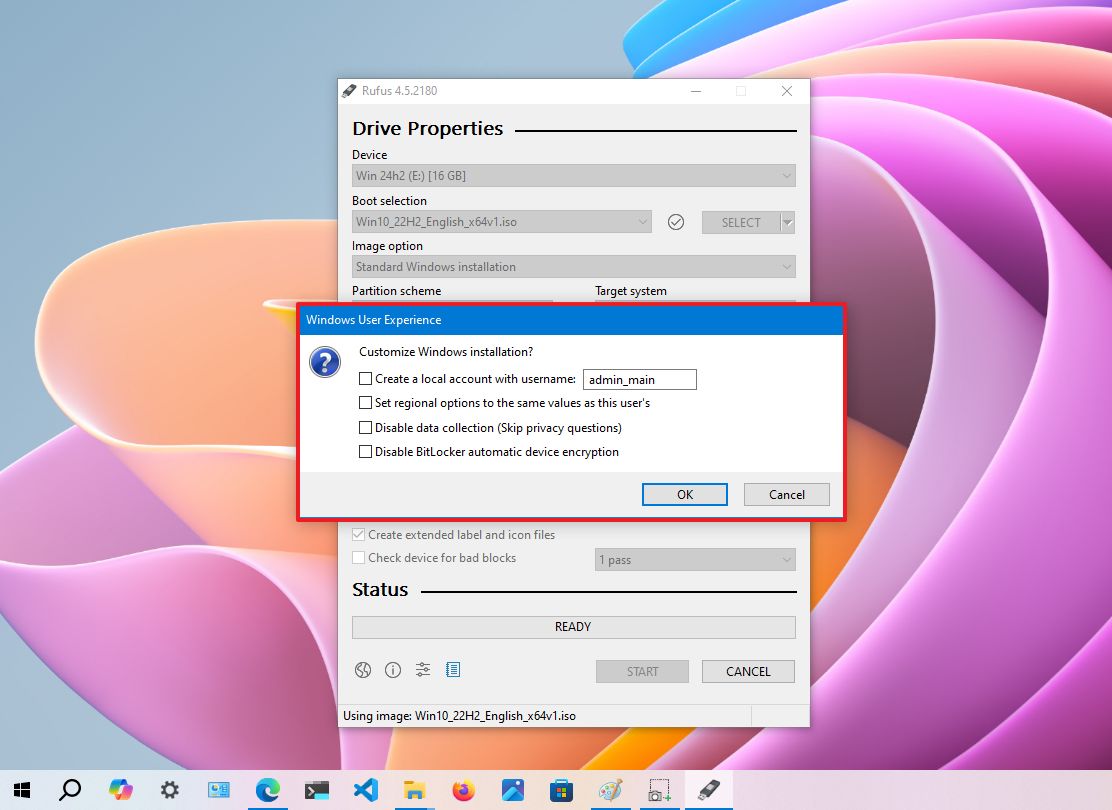
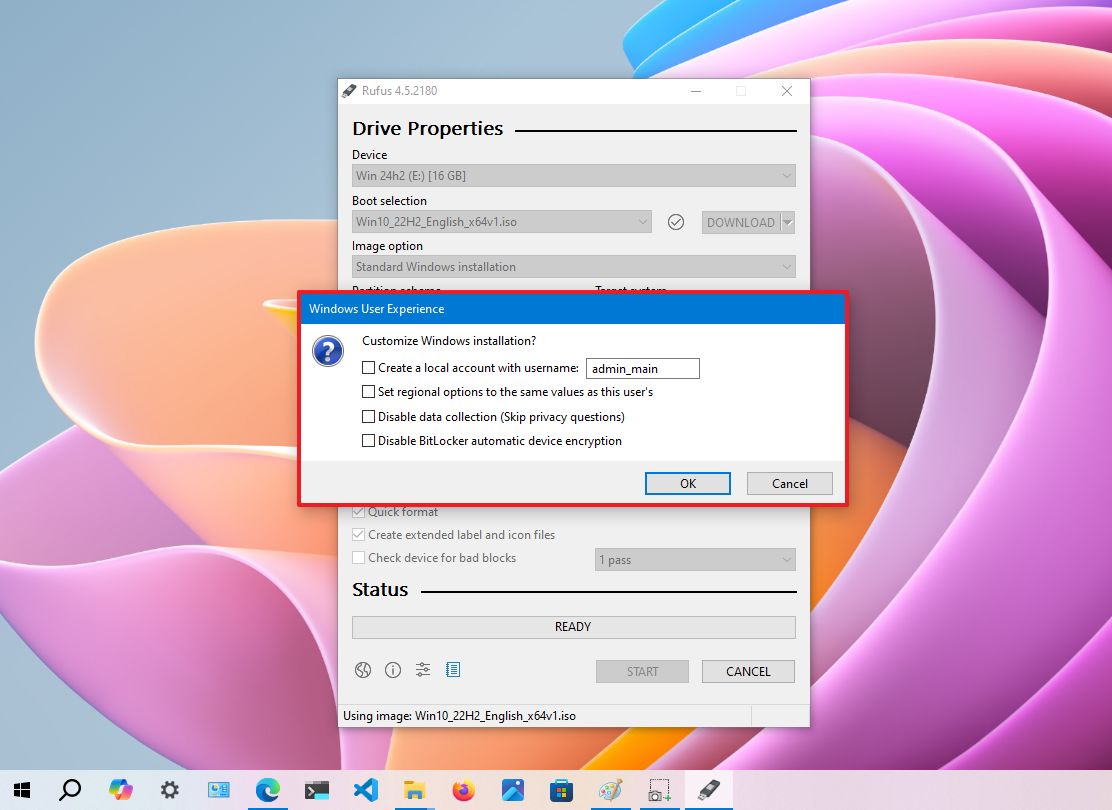
- Clear the available settings in the "Windows User Experience" page.
- Click the OK button to confirm.
- Click the Close button.
After you complete the steps, Rufus will create a USB flash drive to install Windows 10 on a device using UEFI.
Create flash drive downloading Windows 10 ISO
The tool also has a feature to download the Windows 10 ISO file, which you can then use to create a USB flash drive to install Windows 10.
To create an install media with UEFI support with Rufus, use these steps:
- Open Rufus download page.
- Click the latest release (first link) of the tool to save the file under the "Download" section.
- Double-click the Rufus-x.xx.exe file to launch the tool.
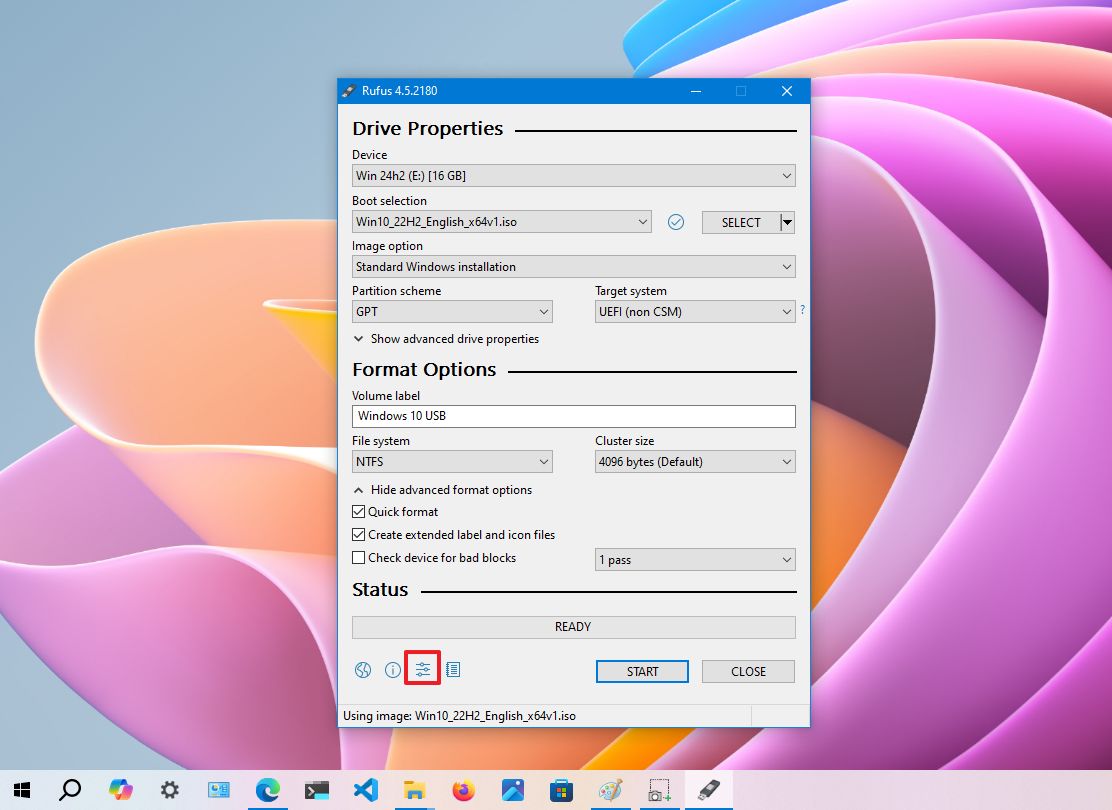
- Click the Settings button at the bottom of the page.
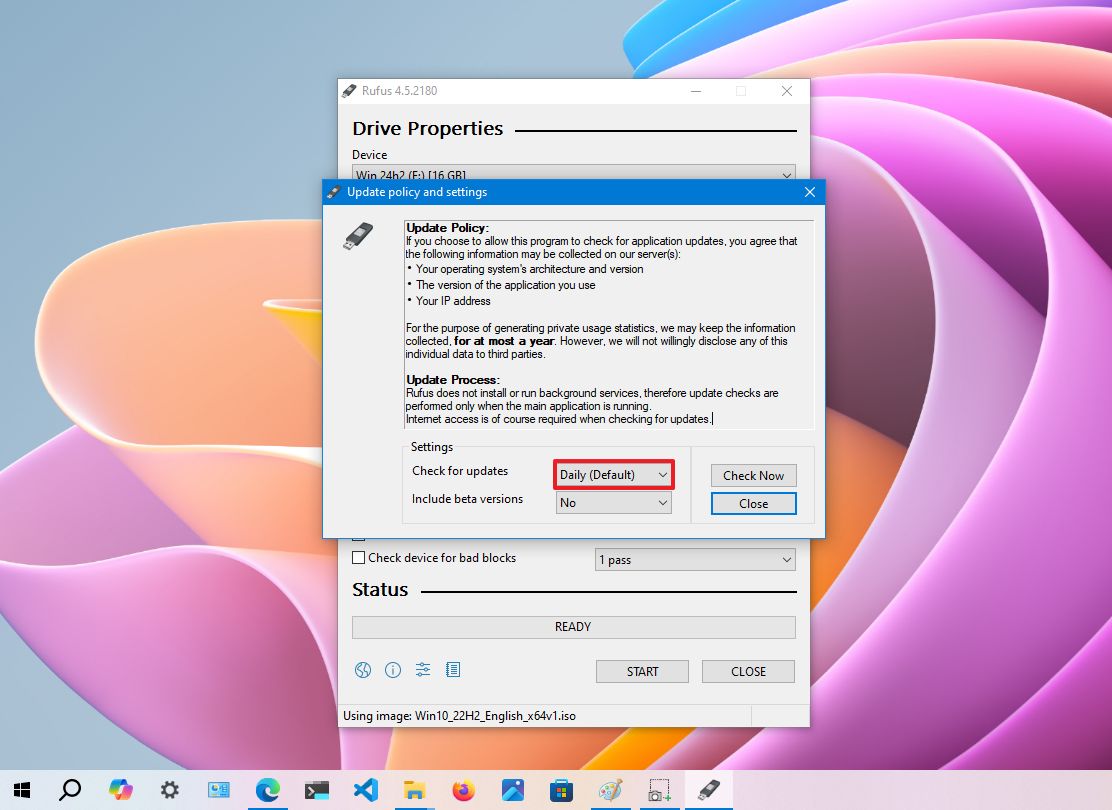
- Choose the "Check for updates" drop-down menu and select the Daily option under the "Settings" section.
- Click the Close button.
- Close the Rufus tool.
- Double-click the Rufus-x.xx.exe file to reopen the utility.
- Select the USB flash drive from the list under the "Device" section.
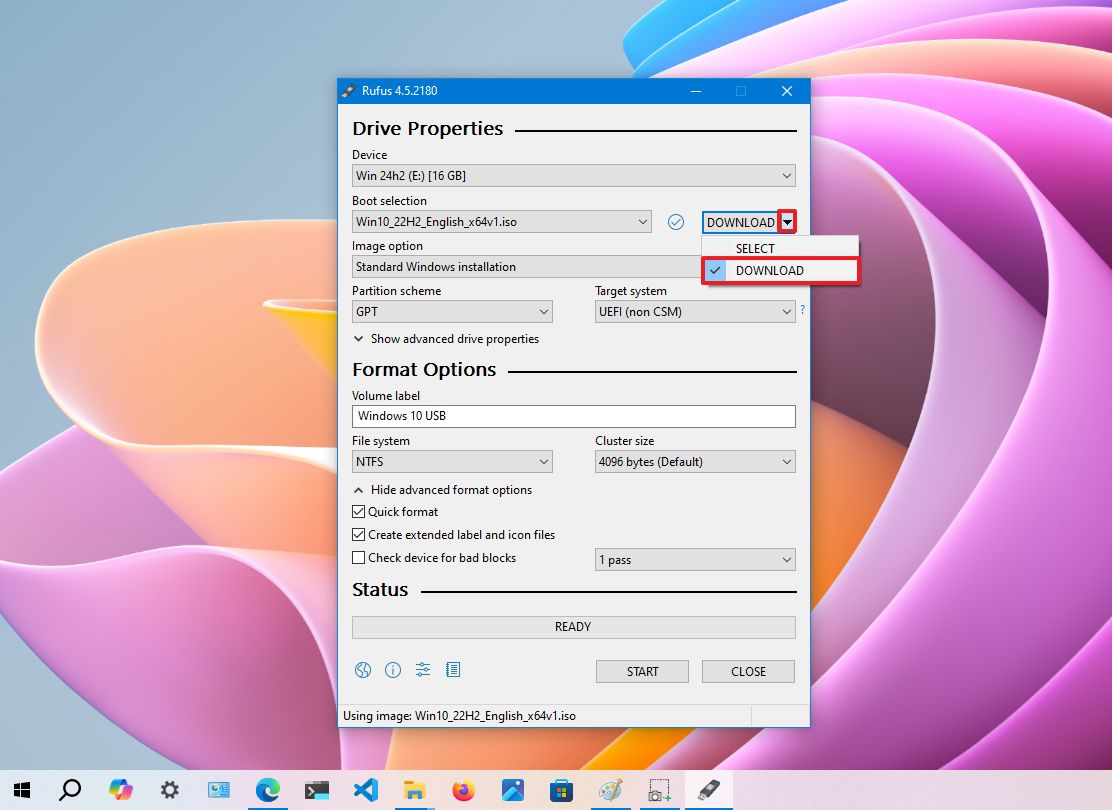
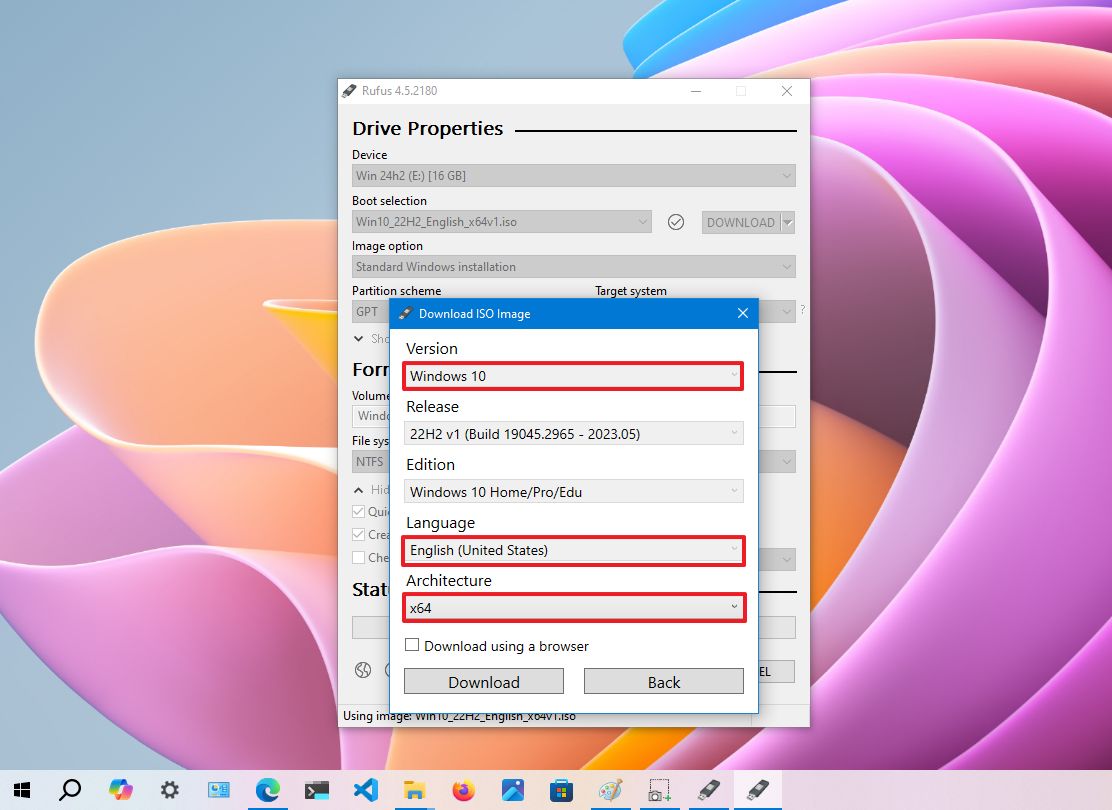
- Click the arrow button next to the "Select" option and choose the Download option.
- Click the Download button.
- Use the "Version" drop-down menu and select the Windows 10 option.
- Click the Continue button.
- Select the 22H2 (Build 19045.xxx - xxxx.xx) option to download the latest version of Windows 10.
- Click the Continue button.
- Select the Windows 10 Home/Pro/Edu option from the "Edition" menu.
- Click the Continue button.
- Choose the installation language in the "Language" menu.
- Quick note: If you are in the United States, select the "English" option. Otherwise, select the "English International" option or the language that applies to you.
- Click the Continue button.
- Select the 32-bit or 64-bit option (recommended) in the "Architecture" menu.
- Quick tip: You can check your computer's architecture on Settings > System > About, and under the "Device specifications" section, confirm whether the "System type" is 64-bit or 32-bit.
- Click the Download button.
- Select a folder to save the ISO file.
- Click the Save button.
- Use the "Image option" drop-down menu and select the "Standard Windows installation" option.
- Use the "Partition scheme" drop-down menu and select the GPT option.
- Use the "Target system" drop-down menu and select the UEFI (non CSM) option.
- Continue with the default settings under the "Show Advanced drive properties" section (as necessary).
- Confirm a name for the drive (for example, "Windows 10 USB") under the "Volume label" setting.
- Do not change the default settings under the "File system" and "Cluster size" sections.
- Click the "Show advanced format options" button.
- Check the Quick format option.
- Check the "Create extended label and icon files" option.
- Click the Start button.
- Clear the available settings on the "Windows User Experience" page.
- Click the OK button.
- Click the Close button.
Once you complete the steps, Rufus will run the automated script to download the Windows 10 ISO file from the Microsoft servers and create a bootable media to install the operating system on a UEFI device without needing the Media Creation Tool.
When you have the USB boot media with support for UEFI systems, you can launch the "Windows Setup" wizard to perform a clean installation of Windows 10 or an in-place upgrade.
More resources
For more helpful articles, coverage, and answers to common questions about Windows 10, visit the following resources:
- Windows 11 on Windows Central — All you need to know
- Windows 10 on Windows Central — All you need to know

Mauro Huculak has been a Windows How-To Expert contributor for WindowsCentral.com for nearly a decade and has over 22 years of combined experience in IT and technical writing. He holds various professional certifications from Microsoft, Cisco, VMware, and CompTIA and has been recognized as a Microsoft MVP for many years.
