How to configure Windows Sandbox on Windows 11 and Windows 10
Are you using Windows Sandbox? Here's how to configure the feature on Windows 11 or 10
- Win 11: Create Sandbox config
- Win 11: Run startup commands
- Win 11: Enable file sharing
- Win 11: Manage networking
- Win 11: Manage graphics
- Win 11: Change system memory
- Win 11: Share audio devices
- Win 11: Share video devices
- Win 11: Increase security
- Win 11: Configure multiple options
- Windows 10
- Win 10: Create a config file
- Win 10: Manage networking
- Win 10: Manage graphics
- Win 10: Map a host folder
- Win 10: Run startup commands
- Win 10: Configure multiple options
All the latest news, reviews, and guides for Windows and Xbox diehards.
You are now subscribed
Your newsletter sign-up was successful
On Windows 11, you can use the "Windows Sandbox" feature to create an isolated lightweight virtual machine to test potentially harmful applications without affecting your main setup.
The feature is basically a traditional virtual machine, but this one is a quick solution that doesn't take up a lot of space and has been optimized for speed, security, and efficiency.
Although out-of-the-box, the Windows 11 feature provides an isolation layer, it's still possible for malicious code to make its way to the main setup using some of the features, such the virtual networking, virtual graphics, and file sharing. However, Windows Sandbox includes many settings you can manage through a configuration file to increase security and perform other tasks, such as running commands and scripts, and redirect peripherals like microphones and cameras to test specific features of an application.
This guide will walk you through the steps to configure the Windows Sandbox feature on Windows 11.
How to create a configuration file for Windows Sandbox
To build a configuration file for Sandbox on Windows 11, use these steps:
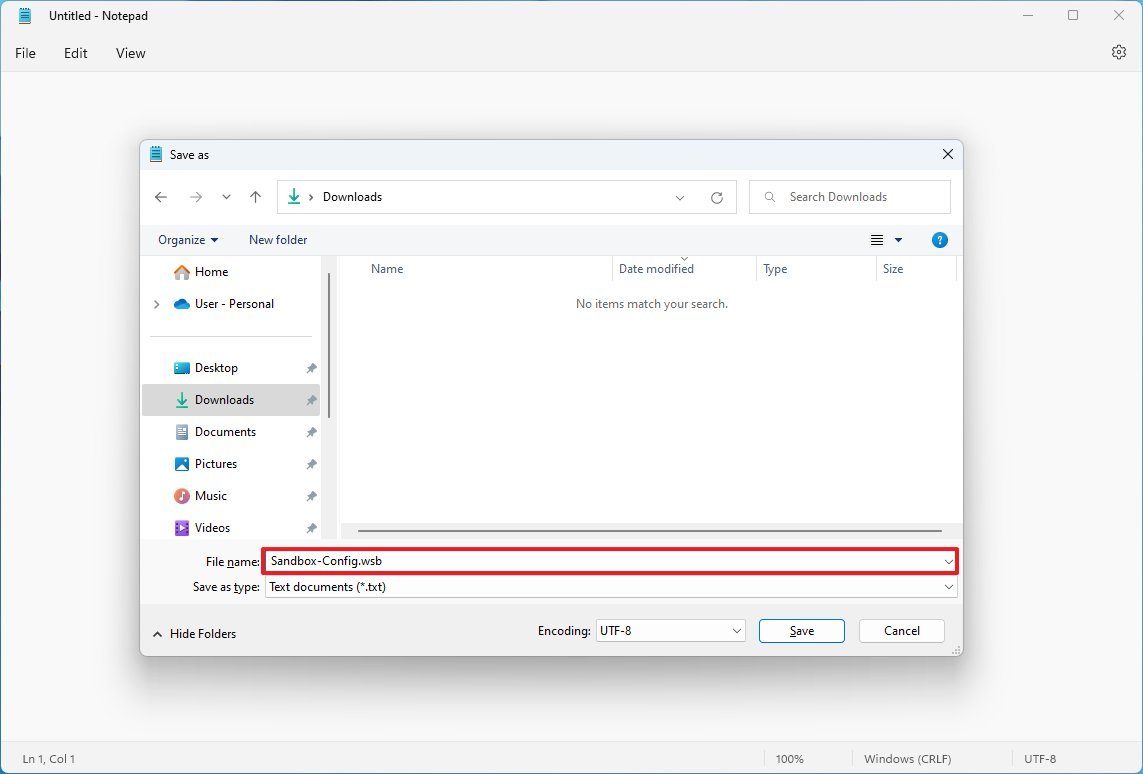
- Open Notepad.
- Click the File menu.
- Select the Save as option.
- Type a descriptive name and use the .wsb extension.
- Use the "Save as type" drop-down menu and select the All Files option.
- Click the Save button.
After completing the steps, you can continue using Notepad or another text editor, such as Visual Studio Code, to edit the file and build custom configurations for Windows Sandbox.
How to run startup commands on Windows Sandbox
To run scripts or commands during login on Sandbox, use these steps:
All the latest news, reviews, and guides for Windows and Xbox diehards.
- Open File Explorer.
- Navigate to the configuration file.
- Right-click the .wsb configuration file you created in the previous steps, select the Open with option, and click the Choose another app option.
- Select the Notepad option.
- Click the OK button.
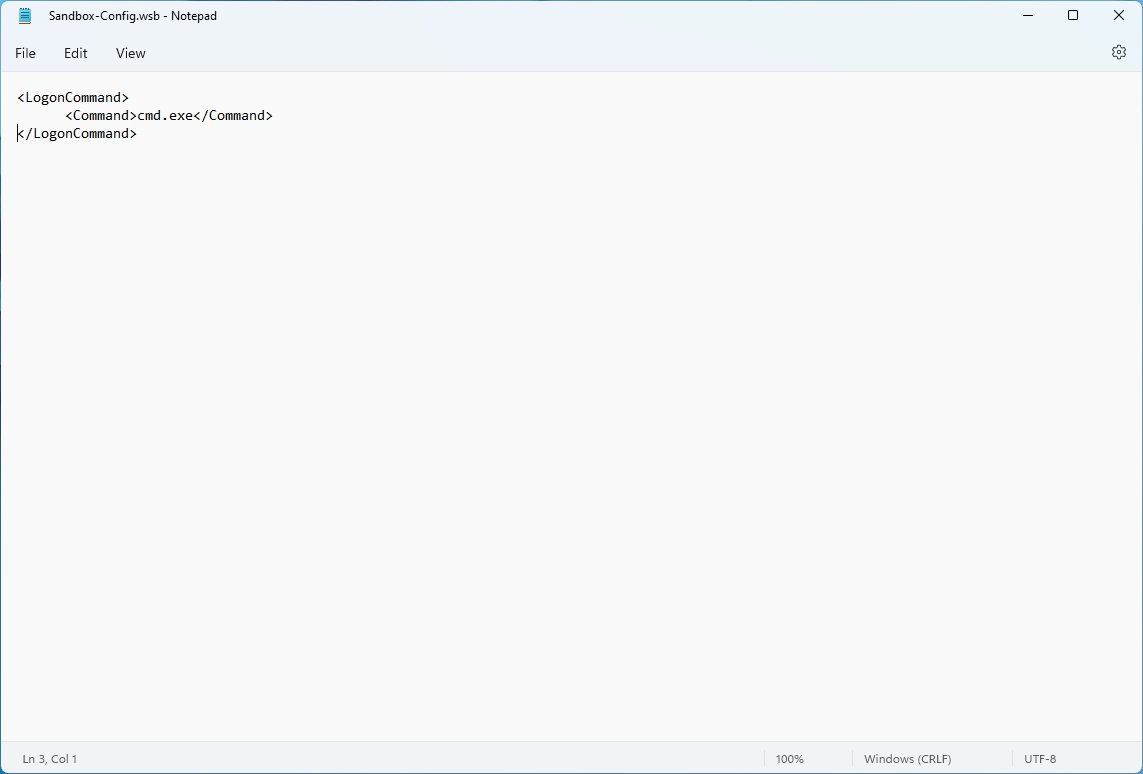
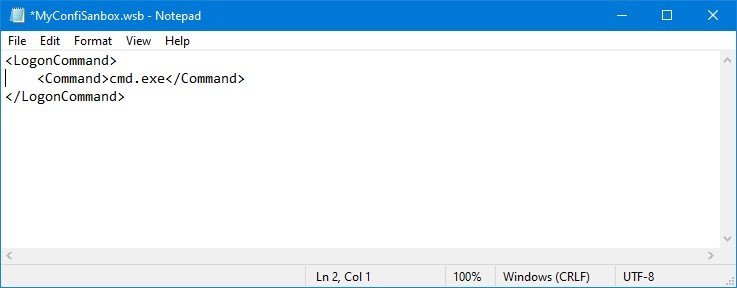
- Type the following to run a command during startup on Windows Sandbox:
cmd.exe
Inside the Command block, make sure to replace cmd.exe for the command that you want to run. If you need to run a complex command, we recommend creating a script and running it with a single command inside Sandbox.
- Click the File menu.
- Click the Save option.
After you complete the steps, the system will run the commands or scripts you specified during the sign-in process.
How to map host folder on Windows Sandbox
To share a local folder from Windows 11 with the Sandbox desktop, use these steps:
- Open File Explorer.
- Navigate to the configuration file.
- Right-click the .wsb configuration file you created in the earlier steps, select the Open with option, and click the Choose another app option.
- Select the Notepad option.
- Click the OK button.
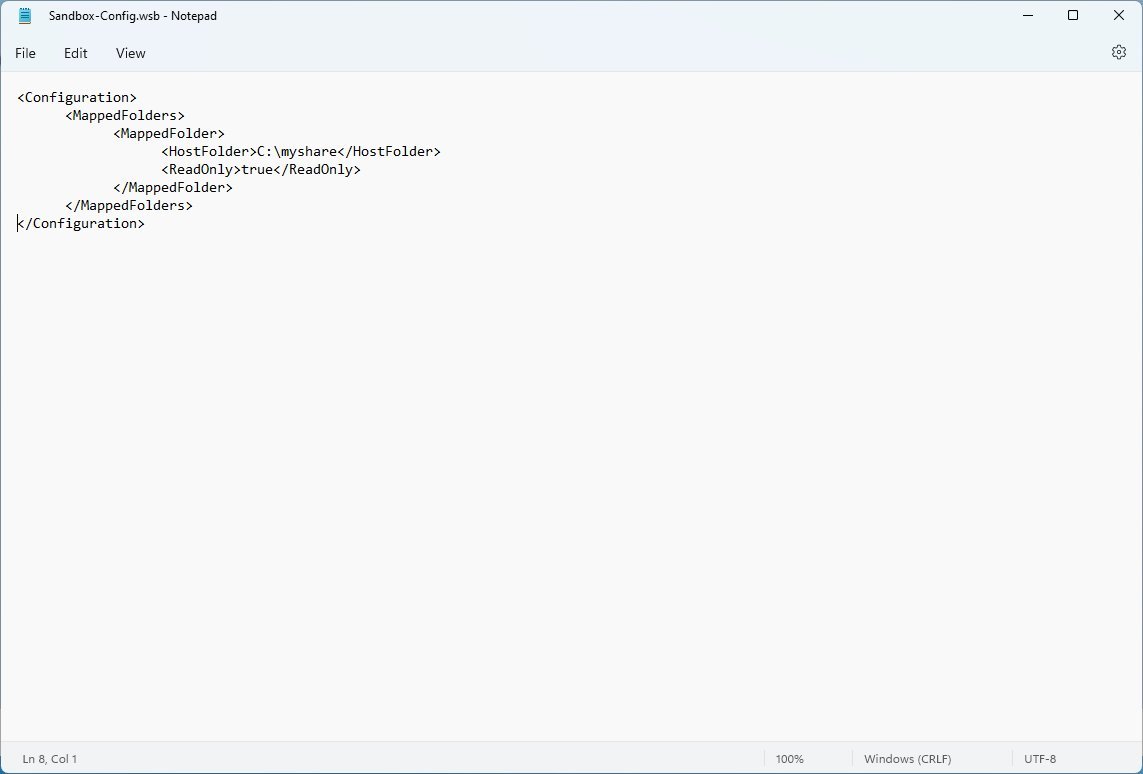
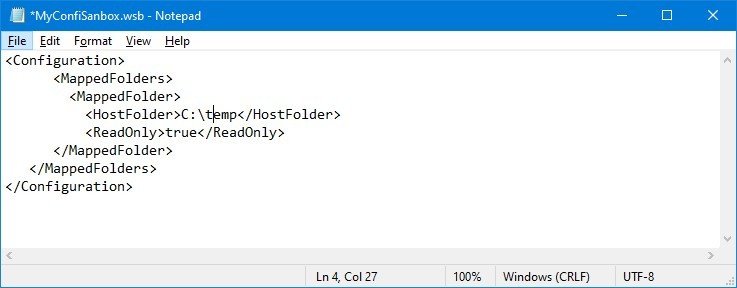
- Type the following to map a folder on Windows Sandbox:
C:\myshare true
In the script, make sure to specify the path for the host folder that you want to appear inside Windows Sandbox within the HostFolder block. Also, inside the ReadOnly block, use the "true" value (recommended) to enforce accessing the folder in read-only mode or use the "false" value to allow read-and-write access to the folder.
- Click the File menu.
- Click the Save option.
Once you complete the steps, when you start the Windows Sandbox from the configuration file, the virtual machine will mount the folder and make it available from the desktop.
Although the above instructions show you how to map only one folder, you can create multiple XML "MappedFolder" blocks inside the "MappedFolders" block to mount as many folders as you need.
How to manage virtual network adapter on Windows Sandbox
To manage the virtual network adapter through a configuration file on Windows Sandbox, use these steps:
- Open File Explorer.
- Navigate to the configuration file.
- Right-click the .wsb configuration file you created in the previous steps, select the Open with option, and click the Choose another app option.
- Select the Notepad option.
- Click the OK button.
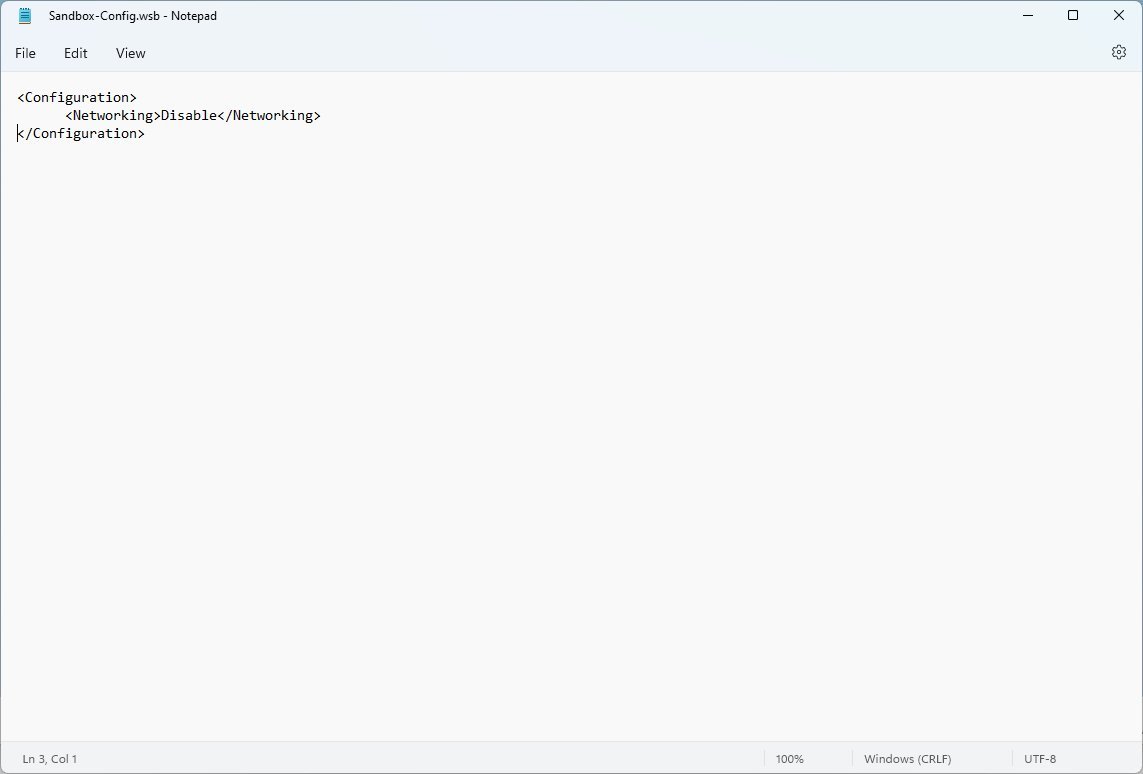
- Type the following to disable the virtual network adapter on Windows Sandbox:
Disable
- Type the following to enable networking on Windows Sandbox:
Default
- Quick note: Although you can disable networking, Windows Sandbox will enable this feature by default whether or not you use a configuration file.
- Click the File menu.
- Click the Save option.
Once you complete the steps, running the .wsb file will spin the virtualization environment with the configuration specified in the file.
How to manage virtual graphics on Windows Sandbox
To manage the virtual graphics adapter from the .wsb file, use these steps:
- Open File Explorer.
- Navigate to the configuration file.
- Right-click the .wsb configuration file you created in the previous steps, select the Open with option, and click the Choose another app option.
- Select the Notepad option.
- Click the OK button.
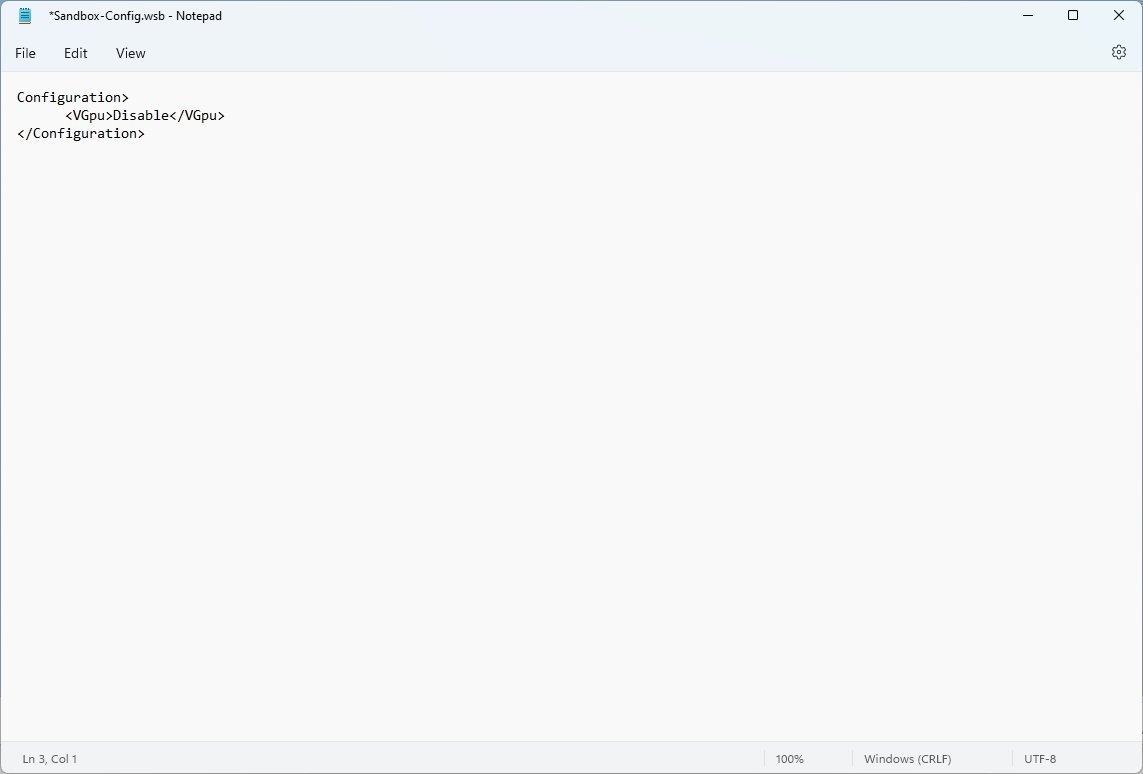
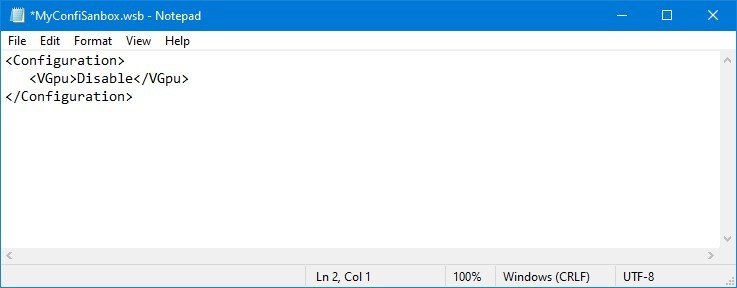
- Type the following to disable the vGPU adapter on Windows Sandbox:
Disable
- Type the following to enable the vGPU on Windows Sandbox:
Default
- Quick note: Although you can specify to disable the vGPU, Windows Sandbox will enable this feature by default whether or not you use a configuration file.
- Click the File menu.
- Click the Save option.
After you complete the steps, the virtualization environment will enable or disable the graphics adapter, depending on your configuration. If you disable the virtual GPU, this will result in performance degradation.
How to configure memory usage for Windows Sandbox
To change the amount of memory for the lightweight virtual machine, use these steps:
- Open File Explorer.
- Navigate to the configuration file.
- Right-click the .wsb configuration file you created in the previous steps, select the Open with option, and click the Choose another app option.
- Select the Notepad option.
- Click the OK button.
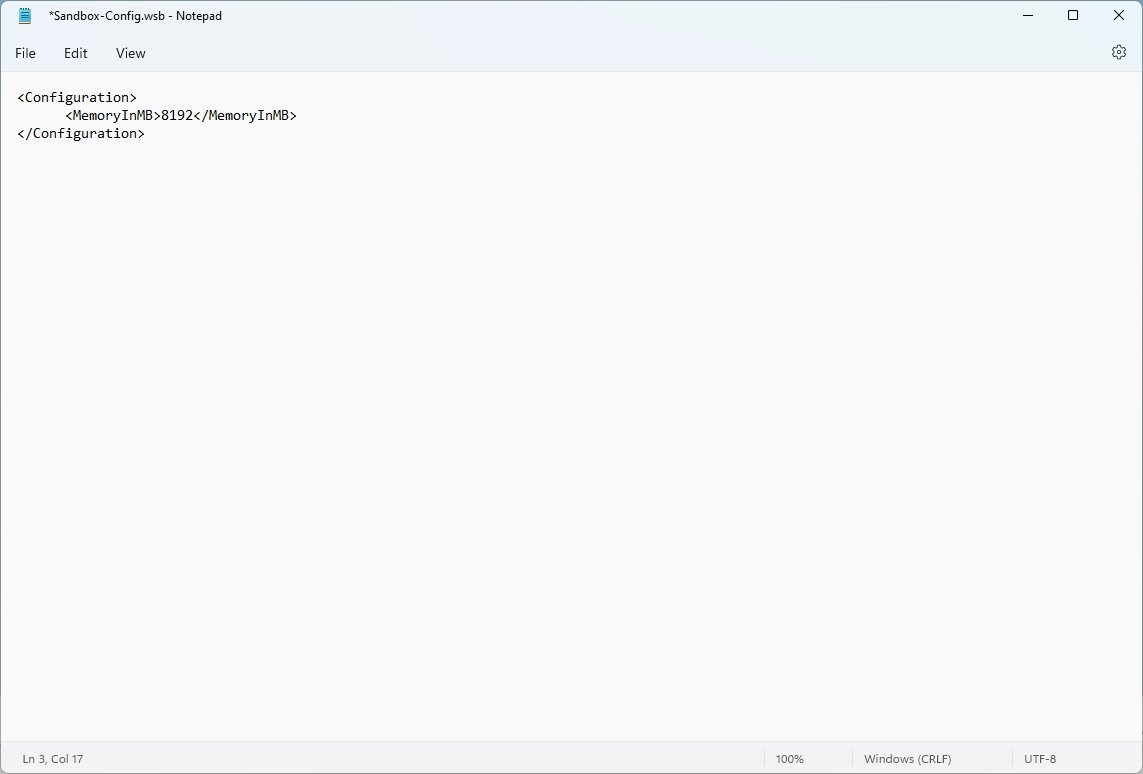
- Type the following to change the amount of memory (in megabytes) for the Sandbox on Windows 11:
8192
In the syntax, change 8192 (representing 8GB of RAM) for the amount you want to assign to the feature.
- Click the File menu.
- Click the Save option.
Once you complete the steps, the Sandbox will boot with the amount of memory you specified.
How to share audio devices on Windows Sandbox
To share audio devices like a microphone with the Sandbox, use these steps:
- Open File Explorer.
- Navigate to the configuration file.
- Right-click the .wsb configuration file you created in the previous steps, select the Open with option, and click the Choose another app option.
- Select the Notepad option.
- Click the OK button.
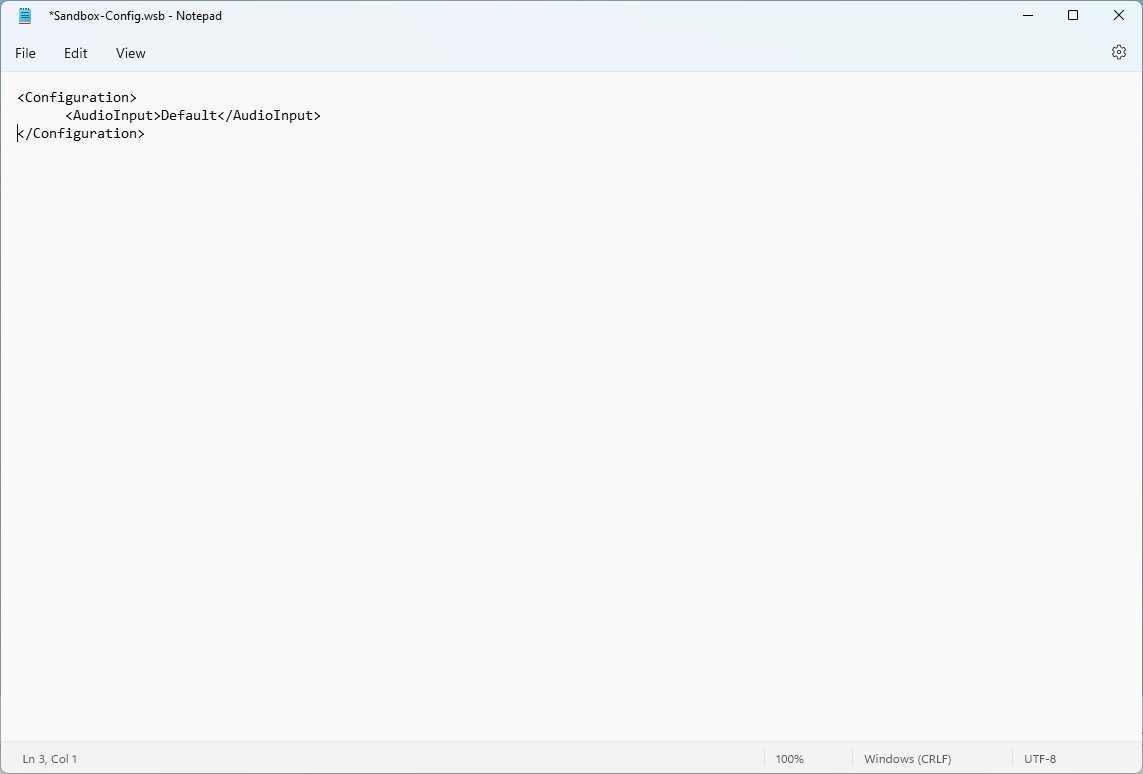
- Type the following to enable audio devices on Windows Sandbox:
Default
- Type the following to disable the audio devices on Windows Sandbox:
Disable
- Quick note: The syntax also supports the "Enable" value.
- Click the File menu.
- Click the Save option.
After you complete the steps, you will be able to connect the microphone to the Sandbox to test the application in question.
How to share video devices on Windows Sandbox
To share videos devices like a webcam with the Sandbox, use these steps:
- Open File Explorer.
- Navigate to the configuration file.
- Right-click the .wsb configuration file you created in the previous steps, select the Open with option, and click the Choose another app option.
- Select the Notepad option.
- Click the OK button.
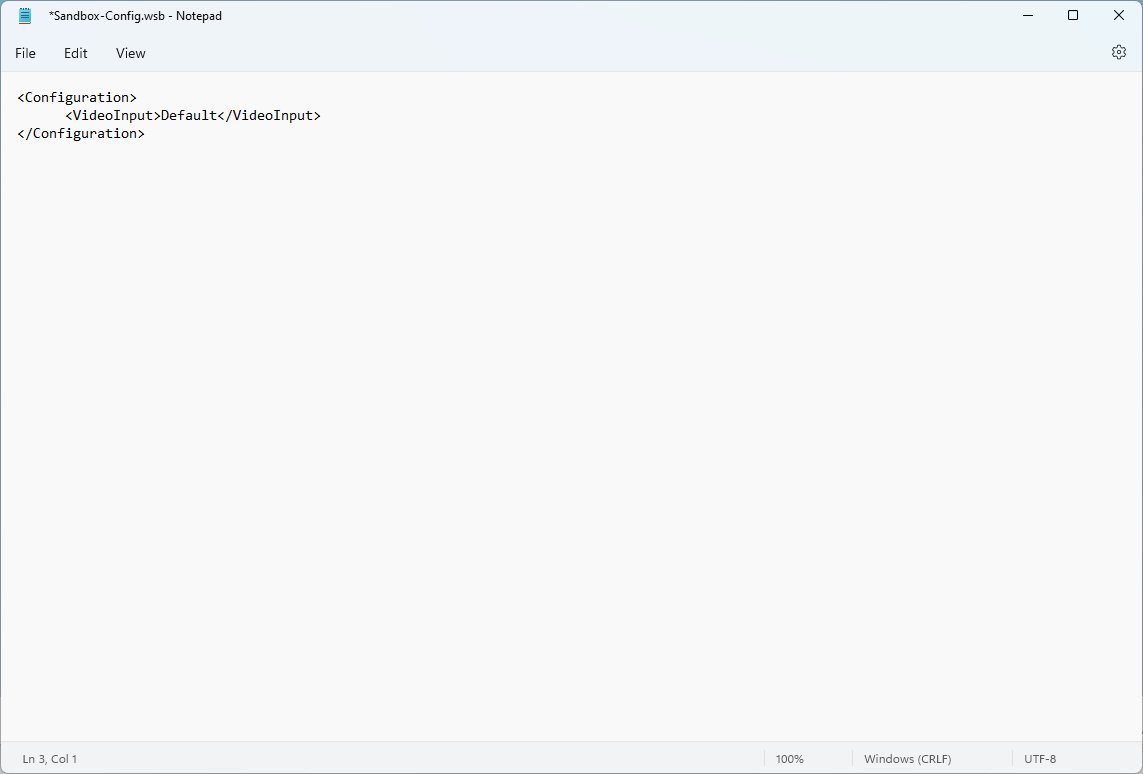
- Type the following to enable video input devices on Windows Sandbox:
Default
- Type the following to disable the video input devices on Windows Sandbox:
Disable
- Quick note: The syntax also supports the "Enable" value.
- Click the File menu.
- Click the Save option.
Once you complete the steps, you will be able to connect, for example, a webcam to the Sandbox to test a specific application.
How to increase security between the host and Windows Sandbox
To increase the security between the host computer and Windows Sandbox through the remote desktop connection, use these steps:
- Open File Explorer.
- Navigate to the configuration file.
- Right-click the .wsb configuration file you created in the previous steps, select the Open with option, and click the Choose another app option.
- Select the Notepad option.
- Click the OK button.
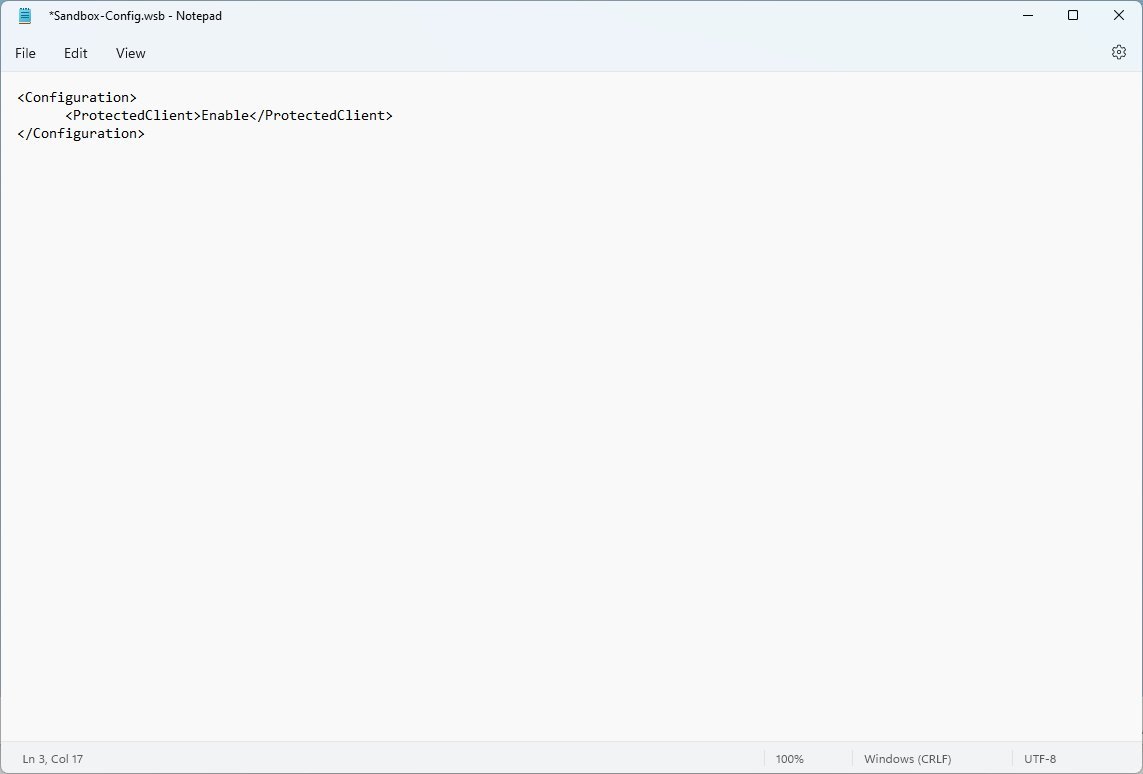
- Type the following to enable security mitigations on Windows Sandbox:
Enable
- Click the File menu.
- Click the Save option.
After you complete the steps, the Windows Sandbox will operate in "Protected Client" mode, which includes extra security mitigation to decrease the chances of attacks through the RPD protocol.
How to control multiple options on Windows Sandbox
To use the Windows Sandbox feature with multiple options on Windows 11, use these steps:
- Open File Explorer.
- Navigate to the configuration file.
- Right-click the .wsb configuration file you created in the previous steps, select the Open with option, and click the Choose another app option.
- Select the Notepad option.
- Click the OK button.
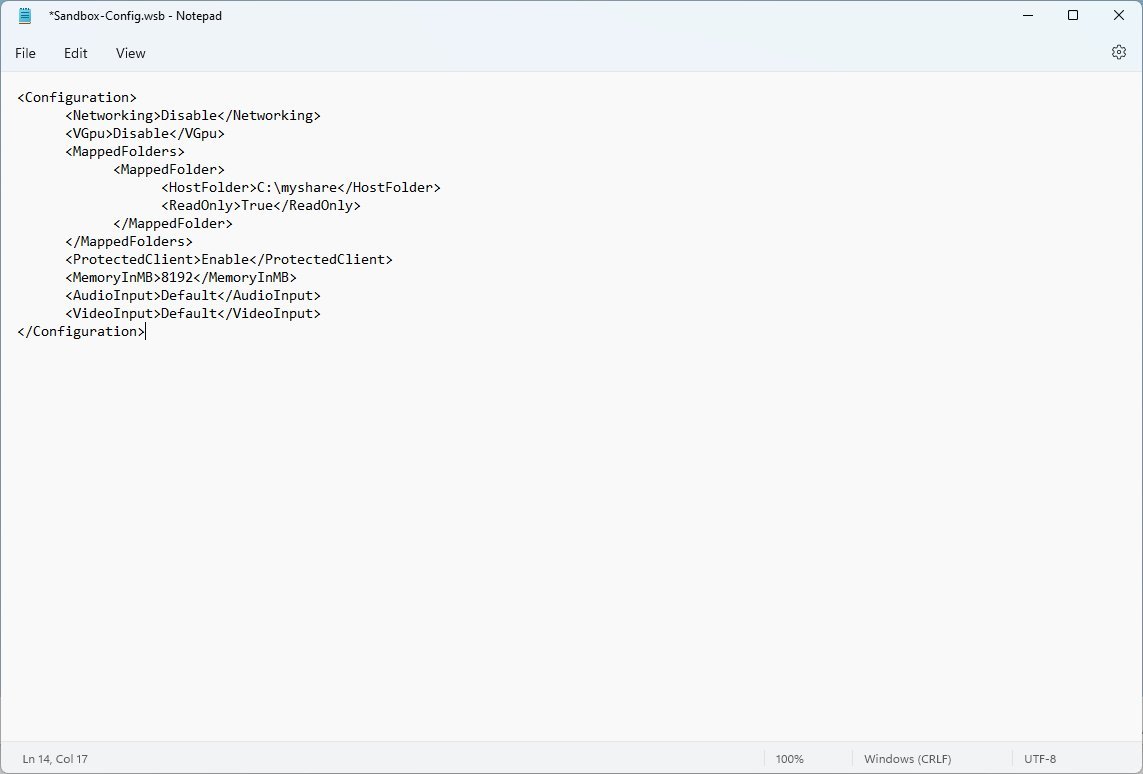
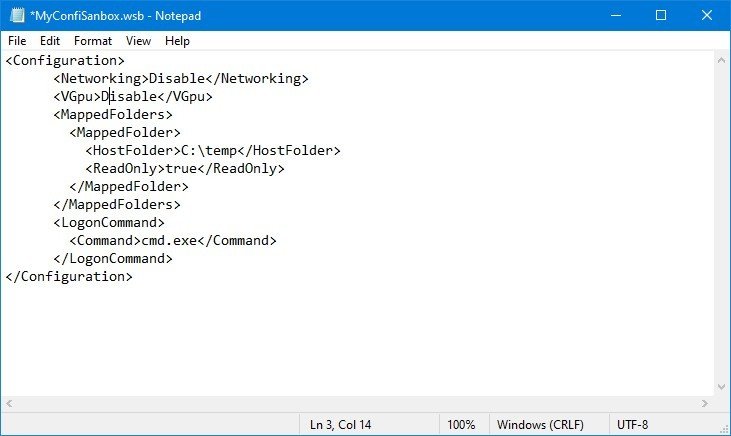
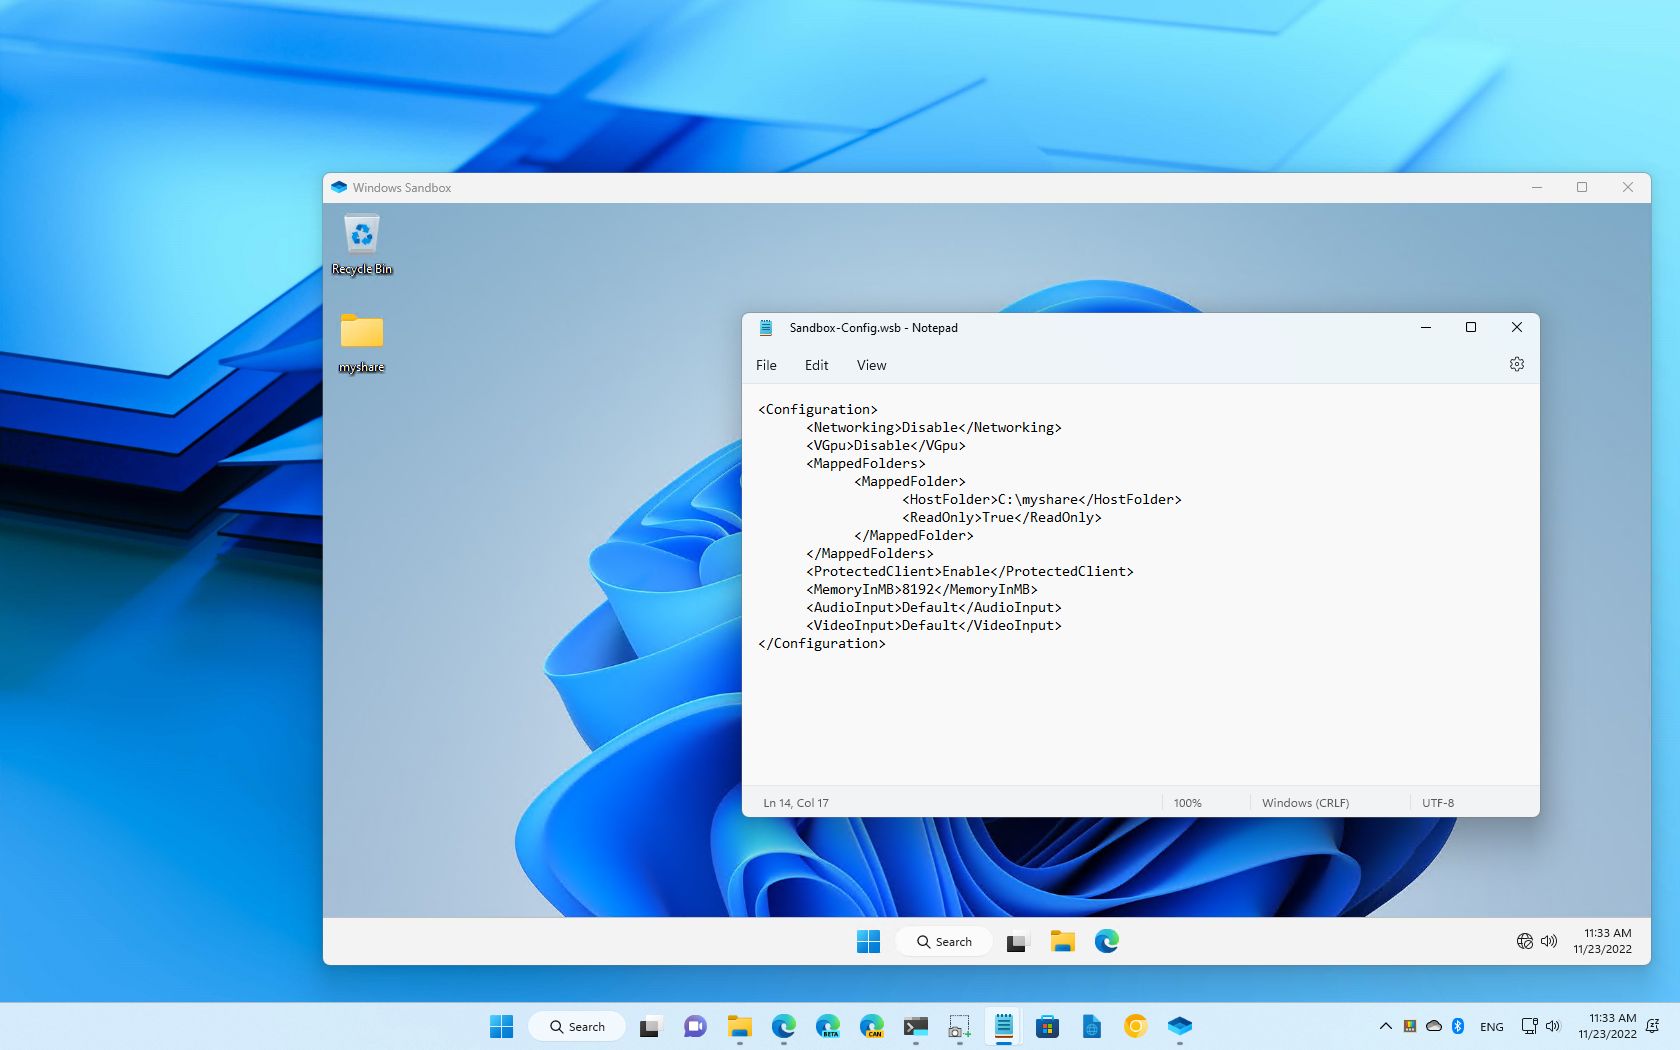
- Type the following to customize Windows Sandbox with all the available options:
Disable Disable C:\myshare True Enable 8192 Default Default
- Click the File menu.
- Click the Save option.
Once you complete the steps using these specific settings, the virtual machine will run without a connection to the internet, and the virtual graphics will be disabled in favor of the software rendering engine. In addition, the feature will run a script to map a folder to the desktop, redirect audio and video devices to the virtual machine, and apply additional mitigations to increase security.
If you stumble upon issues, double-check the syntaxes in the configuration file to ensure that you use the proper casing. For instance, instead of "Disable," try to use "disable" to see if that fixes the problem.
In addition to the settings outlined in this guide, Windows Sandbox supports other features, including printer redirection with the "PrinterRedirection" option and clipboard redirection with the "ClipboardRedirection" option.
More resources
For more helpful articles, coverage, and answers to common questions about Windows 10 and Windows 11, visit the following resources:
- Windows 11 on Windows Central — All you need to know
- Windows 10 on Windows Central — All you need to know
How to configure Windows Sandbox on Windows 10
On Windows 10, starting with the May 2019 Update, you can use Windows Sandbox, a feature that offers a lightweight environment isolated from your main installation, to run untrusted applications.
It works similarly to a traditional virtual machine, but this is a virtual environment optimized for security, efficiency, and speed, and you don't need to perform any extra steps. Also, once you're done using a Windows Sandbox session, everything gets deleted from your machine. Every time you start the feature, an entirely new desktop will be created on demand.
Although it's a great feature for system administrators and developers, Windows Sandbox doesn't include an interface to customize the experience. However, you can create a simple configuration file to control various aspects of the feature. For instance, using a configuration file, you can map folders from the host machine to Windows Sandbox, run commands and scripts at startup, and you can even disable the vGPU or the network adapter to increase the security of the environment.
In this Windows 10 guide, we walk you through the steps to create a configuration file to control the functionalities of Windows Sandbox on the May 2019 Update.
- How to create a configuration file for Windows Sandbox
- How to manage virtual network adapter on Windows Sandbox
- How to manage virtual graphics on Windows Sandbox
- How to map a host folder on Windows Sandbox
- How to run startup commands on Windows Sandbox
- How to control multiple options on Windows Sandbox
How to create a configuration file for Windows Sandbox
To create a Windows Sandbox configuration file, use these steps:
- Open Notepad.
- Click the File menu.
- Select the Save as option.
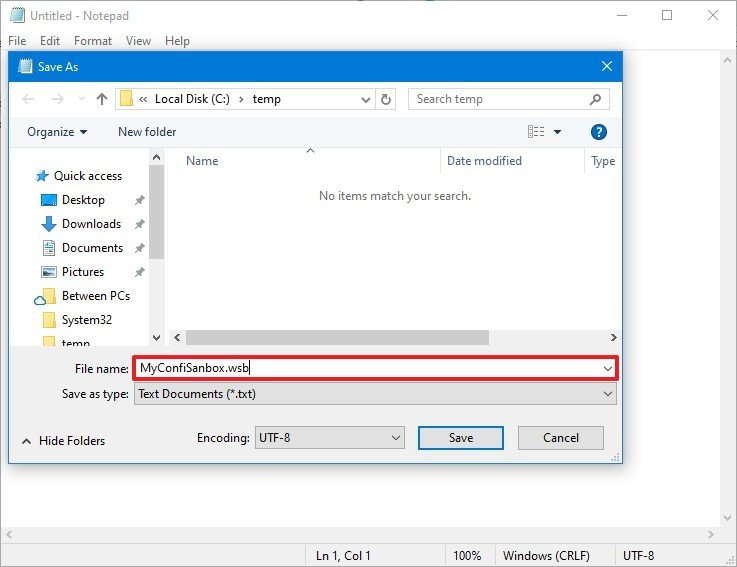
- Type a descriptive name and use the .wsb extension.
- Use the Save as type drop-down menu and select the All Files option.
- Click the Save button.
Once you complete these steps, you can edit the file using an XML format to control features, such as graphics, networking, folder sharing, and startup scripting.
How to manage virtual network adapter on Windows Sandbox
To disable or enable the virtual network adapter on Windows Sandbox, use these steps:
- Open File Explorer.
- Navigate to the configuration file.
- Right-click the .wsb configuration file that you created earlier, select the Open with option, and click the Choose another app option.
- Select the Notepad option.
- Click the OK button.
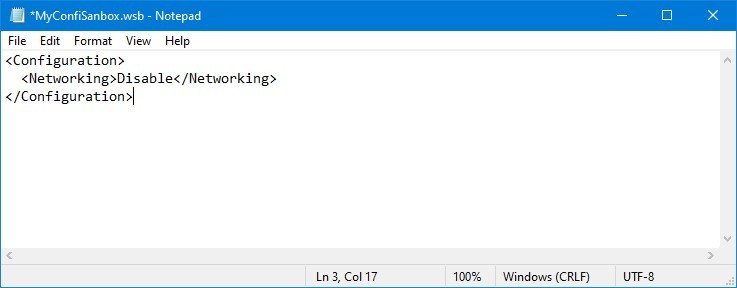
- Type the following to disable the virtual network adapter on Windows Sandbox:
Disable
- Type the following to enable networking on Windows Sandbox:
Default - Click the File menu.
- Click the Save option.
After completing these steps, you can double-click the .wsb file to launch Windows Sandbox with the configuration changes that you specified.
How to manage virtual graphics on Windows Sandbox
To disable or enable graphics virtualization on Windows Sandbox after installing the May 2019 Update, use these steps:
- Open File Explorer.
- Navigate to the configuration file.
- Right-click the .wsb configuration file that you created earlier, select the Open with option, and click the Choose another app option.
- Select the Notepad option.
- Click the OK button.
- Type the following to disable the vGPU adapter on Windows Sandbox:
Disable
- Type the following to enable the vGPU on Windows Sandbox:
Default - Click the File menu.
- Click the Save option.
Once you complete the steps, Windows Sandbox will use software rendering for graphics in the virtual machine, but it'll result in slower performance.
How to map a host folder on Windows Sandbox
To share a folder from the host (physical) device to the Windows Sandbox desktop, use these steps:
- Open File Explorer.
- Navigate to the configuration file.
- Right-click the .wsb configuration file that you created earlier, select the Open with option, and click the Choose another app option.
- Select the Notepad option.
- Click the OK button.
- Type the following to map a folder on Windows Sandbox:
C:\temp true
- Click the File menu.
- Click the Save option.
After you complete the steps, when you run the .wsd file, Windows Sandbox will map the folder, which you can then easily access from the Desktop. Every command you run with Windows Sandbox will be executed under the "WDAGUtilityAccount" account, which means that shared folders will always appear in the Desktop.
While the above instructions outline the steps to map a single folder, you can create multiple MappedFolder blocks inside the MappedFolders block to mount as many folders from the host device as you need.
How to run startup commands on Windows Sandbox
To run a command or script during login on Windows Sandbox, use these steps:
- Open File Explorer.
- Navigate to the configuration file.
- Right-click the .wsb configuration file that you created earlier, select the Open with option, and click the Choose another app option.
- Select the Notepad option.
- Click the OK button.
- Type the following to run a command during startup on Windows Sandbox:
cmd.exe
Once you complete these steps, Windows Sandbox will run the command that you specified after the session has been created.
How to control multiple options on Windows Sandbox
To run Windows Sandbox with multiple custom options, use these steps:
- Open File Explorer.
- Navigate to the configuration file.
- Right-click the .wsb configuration file that you created earlier, select the Open with option, and click the Choose another app option.
- Select the Notepad option.
- Click the OK button.
- Type the following to customize Windows Sandbox with all the available options:
Disable Disable C:\Temp True cmd.exe
After you complete the steps, using the above example, Windows Sandbox will start without a connection to the network, and it'll use software rendering, instead of a virtual GPU. Also, the script will map the Temp folder located in the root of the "C:\" from the host machine, and it'll launch a Command Prompt session.
While the purpose of Windows Sandbox is to provide isolation for potentially harmful applications, it's still possible for malicious code to gain access to your device or network if you're running a session with vGPU, virtual networking, and mapped folder enabled.
If the configuration file doesn't work, make sure you're using the same case for the options as shown in this guide. During my time testing these settings, I have found that some of the settings are case sensitive. For instance, the network adapter didn't disable until I changed "disable" for "Disable," and the folder didn't map correctly until I changed "True" to "true."

Mauro Huculak has been a Windows How-To Expert contributor for WindowsCentral.com for nearly a decade and has over 22 years of combined experience in IT and technical writing. He holds various professional certifications from Microsoft, Cisco, VMware, and CompTIA and has been recognized as a Microsoft MVP for many years.
You must confirm your public display name before commenting
Please logout and then login again, you will then be prompted to enter your display name.
