How to use Windows 10 disk Quota to limit user storage
You can limit the space people can use on a shared PC, to prevent a single person from filling up the drive. In this guide, we show you how.
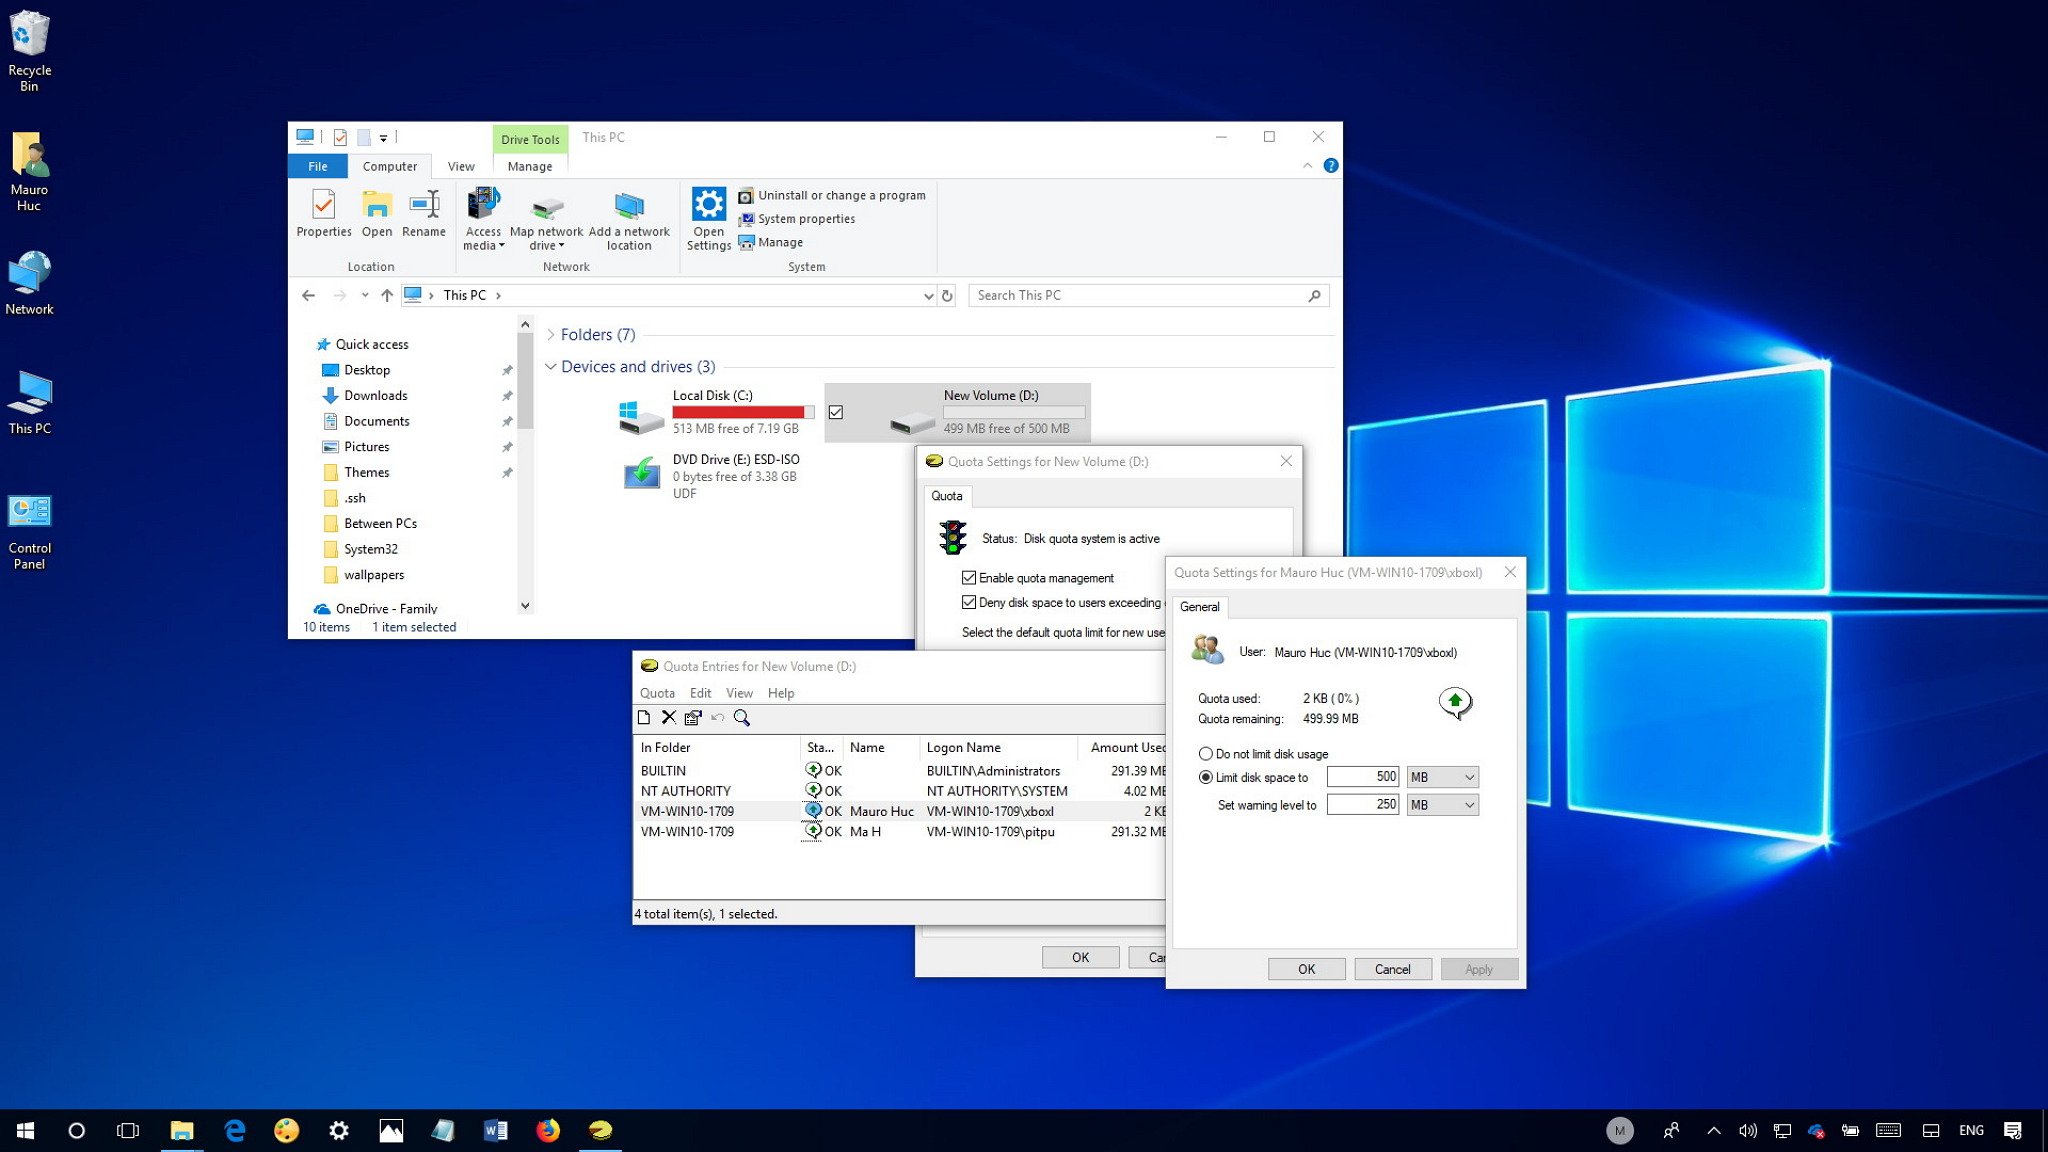
One of the many great features of Windows 10 is the ability to create multiple accounts to share a computer with other people. Thanks to this feature, everyone can have a space they can call their own with custom settings and separate files.
The only issue is that users have unlimited access to the available space on the hard drive to store as many files as they want, and they don't have storage limitations to install apps and games, which can cause your device to run out of space quickly.
In order to overcome this problem, Windows 10 includes a handy feature known as "Quota," which allows you to control and manage the space users can use to prevent a single person from filling up the hard drive and leaving no space for anyone else.
In this Windows 10 guide, we walk you through the steps to set storage limits using disk Quota per account or volume.
Important details
While Quota is a useful feature on Windows 10, there some details you need to know before limiting storage to users:
- Quota is only available on volumes formatted using NTFS.
- Quota is commonly used in corporate networks, but anyone can use it on any device, including on Windows 10 Home.
- Quota needs to be configured per volume, not per computer.
- Quota can be set per individual user or everyone, but you can't set limits on groups of users.
- Quota scans the particular volume every hour to update the storage usage for each user.
- Users with files already on the drive will have their quota initially disabled.
- Newly-added users will start with their quotas as expected.
Although you can configure disk quota on any supported volume, it can become a little messy implementing limits using the Windows installation drive (C:). Whenever possible, you should consider enabling Quota on secondary partitions or external drives. Also, using the C: drive, the system and other files owned by the account count towards the quota limit, so plan accordingly.
How to set up Quota per volume on Windows 10
If you want to limit the available storage for all users, use the following steps:
All the latest news, reviews, and guides for Windows and Xbox diehards.
- Open File Explorer (Windows key + E).
- Click on This PC.
- Under "Devices and drives," right-click the drive you want to limit and select Properties.
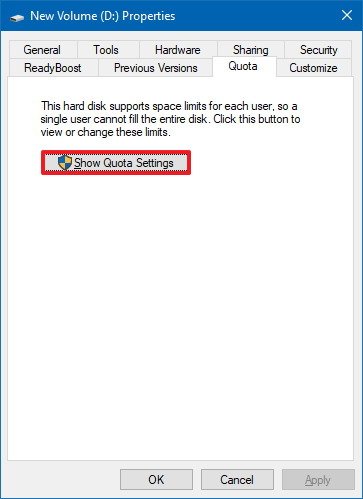
- Click on the Quota tab.
- Click the Show Quota Settings button.
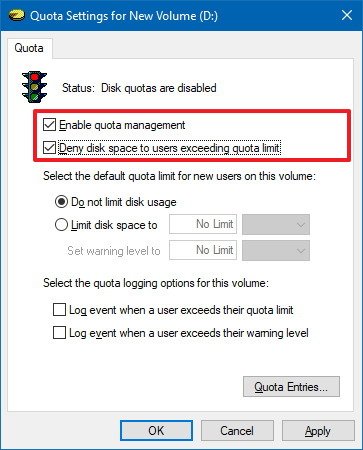
- Check the Enable quota management option.
- Check the Deny disk space to users exceeding quota limit option.
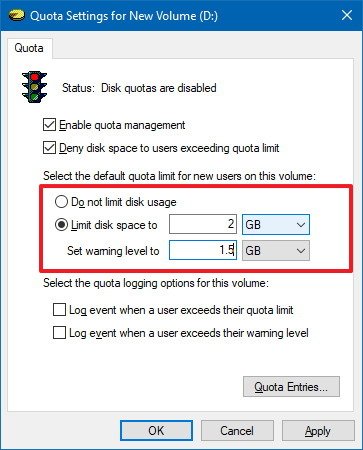
- Select the Limit disk space to option.
- Set the amount of space you want and specify the size unit (e.g., megabyte, gigabyte).
- Set the amount of space before a warning is triggered to the user and specify the size unit (for example, megabyte or gigabyte).
- Click Apply.
- Click OK.
- Restart your computer.
Once you completed these steps, every account on your device will only be able to use part of the total available storage on the hard drive. A warning will alert users that they're reaching their storage quota, and when the threshold is reached, users will no longer be allowed to store additional files.
You can always increase or decrease the storage allowance by modifying the Limit disk space to and Set warning level to options on step No. 6.
If you no longer want to limit the storage users can use on a drive, you can use the same instructions. However, on step No. 6, select the Do not limit disk usage option, and clear the Deny disk space to users exceeding quota limit and Enable quota management options.
How to set up Quota per account on Windows 10
In the case that you want to set storage limit on individual users, while keeping your account unlimited, use the following steps:
- Open File Explorer (Windows key + E).
- Click on This PC.
- Under "Devices and drives," right-click the drive you want to manage and select Properties.
- Click on the Quota tab.
- Click the Show Quota settings button.
- Check the Enable quota management option.
- Check the Deny disk space to users exceeding quota limit option.

- Click the Quote Entries button.
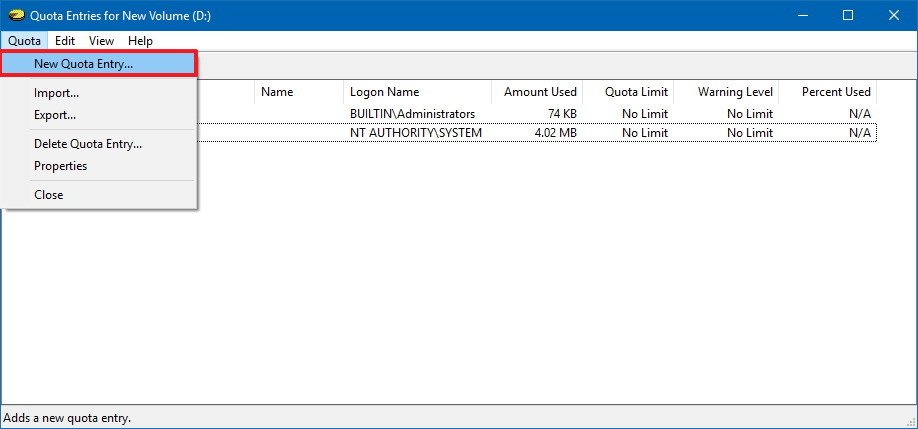
- If the account you want to restrict isn't listed, click Quota, and select New Quota Entry.
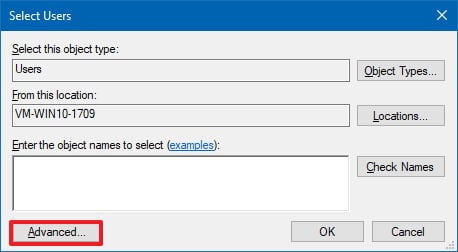
- In the "Select Users" tab, click the Advanced button.
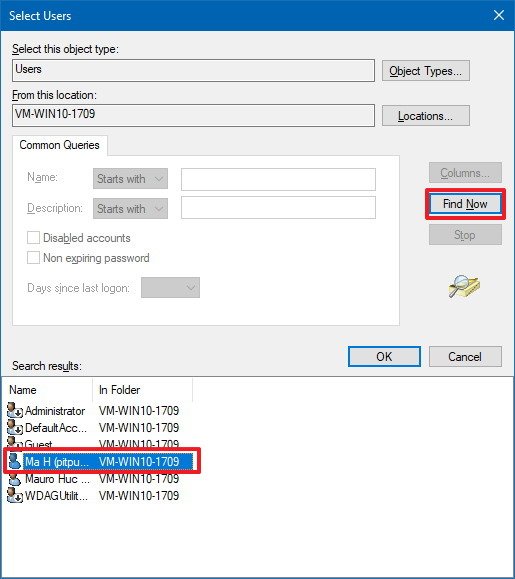
- Click the Find Now button.
- Select the account you want.
- Click OK.
- Click OK again.
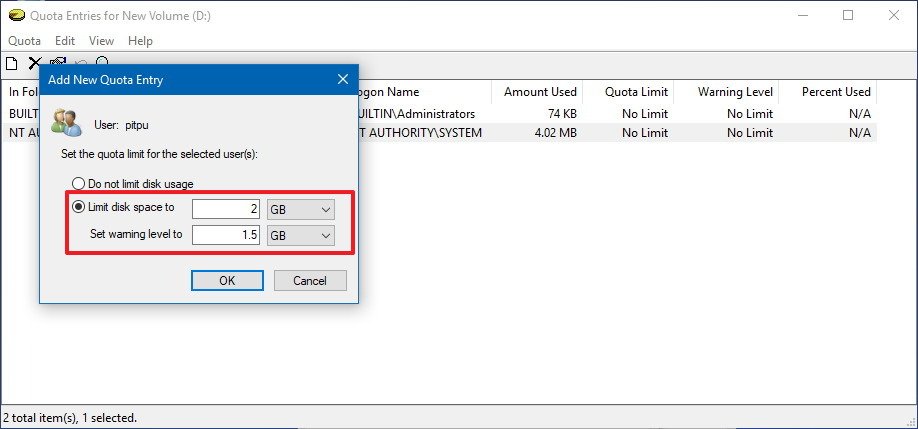
- Select the Limit disk space to option.
- Set the amount of space you want and specify the size unit (for example, megabyte or gigabyte).
- Set the amount of space before a warning is triggered to the user and specify the size unit (for example, megabyte or gigabyte).
- Click Apply.
- Click OK.
After completing the steps, the users you configured storage limits for won't be able to fill up the entire drive.
If you want to disable or change the disk quota settings, you can use the same instructions, but on step No. 15, select the Do not limit disk usage option to disable or change the settings using the Limit disk space to option.
Deleting a disk quota entry
In the case you no longer need to limit the space a user can use, you can simply change the settings in the user entry. However, if you want to remove a Quota entry, this can be a challenge as the account must not be consuming any space before you can delete it.
To remove a Quota entry, do the following:
Note: It's a good idea to relocate the user files to another location temporarily, remove the entry using the steps below, and then move the files back to the original location.
- Open File Explorer (Windows key + E).
- Click on This PC.
- Under "Devices and drives," right-click the Local Disk (C:) drive and select Properties.
- Click on the Quota tab.
- Click the Show Quota Settings button.
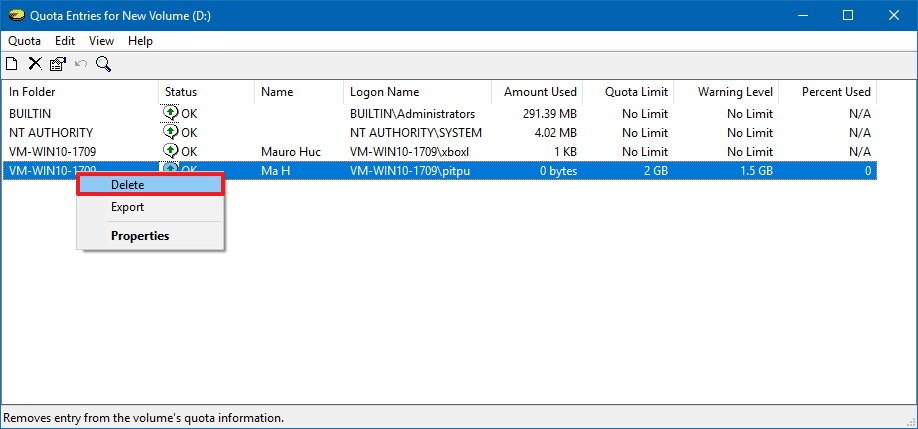
- Check that the Enable quota management option is selected and disk quota is enabled. Otherwise, you won't be able to delete any of the entries, and you'll get a "users charged with disk space cannot be deleted" message.

- Click the Quota Entries button.
- Right-click the user and select Delete.
- Click Yes.
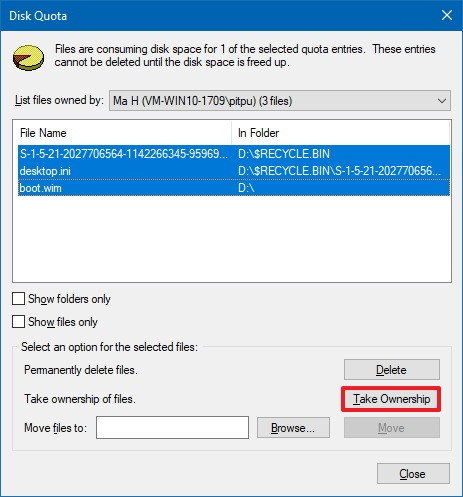
- Select the files owned by the account you're trying to remove.
- Click the Take Ownership button if you want to keep the files, or click the Delete button if taking ownership doesn't work.
- Click Close to delete the entry.
Once you complete these steps, you can properly disable disk quota on the drive, or you can reconfigure the same account again.
Although we're focusing this guide on Windows 10, the ability to set disk quotas has been around for years, and you can also refer to these instructions to limit the space people can use on Windows 8.1 and Windows 7.
More Windows 10 resources
For more helpful articles, coverage, and answers to common questions about Windows 10, visit the following resources:
- Windows 10 on Windows Central – All you need to know
- Windows 10 help, tips, and tricks
- Windows 10 forums on Windows Central

Mauro Huculak has been a Windows How-To Expert contributor for WindowsCentral.com for nearly a decade and has over 22 years of combined experience in IT and technical writing. He holds various professional certifications from Microsoft, Cisco, VMware, and CompTIA and has been recognized as a Microsoft MVP for many years.
