How to change keyboard layout on Windows 11 or Windows 10
Do you need more than one keyboard layout on Windows 11 or 10? In this guide, I'll show you how.
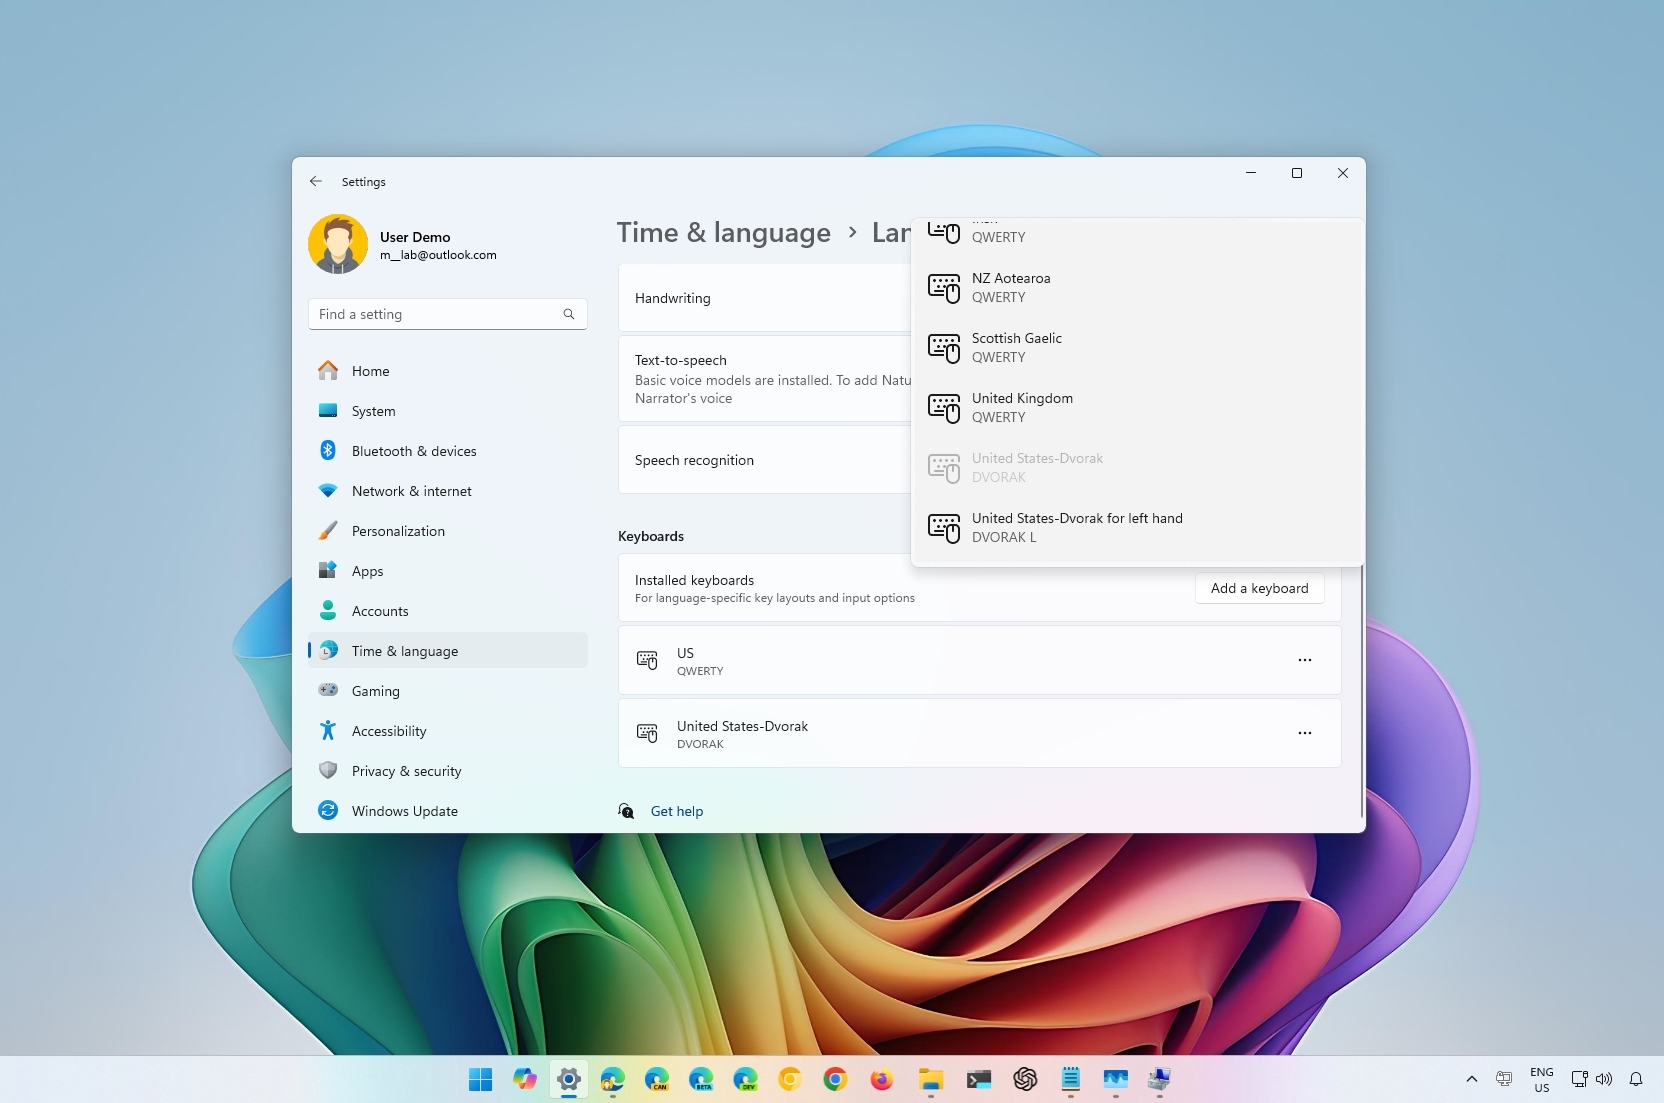
Although Windows 11 allows you to add keyboard layouts during the out-of-the-box experience (OOBE), you can add or remove them at any time.
Technically, you can continue with the default layout if you know how to insert special characters (such as the "Ñ" character in Spanish). However, changing the keyboard layout on Windows 11 makes it much easier to type in a different language. Also, this feature comes in handy if you simply prefer a different layout, such as the United States-Dvorak.
In this how-to guide, I'll explain how to add or remove keyboard layouts on your device.
These instructions have been revised to reflect changes with the most up to date version of the operating system. We've also added details for Windows 10 users.
How to add keyboard layout on Windows 11
To add a keyboard layout on Windows 11, use these steps:
- Open Settings.
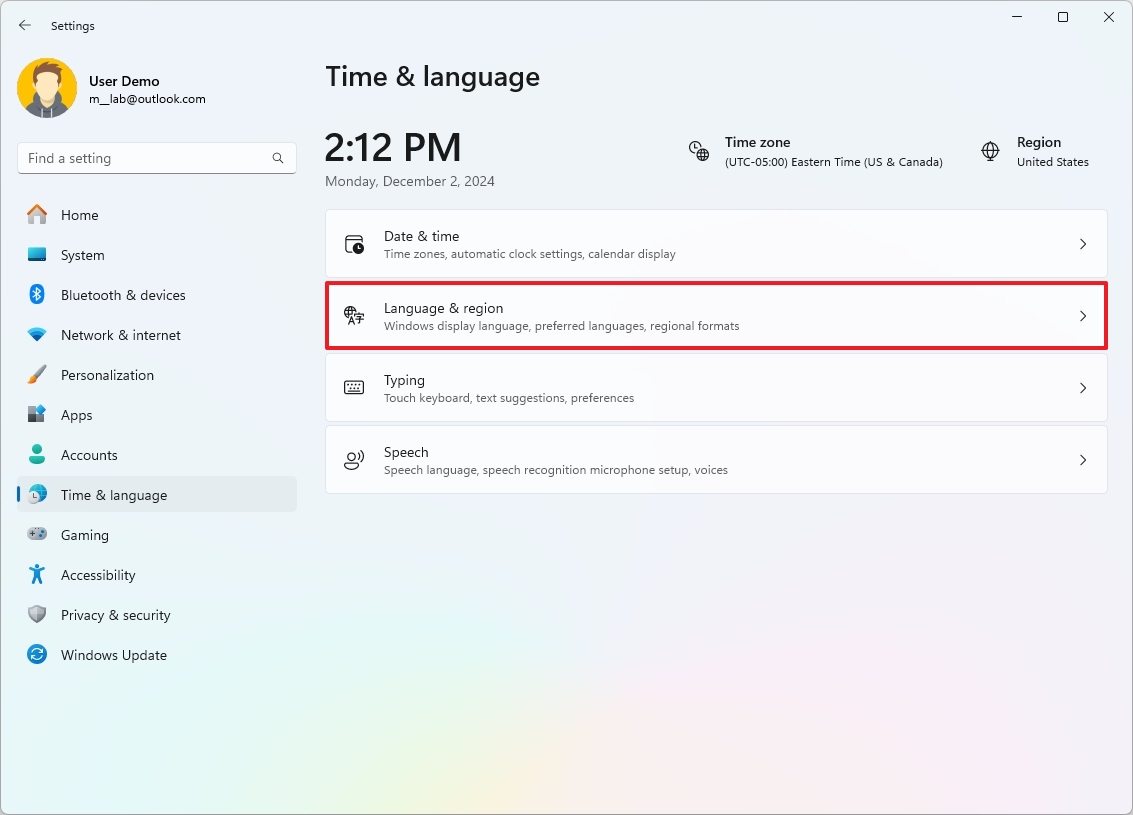
- Click on Time & language.
- Click the Language & region page on the right side.
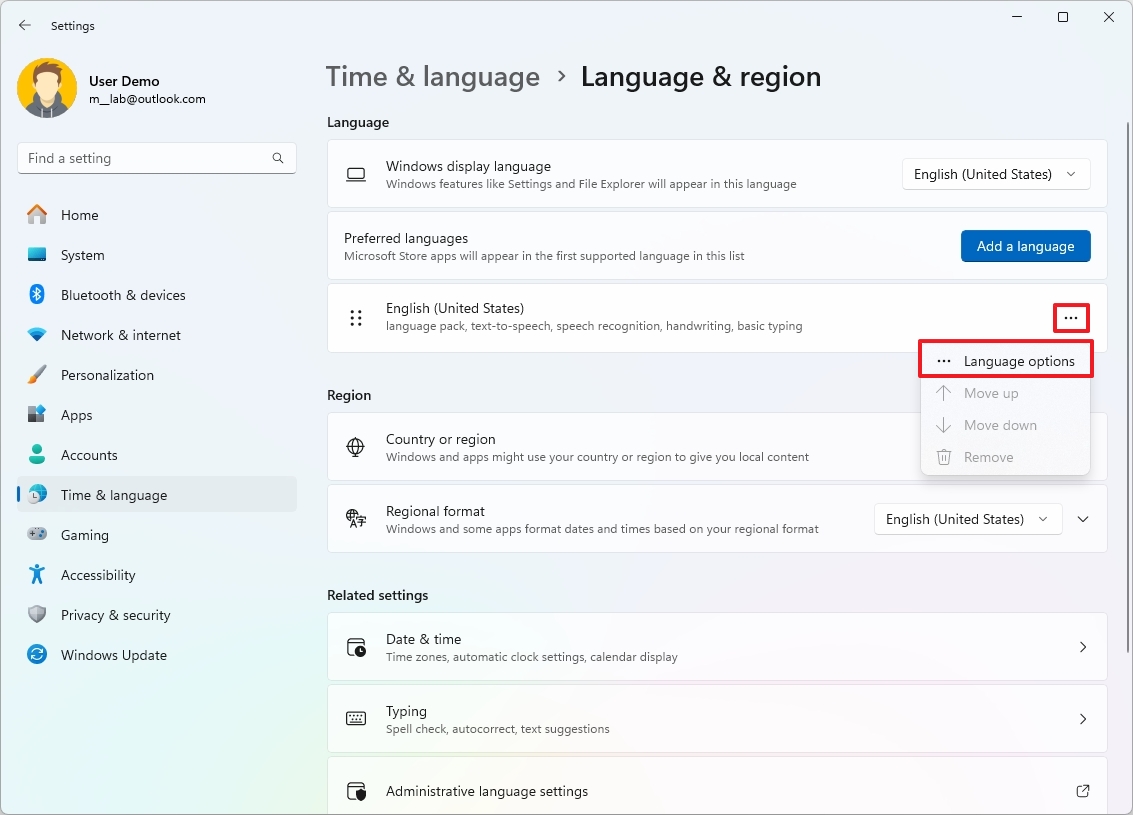
- Click the menu (three-dotted) button next to the language and click on Language options.
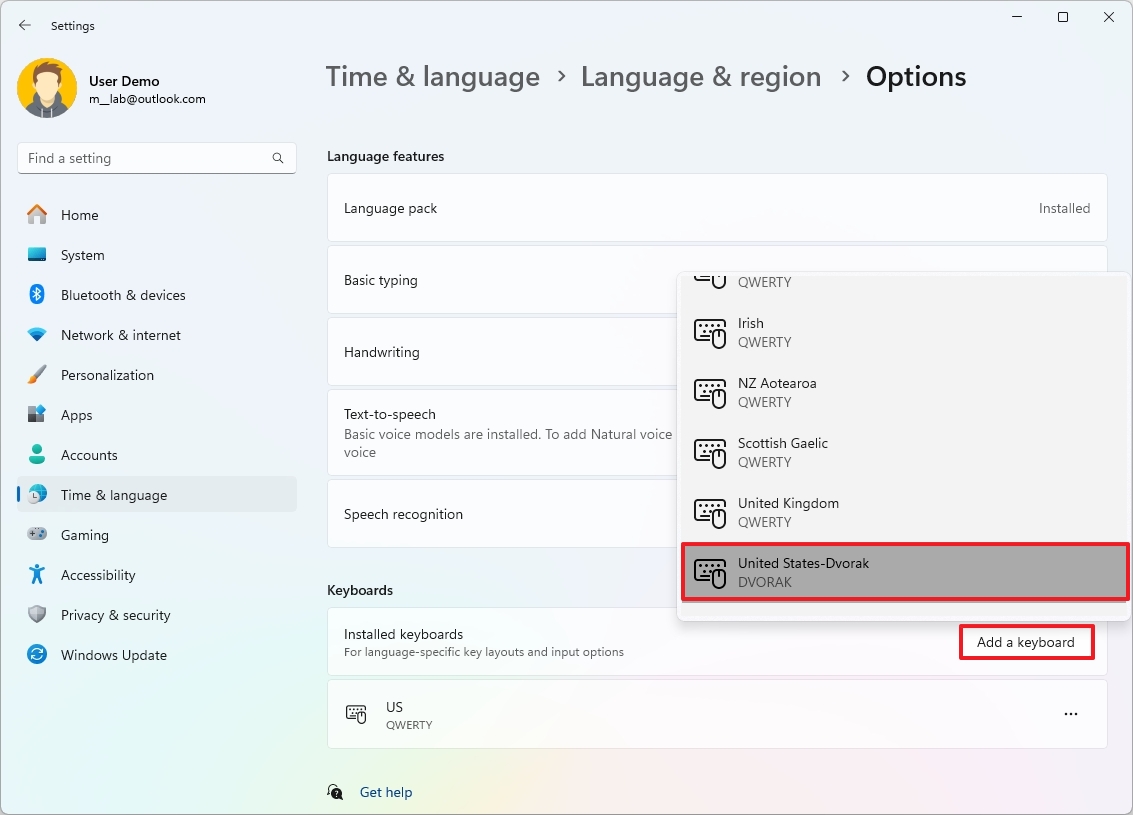
- Click the "Add a keyboard" button for the "Installed keyboards" setting under the "Keyboards" section.
- Select the keyboard layout to add to Windows 11.
Once you complete the steps, the new layout will configure on your account. You may need to repeat the steps to add more layouts as required.
How to change keyboard layout on Windows 11
To change to another keyboard layout, use these steps:
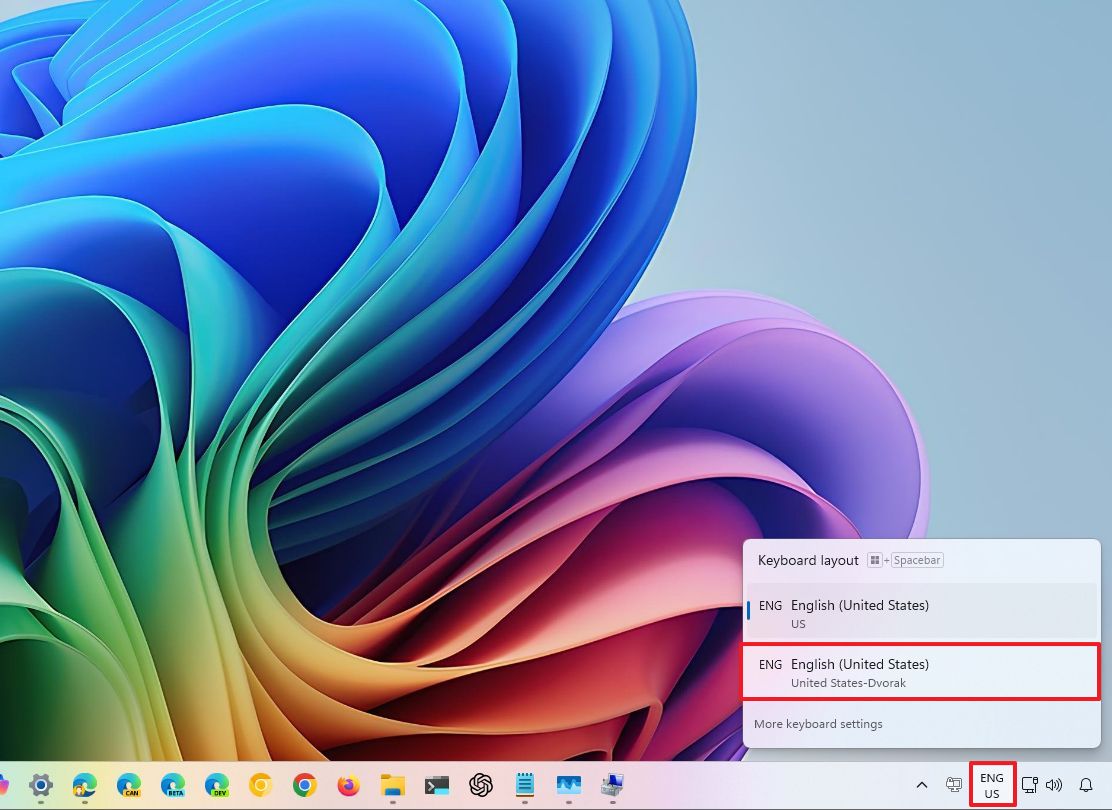
- Click the Keyboard layout icon in Taskbar (bottom right).
- Select the new keyboard layout.
- Repeat steps 1 and 2 to switch back to the default layout.
Alternatively, you can also use the "Windows key + spacebar" keyboard shortcut to cycle between the layouts.
All the latest news, reviews, and guides for Windows and Xbox diehards.
How to remove keyboard layout on Windows 11
To delete a keyboard layout on Windows 11, use these steps:
- Open Settings.
- Click on Time & language.
- Click the Language & region page on the right side.
- Click the menu (three-dotted) button next to the language and click on Language options.
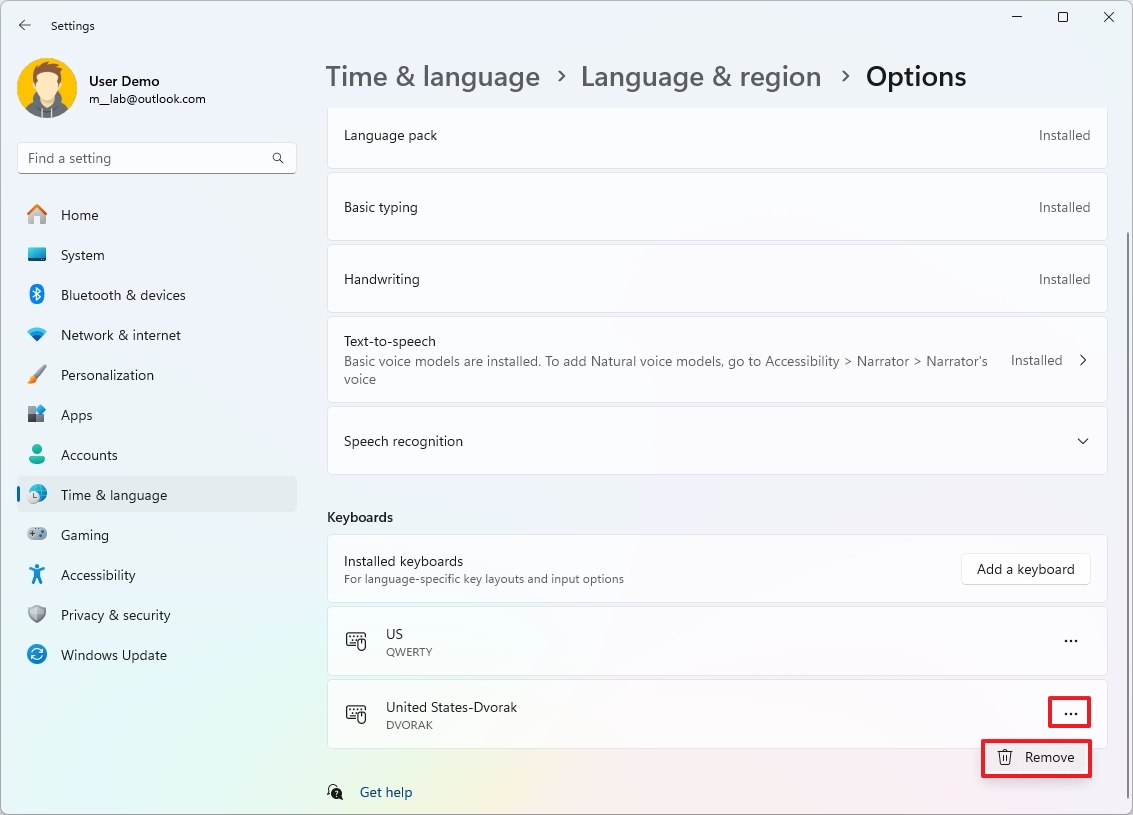
- Click the menu (three-dotted) button next to the keyboard layout and click the Remove option under the "Keyboards" section.
After you complete the steps, the keyboard layout will no longer be available on Windows 11. If you have multiple layouts, you may need to repeat the steps to remove those you don't need.
More resources
For more helpful articles, coverage, and answers to common questions about Windows 10 and Windows 11, visit the following resources:
- Windows 11 on Windows Central — All you need to know
- Windows 10 on Windows Central — All you need to know
How to add keyboard layout on Windows 10
On Windows 10, in the initial setup, you usually get prompted to configure additional keyboard layouts. However, you can always add or remove layouts if you don't choose the correct setting or must type in another language.
Typically, changing the input settings is uncommon, but there are many situations when you might need to. For instance, sometimes you may need to switch to the Spanish layout to write words that include special characters like "Ñ," or prefer a different layout, such as the United States-Dvorak.
Whatever the reason it might be, Windows 10 ships with easy settings to add, remove, and change layouts for hardware and touch keyboards.
In this how-to guide, I will walk you through the steps to manage keyboard layouts on Windows 10.
To add a new keyboard layout on Windows 10, use these steps:
- Open Settings.
- Click on Time & Language.
- Click on Language.
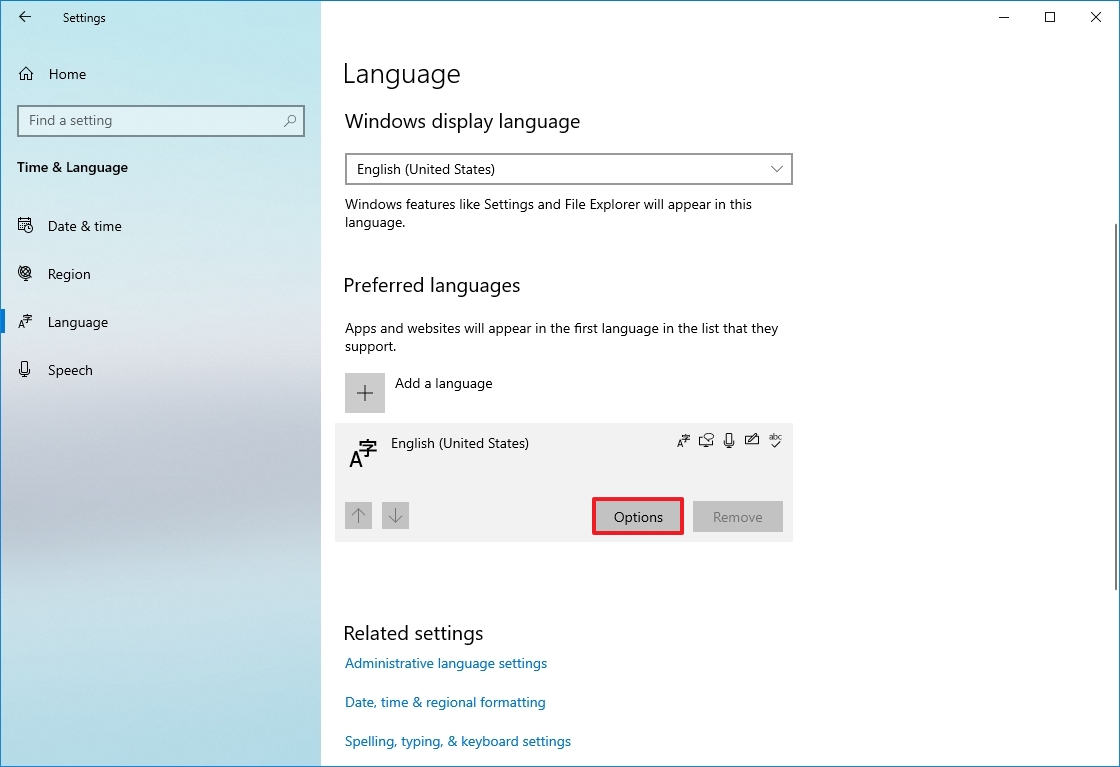
- Under the "Preferred languages" section, select the current default language.
- Click the Options button.
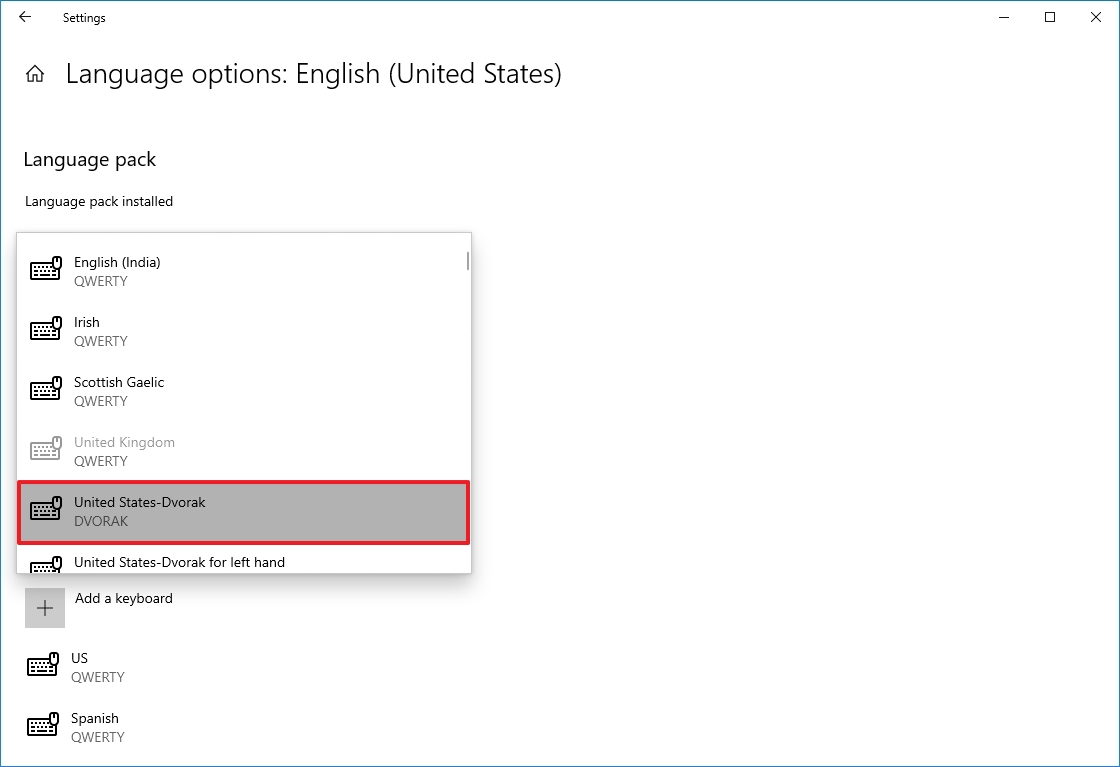
- Under the "Keyboards" section, click the "Add a keyboard" button.
- Select the new keyboard layout to add to Windows 10.
- Repeat steps 6 and 7 to add more layouts.
Once you complete the steps, the new keyboard layout will be added to the device, and you can switch between them using the instructions below.
How to change keyboard layout on Windows 10
While changing layouts is straightforward, it'll reconfigure some of the keyboard keys, which means some of the keys may print a different character depending on the layout.
To switch between keyboard layouts on Windows 10, use these steps:
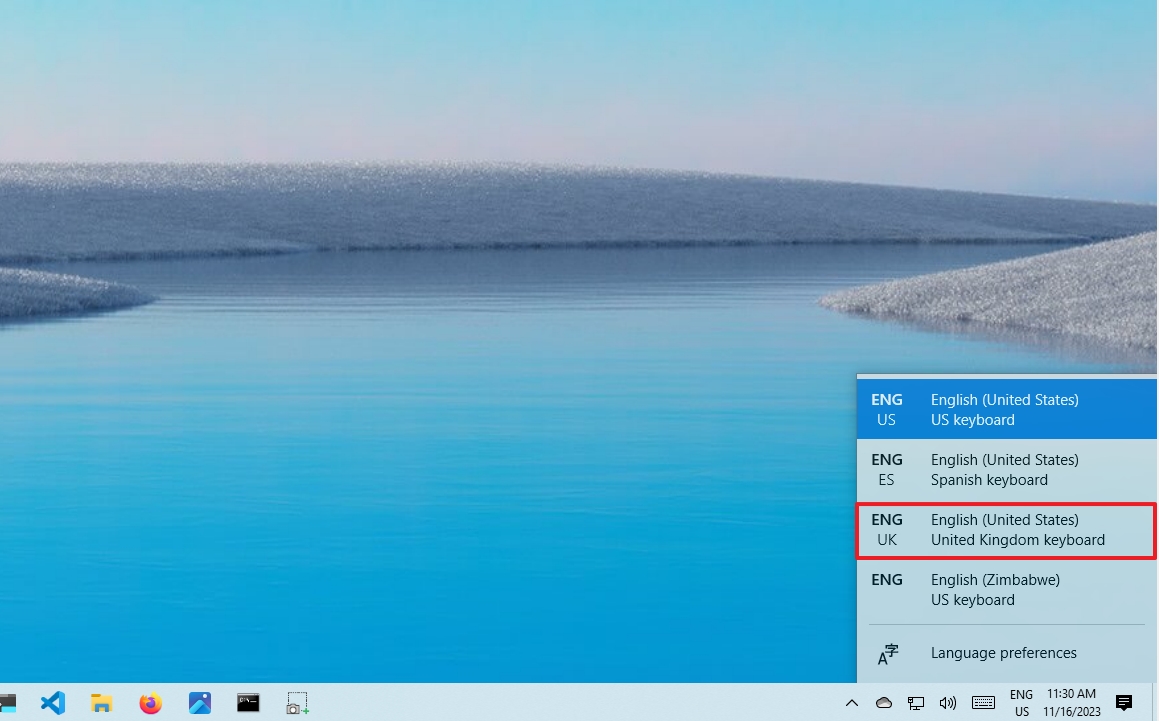
- Click the Input Indicator icon in Taskbar (bottom right).
- Select the new keyboard layout.
- Repeat steps 1 and 2 to switch back to the default layout.
After you complete the steps, you can start typing with the new keyboard layout.
Enable Input Indicator
If the Input Indicator is not present in the Taskbar, you can enable it through the Settings app.
To enable the Input Indicator on Windows 10, use these steps:
- Open Settings.
- Click on Personalization.
- Click on Taskbar.
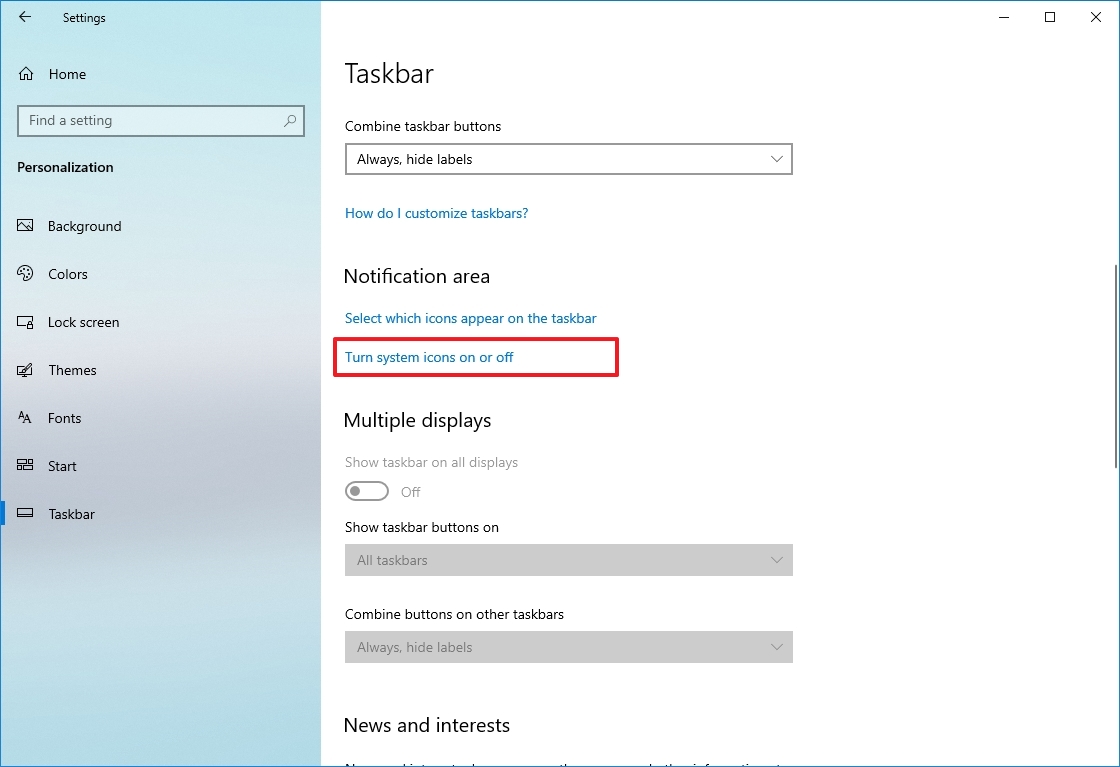
- Under the "Notification area" section, click the "Turn system icons on or off" option.
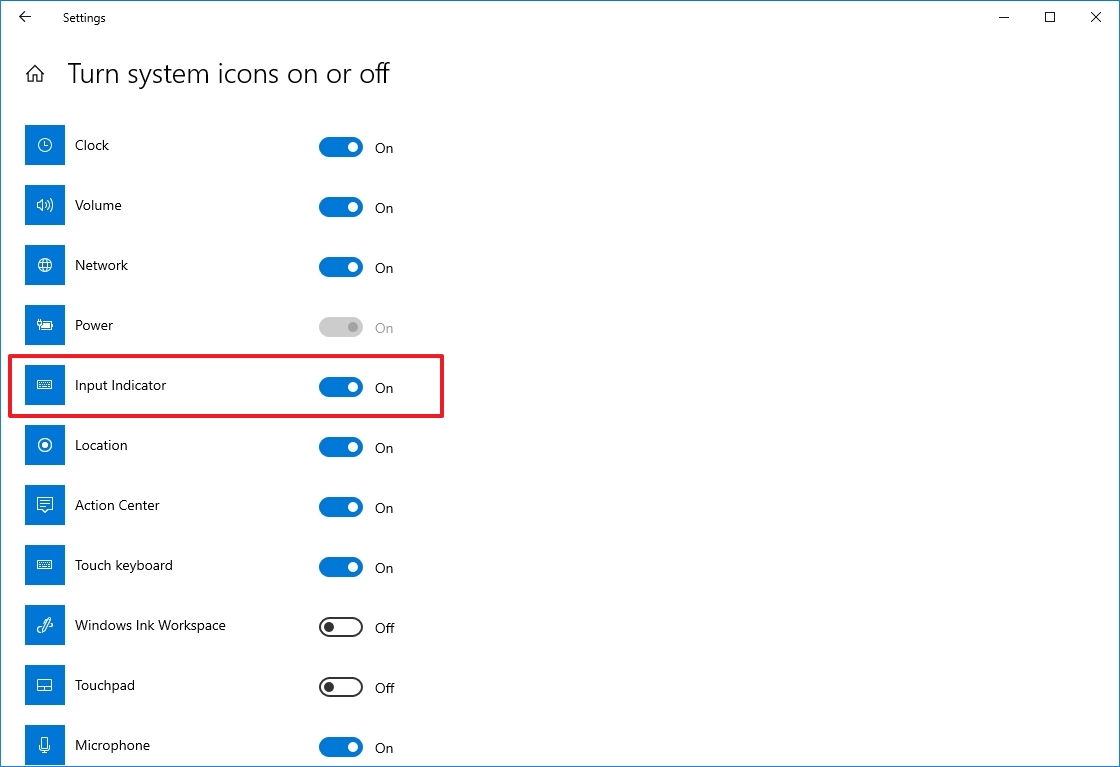
- Turn on the Input Indicator toggle switch.
Once you complete the steps, the icon will appear in the Taskbar's notification area to access the layouts and switch between them. You can also use the "Windows key + Spacebar" keyboard shortcut to cycle between the available keyboard layouts quickly.
How to remove keyboard layout on Windows 10
To remove a keyboard layout on Windows 10, use these steps:
- Open Settings.
- Click on Time & Language.
- Click on Language.
- Under the "Preferred languages" section, select the current default language.
- Click the Options button.
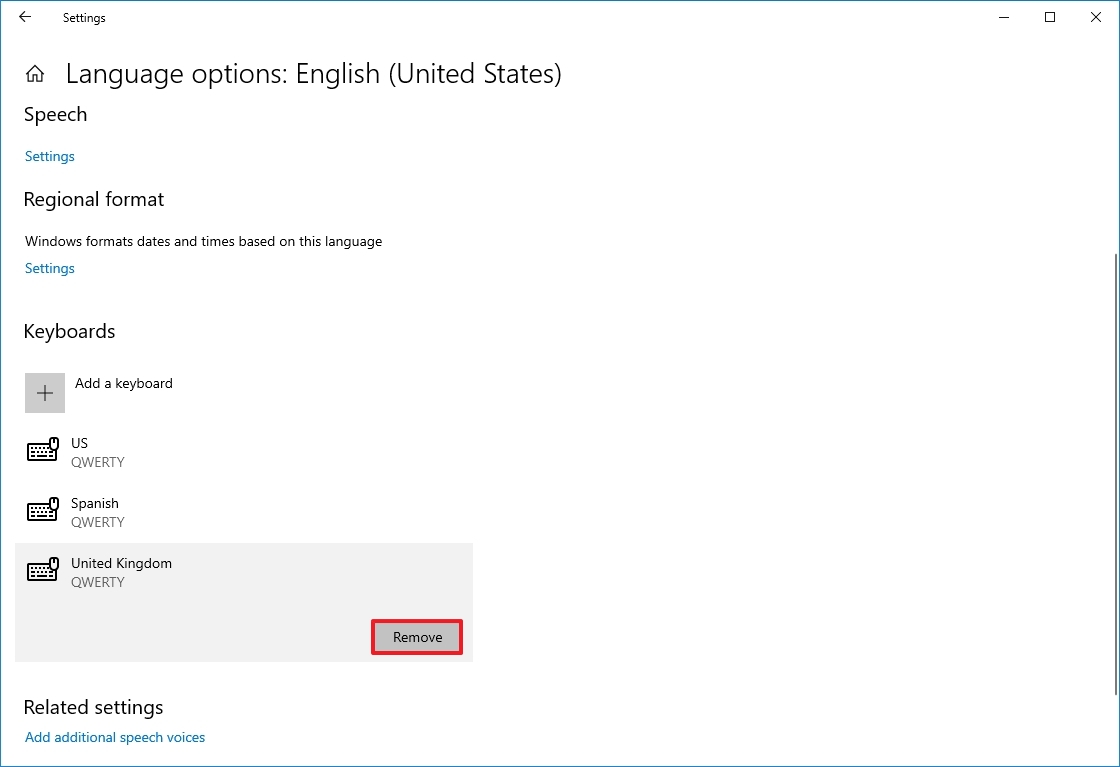
- Under the "Keyboards" section, select the keyboard to remove from the list.
- Click the Remove button.
- Repeat steps 6 and 7 to remove additional layouts.
Once you complete the steps, the keyboard layout will be removed from the device.
More resources
For more helpful articles, coverage, and answers to common questions about Windows 10 and Windows 11, visit the following resources:
- Windows 11 on Windows Central — All you need to know
- Windows 10 on Windows Central — All you need to know

Mauro Huculak has been a Windows How-To Expert contributor for WindowsCentral.com for nearly a decade and has over 22 years of combined experience in IT and technical writing. He holds various professional certifications from Microsoft, Cisco, VMware, and CompTIA and has been recognized as a Microsoft MVP for many years.
You must confirm your public display name before commenting
Please logout and then login again, you will then be prompted to enter your display name.
