How to change the appearance of Command Prompt on Windows 10
You can customize the Command Prompt appearance to make it a little more personal. Here's how you how to do it on Windows 10.
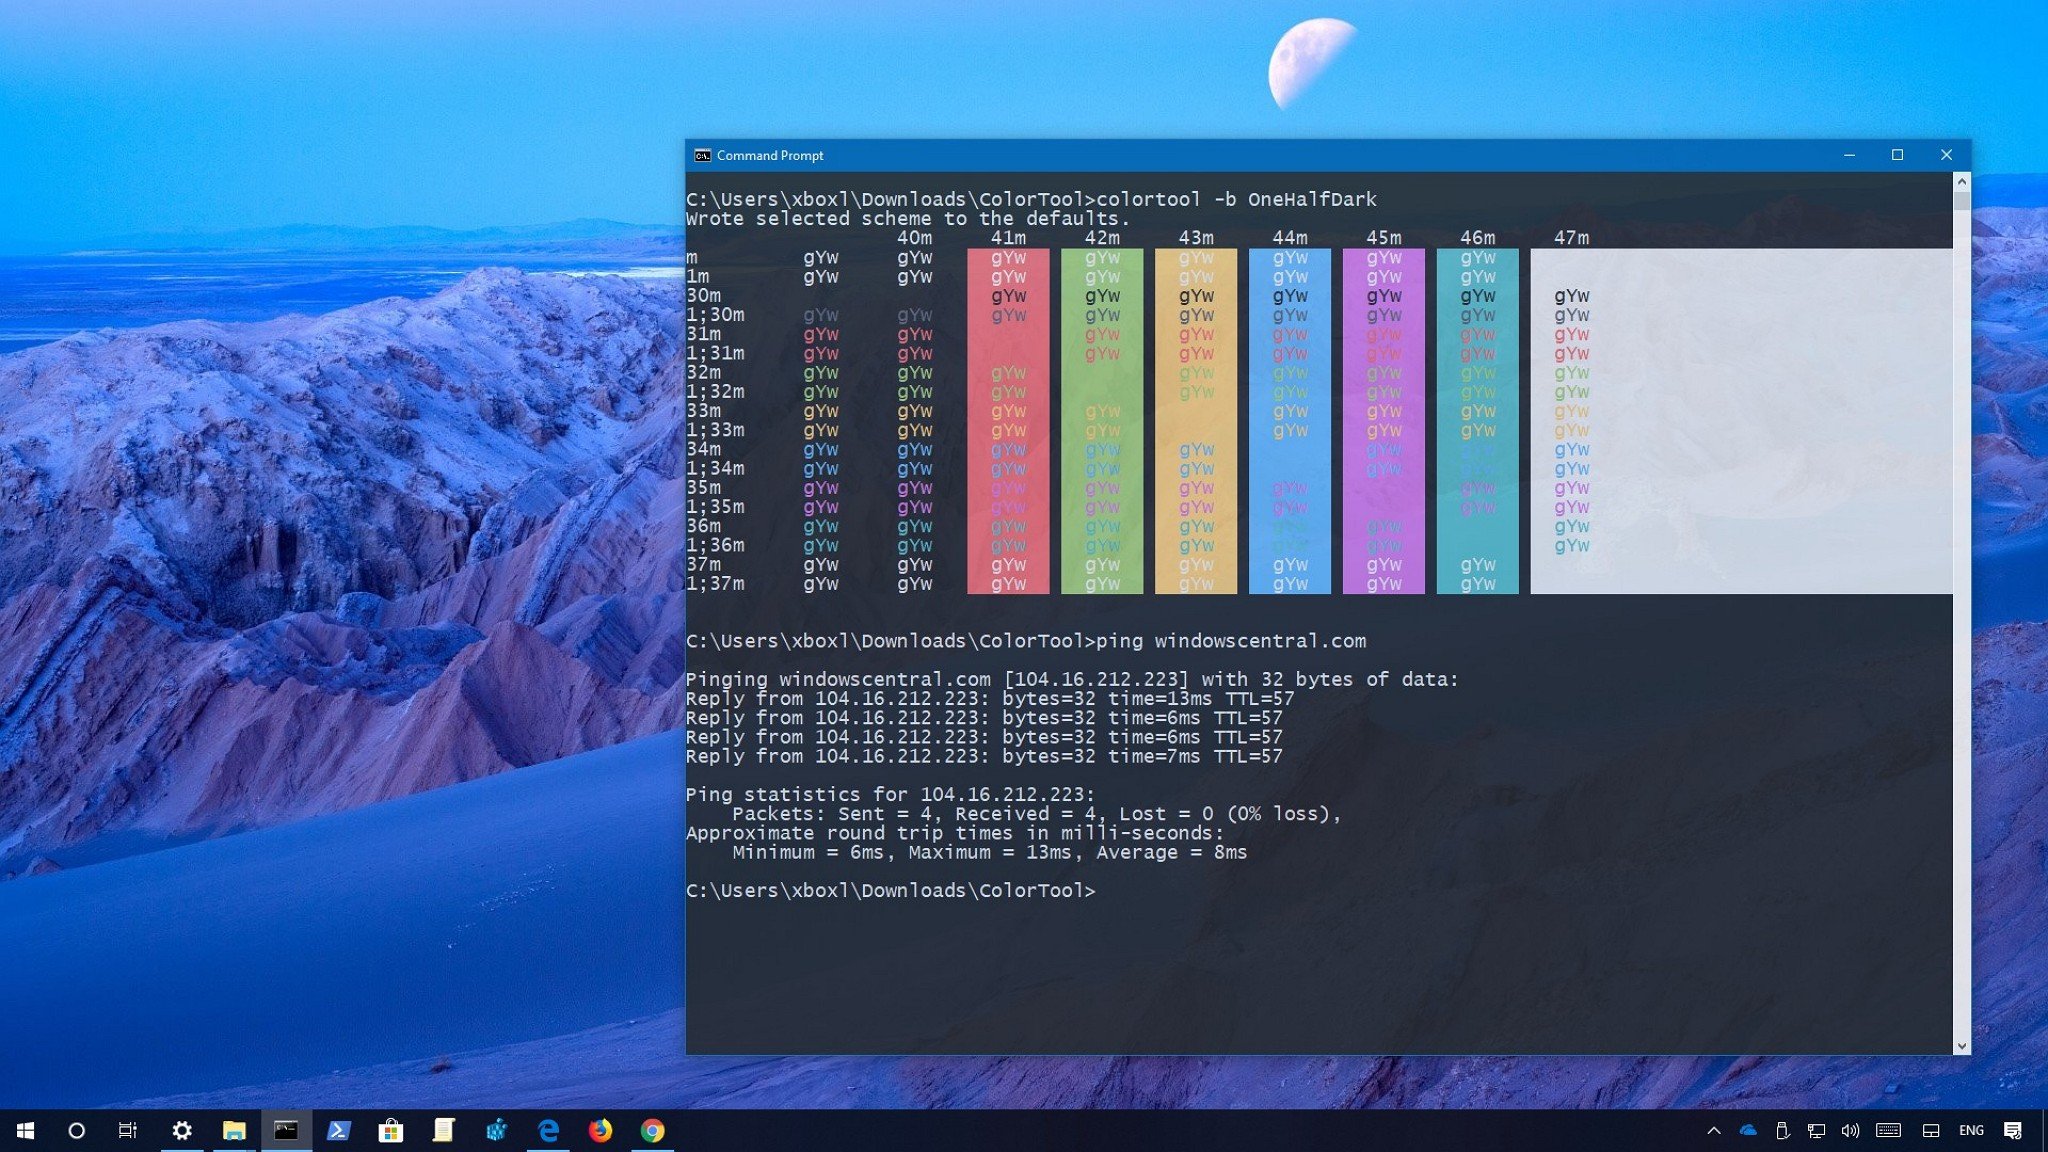
Command Prompt has been around for a long time, and while it's a pretty darn useful tool, it's always been plain and boring with the same black background and white text.
However, this is just the way the program looks by default. You can actually customize many aspects of the experience to make it more personal using different fonts, colors, and window layouts. In addition, if you're using Windows 10, you can even make the console semi-transparent and use custom color schemes to quickly change the appearance. And you can apply the settings globally, or you can apply them independently for each shortcut that starts a new session or to use more suitable settings for different tasks.
In this Windows 10 guide, we walk you through the steps to personalize the Command Prompt experience to make it a little less boring.
- How to customize cursor on Command Prompt
- How to customize font size and family on Command Prompt
- How to customize layout on Command Prompt
- How to customize color and transparency of Command Prompt
- How to change color scheme on Command Prompt
How to customize cursor on Command Prompt
To customize the size of the blinking cursor on Command Prompt, use the following steps:
- Open Start.
- Search for Command Prompt, and click the top result to open the console.
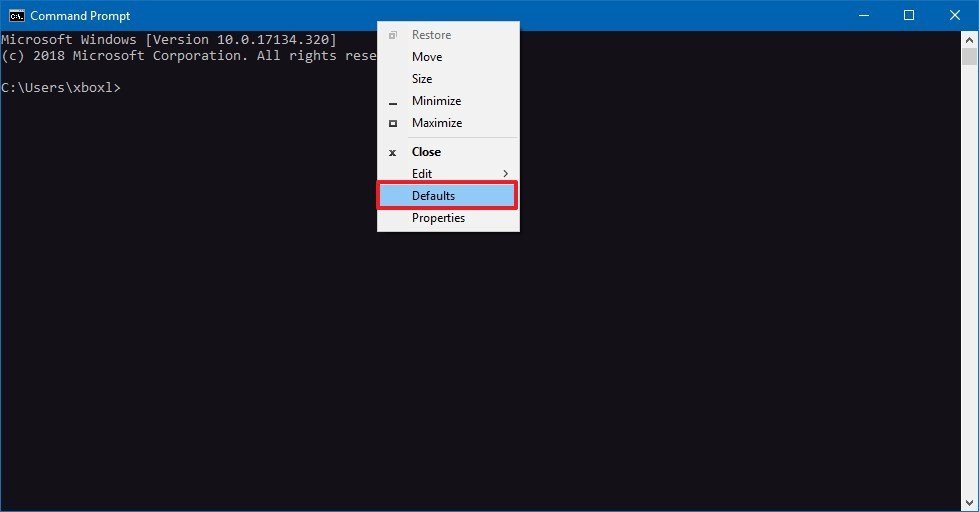
- Right-click the title bar, and select the Defaults option.
- Click on the Options tab.
- Select one of the available options:
- Small (default).
- Medium.
- Large.
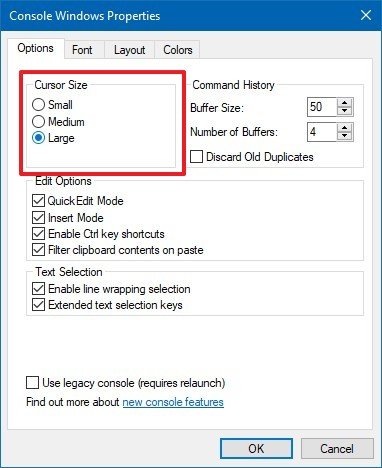
- Click the OK button.
While we recommend using the "Defaults" option from the right-click context menu, you can access the Command Prompt settings in at least two different ways, and each way will affect the console appearance differently.
- Defaults: The changes you customize using this option will not affect the current session, but the new settings will apply when launching Command Prompt using any shortcut.
- Properties: The changes you make using this option will apply to the current session, and future sessions. However, these settings will only apply to the shortcut whose properties have been customized. (This option usually comes in handy when you're trying to customize the appropriate settings for different tasks.)
How to customize font size and family on Command Prompt
Using the Command Prompt settings, you can specify the size of the font and the font family to fit your preferences using these steps:
- Open Start.
- Search for Command Prompt, and click the top result to open the console.
- Right-click the title bar, and select the Defaults option.
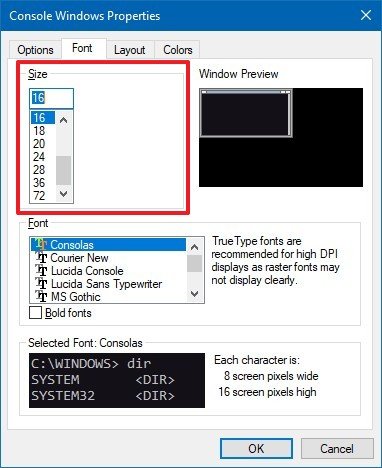
- Click on the Font tab.
- Under "Size," select the size of the font you want to use. (The default option is 14 pixels, but you can go as large as 72 pixels.)
- If you don't like the default "Consolas" font family, you can choose from a number of other families that are suitable to use with Command Prompt under the "Font" section.
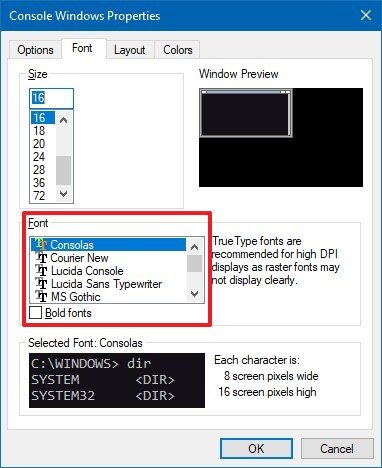
- Click the OK button.
As you make a selection, at the bottom of the page, you'll notice a preview of the new configuration.
All the latest news, reviews, and guides for Windows and Xbox diehards.
How to customize layout on Command Prompt
To use a custom layout on Command Prompt, use these steps:
- Open Start.
- Search for Command Prompt, and click the top result to open the console.
- Right-click the title bar, and select the Defaults option.
- Click on the Layout tab.
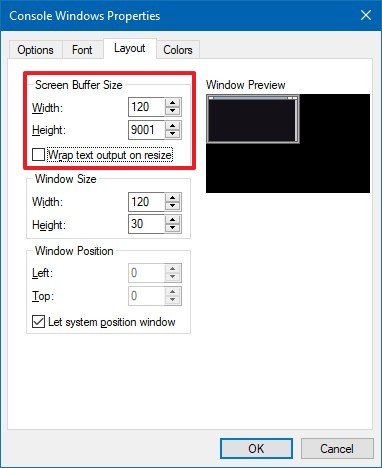
- Under the "Screen Buffer Size" section, you can specify how much content you can view and scroll while working with Command Prompt.Quick Tip: If you want to adjust the width parameter, make sure to clear the Wrap text output on resize option.The buffer size uses coordinate grid based for character cells, which means the width is the number of character cells that can fit on each line, and the height is the number of lines. The larger the width and height, the more content you can view, but these settings will not affect the size of the console. (Usually, you don't want to modify these settings unless you have a reason.)
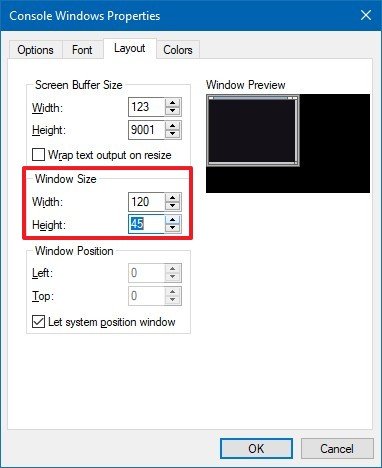
- Under the "Windows Size" section, you can make the window console larger or smaller by changing the width and height parameters, which are based on character cells (not pixels).
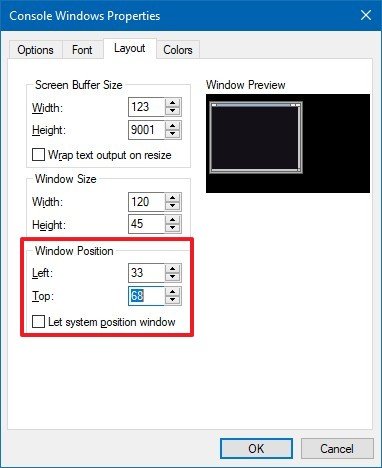
- If you want Command Prompt to launch in a particular position, clear the Let system position window option.
- Specify the new start position (in pixels) using the Left and Top settings.
- Click the OK button.
As you make changes, on the right side of the page, you'll notice a preview of the new configuration.
How to customize color and transparency on Command Prompt
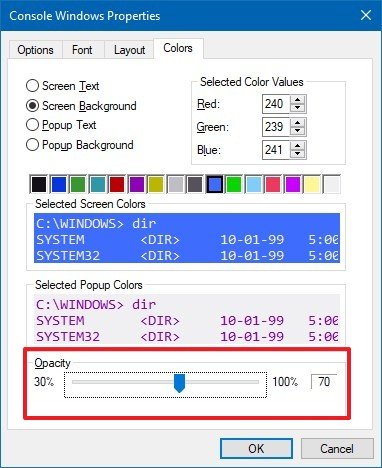
If you want to make the command-line experience a little less boring, you can also change the text and background colors, and on Windows 10, you can make the console window semi-transparent (just like in Linux) using these steps:
- Open Start.
- Search for Command Prompt, and click the top result to open the console.
- Right-click the title bar, and select the Defaults option.
- Click on the Colors tab.
- To change colors, select an element from the left side, and either select a color from the list or use the RGB settings on the right to specify a specific color.Quick Tip: If you don't know the exact amount of red, green, and blue that make up the color you want, do a Google search for "RGB color picker" and use the search engine's built-in tool to get the values.
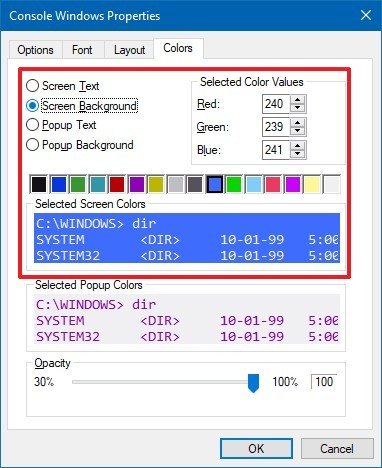
- To make the console window semi-transparent, under the "Opacity" section, drag the slider left or right to set the amount of transparency (to a minimum of 30 percent).
- Click the OK button.
Alternatively, you can change the transparency for the current session without opening the settings using the Ctrl + Shift + mouse wheel up to decrease transparency level or Ctrl + Shift + mouse wheel down to increase transparency level.
How to change color scheme on Command Prompt
Starting with the Windows 10 Fall Creators Update (version 1709), it's possible to customize the appearance of Command Prompt using custom color schemes.
If you want to use this feature, download the Microsoft CoolTool from GitHub, extract the contents of the ColorTool.zip file, and then use these steps:
- Open Start.
- Search for Command Prompt, right-click the result, and click Run as administrator.
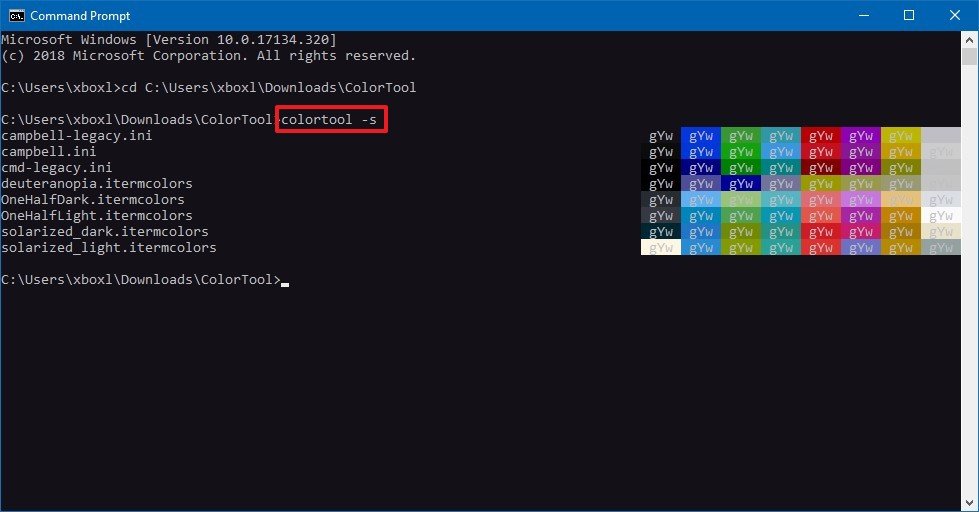
- Type the following command to navigate to the folder that contains the ColorTool executable and press Enter:
cd C:\PATH\TO\ColorToolIn the above command, replace cd C:\PATH\TO\ColorTool with the path to the folder where you extracted the "ColorTool" folder. - Type the following command to list the available color schemes and press Enter:
colortool -s
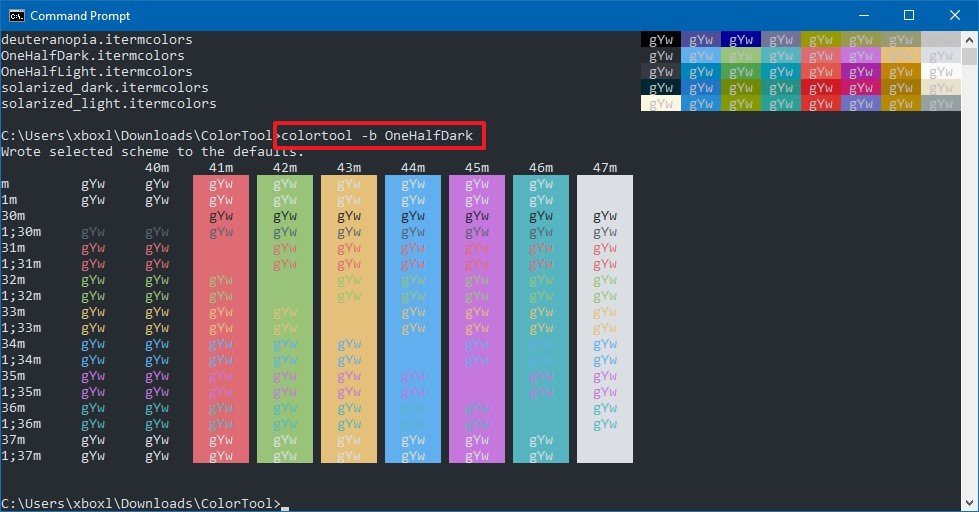
- Type the following command to change the Command Prompt color scheme and press Enter:
colortool -b SCHEME-NAMEIn the above command, replace SCHEME-NAME with the name of the color scheme you want to use. While typing the name, do not include the ".ini" or ".intercolors" extension. The -b switch is optional, and it makes the scheme the system default.
- Right-click the title bar, and select the Properties option.
- Click the OK button to apply the scheme changes.
Once you complete these steps, restart Command Prompt to start using the console with the new color scheme.
At any time, if you want to revert the original colors, you can use the same instructions, but on step No. 6, make sure to use the either the campbell or cmd-campbell scheme name.
More Windows 10 resources
For more helpful articles, coverage, and answers to common questions about Windows 10, visit the following resources:
- Windows 10 on Windows Central – All you need to know
- Windows 10 help, tips, and tricks
- Windows 10 forums on Windows Central

Mauro Huculak has been a Windows How-To Expert contributor for WindowsCentral.com for nearly a decade and has over 22 years of combined experience in IT and technical writing. He holds various professional certifications from Microsoft, Cisco, VMware, and CompTIA and has been recognized as a Microsoft MVP for many years.
