How to customize Microsoft Excel's Quick Access Toolbar
Microsoft Excel 2016 gives you the tools to make meaningful reports, but how you use the app's Quick Access Toolbar is up to you.


While the Microsoft Excel Quick Access Toolbar is minimal compared to the main Ribbon, it gives you direct access to a variety of functions.
Do you know how to make the most of the toolbar? Did you even know it was there? Let's take a look at this customizable command center.
- Adding commands to the Quick Access Toolbar
- Import and Export Toolbars
- Appearance customization
- Keyboard shortcuts
- Reset your customization
Adding commands to the Quick Access Toolbar
Without any previous customization, the Excel Quick Access Toolbar will only display options to save, undo and redo. Here's how to change that.
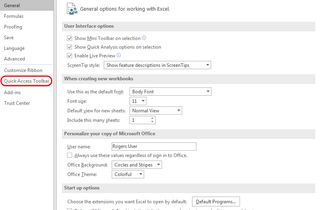
How to access the Quick Access Toolbar options
Option No. 1:
- Click on the Customize Quick Access Toolbar icon.
Option No. 2:
- Right-click on the Quick Access Toolbar.
- Select Customize the Quick Access Toolbar from the list.
Option No. 3:
- Click on File in the Ribbon.
- Click Options.
- Click Quick Access Toolbar.
After gaining access to its options, the toolbar is now ready to incorporate your preferred commands. You can do that in a few ways.
Get the Windows Central Newsletter
All the latest news, reviews, and guides for Windows and Xbox diehards.
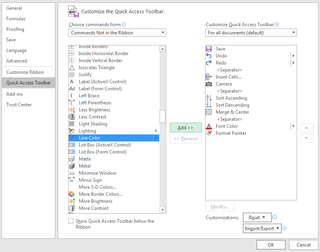
How to add a command from the Ribbon
- From the ribbon, click on the tab that houses the command that you want to add.
- Right-click on the command and select Add to Quick Access Toolbar from the drop-down list.
How to add a command from Quick Access Toolbar
- Click on the icon for Customize Quick Access Toolbar.
- Click on More Commands at the bottom of the list.
- Click on the Choose commands from list and select Commands Not in the Ribbon.
- Click on the command to be added.
- Click on Add to move it to the Toolbar list.
- Click Ok to finish.
When customizing the Toolbar, there is a rather large list of commands to browse through. You'll notice that by default, the Popular Commands list is displayed. Further commands lay within the sorting options. Microsoft divides these by tabs that are found in the ribbon. You can also choose All Commands to see a list of everything possible in Excel.
The Excel Camera, for example, is used to capture a screenshot of the data range in a worksheet in order to paste it into another worksheet. You will see that the data picture will automatically change when the data it originates from also changes. If this is a function that you are seeking, you can add it to the toolbar under "Commands Not in the Ribbon."
On the Excel Options screen, you can also see that Quick Access Toolbar customization will apply to all documents by default. The drop-down list lets you choose to only apply the customization to the workbook that you're working on.
How to remove a command from the Quick Access Toolbar
Option No. 1:
- Right click on command from the Toolbar.
- Select Remove from Quick Access Toolbar from the list.
Option No. 2:
- Select the Customize Quick Access Toolbar icon.
- Select More Commands.
- In the Customize Quick Access Toolbar list, and select the commands to remove.
- Click Ok to save changes.
How to import or export Toolbars
You can also choose to import a previously created Toolbar from one of your colleagues. You may also want to share your own with others.
How to export a Toolbar
- Click on File.
- Select Options.
- Click on Quick Access Toolbar.
- Click Import/Export.
- Click Export all customizations.
- In the File Save box, choose a file name and location.
- Click Save to save the exported Office UI file.
To import a Toolbar
- Select File.
- Click Options.
- Select Quick Access Toolbar.
- Open Import/Export.
- Choose Import Customization file.
- Navigate to the file location.
- Select the file and choose Open.
- In the dialog box, click Yes to replace all existing customizations.
- Click Ok to complete.
Appearance customization
As you add commands, you'll notice that they appear in the order in which they have been selected. You may feel the need to sort alphabetically or by type. Here's how you can organize your commands.
Moving the Toolbar
By default, the Quick Access Toolbar is located in the upper-left corner of the program, above the ribbon. You have a limited ability to change its position to just below the ribbon.
How to move the toolbar
- Click on the Customize Quick Access Toolbar icon.
- Click Show Below the Ribbon if it's currently above the ribbon.
The option will change to "Show Above the Ribbon" if you have already set it to below.
Reordering commands
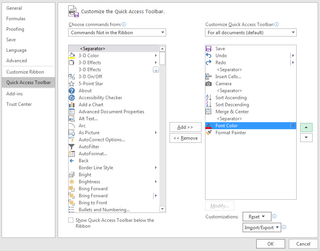
As you add commands, you'll notice that they appear in the order in which they have been selected. You may feel the need to sort alphabetically or by type. Here's how you can organize your commands.
How to reorder the commands
- Right-click on the Quick Access Toolbar and select Customize the Quick Access Toolbar from the list.
- Click on commands under the Customize Quick Access Toolbar section.
- Click on the Up or Down arrows to the right on the command list to move the command up (left) or down (right).
- Click Ok to complete.
Grouping commands in the Toolbar
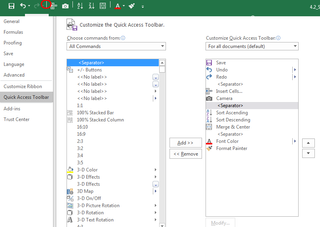
Grouping essentially creates fences around a selection of commands, providing the appearance of relationships between them. These fences are known as "Separators."
How to add Separators
- Right-click on the Quick Access Toolbar.
- Choose Customize the Quick Access Toolbar.
- Under Choose Commands from, select Separator at the top of the list.
- Click Add to add to the toolbar.
- Use the Up and Down arrows to place the Separator.
- Click Ok to complete.
You can stack more than one Separator at a time, depending on your visual preferences.
Keyboard shortcuts
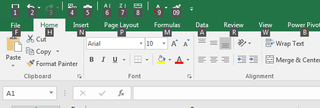
Want to use the Quick Access Toolbar even more quickly? You can use keyboard shortcuts to use the commands with even less effort. By using the ALT key in conjunction with a number key you can execute functions by touching the mouse.
To use keyboard shortcuts
- Press the ALT key to reveal the numbers associated with the Toolbar commands.
- Press the number that corresponds to the chosen command.
You'll soon see that the numbered system increases from left to right, and you can easily learn what to press for your most frequently used commands. Couple this function with reordering your commands, and you'll discover your increased efficiency.
Reset your customization
As you experiment with customization, you may end up with unfavorable results. Being able to reset helps you save time trying to reverse your settings.
To reset the toolbar
- Right-click the Quick Access Toolbar.
- Select Customize the Quick Access Toolbar.
- Click Reset, under Customizations.
- Select Reset only Quick Access Toolbar.
You're then free to start fresh and find a new way to be efficient or to mess something else up.
Wrapping up
When used correctly, the Toolbar can be your best friend for formatting, data entry, and other functions. It's one way of making Microsoft Excel a truly personal experience. What does your Toolbar look like? Do you use the toolbar or do you work mainly out of the Ribbon? Let us know in the comments!
And be sure to visit our Office 101 help hub for more related articles:
- Microsoft Office 101: Help, how-tos and tutorials
