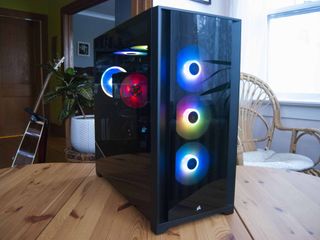

Corsair's lineup of PC cases, including the incredibly popular iCUE 4000X RGB, has a new addition. The Corsair iCUE 5000X RGB is slightly larger than its 4000X sibling, with more space inside for better cooling solutions and airflow, as well as four tempered-glass panels for an exceptional outward appearance. I put together a PC using the 5000X to get a good idea of its feature set, whether or not it promotes an easy build, and, ultimately, whether it's worth the relatively premium price.
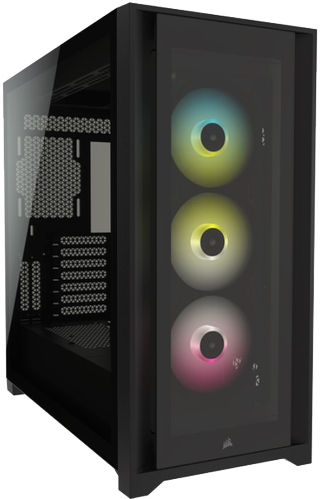
Bottom line: The Corsair iCUE 5000X RGB might not have perfect cable management depending on how much hardware you pack inside, but for most people, it should make for an easy, intuitive build. It's a gorgeous case inside and outside, and it should be considered for your next mid-tower build as long as budget allows.
For
- Tinted tempered glass everywhere
- Ample space for intricate builds
- Excellent airflow throughout
- Intuitive design for easy building
- Overall premium quality
Against
- Some wonky cable management with certain builds
- On the expensive side
Corsair iCUE 5000X RGB at a glance
The Corsair iCUE 5000X RGB is a mid-tower PC case on the larger side of average. It will fit Mini-ITX, Micro-ATX, ATX, and E-ATX motherboards, and there is ample space inside for radiators, fans, custom cooling loops, and the best graphics card options on the market today. It is available in white or black color finishes, and it's made primarily of steel. This is a heavy, solid case.
Corsair sent me a review unit of the iCUE 5000X RGB with a black finish. Included with each case is a set of 12 Velcro cable ties, all the screws, spacers, and washers to make your hardware fit, and an extra PSU shroud cover that can be swapped out in certain builds that require more space near the front of the case. A 90-degree JUSB connector is also included to make plugging in the stubborn cable a bit easier.
| Category | Spec |
|---|---|
| Motherboard | Mini-ITXMicro-ATXATXE-ATX |
| I/O | USB-C 3.1Two USB-A 3.03.5mm audio |
| Expansion | Seven horizontal PCITwo vertical PCI |
| Storage | Four 2.5-inch SSDTwo 3.5-inch HDD |
| Included fans | Three 120mm (front) |
| Front fans | Three 120mmTwo 140mm |
| Top fans | Three 120mmTwo 140mm |
| Right fans | Three 120mm |
| Rear fan | 120mm |
| Front rad | 280mm, 360mm |
| Top rad | 280mm, 360mm |
| Right rad | 240mm, 360mm |
| Filters | FrontRightTopBottom |
| Clearance | Max GPU (L) 420mmMax PSU (L) 225mmMax CPU Cooler (H) 170mm |
| Dimensions | 20.47 x 9.65 x 20.47 inches(520mm x 245mm x 520mm) |
| Weight | 30.51 pounds (13.84kg) |
| Materials | SteelTempered glassPlastic |
| Warranty | Two years |
| Color | WhiteBlack |
What the Corsair iCUE 5000X RGB has to offer


Taking a tour of the case, all sides but the rear have tempered glass panels with a dark tint. All panels are held in place with pressure clips, and the design seems sturdy enough that I have no worries about them popping out accidentally. The side panels, which are much larger than the top or front, are assisted each by two hand-screws to keep them firmly in place. Magnetic panels are nice, but the size and weight of the glass here makes me glad there's something a bit more robust keeping it in place.
The top and front panels pull away to reveal recessed areas covered by a magnetic dust filter. There is mourning space for three 120mm fans, two 140mm fans, or a radiator measuring 280mm or 360mm. At the top front are positioned the case's modern ports, which include two USB-A 3.0, USB-C 3.1, and 3.5mm audio. There are power and reset buttons, as expected.
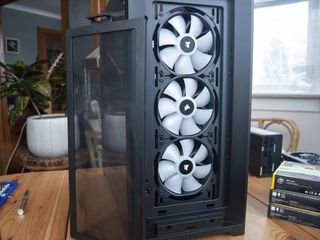
Going all-in with glass makes for a stunning case.
The case comes with three pre-installed 120mm RGB fans on the front. This is the only cooling that's included, so you will no doubt want to add at least an exhaust fan at the back of the case to pull air through. The dust filters have a triangular mesh design that plays nicely with the dark tint and RGB lighting you get from the fans.
Instead of a standard metal panel on the right side of the case to cover cabling, the iCUE 5000X RGB goes ahead with more tinted glass. It has a cutout towards the front, with a permanent vent installed for the optional side radiator. Without a radiator installed, it's simply there for better airflow. On the inside of the vent cutout is another removable dust filter.
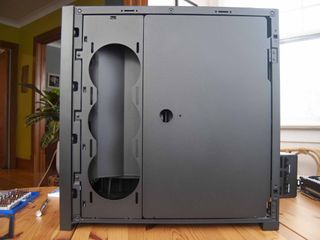
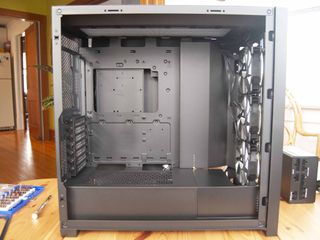
Behind the glass is a steel swing door — completely and easily removable for better building — that hides cabling, SSDs, HDDs, PSU, lighting nodes, and anything else housed behind the motherboard panel. With the panel closed and the glass in place, you'd never know there's anything there. Some might remove the swing door completely if they're particularly proud of their cabling, but others (including myself) will appreciate the relative mess it hides.
Next to the swing door is a semi-permanent radiator mount, covered on the other side by a vertical cable shroud. Both of these pieces can be removed (the shroud, especially if you're side-mounting a radiator). If you're not installing a side radiator, the cable shroud is an elegant way to hide the wide gap that would otherwise be there. It also provides some extra space for cabling that can't be seen from the outside. A couple of cutouts reside between the motherboard panel and radiator mount; rubber gaskets hide any mess behind.
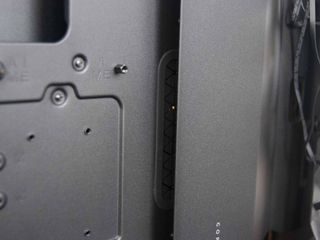
The case comes from the factory with a good start on proper cable management. There's about 25mm of space behind the motherboard panel and a wide primary channel between the panel and side rad mount with loops and Velcro ties already installed. It's definitely not as clean as the promo photos will have you believe, but it's a good foundation. An extra channel runs along the back of the motherboard panel to handle any cables coming over the top, including those for the top and rear-mounted fans and CPU power.
The back of the case has seven horizontal expansion slots, as well as two vertical expansion slots if you're looking to mount your GPU up on its side. You will need to invest in a PCI extension cable for this modification. On the bottom is a slide-out dust filter for the PSU's intake vent. This is about all I observed before getting into the actual build process to see what the case is really like once you're inside.
Building a PC with the Corsair iCUE 5000X RGB
Corsair's iCUE 5000X RGB is a pleasure to work with.
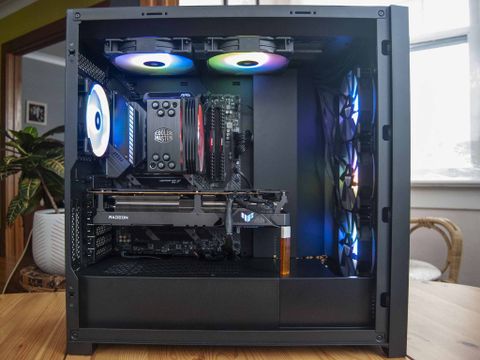
The Corsair iCUE 5000X RGB is a bit intimidating out of the box, but once you get inside, the build process is actually quite easy. If you're on your first mission, be sure to check out our guide on how to build your own PC the right way. Using MSI's B550 MAG Tomahawk ATX motherboard, Cooler Master Hyper 212 CPU cooler (soon to be replaced by an AiO solution), ASUS TUF Gaming RX 6800 GPU, and Corsair 750W PSU posed no problems. There is a ton of space inside, and you should be able to realize your dream build (with some limitations).
For example, the case doesn't fit a radiator on the front and side mounts at the same time. Luckily there is space on the top mount for a radiator. If you do go with a side-mounted radiator, your cabling will have to be perfect. I made use of the open space — no side-mounted radiator in my build — to run some of the larger cables down to the PSU. The vertical shroud elegantly hides the cables from view in my layout. With the vertical shroud removed and a side radiator installed, you'd have to rely on the cutouts and rubber gaskets to move cabling to the back of the motherboard panel. This might cause some frustration.


I do plan eventually to add a radiator to this build, so I'll have to deal with the side cabling at that time. The top mount is being used for dual 140mm fans, which I think I'll keep in place no matter what as they suck a lot of hot air out of the case.
For a build with a side-mounted radiator, there's an extra PSU shroud piece included with lower clearance. The pieces are fastened with hand screws and otherwise just snap into place. It's a simple swap, though I didn't need to keep the change permanently due to the lack of side radiator. On this note, wherever there is a hand screw (including on the glass side panels), it is held from backing out completely—no need to worry about losing them while you work.
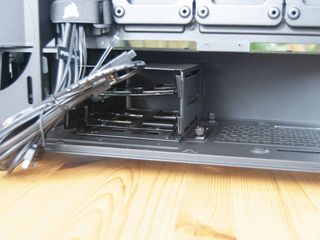
Three 2.5-inch SSD trays come installed on the back of the motherboard panel. Just undo the hand screw, attach your SSD, and reattach the tray. Easy. There's also room and mounting holes for another 3.5-inch HDD or 2.5-inch SSD just above.
A bay for two 3.5-inch HDDs comes installed on the bottom of the case, next to where the PSU fits in. The drive bay can be relocated to the front of the case in builds that don't have a side radiator (that taller shroud piece blocks the drive bay from view), but I completely removed it using the hand screws. If you're working with a build that requires the drive bay in its factory rear position, getting everything plugged into the PSU will likely become a pain due to the cramped space. Move it to the front or remove it completely for the best result.
The motherboard fit in perfectly, with the I/O shield lining uptight with the back of the case. As expected, cutouts around the motherboard panel allow for easy cable management without much mess. I installed a rear 120mm fan and two 140mm fans on the top without issue, thanks to plenty of room inside to work. Running wires was also easy thanks to the extra cable channel with built-in loops, as well as the included Velcro straps.
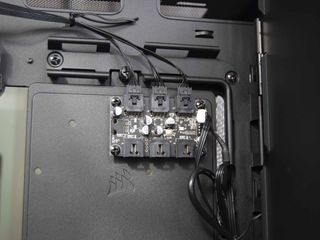
The case has two lighting nodes on the back of the motherboard panel to which you run power and RGB controls from the fans. There are six inputs in total, just enough for my build. Corsair's iCUE software, upon booting the PC for the first time, immediately recognized the fans. With extensive customization and control, you can get pretty much any look you want. No issues here, and I had the PC's RGB vibing in unison within a few seconds.


As mentioned, I took advantage of the open side radiator mount and vertical cable shroud to run some of the bulkier cables down to the PSU. If you're working with a build with a side radiator (which requires you to remove the vertical shroud), you will have to spend some extra time on getting everything laid out properly. One other thing to note is that the powder coat on some of the steel parts is rather delicate. I scratched a couple of areas with what I don't think was excessive force. When building, take care to keep your finish intact.
With everything put together and the glass side panels reinstalled, the case looks stunning. It's tinted just enough to show off only what really matters. I ran the PC under load for about 30 minutes with an outside ambient temperature of about 21 degrees Celsius to see how cool it runs. Keep in mind I added a rear exhaust fan (which you should definitely do as well no matter what) and two top exhaust fans. Temperatures inside the case hit 30 degrees Celsius at the motherboard while the system sat idle. The CPU hovered around 35 degrees Celsius while idling.
Once I began a full-system stress test, including CPU, GPU, FPU, and memory, temperatures at the motherboard averaged out to 33 degrees Celsius after 15 minutes. That's a 33-degree average. The CPU remained right around an 86-degree average for the entire test. It's clear the 5000X shouldn't suffer from overheating.
Should you buy the *Corsair iCUE 5000X RGB?


Who it's for
- PC enthusiasts who want plenty of space for custom builds
- Those who love the look of tempered glass and want more of it
- Those who want to spend more than $200 on a PC case
- Those who don't mind the look of RGB
Who it isn't for
- Those who prefer a simple build
- Those who prefer a compact build
- Those who want to stick to a tight budget
Any good PC case should have an attractive design that doesn't interfere with the building process or proper airflow. By that definition, the Corsair iCUE 5000X RGB is a success. It's a case for enthusiasts for sure and one with plenty of opportunities to realize an intricate custom build. It might not have quite as good of airflow as the Corsair 5000D Airflow (I mean, it's right in the name), but anyone who wants to go all-in with tempered glass should find that it's suited to their needs. And that's not to say the 5000X is stuffy — it was able to move air through without trouble, keeping temperatures right where they should be.
This is an expensive case, so you want to be sure you're going to take advantage of all it has to offer. It's best suited for advanced builds, whether with custom or AiO water cooling. It's also a large case, with plenty of room for future improvements. If you're tight on room in your office, it's probably not the case you're looking for. And, indeed, if it's not quite the case you have in mind, our collection of the best PC cases has plenty more options. Otherwise, the Corsair iCUE 5000X RGB should be near the top of your list for possible cases for your next project.

Cale Hunt brings to Windows Central more than eight years of experience writing about laptops, PCs, accessories, games, and beyond. If it runs Windows or in some way complements the hardware, there’s a good chance he knows about it, has written about it, or is already busy testing it.
