Developers Guide: Get your game published in the Brazilian Windows Phone or Windows 8 Store

For years, publishing games in the South American nation of Brazil was a laborious and mysterious process. While most countries allow developers to publish games with no additional certification beyond those of the platform holder, a few states like Brazil, South Korea, and Russia add on their own approval processes. As you’d expect, the challenge of navigating Brazil’s certifications without speaking Brazilian Portuguese has long prevented many games from releasing in that territory.
Thankfully, the Brazilian government revised their certification policies a few months ago. Now games that have an ESRB or PEGI certification can be submitted for approval through a fast and simple process. Should your game not have one of those certifications, you can alternately request the Brazilian DJCTQ certification.
Windows Phone Central has created a guide for both processes. Follow it, submit your games, and don’t miss out on all those potential Brazilian Windows Phone and Windows 8/RT customers!
Games with ESRB or PEGI Ratings
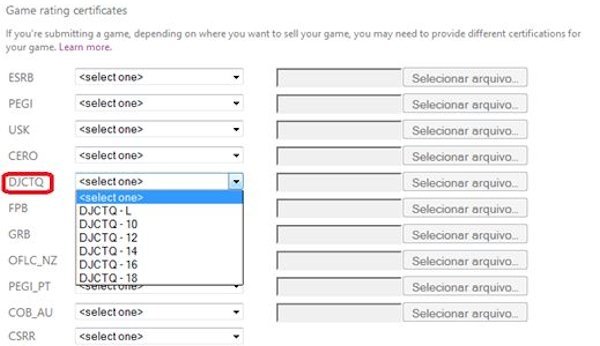
If your game already has one of these certifications, publishing in Brazil is a snap. During the standard Windows Phone or Windows 8 submission process, you’ll arrive at the Game Rating Certificates screen. The DJCTQ category pertains to Brazil.

Just choose an age range that matches your existing certification as closely as possible. L is short for “Livre para todas as idades.” That means free for all ages, much like the ESRB rating E for Everyone. Having selected the appropriate rating, upload your existing ESRB or PEGI certification document, and continue on as usual.
Games without existing certifications

ESRB and PEGI ratings
Now, it’s probably better to seek one of the previously mentioned certifications rather than a Brazil-specific DJCTQ one. PEGI and ESRB will prove more beneficial in the long run since they apply to more than one country.
All the latest news, reviews, and guides for Windows and Xbox diehards.
Still, if you want to skip straight to Brazilian certification, you’ll need these four things:
- A form provided by the government (is attached);
- A synopsis of the game;
- The game itself and/or a gameplay video that shows the main features of the game.
- A Declaration of Rights to the Game (proof of ownership, only if your name differs from the publisher name)
All three documents can be in English, Spanish or Portuguese. Don’t worry about translating into Portuguese.
Step One: Complete the Game Rating Form
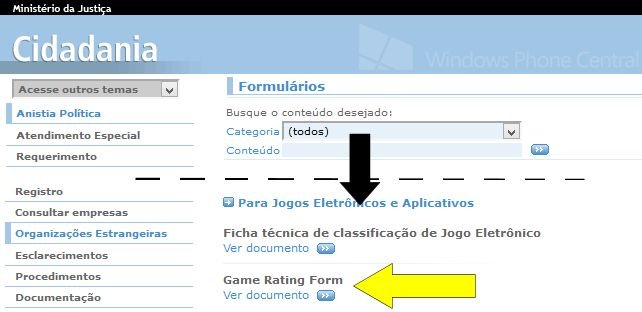
To get the form, head to the Brazilian Ministry of Justice website, pick Cidadania, Formulários, and then scroll down to find the form:

Here’s a link to the Formulários page and a direct link to the form (a .Doc file).
- For Platform, if publishing a Windows Phone game, you only need to check Cell/ Smartphones. You could get more specific, check other and put Windows Phone. But then you’d need to resubmit the form if you port to other mobile platforms, so don’t do that.
- If publishing a Windows 8 game, select Computer/PC for the Platform or Other and then specify Windows 8.
- The Game Title in Brazil can be the regular English title unless you prefer to call it something different in that country.
- In the Game Distributor box, put the publisher’s name and method of distribution. Example: Gameloft – Windows Phone Store.
- The form must be signed by hand, so after completing it, print the form, sign it, and then scan it before submission.
Step Two: Write a synopsis of the game.
This just needs to be a thorough description of the game in Word format. You could probably just copy the game’s existing store description, but I recommend going into more detail and excluding verbiage aimed at selling the game. Also include a global link to the game in the same document.
Step Three: The Game and/or a gameplay video
If the game is already available in an online store, provide a global link to the store page. Remember, you can combine this with the synopsis. If the link does not offer a Trial or Demo option, the certification will take up to three extra months, so let’s make sure your game has a trial!
You could also get by with just a link to a gameplay video. But the process will go much faster if you provide both the game/trial and a video within your synopsis document.
Step Four: Declaration of Rights to the Game
Only complete this step if the publisher name is different from the name of the person filling out the form. In other words, if you publish under your own name, skip it. But if you publish under a company name, I believe you need to do this.
This document needs to declare that you are the copyright holder of the game or that the holder is aware that you are asking for the DJCTQ rating. You can add this to the same document as the synopsis, but the declaration must also be signed by hand. Refer to Step One instructions about signing documents.
Step Five: Submit required items by email
Submit all required documents to classificacaoindicativa@mj.gov.br with the subject line:
"Jogo para Classificação - <Title Game>"
That’s the only Brazilian text you’ll need to enter during the submission process.

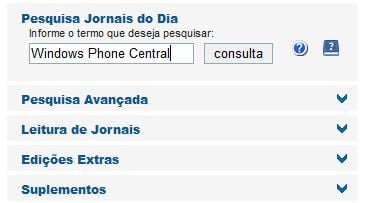
The certification process usually takes 10-20 days. To check on the game’s rating, visit the following site: http://pesquisa.in.gov.br/imprensa/core/start.action
Enter the game name in the blank form and click the Consulta button. If the game isn’t found, you’ll be taken to a results not found screen.

From there, click Abrir/Fechar Pesquisa at the left of the screen. You'll arrive at the advanced search screen shown above.
Fill in the game title or search term, check the Todos (all) box, and enter the date of submission and current date. Hit Consulta again.
If your game comes up in the search results, it’s been approved! The line Classificação: will state the actual rating. Make sure to save the INPDFViewer.pdf file from your game’s certification page as your proof of certification.
A few days after the game appears on that site, you’ll also find the DJCTQ certificate here: http://portal.mj.gov.br/ClassificacaoIndicativa/jsps/ConsultarObraForm.jsp
Final Step: Submit game to the Windows Phone or Windows 8 Store

During the standard Windows Phone or Windows 8 Store submission process, you’ll select the DJCTQ option and age group as described at the beginning of this guide. Upload the INPDFViewer.pdf file as proof. Once Microsoft approves the game, it’ll show up in the Brazilian Windows Phone or Windows 8 Store. Now you can just sit back and watch the money roll in.
Citations

Thanks to dedicated tipster Guilherme da Silva Manso for his help in producing this guide. I also added some tweaks found in Joost van Schaik’s Dotnet by Example blog. For more ratings information, check out Microsoft’s Windows Phone Dev Center Game Ratings page.

Paul Acevedo was formerly a Games Editor at Windows Central. A lifelong gamer, he has written about videogames for over 15 years and reviewed over 350 games for our site. Follow him on Twitter @PaulRAcevedo. Don’t hate. Appreciate!
