The best ways to use Skype for Business
If you have used Skype before, the chances are that you have been involved in a conference call or video presentation before.

As some may think of Skype as a simple chat and phone call service, it is actually a multifunctional means of both communication and collaboration. Skype provides a way to connect teams, work sites and businesses to clients without having to be in the same room.
Speaking in public is anxiety-inducing enough as it is. Having to show off your verbal acuity on top of your technological adeptness could be potentially overwhelming. They can't see you sweating through a monitor, though!
Take a look at some of these features available through Skype to help you prepare for your big moment.
- Create groups for team conference calls
- Sharing on Skype
- Recording your presentation
- Managing participants
- Pairing Skype with OneNote
Create groups for team conference calls
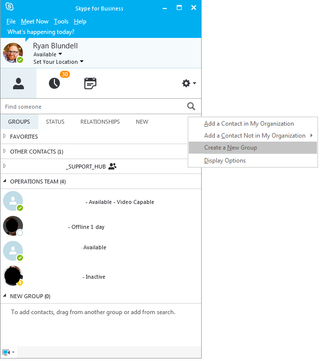
Ideally, you would want to create an appointment for your team to attend, but sometimes you may need to jump on a conference call to address a topic. In Skype, you can create collections of people and then choose to begin a conference call with members of those groups instantly.
Using Skype for Business to create and use groups
- From the Skype menu, click on the Add icon.
- From the list, select Create a New Group.
- Enter the name of the group.
- Search or click and drag on existing contacts to copy them to the new group.
- Right click on the group name and select either Start a Conference Call or Start a Video Call.
Alternatively, you could create an ad hoc call simply by pressing Alt+M from the Skype Menu. You would then begin adding in contacts.
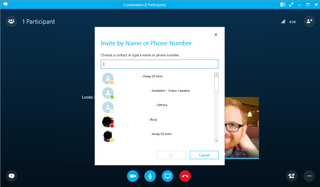
To add contacts to the call
- In the call screen, click on Invite more people.
- Search for contacts by entering their name in the search field or scroll through your list.
- Click on the contact and select Ok.
Sharing on Skype

Adding documents, images, and other files during your meeting or presentation can have many benefits. It can add depth to the conversation and helps participants to understand what is being communicated by accommodating for different learning methods.
Here are a few sharing methods to consider:
Get the Windows Central Newsletter
All the latest news, reviews, and guides for Windows and Xbox diehards.
To share your screen while on a voice or video call
- Click the Present button located the in call bar near the bottom of the screen.
- From the list, click on Present Desktop to share your screen or Present Programs for specific windows.
- If you are a multi-monitor user, you will need to select which screen you want to share with the participants.
- Once selected, press Present to begin.
This provides participants with a live view of what is on your screen or window. Be mindful of what you may have open on your screen as well as you may be sharing private information as well.
To share a PowerPoint presentation
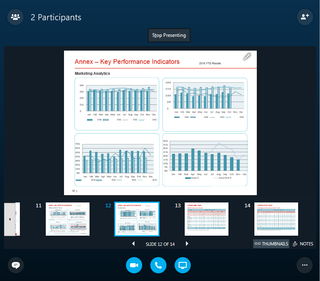
- During a call, click on the Present icon and select Present Powerpoint.
- Locate and click on the file and select Open.
The participant can now follow along with the PowerPoint as you are presenting. Alternatively, they can also scroll forwards and backward in case they were looking for more information or clarification.
This can help viewers understand details at their own pace. If they find the text too small to look at, the participant can alter their view by switching to full-screen mode or by utilizing zoom and pan options.
As the presenter, you have on screen options to view any notes on the presentation or view the order of slides; making it easier to refer to previous information or prepare a proper segue to the next slide.
To share a file:
- Click the Present icon.
- Select Add Attachment.
- Choose the file and select Open.
Keep in mind that there's a file limit of 300 MB and a 30-day expiry on the shared file in a conversation history; be sure to save when necessary.
Recording your presentation

There are a variety of reasons why a presenter would record their call or presentation; perhaps they just finished a dry run with a test subject and wanted to review their performance. It could also be necessary for reporting purposes. Regardless of the reason, Skype for Business allows you to record without the need for a 3rd party solution. Every type of interaction is captured in the recording in an MP4 format, including chat, files presented and shared, even audio and video.
To record during a call:
- Click the More icon to open a list of options.
- Select Start Recording.
- Recording options appear to the right of the end call icon. You can stop, pause or resume the recording.
- To end, click Stop Recording.
Skype for Business also facilitates the option to play or share any recorded presentation.
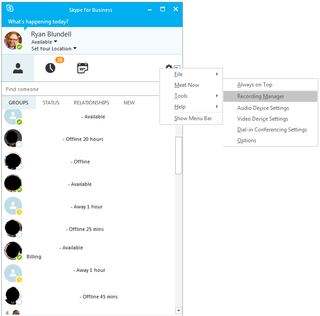
- From the main screen, click the tools icon.
- Select Recording Manager.
- In the popup, select the desired recording and click Play to review it.
- To send a copy, click browse, right-click on the file and select share. You can then choose to delivery options such as email or send to OneDrive.
Managing participants
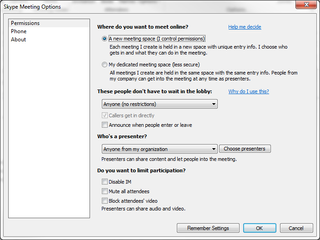
While you are the presenter of the meeting, the fact remains that you may not always be in control of the meeting. The more people that are attending, the greater the risk of interruption; intentional or otherwise. There may be a participant in a loud environment or someone who is all too willing to share their opinion. There are a few options available to help manage behaviors, individuals, and audio mishaps.
Skype meeting options in Outlook
- If you're creating a meeting from Outlook, you can edit the meeting before sending the invite.
- From your Outlook calendar, click on New Appointment.
- In the popup, under Skype Meeting, select Meeting Options.
- To edit all options, select A new meeting space.
- Use These people don't have to wait in the lobby to select which individuals can enter the conference before the presenter.
- Use Who is a presenter to choose who can manage and modify items and files presented during the meeting (great for collaborative work).
- Use Do you want to limit participation to disable IM, mute all attendees or block a participant's video.
Pairing Skype with OneNote
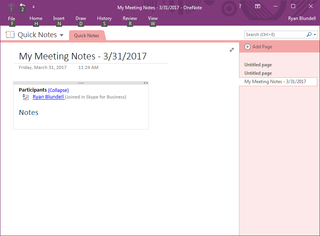
Rather than solely relying on an MP4 of your presentation with colleagues, the presenter could allow for a shared note with participants through OneNote. The presenter could assign a minute taker, or everyone could contribute their ideas collectively. If you would prefer to take your own minutes, you can compose them privately.
To access notes
- Click on the presentation icon and select Shared Notes or My Notes.
- For private notes, click My notes.
- For publically viewed notes, click Shared notes.
- Choose a section from within the note selector; a section will generate a blank page within it.
- The page is then fixed to your desktop while participants will be notified about the notebook.
- All participants will be able to open the same notebook from their own computer to capture their notes.
As you keep these tips in mind, don't forget to cover the basics. Always make sure you check your audio and video capabilities. If you want your voice to be heard, you should check your volume and quality. The files you are prepared to deliver should also be organized in advance. Keep all items handy so that can be easily retrieved, rather that fumbling through folders as you go.
Have you used Skype for the lead a conference call? What advice would you share with those about to take the helm for the first time? Let us know in the comments.
Don't forget to visit our Office 101 help hub for more related articles:
- Microsoft Office 101: Help, how-tos and tutorials
