Destiny 2 best builds 2025: For Hunter, Warlock, and Titan
Having a good Destiny 2 build is more important than ever. Here are our favorites.

Builds have always been valuable in Destiny 2, but they're arguably more important than ever before in the Lightfall era since most PvE activities are tougher than they were previously. Even though you can still get by in low-tier content like Seasonal Battlegrounds and basic Vanguard Operations without using a build, you'll need a good one if you plan on going endgame activities like Legend and Master Lost Sectors, high-difficulty Nightfalls, and Destiny 2's various Dungeons and Raids.
Now that we've had plenty of time to experiment with Lightfall's new Strand subclasses and the game's new Armor Charge mod system, we've put together a variety of top builds for Hunters, Warlocks, and Titans, including setups for all five of their subclasses. We've tested and tweaked these builds extensively across Destiny 2's content suite to ensure that they'll be effective when you use them, and since none of them rely on Seasonal Artifact perks, they'll be just as effective as they are now in the future.
Without further ado, here are the best Destiny 2 builds for Hunters, Warlocks, and Titans in 2025. Note that we've included extensive details about each build, including their abilities, Aspects, Fragments, Exotic gear, armor mods, and the best weapons to use with them.
Note: We highly recommend using Destiny 2's new Loadout system to save all of these builds so that you can swap between them quickly. This will save you a ton of time, and will also allow you to instantly change your entire build in the middle of many activities if necessary.
Destiny 2: Best builds for each class

Between the extensive Light 3.0 subclass overhauls that came in 2022, the consistent introduction of fresh Exotic weapons and armor pieces, the new Armor Charge mod system, and the addition of Destiny 2: Lightfall's Strand subclasses, the gameplay sandbox of Bungie's live service shooter is wider and deeper than ever before. As a result, hundreds of different builds are possible these days, and the vast majority of them can and will be effective as long as you take advantage of their strengths.
With that said, some builds — such as the ones we've featured in the sections below — are stronger than others. And while all of the builds in this article are top-notch, each class has one that truly stands out as the best. These builds are explained in-depth along with the rest of the builds below, but we're calling attention to these three specific builds here so that players looking to use the absolute best build for each class will know what to prioritize.
- The best Hunter build is a Void Nightstalker setup with the Stylish Executioner and Vanishing Step Aspects, the Gyrfalcon's Hauberk Exotic chest armor, and Void weapons. With it, you can infinitely chain Volatile Rounds and invisibility procs while also constantly healing and getting grenade energy from Devour.
- The best Warlock build utilizes the Solar Dawnblade subclass with the Starfire Protocol Exotic, Well of Radiance, the Touch of Flame Aspect, Empowering Rifts, and a damage-over-time weapon like Witherhoard. This build allows you to endlessly shower enemies with deadly Fusion Grenades while constantly healing, regenerating Well of Radiance ridiculously quickly, and getting tons of melee energy and Armor Charge for damage resistance.
- The best Titan build is a Solar Sunbreaker setup with the Sol Invictus and Roaring Flames Aspects, the Throwing Hammer melee, and the Lorely Splendor Helm Exotic. With this build, you can endlessly generate Sunspots with Throwing Hammer kills that heal you and scorch enemies, while also getting extra on-demand healing from Lorely Splendor Helm and a stacking melee damage bonus from Roaring Flames that makes it easy to spawn more Sunspots.
Destiny 2: Best Hunter builds in Season 20
These are the best builds for Destiny 2's Hunter class. Note that compared to Warlock and Titan builds, Hunter builds are generally at their best when they're centered around high mobility, stealthy invisibility buffs, or burst damage at close or far range.
Get the Windows Central Newsletter
All the latest news, reviews, and guides for Windows and Xbox diehards.
Best Void Hunter Nightstalker build
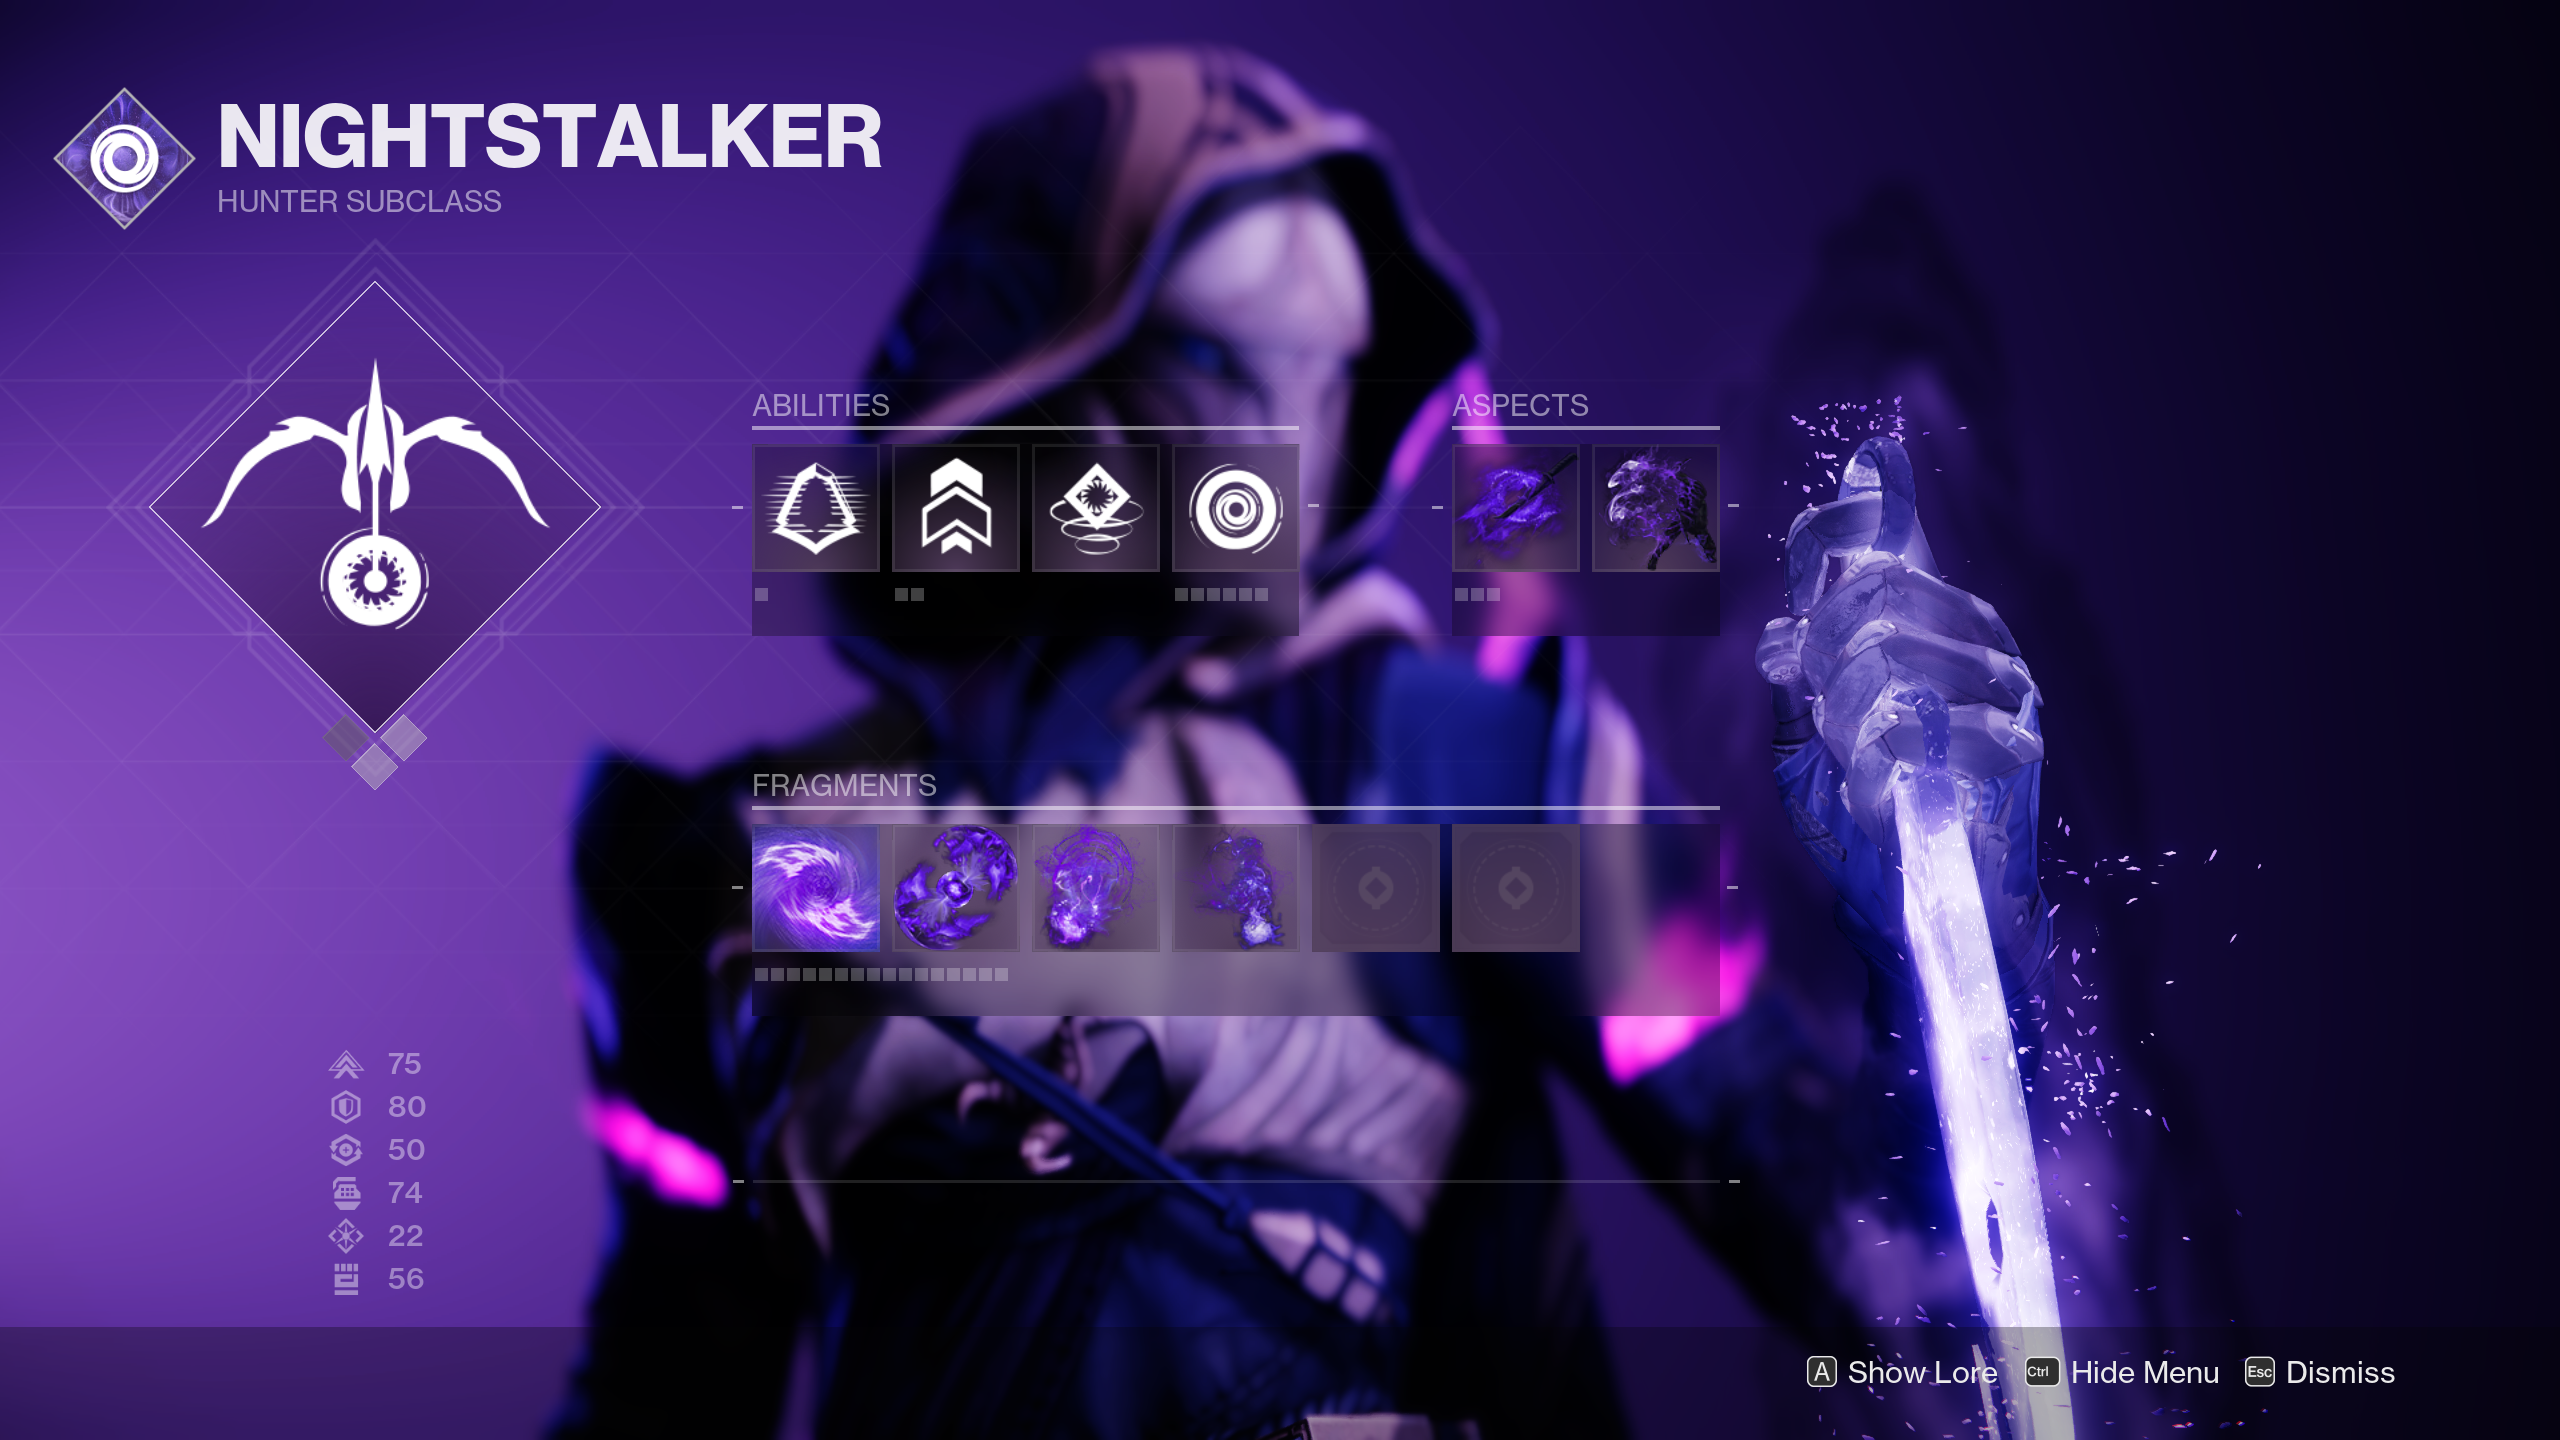
- Abilities: Shadowshot (Deadfall or Moebius Quiver), Marksman's Dodge, Vortex Grenade
- Aspects: Stylish Executioner, Vanishing Step
- Fragments: Echo of Cessation, Echo of Starvation, Echo of Persistence, Echo of Obscurity
- Exotic: Gyrfalcon's Hauberk
- Armor mods: Harmonic/Void Siphon (x2), Bolstering Detonation, Impact Induction, Charged Up, Stacks on Stacks, Insulation, Utility Kickstart (x2)
- Important stats: Mobility, Resilience, Discipline
- Weapons: Void primary
At its core, this build is centered around taking advantage of the incredible synergy between the Gyrfalcon's Hauberk Exotic chest armor and the Stylish Executioner and Vanishing Steps Aspects. The former gives Volatile Rounds to your Void weapons when you come out of invisibility, while the latter Aspects make you invisible when you kill a volatile target or when you dodge. By using them together, you can infinitely chain volatile kills and invisibility procs as long as you're using Void weapons. Not only will this easily clear entire rooms of enemies thanks to area-of-effect volatile explosions, but you'll also avoid lots of damage since you'll constantly be going in and out of invisibility.
With the Echo of Cessation Fragment, you'll also create Void Breaches when you kill volatile enemies. These give class ability and will help you get your dodge back faster, which you'll need to get your invis/volatile combo rolling again if you mess it up. Echo of Starvation makes Void Breaches and Orbs of Power give you Devour, a very powerful buff that replenishes grenade energy and fully heals you each time you refresh it with a kill, as well. Echo of Persistence makes your invisibility and Devour last longer, while Echo of Obscurity gives you another way to access invisibility by performing a Finisher.
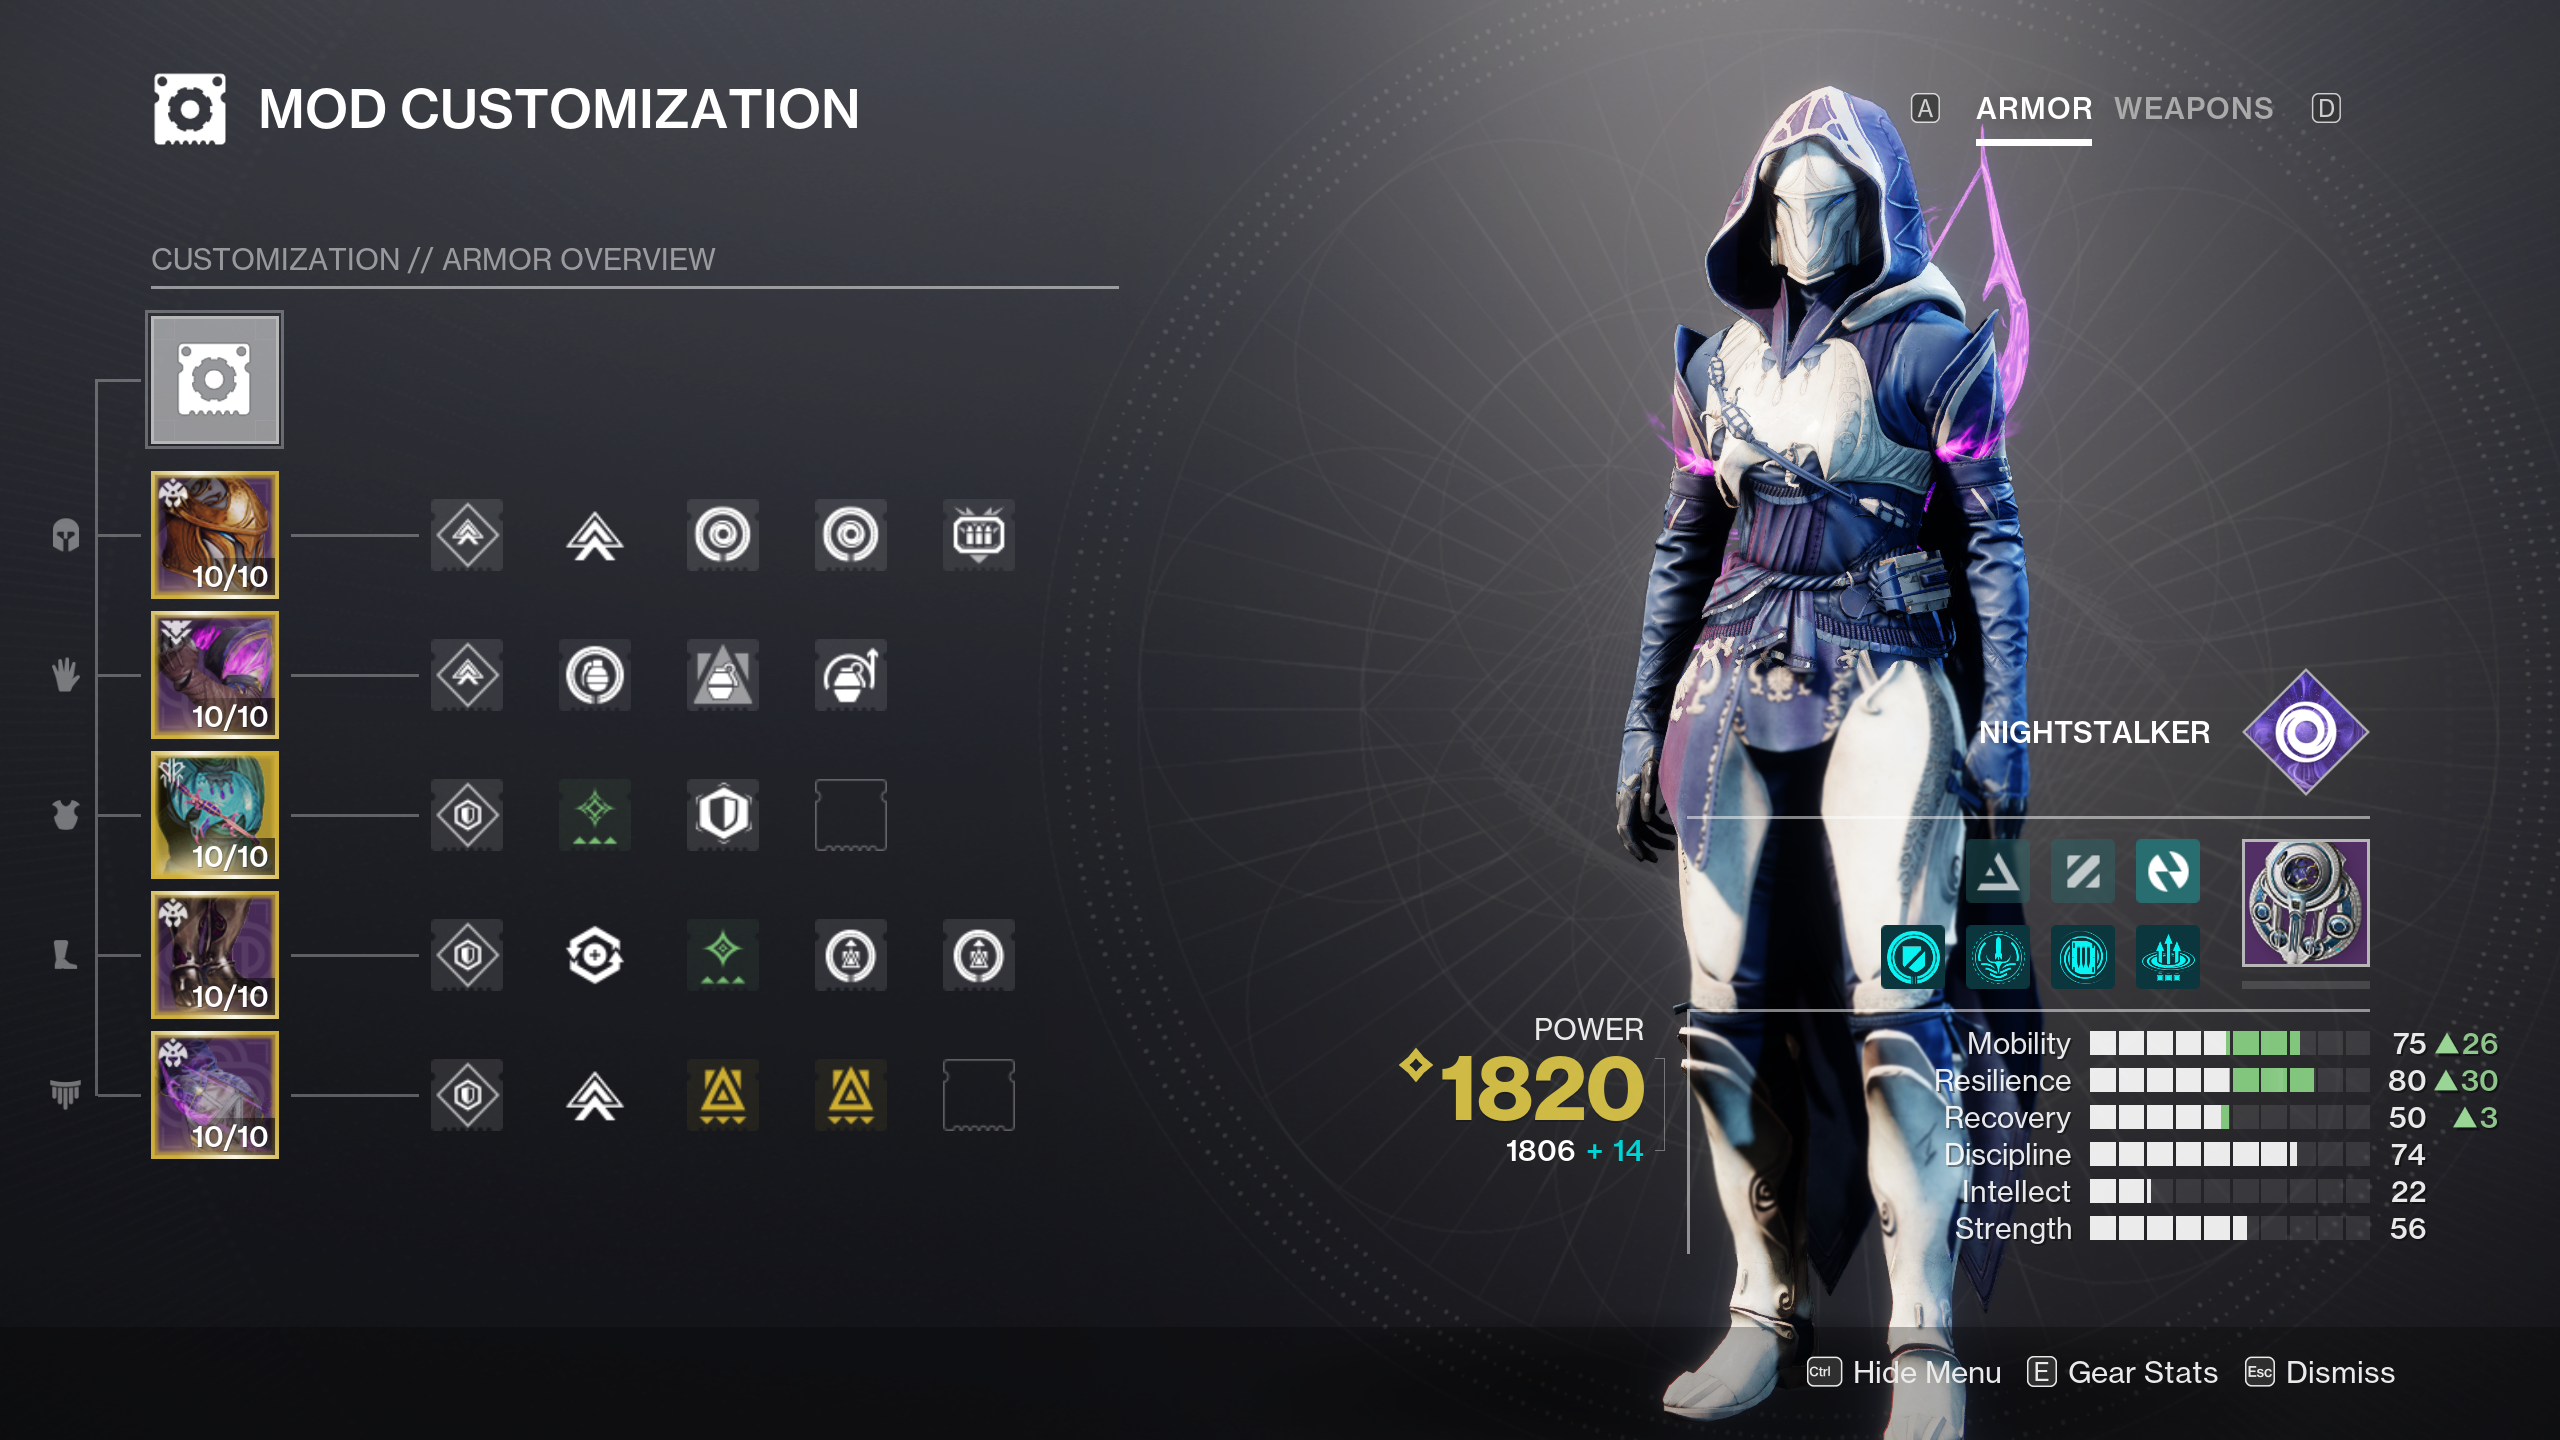
For armor mods, go with Harmonic/Void Siphons to generate Orbs of Power with Void kills and mods like Bolstering Detonation, Impact Induction, and Insulation that feed your most impactful abilities, which are your dodge and grenade. The Charged Up, Stacks on Stacks, and Utility Kickstart Armor Charge mods are also worth using since they'll convert your Orbs of Power into huge chunks of returned dodge energy whenever you dodge. Stat-wise, focus on Mobility, Resilience, and Discipline for high damage resistance and quicker cooldowns on your dodge and grenade.
Best Solar Hunter Gunslinger build
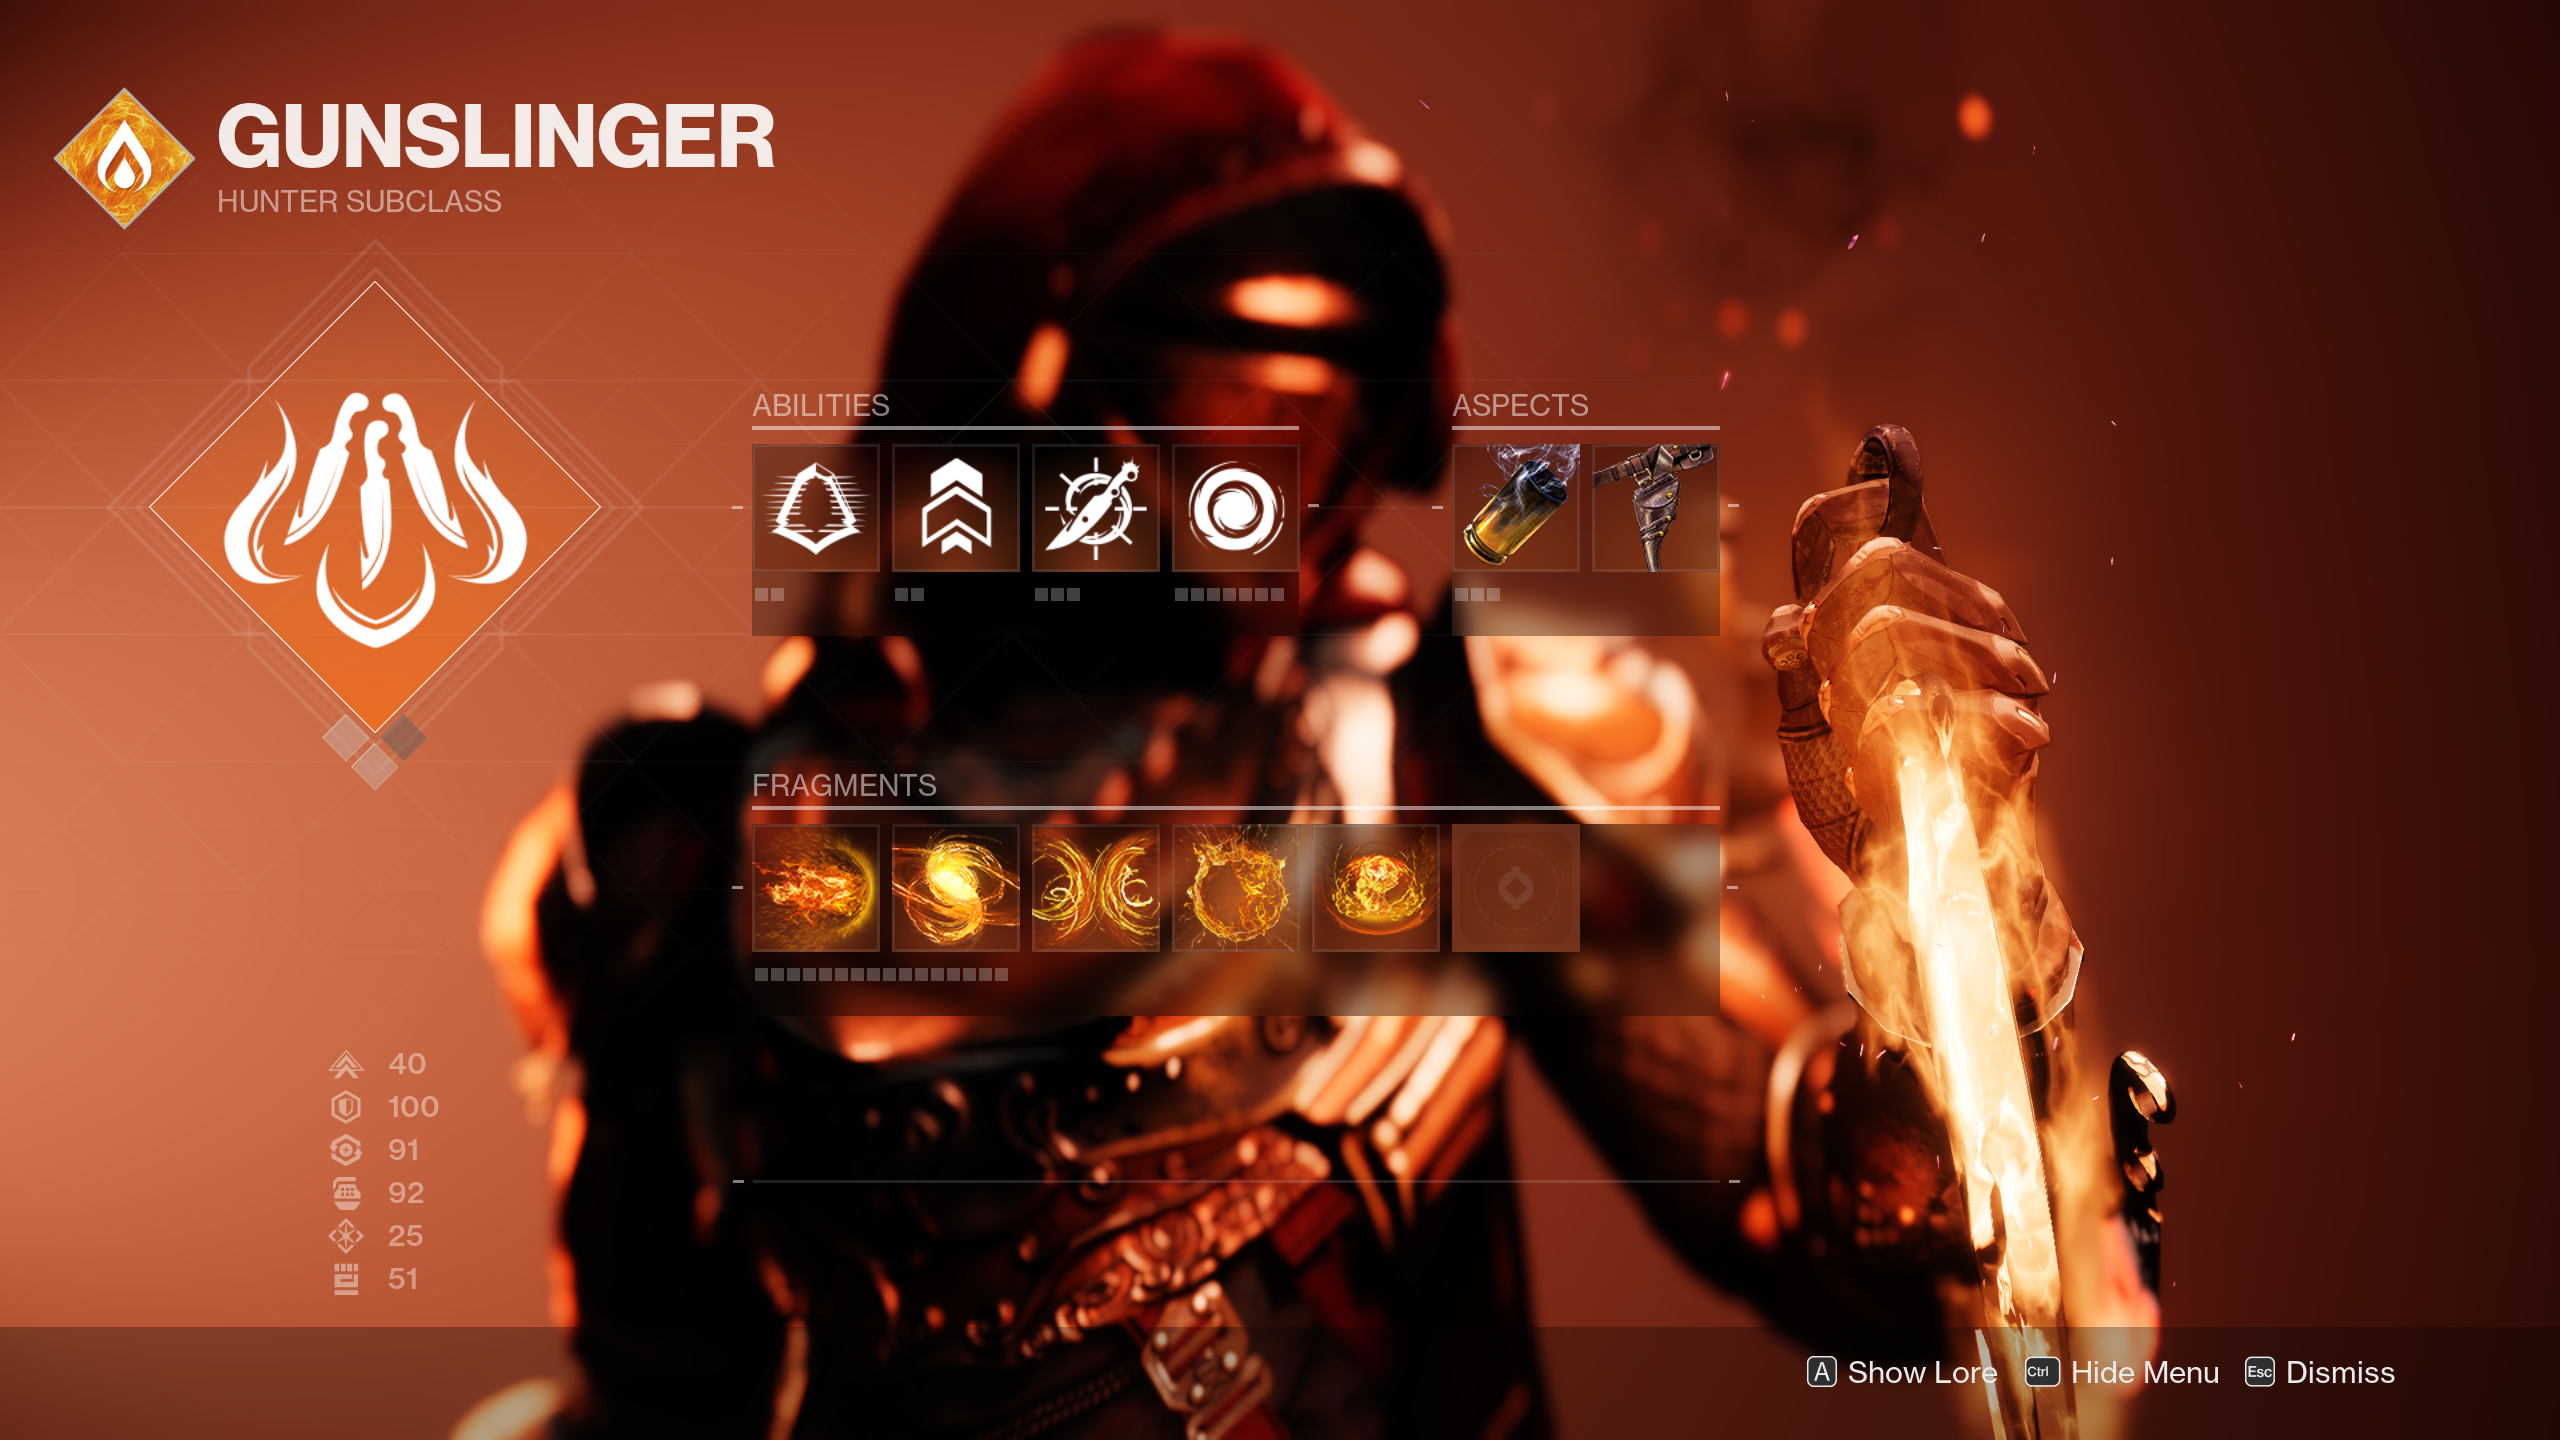
- Abilities: Blade Barrage, Gambler's Dodge, Proximity Explosive Knife, Solar Grenade
- Aspects: Knock 'Em Down, On Your Mark
- Fragments: Ember of Torches, Ember of Mercy, Ember of Char, Ember of Searing, Ember of Blistering
- Exotic: Caliaban's Hand
- Armor mods: Harmonic/Solar Siphon, Firepower, Heavy Handed, Charged Up, Solar Weapon Surge, Recuperation, Orbs of Restoration, Bomber (x2), Time Dilation
- Important stats: Resilience, Discipline
- Weapons: Solar primary (ideally w/ Incandescent perk)
The Solar Gunslinger subclass is often thought of as one of the weakest options for Hunters, but we think this setup will change some minds about that. The star of the show is the Caliban's Hand Exotic gauntlets that make Proximity Explosive Knives cause explosive ignitions whenever you get a final blow with them. It pairs perfectly with the Ember of Torches Fragment and Knock 'Em Down Aspect, as the former gives you the radiant damage buff when you use your knife and the latter fully refunds your knife (melee) energy when you get a kill with one.
These three core components of the build allow you to throw infinite explosive knives as long as you get kills with them, but we can make it even better with more Fragments (the On Your Mark Aspect's weapon handling and reload speed benefits are nice, but we're mainly using it for its three Fragment slots). In addition to Ember of Torches, make sure you take Ember of Char, Searing, Mercy, and Blistering. Ember of Char will make the ignitions your explosive knives cause spread damage-over-time scorch stacks, while Ember of Searing gives you melee energy when defeating scorched targets and makes them leave behind a Firesprite pickup. These give you grenade energy at baseline, but with Ember of Mercy, they'll also grant you strong restoration healing. Finally, there's Ember of Blistering, which gives you grenade energy when you get ignition kills.
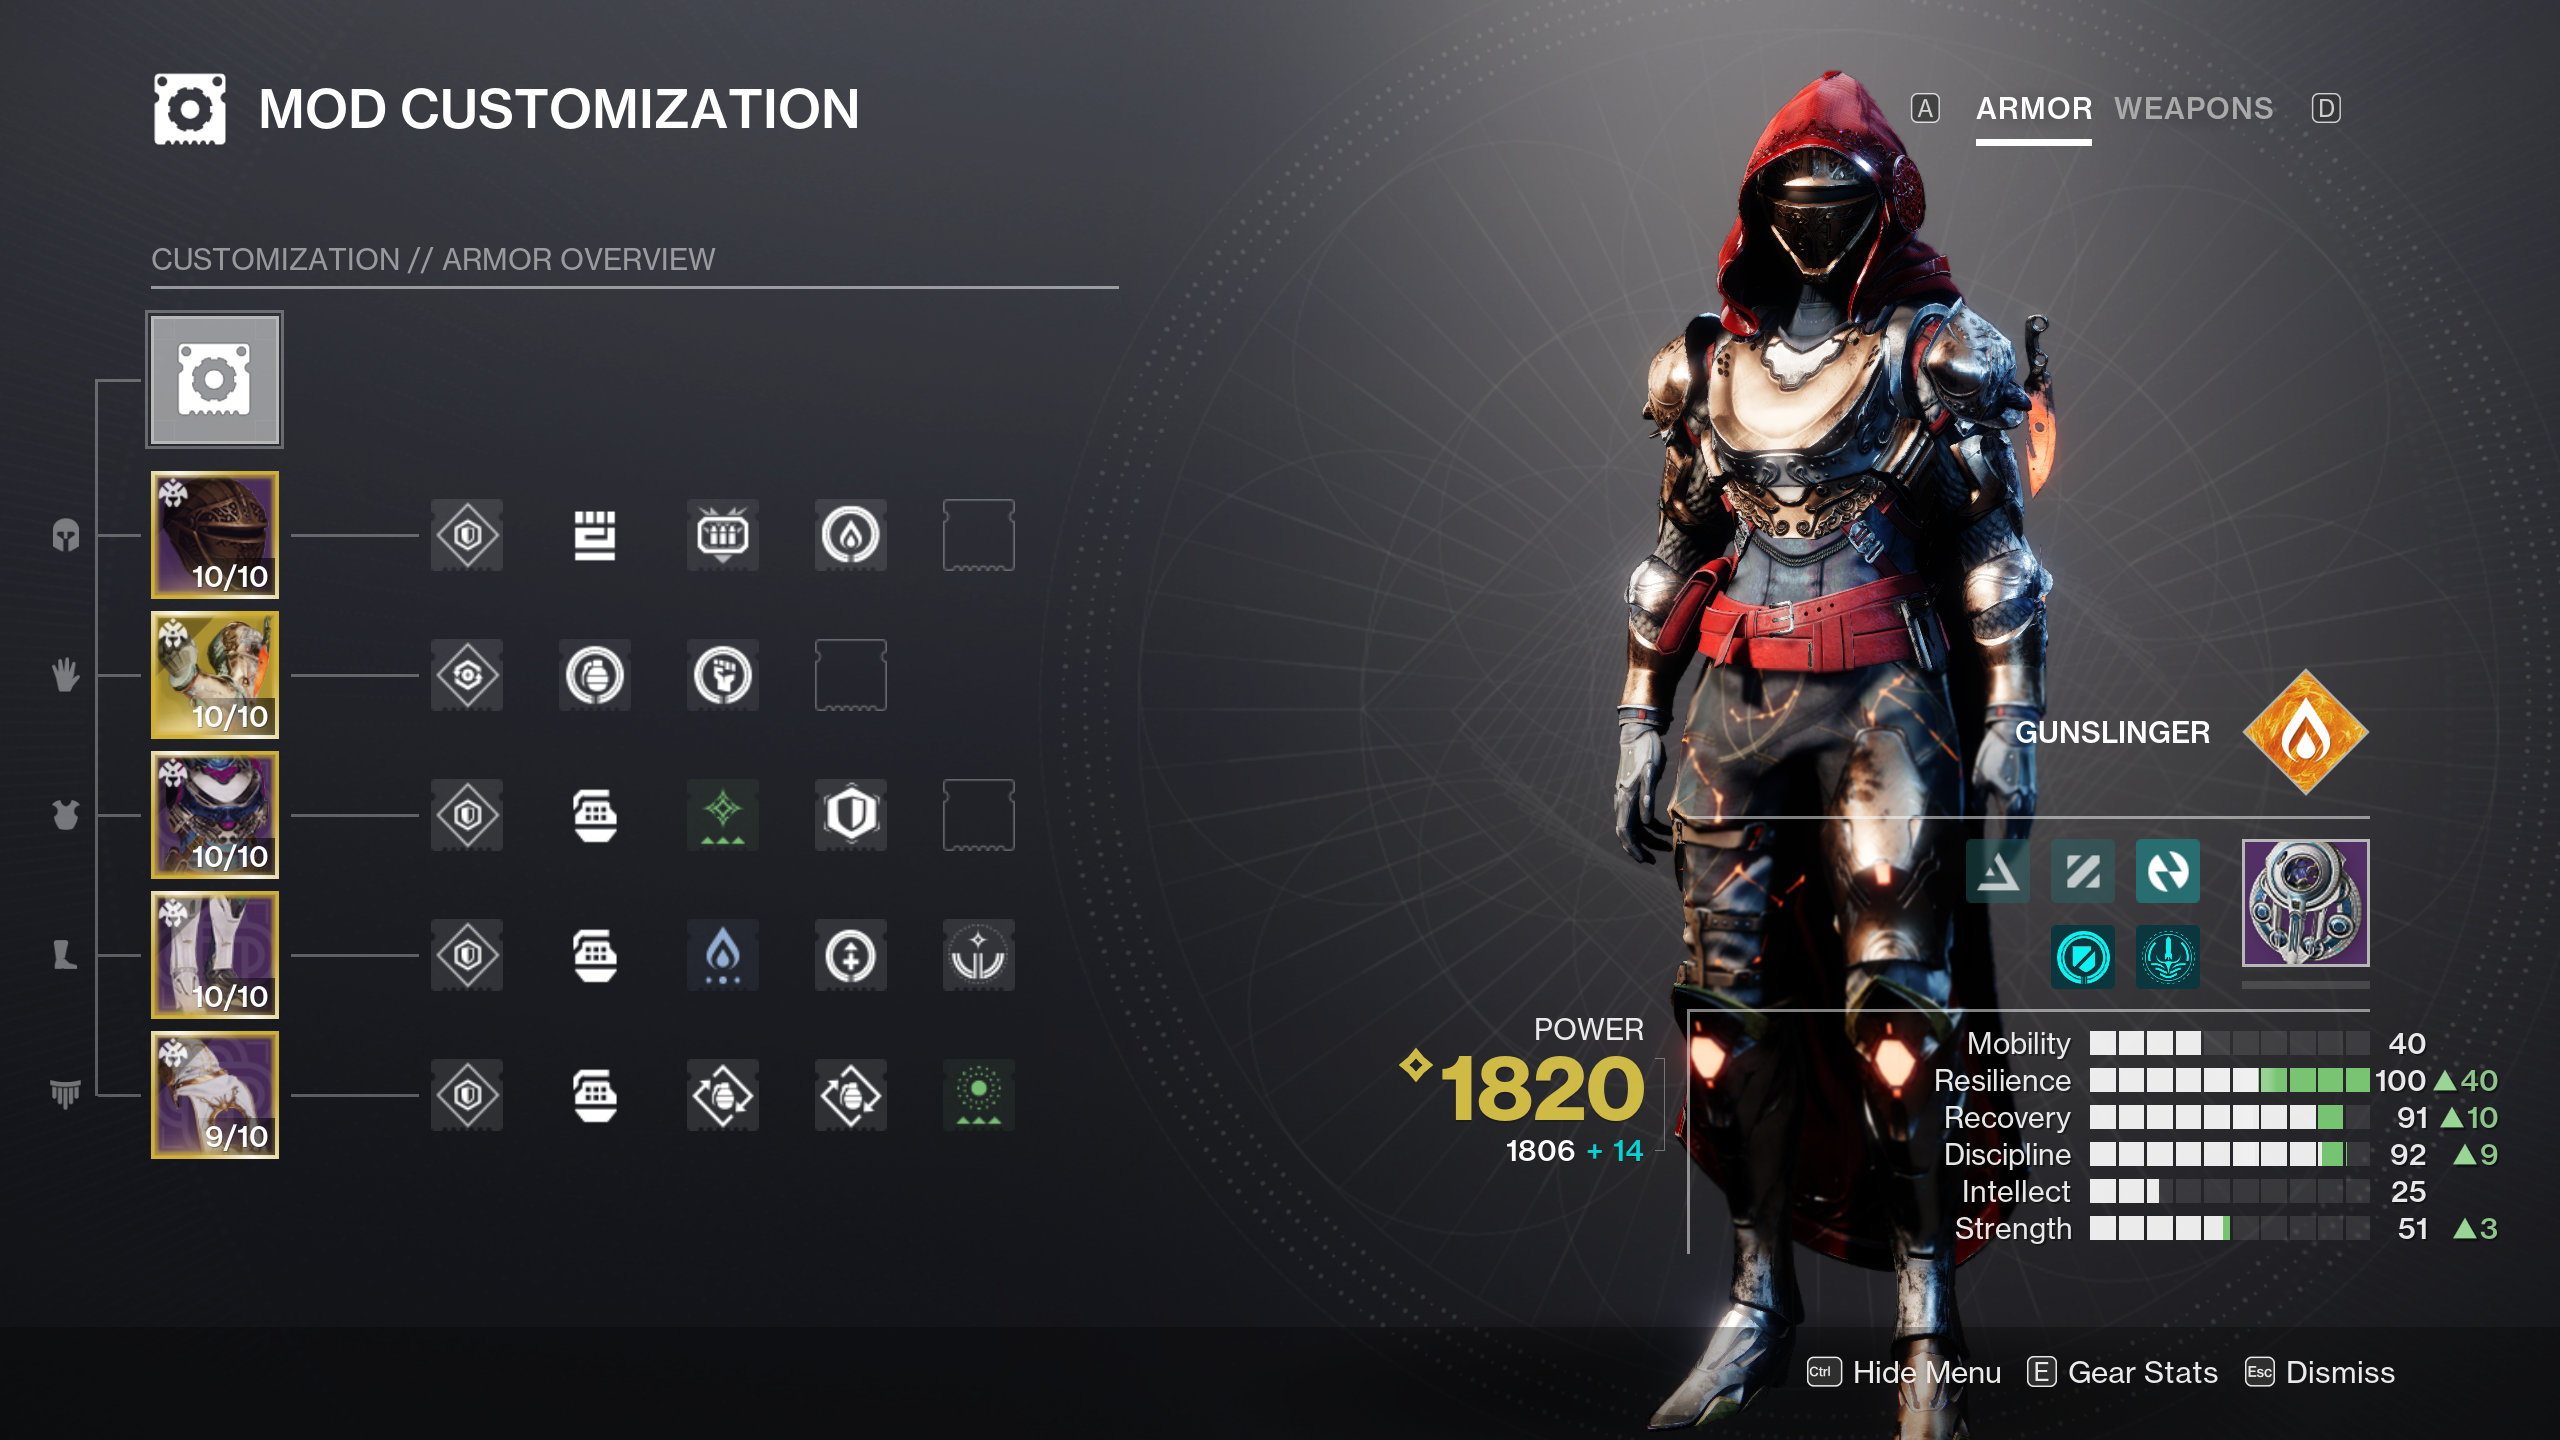
With this setup, you'll get tons of healing and grenade energy from your knife kills, and the melee energy provided by Ember of Searing will help you get your knife back as quickly as possible if you miss with it (Gambler's Dodge, too). Mod-wise, we recommend using Firepower and Heavy Handed to generate Orbs of Power with your grenade and knife kills (Harmonic/Solar Siphon as well if you have a Solar weapon). These will heal you and give you ability energy with additional mods such as Recuperation, Orbs of Restoration, and Bomber. With Charged Up, Solar Weapon Surge, and Time Dilation, these Orbs will also give you Armor Charge that converts into a long-lasting Solar weapon buff that stacks with the radiant one provided by Ember of Torches. Note that you should try and use a Solar weapon with the Incandescent perk on it such as Calus Mini-Tool, as it'll give you another way to proc the build's scorch-related benefits.
Best Arc Hunter Arcstrider build
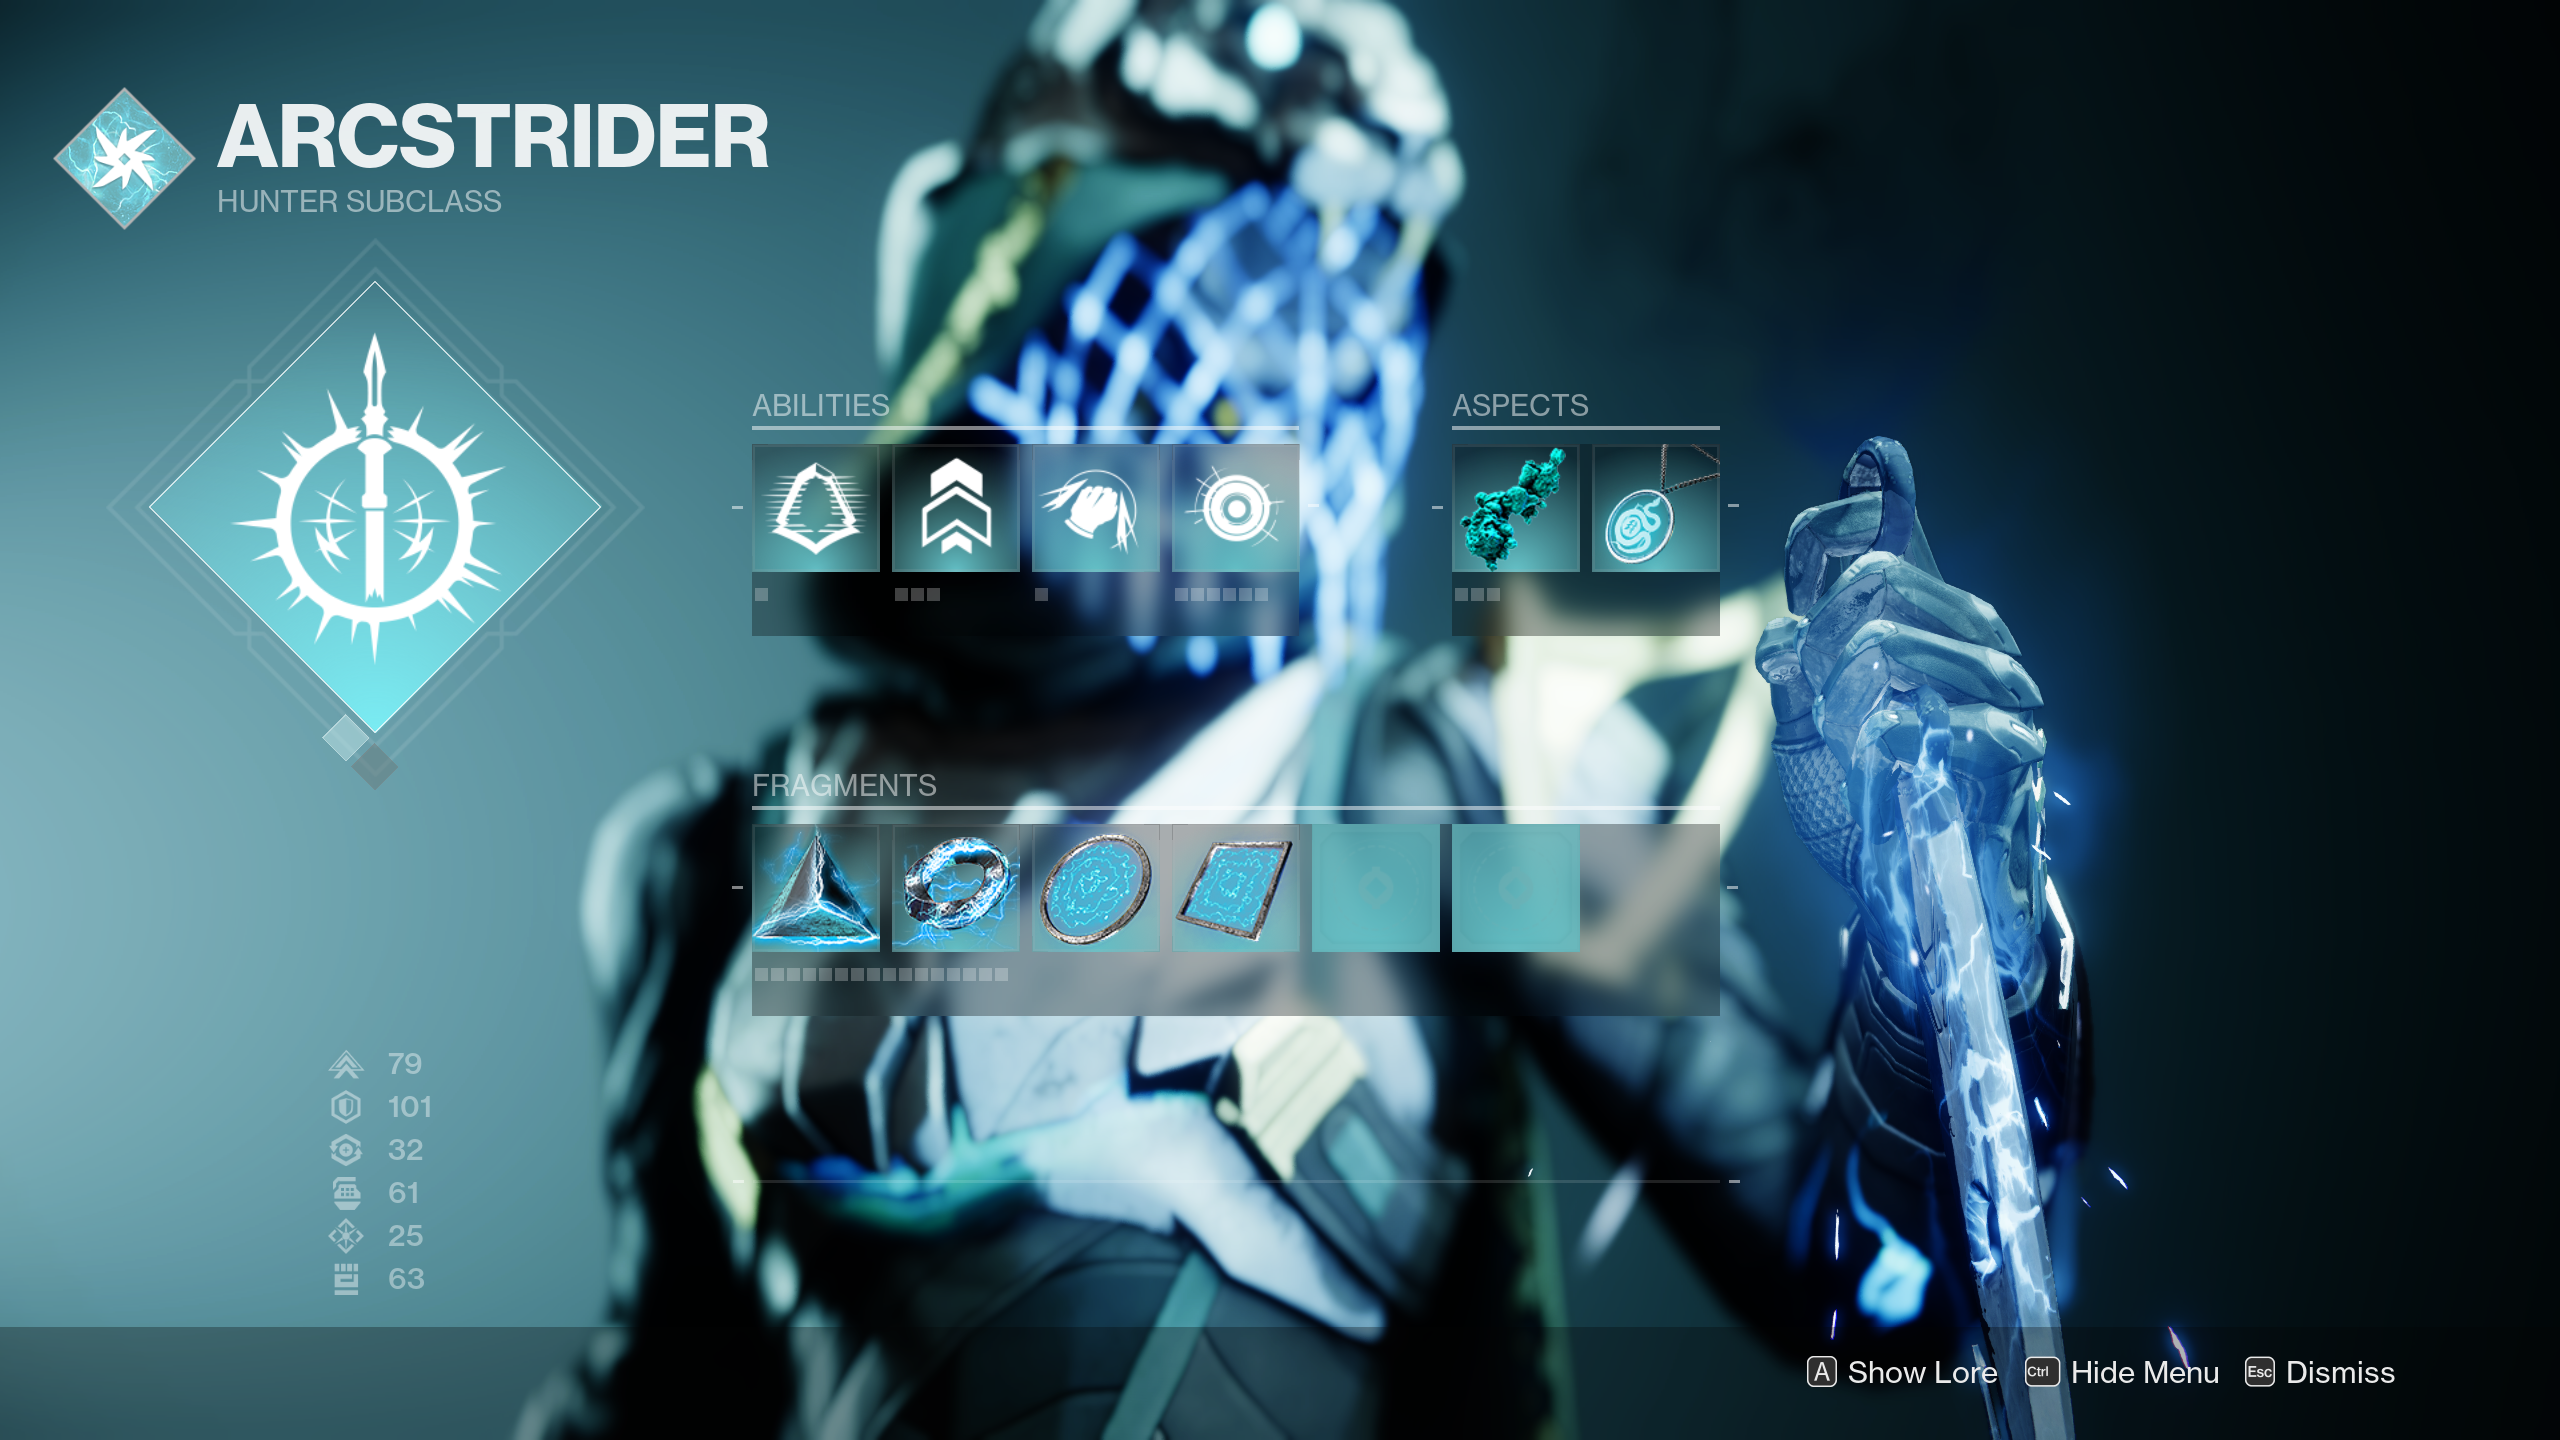
- Abilities: Gathering Storm, Gambler's Dodge, Combination Blow, Pulse Grenade
- Aspects: Lethal Current, Flow State
- Fragments: Spark of Resistance, Spark of Shock, Spark of Magnitude, Spark of Feedback
- Exotic: Assassin's Cowl OR Liar's Handshake
- Armor mods: Hands-On, Ashes to Assets, Heavy Handed, Impact Induction, Melee Damage Resistance, Charged Up, Stacks on Stacks, Weapon Surge (of your choice) OR a Font mod (of your choice) OR Emergency Reinforcement, Innervation, Recuperation, Bomber (x2), Distribution
- Important stats: Resilience, Discipline, Mobility
- Weapons: Shotgun w/ One-Two Punch
Melee-focused builds are hard to use in endgame content due to how resilient and deadly many foes are in higher difficulties, but this one is the exception. By using the Lethal Current and Flow State Aspects with the Combination Blow melee ability and the Assassin's Cowl Exotic helmet, you can punch your way through hordes of enemies with relative safety and deadly efficiency.
To make the build work, you'll first need to dodge near an enemy to proc Lethal Current and make your next melee attack jolt your target and create an Arc shockwave (follow up melees against jolted foes will also blind them). Then, kill an enemy with this melee to get Combination Blow's stacking damage buff rolling, regain your Gambler's Dodge, become Amplified for faster movement, and proc healing and Void invisibility from the Assassin's Cowl. Use the invisibility and Amplified status effect to get close to other foes and repeat this process until you're at Combination Blow x3, at which point you'll be killing most enemies in one melee hit with ease. Continue chaining Combination Blow and Gambler's Dodge over and over, throwing grenades when necessary and using a One-Two Punch Shotgun to buff your melee damage further when fighting resilient enemies like Champions or other "yellow bars." Note that since you can jolt and blind with your melee attacks, you can counter both Overload and Unstoppable Champions using this build.

Fragments aren't important for this build's functionality, but the ones we've chosen — Spark of Resistance, Shock, Magnitude, and Feedback — provide some valuable benefits. Spark of Resistance reduces the damage we take from enemies while you're surrounded, which you often will be with a melee build like this. Spark of Shock lets you use your grenade as a jolting tool, while Magnitude increases the duration of their lingering effects. Spark of Feedback, meanwhile, gives your melee damage an additional buff if enemies hit you with a melee attack of their own.
For your stats, focus primarily on Resilience and Discipline (Mobility and Strength are less important since your dodge and melee abilities refresh each other, and you don't need a lot of Recovery thanks to Assassin's Cowl healing). Your mods don't matter much, but we do recommend using Heavy Handed to create Orbs of Power with your melee kills and get Armor Charge stacks. You can then use these on a Weapon Surge mod of your choosing (consider buffing whatever element your One-Two Punch Shotgun is), the Emergency Reinforcement mod that provides heavy damage resistance when your shields are broken, or a Font mod that provides a temporary +30 to one of your stats while active.
Best Stasis Hunter Revenant build
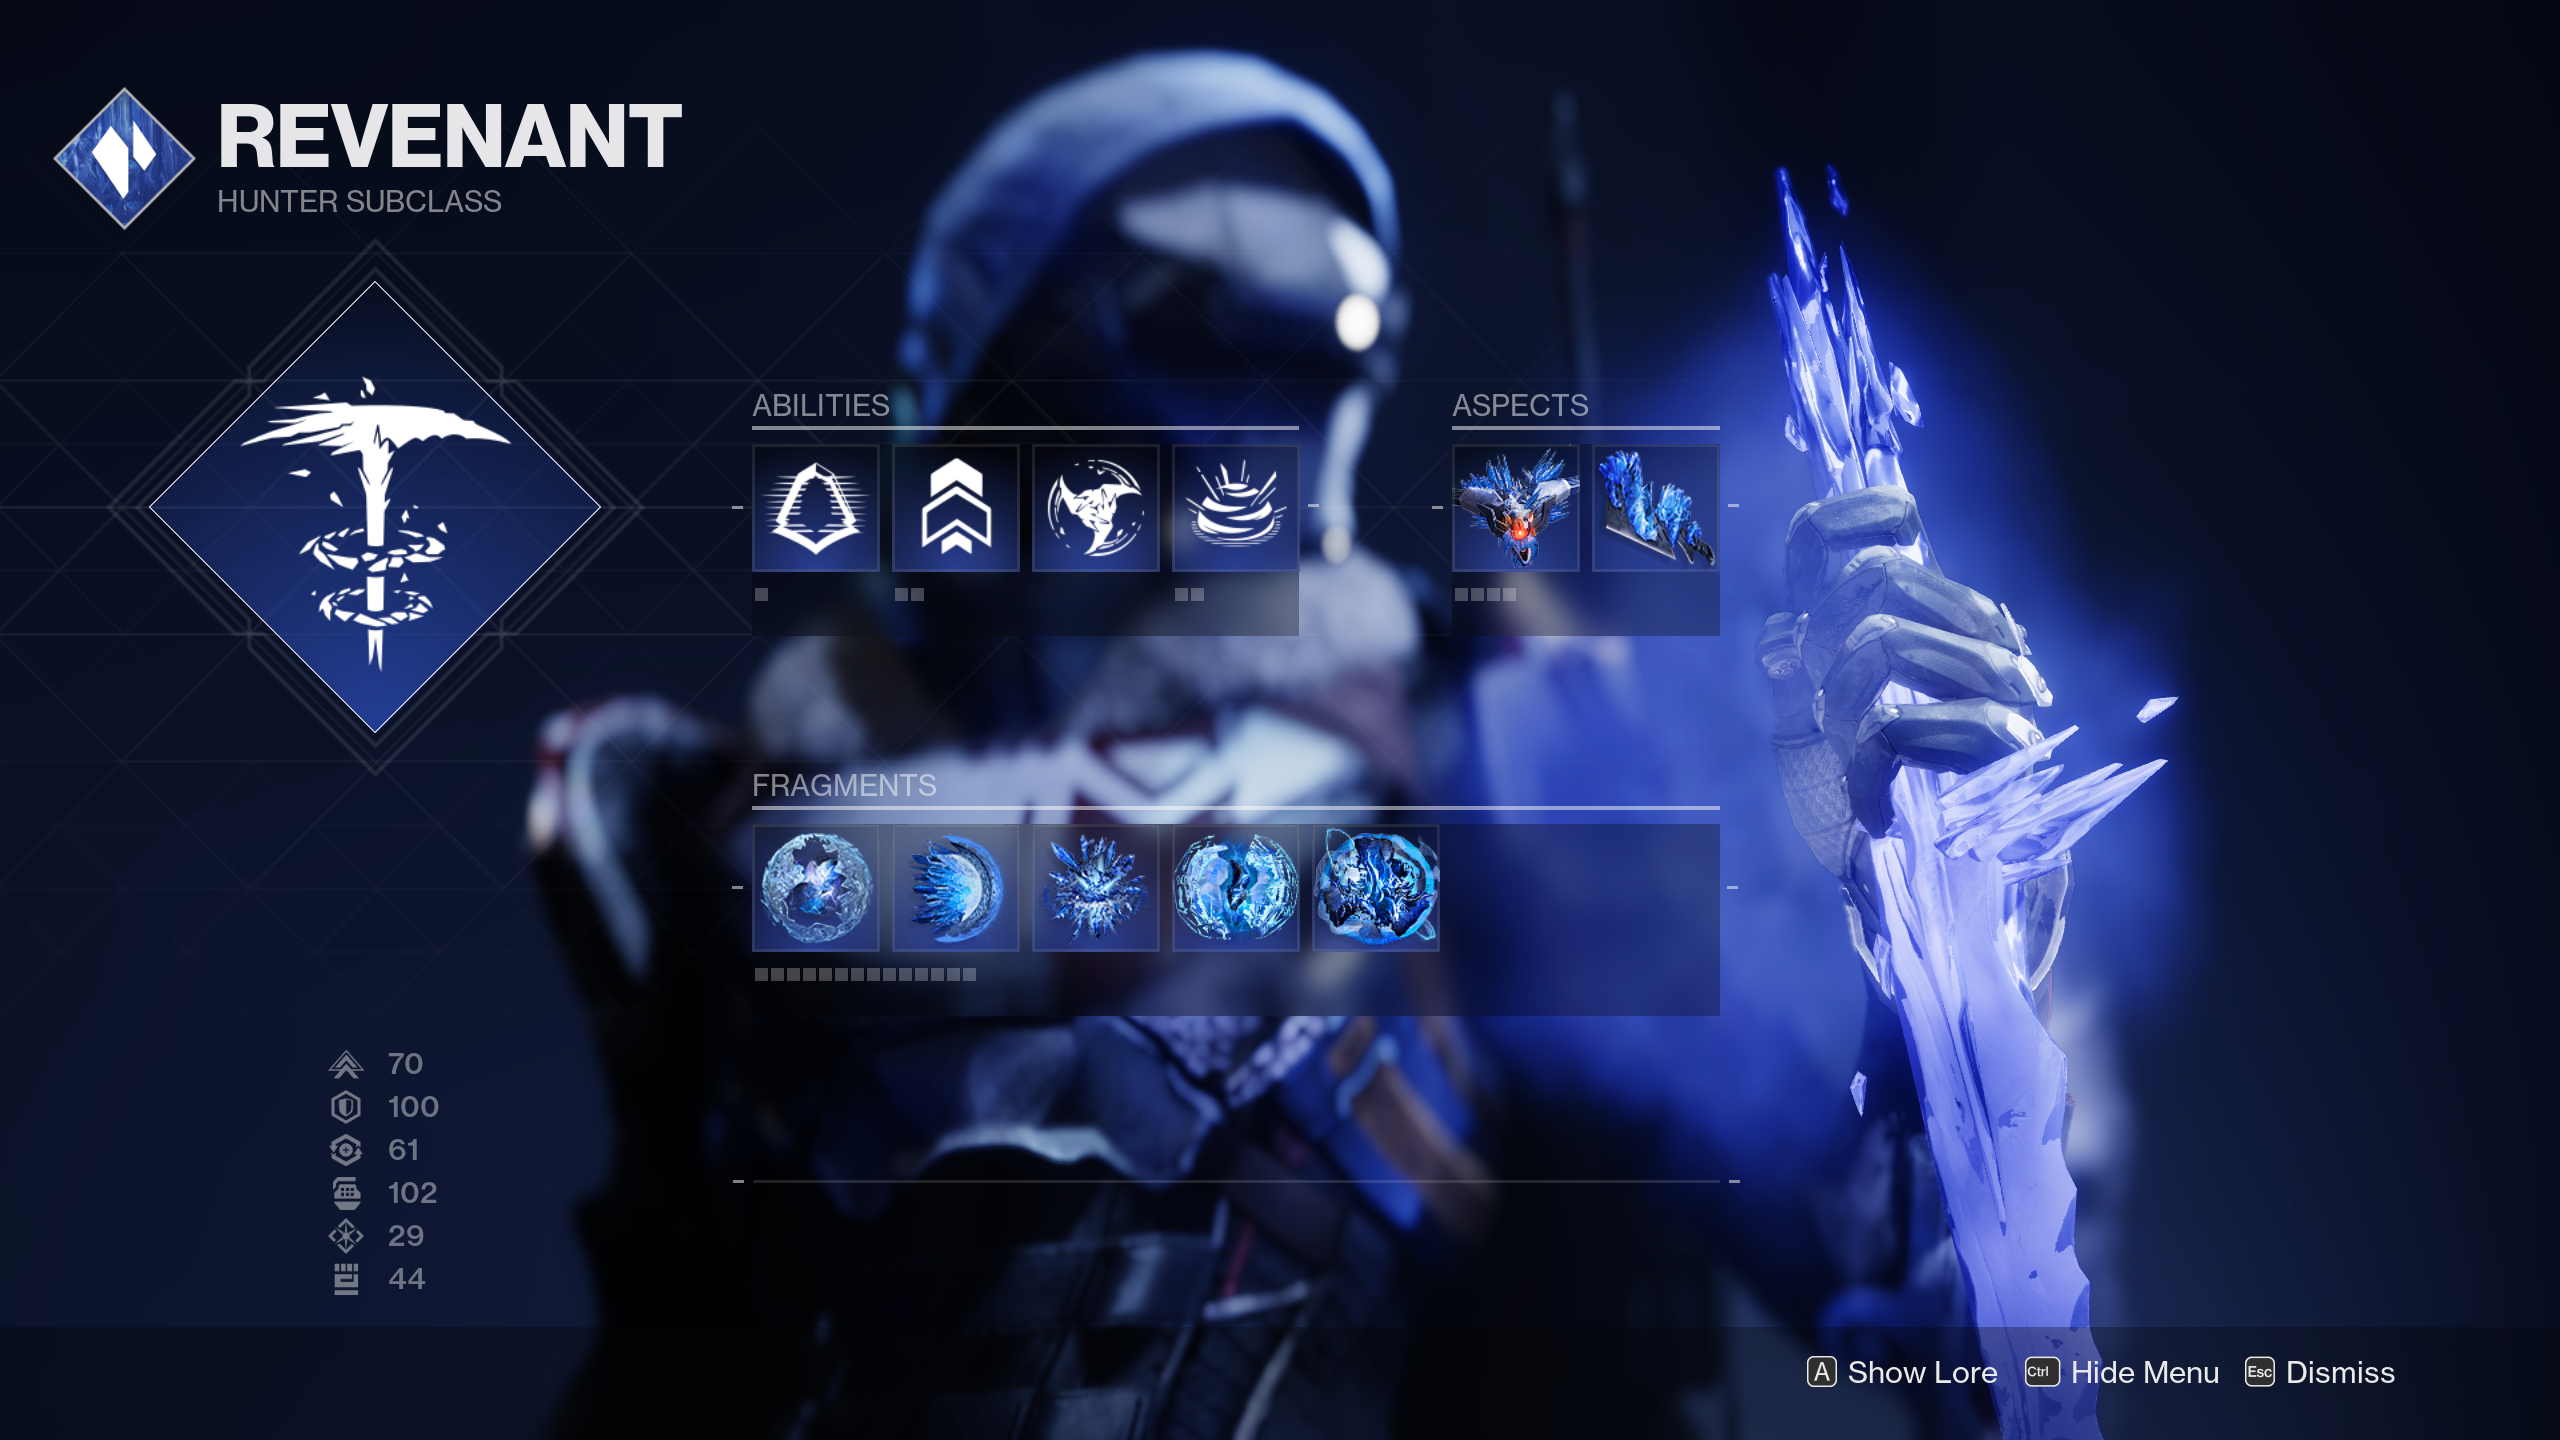
- Abilities: Gambler's Dodge, Duskfield Grenade
- Aspects: Touch of Winter, Grim Harvest
- Fragments: Whisper of Chains, Whisper of Durance, Whisper of Shards, Whisper of Torment, Whisper of Rime
- Exotic: Renewal Grasps
- Armor mods: Siphon mod (of your choice), Impact induction, Grenade Kickstart, Charged Up, Innervation, Recuperation, Stacks on Stacks, Bomber (x2), Reaper
- Important stats: Resilience, Discipline, Mobility
- Weapons: Close to medium range
Hunters aren't typically thought of as a tanky class, but you'll be surprisingly resilient with this Stasis build. It revolves primarily around the Renewal Grasps Exotic gauntlets and the Touch of Winter Aspect, both of which increase the radius of your Duskfield Grenade and enhance its functionality. The former reduces the damage output of enemies in the grenade's area-of-effect and also reduces the damage you take while standing in it, and the latter makes the grenade also create a Stasis crystal where it lands. Thus, as long as you're fighting enemies within your Duskfield Grenade's radius, it'll be very difficult for them to kill you — especially if you're using the Fragments listed below.
A few different Fragment combinations can work, but in our experience, the best ones to equip for this build are Whisper of Chains, Durance, Shards, Torment, and Rime. Whisper of Chains further increases your damage resistance whenever you're near a friendly Stasis crystal (like the one your Duskfield Grenades create thanks to Touch of Winter), while Whisper of Durance makes the slowing effects of your Duskfields last longer. Whisper of Shards and Torment both help you get your Duskfield Grenades back faster via destroying your Duskfield's Stasis crystal and taking damage, and Whisper of Rime makes the Grim Harvest Stasis shards generated by defeating slowed or frozen enemies heal you and provide a small overshield.
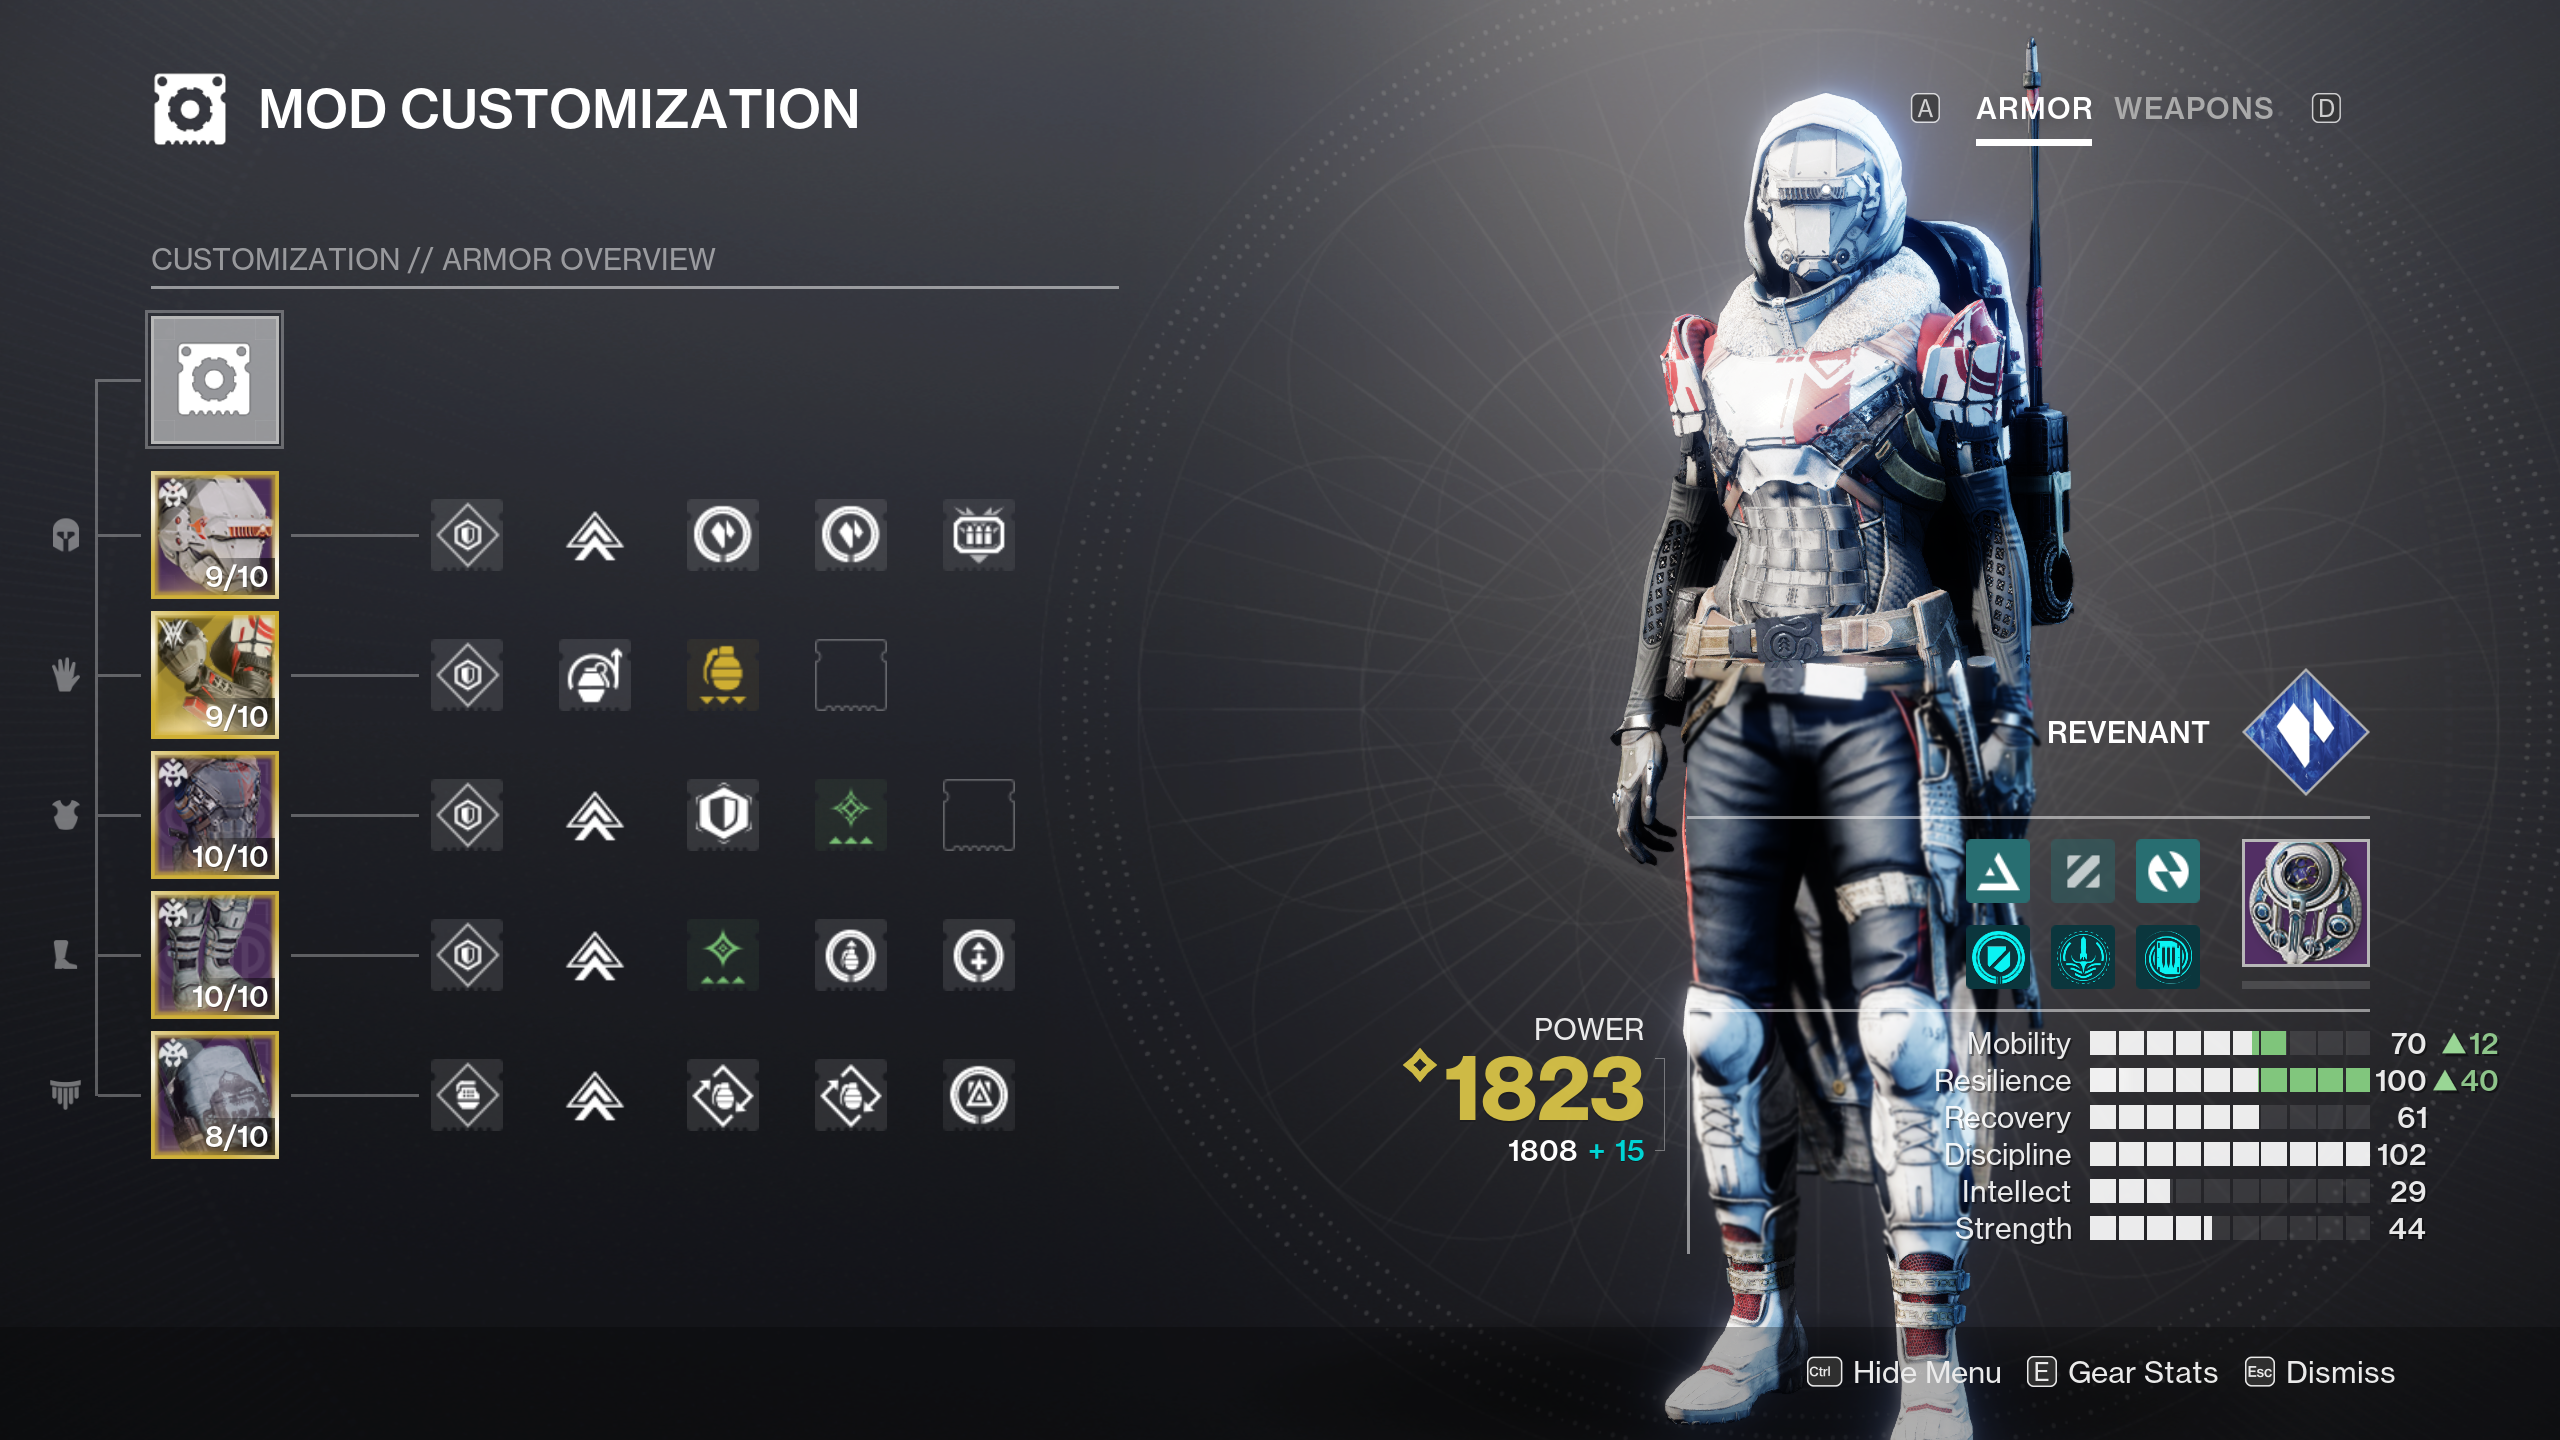
Your mod package should be focused on getting your Duskfield Grenades back faster since they're the core ability in this build. Impact Induction will make your shuriken melees return grenade energy to you, and Bolstering Detonation will make your Duskfield damage feed your Gambler's Dodge, which will in turn replenish shurikens for you to proc Impact Induction with. Also make sure you use a Siphon mod that matches the element of your primary weapon to make Orbs of Power, which will give you Armor Charge to use Grenade Kickstart with and will also directly help you get your grenades (and health, with Recuperation) back if you use the Innervation mod. Stat-wise, go for max Resilience and Discipline, followed by Mobility.
Best Strand Hunter Threadrunner build
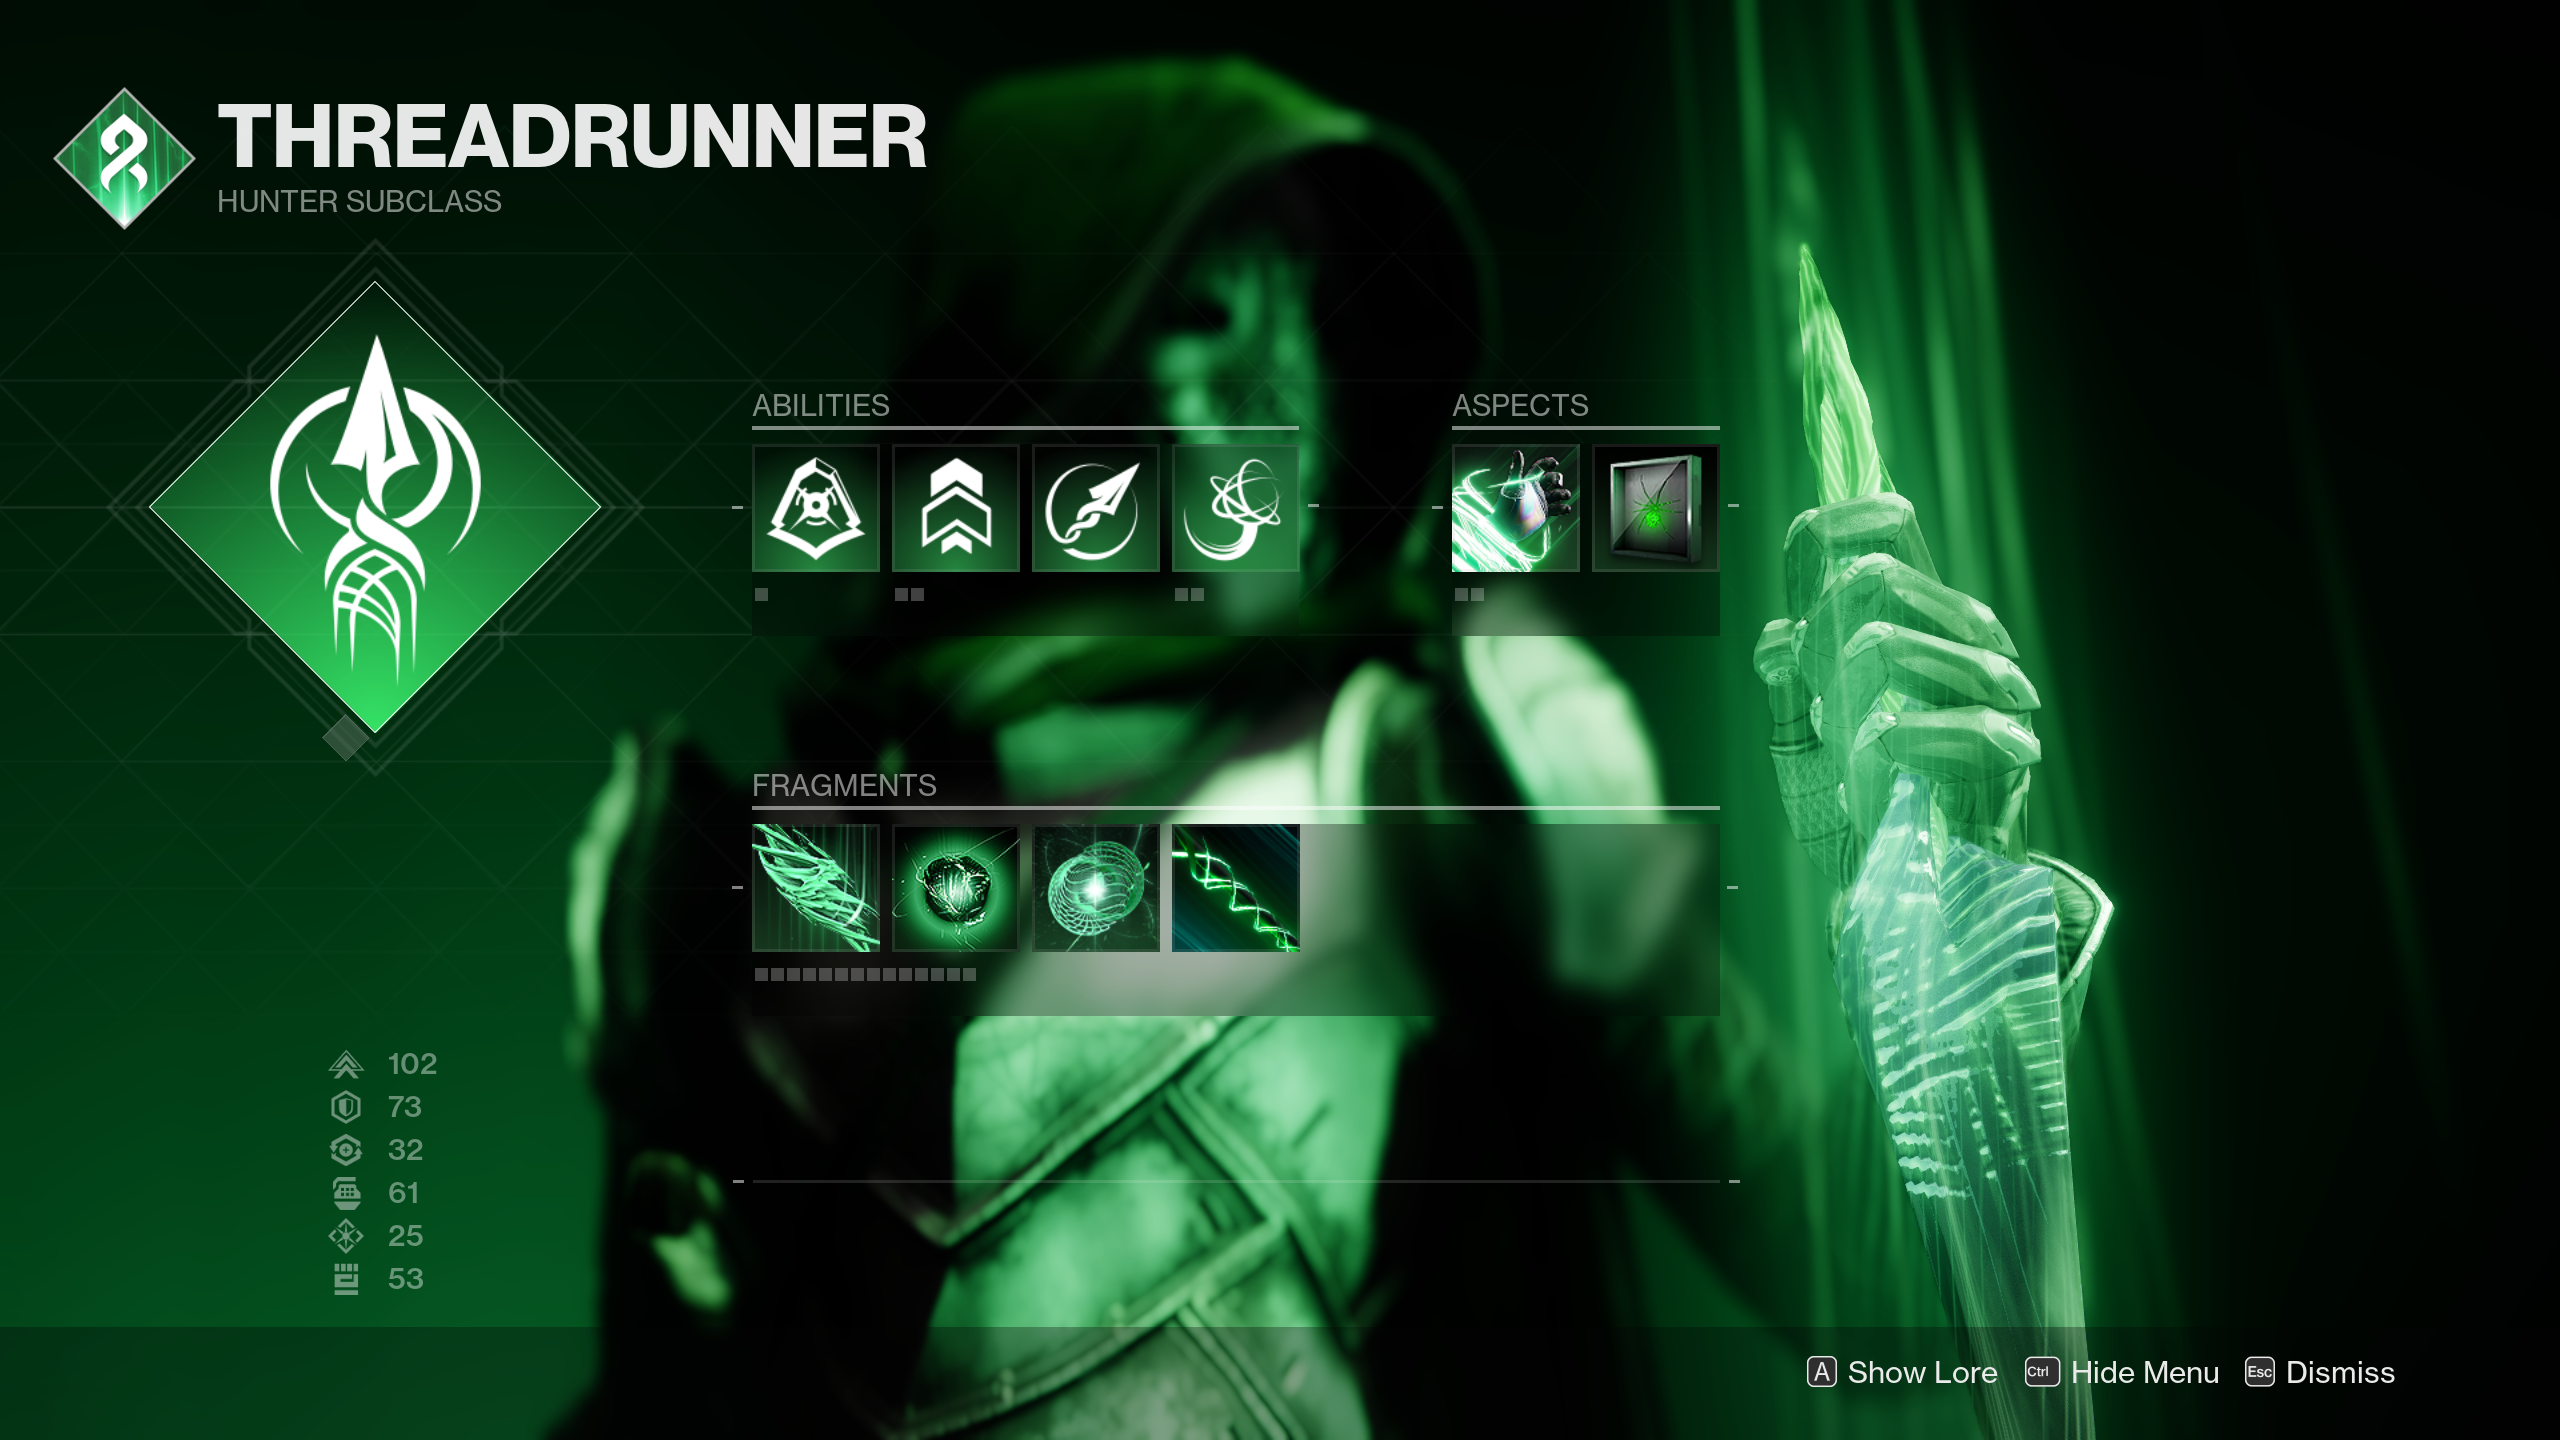
- Abilities: Marksman's Dodge, Grapple Grenade
- Aspects: Widow's Silk, Ensnaring Slam
- Fragments: Thread of Mind, Thread of Generation, Thread of Warding, Thread of Binding OR Thread of Wisdom
- Exotic: Assassin's Cowl OR The Sixth Coyote
- Armor mods: Impact Induction, Focusing Strike, Heavy Handed, Charged Up, Stacks on Stacks, Innervation, Recuperation, Utility Kickstart, Bomber, Reaper
- Important stats: Mobility, Discipline, Resilience
- Weapons: Close to medium range
The best way to build the new Strand Hunter subclass, Threadrunner, is to lean into its intrinsic synergy with the Grapple Grenade. You get two grenade charges with the Widow's Silk Aspect, and since it also makes your grapples create anchors that you can grapple to without using your grenade energy, you can grapple to these anchors over and over again to repeatedly hit enemies with grapple melee combos. You can also grapple to Tangles you create and throw in the same way, using them as a mobility and initiation tool. Meanwhile, the Ensnaring Slam Aspect allows you to consume your dodge while midair to slam into the ground and suspend foes in an area-of-effect, leaving them helpless as you grapple melee them.
There are three key Fragments in this build: Thread of Mind, Generation, and Warding. Thread of Mind gives you class ability energy whenever you kill suspended targets, which will allow you to get your dodge — and, by extension, your Ensnaring Slams — back simply by defeating the enemies you suspend with it. Thread of Generation steadily replenishes grenade energy as you do damage, ensuring that you'll always have your grapple charges available. Finally, Thread of Warding will grant you the Woven Mail buff (60% damage resistance) whenever you pick up an Orb of Power, making it significantly harder for foes to kill you. The fourth Fragment slot is flexible; we chose Thread of Binding for its +10 Resilience boost and the ability to suspend groups of ads while you're using the Silkstrike Super, but Thread of Wisdom is also a good choice if you'd rather generate Orbs of Power by killing suspended targets with precision damage.
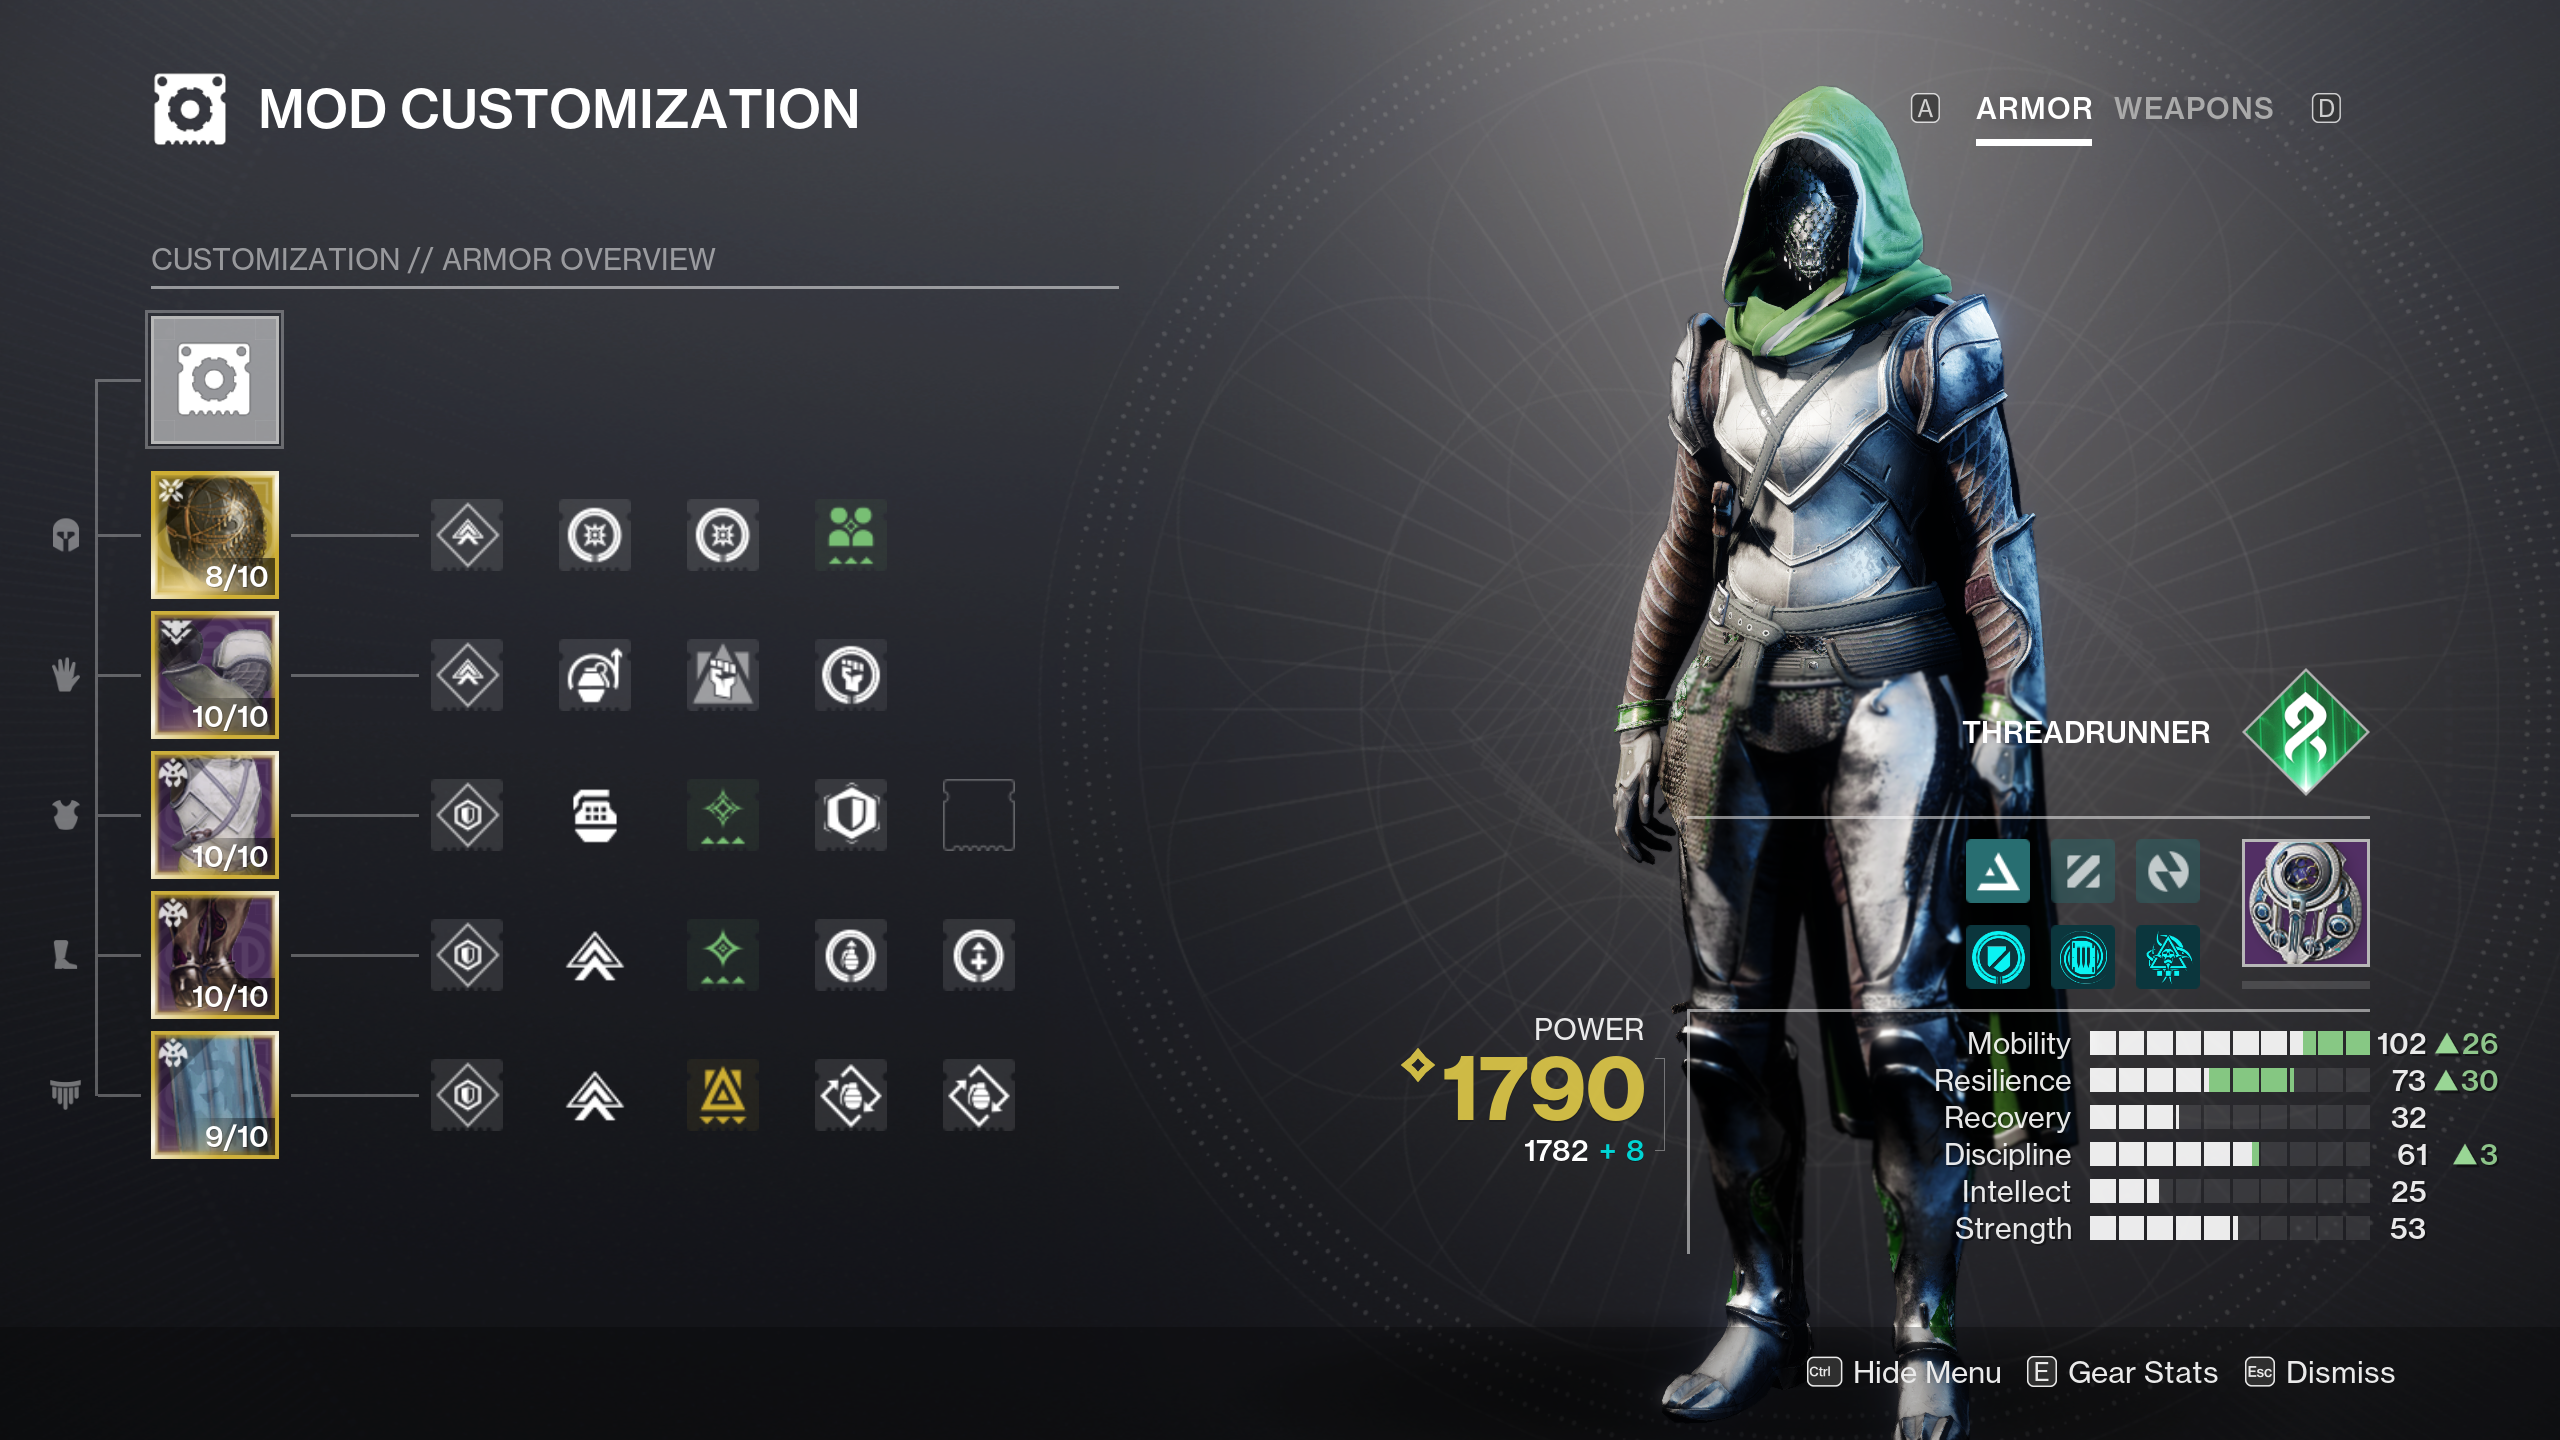
For mods, we recommend Impact Induction and Focusing Strike to get grenade and class ability energy back during each of your grapple melees. Also take Heavy Handed, which will generate an Orb of Power each time you kill something with your grapple melees. These Orbs will also replenish grenade energy and heal you if you equip the Innervation and Recuperation mods, and the Armor Charge they provide when using Charged Up, Stacks on Stacks, and Utility Kickstart will return a significant amount of class ability energy after each Ensnaring Slam you perform as well. Note that you can also use Reaper to make an additional Orb of Power by killing something with one of your weapons after each use of Ensnaring Slam, too. You should go for high Mobility, Discipline, and Resilience with your stats.
Two Exotics work well for this build: Assassin's Cowl and The Sixth Coyote. Assassin's Cowl will give you healing and Void invisibility whenever you kill enemies with your grapple melees, while The Sixth Coyote will give you an extra dodge charge that you can use to perform two Ensnaring Slams in rapid succession. Assassin's Cowl and its survivability benefits generally make it the better choice, but ultimately, both Exotics synergize strongly with the build's playstyle.
Destiny 2: Best Warlock builds in Season 20
Here are the best builds for Warlocks. Though there are many different ways to create powerful setups with this class, the best Warlock builds typically feature tons of grenade spam and give your grenades unique class-exclusive functionalities.
Best Void Warlock Voidwalker build

- Abilities: Nova Bomb (Vortex or Cataclysm), Healing Rift OR Empowering Rift, Vortex Grenade
- Aspects: Feed The Void, Chaos Accelerant
- Fragments: Echo of Instability, Echo of Remnants, Echo of Undermining
- Exotic: Contraverse Hold
- Armor mods: Harmonic/Void Siphon, Ashes to Assets, Firepower, Grenade Kickstart, Charged Up, Stacks On Stacks, Innervation (x2), Bomber (x2), Reaper
- Important stats: Resilience, Discipline, Recovery
- Weapons: Void primary
Void Warlock has been an endgame PvE staple since Destiny 2 launched in 2017, and thanks to The Witch Queen's Void 3.0 overhaul last year, it's stronger now than it has ever been. It's also hilariously simple: all you have to do is throw Chaos Accelerant-boosted Vortex Grenades at foes. You'll get a ton of grenade energy back after each throw from the Contraverse Hold Exotic's Chaotic Exchanger perk, and your grenade kills will also give you both Devour healing and Volatile Rounds for your Void weapons thanks to the Feed The Void Aspect and the Echo of Instability Fragment, respectively.
In addition to Echo of Instability, you should also use Echo of Remnants and Echo of Undermining. Remnants will increase the duration of your Vortex Grenade's lingering effects, while Undermining will make your grenades weaken the foes they hit and cause them to take 15% increased damage. The -20 hit to your Discipline is a bit costly, but Contraverse Hold's Exotic perk and the build's mod setup mitigate this drawback.
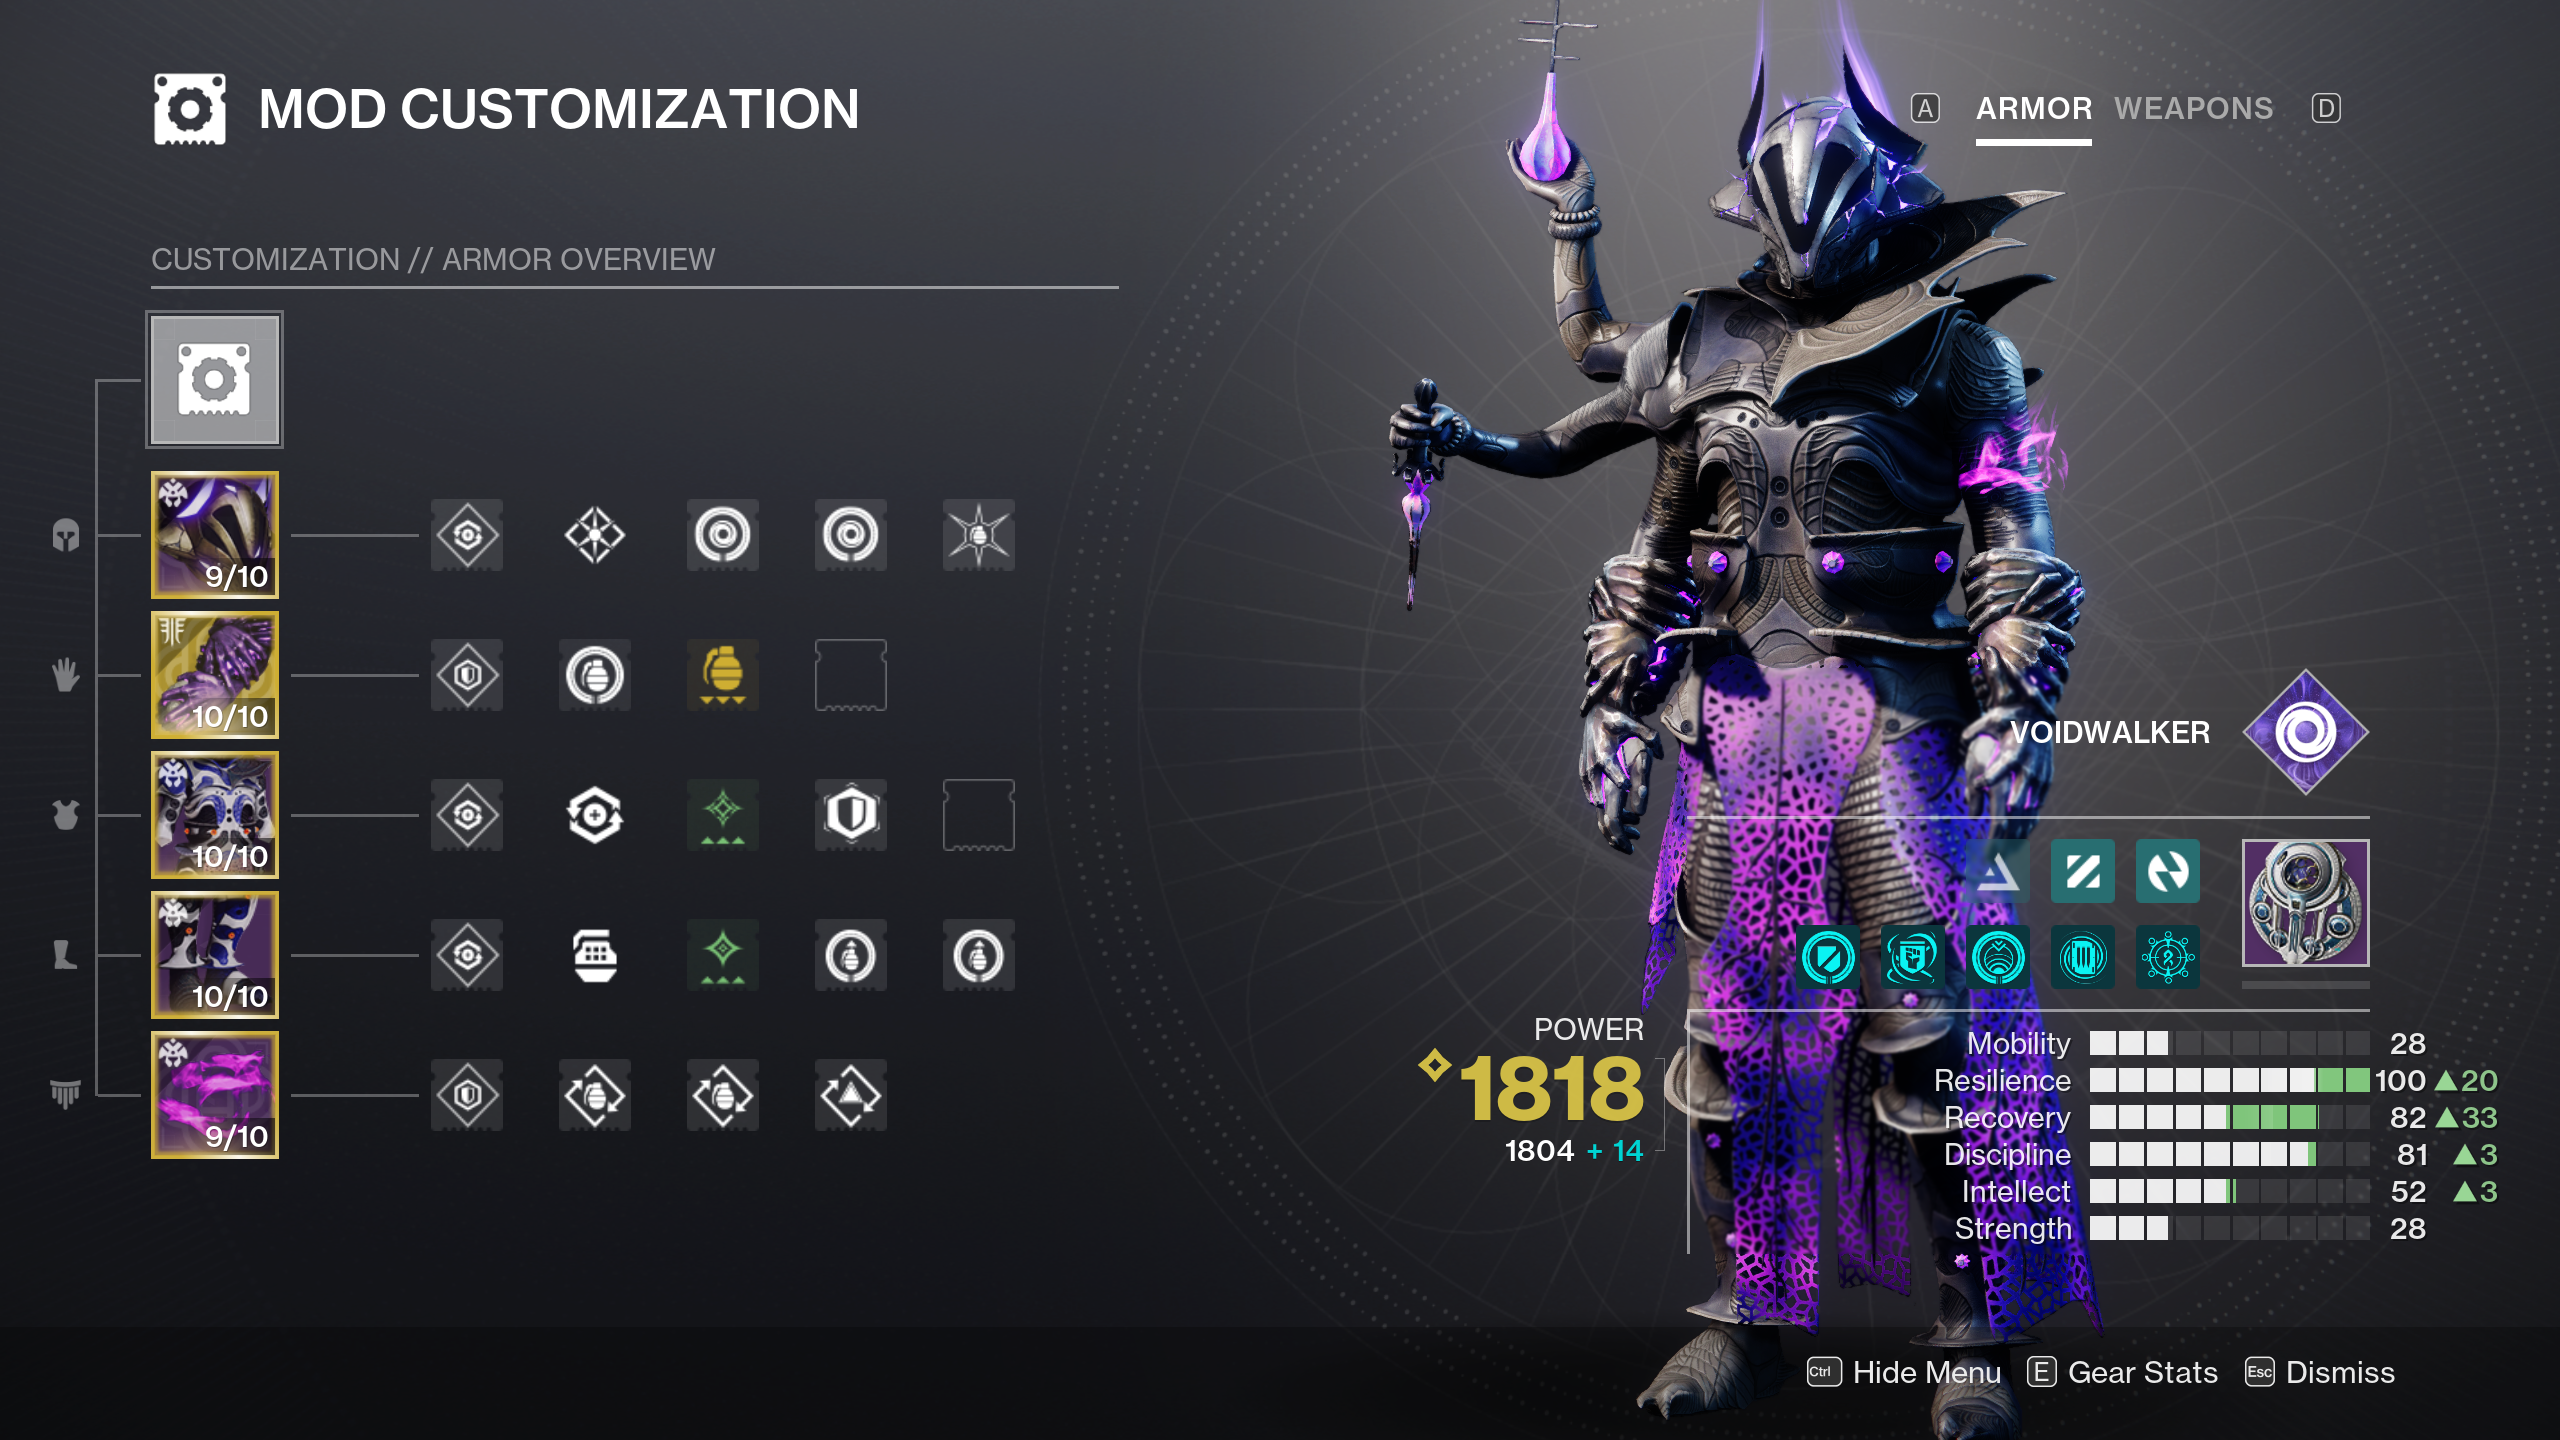
To round out the build, you'll want to boost our grenade recharge rate as much as possible with your armor mods. To that end, we recommend a Charged Up, Stacks On Stacks, and Grenade Kickstart setup, with both Firepower and Harmonic/Void Siphon mods acting as our Orb of Power generators. Use Innervation and Bomber for even more grenade energy, and consider using Reaper to get an extra Orb of Power with weapon kills after each rift cast, too. Stat-wise, aim for high Resilience, Discipline, and Recovery.
Best Solar Warlock Dawnblade build
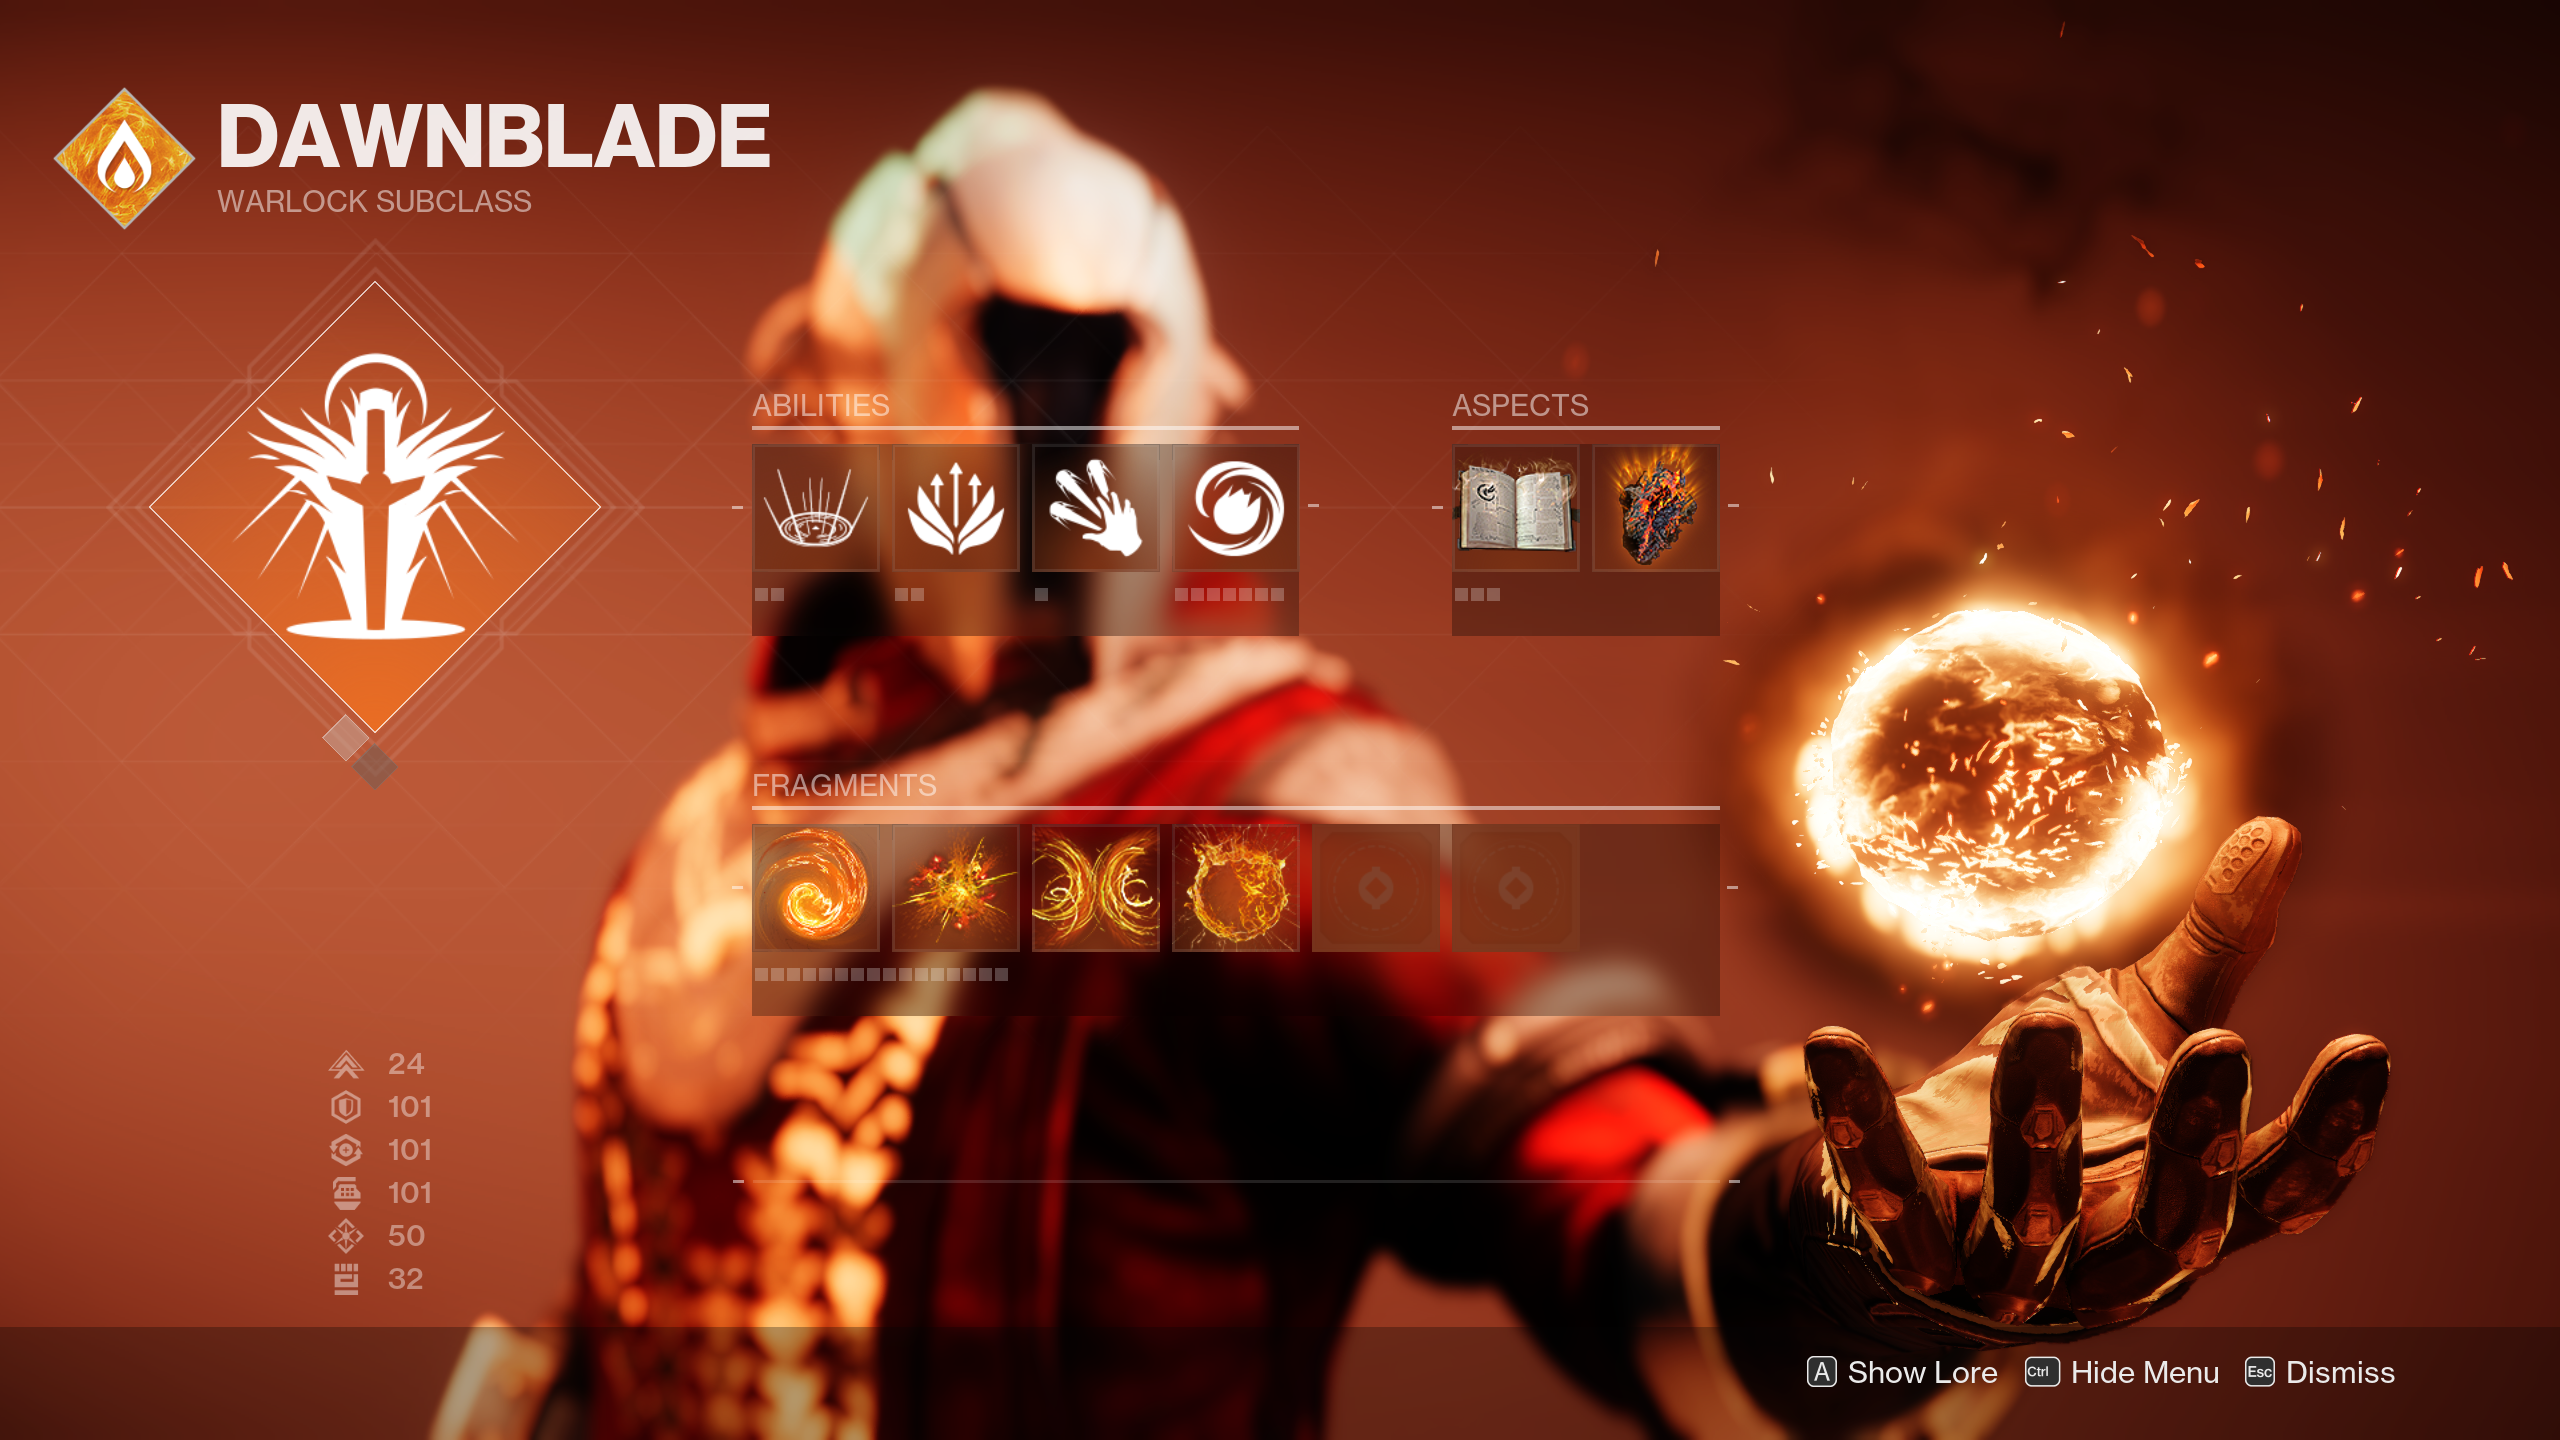
- Abilities: Well of Radiance, Empowering Rift, Celestial Fire OR Incinerator Snap, Fusion Grenades
- Aspects: Touch Of Flame, Heat Rises
- Fragments: Ember of Resolve, Ember of Eruption, Ember of Char, Ember of Searing
- Exotic: Starfire Protocol
- Armor mods: Harmonic/Solar Siphon, Ashes to Assets, Firepower, Momentum Transfer, Emergency Reinforcement, Charged Up, Stacks On Stacks, Recuperation, Innervation, Bomber (x2), Reaper
- Important stats: Resilience, Discipline, Recovery
- Weapons: Solar weapons, Witherhoard OR Osteo Striga
This Starfire Protocol build is arguably the best Destiny 2 build in the entire game. With it, you'll have infinite Fusion Grenade spam, tons of healing, frequent Well of Radiance Supers, plenty of melee charges, and more. To get it rolling, you'll first need to cast an Empowering Rift and throw your two Fusion Grenades at enemies. Then, use a damage-over-time weapon (Witherhoard is the best option in most situations, but Osteo Striga works well too) while in the Empowering Rift to proc Starfire Protocol's Fusion Harness perk and get your Fusion Grenades back extremely quickly. Whenever you get a kill with your grenades, Fusion Harness will also grant you full class ability energy, allowing you to cast another Empowering Rift and repeat this cycle. Note that Wells of Radiance are considered Empowering Rifts by Fusion Harness, too, so you can (and should) take advantage of this to chuck lots of grenades while in one.
The reason why the build is so effective is because with the Touch Of Flame Aspect, your Fusion Grenades will explode twice, instantly causing a deadly ignition. To further empower this setup, you should use Ember of Resolve, Eruption, Char, and Searing as your Fragments. Ember of Resolve cures you whenever you get a grenade kill, and since that will happen constantly with this build, you'll be getting a ton of healing. Ember of Eruption makes your ignition explosions larger, while Char makes them spread scorch to nearby enemies. Ember of Searing takes advantage of this, as it gives you melee energy and creates a Firesprite pickup when defeating scorched foes. Firesprites give grenade energy when picked up, which can help you get a Fusion Grenade back if you fail to get them with the Empowering Rift/Witherhoard combo.

This build doesn't need any armor mods to function, but its effectiveness is improved considerably with the suite of mods we've chosen. Harmonic/Solar Siphon and Firepower will generate Orbs of Power from rapid Solar weapon kills and grenade kills, respectively, which will then provide extra damage resistance whenever your shields get broken thanks to the Charged Up, Stacks On Stacks, and Emergency Reinforcement Armor Charge mods. Orbs will also give you grenade energy and healing if you need it when Innervation and Recuperation are equipped. Finally, make sure you use Ashes to Assets; since you'll be getting constant grenade kills, this mod will allow you to get your Well of Radiance Super extremely quickly. For stats, we recommend focusing on Resilience primarily, followed by Discipline and Recovery.
Best Arc Warlock Stormcaller build
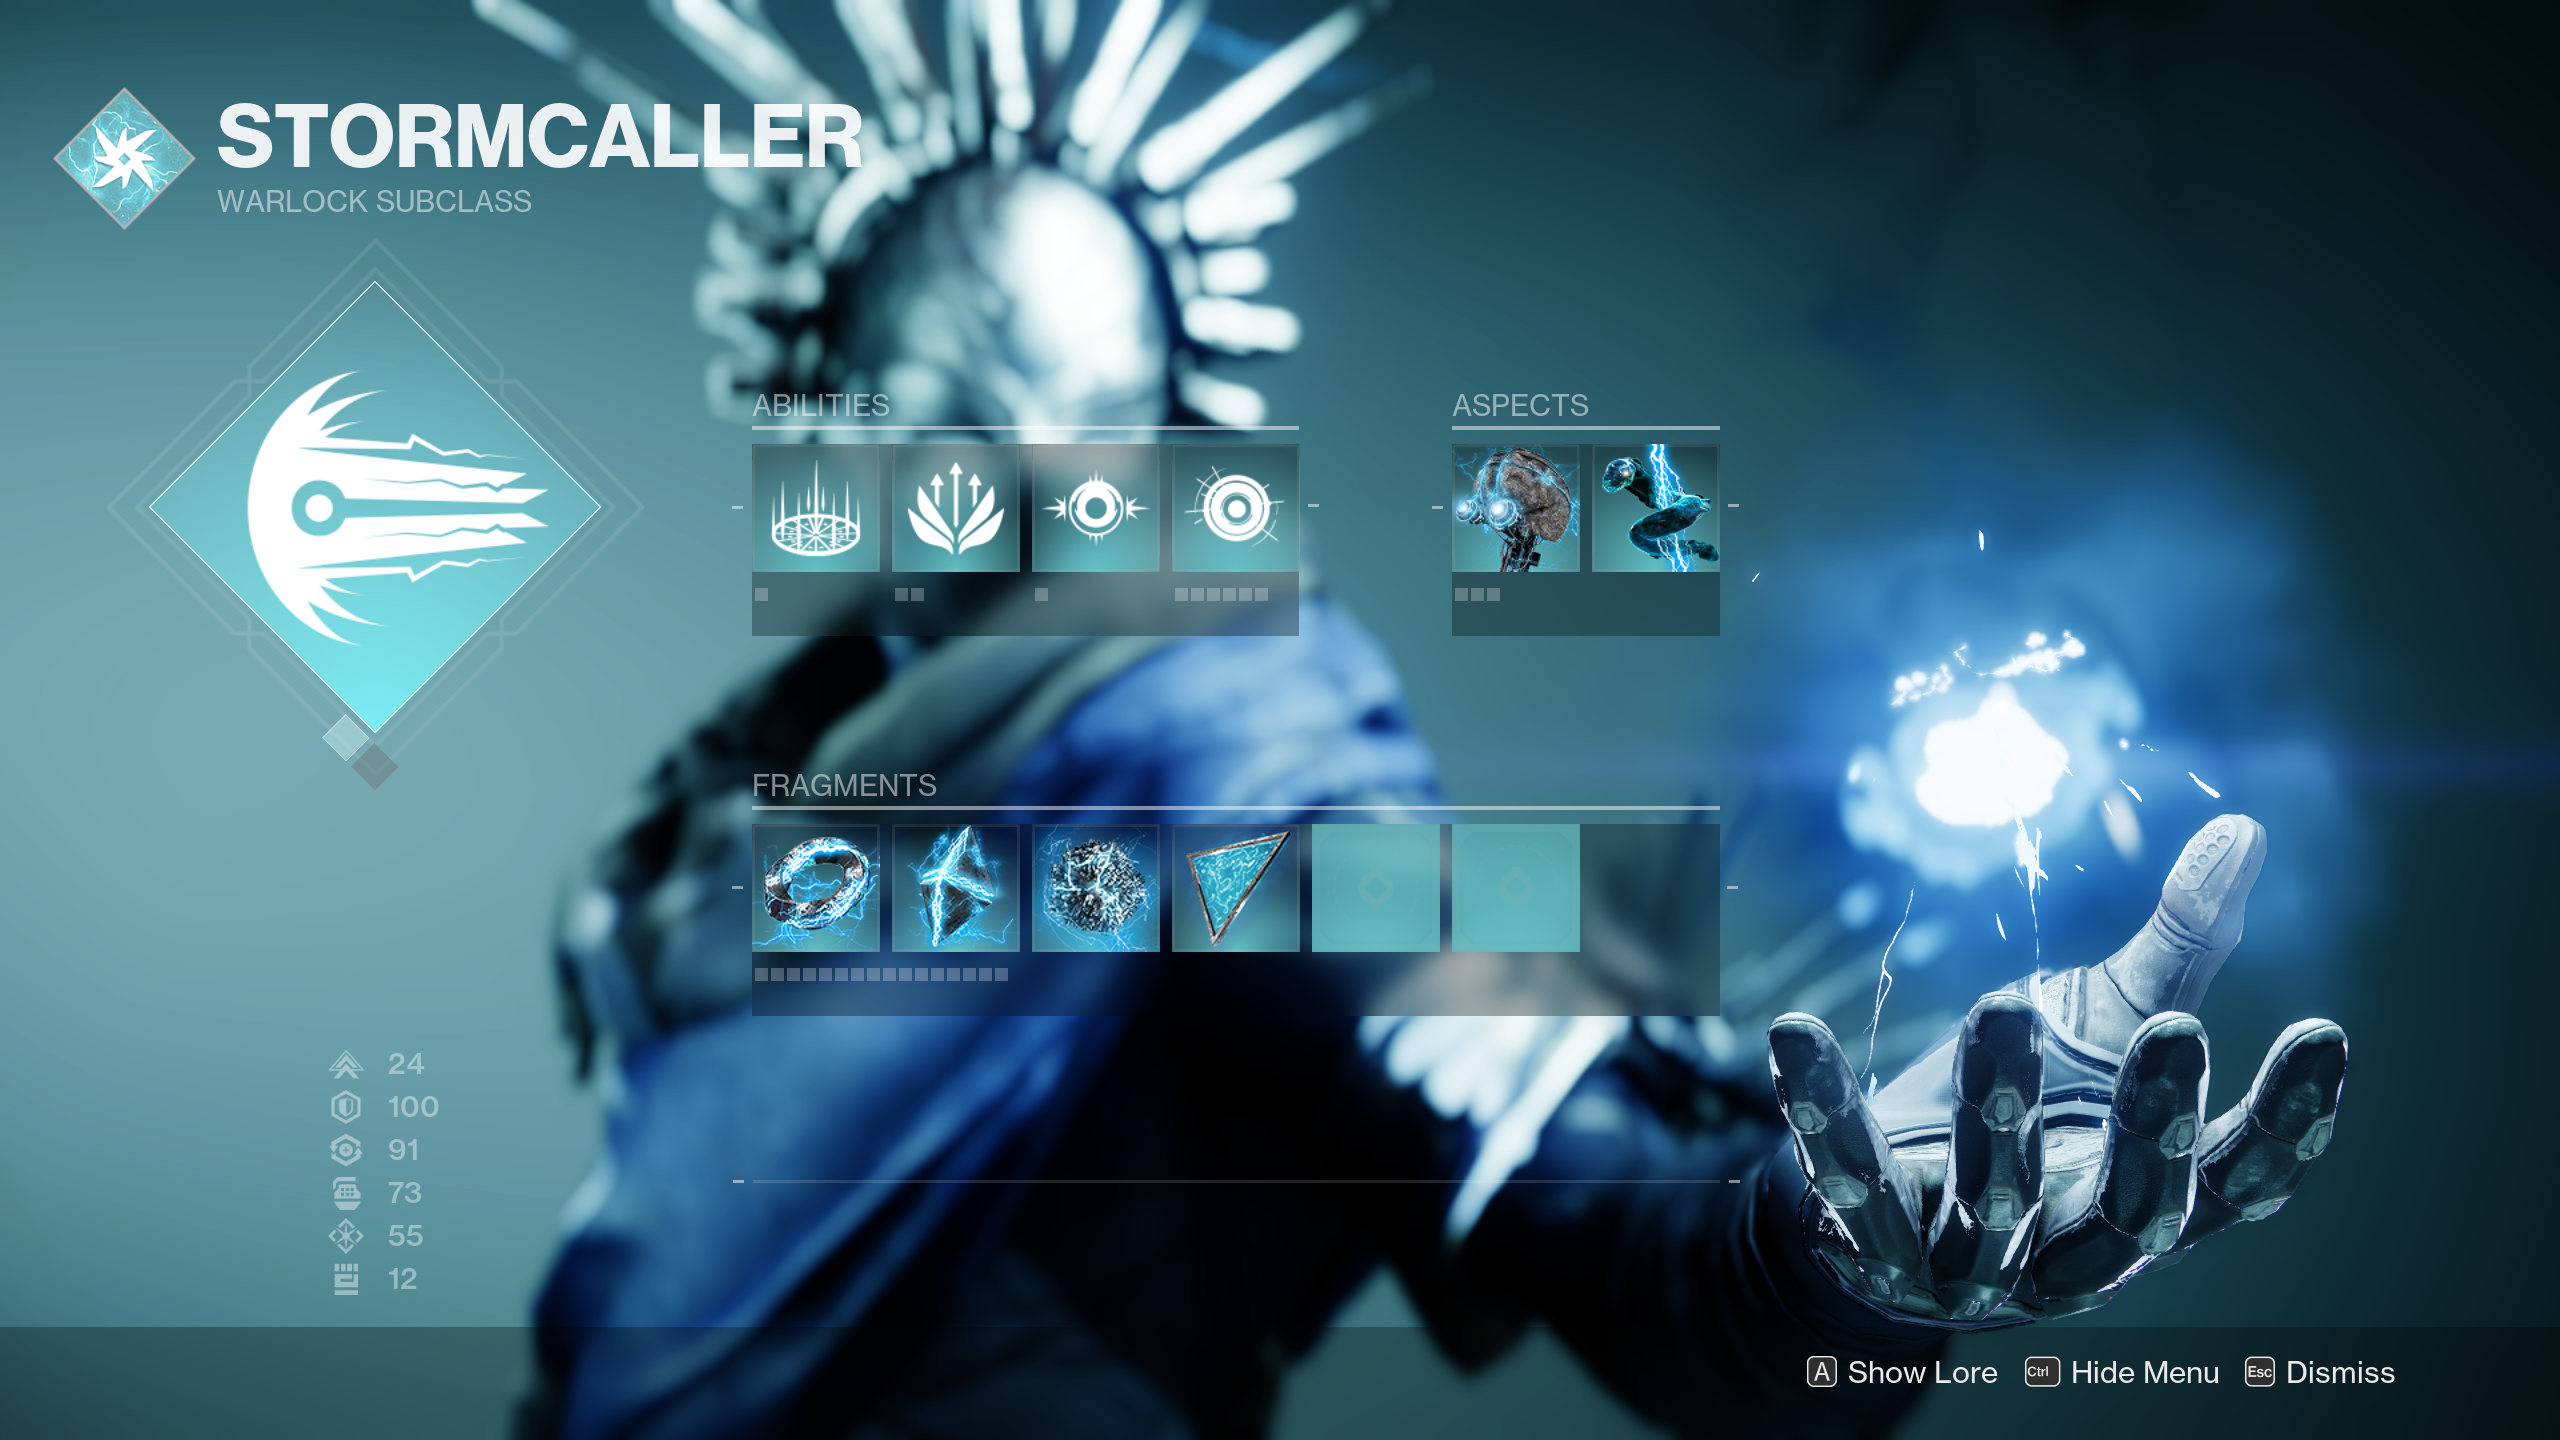
- Abilities: Chaos Reach, Healing Rift, Ball Lightning, Pulse Grenade
- Aspects: Electrostatic Mind, Arc Soul
- Fragments: Spark of Shock, Spark of Ions, Spark of Discharge, Spark of Amplitude
- Exotic: Fallen Sunstar
- Armor mods: Harmonic/Arc Siphon, Ashes to Assets, Focusing Strike, Bolstering Detonation, Charged Up, Stacks On Stacks, Arc Weapon Surge, Time Dilation, Recuperation, Bomber (x2)
- Important stats: Resilience, Recovery, Discipline
- Weapons: Arc weapon w/ Voltshot
This offensive support-focused Arc build allows you to clear crowds of ads with powerful ability spam while simultaneously helping teammates get their abilities back faster. At its core is the Fallen Sunstar Exotic helmet that makes your Ionic Traces — bolts of ability-regenerating energy from the Electrostatic Mind Aspect that get created whenever you get Arc ability kills or you defeat a jolted target — move to you faster, replenish additional energy, and also replenish ability energy for nearby allies.
The goal of this build is to make as many Ionic Traces as possible, so in addition to Electrostatic Mind, we've chosen the Arc Soul Aspect that creates a "buddy" when you cast a rift that automatically shoots Arc bolts at enemies. Arc Soul kills count as ability ones, so they'll make Ionic Traces. Additionally, the Spark of Shock, Discharge, Ions, and Amplitude Fragments will also help create Ionic Traces. Spark of Shock causes your grenades to jolt enemies, which will then spawn Ionic Traces when killed thanks to Spark of Ions. Spark of Discharge, meanwhile, will give your Arc weapons a chance to create Ionic Traces when you get final blows with them. Spark of Amplitude doesn't make Ionic Traces, but it does create Orbs of Power when you get rapid kills while Amplified. Since the secondary benefit of Electrostatic Mind makes you Amplified when you collect Ionic Traces, you'll have 100% uptime of this buff and will get constant Orbs of Power as a result.
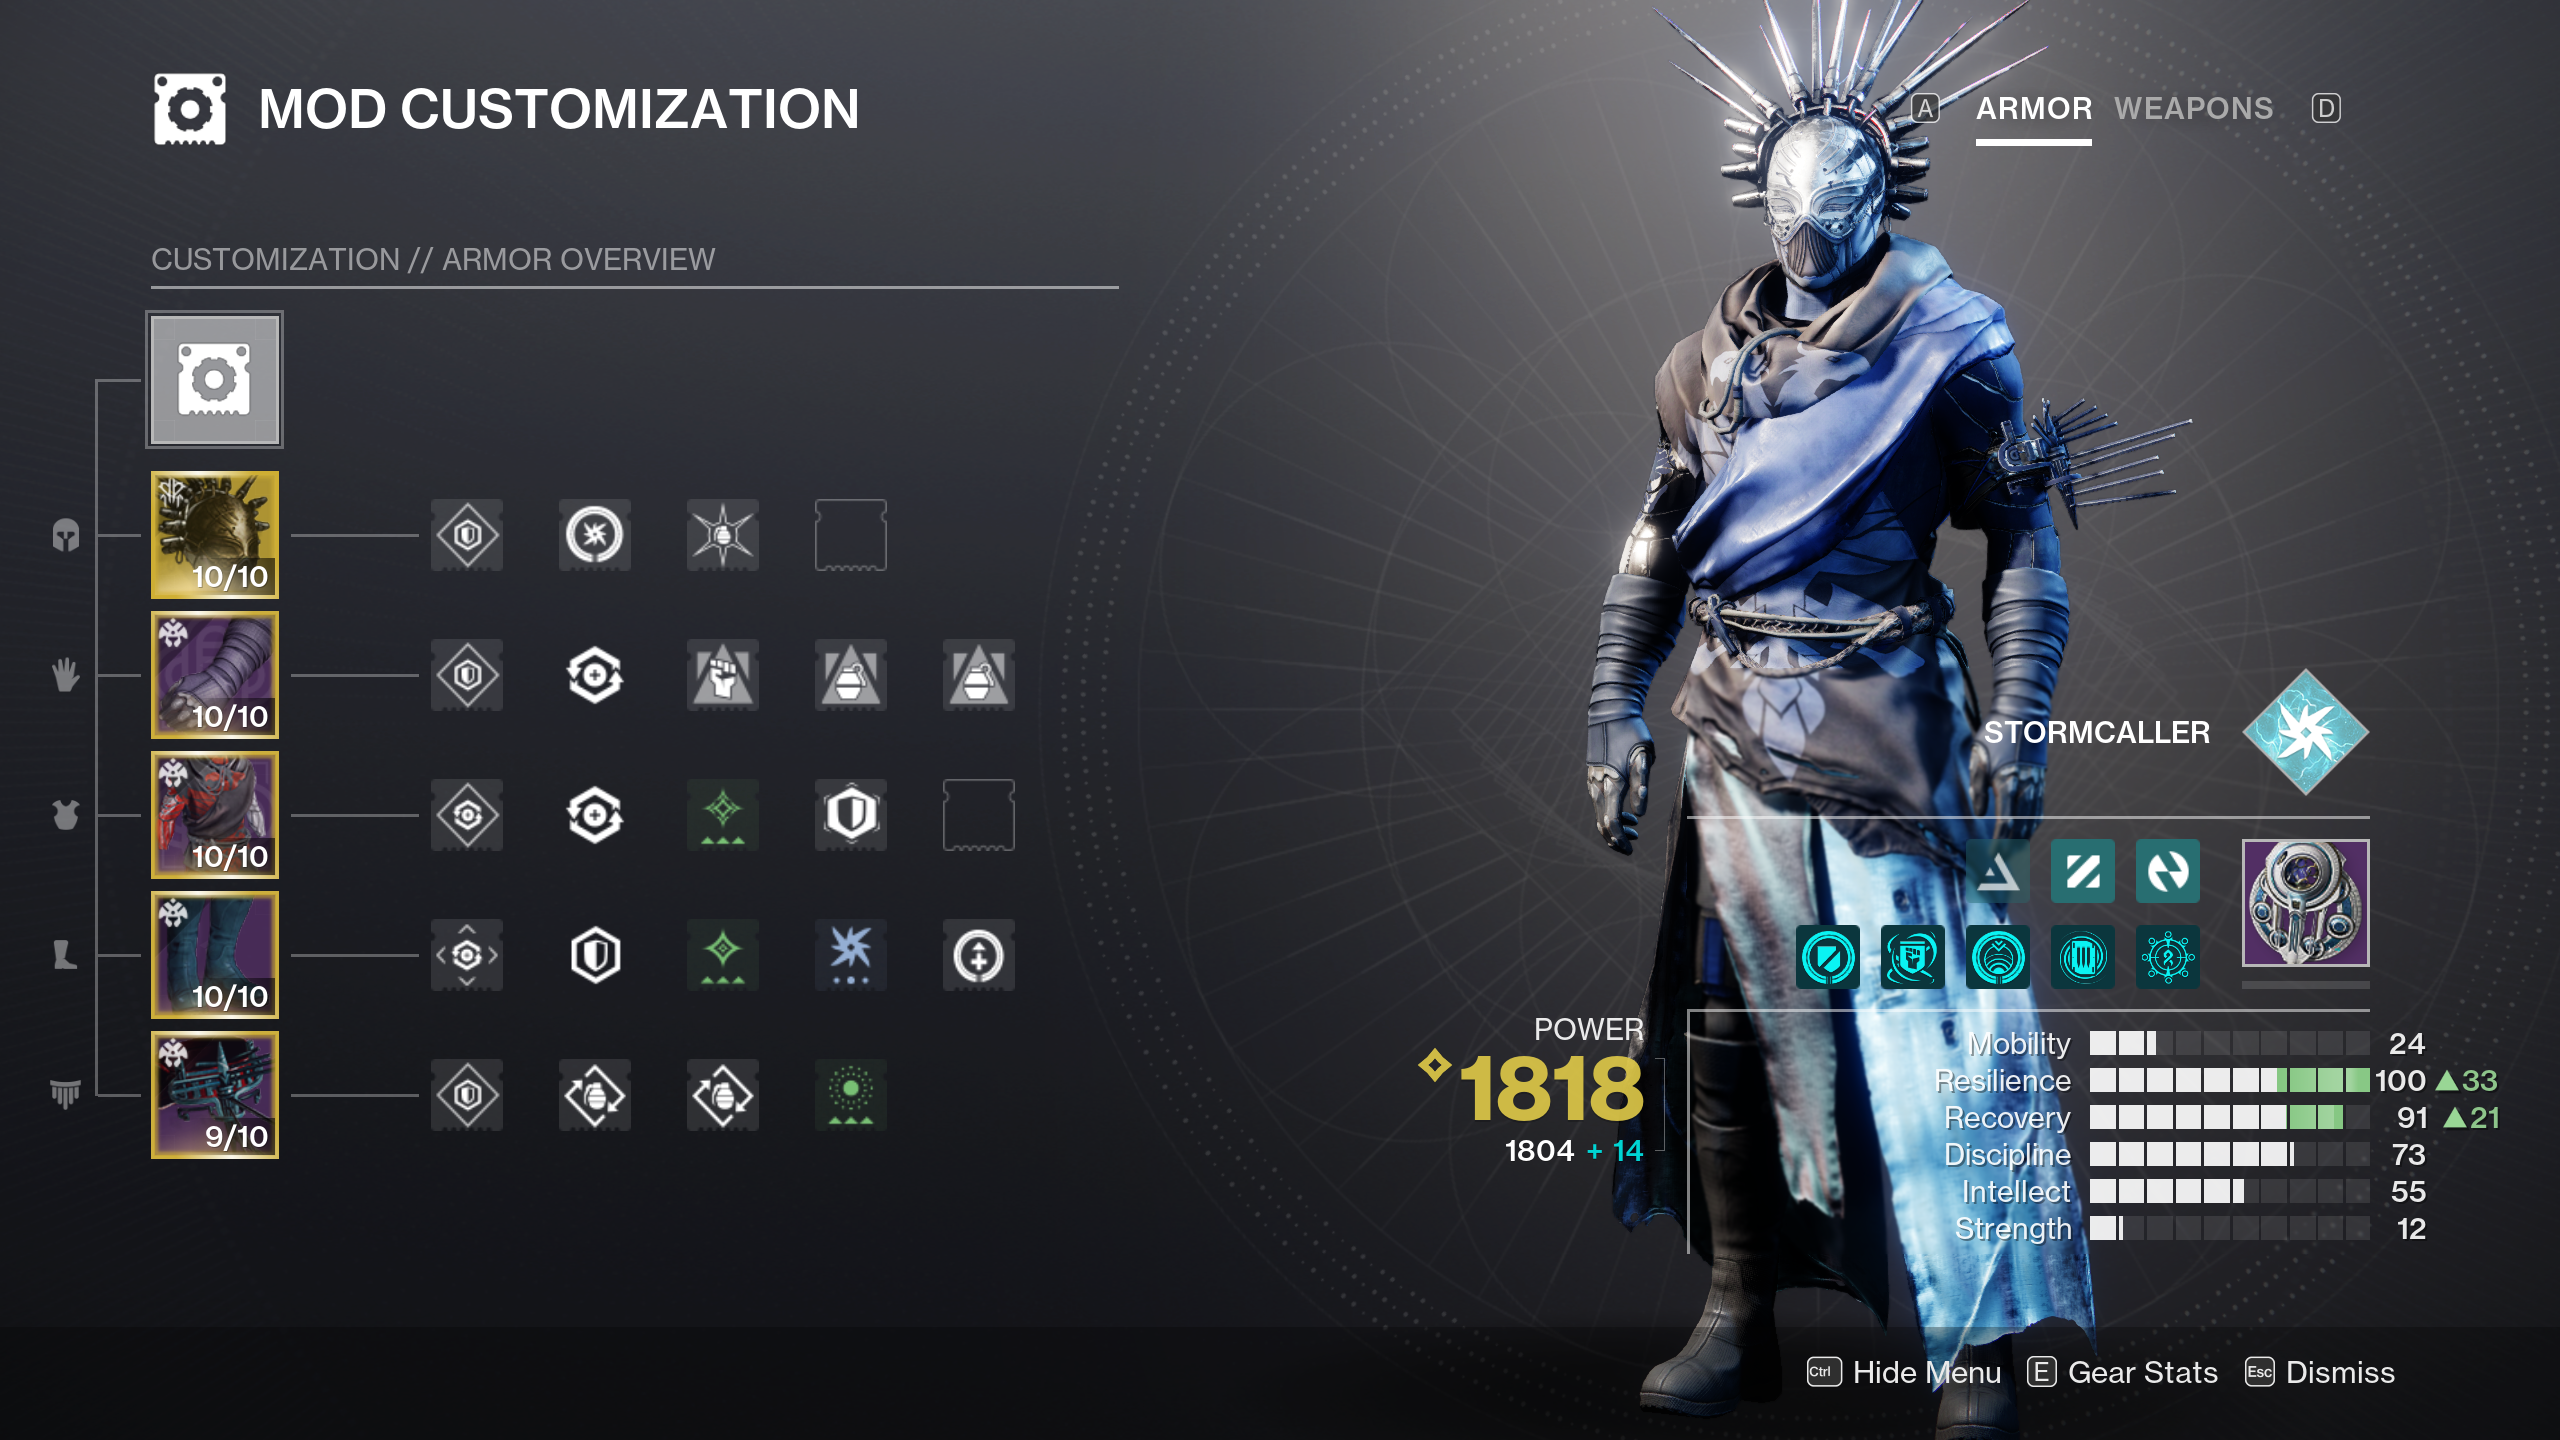
Since your ability uptime is already insane with this build, it's better to focus primarily on improving your Arc weapon damage with your mods. This is done with Charged Up, Stacks On Stacks, Arc Weapon Surge, and Time Dilation. Running Ashes to Assets is also a great way to get Chaos Reach Super energy from grenade kills. Use whatever armor energy you have left on your gauntlets for class ability regen mods like Focusing Strike and Bolstering Detonation. These, along with all your Ionic Traces, will give you max Healing Rift uptime so you can stay healthy and constantly refresh your Arc Soul while vaporizing foes. For stats, both Resilience and Recovery get lots of value here, followed by Discipline.
Best Stasis Warlock Shadebinder build
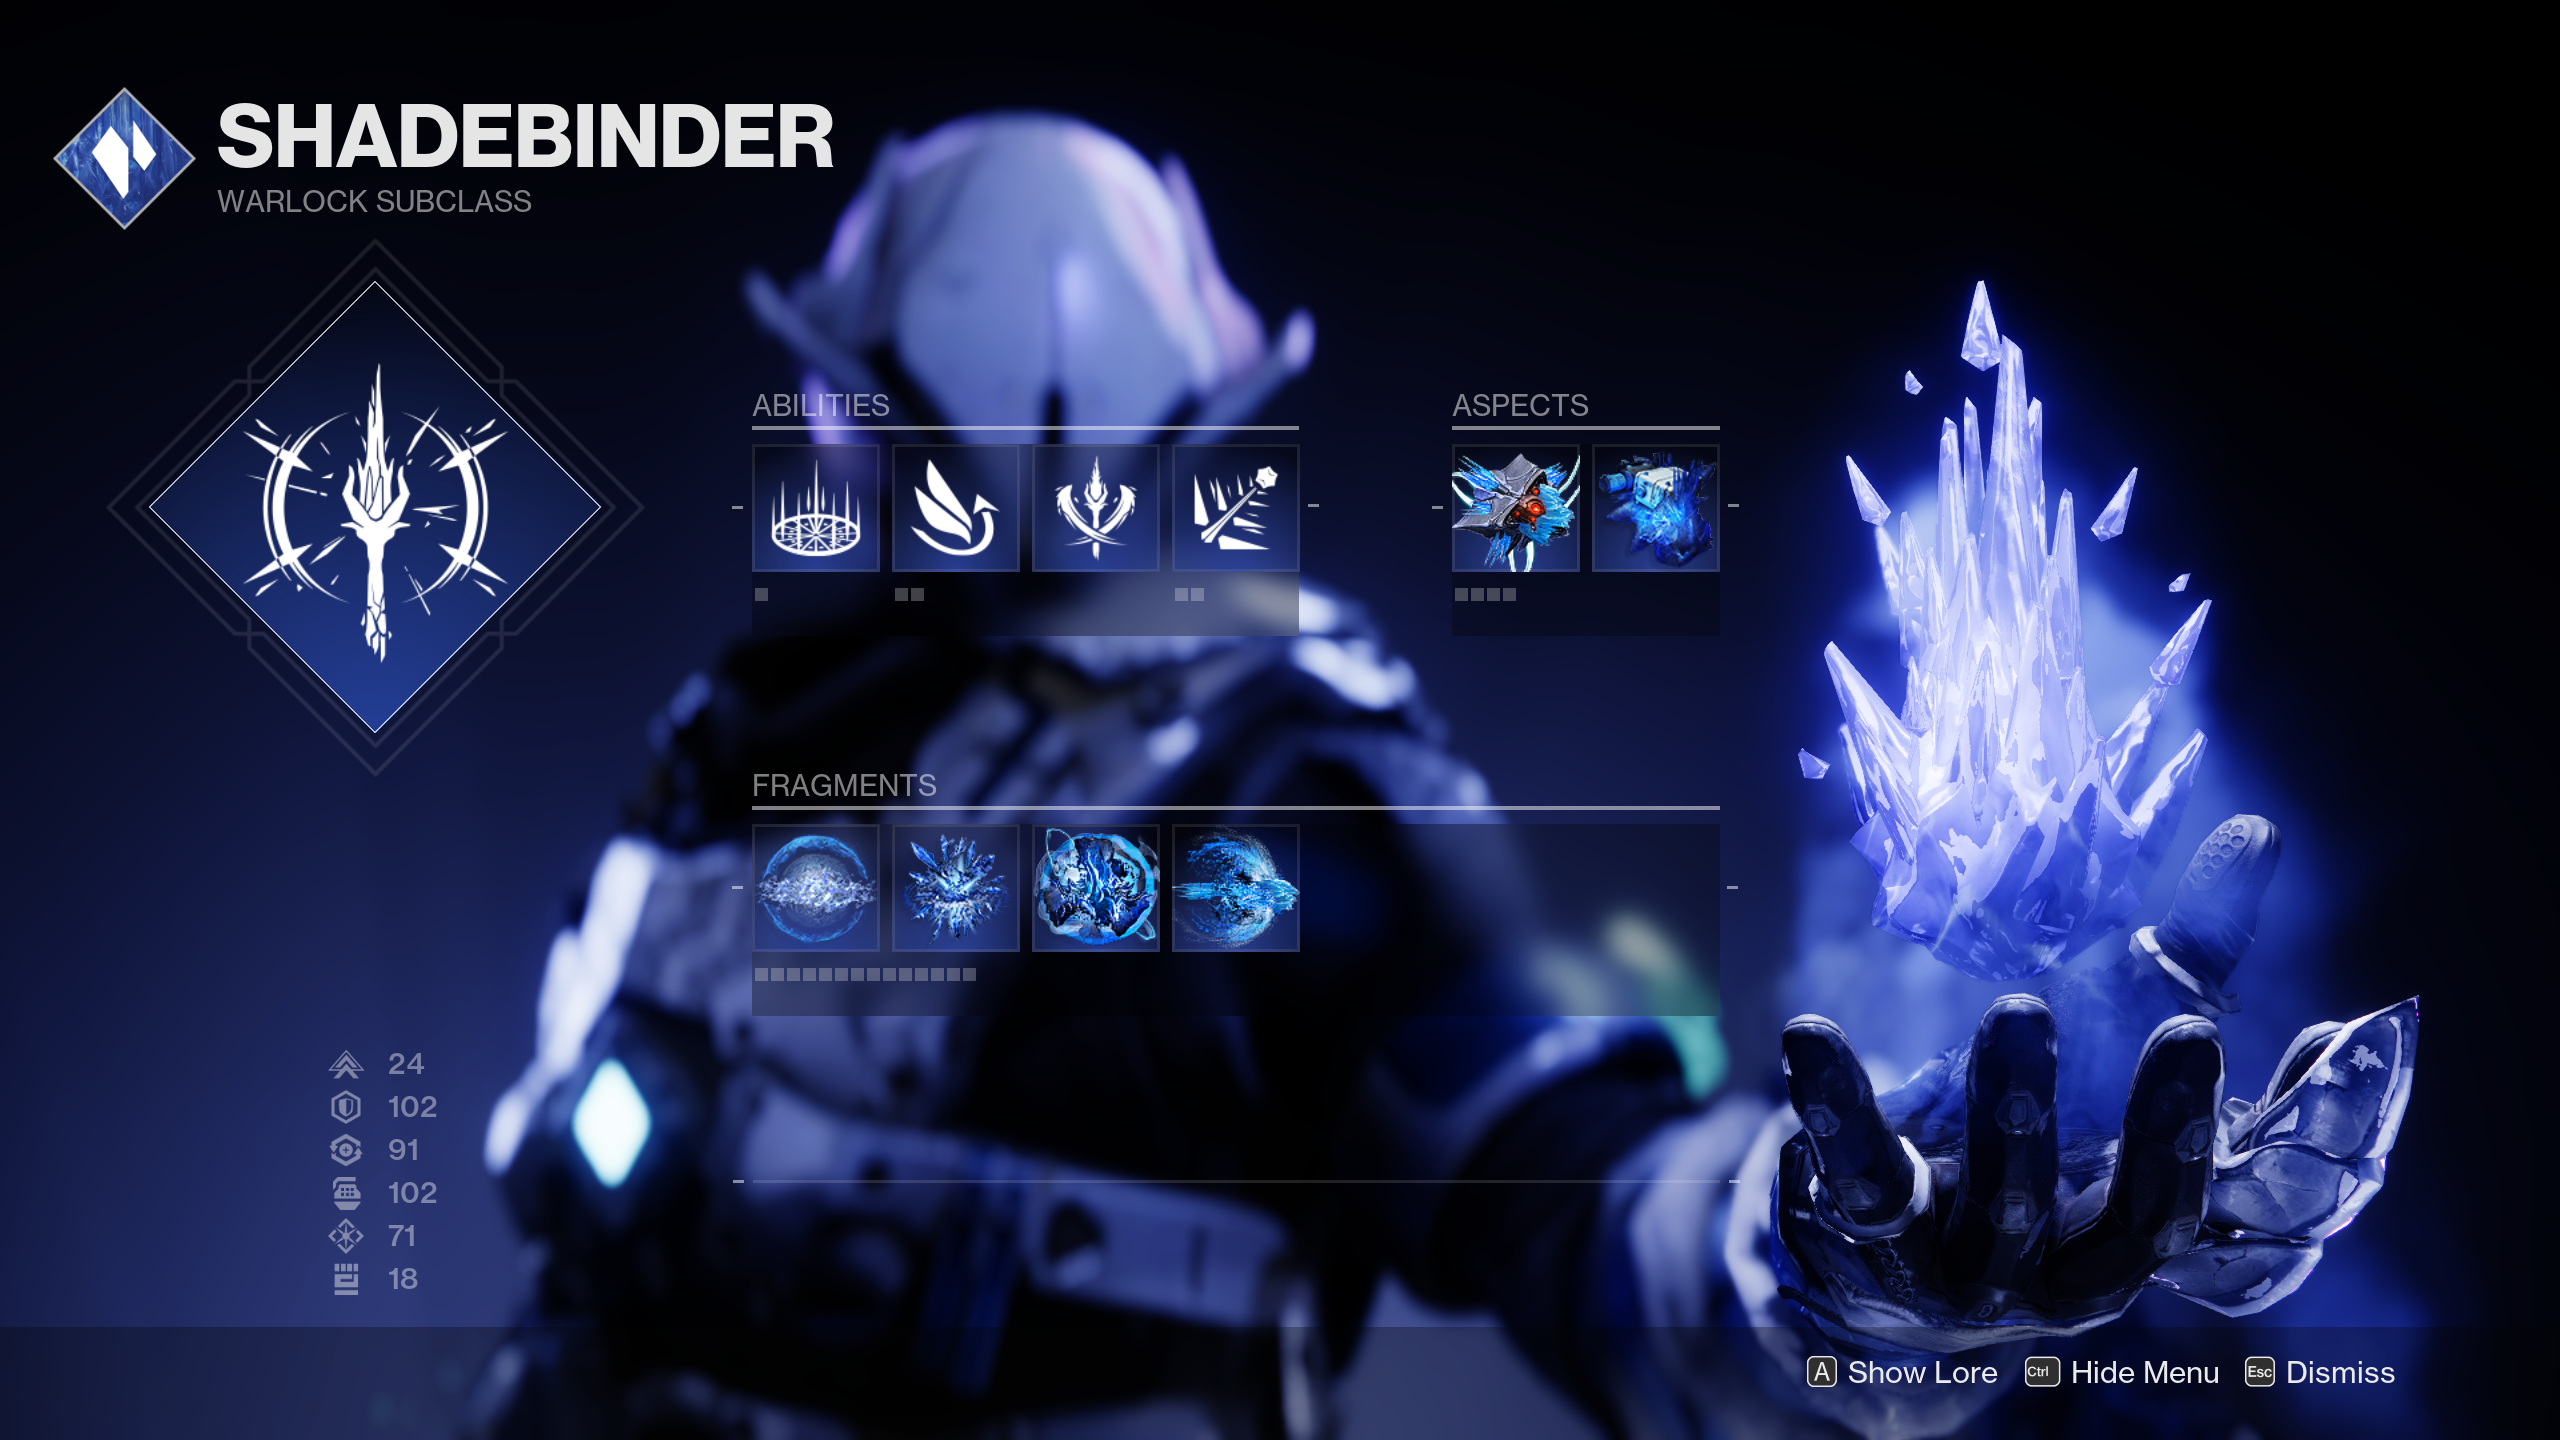
- Abilities: Healing Rift, Coldsnap Grenade
- Aspects: Bleak Watcher, Glacial Harvest
- Fragments: Whisper of Torment, Whisper of Shards, Whisper of Rime, Whisper of Conduction
- Exotic: Osmiomancy Gloves
- Armor mods: Harmonic/Stasis Siphon, Grenade Kickstart (x2), Charged Up, Stacks On Stacks, Innervation, Insulation, Bomber (x2), Reaper
- Important stats: Discipline, Resilience, Recovery
- Weapons: Stasis weapon w/ Headstone
In situations where you need heavy crowd control, there's nothing better than a Shadebinder Warlock build. With the Osmiomancy Gloves, you'll get two charges of your Coldsnap Grenades, and with the Bleak Watcher Aspect, you can convert these into throwable Stasis turrets that constantly slow and freeze enemies they hit. This build also uses the Glacial Harvest Aspect so that Stasis shards are created when your turrets freeze things, as well as a Stasis weapon with the Headstone perk to create Stasis crystals.
The goal of this build is to get your Coldsnap Grenades back as fast as possible for maximum turret spam, while also shrugging off damage you take with healing. To achieve this, use the Whisper of Torment, Shards, Rime, and Conduction Fragments. Whisper of Torment gives you grenade energy when you take damage, while Shards boosts your grenade recharge rate when you shatter a Stasis crystal — something you'll be doing often with a Headstone Stasis weapon. Whisper of Rime and Conduction, meanwhile, expand the utility of Glacial Harvest's Stasis shards; in addition to the melee energy they give you at base, Whisper of Rime will make them heal you and provide a small overshield when you're at full health, and Whisper of Conduction will make them automatically fly to your position.

For mods, go with a Charged Up, Stacks On Stacks, and double Grenade Kickstart Armor Charge setup to further improve how quickly you can get fresh turrets to throw onto the battlefield. Making Orbs of Power on Stasis Warlock to get Armor Charge is a bit tough since your grenades and melee don't deal much direct damage, making Firepower and Heavy Handed useless here. However, with a Harmonic/Stasis Siphon and the Reaper mod, you'll be able to generate an Orb each time you get rapid Stasis weapon kills or a weapon kill after casting your Healing Rift (use your rift often; it'll come back very fast with high Recovery, and you'll want the healing, overshield, and Reaper procs it provides). Use Innervation and Insulation for additional grenade and rift energy whenever you collect an Orb, and don't forget about a pair of Bomber mods for even more grenade energy when you use your rift. Stat-wise, you'll want to prioritize Discipline for the highest possible grenade recharge rate, as well as Resilience and Recovery for damage resistance, faster healing-over-time, and short Healing Rift cooldowns.
Best Strand Warlock Broodweaver build
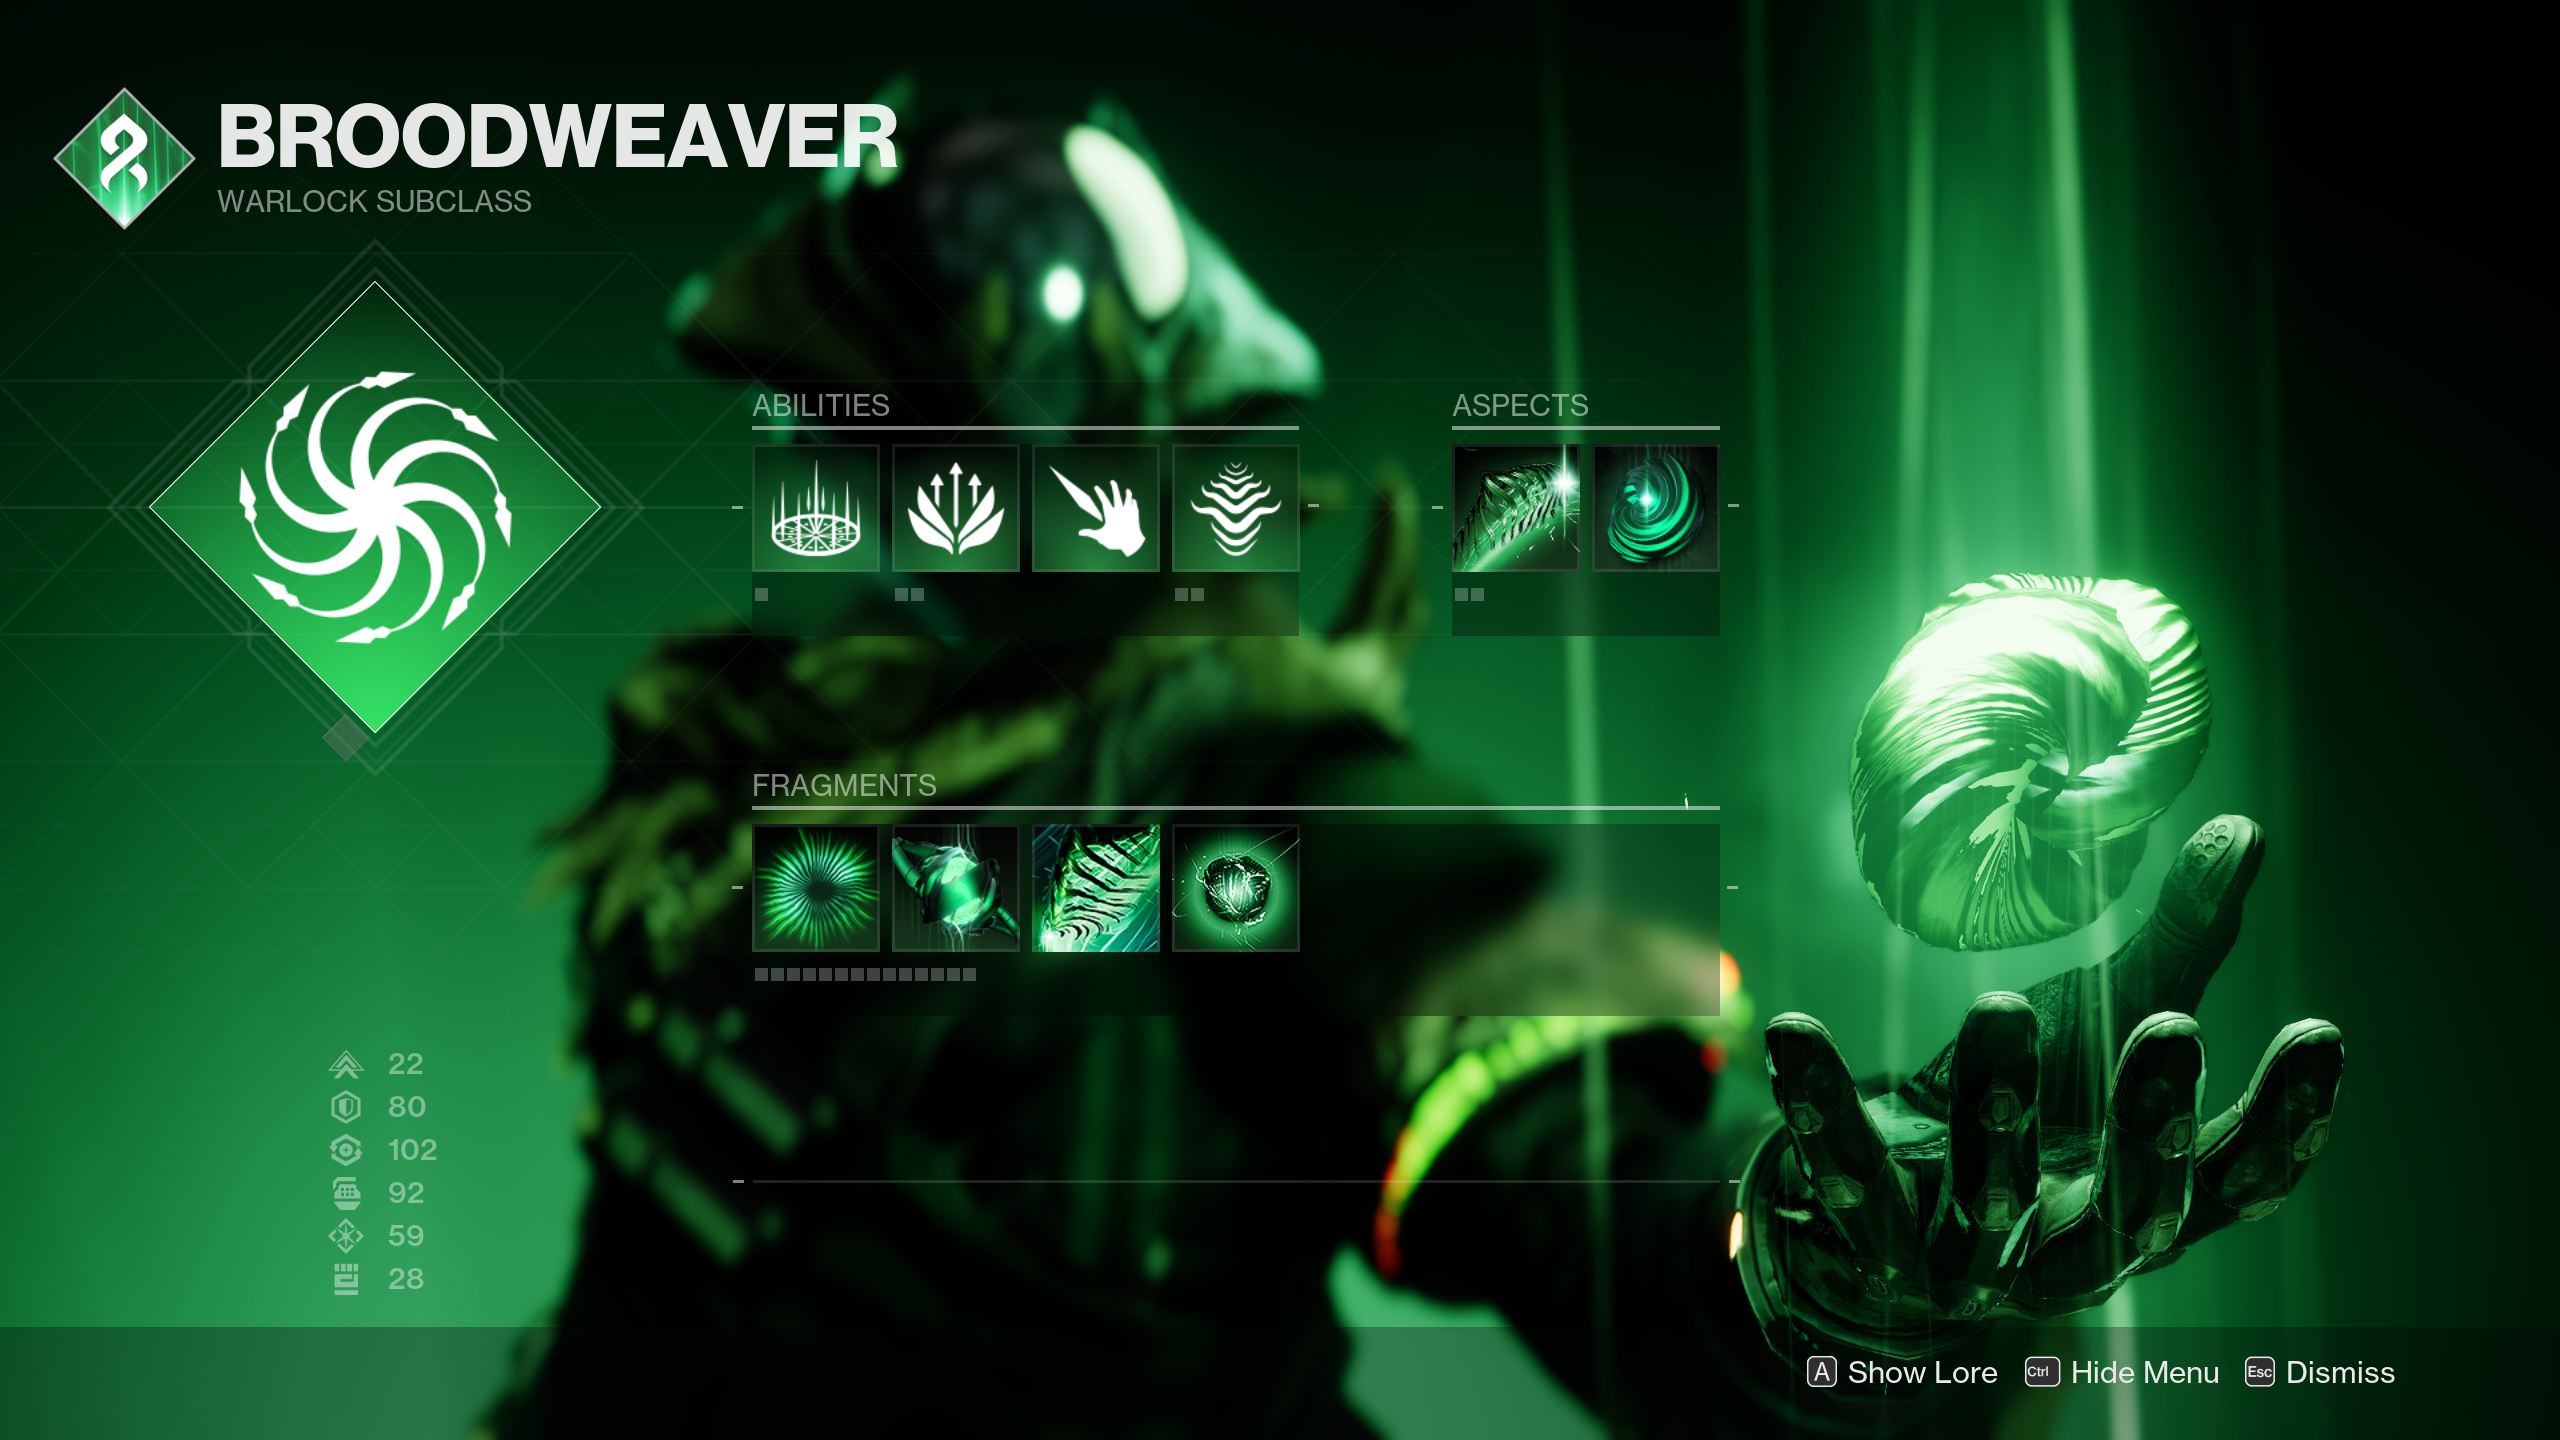
- Abilities: Healing Rift, Threadling Grenade
- Aspects: Weaver's Call, Mindspun Invocation
- Fragments: Thread of Finality, Thread of Rebirth, Thread of Evolution, Thread of Generation
- Exotic: Swarmers
- Armor mods: Harmonic/Strand Siphon, Grenade Kickstart, Impact Induction, Charged Up, Stacks On Stacks, Innervation, Insulation, Bomber (x2), Reaper
- Important stats: Discipline, Resilience, Recovery
- Weapons: Strand weapon (ideally w/ Hatchling, Demolitionist, or both)
There are a few different ways to set up a Broodweaver Warlock, but in our experience, nothing tops this build that drowns your enemies in hordes of Threadling minions. By consuming your Threadling Grenade, the Mindspun Invocation Aspect allows you to generate five perched Threadlings that will attack whatever you shoot at. Weaver's Call also spawns three Threadlings when you cast a rift, and with the Swarmers Exotic, your Threadlings will unravel targets they kill, creating a Tangle that will then create another Threadling when destroyed.
The goal of the build is simple: create as many Threadlings as possible and buff them however you can. To do this, you'll want to use the Thread of Finality, Rebirth, Evolution, and Generation Fragments. Thread of Finality and Rebirth spawn Threadlings from finisher and Strand weapon kills, respectively, giving you even more ways to create them. Thread of Evolution buffs Threadling movement speed, travel distance, and damage, while Thread of Generation converts all damage you and your Threadlings deal into grenade energy so that you get your Threadling Grenades back faster.

Just like with the Shadebinder setup, your mods should be centered around getting grenade energy back so you can repeatedly consume your Threadling Grenade and make more Threadlings. We recommend a Grenade Kickstart Armor Charge-based setup with Charged Up, Stacks On Stacks, with both Harmonic/Strand Siphon mods and the Reaper mod acting as your Orb of Power generators. Try and use a Strand weapon with the Hatchling or Demolitionist perk (or both), as the former creates Threadlings when you get precision final blows and the latter gives you a chunk of grenade energy when you get a kill. Innervation and Insulation are worth using since they convert your Orbs of Power into energy for your grenade and rift abilities, both of which generate Threadlings for you. Impact Induction and Bomber are great mods to equip as well. For stats, you'll want to focus on Discipline, Resilience, and Recovery.
Destiny 2: Best Titan builds in Season 20
These are the best builds for Titans. In situations where you need a resilient and powerful frontline tank that can both take and dish out plenty of punishment, look no further than these setups.
Best Void Titan Sentinel build
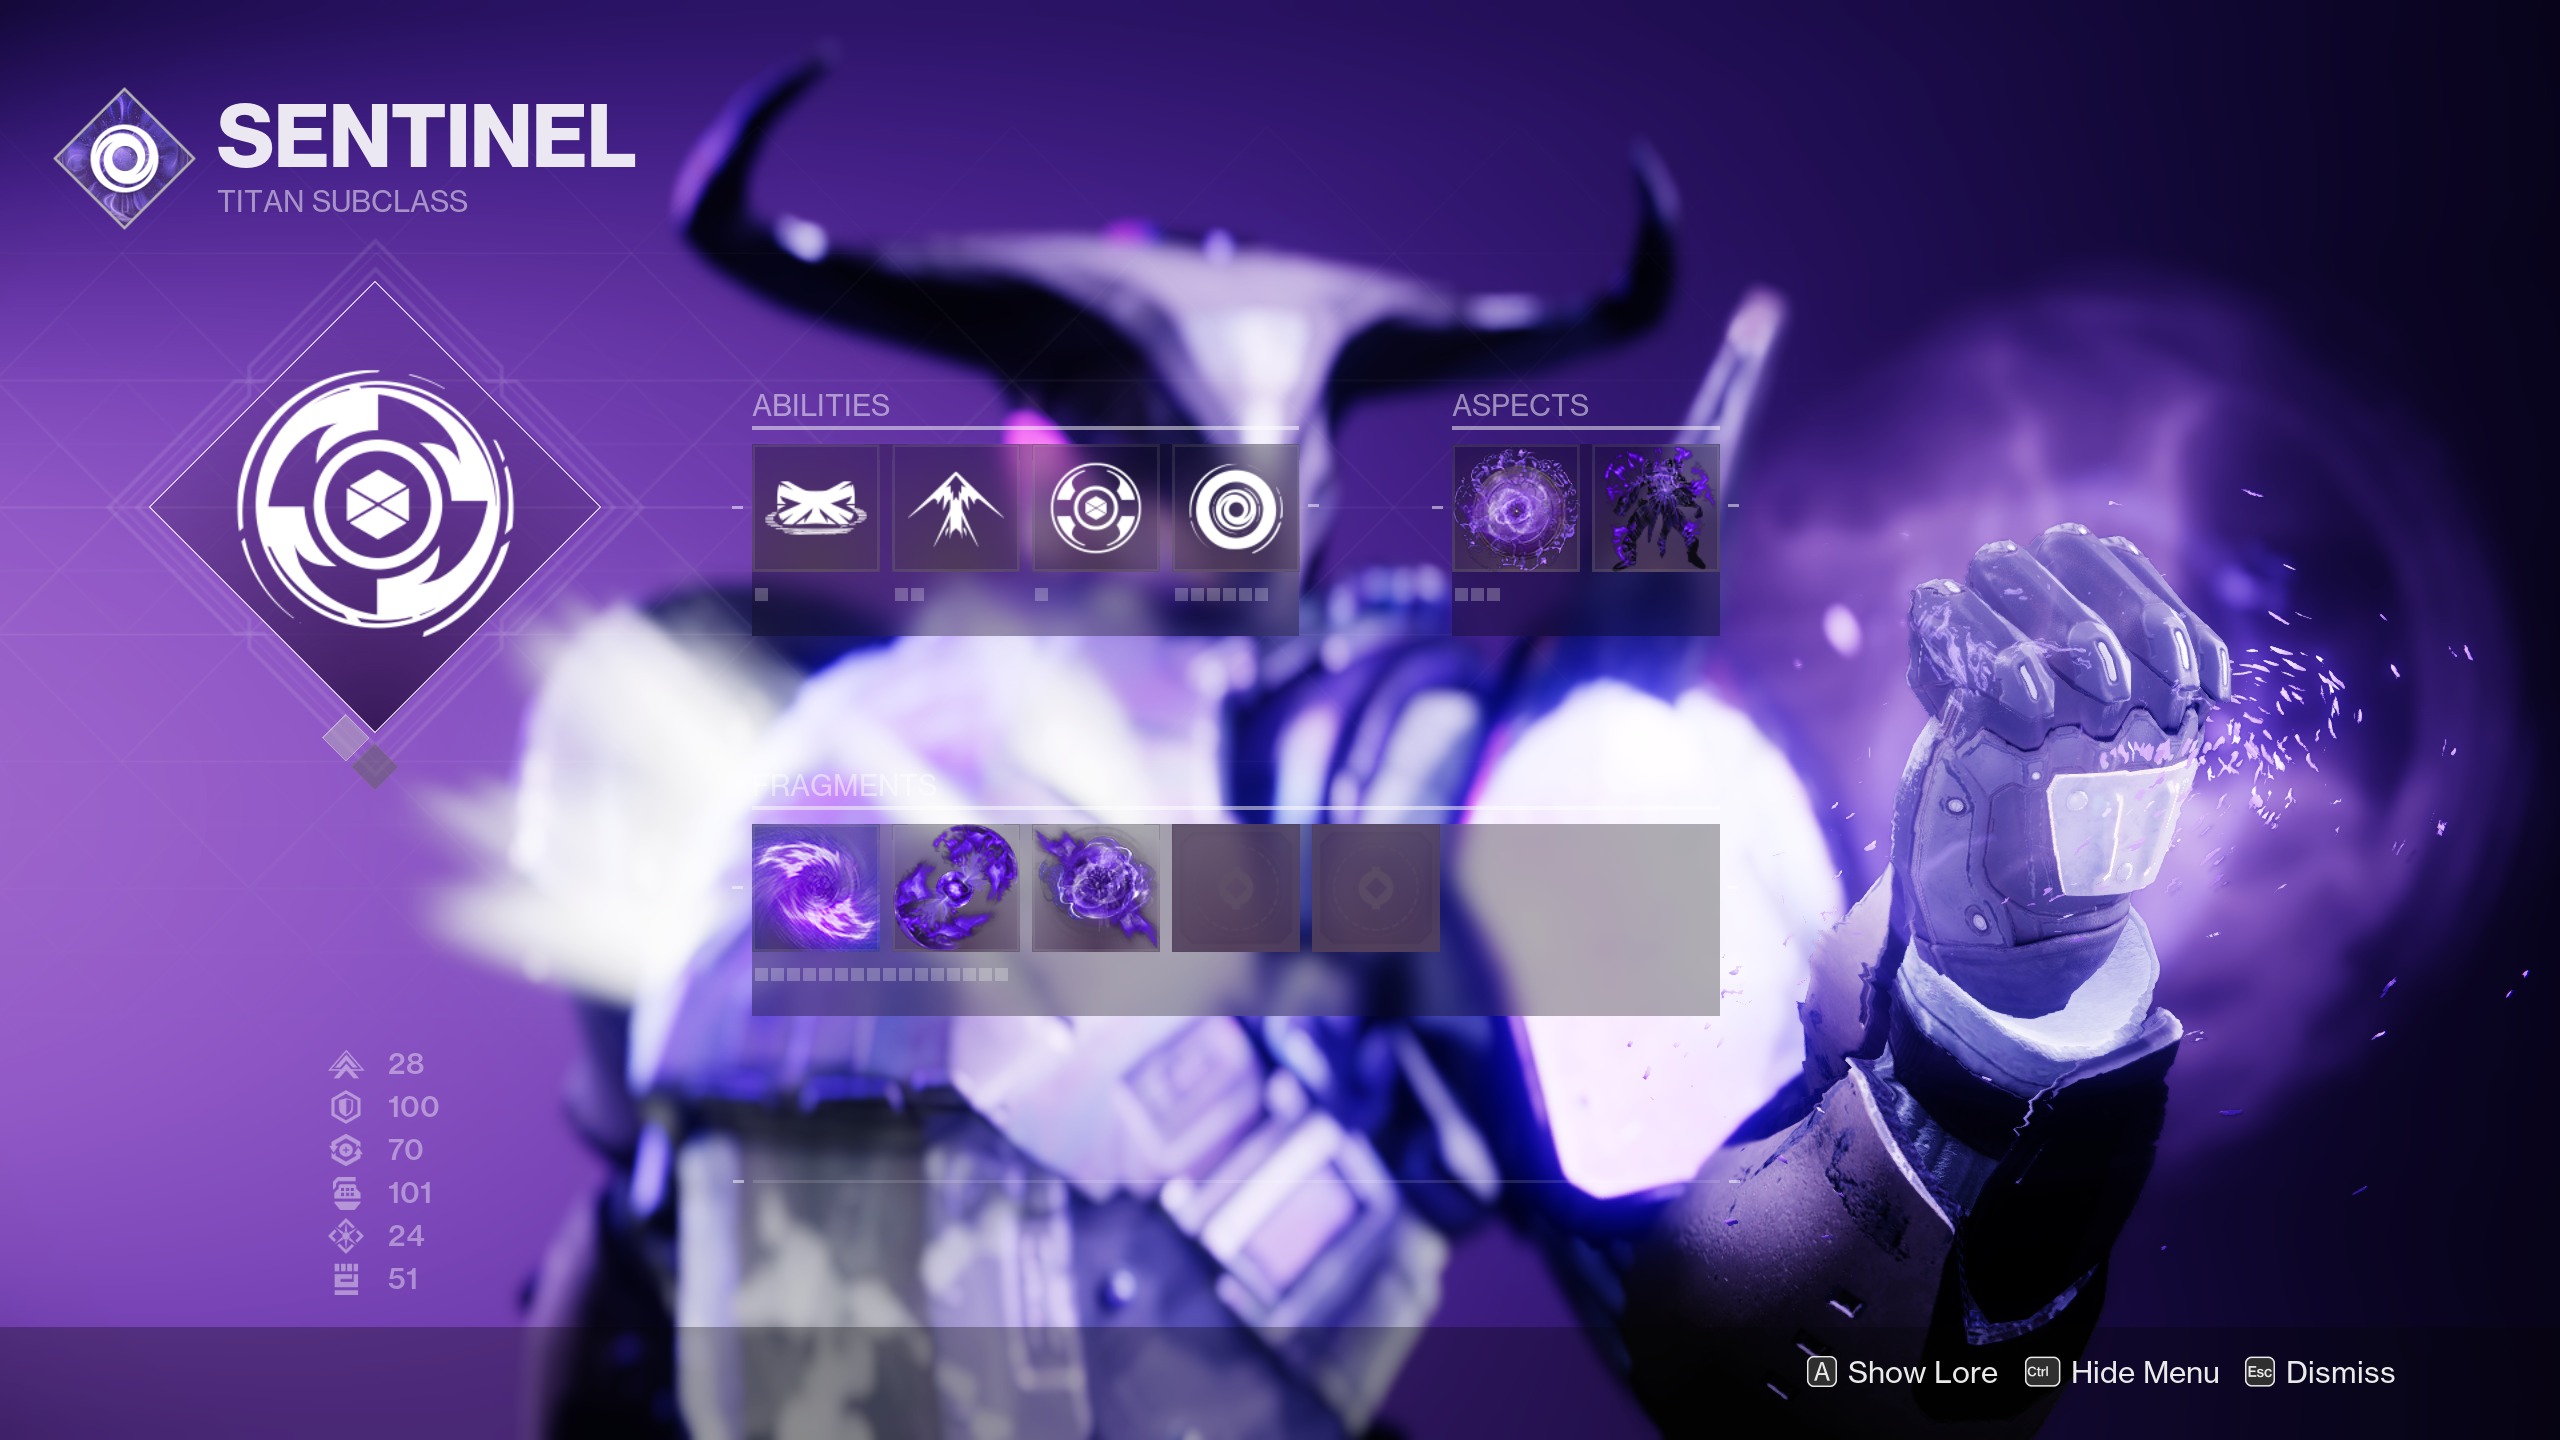
- Abilities: Sentinel Shield OR Ward of Dawn, Rally Barricade, Shield Throw, Vortex Grenade
- Aspects: Bastion, Controlled Demolition
- Fragments: Echo of Instability, Echo of Cessation, Echo of Starvation
- Exotic: Heart of Inmost Light
- Armor mods: Harmonic/Void Siphon, Ashes to Assets, Firepower, Bolstering Detonation, Charged Up, Stacks On Stacks, Innervation, Insulation, Bomber, Utility Kickstart (x2)
- Important stats: Resilience, Discipline, Recovery
- Weapons: Void weapons (ideally w/ Repulsor Brace)
Sentinel Titan has been a popular choice in endgame PvE since Void 3.0 launched thanks to the subclass' ability to provide powerful overshields and make enemies volatile frequently with the Bastion and Controlled Demolition Aspects. The former gives you and your nearby allies a 50% damage-resistant Void overshield whenever you cast your barricade, and the latter makes every enemy you hit with your abilities become volatile. Controlled Demolition also allows you to make volatile enemies explode with follow-up damage and spread volatility to other nearby targets. These Aspects are very effective together at base, but by using the Heart of Inmost Light Exotic, you can buff your abilities and make them come off cooldown faster. This allows you to proc the benefits of these Aspects more often.
The build truly takes off once you begin slotting in some Fragments. Echo of Instability grants your Void weapons Volatile Rounds whenever you get a grenade kill, making it very easy to continue spreading the volatile debuff with Controlled Demolition even when you don't have a grenade or shield throw melee available (if the weapon has Repulsor Brace, you'll also get a full Void overshield when killing volatile enemies). Echo of Cessation spawns a Void Breach pickup whenever you kill a volatile target, which then gives you Devour for healing and grenade energy thanks to Echo of Starvation.

Recent Heart of Inmost Light nerfs significantly reduced how effectively the Exotic could boost the recharge rate of your barricade, so we're counteracting them with Armor Charge mods. Specifically, use Harmonic/Void Siphon and Firepower mods to make Orbs of Power with Void weapon and grenade kills, then use Charged Up, Stacks On Stacks, and double Utility Kickstart to get a big chunk of barricade energy back whenever you use one. Other great mods to use include Ashes to Assets, Innervation, Insulation, and Bomber. Stat-wise, go with Resilience and Discipline, with Recovery as your secondary priority.
Best Solar Titan Sunbreaker build
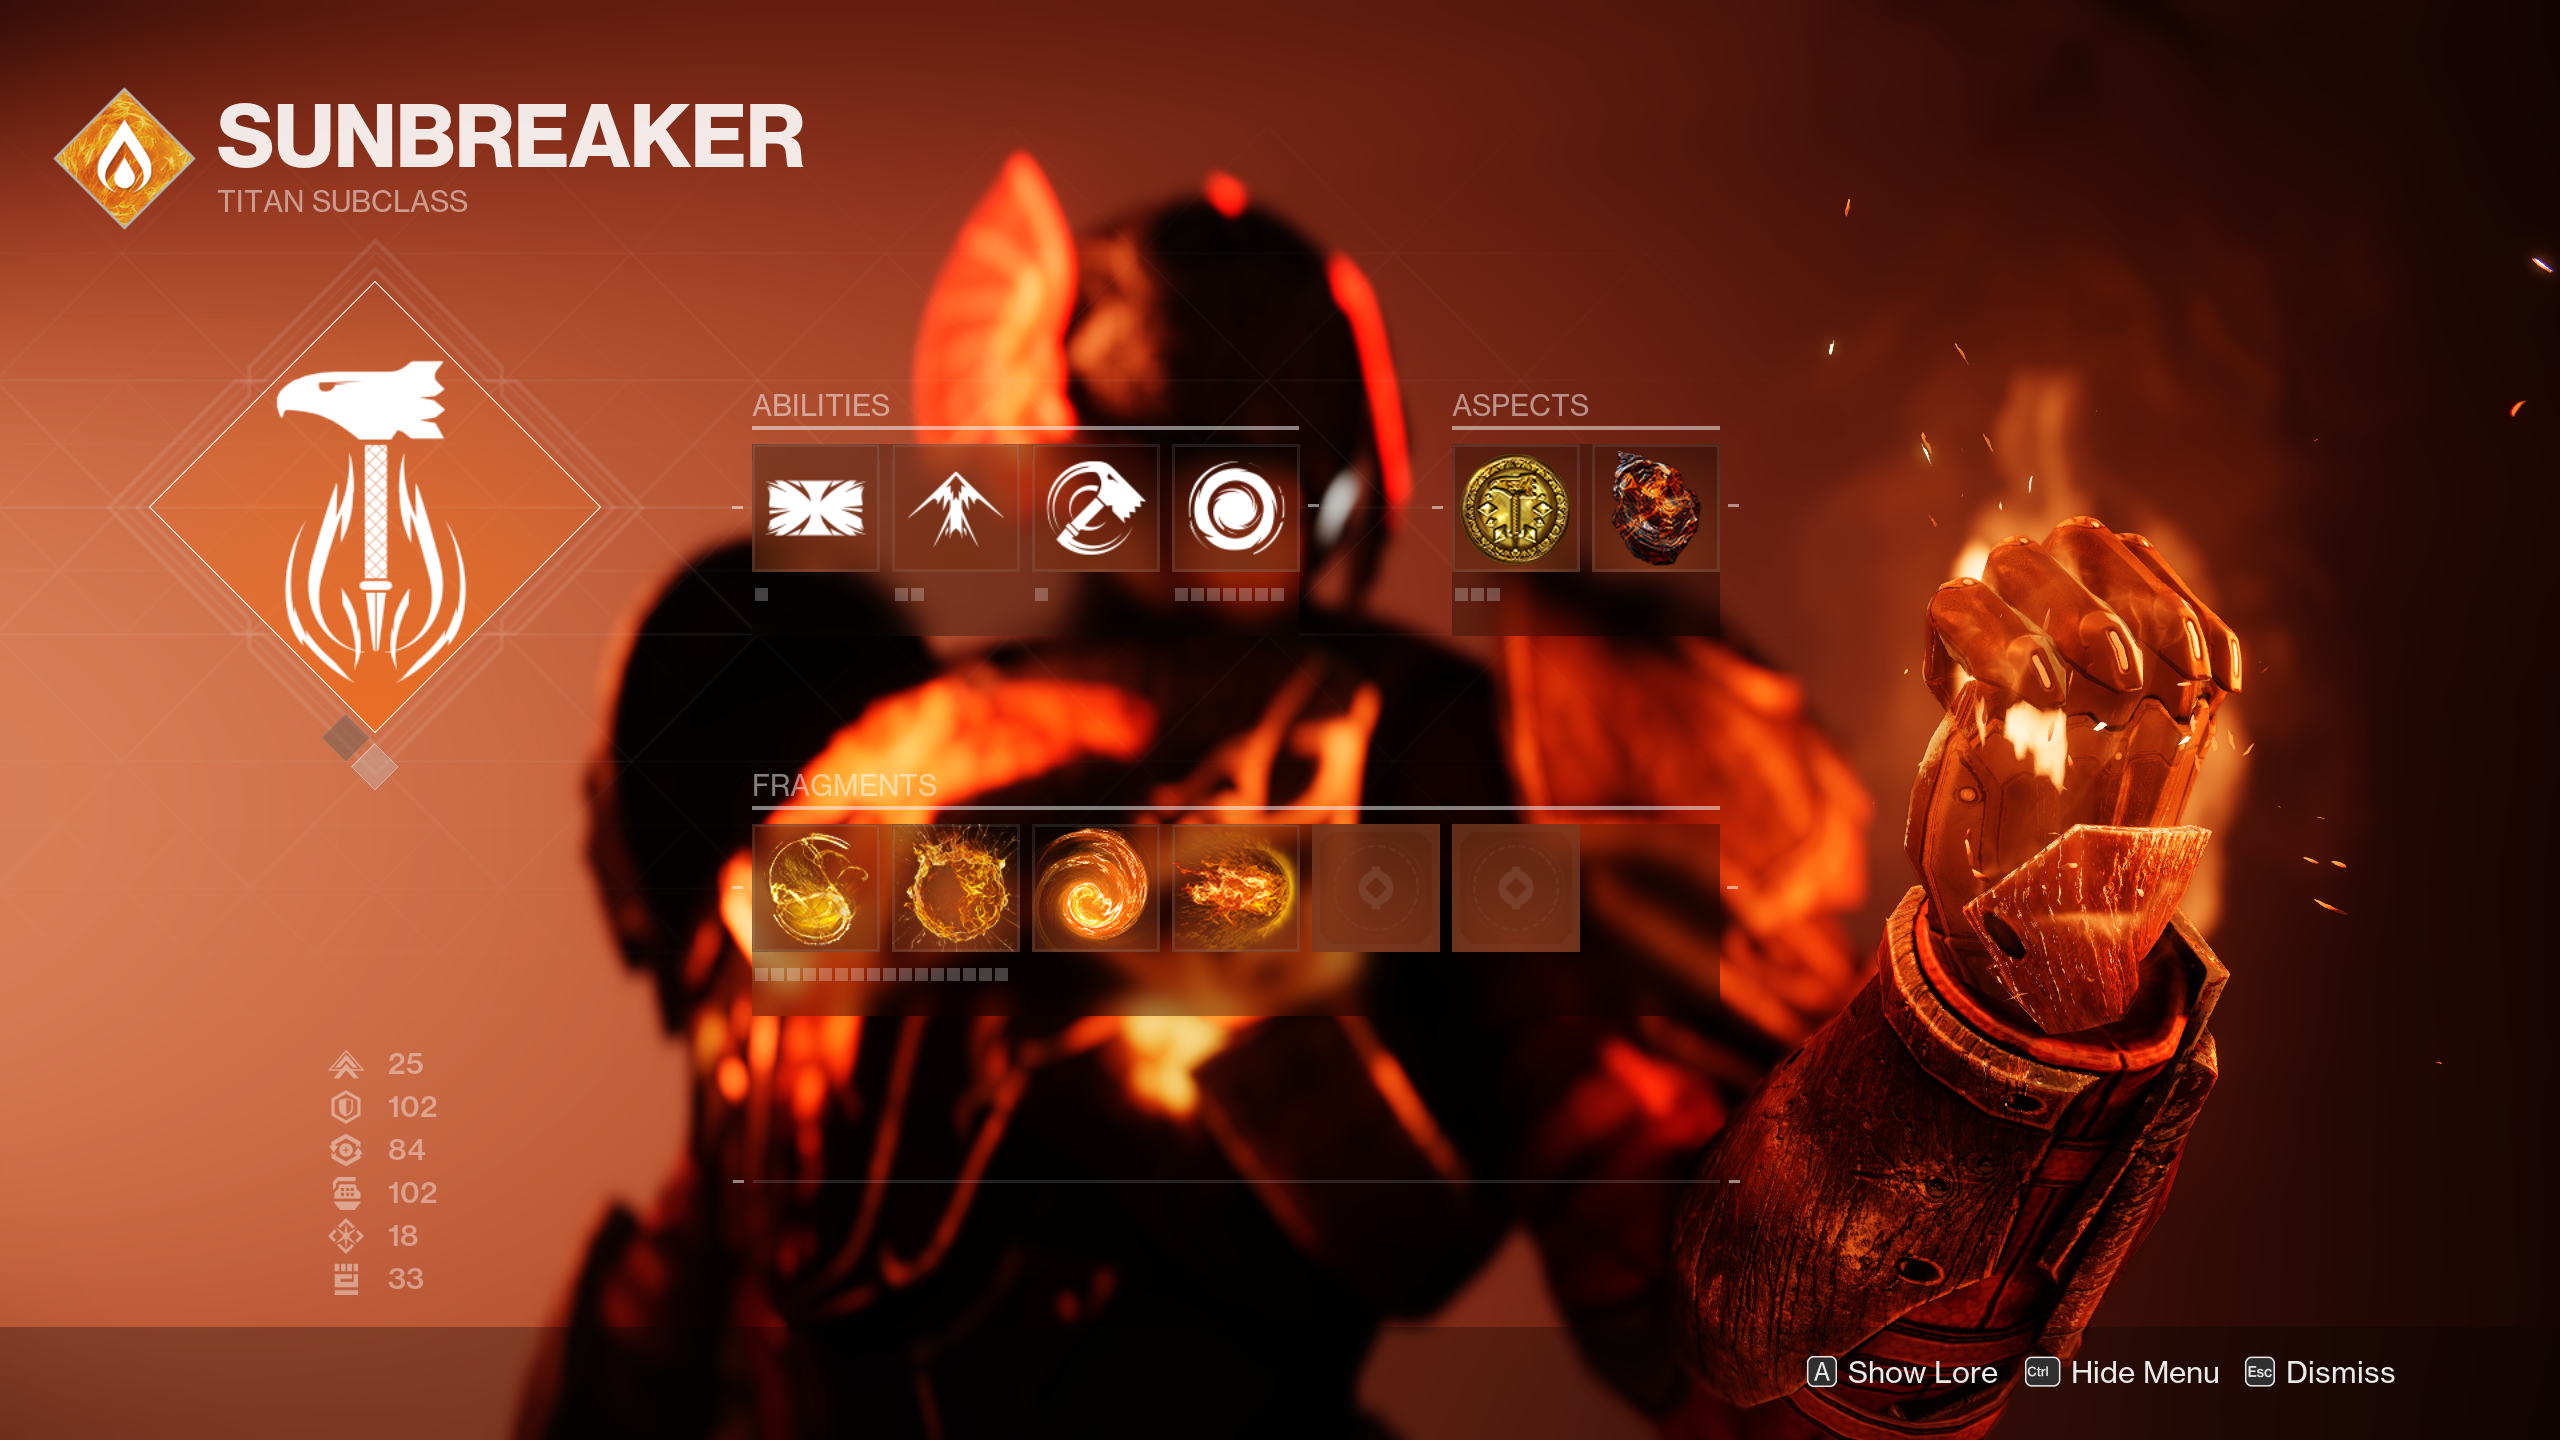
- Abilities: Hammer of Sol OR Burning Maul, Towering Barricade, Throwing Hammer, Solar Grenade
- Aspects: Sol Invictus, Roaring Flames
- Fragments: Ember of Singeing, Ember of Searing, Ember of Resolve, Ember of Torches
- Exotic: Lorely Splendor Helm
- Armor mods: Harmonic/Solar Siphon, Ashes to Assets (x2), Heavy Handed, Focusing Strike, Bolstering Detonation, Charged Up, Innervation (x2), Solar Weapon Surge, Bomber (x2), Time Dilation
- Important stats: Resilience, Discipline, Recovery
- Weapons: Solar weapons (ideally w/ Incandescent perk)
This Titan build became the best option overall when Solar 3.0 and the Lorely Splendor Helm Exotic came out in Season of the Haunted, and despite a few nerfs, that hasn't changed. With the Sol Invictus and Roaring Flames Aspects, you can use your Throwing Hammer melee to kill enemies and create sunspots that heal you and scorch foes while also building up the stackable Roaring Flames Solar ability damage buff. In tight situations, you can cast your barricade to instantly deploy a sunspot with improved healing thanks to the Lorely Splendor Helm's Cauterizing Flame perk. The helmet will automatically deploy this sunspot if you suddenly get critically injured, too.
Because the Lorely Splendor Helm's buffed sunspot is so valuable and because you'll be constantly scorching enemies with sunspots created by your Throwing Hammer, it's best to choose the Fragments that enhance these aspects of your build. Ember of Singeing gives you faster barricade recharges when you scorch targets, helping to keep Cauterizing Flame available as much as possible. Ember of Searing creates a grenade energy-restoring Firesprite pickup when you kill scorched enemies, and also provides you with melee energy that will help you get your Throwing Hammer back if you lose it. Ember of Resolve, meanwhile, makes your grenade kills give you a powerful burst of healing. Your fourth Fragment slot is flexible, but we recommend Ember of Torches to get the radiant weapon damage buff each time you hit a combatant with your Throwing Hammer.

For your mods, both Ashes to Assets and Hands-On are must-have mods for extra Super energy since you'll be getting tons of grenade and melee kills. Also use Heavy Handed to generate Orbs of Power from Throwing Hammer kills, and pair it with Charged Up, Solar Weapon Surge, and Time Dilation to get a long-lasting Solar weapon damage buff that stacks with radiant (try and use a Solar weapon with Incandescent to scorch whatever your sunspots don't). Focusing Strike, Bolstering Detonation, and Insulation will all help you get your class ability energy faster, while Innervation and Bomber will bolster your grenade energy. The stats you should focus on are Resilience for damage resistance and shorter barricade cooldowns, then Discipline and Recovery.
Best Arc Titan Striker build
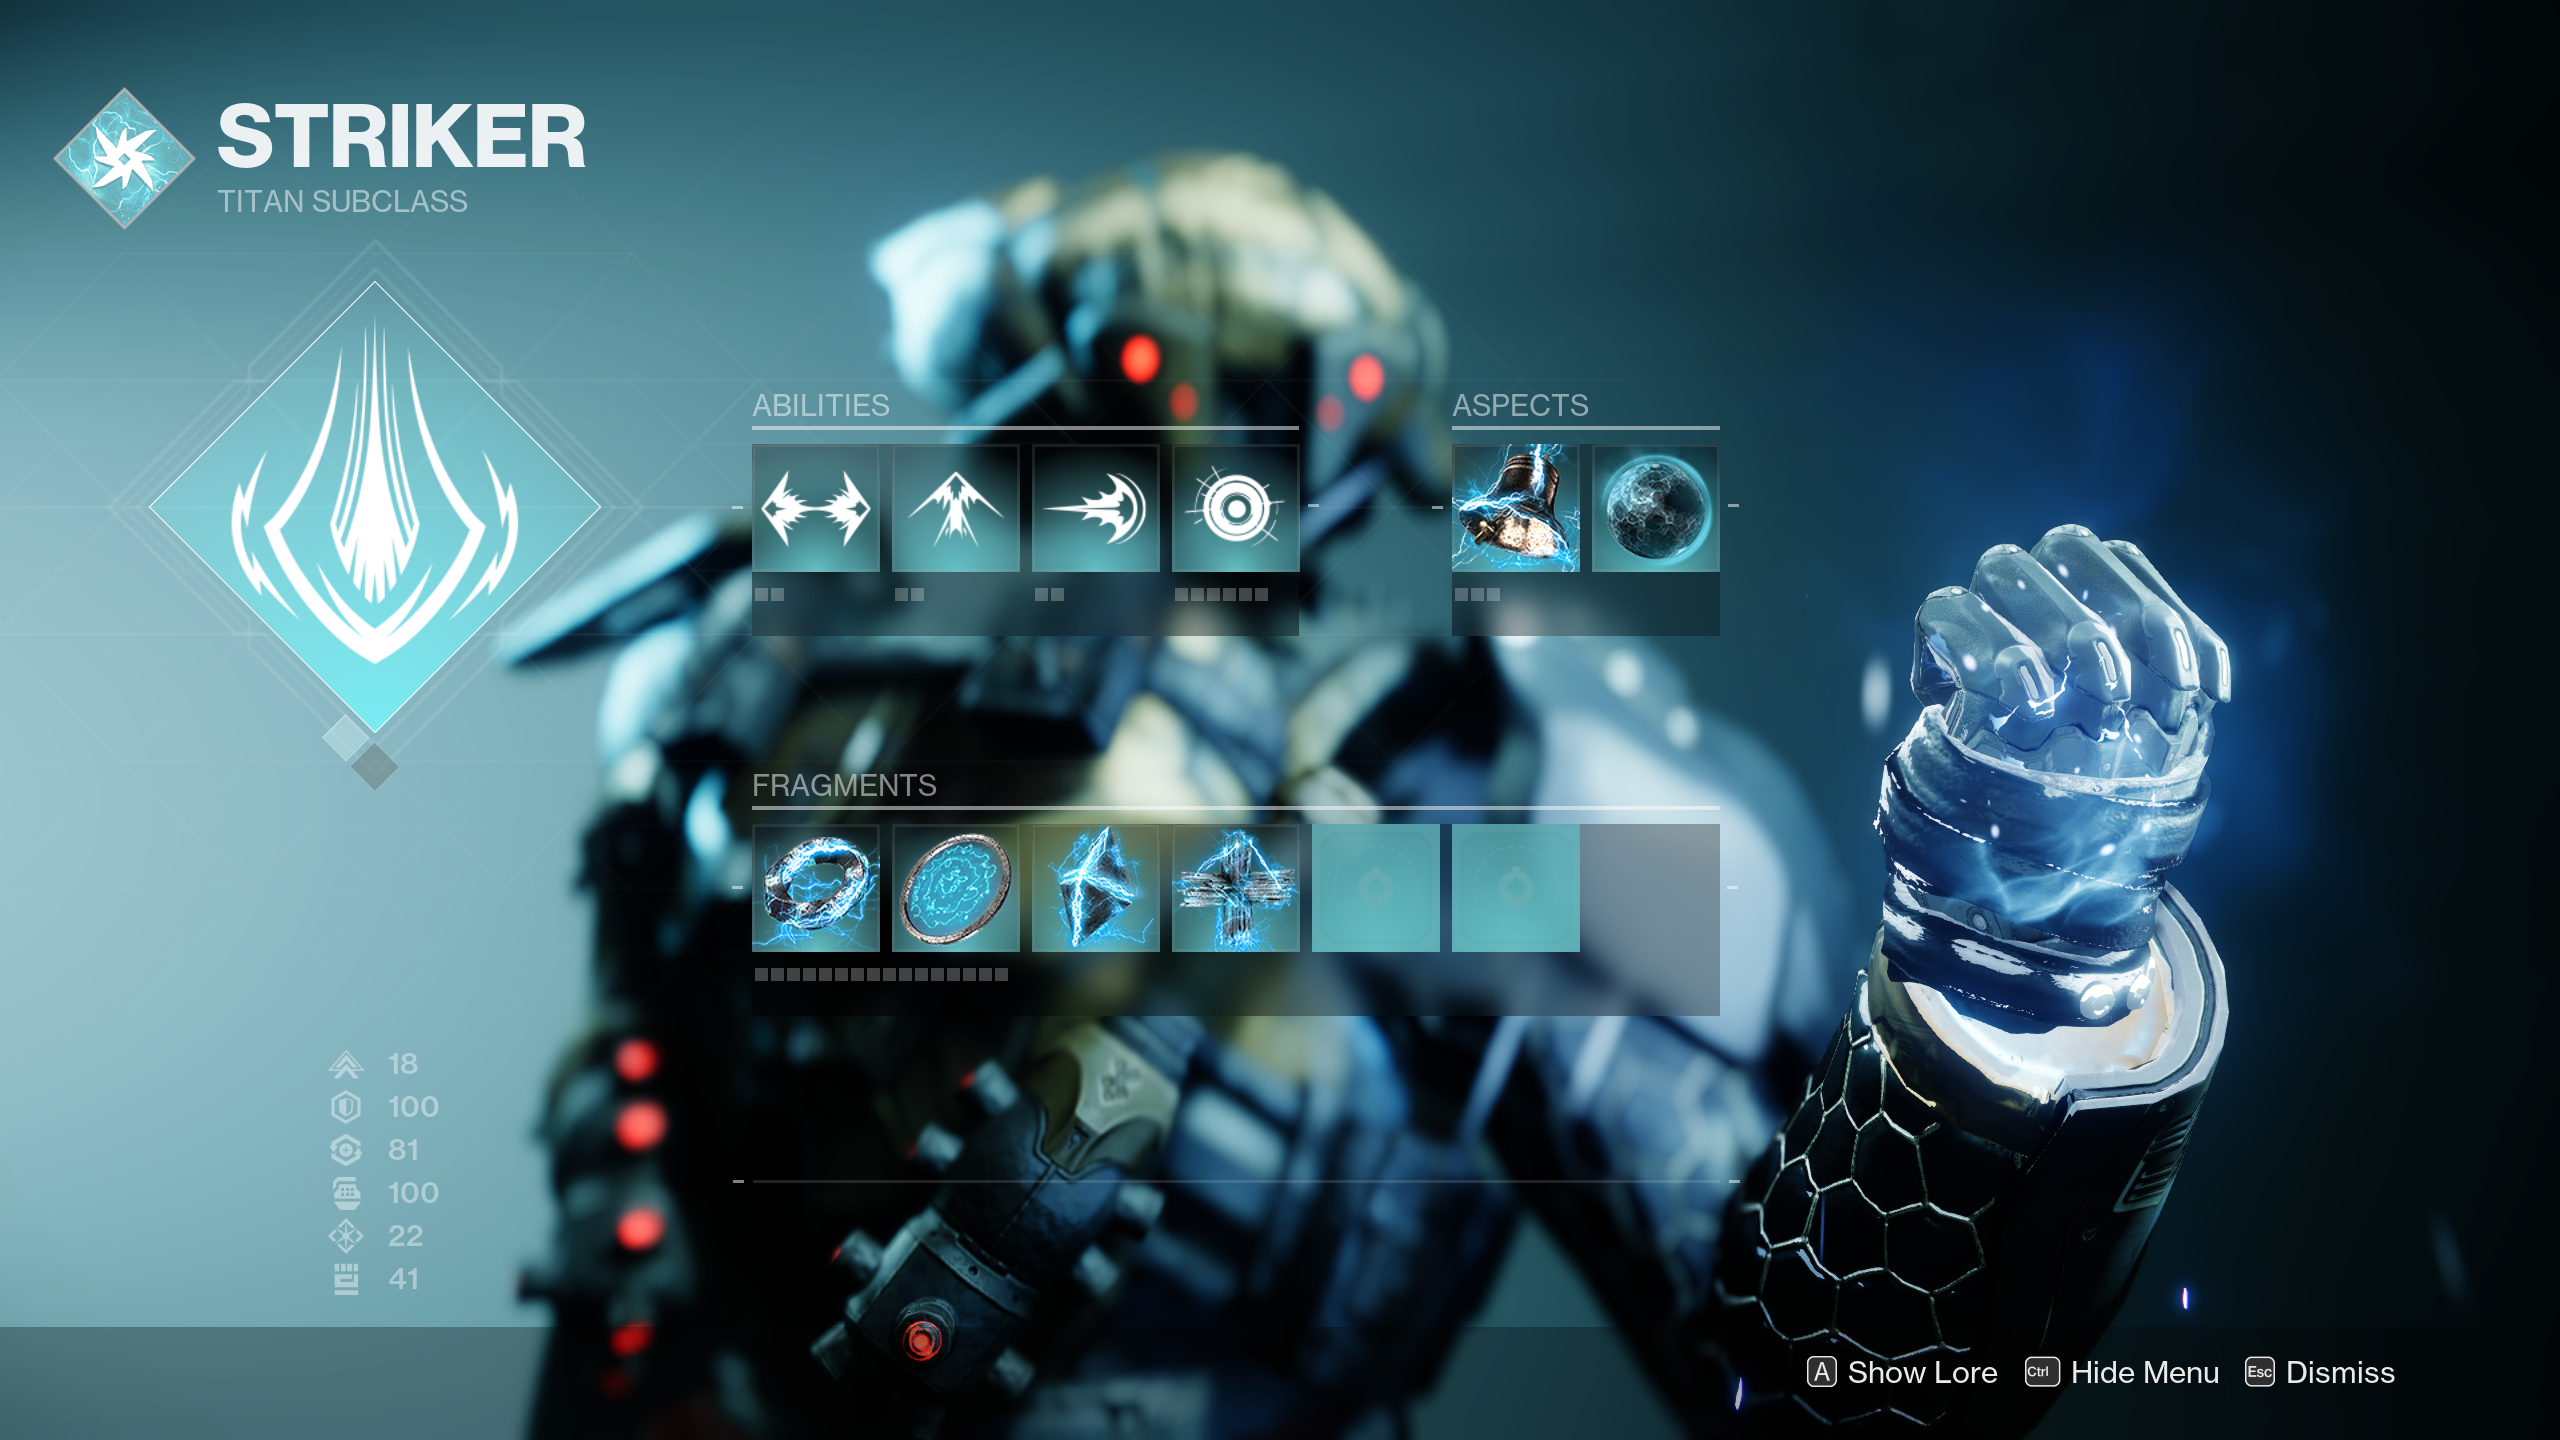
- Abilities: Thundercrash, Thruster, Seismic Strike OR Thunderclap, Pulse Grenade
- Aspects: Touch Of Thunder, Knockout
- Fragments: Spark of Shock, Spark of Magnitude, Spark of Ions, Spark of Recharge OR Spark of Resistance
- Exotic: Armamentarium
- Armor mods: Harmonic/Arc Siphon, Hands-On, Ashes to Assets, Firepower, Heavy Handed, Impact Induction, Emergency Reinforcement, Stacks On Stacks, Innervation, Recuperation, Bomber (x2), Distribution
- Important stats: Resilience, Discipline, Recovery
- Weapons: Arc weapons (ideally w/ Voltshot)
Ionic Traces used to be exclusive to the Warlock class, but thanks to Arc 3.0, other classes can access them too. The best way to use them on Titan is to create a Pulse Grenade-focused build with the Touch Of Thunder Aspect and the Armamentarium Exotic that gives you two grenade charges. This is because with Touch Of Thunder, your Pulse Grenades will continuously spawn Ionic Traces as they damage enemies and give you a ton of ability energy back. Knockout, meanwhile, buffs your standard melee attacks with Arc energy and makes melee kills heal you whenever you heavily wound a target or break their shield, mitigating the build's one weakness: low overall survivability compared to Void and Solar setups.
For Fragments, you should choose Spark of Shock, Magnitude, Ions, and Recharge. Spark of Shock makes your grenades jolt enemies, while Magnitude extends the duration of their lingering area-of-effect (this means extra Ionic Traces are generated for you). Spark of Ions takes advantage of Spark of Shock since it creates an Ionic Trace when you kill a jolted enemy, while Spark of Recharge gives you significantly increased ability regen when you become critically injured. Alternatively, you could go with Spark of Resistance for more damage reduction while surrounded by targets.
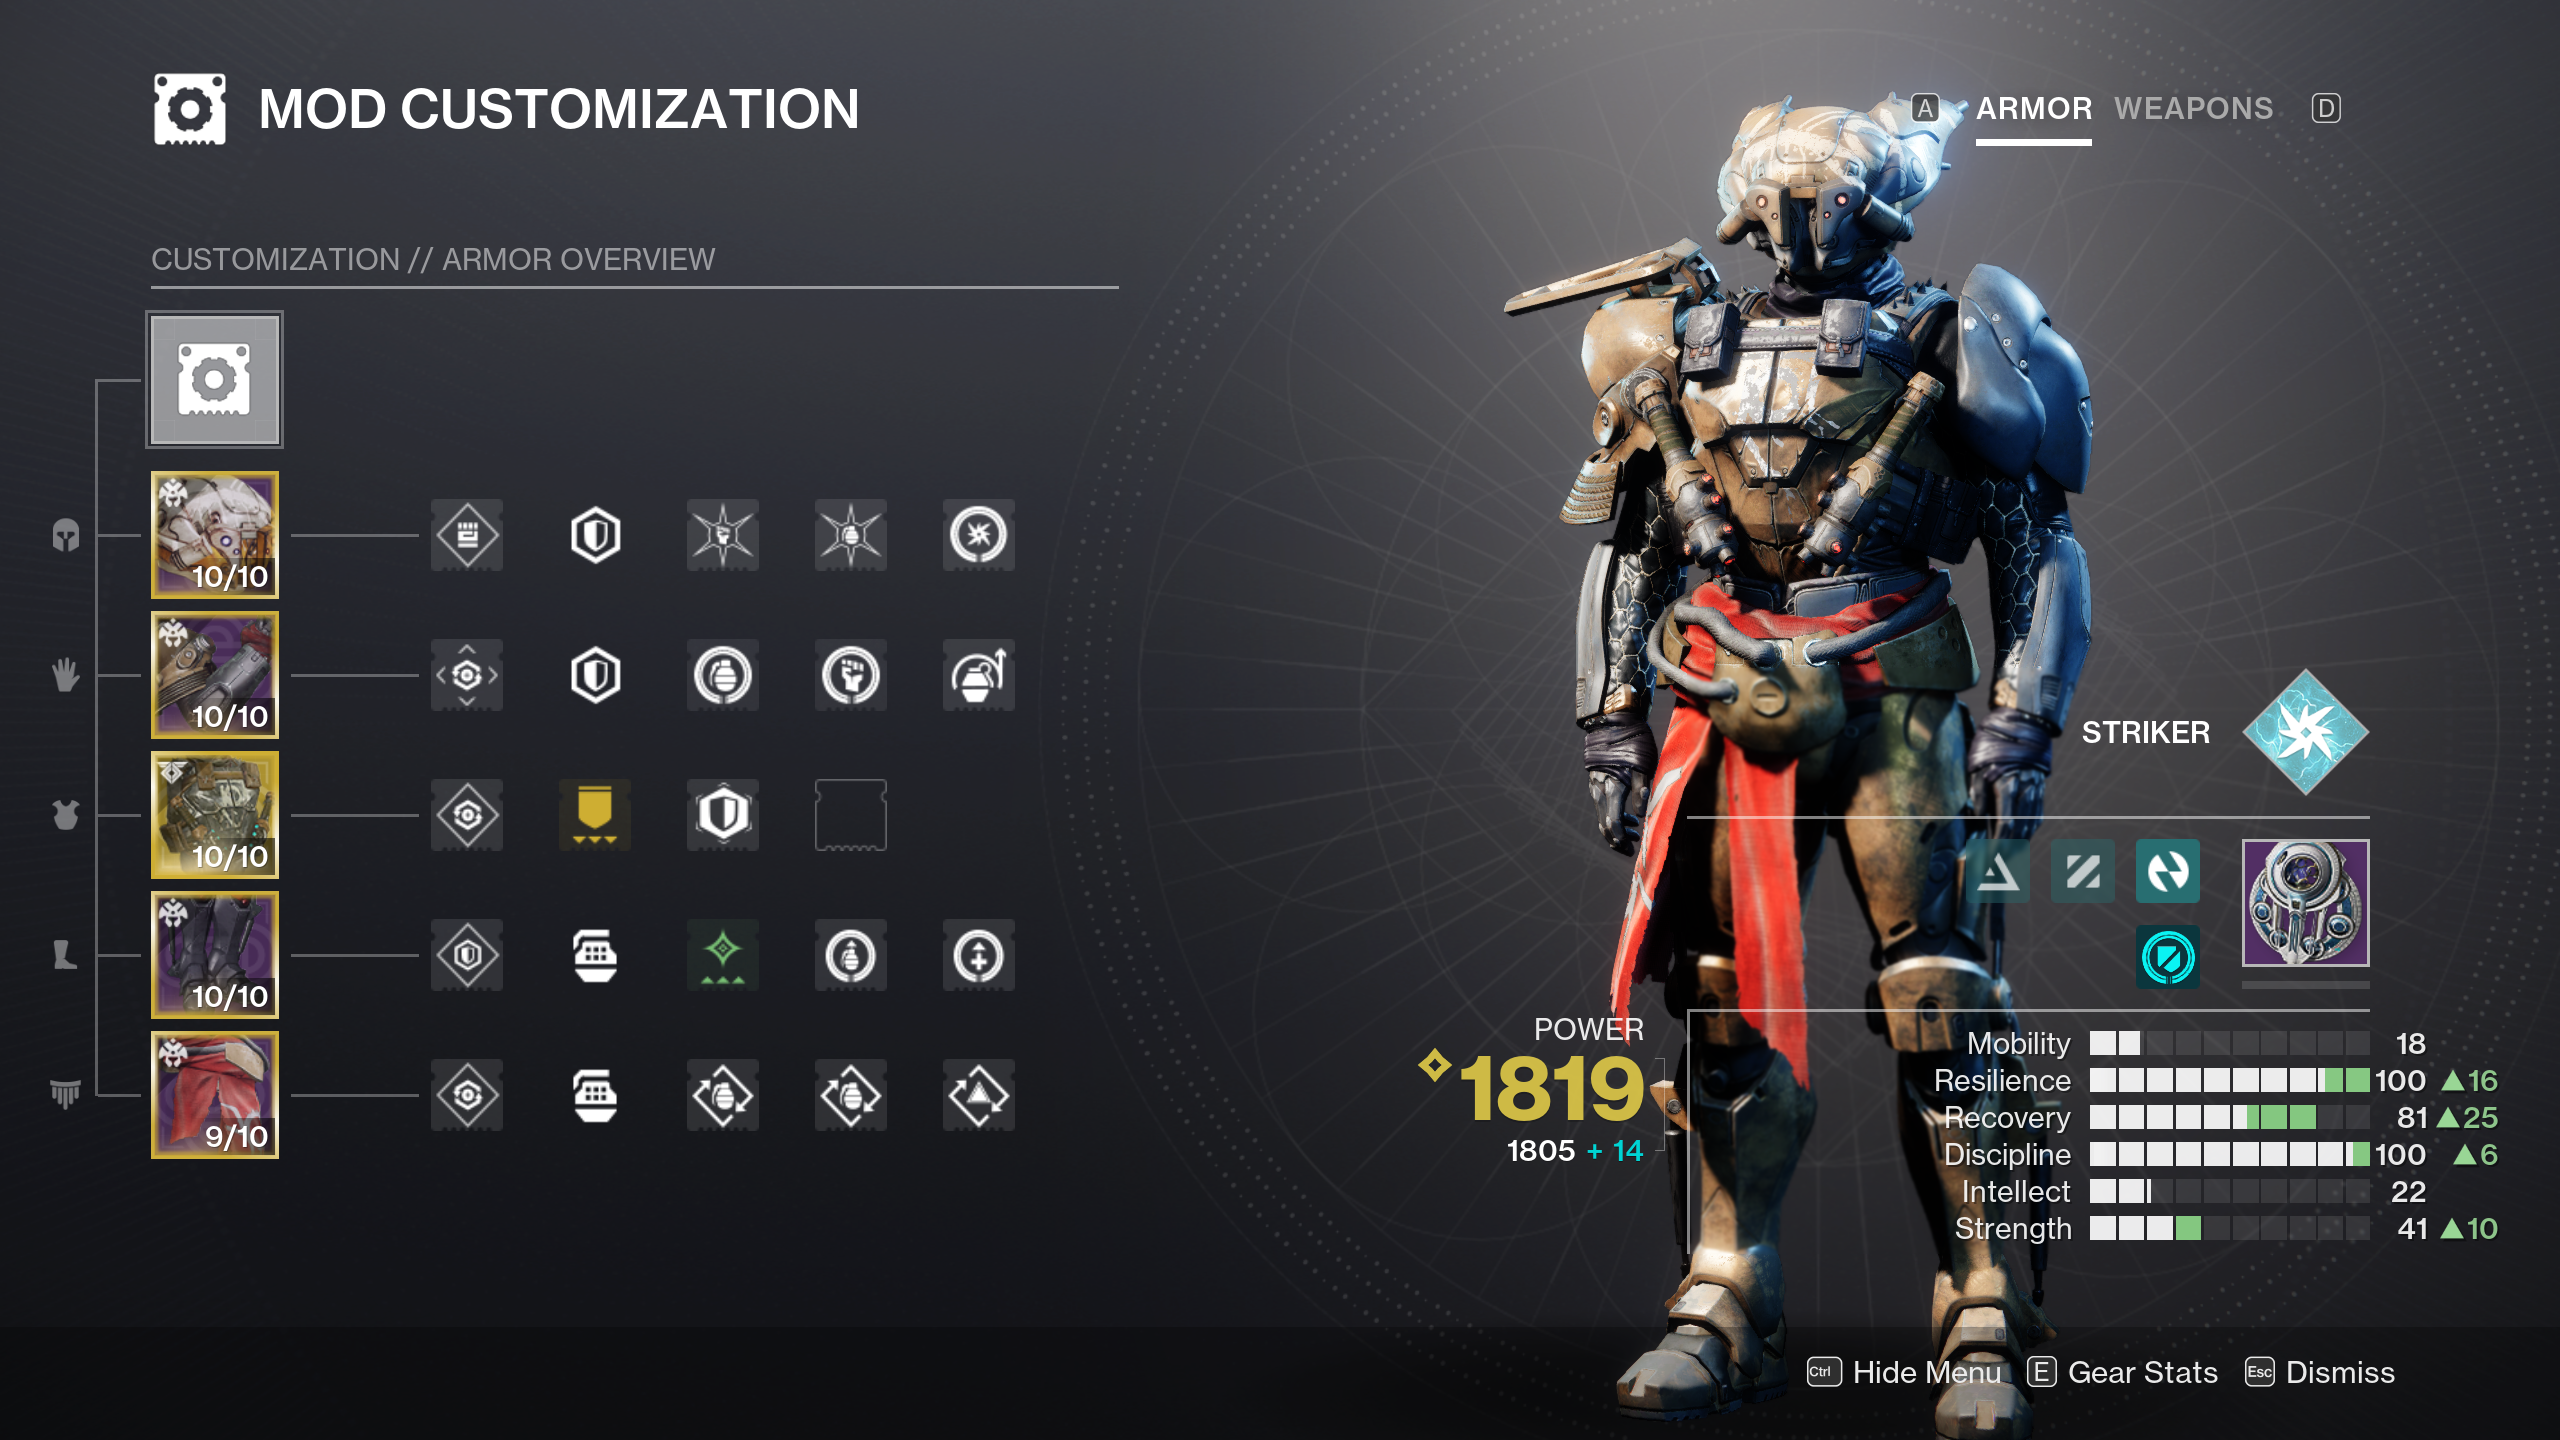
With Harmonic/Arc Siphon mods, Ashes to Assets, Hands-On, Firepower, and Heavy Handed, you can generate lots of Super energy for Thundercrash and also create tons of Orbs of Power with your grenade, melee, and Arc weapon kills. These Orbs will give you Armor Charge you can use with Stacks On Stacks and Emergency Reinforcement to get strong damage resistance when your health is low, which you'll need for a build this aggressive. Recuperation will also make Orbs heal you directly, while Innervation will work alongside your Ionic Traces to get you your grenades back quicker. Additionally, a pair of Bomber mods and Distribution will give you a good amount of ability energy whenever you use the Arc-exclusive Thruster class ability, which you can do often thanks to its low cooldown. For stats, go with Resilience, Discipline, and Recovery for high base damage resistance, faster grenade energy regen, and quick healing-over-time.
Best Stasis Titan Behemoth build
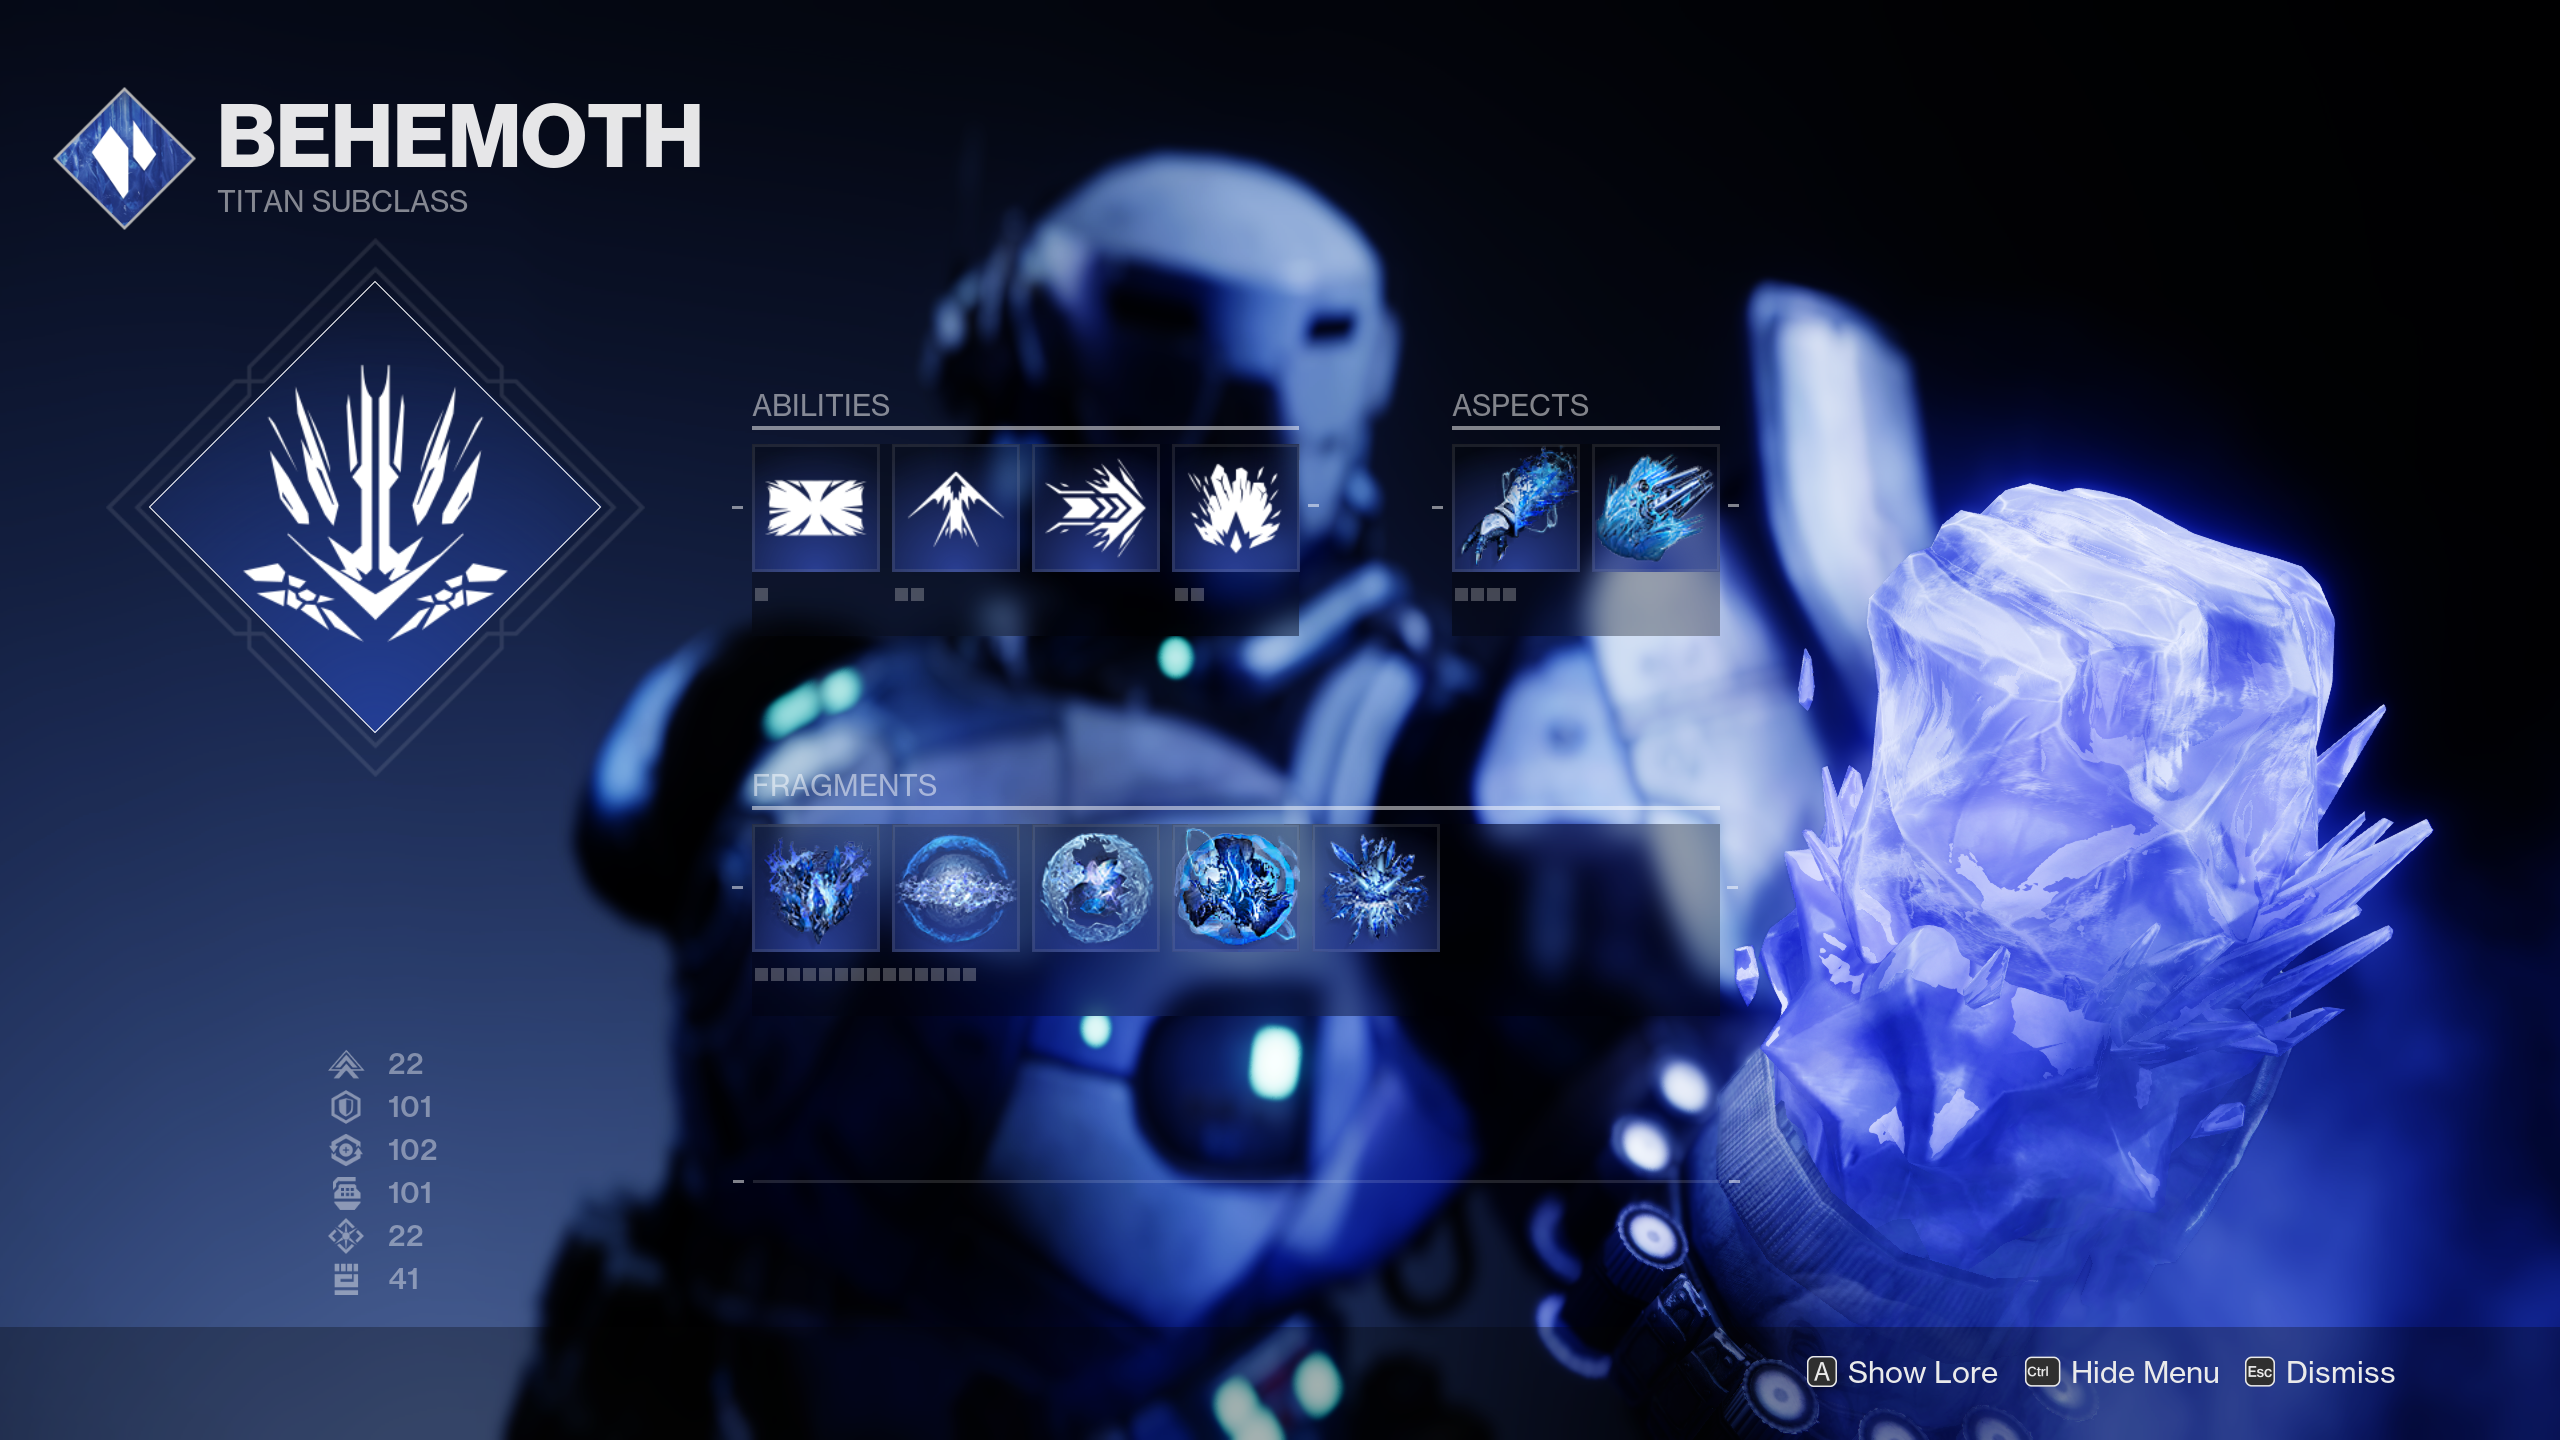
- Abilities: Rally Barricade, Glacier Grenade
- Aspects: Tectonic Harvest, Diamond Lance
- Fragments: Whisper of Chains, Whisper of Shards, Whisper of Torment, Whisper of Fissures, Whisper of Rime
- Exotic: Hoarfrost-Z
- Armor mods: Harmonic/Stasis Siphon, Energy Siphon mod (of your choice), Grenade Kickstart, Impact Induction, Charged Up, Stacks On Stacks, Innervation, Insulation, Bomber (x2), Reaper
- Important stats: Resilience, Discipline, Recovery
- Weapons: Stasis primary (preferably w/ Headstone), Energy special weapon
Need a tanky build for crowd control at close or medium range? You won't find a better one than this Stasis Behemoth Titan setup. Between the Hoarfrost-Z Exotic that replaces your barricade with a wall of Stasis crystals, your Glacier Grenade, and (optionally) the use of a Stasis primary weapon with the Headstone perk on it, you'll be able to cover the battlefield with Stasis crystals that will provide you with multiple different benefits. With the Tectonic Harvest and Diamond Lance Aspects, you can also create helpful Stasis shard pickups by shattering your crystals and create throwable Stasis javelins that freeze enemies instantly.
This build is extremely reliant on your Fragments, which are Whisper of Chains, Torment, Shards, Fissures, and Rime. Whisper of Chains reduces the damage you take from enemies while near one of the Stasis crystals generated by Hoarfrost-Z's Glacial Fortification perk, your Glacier Grenade, or a Headstone weapon. Whisper of Torment gives you grenade energy when you take damage, and Whisper of Shards boosts your grenade recharge rate whenever you destroy these crystals to slow and freeze targets near them. Whisper of Fissures then increases the damage and size of these crystal explosions, making them more effective. Lastly, Whisper of Rime makes your Tectonic Harvest Stasis shards heal you and give a small overshield.
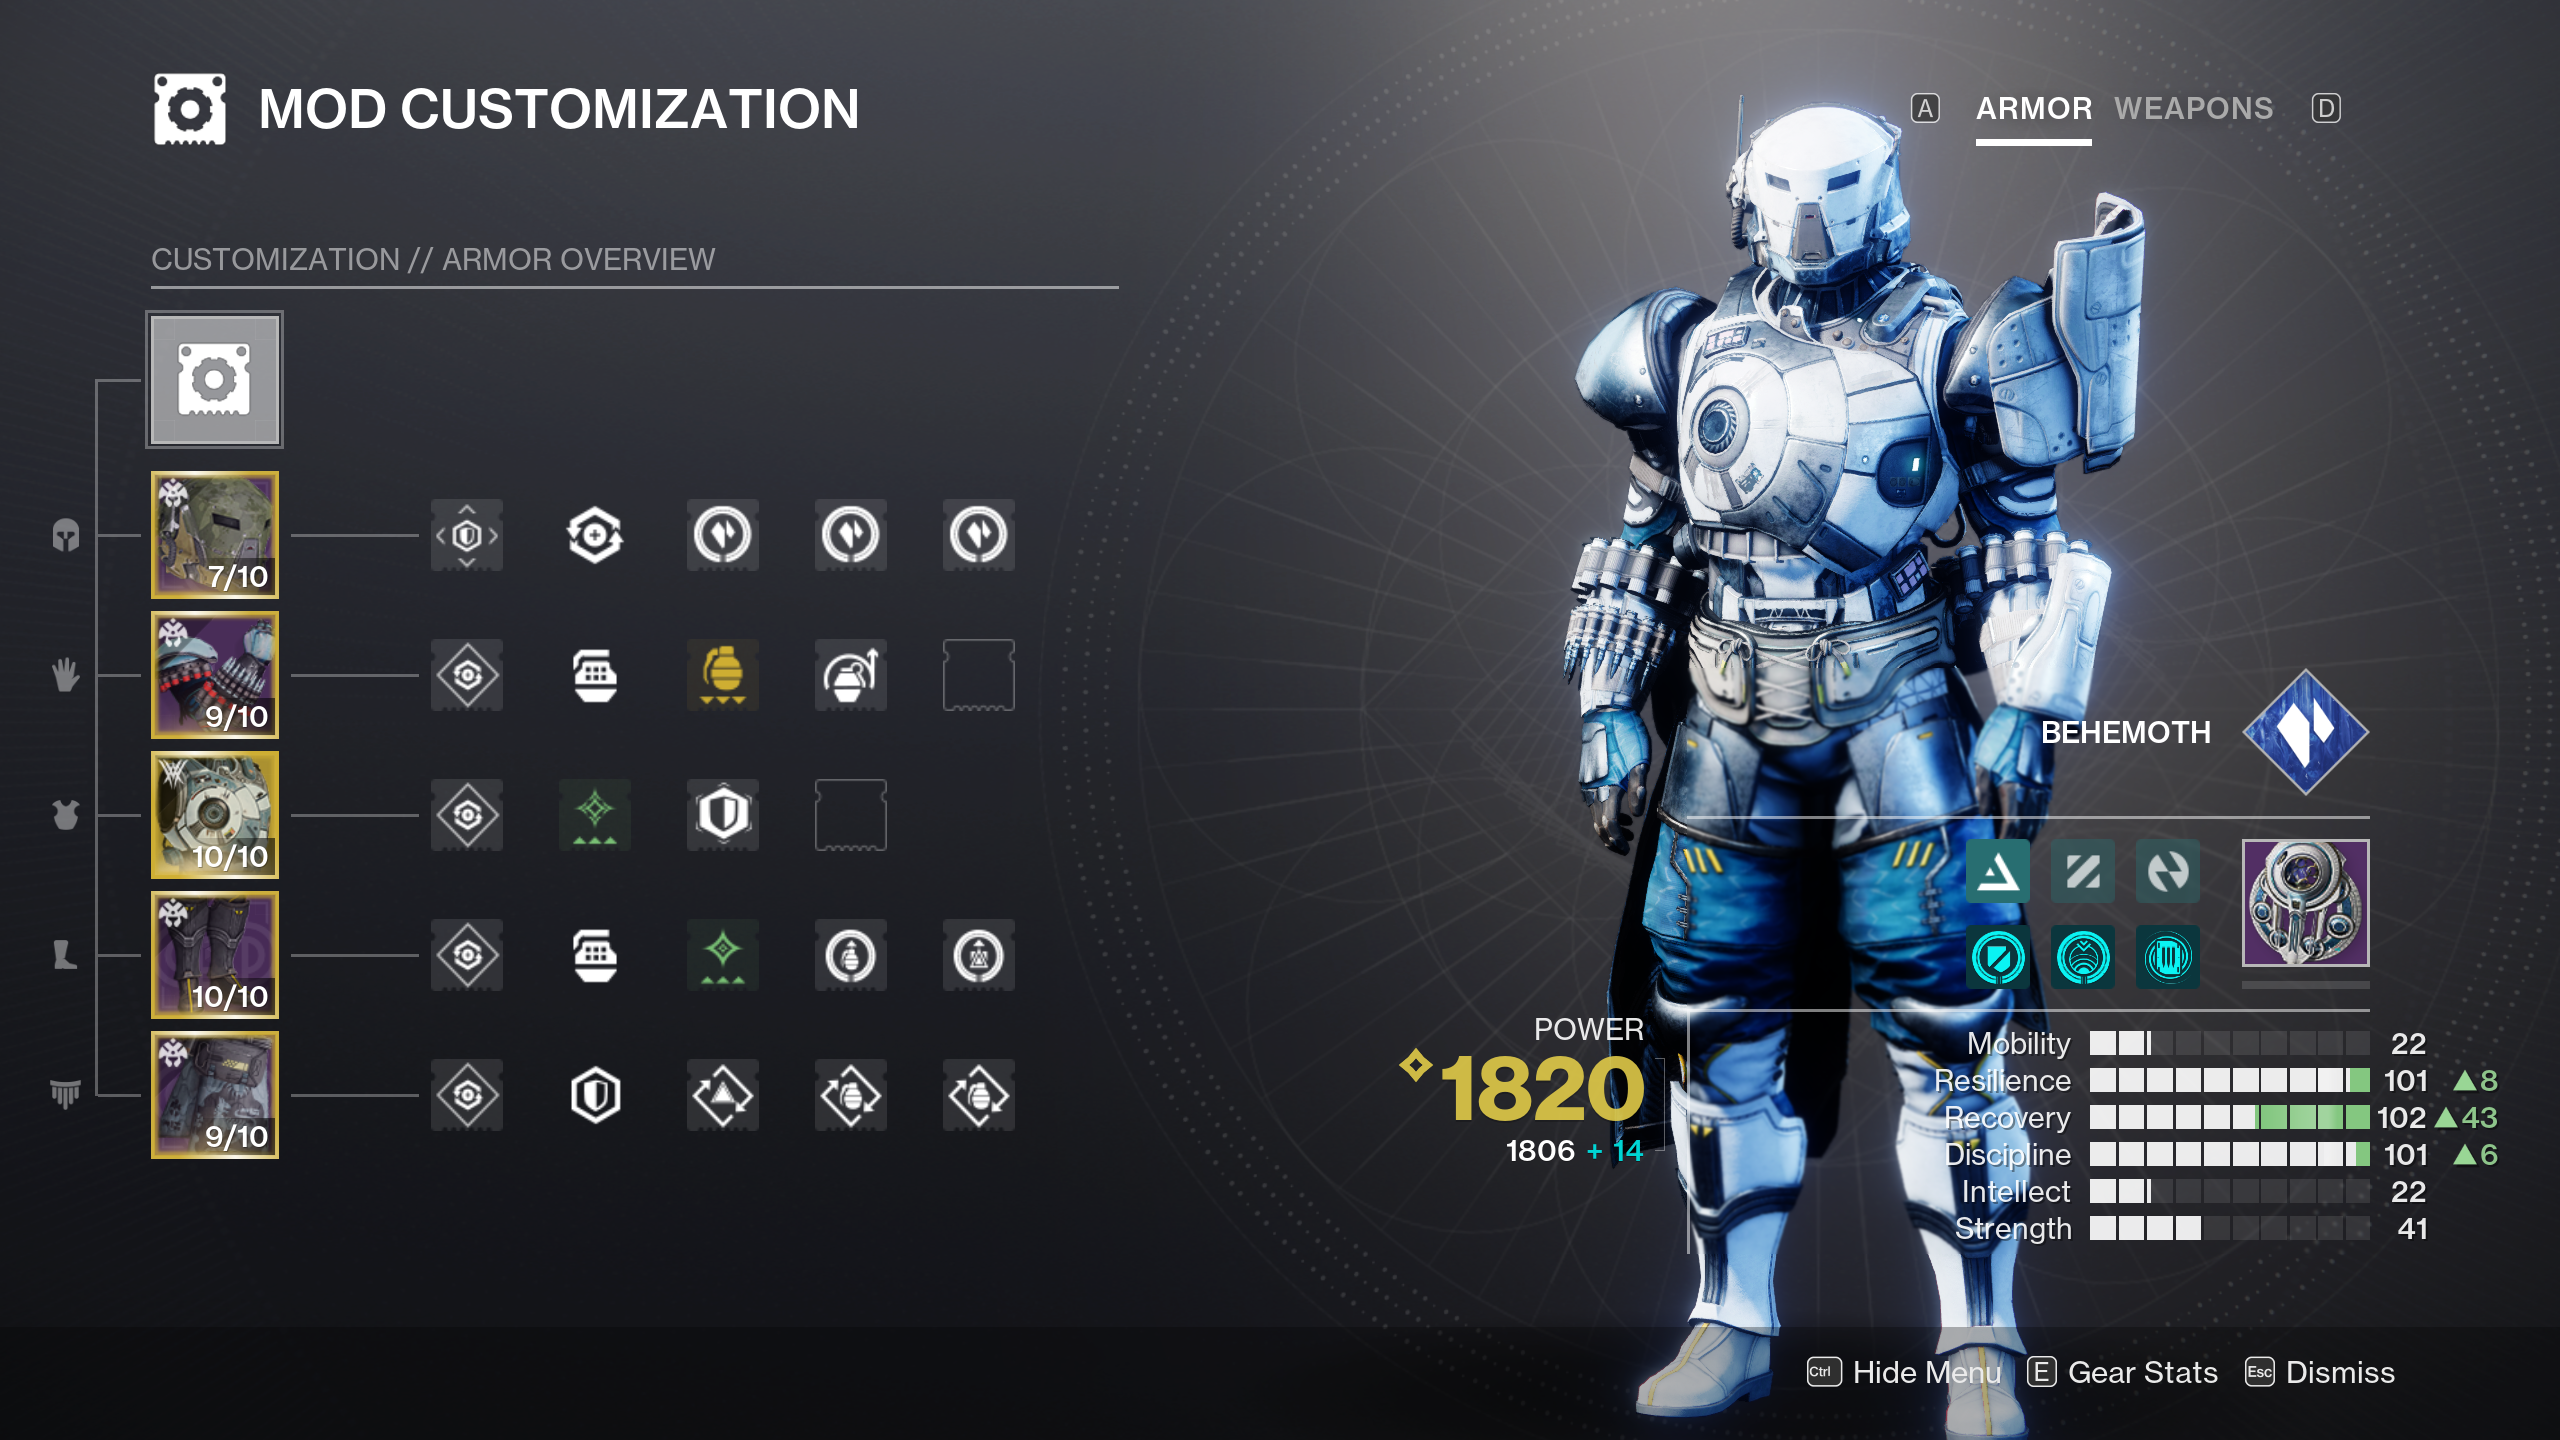
This build relies heavily on Glacier Grenades to keep Stasis crystals on the field between barricade casts, so for Armor Charge mods, use Charged Up, Stacks On Stacks, and Grenade Kickstart to get huge chunks of grenade energy back whenever you throw one. Use Harmonic/Stasis Siphons, a Siphon mod that matches the element of your chosen energy weapon, and Reaper to make Orbs of Power to feed Grenade Kickstart, along with Impact induction, Innervation, Insulation, and a pair of Bomber mods. Like with most builds in this list, Resilience, Discipline, and Recovery are the main stats to prioritize.
Best Strand Titan Berserker build
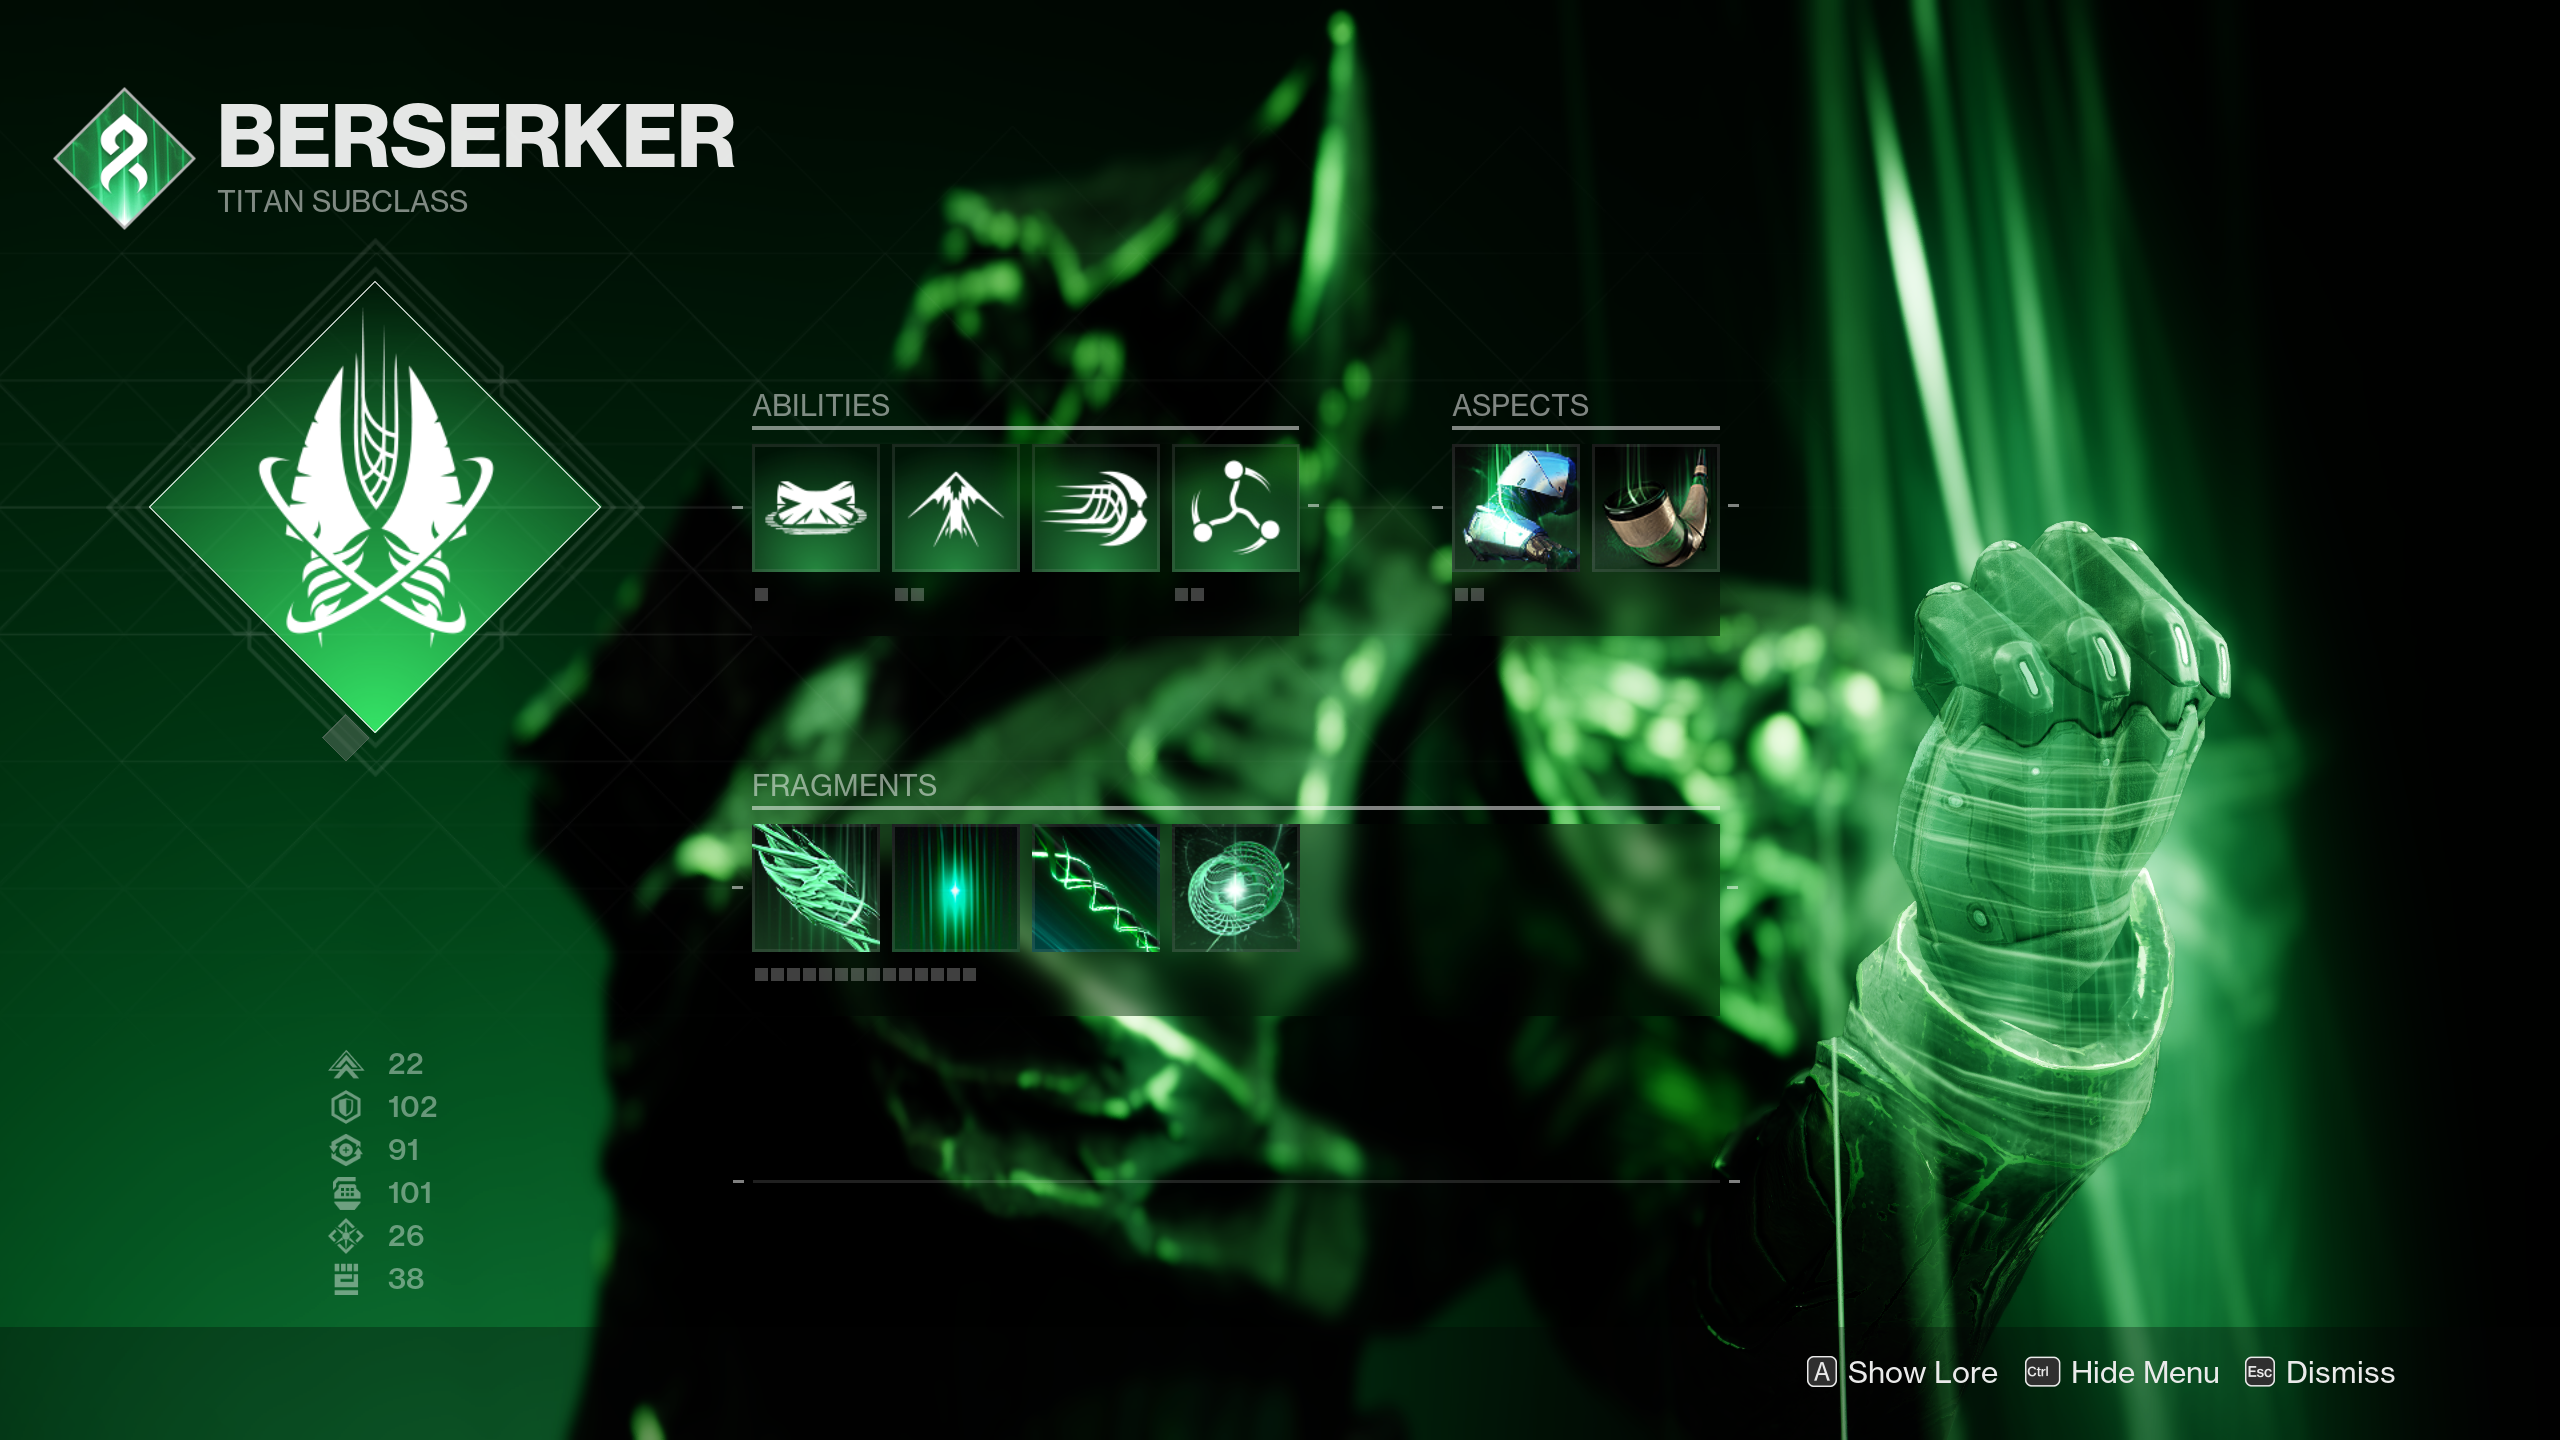
- Abilities: Rally Barricade, Shackle Grenade
- Aspects: Into The Fray, Drengr's Lash
- Fragments: Thread of Mind, Thread of Wisdom, Thread of Warding, Thread of Binding (or whatever you'd prefer)
- Exotic: Abeyant Leap
- Armor mods: Siphon mod (of your choice), Heavy Handed, Bolstering Detonation, Charged Up, Stacks On Stacks, Insulation, Recuperation, Bomber, Outreach, Utility Kickstart
- Important stats: Resilience, Discipline OR Strength, Recovery
- Weapons: Any (match w/ Siphon mods)
Last but certainly not least is the best build for the Titan's new Strand Berserker subclass. By pairing the Drengr's Lash Aspect with the Abeyant Leap Exotic, your barricades will cast three ripples of suspending Strand energy instead of one, significantly improving your ability to crowd control enemy formations. Then, with the Into The Fray Aspect, you'll get the powerful damage-reducing Woven Mail buff by destroying one of the Tangles left behind by the foes you suspended. This makes it easier to tear into the rest of them with your Frenzied Blade melee safely, and also gives you access to the increased melee ability regen you get from Into the Fray while you have Woven Mail.
Since the core of this build revolves around suspending targets and taking advantage of Woven Mail, choose Fragments that improve the functionality or uptime of these effects. We recommend Thread of Mind, Wisdom, Warding, and Binding. Thread of Mind gives you barricade energy when killing suspended enemies, and since your barricade is your primary way to suspend, this is an obvious must-have. Thread of Wisdom creates an Orb of Power whenever you kill a suspended target with precision damage, and when using Thread of Warding, that Orb of Power will give you Woven Mail (this is useful in situations where your ability to make a Tangle and get Woven Mail that way is on cooldown). The final Fragment slot is up to you; we like Thread of Binding since it gives a +10 boost to your Resilience stat and makes your Bladefury Super capable of suspending nearby targets with every kill.
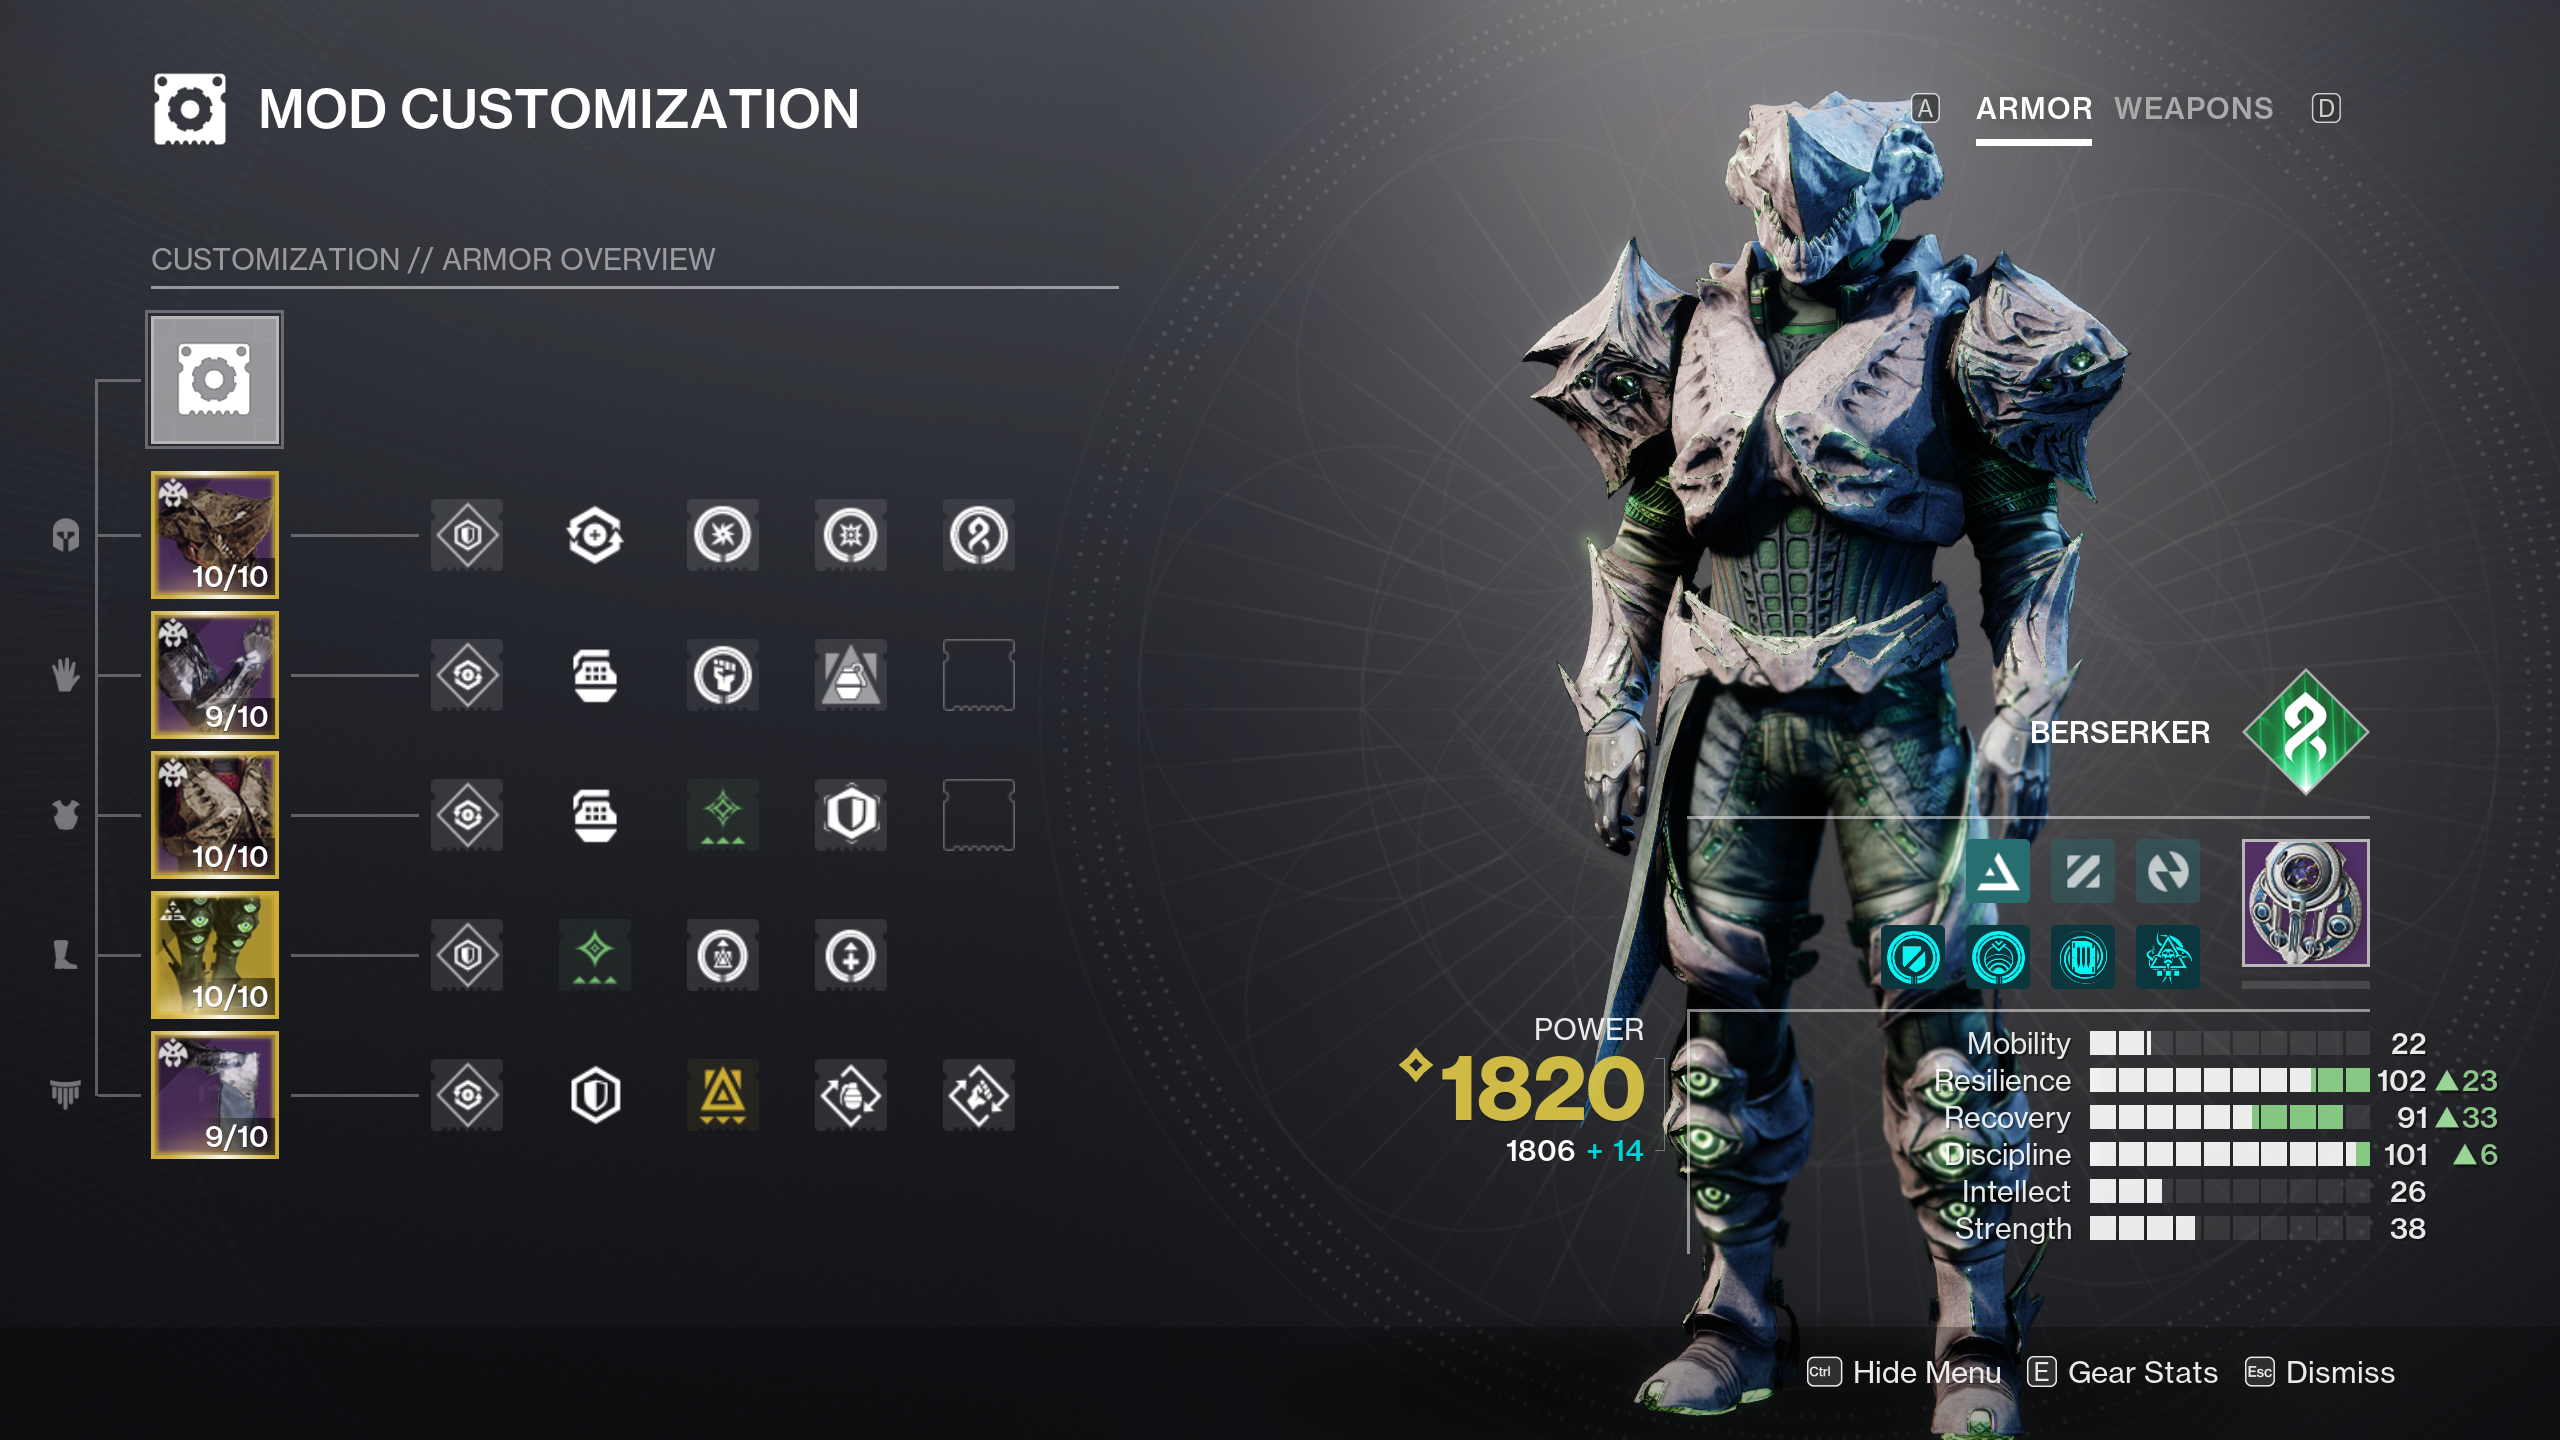
For mods, use Siphon mods that match the elements of the weapons you're using and Heavy Handed to make Orbs of Power with weapon kills and Frenzied Blade melee attacks. Then, use Charged Up, Stacks On Stacks, and Utility Kickstart to convert those Orbs of Power into Armor Charge stacks that give you a significant portion of your barricade energy back whenever you use it. Other good mods to use include Bolstering Detonation, Insulation, Recuperation, Bomber, and Outreach. With these, you'll be able to heal off of Orbs of Power and will get a general increase to your ability uptime across the board.
Finally, there's stats to consider. Resilience is the most important stat here since it bolsters your base damage resistance and reduces your barricade cooldown, while both Discipline and Strength work well as secondary stats. Opt for Strength if you want Frenzied Blade to be available more often, and go with Discipline if you'd prefer to always have a Shackle Grenade on hand to suspend whatever your Drengr's Lash barricade misses. For your tertiary stat, Recovery is a good choice since quicker healing is always helpful.
The best Destiny 2 builds ... for now
These are our favorite Destiny 2 builds to use in the Lightfall expansion and the Season of Defiance, but in the future, new gear and gameplay tweaks will surely shake things up. As Bungie adds new Exotics and makes balance adjustments over time, we'll be sure to keep this article updated with the latest and greatest builds for each class and all of their respective subclasses. Until then, have fun!
Destiny 2: Lightfall is available now on Xbox Series X|S, Xbox One consoles, Windows PCs, and PlayStation systems. In it, you'll take the fight to Emperor Calus, gain access to Strand subclasses and their unique abilities, and more.
Destiny 2: Lightfall
The Lightfall expansion takes players to the neon-soaked city of Neomuna on Neptune and pits them against the fearsome Shadow Legion — all while the threat of Darkness Pyramids, The Witness, and his new Disciple Emperor Calus looms overhead.
See at: Microsoft | GMG (Steam)
Brendan Lowry is a Windows Central writer and Oakland University graduate with a burning passion for video games, of which he's been an avid fan since childhood. He's been writing for Team WC since the summer of 2017, and you'll find him doing news, editorials, reviews, and general coverage on everything gaming, Xbox, and Windows PC. His favorite game of all time is probably NieR: Automata, though Elden Ring, Fallout: New Vegas, and Team Fortress 2 are in the running, too. When he's not writing or gaming, there's a good chance he's either watching an interesting new movie or TV show or actually going outside for once. Follow him on X (Twitter).
