10 Tips everyone should know after installing Windows 10 Technical Preview
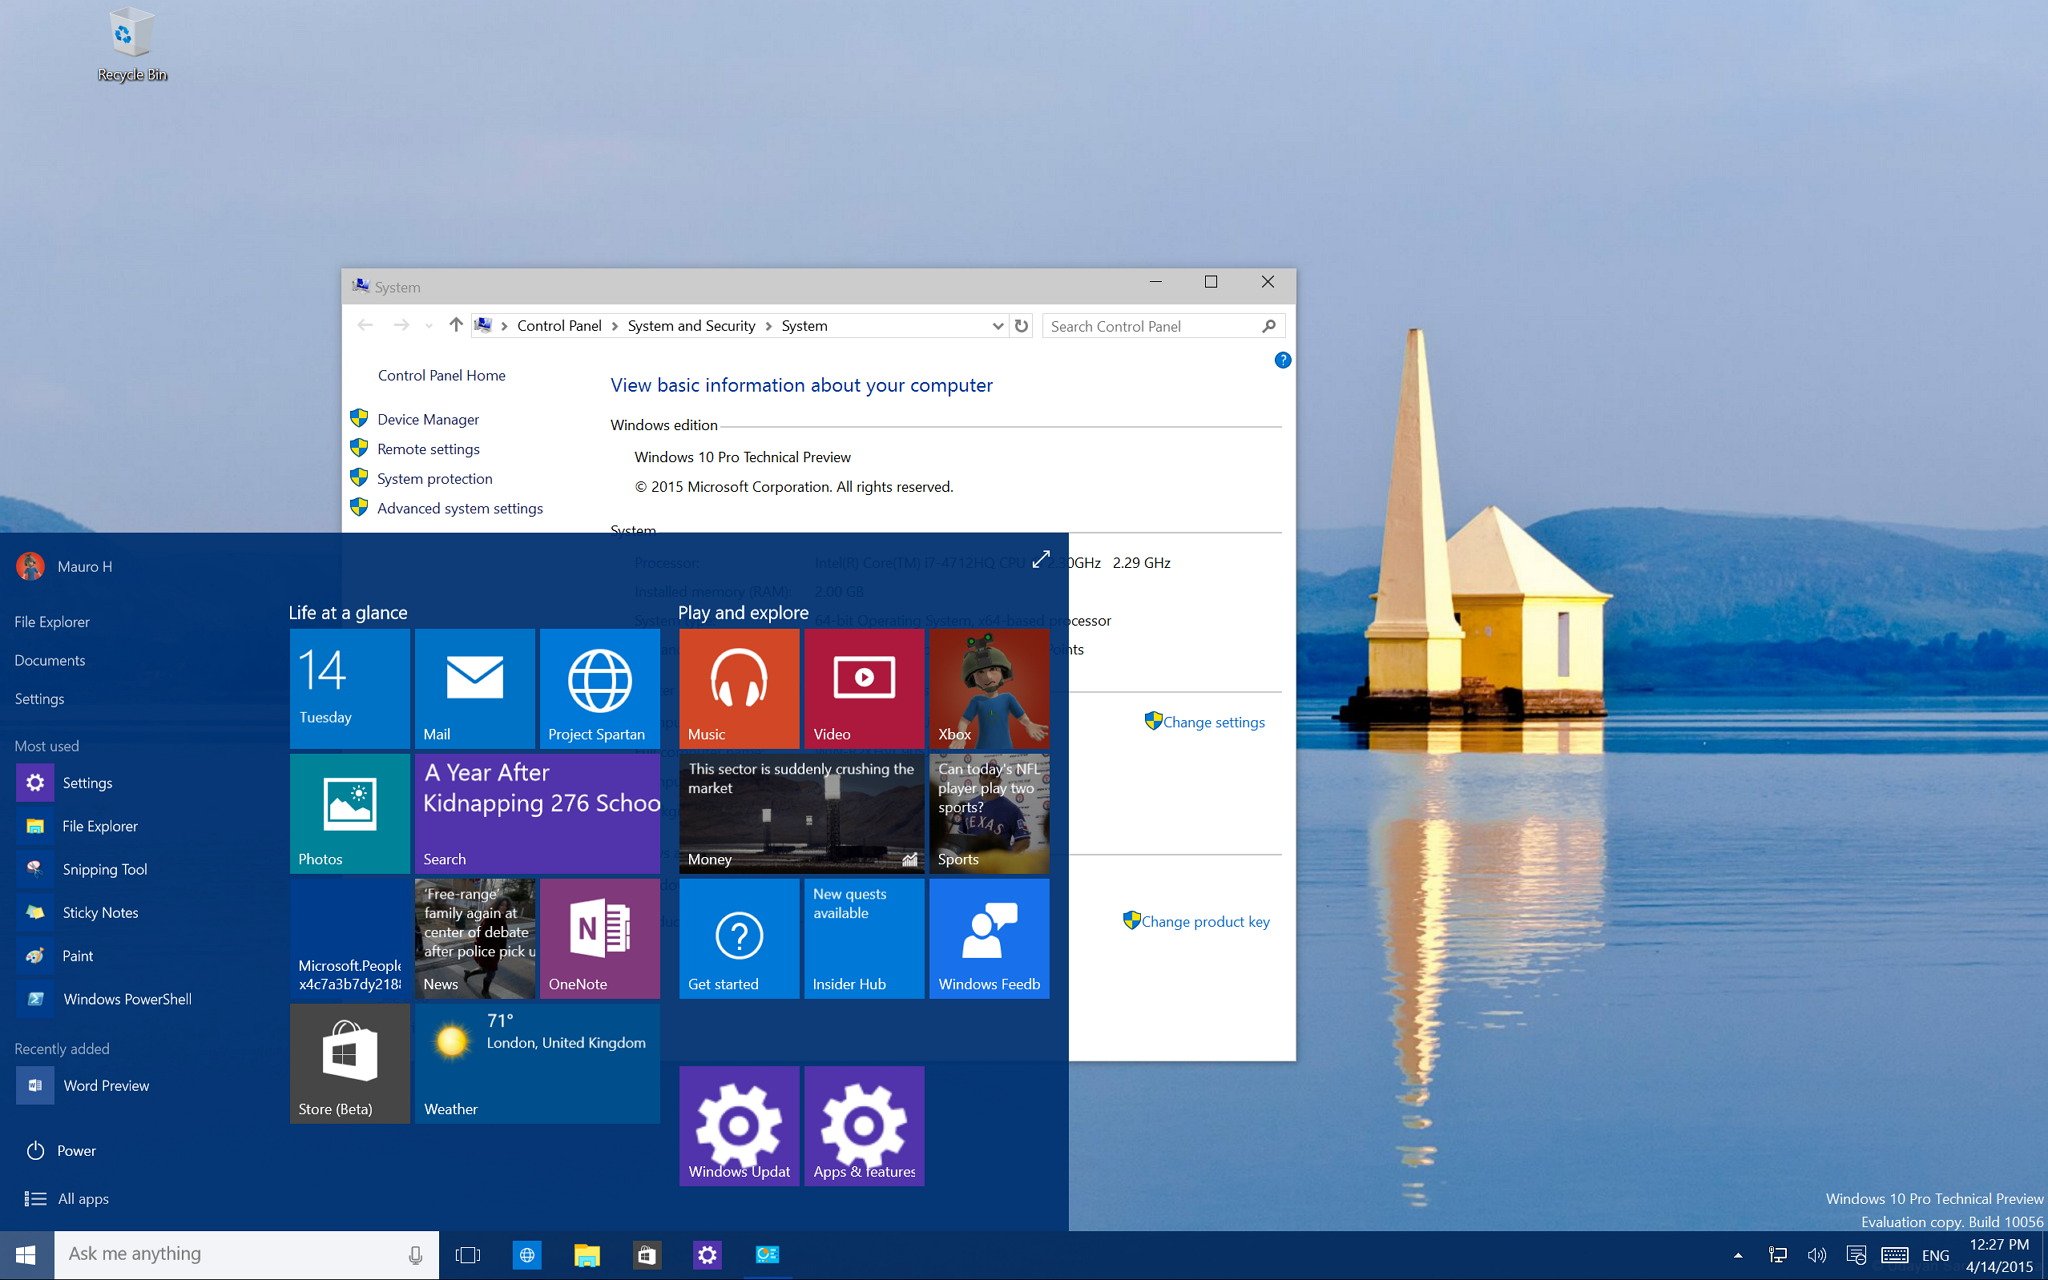
While Windows 10 is still a preview and months away from final release (aka RTM), Microsoft's upcoming operating system is already taking shape with tons of new features and improvements. Every day more people are becoming part of the Windows Insider program to get a taste of what's to come later this summer, when Microsoft launches Windows 10 to the public.
As such, we thought we would share 10 of the most useful tips every Windows Insider should know to get started with Windows 10 Technical Preview.
Tip 1: Stop the syncing madness
Perhaps the single most important requirement for installing a preview of Windows 10 is to register as a Windows Insider. Registering for the program will give you access to the latest builds, to the Store (beta), and to send feedback to Microsoft. More importantly, it gives Microsoft the opportunity to track how you use Windows 10, so the company can improve and fix the operating system.
However, chances are that most users will use the same Microsoft account they use with Windows 8.1 to register as a Windows Insider. One of the benefits of using the same Microsoft account is that by default Windows will synchronize all of your settings from your primary computer to the new installation of Windows 10 and vice versa. This syncing though can also cause some issues.
If you are simply testing Windows 10 Technical Preview, you probably will change a few settings to see how things work. However, you don't necessary want to have these settings synced to your primary PC or other devices. As such, it is a good idea to disable the sync option in the Settings app to avoid "testing settings" from replicating throughout all your devices.
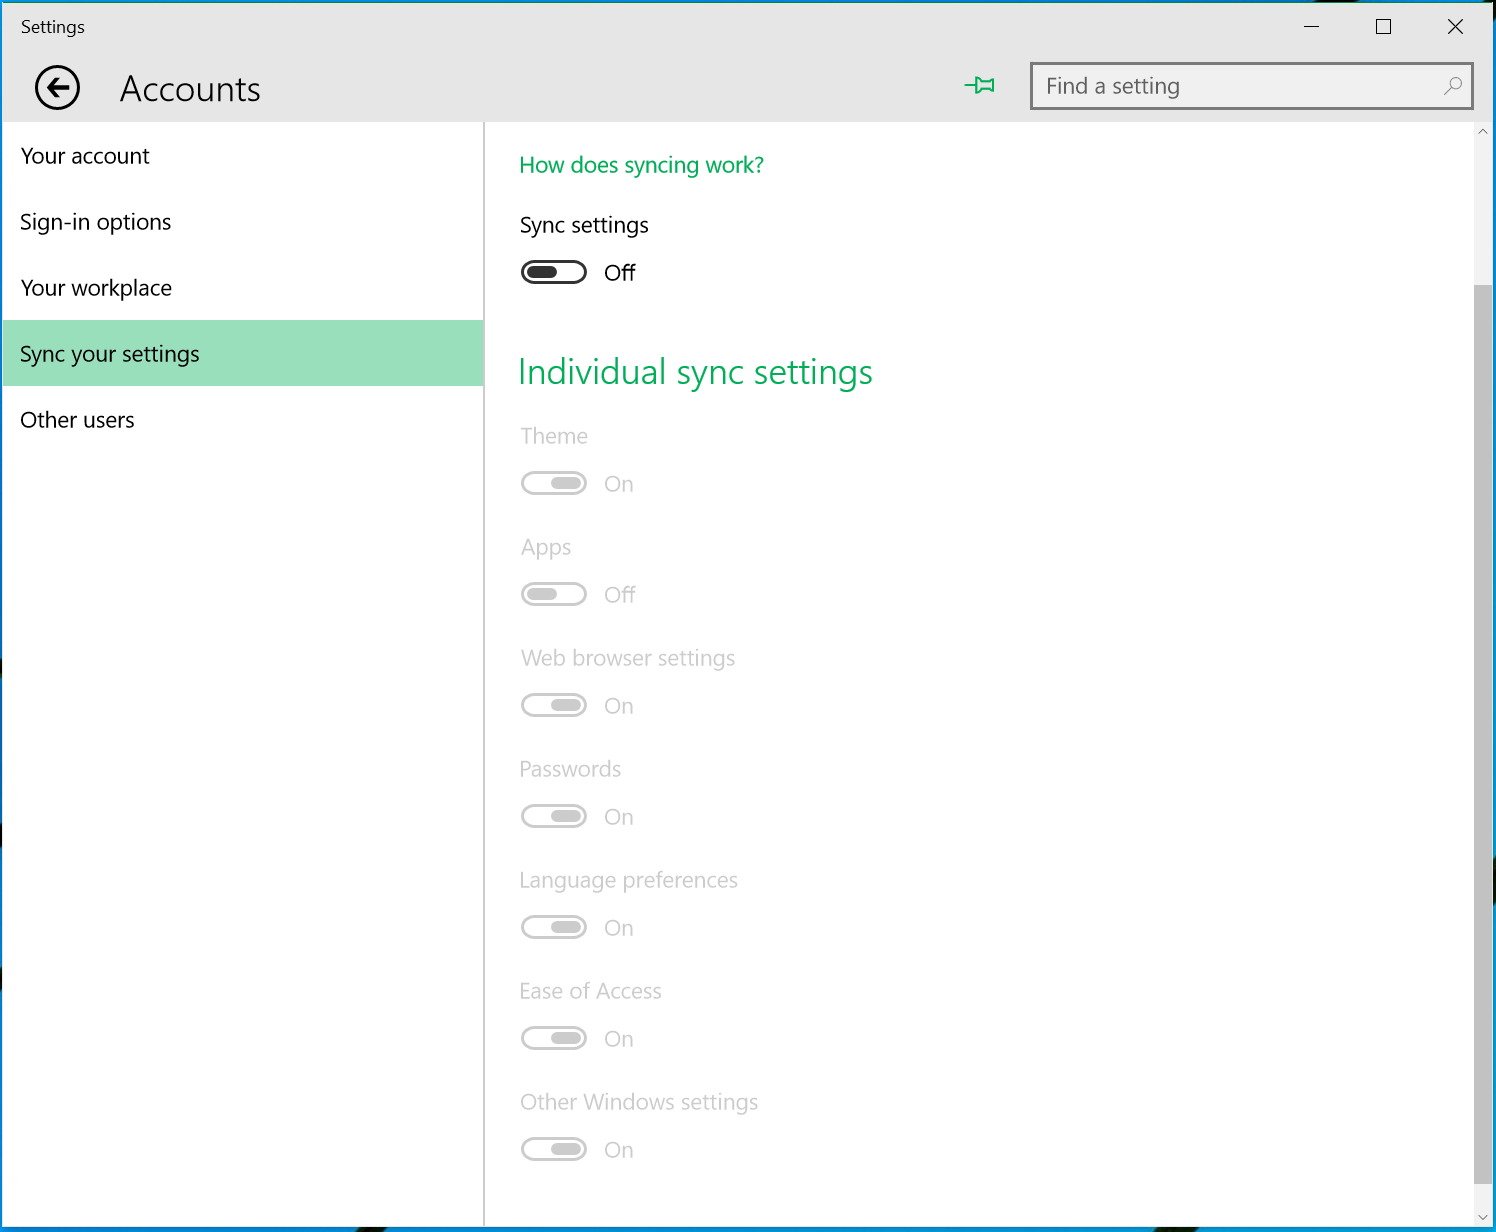
To stop synchronization of your Windows settings, open the Settings app, click Accounts, navigate to Sync your settings and turn off the Sync settings option. Disabling this will stop themes, apps, web browser settings, passwords, language preferences, Ease of Access, and other Windows settings from syncing between computers.
Tip 2: Enable Cortana and Hey Cortana
Microsoft's digital assistant, Cortana, was first introduced in Windows Phone 8.1, and now the company is bringing the assistant to the Windows 10 desktop.
Get the Windows Central Newsletter
All the latest news, reviews, and guides for Windows and Xbox diehards.
If during the installation, you didn't enable Cortana, click on the taskbar's search box, to bring up the option to enable the personal assistant and click Allow. Also, you'll be prompted to enter the name you want Cortana call you. Just enter a name, and now you should be all set.
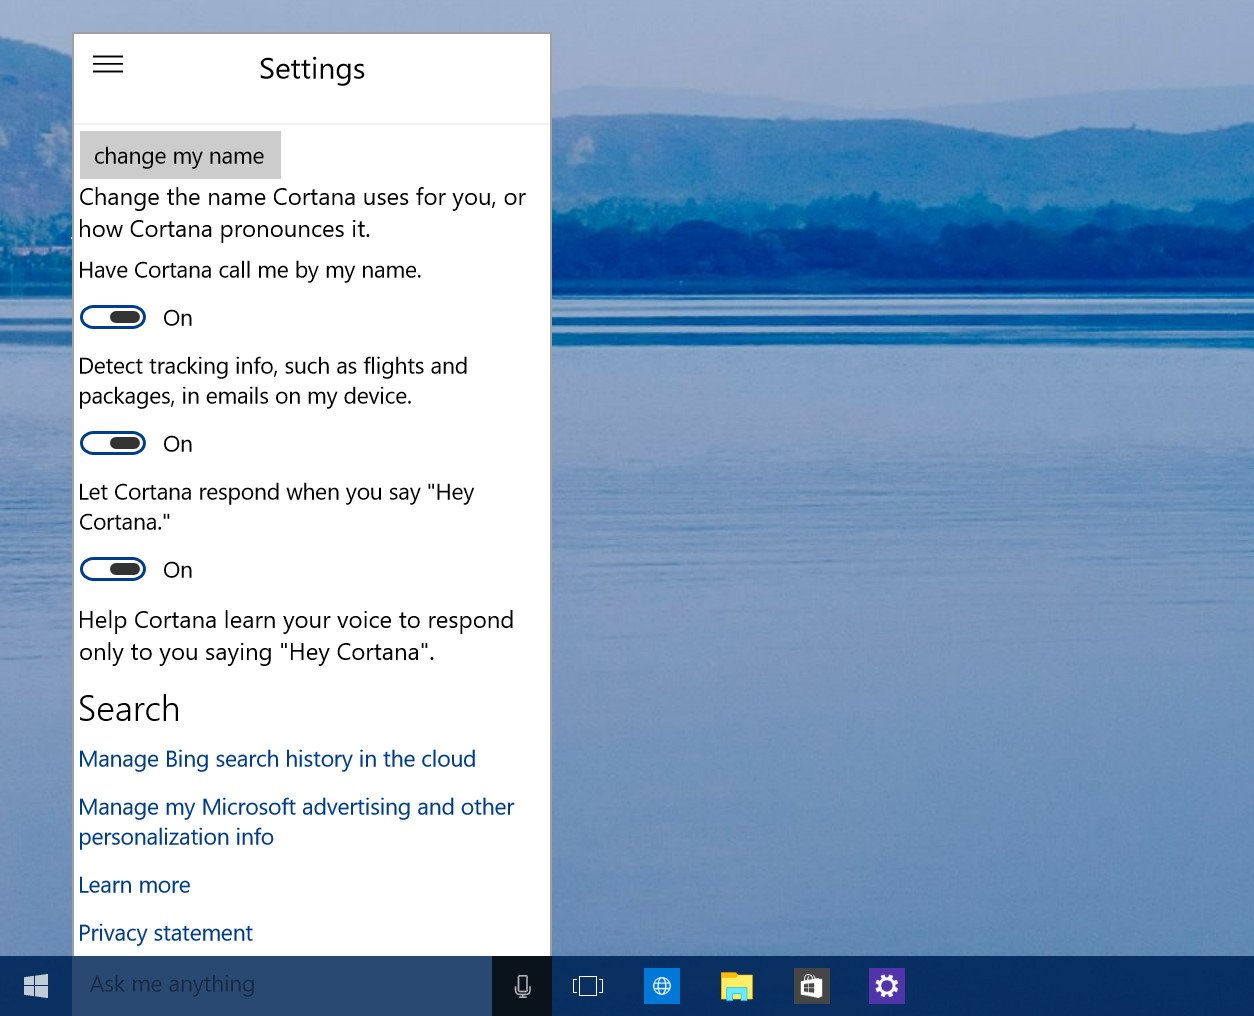
Now, if you are trying use the "Hey Cortana" feature to use the assistant hands-free, you will notice that won't work. This failure is because, by default, the feature is disabled for privacy concerns. However, you can easily enable "Hey Cortana" by clicking the menu button in the top-left corner to bring Cortana's settings. Scroll down until you see the option "Let Cortana respond when you say "Hey Cortana," then simply slide the switch to the "On" position.
Quick Tip: If you ever like to disable Cortana, you go back to Settings and slide the switch to the "Off" position for the first option.
You won't notice any change, but now you can use your computer as you would normally do, and when you need something, simply start saying "Hey Cortana," followed by the task. For example, "Hey Cortana: What's the weather in New York City".
Since Windows 10 build 10041, Cortana is available in China, UK, France, Germany, Italy, and Spain. Microsoft is expected to expand its digital assistant to more countries in future releases of the operating system.
Tip 3: More frequent builds
When Microsoft rolled out the first preview of Windows 10, the company also announced that users would have two choices for updating to future releases of the operating system. The first being the Slow ring option, which offers the most stable bits of the operating system. The second option was the Fast ring, which as the name implies is an option that allows users to get a new build of Windows 10 at an earlier time. However, with it comes more bugs and fewer workarounds.
So, if you like to get the latest and greatest, regardless if it is working correctly or not, and you're not using Windows 10 as your primary operating system. You are a perfect candidate to switch to the fast lane of updates to get new builds more frequently.
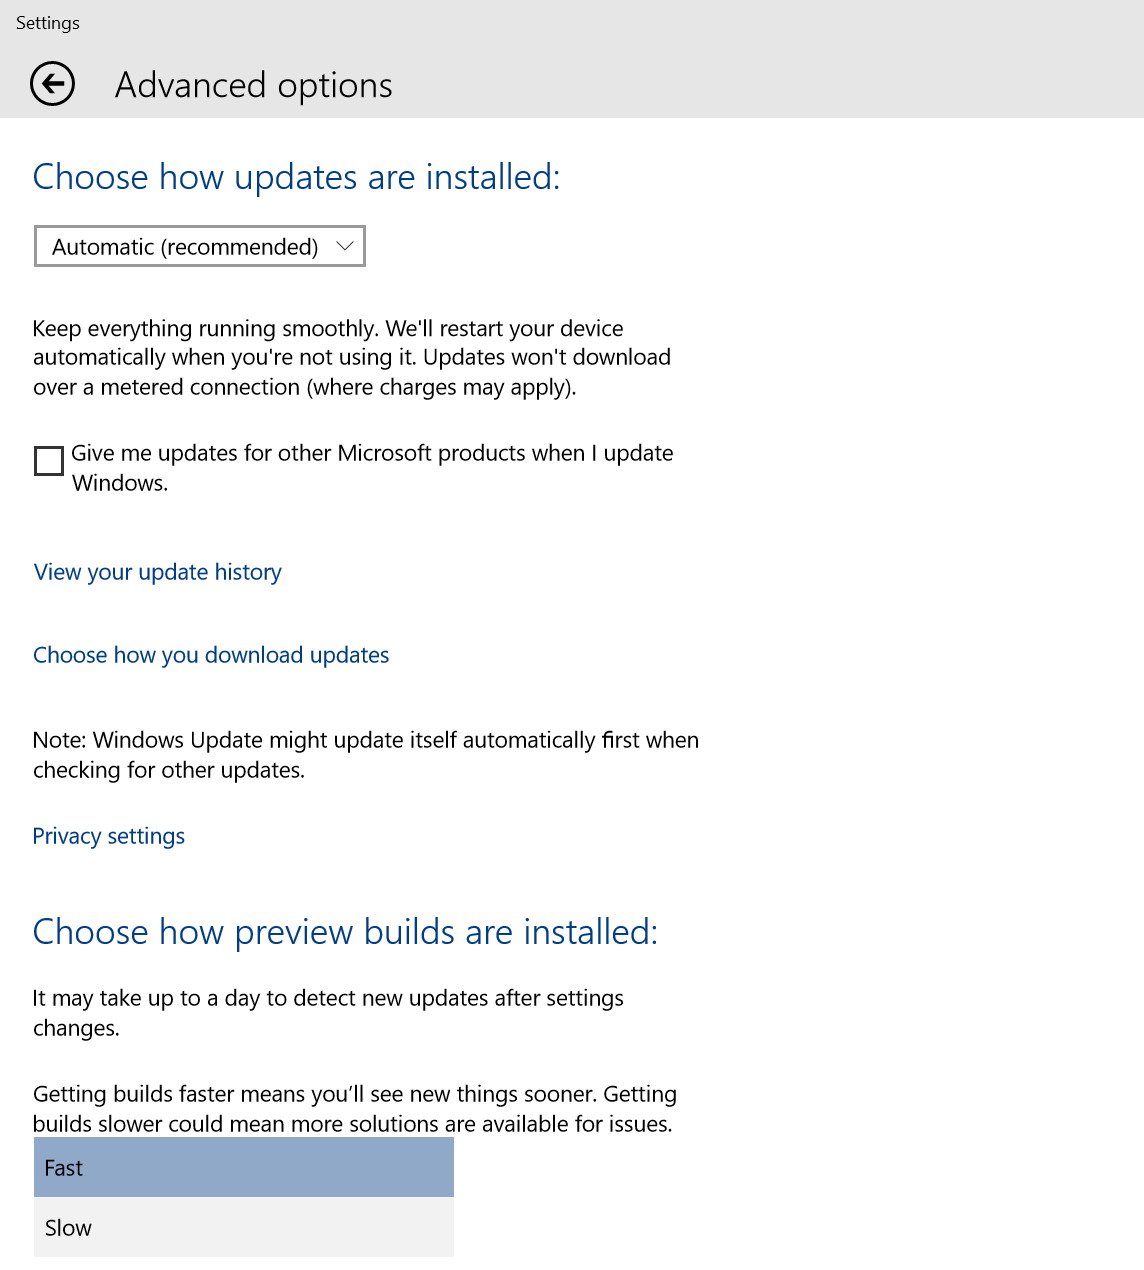
By default, every new installation of Windows 10, is configured to be in the Slow ring category. If you want to switch to the Fast ring, launch the Settings app, click Update & recovery, in Windows Update, click the Advanced options link, and under Choose how preview builds are installed, select Fast.
It is worth pointing out that after installing a new build of Windows 10 via the Fast ring, you don't have to change the settings back. When Microsoft releases a new build via the Slow ring, the company will also release the necessary updates to bring the bits to the same code level as the Slow ring.
Tip 4: Additional apps you should try
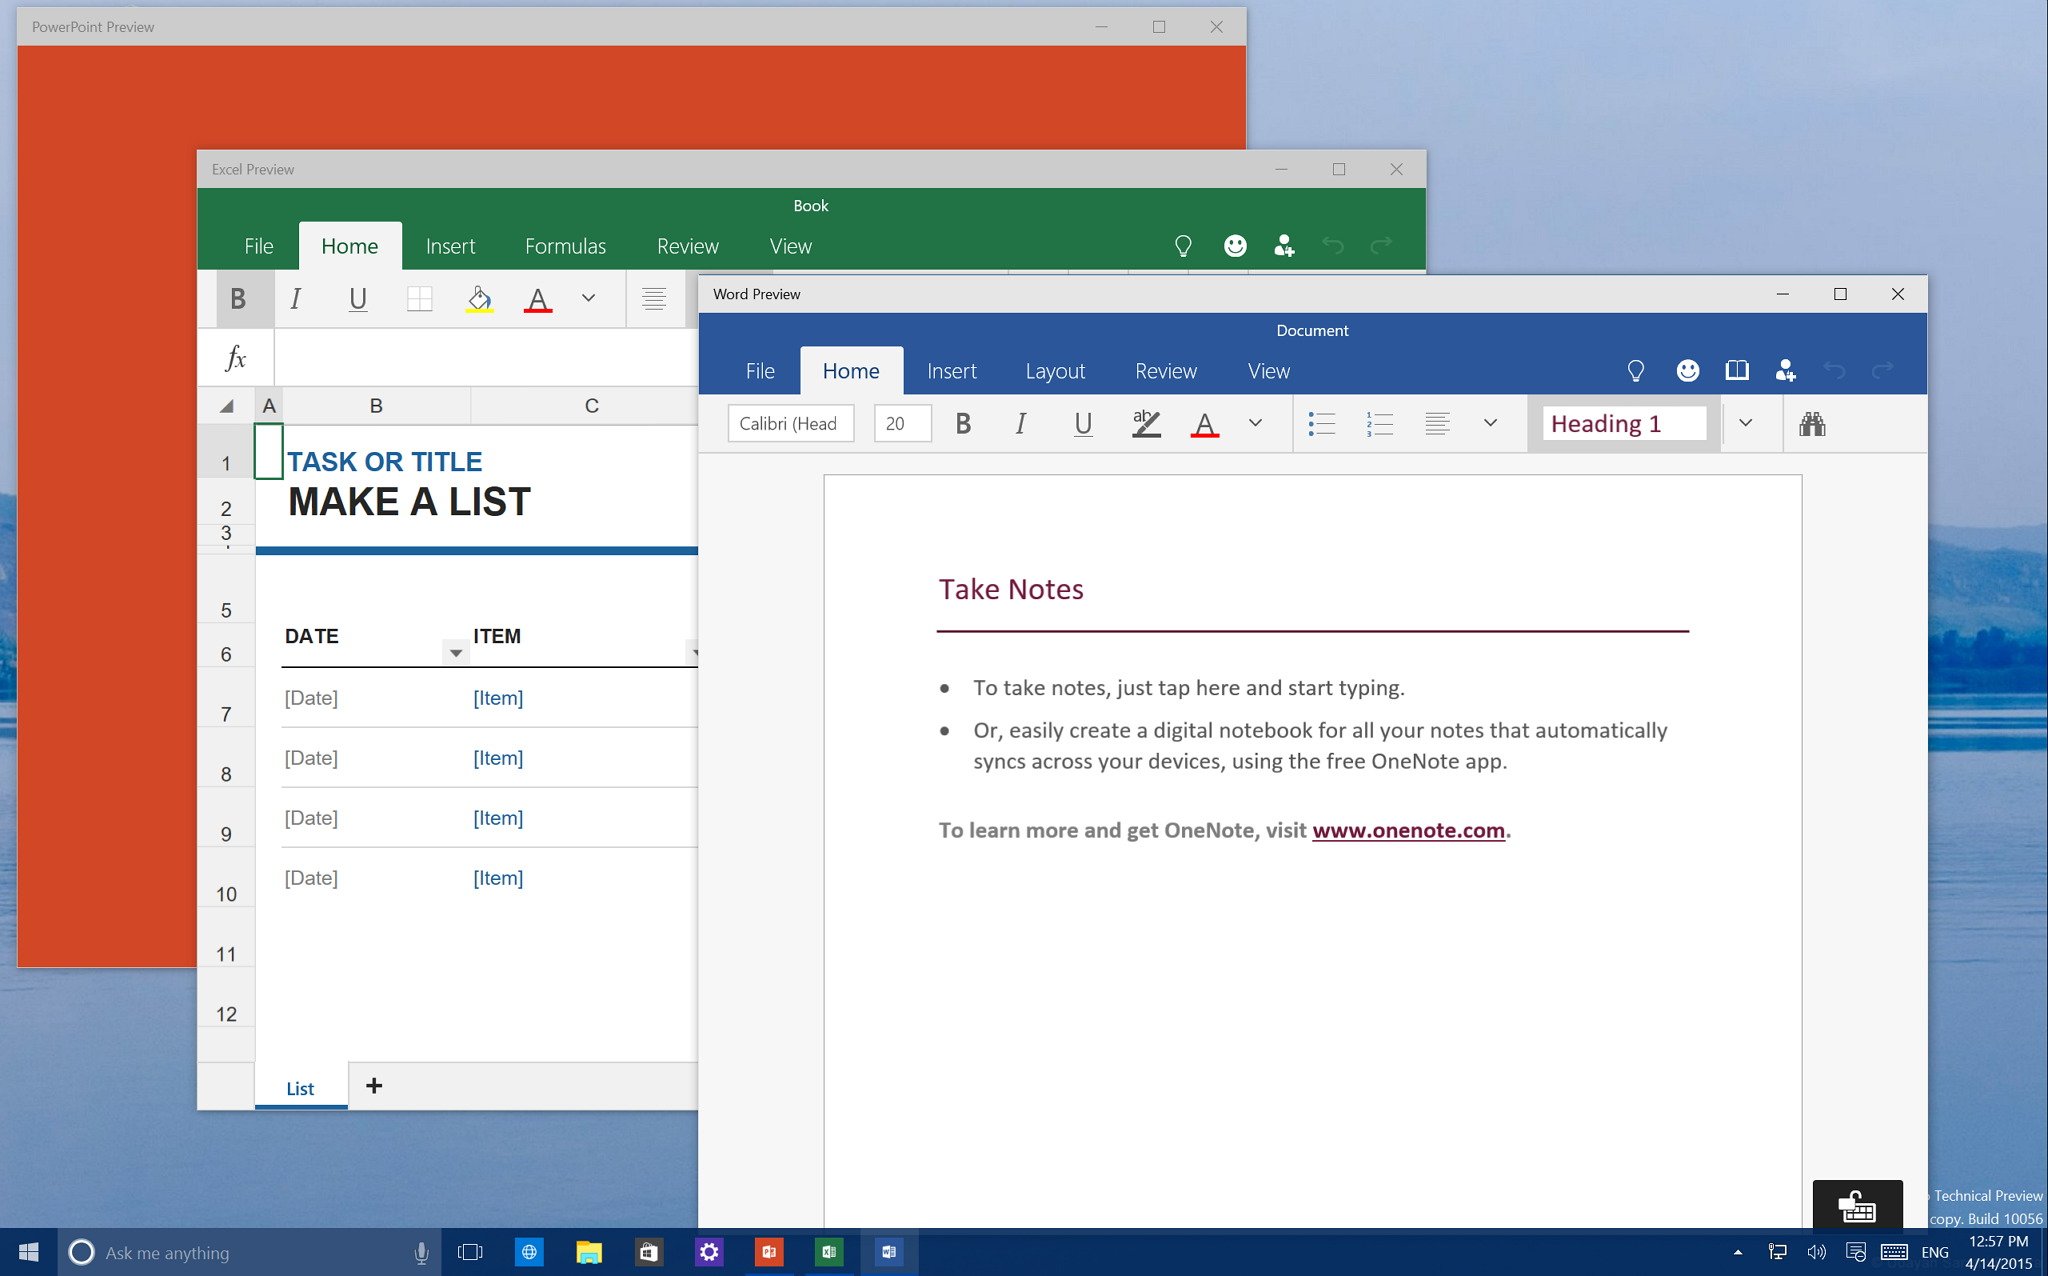
The latest preview of Windows 10 bundles a few interesting apps, such as a new Xbox app, Project Spartan web browser, Insider Hub, Windows Feedback, and other built-in utilities like the new Calculator, Alarms & Clock, Voice Recorder, and even a new OneNote app.
Although, these are great apps to start using Windows 10, Microsoft is also making available a preview of the touch-friendly version of Word, Excel, and PowerPoint. These apps are part of Office 2016 due later this year.
These are Universal apps, which means that the same code runs on phones, tablets, and PCs. However, Microsoft has not yet release the same apps optimized for phones or tablets.
These apps do not come bundled with Windows 10, but you can download all the new apps via the Store (beta):
Along with Universal Office apps for Windows 10, Microsoft is also releasing a Music Preview and Video Preview apps. As their names imply, these two new Windows apps aimed to replace the current Music and Video app in Windows 8.1. Both apps introduce a fresh new look that match the design Microsoft is trying to implement around different apps throughout the operating system.
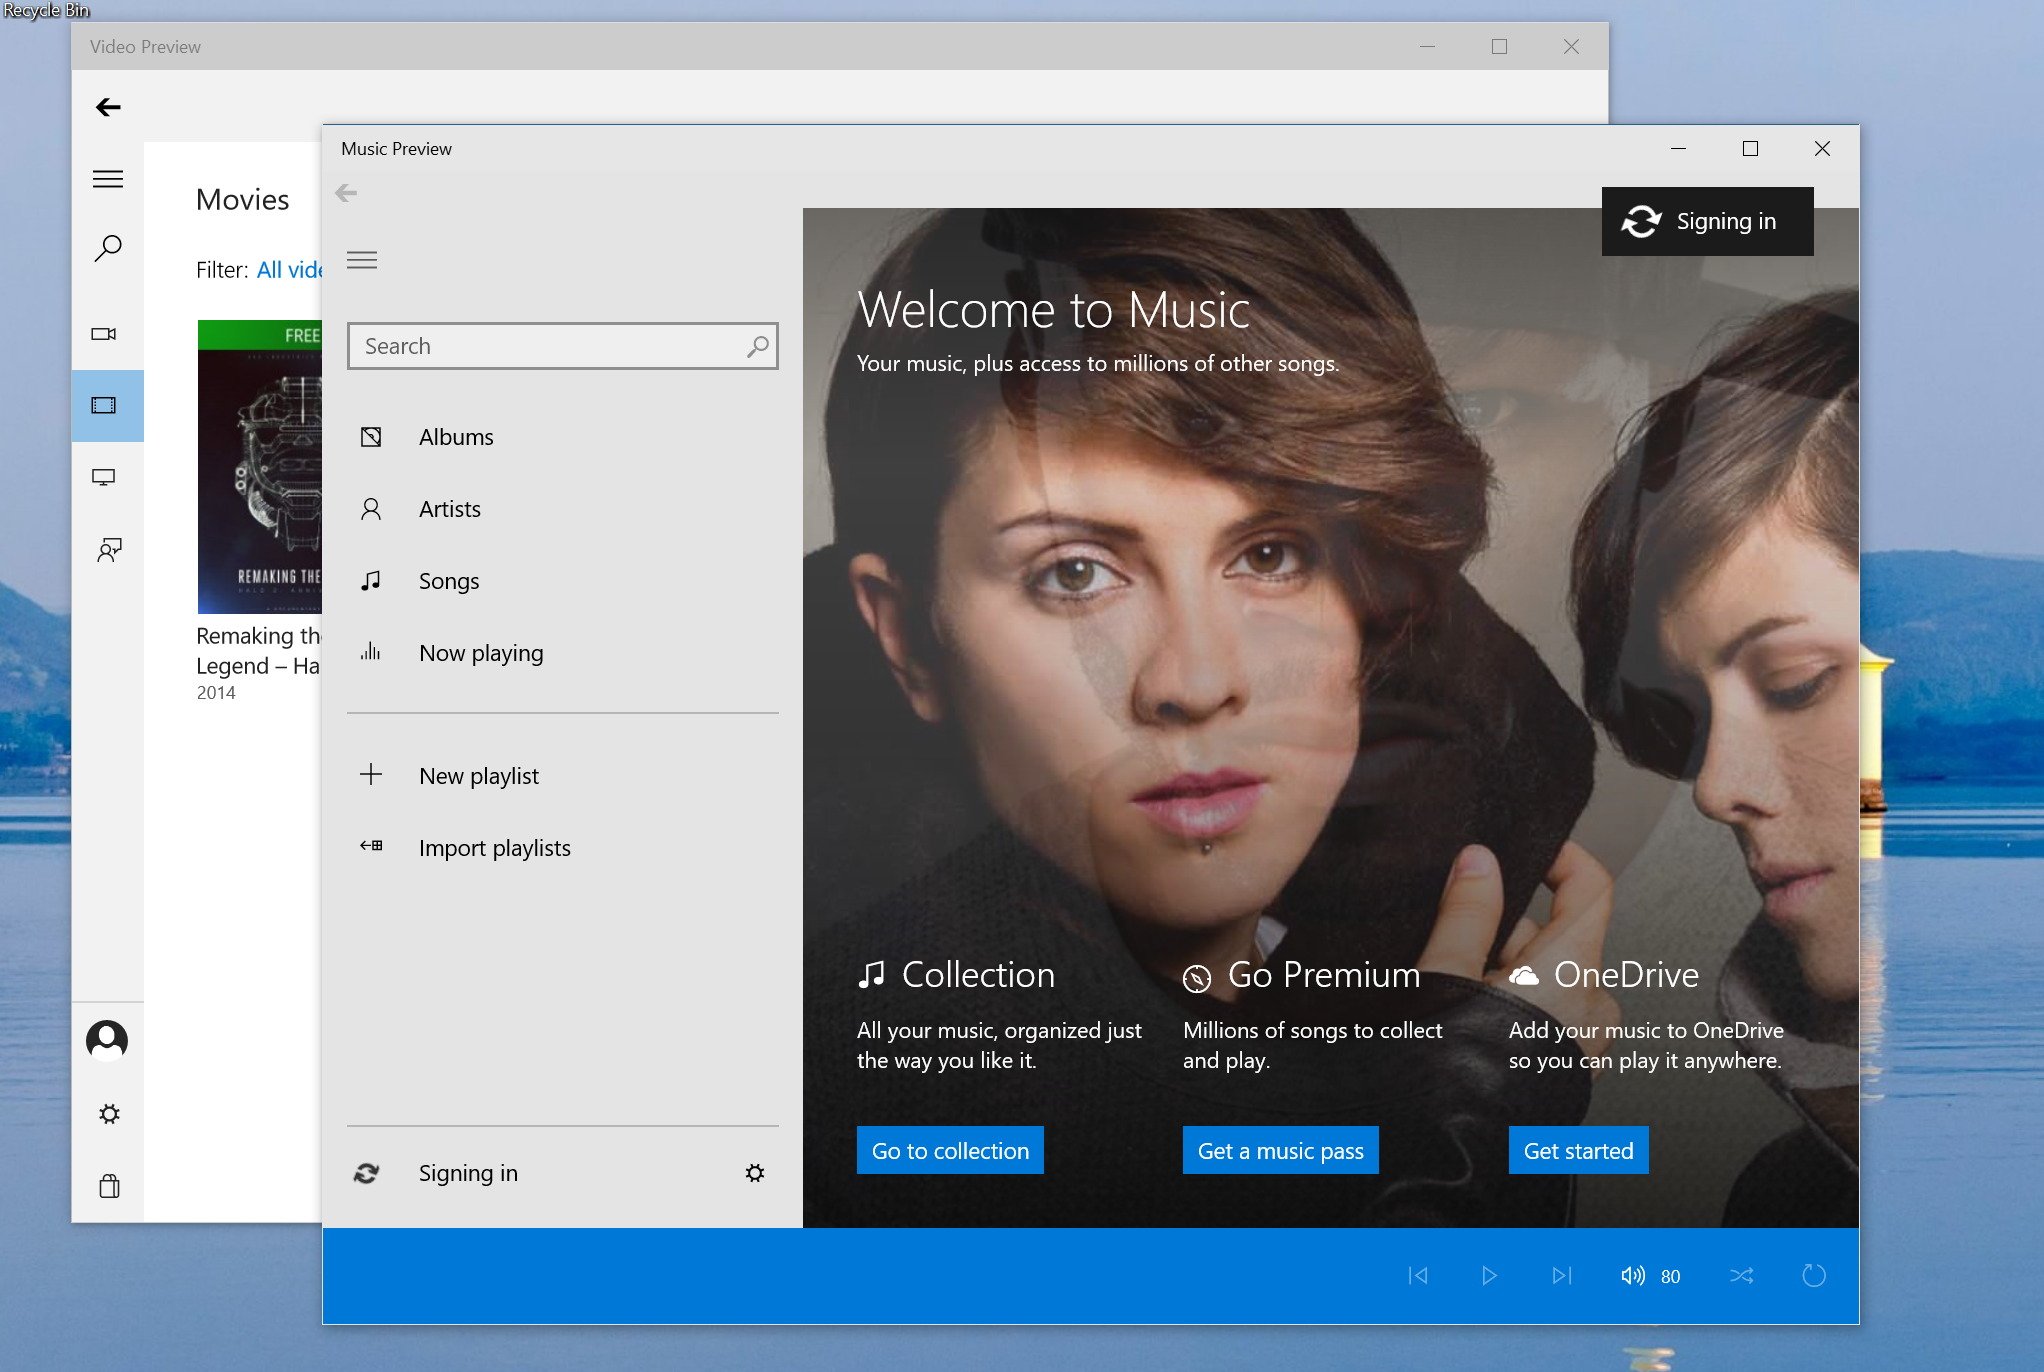
These apps also are not included when installing the latest build of Windows 10, but you can download them manually from the Store (beta):
Tip 5: Pin your favorite Settings
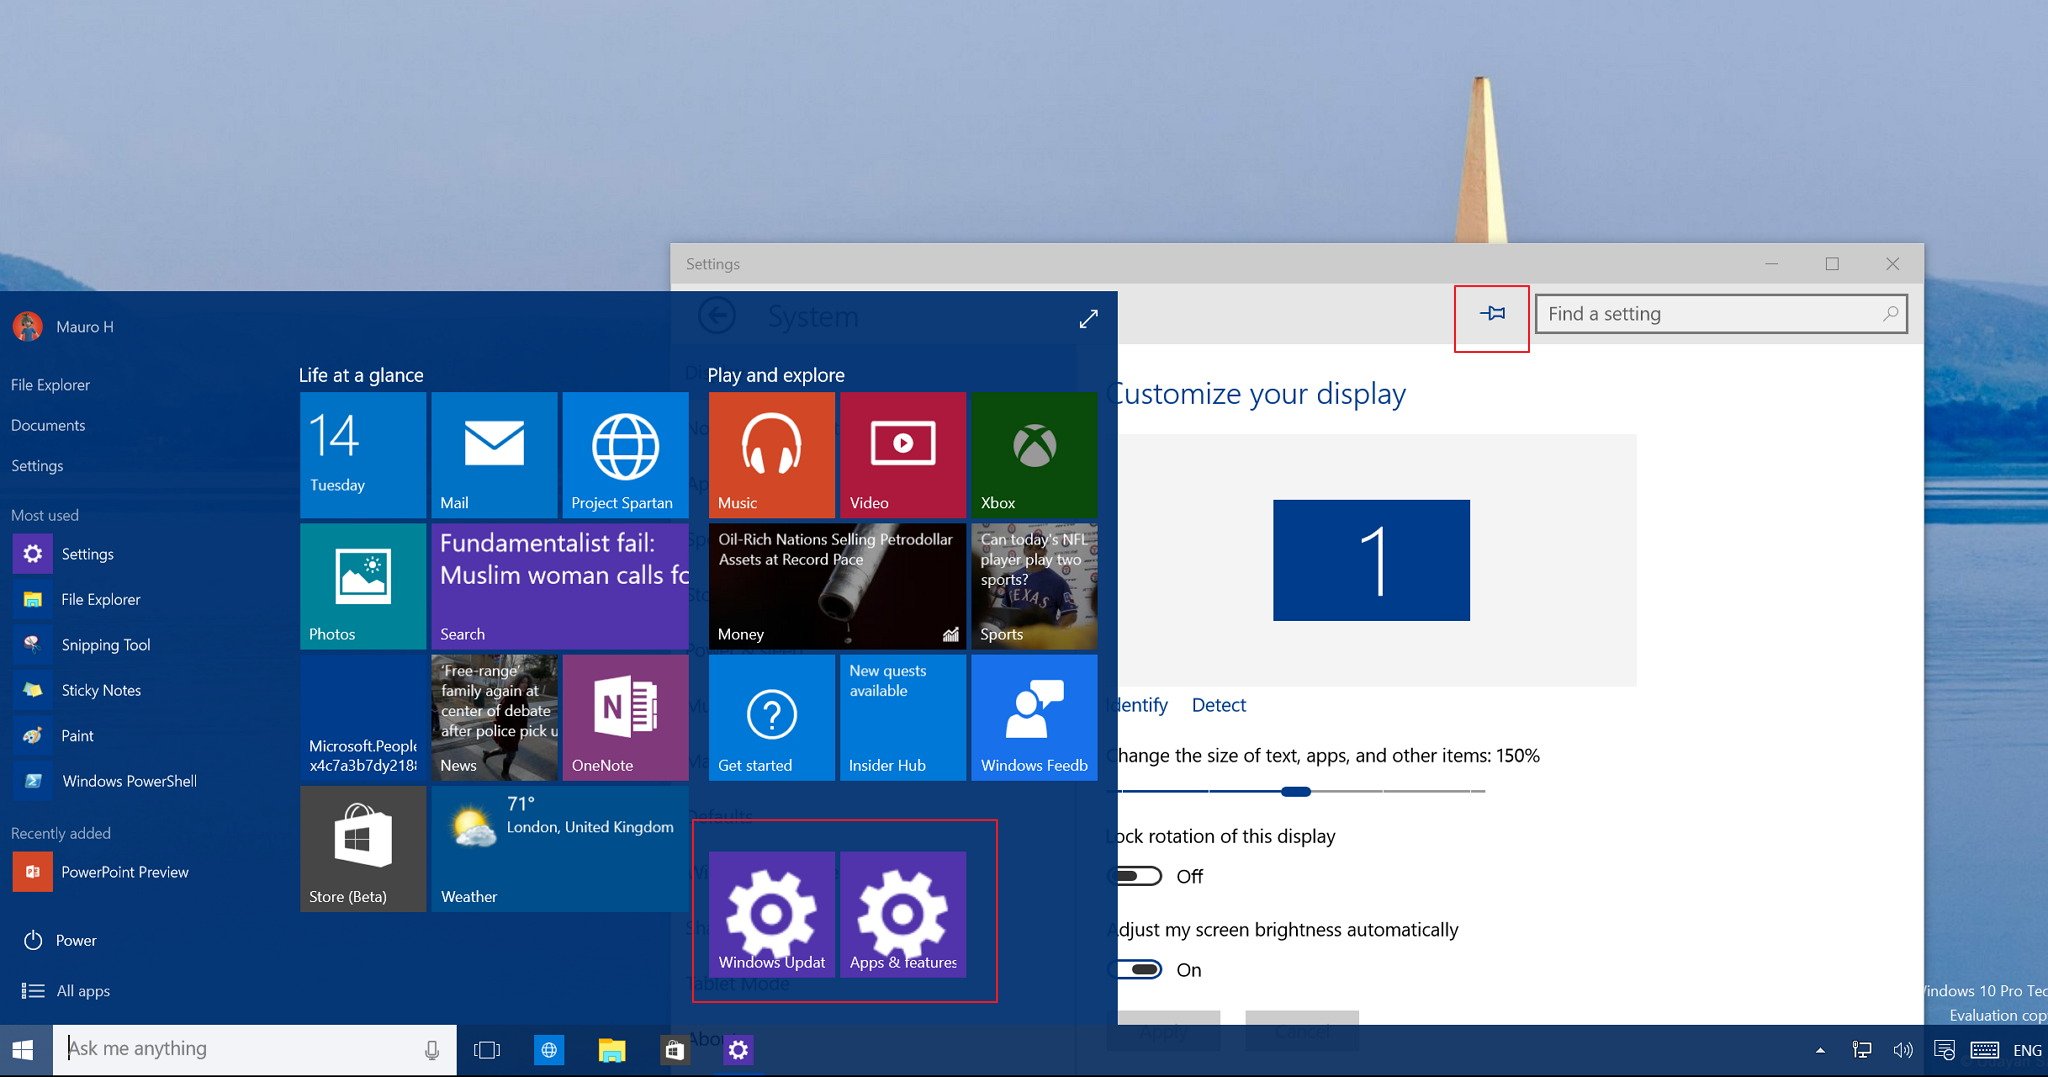
Do you access the same settings over-and-over on the Settings apps? Well, Windows 10 makes it easier for you access to same settings quicker.
If you haven't yet noticed, the Settings apps now feature a pin icon, in the top-right corner of the screen, next to the search box. This pin allows you to any section of the Settings app to the Start menu.
Tip 6: Reclaiming hard drive space
If you are making an upgrade to a new build of Windows 10, you probably didn't notice that Microsoft makes a backup of the previous installation in a folder called Windows.old. This backing up is a standard procedure in case things go wrong during the installation, and you need roll back to the previous build.
However, if the installation completes correctly, the "Windows.old" folder will stay on the hard drive using valuable hard drive space, this is space that you could be using for files that are more important.
The following instructions will guide to the process of removing the Windows.old folder from Windows 10:
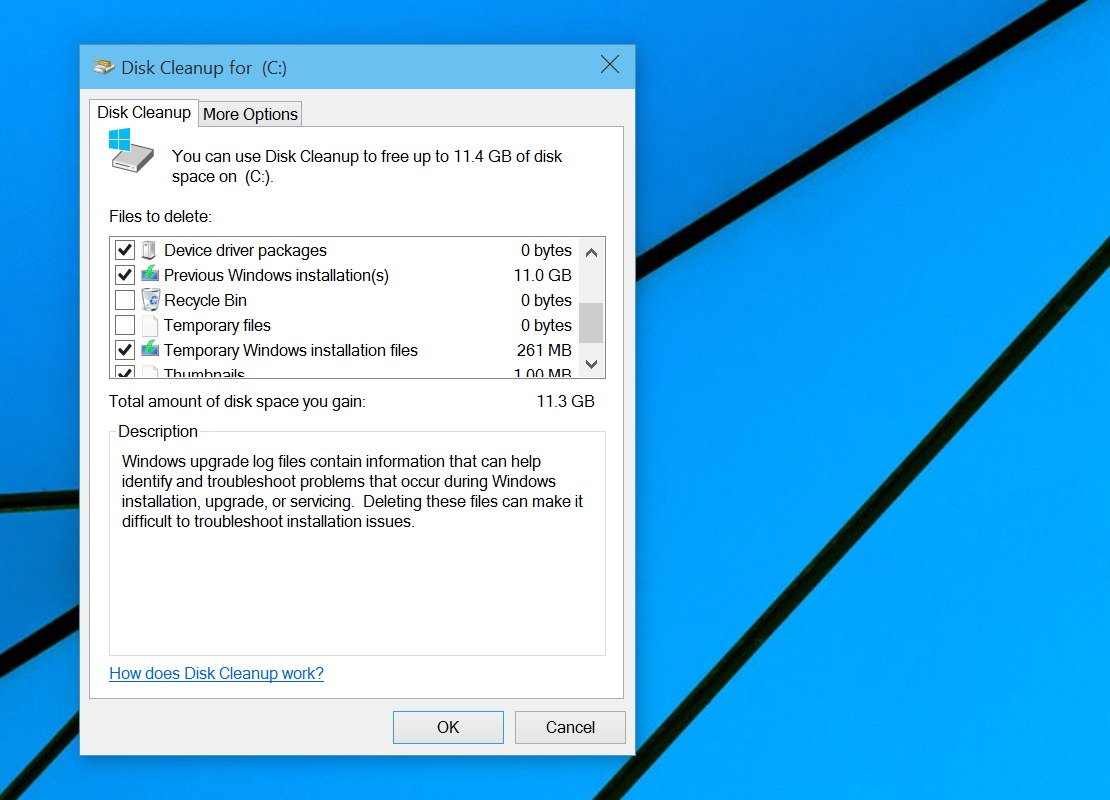
- In Cortana's search box on the taskbar, type cleanmgr.exe, and hit Enter.
- Click the Clean up system files button.
- Now, you'll find a list of system files you can delete from your installation. Although, you can select everything from the list for deletion, we're interested in "Previous Windows Installations" and "Temporary Windows Installation Files" options from the list. The click OK and wait for the process to complete.
Deleting the previous installation files of Windows 10 will give you back around 11 GB. That is a significant amount of storage, especially if you're running the operating system on a device with limited storage capacity.
Warning: Keep in mind that deleting the Windows.old folder will also prevent you from rolling back to the previous build. I would recommend you to do this after you're comfortable using a newer build. Also, you'll have to repeat this process for every new preview you install in your computer.
Tip 7: Customizing File Explorer
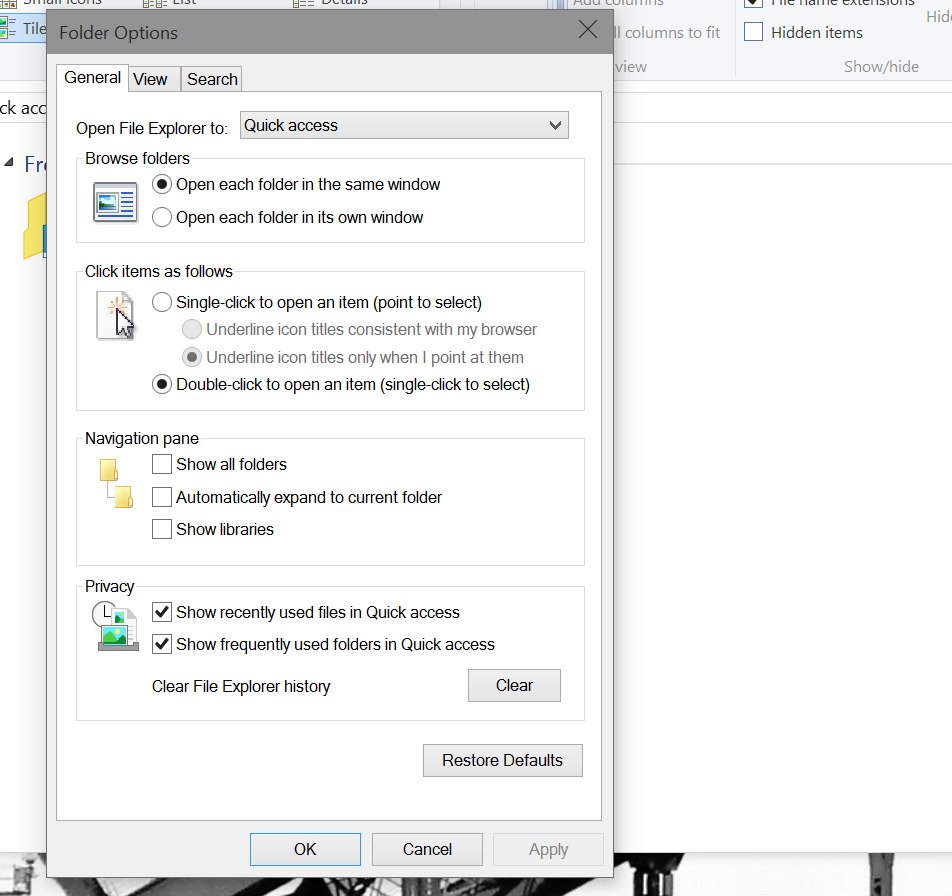
When you click to open File Explorer in Windows 10, by default it now opens the new "Quick Access" section, instead of "This PC". This was the place we're more accustomed to access. However, Microsoft is adding an option to change this behavior to open "This PC" when clicking File Explorer in the taskbar.
If you like this behavior better, simply follow the instructions below:
- Open File Explorer, navigate to the View tab and click Options.
- Under Open File Explorer to change the setting to This PC.
- Finally click Apply and OK.
Tip 8: Configuring OneDrive
OneDrive has been gaining a lot of popularity in Windows 8.1, in mobile devices, and in other operating systems. In Windows 10, Microsoft is building OneDrive straight into the operating system, which means that there will not be an app you have to install or uninstall.
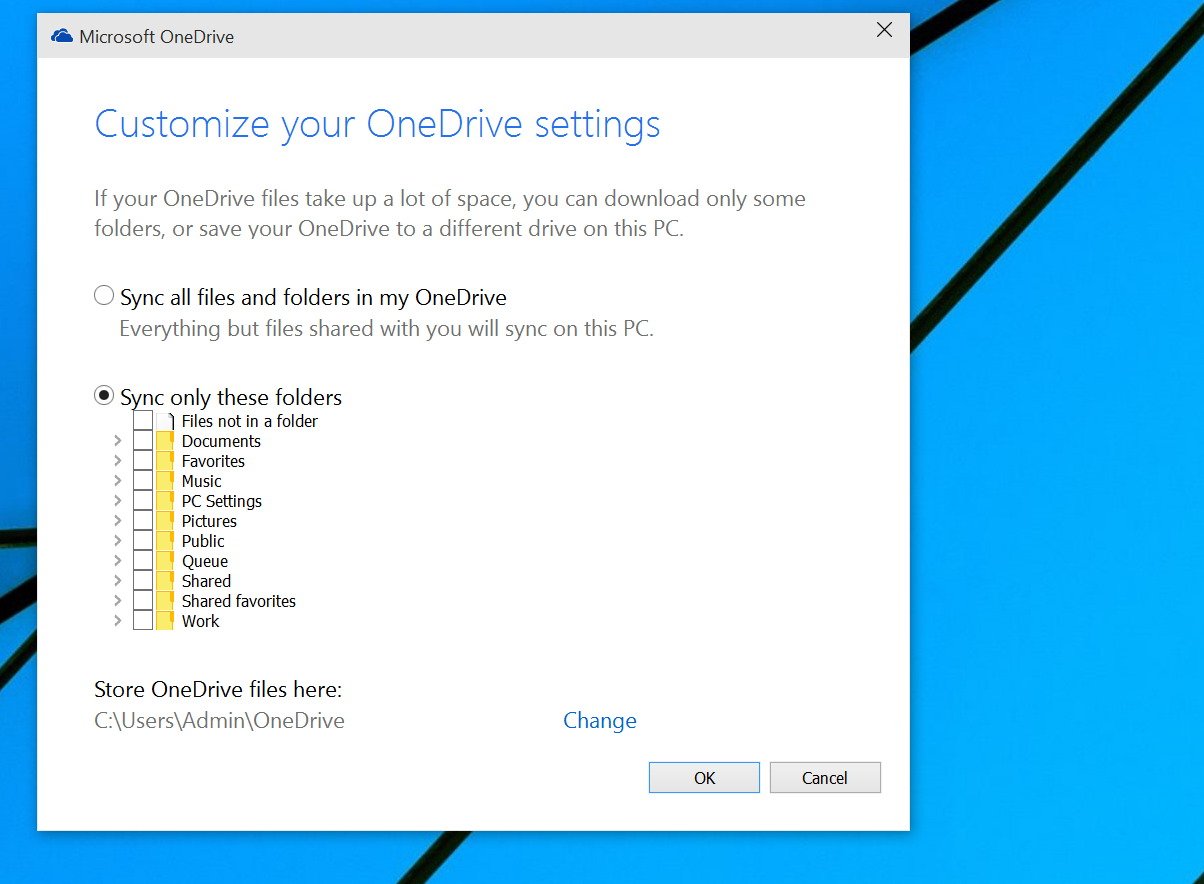
Users will also find that Microsoft is even changing how sync works and how the feature is configured. In Windows 10, the software giant is opting for selective sync instead of using the placeholder feature, also known as "smart files". This change means that after you install the operating system, nothing will sync initially. You will have to specify if you want to sync everything or specific folders, and you will also have the chance to select the location for those files to sync.
If you're just trying out Windows 10 Technical Preview and you're not planning to use the OS on a daily basis, I wouldn't recommend configuring OneDrive. Instead, just leave everything as it is, and nothing will sync, and you could avoid any issue that it might happen using an unfinished product.
However, if you are planning to use Windows 10 every day, you'll have to open File Explorer, click OneDrive from the left pane and customize your settings to your liking. You can choose what to sync and where to store your synced files, if you don't like to store the file in the default location.
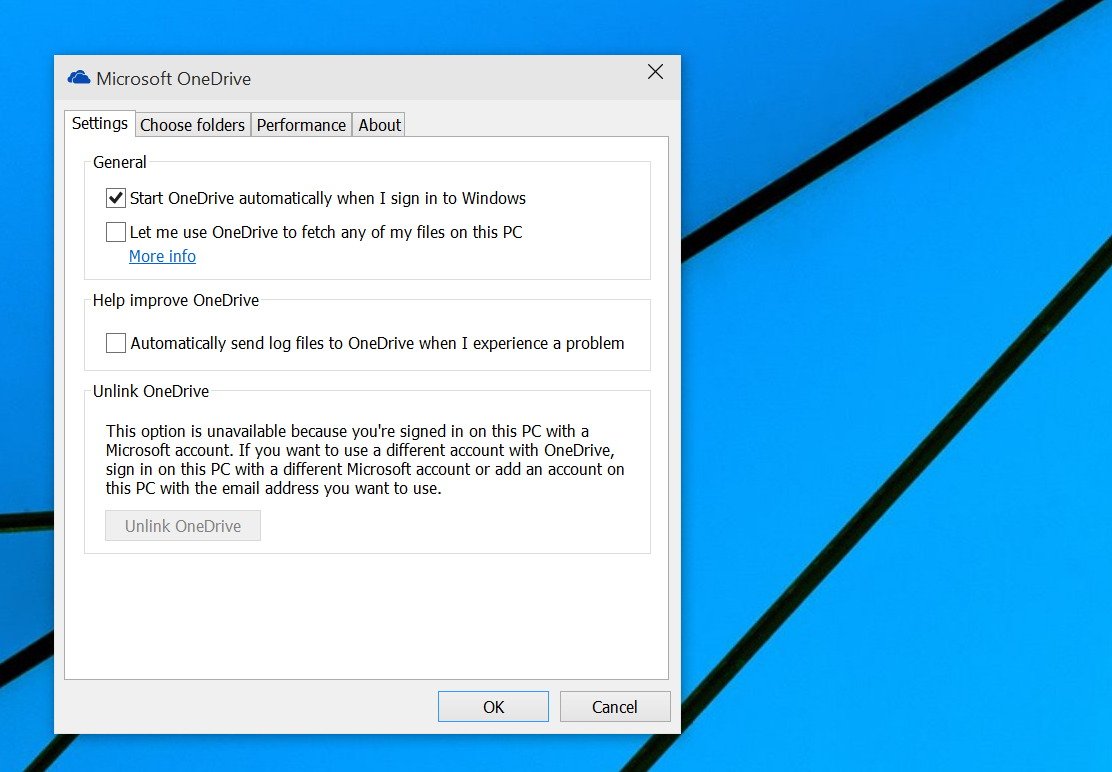
Once you have configured the folders you want to sync, you can access all the settings available to OneDrive by right-clicking the icon in the system tray and selecting Settings. Inside the OneDrive properties, you can choose to start the service automatically when you sign in to Windows, use OneDrive fetch feature, and re-configure what folder to sync, control performance, and much more.
Tip 9: Sending Feedback
In Windows 10, if something doesn't work, you don't like what you see, or you have an idea, Microsoft wants to hear what you have to say to make the operating system better. You can use the Windows Feedback app to do just that.
As you use any of the previews of Windows 10, you'll start noticing toast notifications popping up in the bottom-right corner of the screen. These prompt you to rate the task you have just performed as easy or complicated.
If you want to make Windows 10 better, on every notification send feedback to Microsoft. The task does not take long and with enough people sending their feedbacks, Microsoft can understand when a particular feature is working and which ones are not, and make changes accordingly.
If you want to send your feedback on something that it's not working correctly or you have a feature idea. Open the Start menu, find and launch the Windows Feedback app, look through the categories in the left pane to find feedbacks users are submitting and vote on it, by clicking Me too.
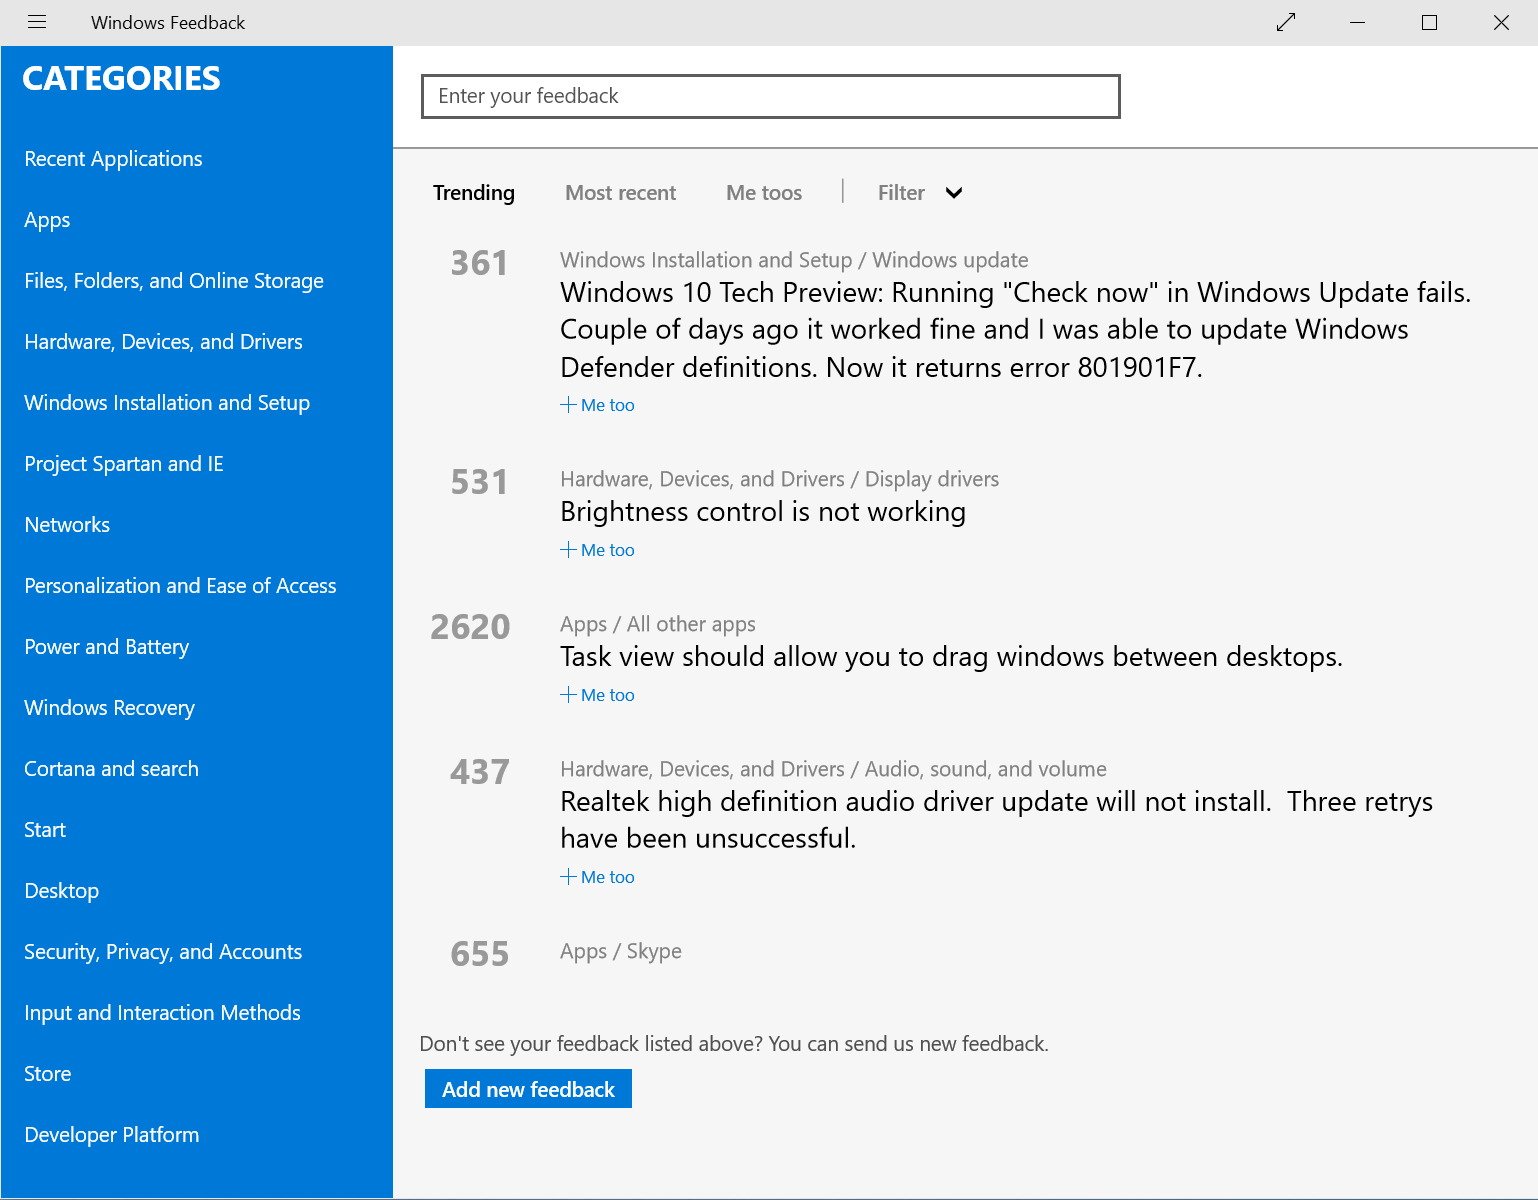
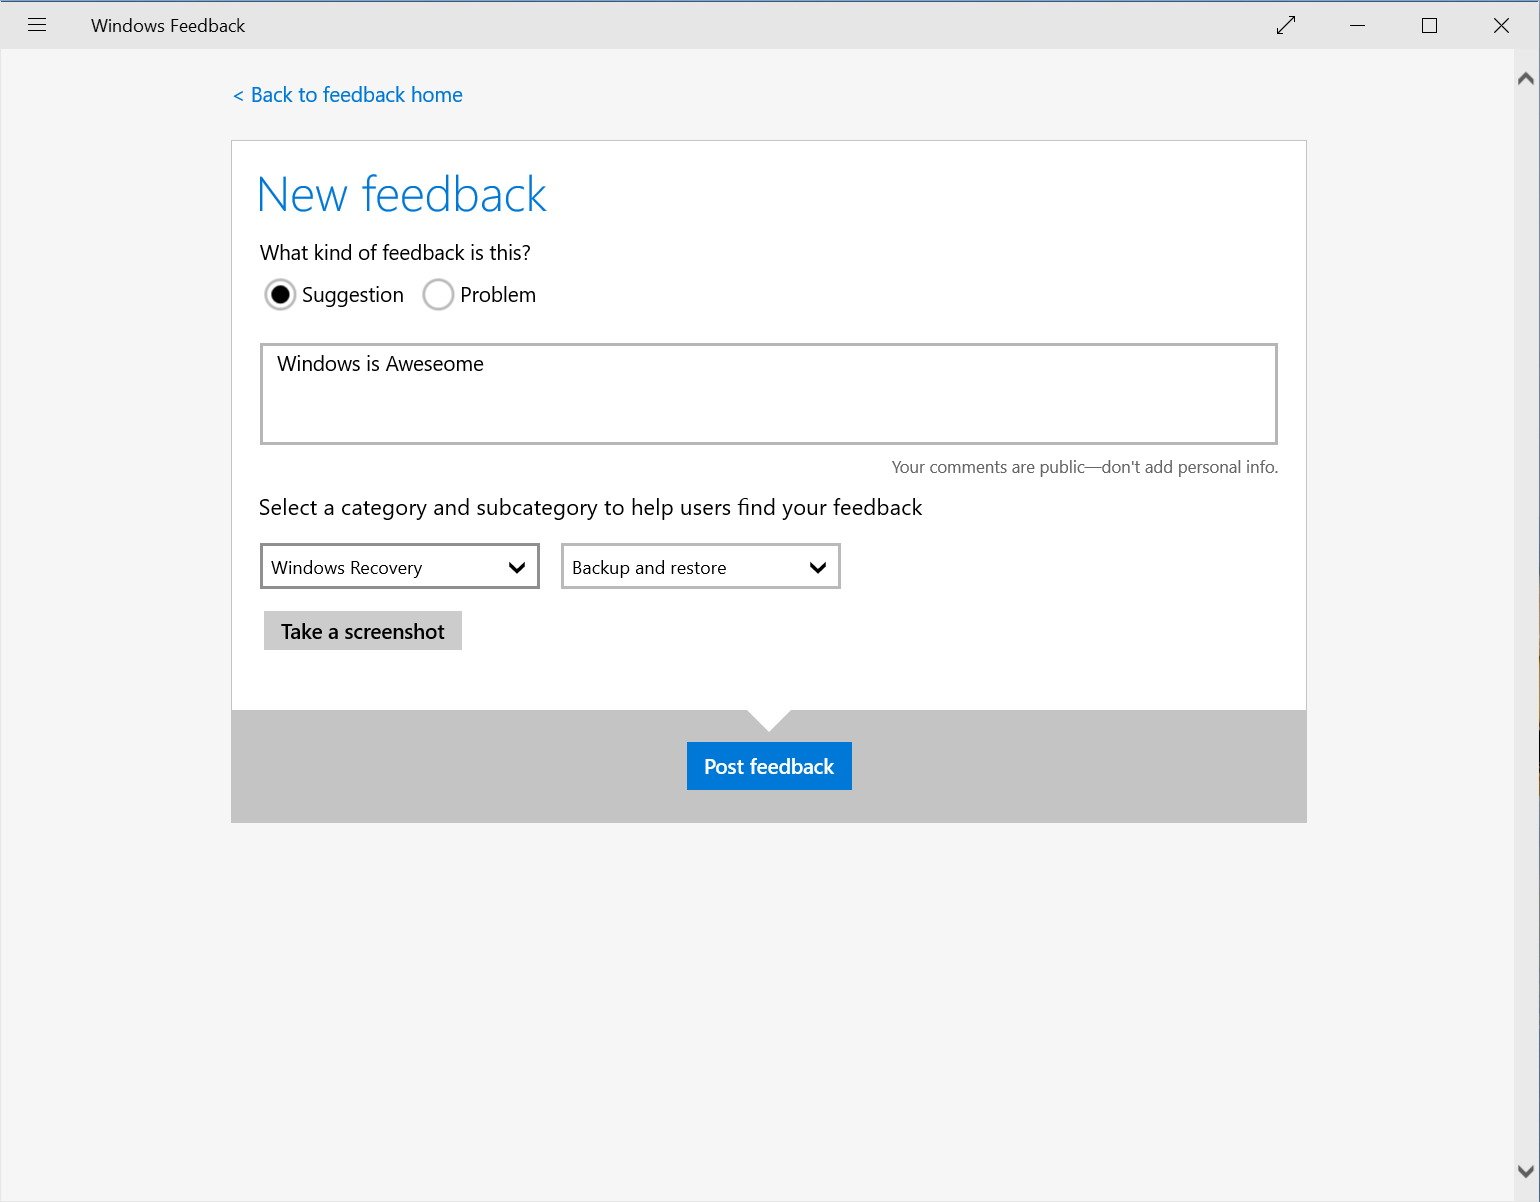
To submit a new feedback, do a search in the "Enter your feedback" box to see if someone else already submitted the same request. If you find a similar entry simply click Me tooand you're all done. Nonetheless, if you don't see what you're looking for, click the Add new feedback, which you'll find at the bottom of the screen.
Now, describe the feedback, select the appropriate category, send a screenshot if necessary, and click **Post Feedback***.
Remember that you need to signed-in as a Windows Insider to submit feedback.
Tip 10: Rollback just in case
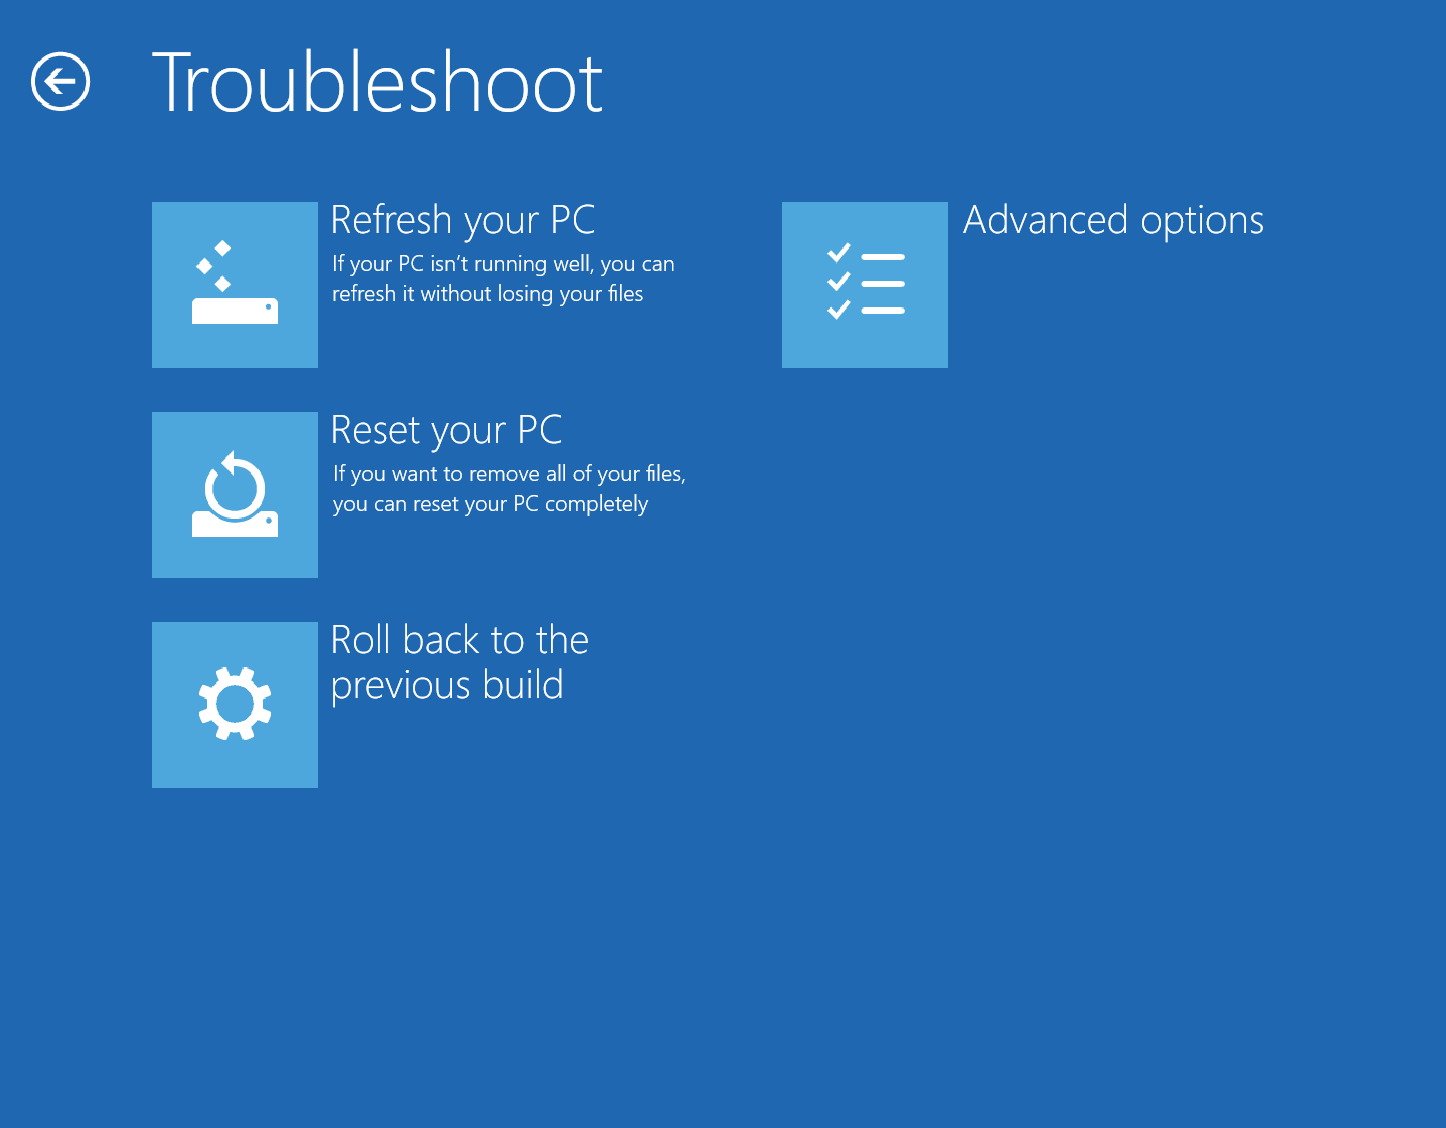
If Windows 10 is not working correctly, if you are noticing that a particular build has more bugs than the previous installation, or you simply do not like the build, Microsoft added a rollback mechanism to go back to the previous Windows 10 Technical Preview you were using.
Open the Settings app and go to Update & recovery, navigate through Recovery and click the Restart now button from the Advanced startup section.
Once you do that, Windows will go into the boot options, click Troubleshoot, and then simply click the Roll back to the previous build button and wait for the process to finish.
Hopefully after a few minutes, you'll be back to the previous version of Windows 10 Technical Preview.
There you have it, ten of the most useful tips to start using Windows 10. It's also worth pointing out that even though the operating system is already taking shape, it's not ready for prime time. This riskiness means that you should not use any of the Technical Previews of Windows 10 as your primary operating system (or at least until the RTM release). If you're planning to test the preview, you'll be safer running the OS on a virtual machine using software like VirtualBox on a spare computer or creating a dual-boot system with your current version of Windows.
If you have another useful tip to get the most of Windows 10 Technical Preview, please leave your thoughts in the comments below!
Mauro Huculak has been a Windows How-To Expert contributor for WindowsCentral.com for nearly a decade and has over 15 years of experience writing comprehensive guides. He also has an IT background and has achieved different professional certifications from Microsoft, Cisco, VMware, and CompTIA. He has been recognized as a Microsoft MVP for many years.

