How To: Set up and manage safe and blocked senders in Outlook.com

Spam? SPAM!? No spam for me!
We've continuously explored the functionality of Microsoft's Outlook.com, the Hotmail email service successor, in our how to / tutorial series of articles. Today we'll be looking at setting up and managing blocked and safe senders that protect against spam and useless emails but ensure all wanted mail gets through filters and junk protection to your desktop and Windows Phone.
Setting up blocked senders in Outlook.com
Setting up blocked senders on Outlook.com is a straightforward process that involves a few clicks and entries to configure 'bad' domains and addresses that pose a threat to a clean inbox. Both individual email addresses and domains can be blocked to provide maximum control to the user in defining entries.

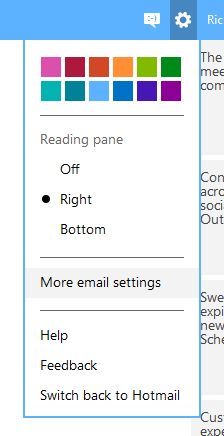
To reach the desired area of Outlook.com to achieve setting up the blocked list, we have to first open up the control panel which can be selected from the settings menu (the cog icon next to the user display name). Choosing "More email settings" will fire up the main settings page where we can set up blocked and safe senders, as well as managing junk filters and settings.

Speaking of junk filters, we'll first head into the pane for the junk configurations and manipulate these to our liking before we begin. Under 'Preventing junk email' choose "Filters and reporting". We should now see a number of settings to configure the junk filters (see above).
The more important option is the "Choose a junk email filter" which will determine if most junk is sent to the designated junk folder, or if all incoming mail is - excluding emails from contacts and safe senders. Choose either that suits your preference. Note: you can also enable junk mail reporting which will forward addresses marked as junk to Microsoft to better tune filters for other Outlook.com accounts to benefit from.
Right, back into the main settings pane we go to continue on our adventure.
Get the Windows Central Newsletter
All the latest news, reviews, and guides for Windows and Xbox diehards.

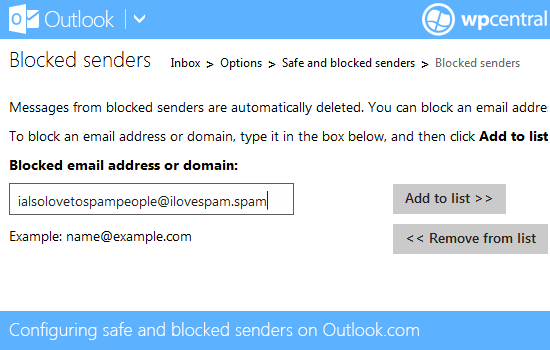
Next we'll select "Safe and blocked senders" under 'Preventing junk email' to head into the filter control centre. We'll be diving into safe senders in a minute, for now be sure to select "Blocked senders". This will load up the management area for adding and removing blocked email domains and addresses (see above).
From here we can add email domains (example.com) or individual addresses (margret@example.com) to the blacklisted sender list by entering the desired entry and hitting the 'add to list' button, which will subsequently be displayed on the right. Entries already blocked can be removed by selecting said domains and / or addresses and hitting the 'remove from list' button.
Once entries are saved in the blocked senders table, these will then be automatically deleted before reaching your inbox. This functionality is exceptionally useful to combat unwanted spam and newsletters that wont accept anyone opting out.
Setting up safe senders in Outlook.com
As well as blacklisting domains and addresses, Outlook.com also provides users the option to add 'safe senders' that bypass all spam filters and ensures that any desired mail is guaranteed to be present in the inbox - useful if mail you do want to read continuously gets sent to your junk folder. To reach the management area for adding and removing safe senders, we need to select "Safe senders" from the menu instead of "Blocked senders".

The interface is identical to the blocked senders management area, and to add / remove domains and individual addresses is just as easy. Simply enter a domain (example.com) or an email address (margret@example.com) into the field to the left and hit the 'add to list' button. To remove an entry, select and hit the 'remove from list' button.
Once added, emails from domains or individual email addresses will not be blocked.
Note: should you configure the junk settings to automatically delete incoming emails that aren't from contacts, Microsoft or the safe sender list will require you to add each domain / email address you wish to receive mail from in this area of the control panel. Failing to do so will see all mail being automatically trashed.
There we have it folks, the easy and simple way to configure blocked and safe senders. Outlook.com can also configure safe mailing lists, which should be configured if any problems arise with mailing lists that get caught in the filters. This can be accessed in the same area where the blocked / safe sender controls are located.
Be sure to check more Outlook.com tutorials for other useful tips and walkthroughs.
More Outlook.com tutorials:

Rich Edmonds was formerly a Senior Editor of PC hardware at Windows Central, covering everything related to PC components and NAS. He's been involved in technology for more than a decade and knows a thing or two about the magic inside a PC chassis. You can follow him on Twitter at @RichEdmonds.