How to check for updates from the right-click menu on Windows 10
You can save a bunch of clicks when trying to update and access Windows 10 update settings by adding quick access options to the right-click context menu.
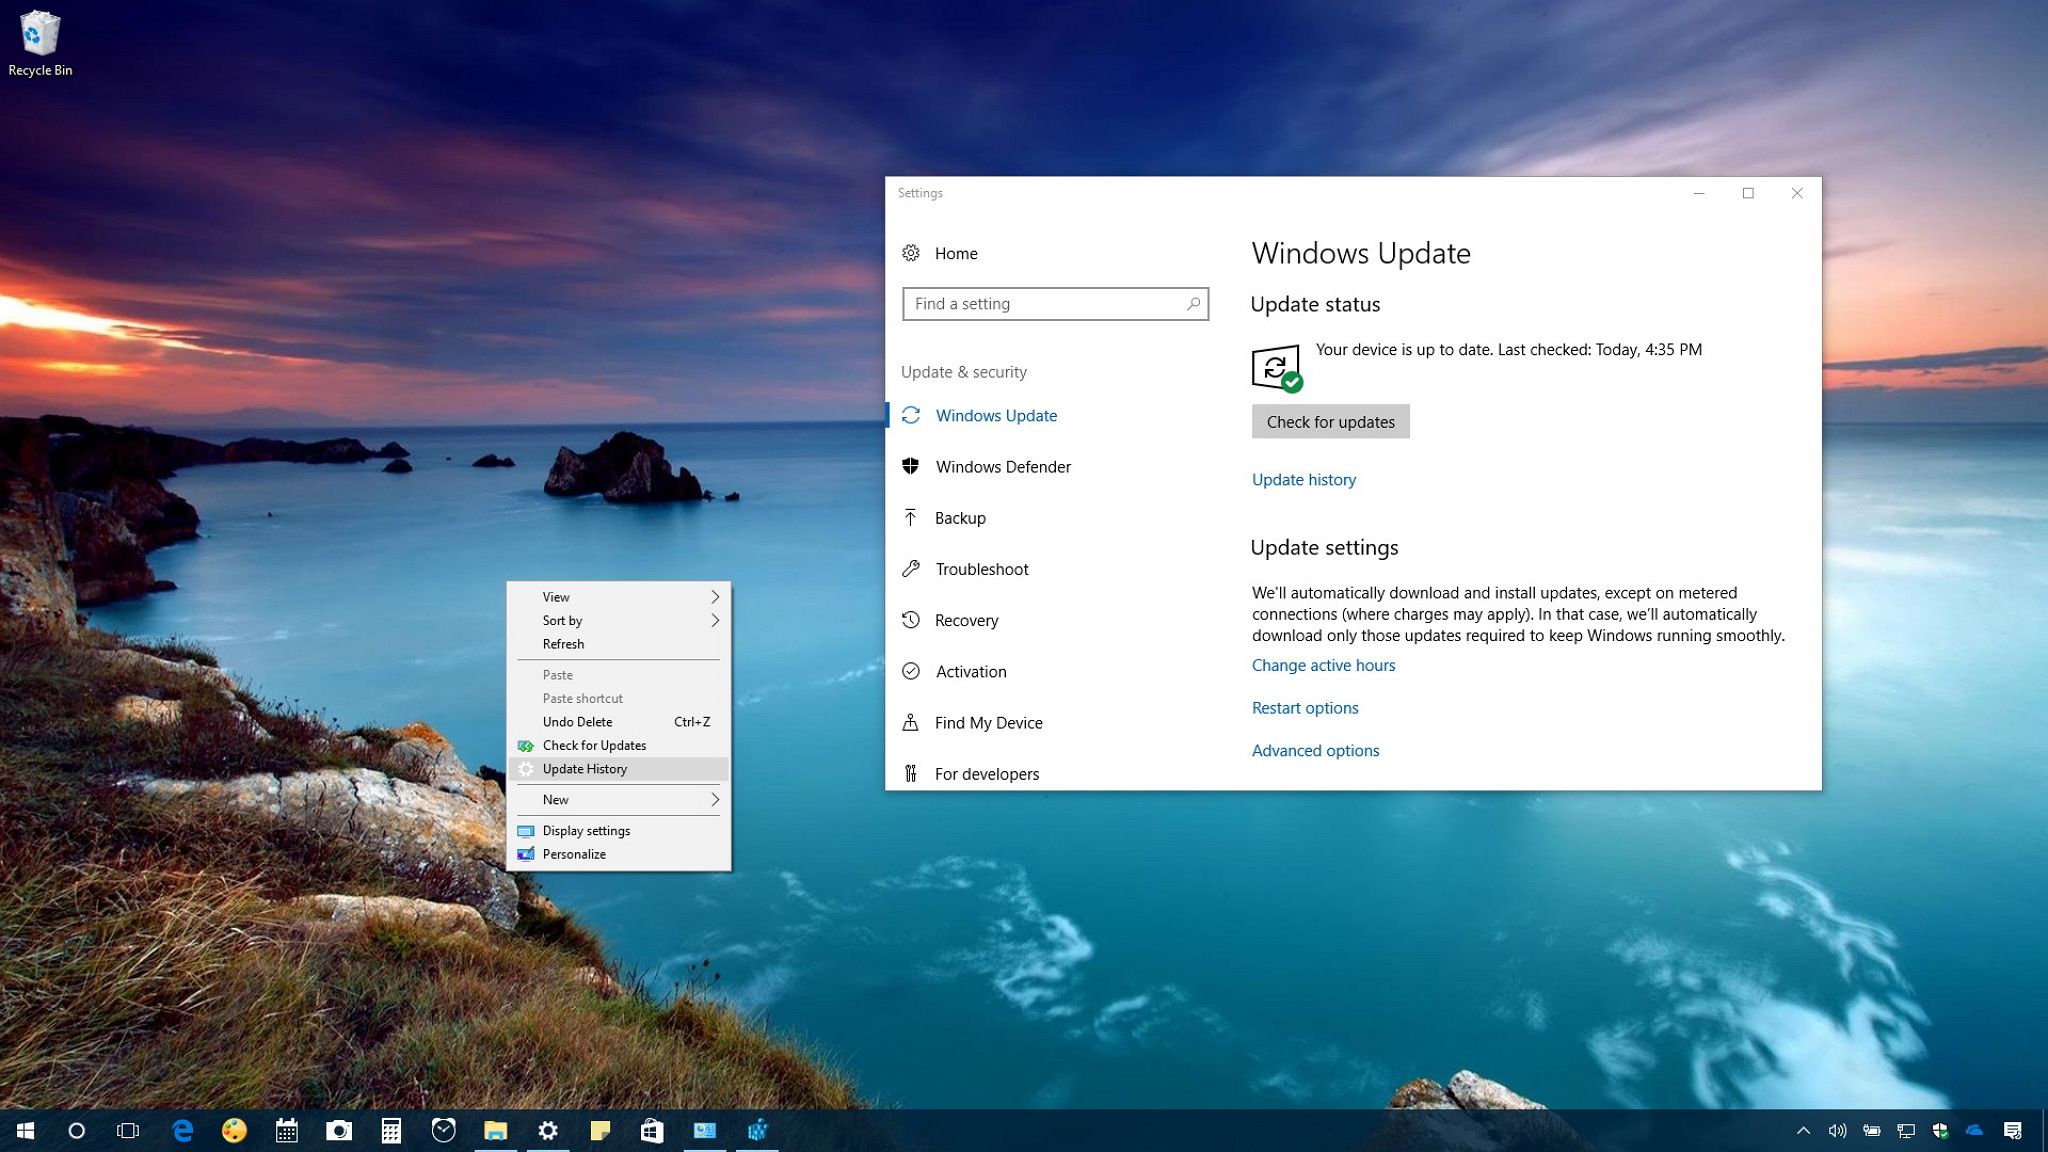
Although Windows 10 automatically checks for updates periodically, sometimes you may need to check for new updates manually, such as when trying to download a new Windows Insider Preview build or a driver update when setting up a new peripheral. However, the process requires a bunch of clicks just to get to the settings — even more, if you're trying to see update history or trying to change the restart options.
Luckily, you can customize the desktop right-click context menu to include additional options to check for updates and access different settings, such as update history to see if an update has been installed correctly. You can do this using some tweaks to the Registry.
In this Windows 10 guide, we'll walk you through the steps to add new options to the right-click context menu to quickly check for updates. In addition, we'll show you the steps to add more options for quick access to update history, restart options, advanced options, and more.
- How to add 'Check for updates' option to context menu
- How to add quick access to Windows Update settings to the context menu
How to add 'Check for updates' option to context menu
To add a new "Check for updates" option to the right-click context menu use the following steps:
Warning: This is a friendly reminder that editing the registry is risky, and it can cause irreversible damage to your installation if you don't do it correctly. It's recommended to make a full backup of your PC before proceeding.
- Use the Windows key + R keyboard shortcut to open the Run command.
- Type regedit, and click OK to open the Registry.
- Browse the following path:
HKEY_CLASSES_ROOT\DesktopBackground\Shell- Quick Tip: On the Windows 10 Creators Update, you can now copy and paste the path in the new Registry's address bar to quickly jump to the key destination.
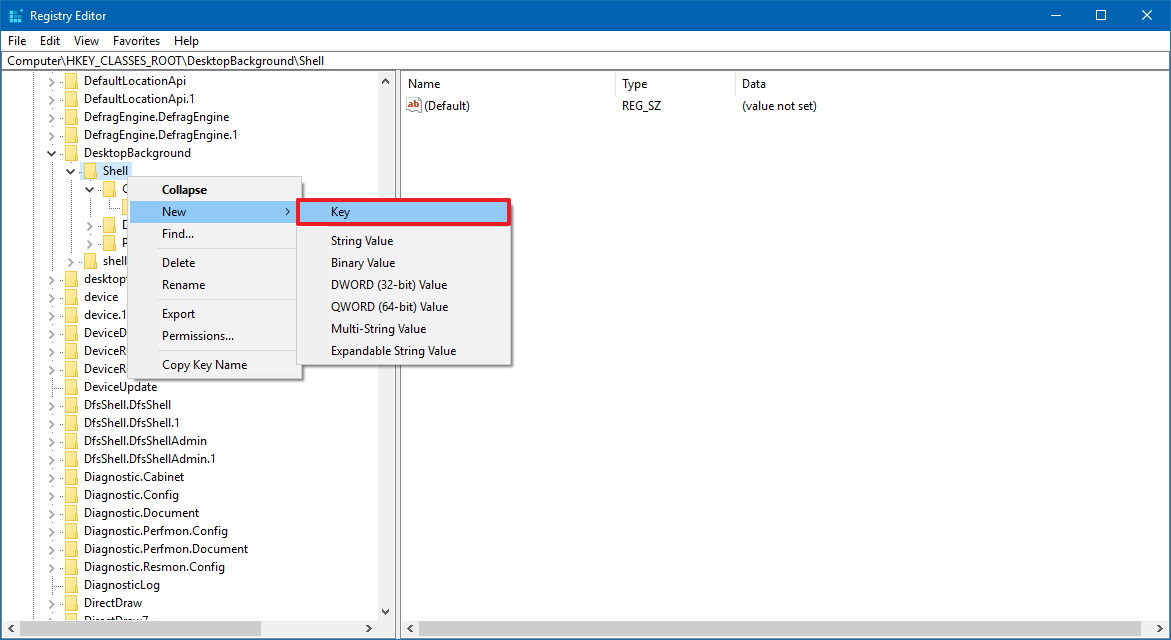
- Right-click the Shell (folder) key, select New, and click on Key.
- Name the key Check for Updates and press Enter.
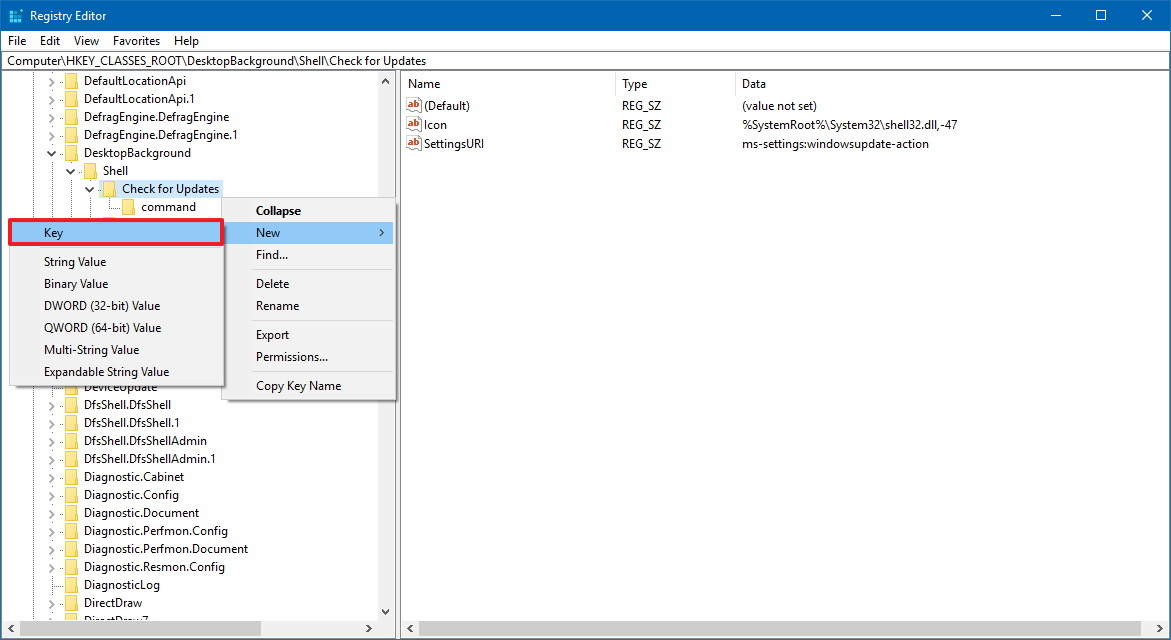
- Right-click the newly created (folder) key, select New, and click on Key.
- Name the key command and press Enter.
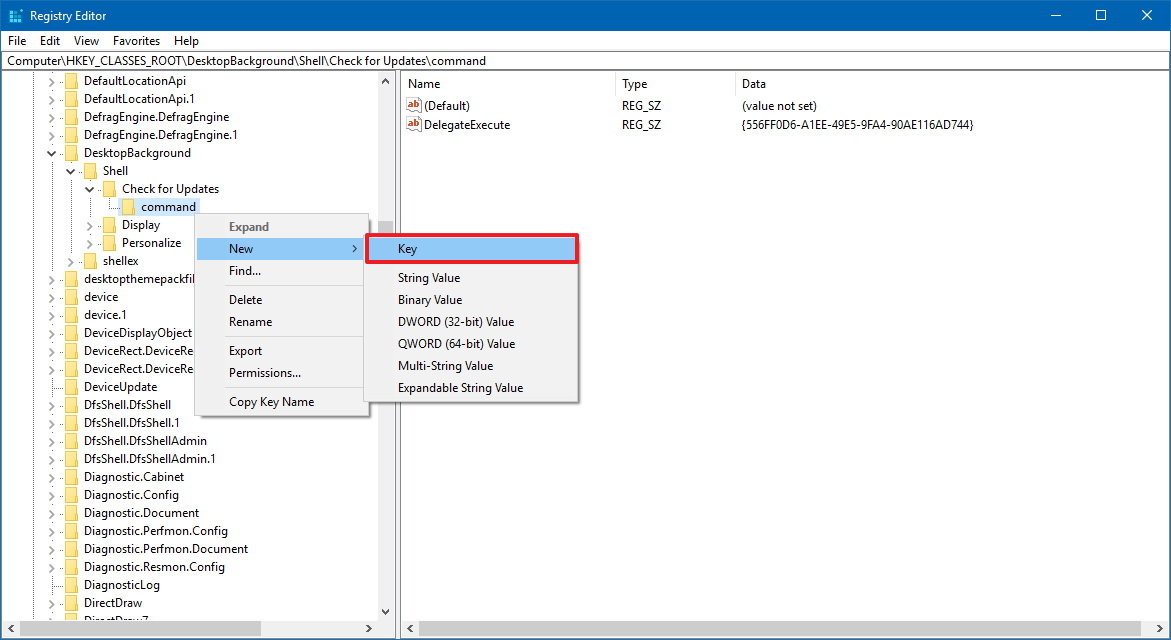
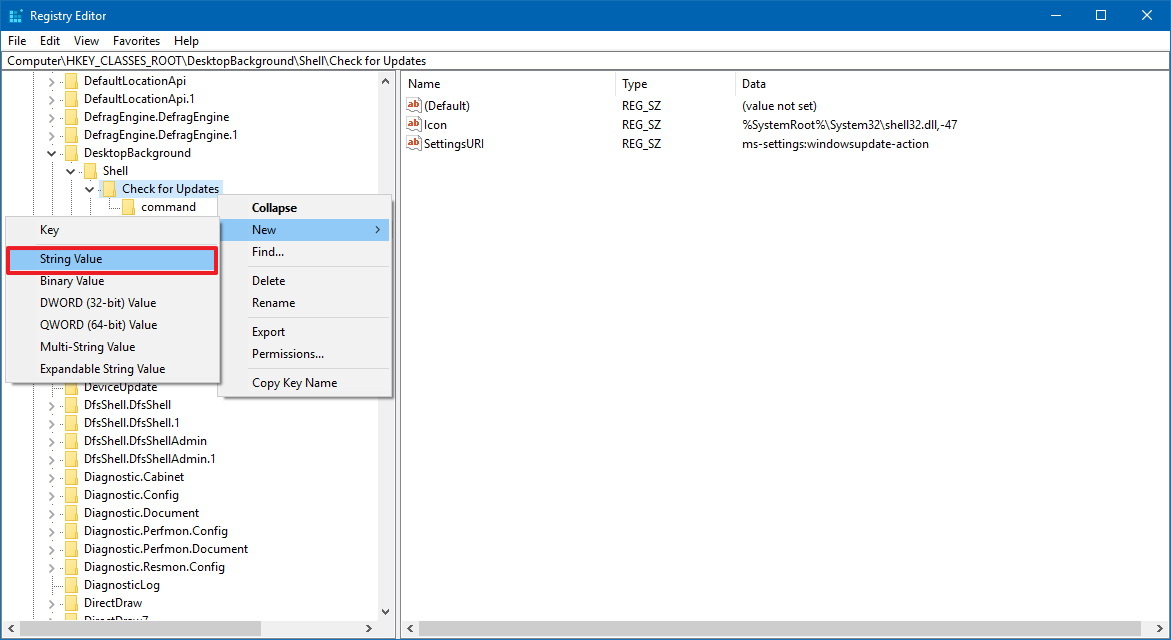
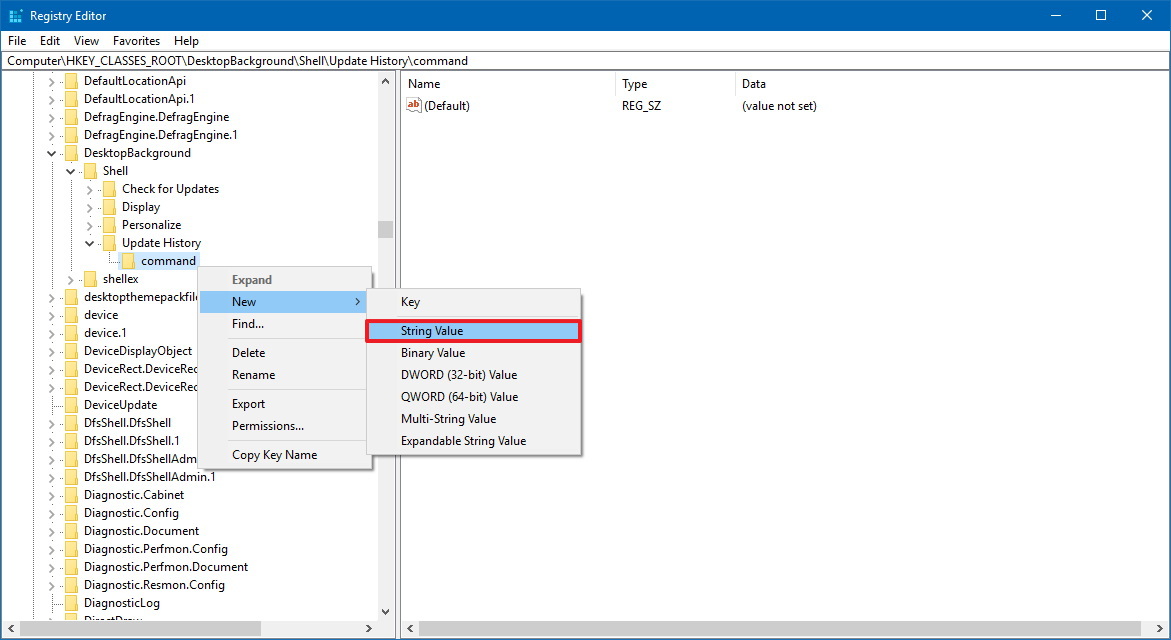
- Right-click the command (folder) key, select New, and click on String Value.
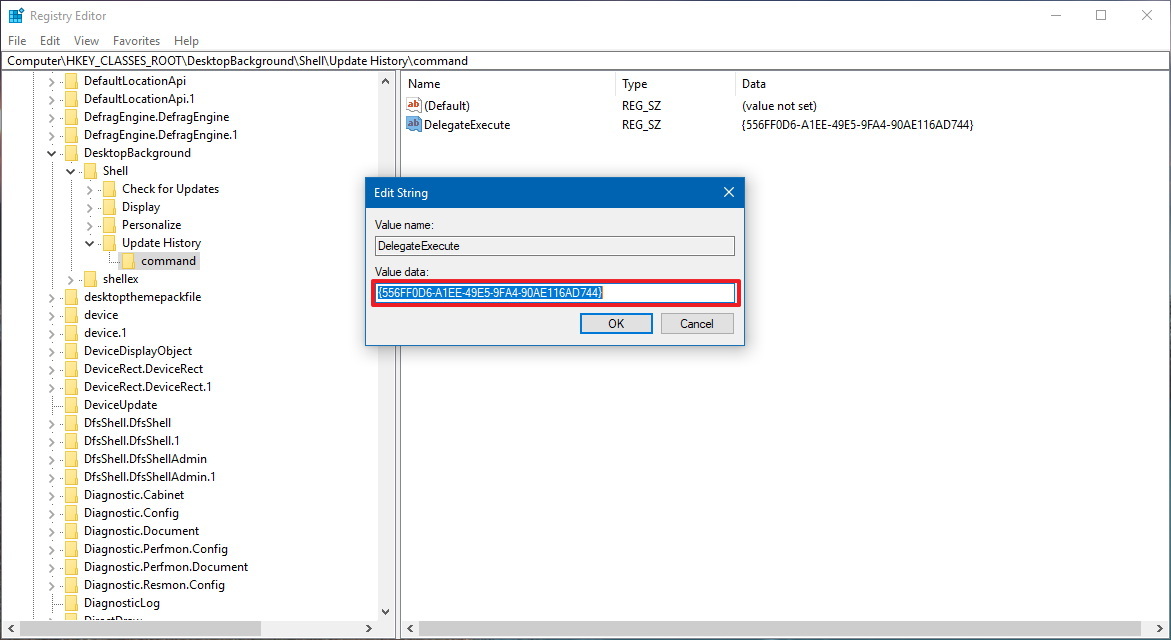
- Name the new string DelegateExecute and press Enter.
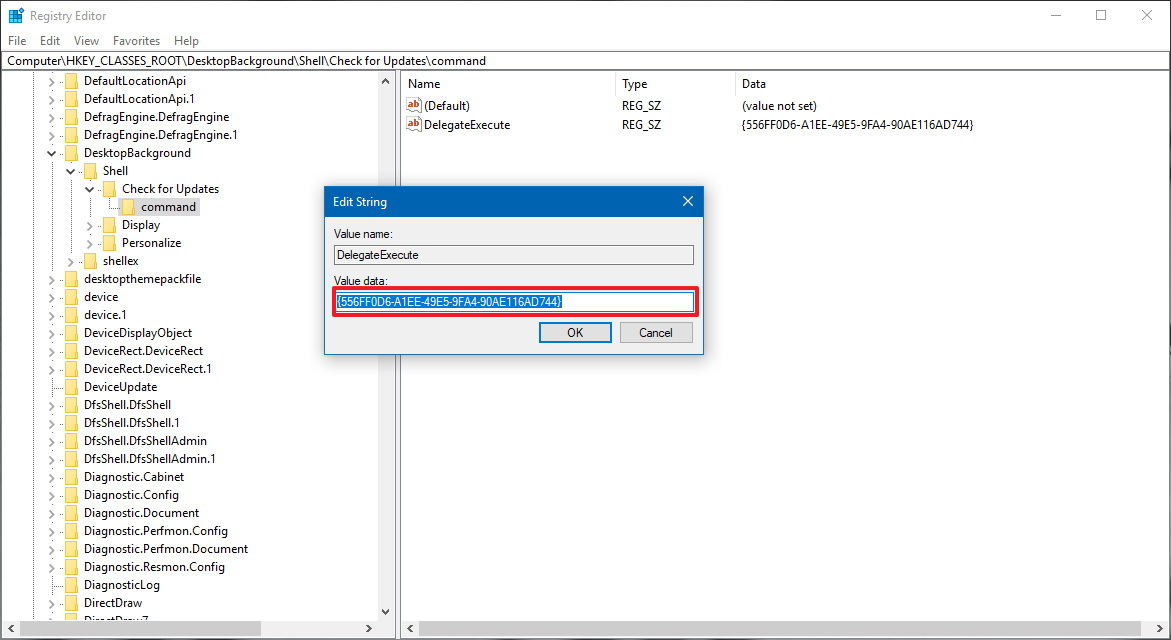
- Double-click the newly created string and type the following value:
{556FF0D6-A1EE-49E5-9FA4-90AE116AD744} - Click OK.
- Right-click the Check for Updates (folder) key, select New, and click on String Value.
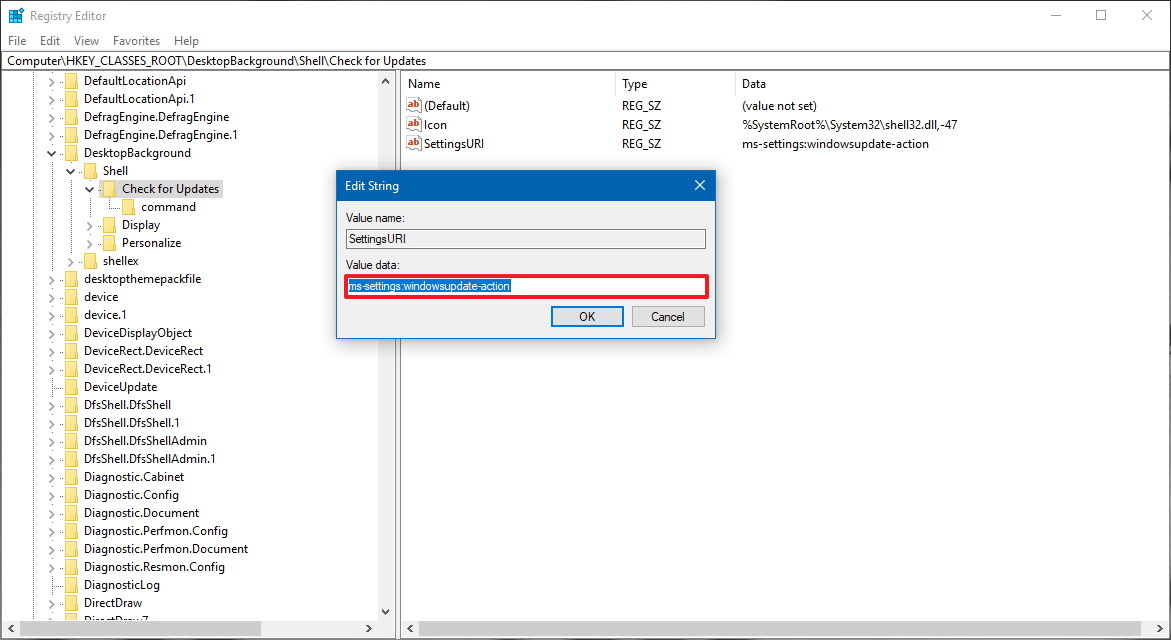
- Name the string SettingsURI and press Enter.
- Double-click the newly created string and type the following value:
ms-settings:windowsupdate-action - Click OK.
- Right-click the Check for Updates (folder) key, select New, and click on String Value.
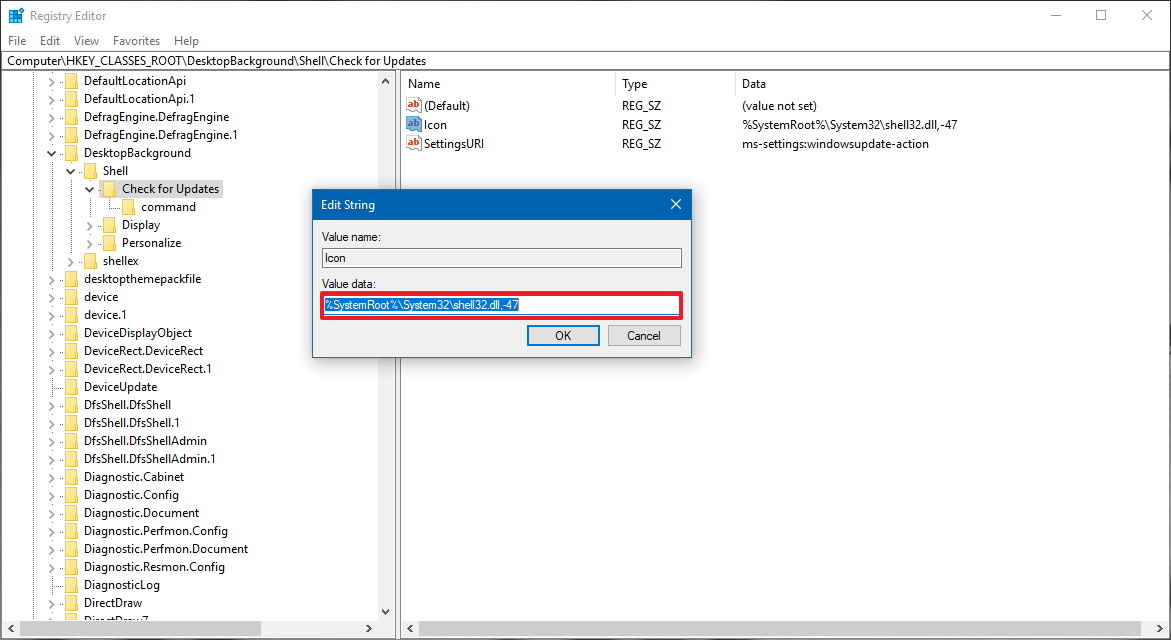
- Name the string Icon and press Enter.
- Double-click the newly created string and type the following value:
%SystemRoot%\System32\shell32.dll,-47 - Click OK.
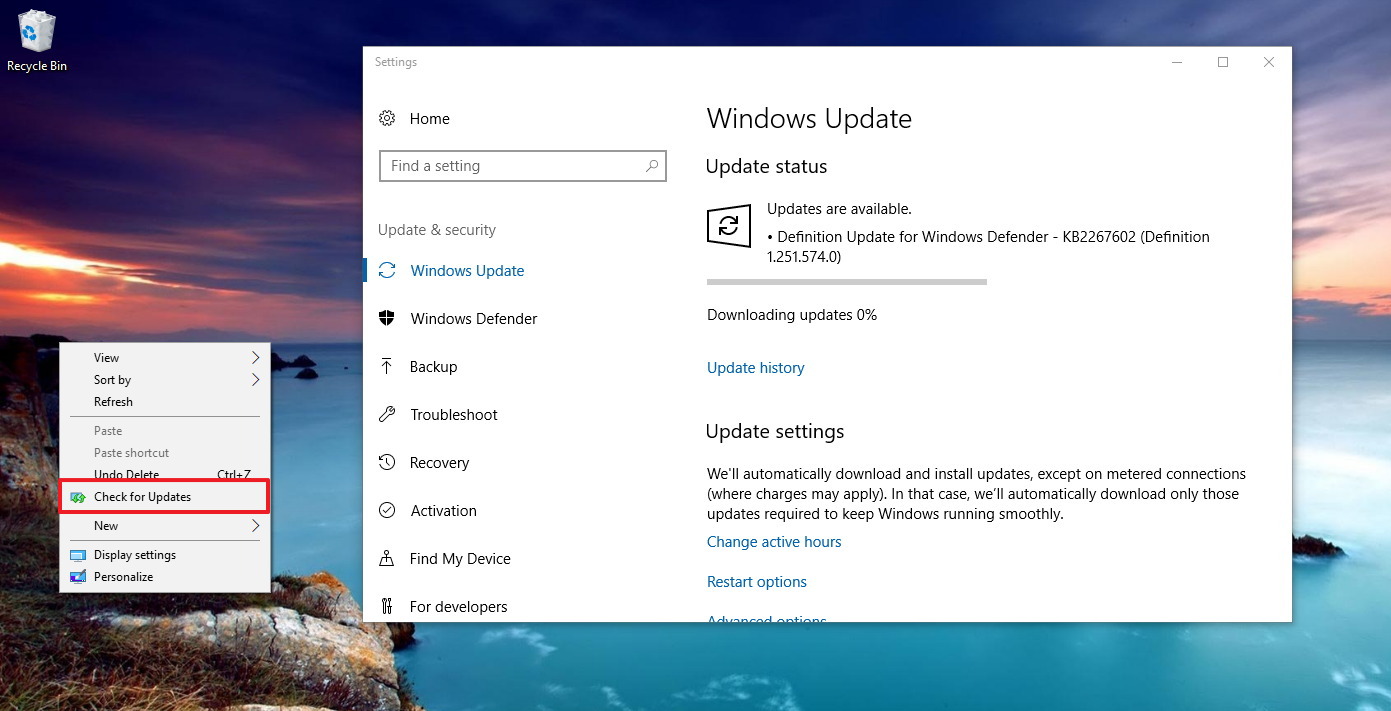
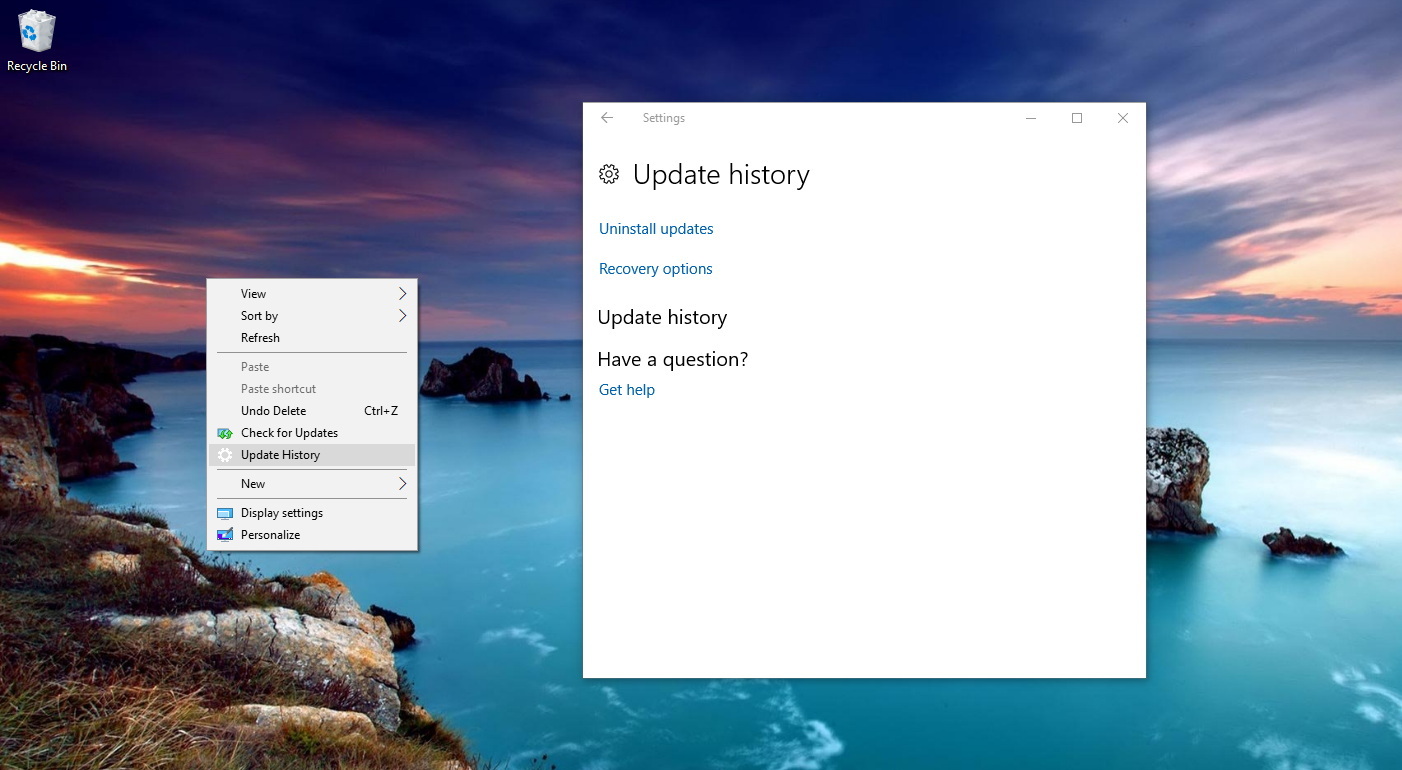
Once you've completed the steps, without having to restart your system, you can right-click on the desktop to open the context menu to see the new option. When you click the new option, it'll open the Windows Update page and trigger an update check without further steps.
At any time you can use the same instructions to revert the changes, but on step No. 4, expand the Shell key, right click the Check for updates key and select Delete.
All the latest news, reviews, and guides for Windows and Xbox diehards.
Alongside the direct access to check for updates using the instructions above, it's also possible to speed up the download process for Windows 10 Insider Preview builds using this guide.
How to add quick access to Windows Update settings to the context menu
You're not limited to add only an option to check for updates. You can also create additional options to access other Windows Update settings using the following steps:
- Use the Windows key + R keyboard shortcut to open the Run command.
- Type regedit, and click OK to open the Registry.
- Browse the following path:
HKEY_CLASSES_ROOT\DesktopBackground\Shell- Quick Tip: On the Windows 10 Creators Update, you can now copy and paste the path in the new Registry's address bar to quickly jump to the key destination.
- Right-click the Shell (folder) key, select New, and click on Key.
- Name the key with the settings page name you want to open and press Enter. For example:
- Update History
- Restart Options
- Advanced Options
- Windows Update
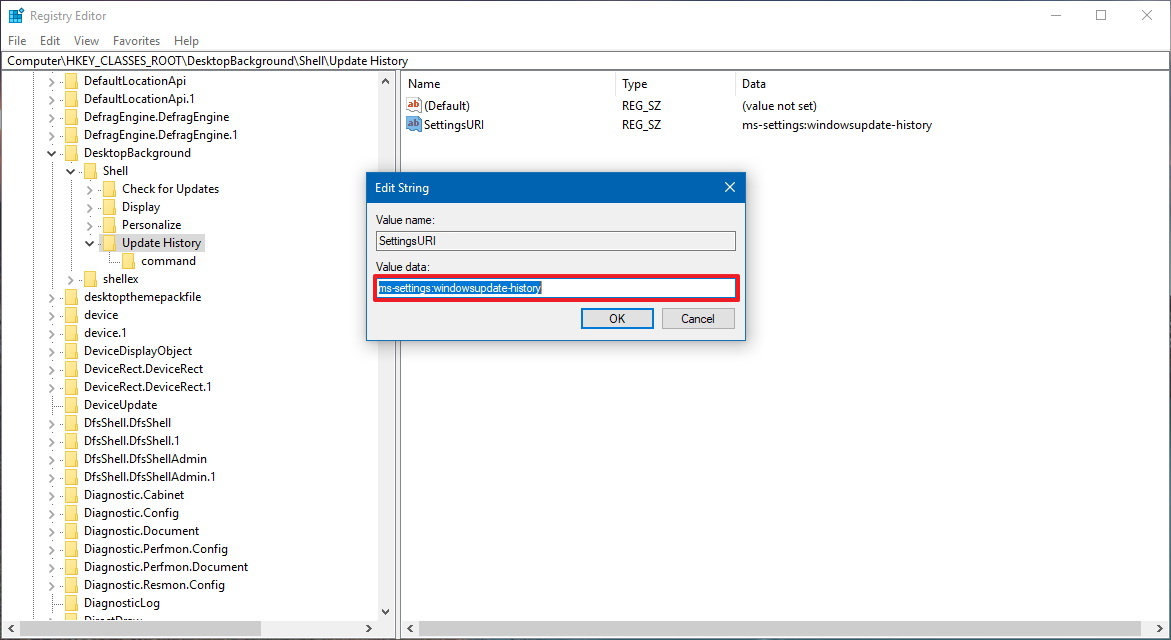
- Right-click the newly created (folder) key, select New, and click on String Value.
- Name the string SettingsURI and press Enter.
- Double-click the newly created string and type the action you want for the context menu option. For example:
ms-settings:windowsupdate-history: Opens the Update History settings page.ms-settings:windowsupdate-restartoptions: Opens the Restart options page.ms-settings:windowsupdate-options: Opens the Advanced options settings page.ms-settings:windowsupdate: Opens the Windows Update settings page.
- Click OK.
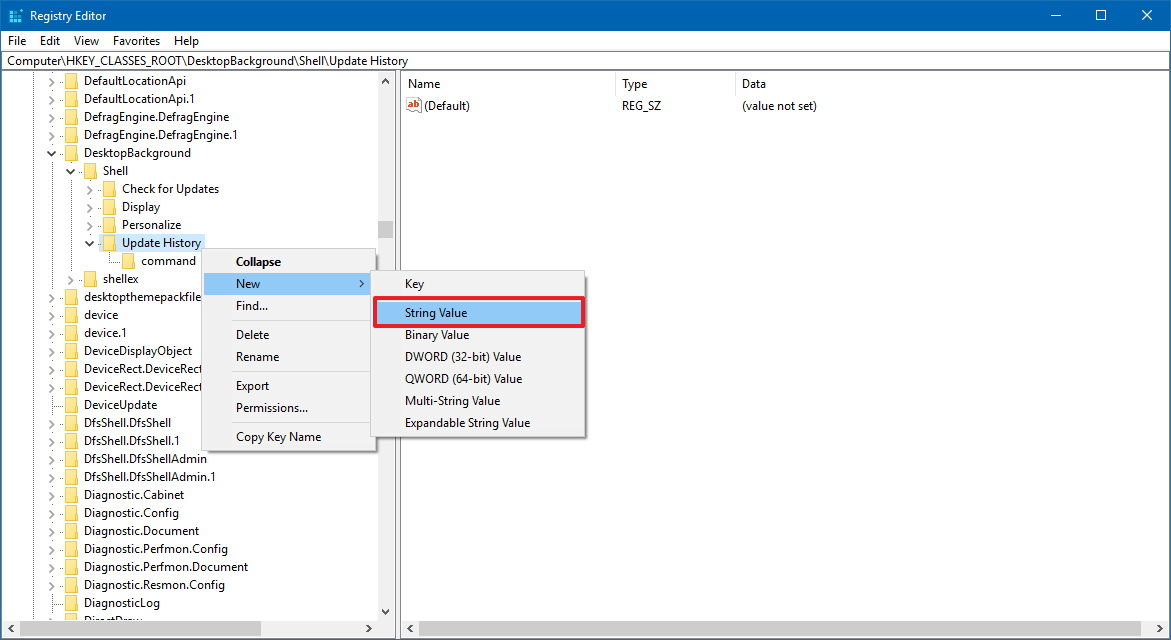
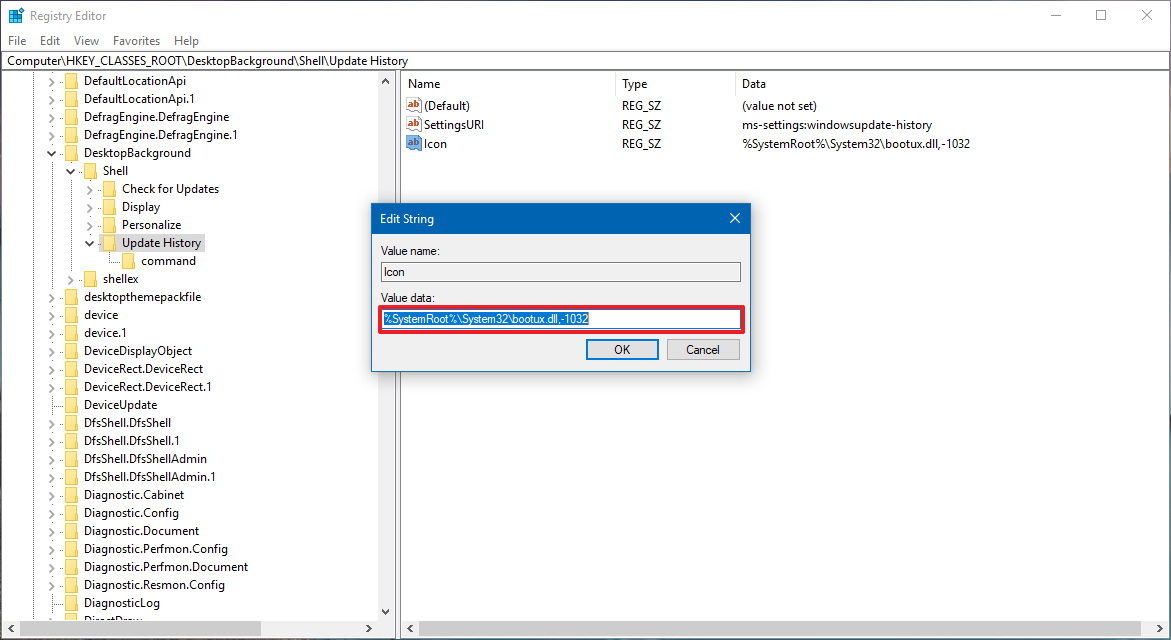
- Right-click the option key (folder) you created, select New, and click on String Value.
- Name the string Icon and press Enter.
- Double-click the newly created string and type the following value to add an icon to the new context menu option:
%SystemRoot%\System32\bootux.dll,-1032 - Click OK.
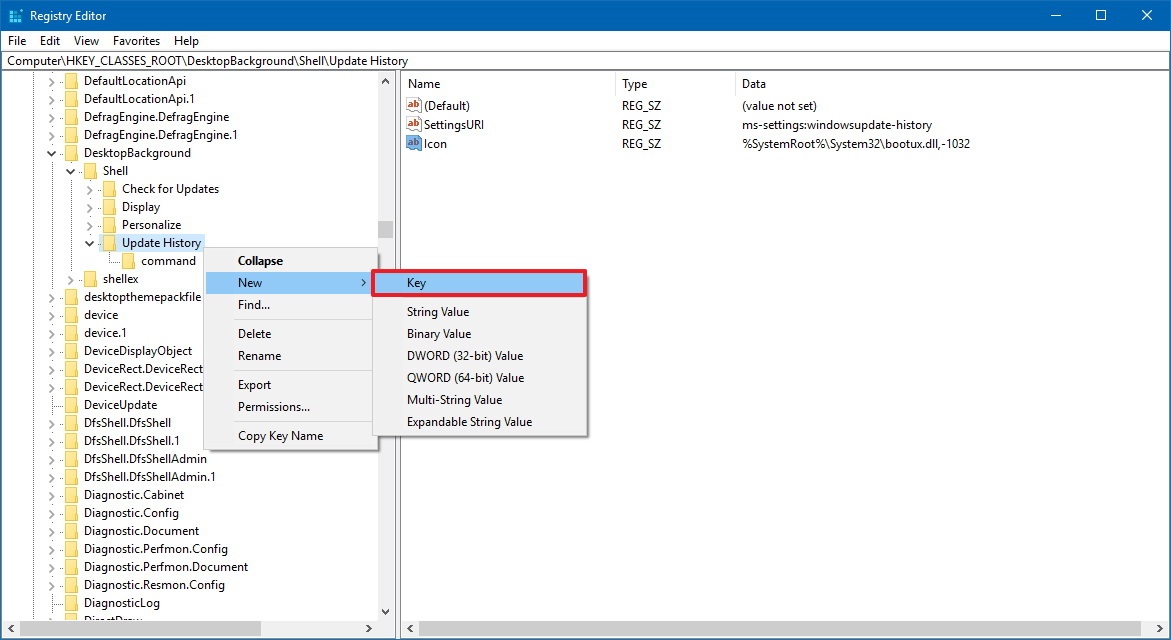
- Right-click the option key (folder) you created again, select New, and click on Key.
- Name the key command and press Enter.
- Right-click the command (folder) key, select New, and click on String Value.
- Name the string DelegateExecute and press Enter.
- Double-click the string and enter the following value:
{556FF0D6-A1EE-49E5-9FA4-90AE116AD744} - Click OK.
- Repeat the above steps to add any additional options you want.
After completing the steps, you don't need to restart your computer, right-clicking on an empty space on the desktop will open the context menu, and you should now see your new quick access to the settings page you configured.
If you no longer want to keep this configuration, you can use the same instructions, but on step No. 4, expand the Shell key, right click the key configure and select Delete.
More Windows 10 resources
For more helpful articles, coverage, and answers to common questions about Windows 10, visit the following resources:
- Windows 10 on Windows Central – All you need to know
- Windows 10 help, tips, and tricks
- Windows 10 forums on Windows Central

Mauro Huculak has been a Windows How-To Expert contributor for WindowsCentral.com for nearly a decade and has over 22 years of combined experience in IT and technical writing. He holds various professional certifications from Microsoft, Cisco, VMware, and CompTIA and has been recognized as a Microsoft MVP for many years.
