How to disable auto-correct and highlighted misspelled words in Windows 10

Windows 10 is the new operating system from Microsoft that brings Cortana to the desktop, universal apps, and a super easy to use Settings app to find and configure different options in the operating system, and many other features. Like in Windows 8.x, the new version of the operating system includes an automatic spell checker that will autocorrect and highlight misspelled words in apps designed to take advantage of the functionality.
You will find such feature inside the Microsoft Edge web browser and Internet Explorer, Facebook, Readit, Xbox app, and on countless of other apps. Autocorrect and highlighted misspelled words are excellent productivity tools inside Windows 10, but there could be times when you will not require assistant correct your grammar.
Fortunately, Windows 10 comes with the necessary settings to individually enable or disable the spelling options. If you want to change the grammar settings follow these super easy steps:
- Use the Windows + I keyboard shortcut to open the Settings app
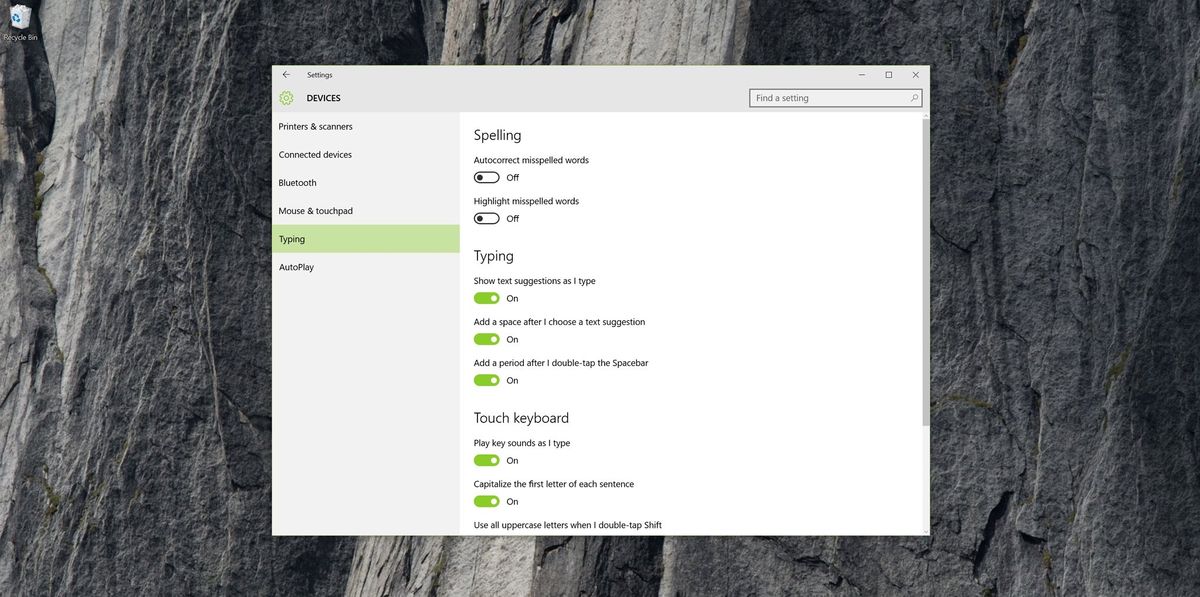
- Navigate to Devices and go to Typing
- Under Spelling, switch the Autocorrect misspelled words and Highlight misspelled words to the Off position.

Quick Note: If you're disabling the spelling options while the apps are still running, you'll need to restart the app you want to use without the autocorrect in order the changes to take effect.
That's all you have to do to disable the spell checker in Windows 10. You can always enable the settings back by coming back to the Typing Settings section.
It's worth pointing out that surprisingly, even though the spell checker is a global feature, many apps work independently. For example, if you want to disable spell checking on the new Windows 10 Mail app, you'll need to open Mail, click on New Mail, navigate to Options, and change the Spelling options. OneNote also doesn't respond to the Windows 10 Spelling feature. However, OneNote doesn't even have options to control spelling.
Disabling spelling feature in Office
The suite of Office apps, including Word, Excel, PowerPoint, and the others, also have an independent spell checker, which you can easily disable. Here is how to do it:
Get the Windows Central Newsletter
All the latest news, reviews, and guides for Windows and Xbox diehards.
- Going to File > Options.
- Then go to Proofing and under When correcting spelling and grammar in Word (or from another Office app), make sure you uncheck Check spelling as you type and Check grammar with spelling. And click the AutoCorrect options button to control how Office apps, in this case, Word, corrects and formats your content.

Editing your custom dictionary in Windows 10
If you happen to want to disable spell checker in Windows 10 because, by mistake, you added some misspelled words to your personal dictionary, you can do that too. There are two ways to remove added words to the dictionary.
Method one
- Open the run command and type the following command with your account name: **C:\Users\yourAccountName\AppData\Roaming\Microsoft\Spelling**
- Go inside the language folder – in my case es-US.
- Open the default.dic file with Notepad. Now remove the misspelled words and save the file.
Method two
- Open Word and go to File > Proofing and click the Custom Dictionary button.
- Select RoamingCustom.dic from the list and click Edit Word List
- Then add or remove the words you want and click OK
- Click OK, OK again, and close Word.

That's all there is to it!
Do you let Windows 10 help you out with grammar? Let us know your configuration options in the comments below.
More Resources
Remember that we have many other articles on Windows 10, if you need help you always check these other resources:
Mauro Huculak has been a Windows How-To Expert contributor for WindowsCentral.com for nearly a decade and has over 15 years of experience writing comprehensive guides. He also has an IT background and has achieved different professional certifications from Microsoft, Cisco, VMware, and CompTIA. He has been recognized as a Microsoft MVP for many years.
