How to manually stop the Windows 10 upgrade prompts on your Windows 7 or 8 PC
Windows 7 or 8.1 still nagging you to upgrade to Windows 10? Here's how to kill the "Get Windows 10" app and make it leave you alone.
If you've been running Windows 7 or Windows 8.1 on your computer, you're probably familiar with the "Get Windows 10" (GWX) app, which is constantly trying — sometimes aggressively — to lure you to upgrade to Windows 10. While this marketing campaign initially only included non-business computers, Microsoft has already announced its plans to continue expanding the operating system using the GWX app to small businesses and organizations.
Along with the new announcement, the software giant is finally offering officially documented instructions for IT administrators to stop qualifying computers running Windows 7 or Windows 8.1 from installing Windows 10 and getting rid of the unpleasant notifications.
Microsoft is aiming the instructions for business computers joined to a domain network running Windows 7 Pro and Windows 8.1 Pro, but the steps will also work for devices that aren't joined to a domain, including the home versions of the operating system.
Previously, we described the steps to stop the "Get Windows 10" nags and prevent your computer from installing Windows 10 using the GWX Control Panel tool. But if installing a third-party software isn't your approach, and you are comfortable modifying the Windows Registry and Group Policy settings, you will want to use the following guide:
Disabling the GWX app and stop the Windows 10 upgrade
Warning: Before jumping into this guide, it's important to note that modifying the Windows Registry can be a dangerous game that can cause irreversible damage to your system if you don't do it correctly. It's highly recommended to make a full backup of your system before proceeding.
You have been warned!
If you're running Windows 7 Pro or Windows 8.1 Pro, you can stop the upgrade offer to Windows 10 and disable the "Get Windows 10" app following the steps below:
All the latest news, reviews, and guides for Windows and Xbox diehards.
Prerequisites
To block the upgrade to Windows 10 through Windows Update, you'll need to have installed update KB3065987 in Windows 7 or KB3065988 in Windows 8.1 to make available the new Group Policy Object to perform the task.
You can download the updates using the links below:
Once you've downloaded the update for your current version of Windows, double-click the package to begin the installation, on the dialog box prompt click Yes to complete the install, and restart your computer.
Blocking the Windows 10 upgrade offer using Group Policy
After installing the required update follow these steps:
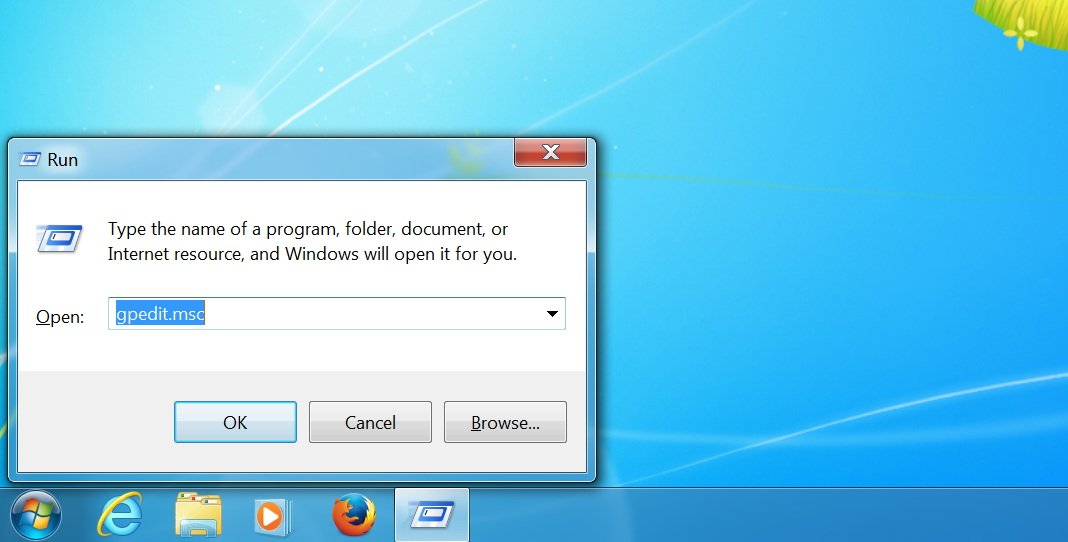
- Use the Windows Key + R keyboard shortcut to open the Run command, type gpedit.msc, and press Enter to open the Local Group Policy Editor.
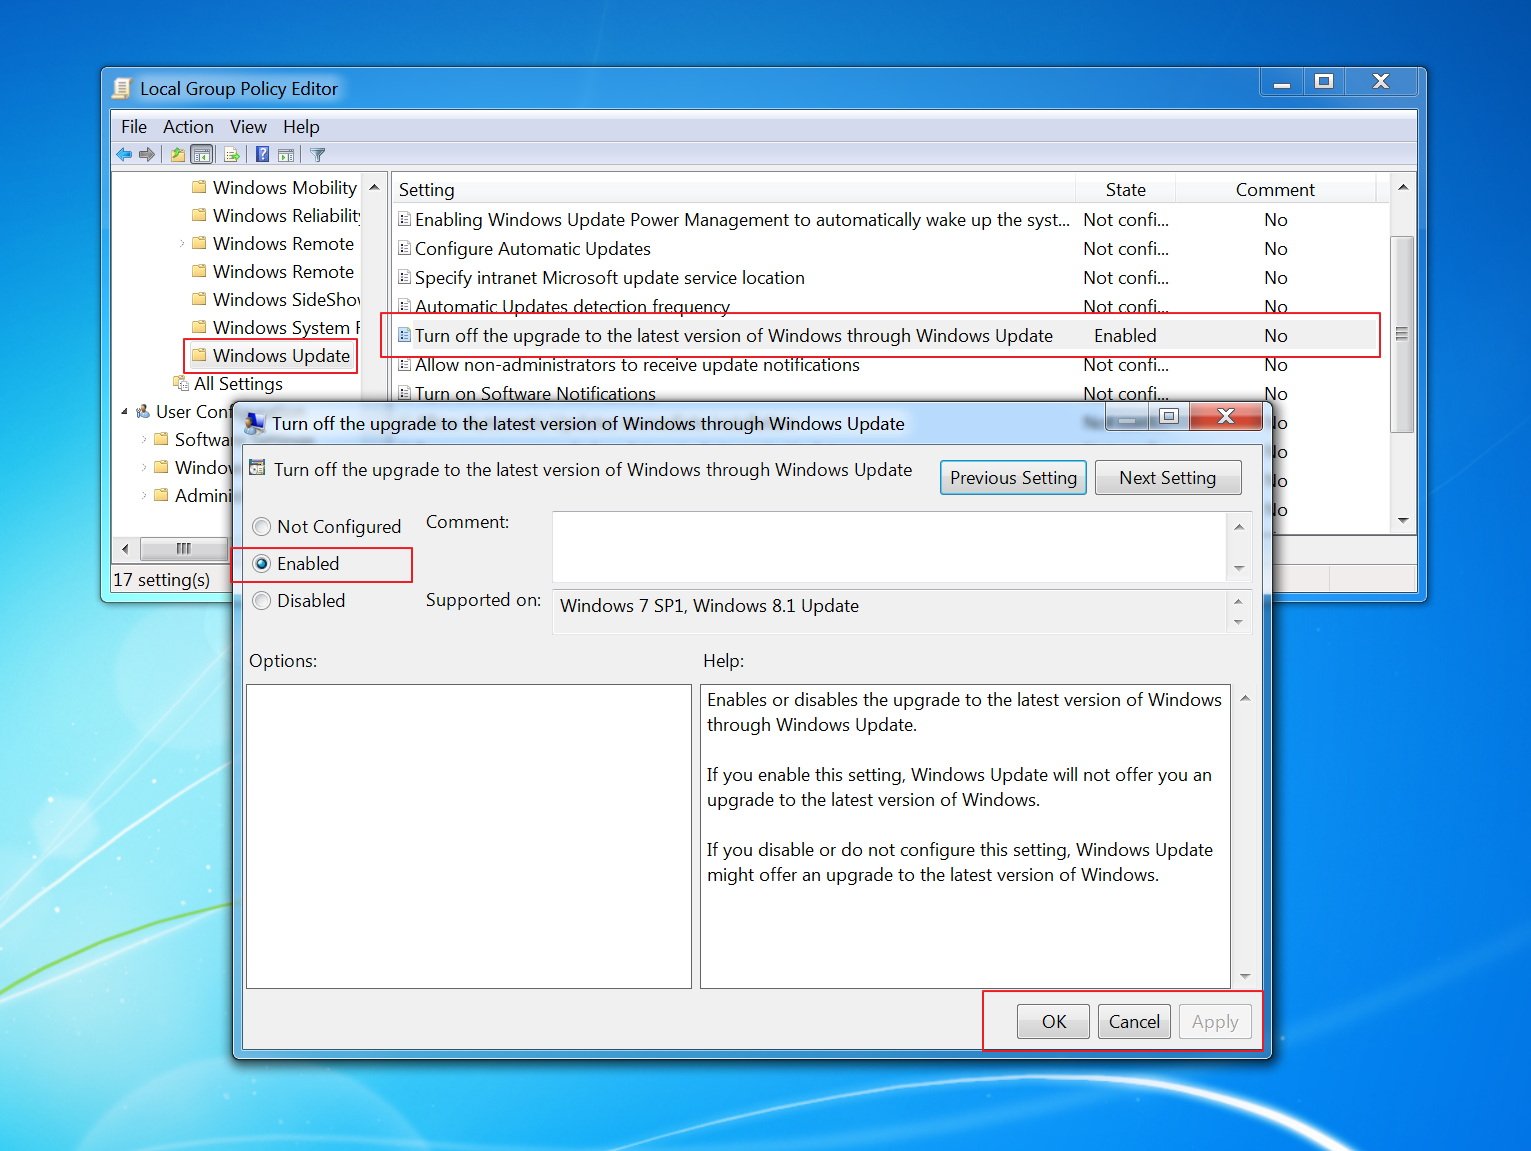
- Browse the path Computer Configuration > Administrative Templates > Windows Components > Windows Update.
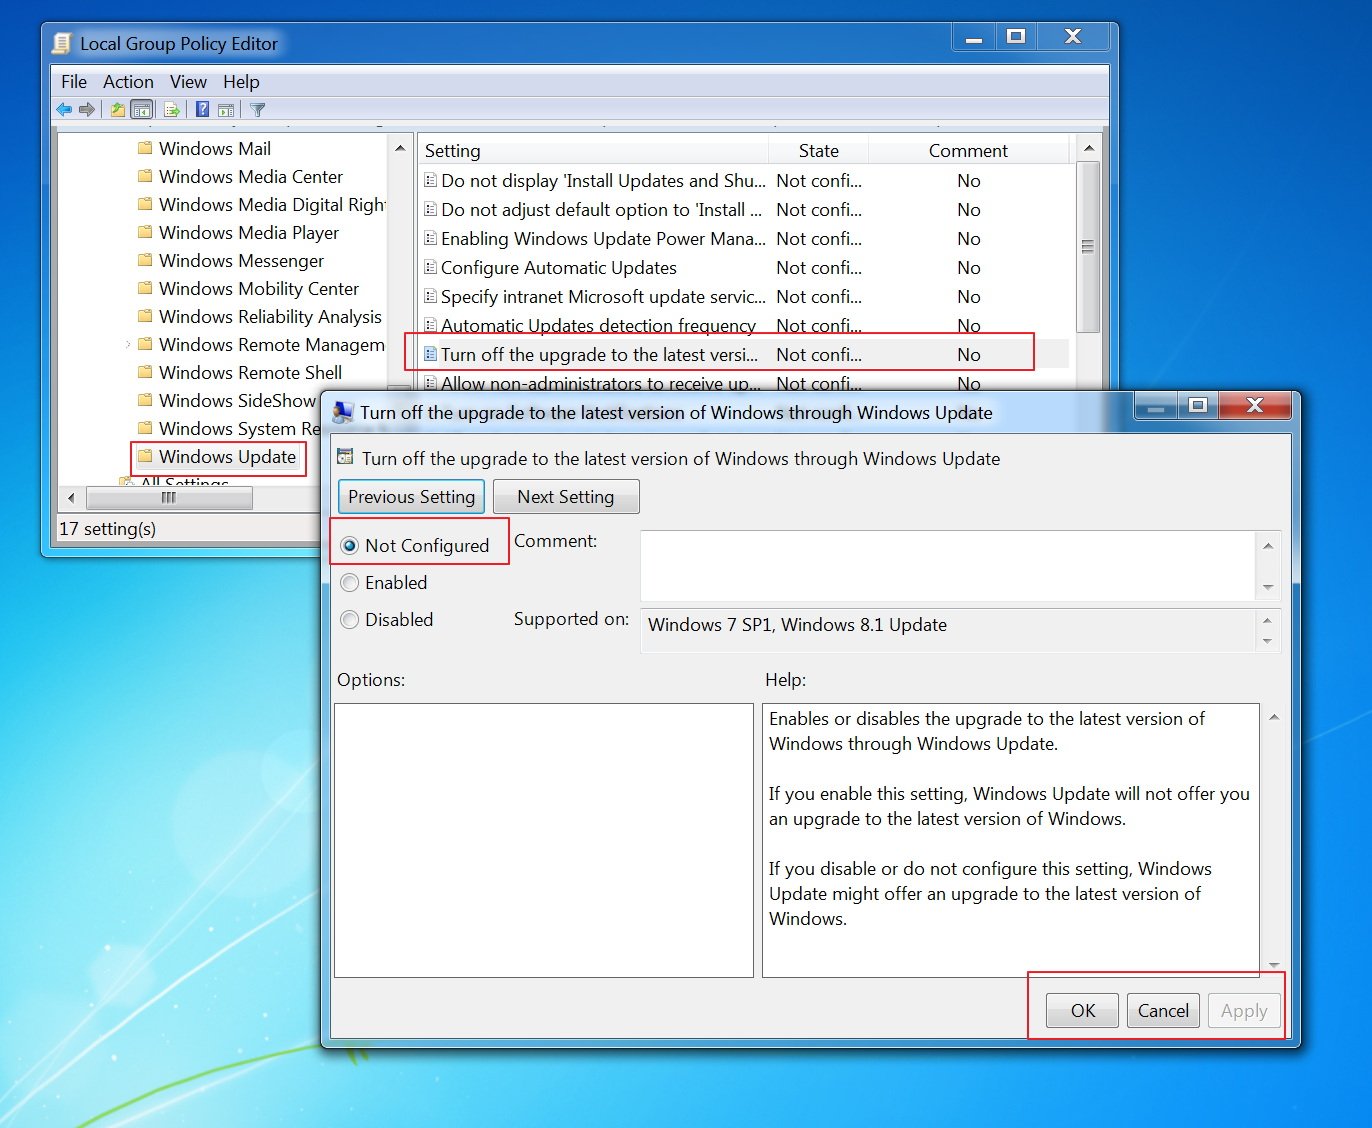
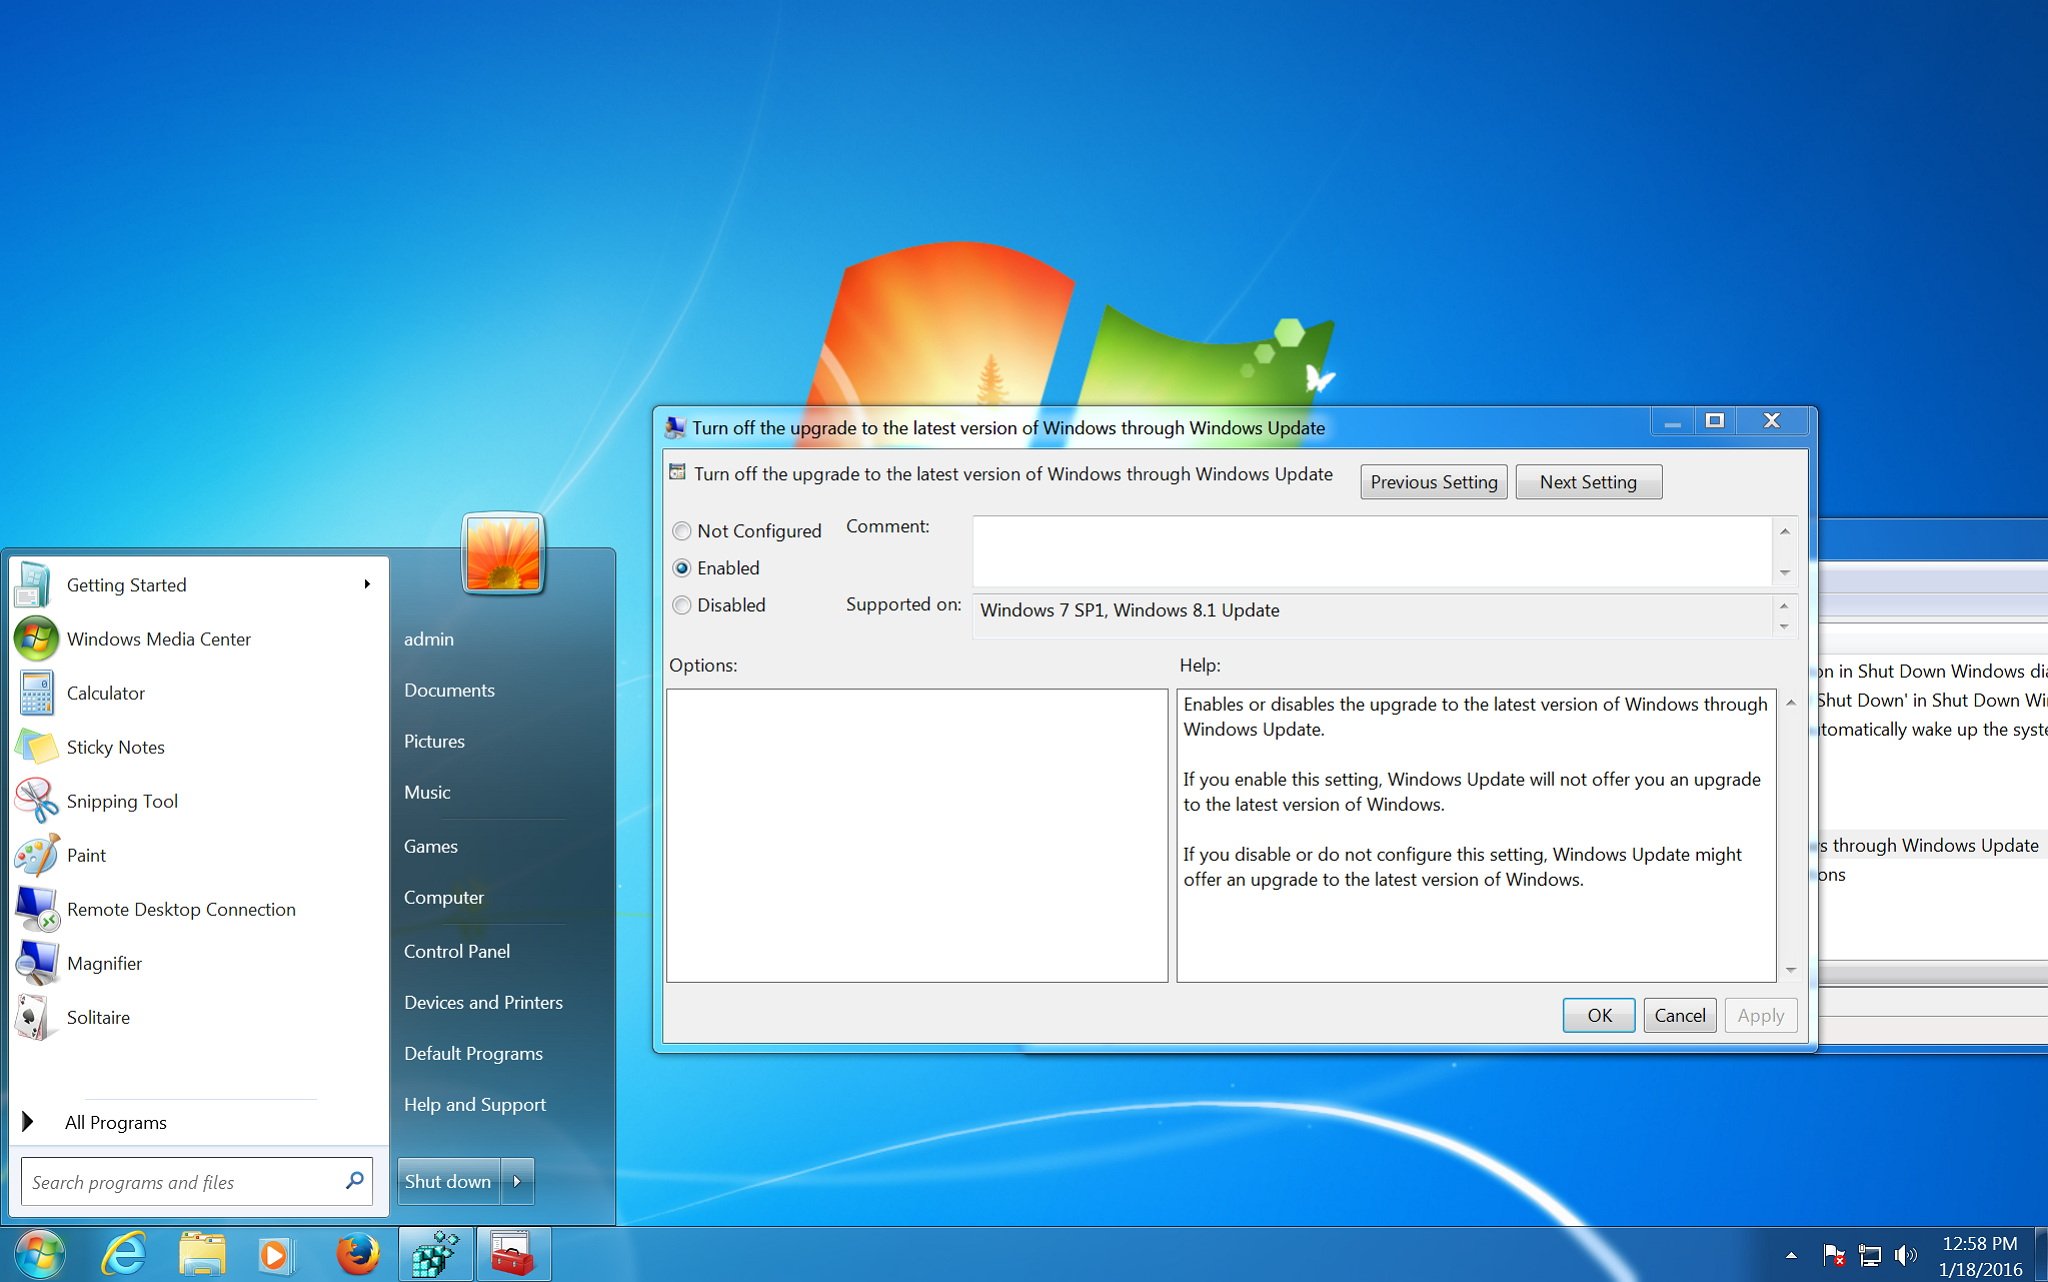
- In Windows Update, find and double-click the Turn off the upgrade to the latest version of Windows through Windows Update option.
- Click Enable, then Apply and finally click OK.
Blocking the Windows 10 upgrade offer using the Registry Editor
If you're running a home version of the operating system, the Local Group Policy Editor won't be available to you, in which case you need to stop the Windows 10 upgrade using the registry.
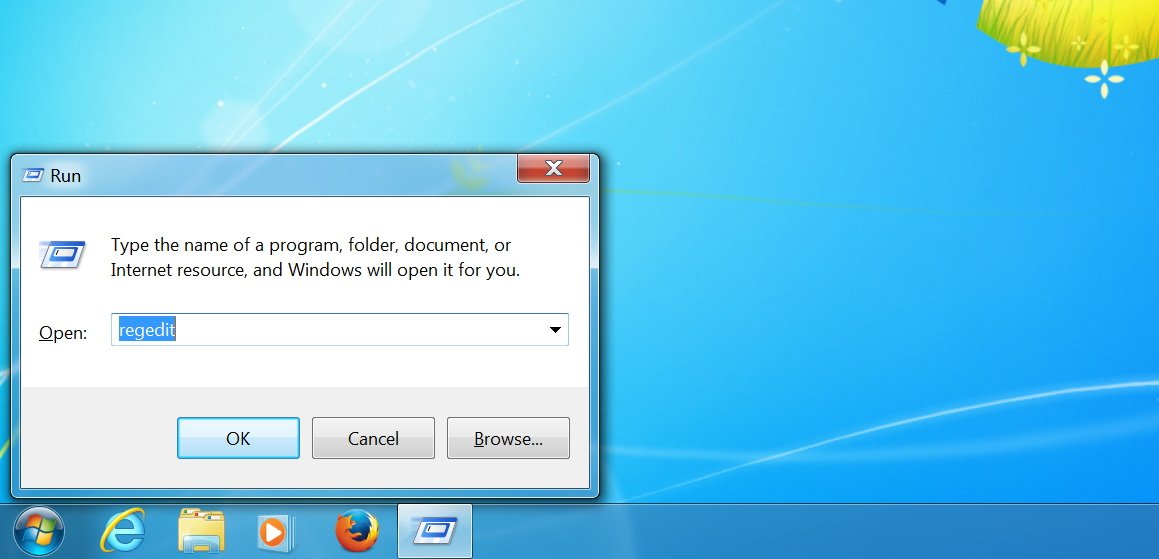
- Use the Windows Key + R keyboard shortcut to open the Run command, type regedit, and press Enter to open the Registry Editor.
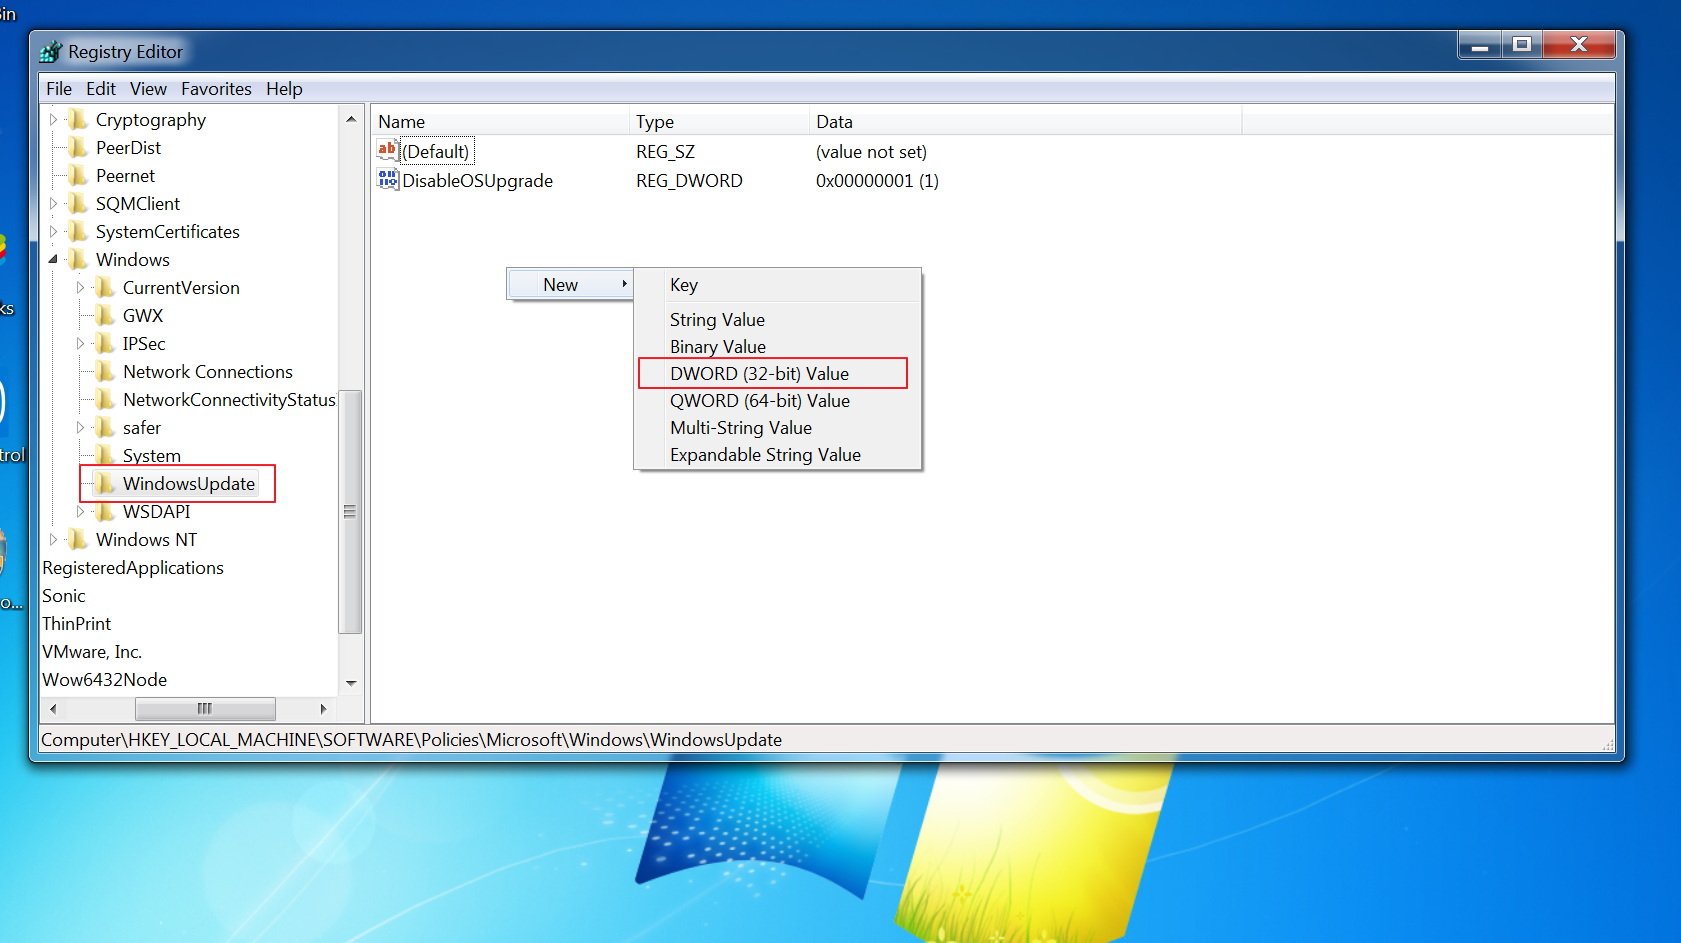
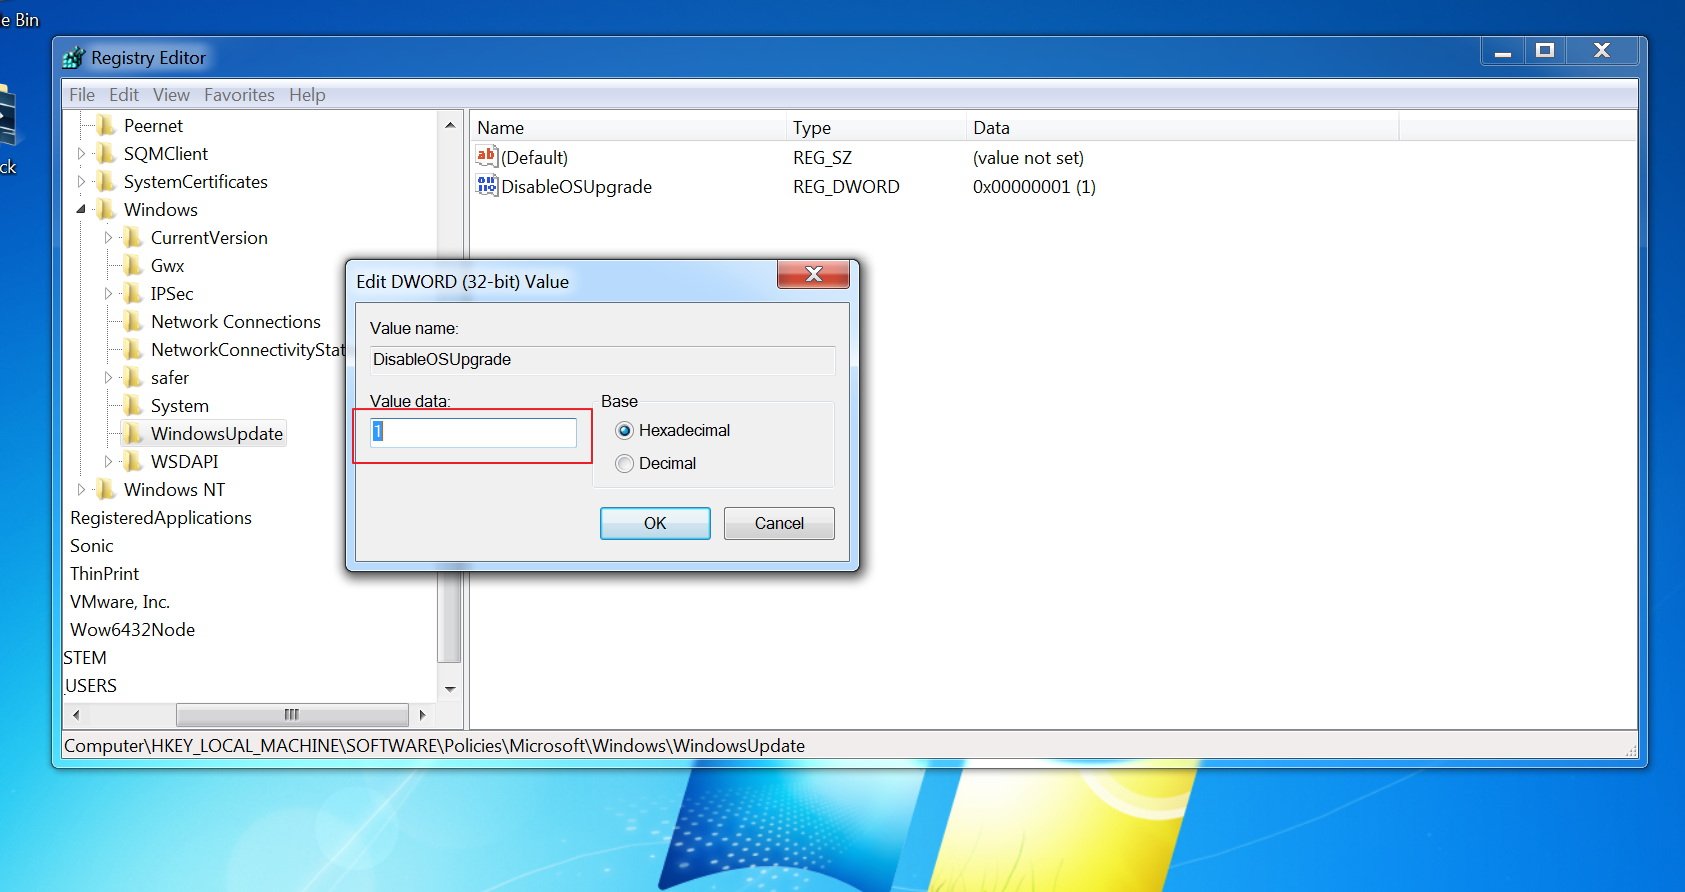
- Carefully browse the following path: HKEY_LOCAL_MACHINE\SOFTWARE\Policies\Microsoft\Windows\WindowsUpdate.
- On the right side, right-click, select New, create a new DWORD key and name it DisableOSUpgrade.
- Double-click the DisableOSUpgrade key and change the value from 0 to 1.
Quick Tip: If you don't see the WindowsUpdate key when browsing the path, right-click the Windows key, select New, then Key, and name the new key WindowsUpdate.
Disabling the "Get Windows 10" nags
There is no Group Policy setting to disable the "Get Windows 10" app. As such, you will need to modify the Windows Registry in both the professional and home version of Windows 7 and Windows 8.1.
- Use the Windows Key + R keyboard shortcut to open the Run command, type regedit, and press Enter to open the Registry Editor.
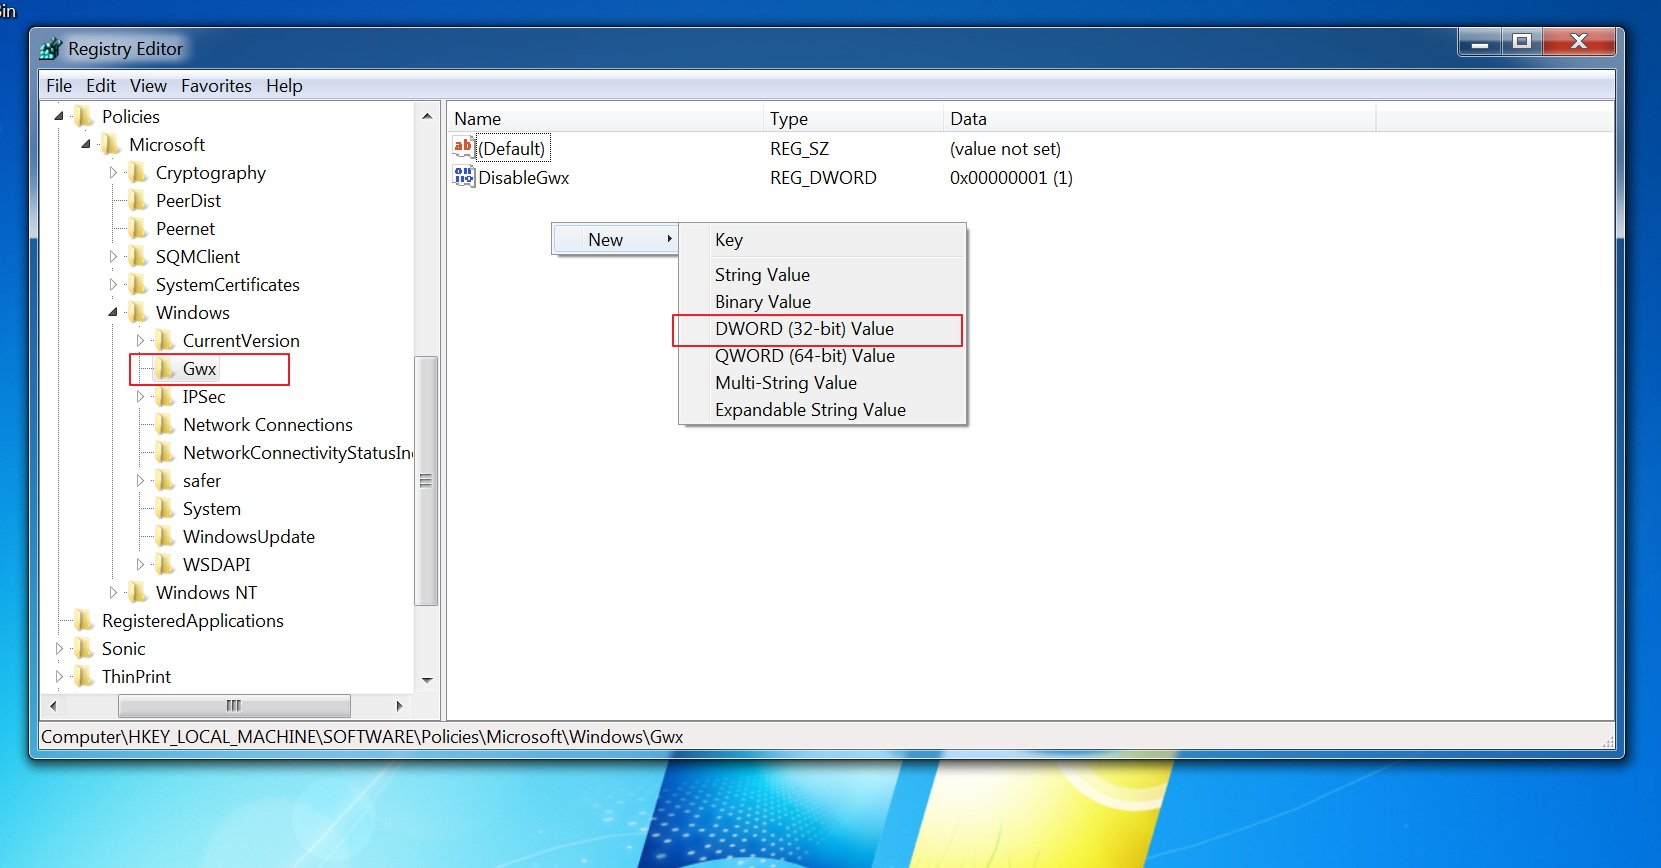
- Carefully browse the following path: HKEY_LOCAL_MACHINE\SOFTWARE\Policies\Microsoft\Windows\Gwx.
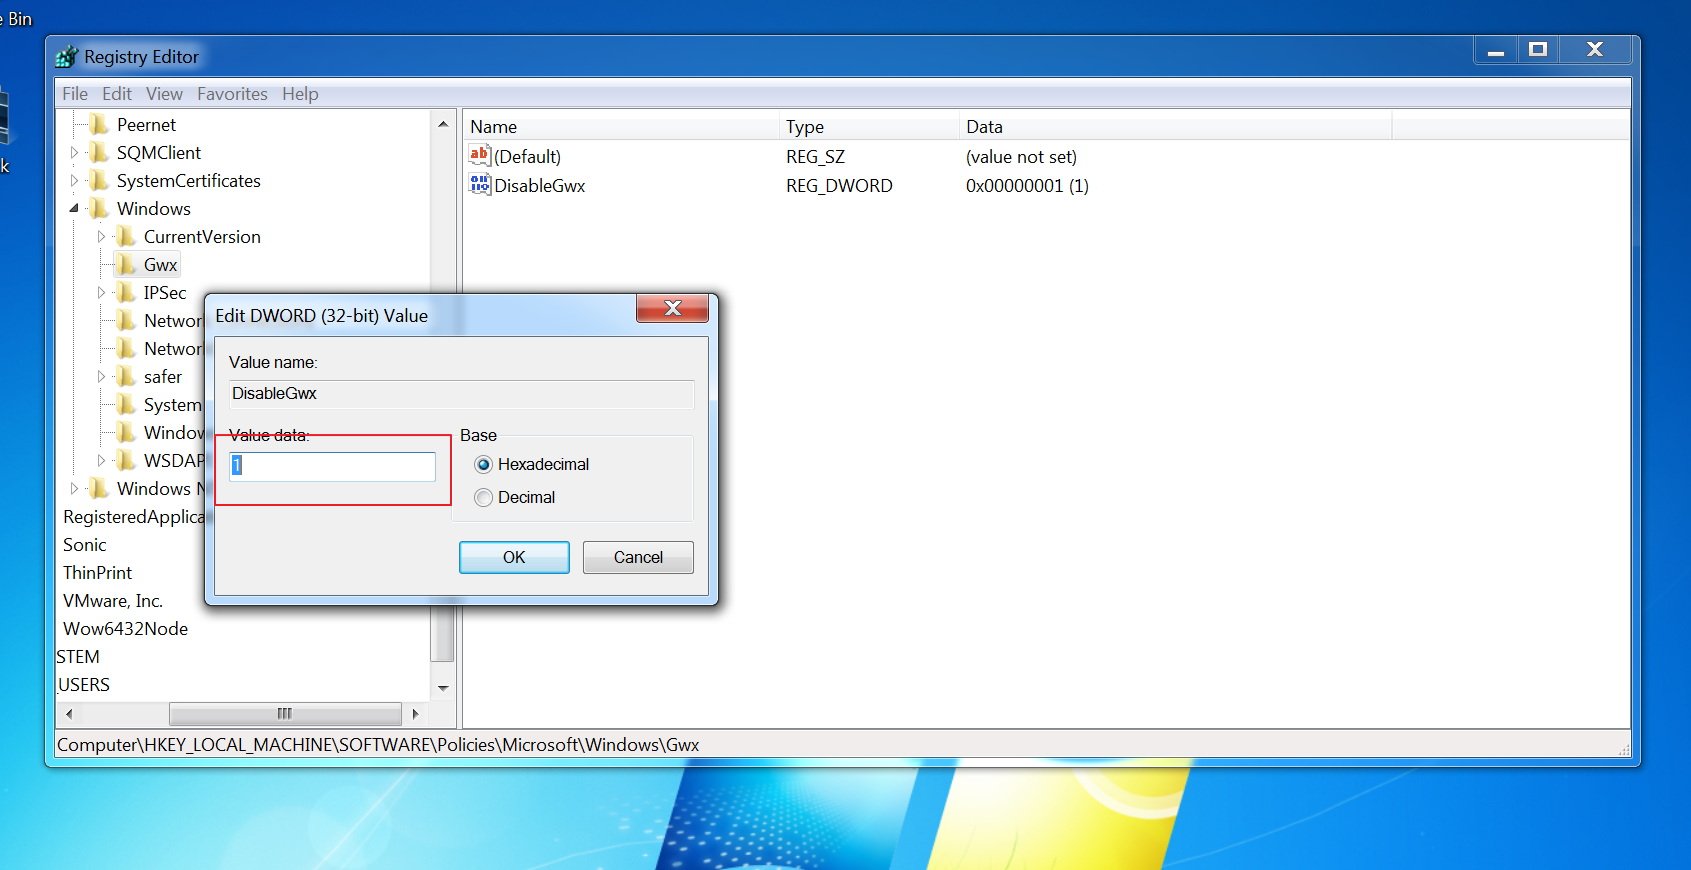
- On the right side, right-click, select New, create a new DWORD key and name it DisableGwx.
- Double-click the DisableGwx key and change the value from 0 to 1.
Quick Tip: If you don't see the Gwx key when browsing the path, right-click the Windows key, select New, then Key, and name the new key Gwx.
Once you have completed these instructions, the last thing left to do is to restart your computer. After a reboot, you should no longer see the GWX app in the notification area, and Windows 10 will no longer try to install on your computer.
Remember that through this process, you no longer have to remove the update KB3035583 that is known to prepare your computer for Windows 10. Microsoft says that your system will remain excluded until the changes are removed, which you can do with the steps shown below.
Reverting changes to get the Windows 10 upgrade
If later on you change your mind and feel that you're ready for Windows 10, you can undo the changes to re-enable the Windows 10 offer through Windows Update and the "Get Windows 10" app.
On Windows 7 Pro and Windows 8.1 Pro use the following steps to re-enable the upgrade offer:
- Use the Windows Key + R keyboard shortcut to open the Run command, type gpedit.msc, and press Enter to open the Local Group Policy Editor.
- Browse the path Computer Configuration > Administrative Templates > Windows Components > Windows Update.
- Find and double-click the Turn off the upgrade to the latest version of Windows through Windows Update option.
- Select the Not Configured option, click Apply and then click OK. This actions should also delete the WindowsUpdate and DisableOSUpgrade keys from the Registry.
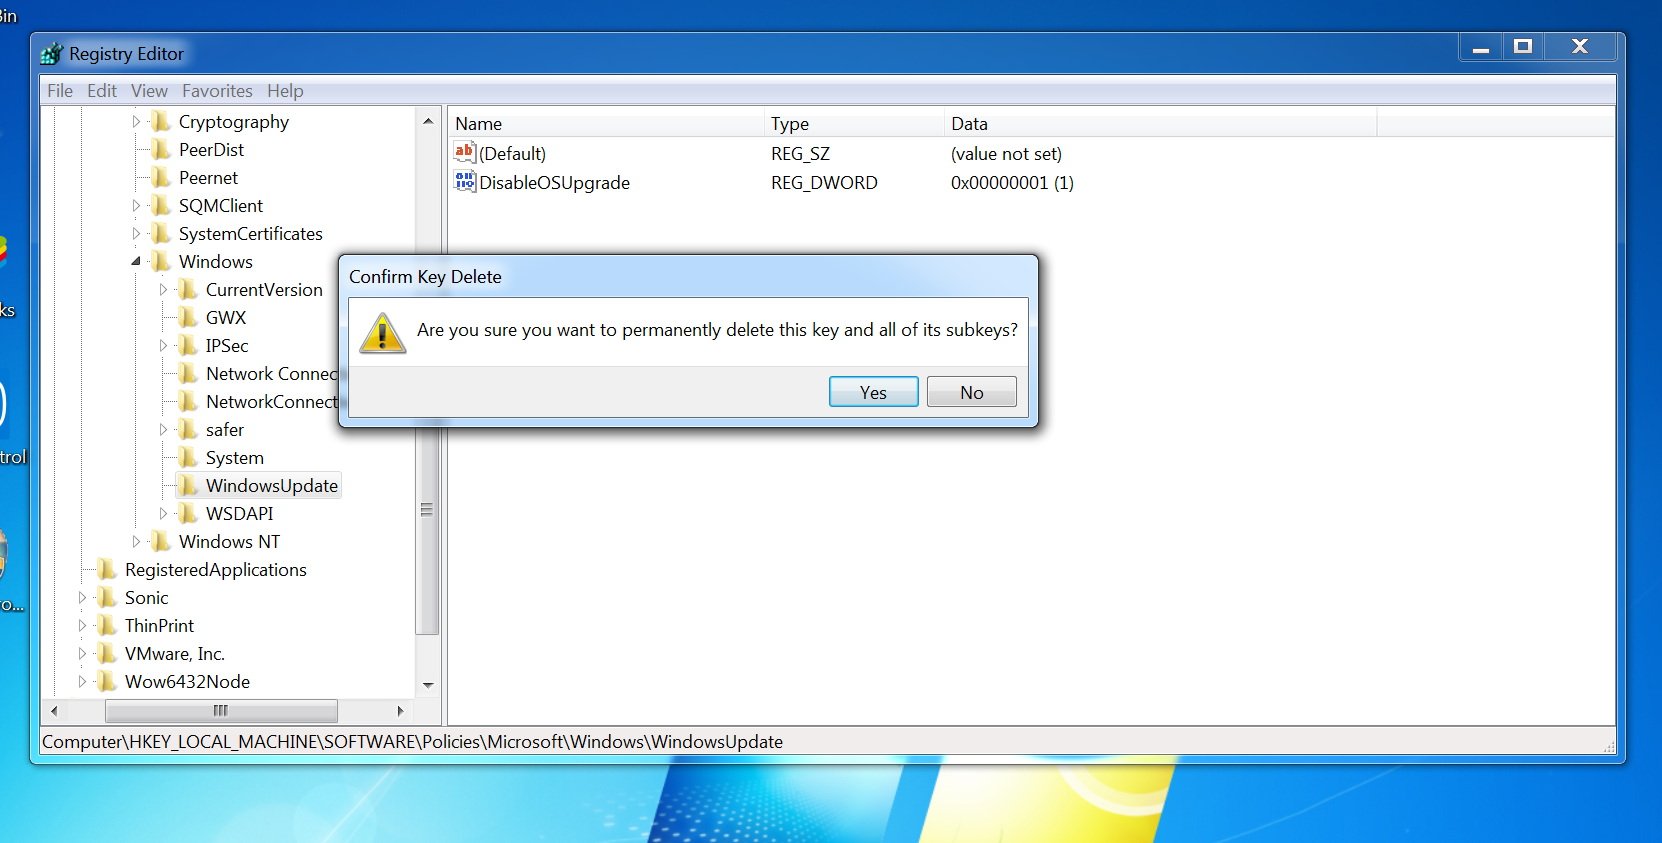
If you're in Windows 7 Home or Windows 8.1 Home, you will have to manually and carefully delete the changes in the Registry.
- Use the Windows Key + R keyboard shortcut to open the Run command, type regedit, and press Enter to open the Registry Editor.
- Carefully browse the following path: HKEY_LOCAL_MACHINE\SOFTWARE\Policies\Microsoft\Windows.
- Right-click the WindowsUpdate key, select Delete, and click Yes to confirm the deletion.
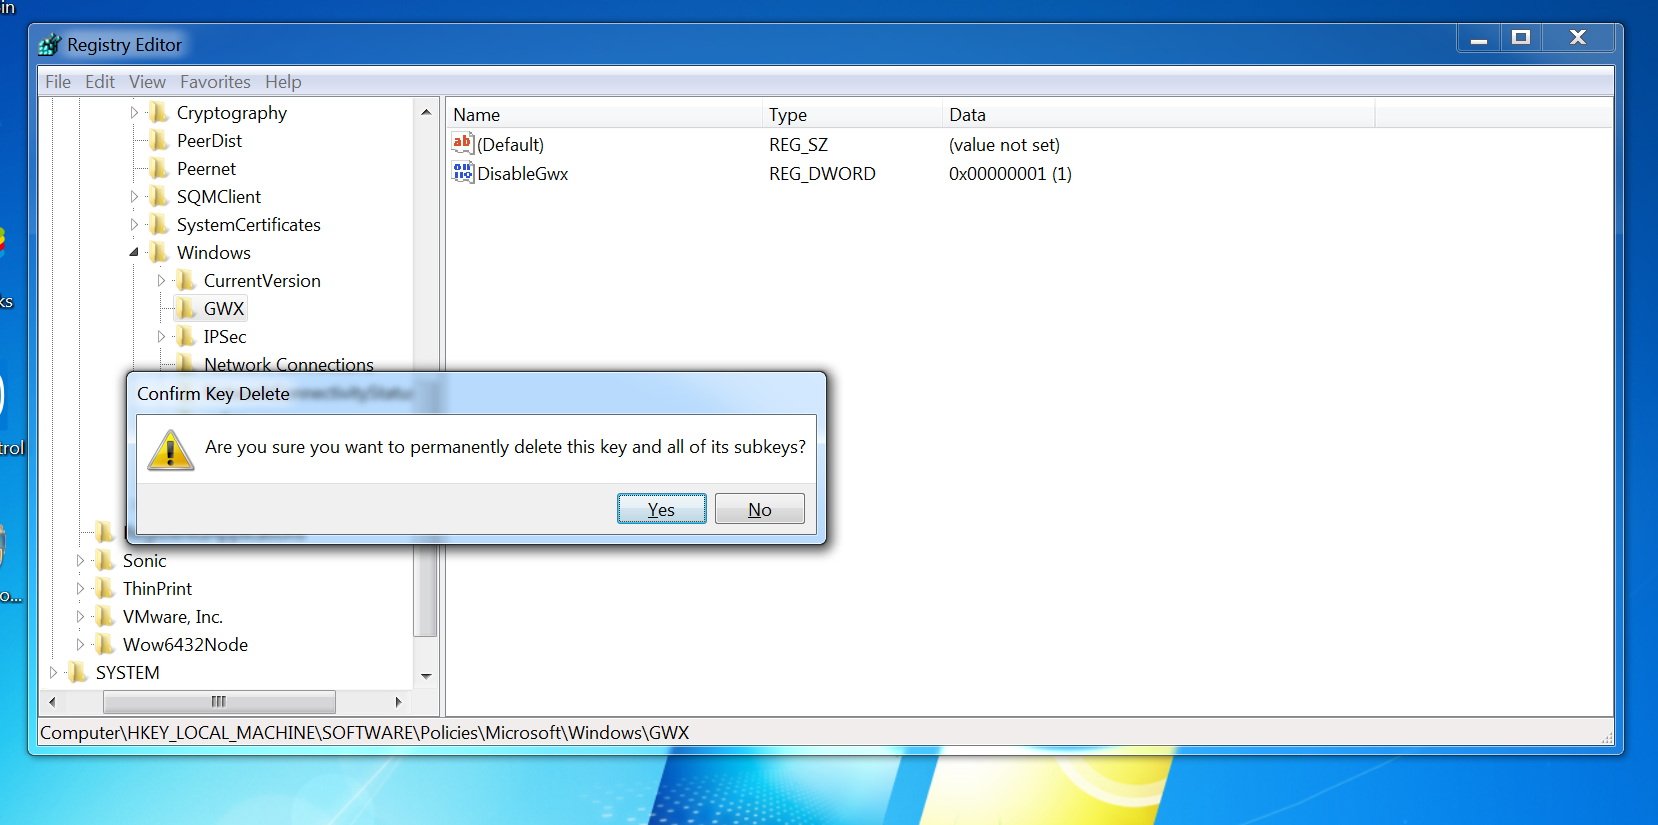
For all editions of Windows 7 and Windows 8.1, you will need to re-enable the "Get Windows 10" app by deleting the keys you have previously created.
- While in the Windows Registry carefully browse the following path: HKEY_LOCAL_MACHINE\SOFTWARE\Policies\Microsoft\Windows.
- Right-click the GWX key, select Delete, and click Yes to confirm the deletion.
Finally, restart your computer to complete the process. Once done, your computer should be able to receive the free Windows 10 upgrade.
It's important to point out that Microsoft is only making available Windows 10 as a free upgrade within the first year of its official release. This limitation means that you only have until July 29, 2016, to upgrade your qualifying Windows 7 SP1 or Windows 8.1 with Update computer to Windows 10.
More resources
For more tips and tricks on Windows 10, and get the latest news, you can visit the following resources:
- Windows 10 on Windows Central – All you need to know
- Windows 10 help, tips, and tricks

Mauro Huculak has been a Windows How-To Expert contributor for WindowsCentral.com for nearly a decade and has over 22 years of combined experience in IT and technical writing. He holds various professional certifications from Microsoft, Cisco, VMware, and CompTIA and has been recognized as a Microsoft MVP for many years.
